
User management is the most common goal of identity deployments. Synchronizing user information between different Management Agents and managing user provisioning and deprovisioning will be our primary goals for this chapter. We will show you two different approaches: one using the synchronization engine with its rules extensions, and the second using the MIM portal and its synchronization rules, Management Policy Rules (MPRs), and workflows.
In this chapter, we will look at the following topics:
- Additional sync engine information
- Portal MPRs for user management
- Configuring sets for user management
- Inbound synchronization rules
- Outbound synchronization rules
- Provisioning
- Managing users in a phone system
- Managing users in Active Directory
- Temporal sets
- Self-service using MIM Portal
- Managing Exchange
- More considerations
In the previous chapters, we have shown you how to configure a Management Agent for SQL, Active Directory, and MIM Portal. We wrote a simple rules extension for the SQL (HR) Management Agent to generate a unique account name, and generated the display name by concatenating two attributes, the first name and last name. A Metaverse rules extension was created to provision objects to the Active Directory connector space. Run profiles were used to copy the data from the HR system to its connector space, into the Metaverse (called a projection), out to the Active Directory connector space (referred to as a provision), and then out to Active Directory.
As we have it now, the Active Directory objects have minimal information: sAMAccountName, userPrincipalName, and a password. The Active Directory accounts are enabled by setting the userAccountControl attribute, and the pwdLastSet attribute is set to 0. Look back at Chapter 3, MIM Sync Configuration, and you will notice that sAMAccountName, userPrincipalName, unicodePwd, userAccountControl, and pwdLastSet are all specified in the Metaverse rules extension. Does this mean that we have to specify the additional attributes that we have in our HR system in our Metaverse rules extension code? Nope! The attributes we specify in the Metaverse rules extension are only used for provisioning out to one or more connector spaces, meaning that we set those values, upon provisioning, out to the connector space. Another way to look at provisioning in the Metaverse rules extension is to think of it as a one-time set. Once provisioned out to the connector space, we don't modify the attributes in any way. If we need to keep attributes up to date, we need to add some attribute flow rules to our configuration.
Before we begin, why did we select those few attributes in our Metaverse rules extension? First, a few of these attributes are required by Active Directory in order to create an account. Secondly, some attributes should only be set initially, and then left to be managed by the end user or some other team. For example, we almost never want to change someone's logon name (sAMAccountName or userPrincipalName), or their password without their prior knowledge. If the logon names need to be changed (and business rules require them to be changed), we would need to coordinate that change with the end user; otherwise, the end user would have no idea how to log on and work. End-user passwords should be handled directly by the end user, when possible, or by a service desk. We will talk more about passwords later in the book.
Now, let's update our configuration to account for future HR data changes of additional attributes, and enable the flow of potential updated data out to the target systems:
- Start MIM Synchronization Service Manager.
- Select the Management Agents tool, click on AD Management Agent, then click on Properties.
- Click on Configure Attribute Flow:
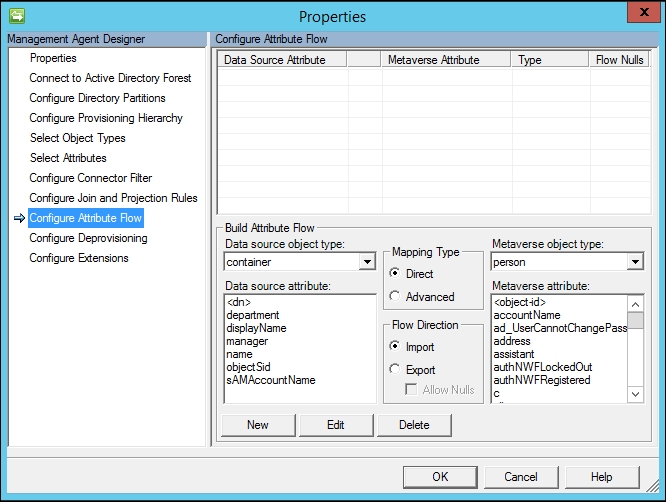
- In the Data source object type drop-down menu, select user, and verify that Metaverse object type is set to person.
- Verify that Mapping Type is set to Direct and Flow Direction is set to Export.
- In the Data source attribute section, click on department.
- In the Metaverse attribute section, click on department.
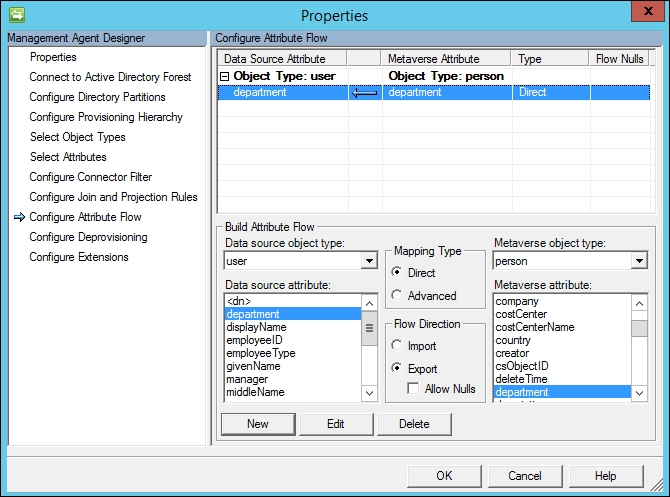
- Click on the New button. You should now have a new export attribute flow for department in your AD Management Agent, as shown in the next screenshot:
- Create additional attribute flows for additional attributes, as listed in the following table:
Data source attribute
Flow Direction
Metaverse attribute
Mapping Type
displayName

displayName
Direct
employeeID
employeeID
Direct
employeeType
employeeType
Direct
givenName
firstName
Direct
manager
manager
Direct
middleName
middleName
Direct
sn
lastName
Direct
title
title
Direct
- In the upper Configure Attribute Flow pane, click on the first row Object Type: user and Object Type: person in order to create a new import flow.
- In the Flow Direction section, click on Import.
- In the Data source attribute section, click on objectSid.
- In the Metaverse attribute section, click on objectSid.
- Click on the New button to create a new import attribute flow for objectSid.
- Create another import attribute flow from sAMAccountName to the Metaverse attribute accountName.
- In Mapping Type, click on Advanced, and then click on the New button.
- Choose Constant, and enter
TFC. Note that TFC is the NETBIOS name for our domain:
- The final attribute flow for the AD Management Agent should look like the following:

- Click on the OK button to save the changes.
As an aside, before we run a full synchronization, let us peek at one of the objects in the connector space, Murray Sosa, with
employeeID10000868, by running an administrative command prompt, going toProgram FilesMicrosoft Forefront Identity Manager2010Synchronization ServiceBin, and running the following command:csexport "HR" msosa.xml /f:d="10000868"The output is displayed as seen in the next screenshot:

Open the XML file in an XML viewer to see just how much information is stored about the object. MIM is able to perform state-based processing of an identity by storing all the information found in the XML file we just created. The complete identity information for a state (the condition of the identity data that MIM has at that time) is called a hologram. MIM keeps a hologram for the data imported into the system, and for the data that would be exported out to a target system. From a performance perspective, MIM uses holograms in order to minimize the amount of data changes it needs to process. For example, if a single attribute value changes on a single object, the MIM engine only needs to make a single attribute update, and not update all the data on the entire object. Holograms also enable us to apply new synchronization logic without retrieving the source data again. More information on holograms and state-based processing can be found in an older Microsoft TechNet article dating back to MIM's origins, but its contents are still valid today. You can refer to this article at http://bit.ly/MIMStateBasedProcessing:

- Click on the HR Management Agent. Then, in the Actions pane, click on Run, select Full Sync, and click on OK.
- In the pane labeled Synchronization Statistics on the lower-left side, you should see some changes that have taken place out to the AD connector space, as shown in the following screenshot:

- Click on the Export Attribute Flow hyperlink, and you will see a listing of objects that have been updated in the AD connector space:

- Double-click on any object, and click on the Properties button to find out what has been changed for that object:

- You can click on the Changes column to sort the attributes that have been changed, or in this case, the attributes that have been added.
- Click on the Close button.
- Click on the AD Management Agent. Then, in the Actions pane, click on Run, select Export, and click on OK. You should see 1021 updates.
- Click on the Updates hyperlink in the Export Statistics pane on the lower-left side of the screen to open up Object Details.
- Click on an object and look at its properties. Notice that the tab at the top says Awaiting Export Confirmation.
- Click on the Close button.
- Verify that the AD Management Agent is selected. Then click on Run, select the Delta Import Run Profile, and click on OK.
Let us review what we have done. The Export attribute flows were created to enable the attribute data to flow from the Metaverse out to the AD connector space. The Import attribute flows are done to enable the flow of attribute data from the AD connector space into the Metaverse. Whenever we run an Import Run Profile, we pull data from that system into its connector space. Likewise, when we run an Export Run Profile, we write connector space data out to its corresponding system.
We also looked at the Synchronization Statistics, clicking on a hyperlink to view all objects that have been changed in the AD connector space, and looked at the property of an object to find out what has changed (been added) on the object. As you may suspect, a change to an existing attribute would show up as Modify, and if data were deleted (cleared) for an attribute, MIM would indicate a Delete.
The Synchronization Statistics can be confusing for beginners, but think of it in terms of what has happened. We ran a full synchronization on our HR Management Agent, and MIM reported zero for almost everything in Inbound Synchronization. The only non-zero item listed under Inbound Synchronization are 1021 Connectors without Flow Updates, which tells us that no Metaverse changes occurred between our existing HR connector space objects and their corresponding Metaverse objects. No changes in the Metaverse makes sense as we have made no changes to the HR data or the HR Management Agent configuration.
The Synchronization Statistics also showed an Outbound Synchronization for the AD Management Agent with 1021 objects listed for Export Attribute Flow. The Synchronization Run Profile can change Metaverse objects, as well as target connector spaces. Therefore, it follows that we have now pushed data in the Metaverse out through those new Export Attribute Flow mappings.
Recall back to when we ran an Export Run Profile for the AD Management Agent, and new attribute data was exported to AD. At that moment, MIM showed Awaiting Export Confirmation for our objects, telling us that it needed to verify the changes made to Active Directory. MIM verifies that the write happened by importing what it exported, which is done by running an Import Run Profile—either Full Import or a Delta Import.
As you may have guessed, a Delta Import Run Profile imports only those objects with content that has changed in the connected data source into its connector space. Similarly, a Delta Synchronization Run Profile re-evaluates and applies synchronization rules to objects and attributes that are staged in the connector space and which have changed. Those changed objects and attributes are then synchronized with the Metaverse, or they disconnect from the Metaverse based on defined rules. A Full Import Run Profile imports all objects and attributes from the connected data source into its connector space, while a Full Synchronization Run Profile re-evaluates and applies synchronization rules to all connector space objects, synchronizes with the Metaverse, or disconnects from the Metaverse.
Import and Export Run Profiles are simple enough; they pull data from the source system into its connector space, or push data from the connector space out to the target system. Synchronization Run Profiles are more involved. Let's look at the Run Profile synchronization process a little closer by reviewing the following diagram:
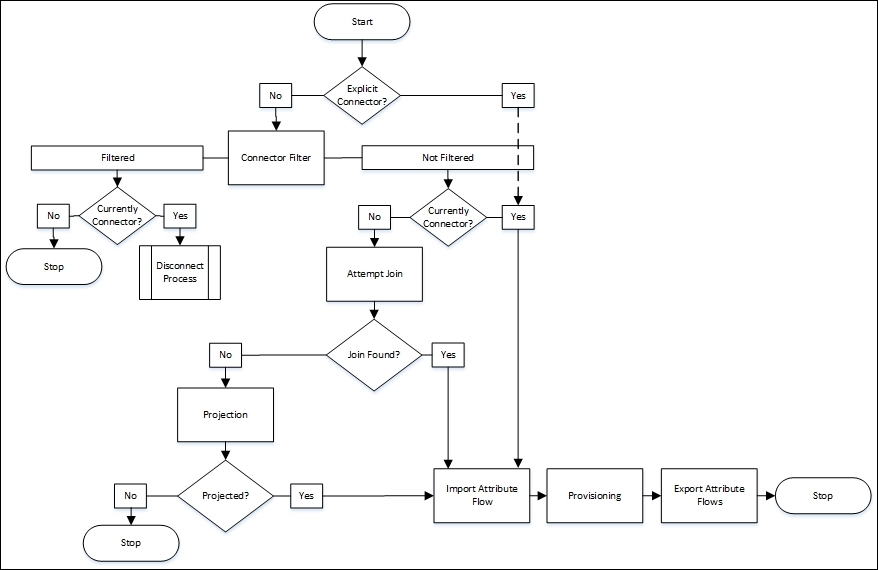
The preceding diagram references some terminology we have not discussed yet. We first look to see whether the object is an explicit connector, and if so, ignore any currently defined or future connector filters. Connector filters were demonstrated back when we configured the MIM Service Management Agent and filtered the administrative account (installation account) and the MIM MA account. An explicit connector can only be created manually by the Joiner Tool, a tool that allows you to forcefully connect a connector space object with a Metaverse object, regardless of your defined rules. The key takeaway here is that when you use the Joiner Tool to go around your defined logic, and forcefully project or join a connector space object to the Metaverse, the synchronization engine assumes you want to ignore any current or future logic and keep the connector space object connected to the Metaverse object. The authors suggest avoiding the use of the Joiner Tool as much as possible. Let's now look at how we can utilize MIM Portal to perform user management functions.