
9. Printing
Printing
In most cases, when you create a worksheet or chart, you’ll want to print it. With Microsoft Excel, you can print all or part of a sheet, multiple sheets, or an entire workbook—all at once.
Excel gives you control over page size, margins, headers, footers, page breaks, orientation, scaling, page order, and content. Its Print Preview feature (Figure 1) shows you what your report will look like when printed, so you can avoid wasteful, time-consuming reprints.
Figure 1. Print Preview lets you see reports before you commit them to paper.

Printing is basically a three-step process:
1. Use Excel’s Page Setup, Scale to Fit, and Sheet Options groups to set up your report for printing. (You can skip this step if you set the report up the first time you printed it and don’t need to change the setup.)
2. Use the Page Layout and Print Preview features to take a look at your report before committing it to paper. You can skip this step if you already know what the report will look like.
3. Use the Print command to send the desired number of copies to the printer for printing.
In this chapter, I explain each of these steps.
• When you save a document, Excel saves many print-related options with it.
• This chapter assumes that your computer is already set up for printing. If it is not, consult the documentation that came with your printer for setup information.
Page Setup Options
The Page Layout tab’s Page Setup (Figure 2), Scale to Fit (Figure 3), and Sheet Options (Figure 4) groups and the Page Setup dialog (Figures 5, 11, 12, 13, 21, and 28) offer options you can use to set up a document for printing.
Figure 2. The Page Layout tab’s Page Setup group.
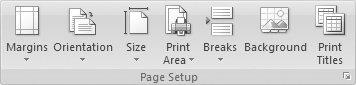
Figure 3. The Scale to Fit group.

Figure 4. The Sheet Options group.

The Page Setup group (Figure 2) includes seven menus or buttons:
• Margins (Figure 10) offers basic options to set document’s margins and the distance a header or footer should be from the edge of the paper.
• Orientation (Figure 6) enables you to set the document’s print direction.
• Size (Figure 8) offers a list of standard paper sizes.
• Print Area (Figure 20) enables you to specify what part of the document should print.
• Breaks (Figure 33) enables you to insert, remove, or reset all page breaks.
• Background enables you to specify a background image.
• Print Titles displays the Sheet tab of the Page Setup dialog (Figure 21) so you can set column or row headings as titles that repeat on every page.
The Scale to Fit group (Figure 3) includes drop-down lists to set the width and height of a document in pages and the print scale of a document.
The Sheet Options group (Figure 4) enables you to specify whether you want to view or print gridlines and headings.
In the Page Setup dialog, options are organized under the following tabs:
• Page (Figure 5) lets you set the orientation, scaling, first page number, paper size, and print quality.
Figure 5. The Page tab of The Page Setup dialog.

• Margins (Figures 11 and 12) lets you set the page margins, the distance the header and footer should be from the edge of the paper, and the positioning of the document on the paper.
• Header/Footer (Figure 13) lets you select a standard header and footer or create custom ones.
• Sheet (Figure 21) lets you specify the print area, print titles, items to print, and page order. If a chart sheet is active when you choose Page Setup, you’ll see a Chart tab (Figure 28) rather than a Sheet tab. Use it to specify the print quality and indicate if you want the chart to print in black and white.
In this part of the chapter I explain how to set all of these options with Page Layout tab groups and the Page Setup dialog.
To open the Page Setup dialog
1. Click the Page Layout tab to display its options.
2. Click the Dialog Box Launcher button in the bottom-right corner of the Page Setup group (Figure 2), the Scale to Fit group (Figure 3), or the Sheet Options group (Figure 4).
The Page Setup dialog appears.
• The tab of the Page Setup dialog that appears depends on which group’s Dialog Box Launcher button you clicked. You can always click a tab to go to the one you want.
To set orientation with the Page Setup group
1. Click Page Layout > Page Setup > Orientation to display the Orientation menu (Figure 6).
Figure 6. The Orientation menu enables you to set a document for Portrait or Landscape orientation.

2. Choose the option you want:
• Portrait, the default option for worksheets, prints vertically down the page.
• Landscape, the default option for chart sheets, prints horizontally across the page.
To set scaling options with the Scale to Fit group
To scale the document to a specific magnification, enter a percent value in the Scale box in the Scale to Fit group (Figure 3).
Or
To scale the document so it fits on a certain number of pages, choose options from the Width (Figure 7) and Height drop-down lists in the Scale to Fit group (Figure 3).
Figure 7. Choose the number of pages you want the document to fit on horizontally from the Width drop-down list. The Height drop-down list is identical, but works for the number of pages vertically.

• You will not see any magnification changes onscreen when you set these options. The scale options affect printed documents only.
• The options you choose from the Width and Height drop-down lists represent the maximum number of pages.
To set paper size with the Scale to Fit group
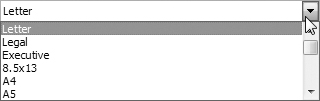
1. Click Page Layout > Page Setup > Size to display the Size menu (Figure 8). These options vary depending on your printer.
Figure 8. You can use the Size menu to choose a paper size.

2. Choose the paper size on which you want to print.
To set all Page options in the Page Setup dialog
1. In the Page Setup dialog, click the Page tab to display its options (Figure 5).
2. In the Orientation area, select the desired orientation option:
• Portrait, the default option for worksheets, prints vertically down the page.
• Landscape, the default option for chart sheets, prints horizontally across the page.
3. For a worksheet only, in the Scaling area, select the desired scaling option:
• Adjust to enables you to specify a percentage of the normal size for printing. Be sure to enter a value in the text box. This option is selected by default with 100 in the text box.
• Fit to instructs Excel to shrink the report so it fits on the number of pages you specify. Be sure to enter values in the two text boxes.
4. Choose an option from the Paper size drop-down list (Figure 9). These options vary depending on your printer.
Figure 9. The Paper Size drop-down list.
5. Choose an option from the Print quality drop-down list. These options vary depending on your printer.
6. If desired, in the First page number box, enter a value that should be used as the page number on the first page of the report. This enables you to start page numbering at a value other than 1.
7. Click OK to save your settings.
• Neither scaling option is available for chart sheets. You can change the scaling for a chart sheet on the Chart tab of the Page Setup dialog, which I discuss later in this chapter.
• The options that appear in this dialog vary from printer to printer. To learn more about the options for your printer, consult the documentation that came with the printer.
To set margins with the Page Setup group
1. Click Page Layout > Page Setup > Margins to display the Margins menu (Figure 10).
Figure 10. The Margin menu offers three basic margin combinations.

2. Choose the margin option you want.
or
Choose Custom Margins to display the Margins tab of the Page Setup dialog (Figures 11 and 12). Then follow the steps in the next section to set margins.
Figure 11. The Margins tab of the Page Setup dialog for a worksheet ...

Figure 12. ... and for a chart sheet.

• The margins menu includes only a few common options. If you want to customize your margins, use the Margins tab of the Page Setup dialog (Figures 11 and 12) as discussed next.
To set margins & centering options with the Page Setup dialog
1. In the Page Setup dialog, click the Margins tab to display its options (Figure 11 or 12).
2. Enter values in the Top, Left, Right, and Bottom text boxes to set the amount of space between the edge of the paper and the report content.
3. Enter values in the Header and Footer text boxes to set the amount of space between the edge of the paper and the header and footer content.
4. For a worksheet only, turn on the desired Center on page check boxes:
• Horizontally centers the report content between the left and right margins.
• Vertically centers the report content between the top and bottom margins.
5. Click OK to save your settings.
• As you make changes in this window, the preview area changes accordingly. This helps you get an idea of what the document will look like when previewed or printed.
• You can also set margins in the Print Preview window. I explain how later in this chapter.
• Do not set margins to smaller values than the Header and Footer values or Excel will print your report over the header or footer.
• Some printers cannot print close to the edge of the paper. If part of your report is cut off when printed, increase the margin, header, and footer values.
To add built-in headers & footers
1. In the Page Setup dialog, click the Header/Footer tab to display its options (Figure 13).
Figure 13. The Header/Footer tab of the Page Setup dialog.

2. Choose options from the Header and Footer drop-down lists (Figure 14).
Figure 14. The Header and Footer drop-down lists offer a number of predefined headers and footers.

The option(s) you selected appear in the sample area(s) in the dialog (Figure 15).
Figure 15. The header and footer you select appear in the sample areas in the dialog.

3. Click OK to save your settings.
• The drop-down list for Footer is identical to the one for Header (Figure 14).
• Excel gets your name and company name from entries you made when you installed Excel. I explain how to change this information in Chapter 15.
• To change the formatting of text in the header or footer, you need to use the Custom Header or Custom Footer button in the Header/Footer tab of the Page Setup dialog. I tell you about that next.
To add custom headers & footers
1. In the Page Setup dialog, click the Header/Footer tab to display its options (Figure 13).
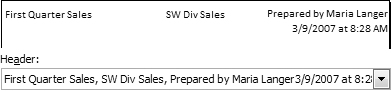
2. To add a header, click the Custom Header button to display the Header dialog (Figure 16).

3. Enter the text or codes that you want to appear in the header in the Left section, Center section, and Right section text boxes. You can use the buttons listed in Table 1 to format selected text or insert codes for dynamic information. Figure 17 shows an example.
Table 1. Buttons for Inserting Dynamic Information into Headers or Footers

Figure 17. An example of a custom header entered into the Header dialog.

4. Click OK to save your settings. The settings appear in the Page Setup dialog (Figure 18).
Figure 18. Here’s the header from Figure 17 in the Page Setup dialog.
5. To add a footer, click the Custom Footer button. This displays the Footer dialog, which looks just like the Header dialog.
6. Repeat steps 3 and 4 for the footer.
7. Click OK in the Page Setup dialog to save your settings.
• In step 3, to enter an ampersand (&) character in a header or footer, type && where you want it to appear.
• To specify the starting page number to be printed in the header or footer, enter a value in the First page number text box of the Page tab of the Page Setup dialog (Figure 5).
• Dynamic information changes automatically. For example, the page number changes on each page and the print date changes each day you print the file. Using the buttons or codes for dynamic information (Table 1) ensures header and footer contents are accurate.
To remove headers & footers
1. In the Page Setup dialog, click the Header/Footer tab to display its options (Figure 13).
2. To remove a header, choose (none) from the Header drop-down list (Figure 14). The header disappears from the dialog.
3. To remove a footer, choose (none) from the Footer drop-down list (Figure 14). The footer disappears from the dialog.
4. Click OK to save your settings.
To set additional header & footer options
1. In the Page Setup dialog, click the Header/Footer tab to display its options (Figure 13).
2. Toggle check boxes near the bottom of the dialog to set options as desired:
• Different odd and even pages enables you to specify a different header and footer for odd and even pages.
• Different first page enables you to specify a different header and footer for the first page of a printout.
• Scale with document applies the same scaling to the header and footer that is applied to the rest of the document when printed. I explain how to set scaling options earlier in this chapter.
• Align with page margins ensures that the header and footer are properly aligned with the document’s left and right margins when printed.
3. Click OK to save your settings.
• Turning on the Different odd and even pages and Different first page check boxes display tabs in the Header (Figure 19) and Footer dialogs so you can specify the content for each header and footer.
Figure 19. Tabs appear in the Header and Footer dialogs so you can specify the content for each header and footer in your document.

To set the print area with the Page Setup group
1. Select the part of the document you want to print.
2. Choose Page Layout > Page Setup > Print Area > Set Print Area (Figure 20).
Figure 20. Use the Print Area menu to set and clear a worksheet’s print area.

• If you want to print an entire sheet, it is not necessary to set the print area—as long as a different print area has not already been set.
• You can have a different print area active in every sheet of a workbook.
• Excel remembers the print areas that were active when a workbook was saved. When you reopen a workbook the same print areas are active.
• To print a different part of your worksheet, you must specify a different print area.
To clear a print area
Choose Page Layout > Page Setup > Print Area > Clear Print Area (Figure 20).
To set gridline & heading printing with the Sheet Options group
Toggle the Print check boxes in the Sheet Options group (Figure 4) as desired:
• Print under Gridlines prints the worksheet gridlines.
• Print under Headings prints the column and row headings.
• By default both of these check boxes are turned off so neither gridlines nor column and row headings print.
To set sheet options in the Page Setup dialog
1. In the Page Setup dialog, click the Sheet tab to display its options (Figure 21).
Figure 21. The Sheet tab of the Page Setup dialog.

2. To print less than the entire worksheet, enter a range in the Print area box (Figure 22).
Figure 22. This example shows the proper way to enter ranges for the Print area and Print titles.

3. To display column or row titles on all pages of a lengthy report, enter row or column (or both) ranges in the Rows to repeat at top or Columns to repeat at left boxes (Figure 22). Figures 23 through 25 show how this affects the printout.
Figure 23. Here’s the first page of a lengthy report.

Figure 24. Without page titles, the headings don’t appear on subsequent pages.

Figure 25. But with page titles set as they are in Figure 22, headings appear on every page.

4. Turn on check boxes in the dialog to set additional print options as desired:
• Gridlines prints worksheet gridlines.
• Black and white prints the worksheet in black and white. This can save time if you print on a color printer.
• Draft quality reduces printing time by omitting gridlines and most graphics.
• Row and column headings prints the column letters and row numbers with the worksheet.
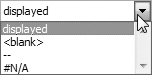
5. To print worksheet comments, choose an option other than (None) from the Comments drop-down list (Figure 26).
Figure 26. The Comments drop-down list.

6. To specify how cells containing errors should be printed, choose an option from the Cell errors as drop-down list (Figure 27).
Figure 27. The Cell errors as drop-down list.
7. Select a Page order option for a long or wide worksheet:
• Down, then over prints all rows of the first few columns first, then prints rows from subsequent columns.
• Over, then down prints all columns of the first bunch of rows first, then prints columns from subsequent rows.
8. Click OK to save your settings.
• In steps 2 and 3, you can enter each range manually by typing it into the text box or have Excel enter it automatically for you by clicking in the text box, then selecting the range in the worksheet window.
• I tell you about worksheet comments in Chapter 11.
To set chart options with the Page Setup dialog
1. In the Page Setup dialog, click the Chart tab to display its options (Figure 28).
Figure 28. The Chart tab of the Page Setup dialog.

2. Turn on Printing quality check boxes as desired:
• Draft quality omits graphics from printouts. This increases printing speed and uses less printer memory.
• Print in black and white prints the chart in black and white with patterns replacing colors.
3. Click OK to save your settings.
Adding a Background Image
Excel now enables you to add an image to the background of your sheets. You do this with the Background button in the Page Setup group (Figure 2).
To add a background image
1. Click Page Layout > Page Setup > Background (Figure 2).
2. The Sheet Background dialog appears (Figure 29). Use it to locate and select the image you want to use as a background.
Figure 29. Use the Sheet Background dialog to locate, select, and insert an image.

3. Click Insert.
The image is inserted as a background image in your worksheet. If the image is smaller than the page size, it is tiled as shown in Figure 30.
Figure 30. In this example, an image is tiled in the background of a sheet. (I like my company’s logo, but not that much.)

• For best results, choose a low-contrast or light-colored image. Otherwise, you may not be able to read worksheet contents placed above it.
To remove a background image
Click Page Layout > Page Setup > Delete Background (Figure 31). The background image is removed.
Figure 31. Once an image has been inserted as a background, the Background button turns into a Delete Background button.

• To replace a background image with a different image, remove it as instructed here, then follow the instructions above to add a different background image.
Adding Page Breaks
Once you start preparing your worksheet for printing, you may see black dashed lines within the worksheet window. (You can see an example to the right of column G in Figures 30 and 32.) These lines represent page breaks automatically inserted by Excel based on column widths, row heights, and margin settings.
Figure 32. Select a cell to the right of and below where you want the page break to occur.

Sometimes you might want a page to break in a specific place. You can insert your own vertical and horizontal page breaks as needed to ensure that page breaks occur where you want them to. You do this with the Breaks menu (Figure 33) or with Page Break Preview (Figure 36).
Figure 33. The Breaks menu offers several page break options.

• To remove one of Excel’s automatically calculated page breaks, you must insert a manual page break to the left of or above it. Otherwise, you’ll be adding a manual page break after the automatic page break.
To add a page break with the Breaks menu
1. Select the cell below and to the right of where you want a page break to occur (Figure 32).
2. Choose Page Layout > Page Setup > Breaks > Insert Page Break (Figure 33).
A different dashed line appears, indicating the manual page break you inserted (Figure 34).
Figure 34. A manual page break is inserted to the left of and above the selected cell. In this case, the selected cell is in column A, so no page break is inserted to its left.

To remove manual page breaks with the Breaks menu
1. Select the cell to the right of and below the page break you want to remove (Figure 34).
2. Choose Page Layout > Page Setup > Breaks > Remove Page Break (Figure 33). The page break is removed.
Or
Choose Page Layout > Page Setup > Breaks > Reset All Page Breaks (Figure 33). All manual page breaks are removed.
To add page breaks with Page Break preview
1. Click View > Workbook Views > Page Break Preview (Figure 35) to switch to Page Break Preview view (Figure 36).
Figure 35. The Workbook Views group with Page Break Preview selected.

Figure 36. Page Break Preview view, with its instruction dialog.

2. Position the mouse pointer over one of the dashed, blue page break lines. The mouse pointer turns into a box with two triangles in its corners.
3. Press the mouse button and drag to make the change. A dark line moves with the mouse pointer (Figure 37).
Figure 37. Drag a page break to change it.
4. Release the mouse button. The page break shifts to the new position and turns into a solid blue line (Figure 38). Any automatic page break to its right or below it also shifts.
Figure 38. A manual page break looks like a thick blue line.

5. To return to Normal view, click View > Workbook Views > Normal.
• The first time you use the Page Break Preview feature, a dialog with instructions appears (Figure 36). Click OK to dismiss the dialog before you can drag page breaks. Turn on the check box within the dialog if you don’t want to see it again.
• You may need to scroll within the window to see all page breaks for a large worksheet.
• You can use this feature to change both vertical and horizontal page breaks.
Page Layout View
Excel’s new Page Layout view feature enables you to work with your worksheet in a view that shows you one or more pages at a time You can use Page Layout view (Figure 39) to fine-tune the appearance of your worksheet files.
Figure 39. Page Layout view offers a fully functional view of your worksheets, page by page.

• Page Layout view is a fully functional view for working with worksheet contents. As you work with Excel, you may find that you prefer Page Layout view over Normal view for creating, formatting, and modifying your workbook files.
To switch to Page Layout view
Click View > Workbook Views > Page Layout (Figure 40). The document switches to Page Layout view (Figure 39).
Figure 40. The Workbook Views group with Page Layout selected.

To modify worksheet contents in Page Layout view
Make changes as desired to anything you see within the Excel window (Figure 39), including worksheet cells, charts, or the document header and footer.
Print Preview
Excel’s Print Preview feature lets you see what a report will look like before you print it (Figure 41). If a report doesn’t look perfect, you can use Page Setup or the Show Margins check box right inside the Print Preview window to make adjustments. When you’re ready to print, click the Print button.
Figure 41. A worksheet with embedded chart in Print Preview.

• Unlike Page Layout view, Print preview does not enable you to modify the contents of a report. You must be in Normal or Page Layout view to make changes to a worksheet’s contents.
To preview a report
Choose Microsoft Office > Print > Print Preview (Figure 42).
Figure 42. The Print submenu under the Microsoft Office menu.

Or
Click the Print Preview button in the Page Setup dialog or the Preview button in the Print dialog.
A preview of the current sheet appears (Figure 41). It reflects all Page Setup settings.
• To view the other pages of the report, click the Next Page or Previous Page button. (These buttons are inactive for one-page reports.)
• To zoom in to see report detail, click the Zoom button or click the mouse pointer (a magnifying glass) on the area you want to magnify.
• To open the Print dialog and print, click the Print button. I tell you about the Print dialog later in this chapter.
• To change Page Setup dialog options, click the Page Setup button.
• To close the Print Preview window, click the Close Print Preview button.
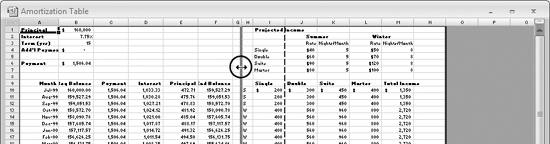
To change margin options & column widths
1. In the Print Preview window, turn on the Show Margins check box. Handles for margins, header and footer locations, and column widths appear around the report preview (Figure 43).
Figure 43. When you turn on the Show Margins check box, handles for margins, header, footer, and columns appear.

2. Position the mouse pointer over the handle or guideline for the margin, header, footer, or column you want to change. The mouse pointer turns into a line with two arrows coming out of it (Figure 44).
Figure 44. Position the mouse pointer on a handle and drag to change the measurement.
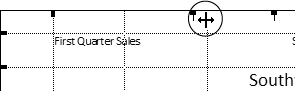
3. Press the mouse button and drag to make the change. A measurement for your change appears in the status bar as you drag.
4. Release the mouse button to complete the change. The report reformats automatically.
• The changes you make by dragging handles in the Print Preview dialog will be reflected in the appropriate text boxes of the Page Setup dialog.
• I tell you how to change margins and header and footer locations with the Page Setup dialog earlier in this chapter. I tell you how to change column widths in the worksheet window or with the Column Width dialog in Chapter 6.
The Print Dialog
You use the Print dialog (Figure 45) to set options for a print job and send it to the printer.
To print
1. Choose Microsoft Office > Print > Print (Figure 42) or press ![]() .
.
or
Click the Print button in the Page Setup dialog (Figure 5, 11, 12, 13, 21, or 28) or Print Preview window (Figure 41).
The Print dialog appears (Figure 45).
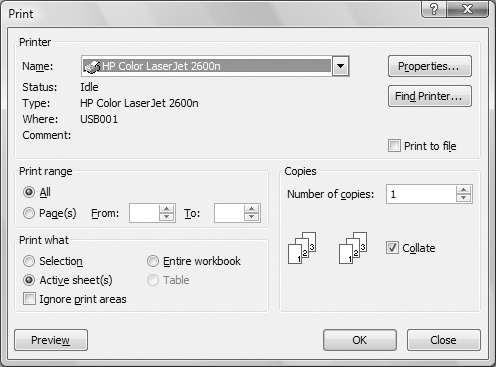
2. If desired, choose a different printer from the Name drop-down list near the top of the dialog.
3. Select a Print range option:
• All prints all pages in the report.
• Page(s) enables you to enter a page range. Enter the first and last page to print in the From and To text boxes.
4. Select a Print what option:
• Selection prints only the selected cells, sheet, or object.
• Active sheet(s) prints the currently selected sheets.
• Entire workbook prints all nonblank sheets in the workbook file.
• Table prints a database table on the worksheet. This option is only available if the worksheet includes a table.
5. Enter the number of copies you want to print in the Number of copies box. If you enter a value greater than 1, you can turn on the Collate check box to have Excel automatically collate copies as it prints.
6. Click OK. Excel sends the document to the printer.
• In step 4, to disregard any print areas set for the workbook or sheet, turn on the Ignore print areas check box.
• You can click the Properties button in the Print dialog to display a dialog full of options for your printer. Consult the documentation that came with your printer to learn more about these options.