
15. Setting Excel Options
The Options Dialog
Microsoft Excel’s Excel Options dialog offers five categories of general options that you can set to customize the way Excel works for you:
• Popular options are the most commonly accessed options for display, font settings, and user information.
• Formulas options control formula calculation, performance, and error handling.
• Proofing options control how Excel corrects and formats text.
• Save options control how workbook files are saved.
• Advanced options control other aspects of working with Excel.
• Excel’s default options settings are discussed and illustrated throughout this book.
• Some of the options settings affect only the active sheet or workbook file while others affect all Excel operations. If you want a setting to affect a specific sheet or file, be sure to open and activate it before opening the Options dialog.
• The Options dialog also offers more advanced options for customizing Excel and setting security options. You can explore these options on your own.
To set options
1. Click Microsoft Office > Excel Options (Figure 1) to display the Excel Options dialog (Figure 2).
Figure 1. To open the Excel Options dialog, click the Excel Options button in the Microsoft Office menu.

Figure 2. The Popular options in the Excel Options dialog.

2. On the left side of the dialog, click the name of the category of options that you want to set.
3. Set options as desired.
4. Repeat steps 2 and 3 for other categories of options that you want to set.
5. Click OK to save your settings.
Popular Options
The Popular category in the Excel Options dialog includes the options most likely to be modified by users. There are three subcategories of options: Top options for working with Excel, When creating new workbooks, and Personalize your copy of Microsoft Office.
Top options for working with Excel
Top options for working with Excel are the most commonly changed options.
• Show Mini Toolbar on selection displays the Mini Toolbar, which includes formatting options, when you select cells or text (Figure 3).
Figure 3. The Mini Toolbar appears as a transparent image when you select text.
• Enable Live Preview displays the affects of an Excel option when you hover over that option. This makes it possible to see how formatting or other commands will affect your work before applying the command.
• Show Developer tab in the Ribbon displays the Developer tab, which includes commands for macros, form editing, and XML features, in the Ribbon.
• Always use ClearType (not shown in Figure 2) makes the text easier to read onscreen in Windows XP. This option is not available in Windows Vista.
• Color Scheme enables you to choose Excel’s overall color scheme: Blue, Silver, or Black.
• ScreenTip style determines how ScreenTips appear—or whether they appear at all.
• Create lists for use in sorts and fill sequences enables you to create or edit custom lists. Click the Edit Custom List button to display the Custom Lists dialog (Figure 4), which you can use to define lists. I tell you more about filling a range with a series in Chapter 3.
Figure 4. Use the Custom Lists dialog to create and edit custom series and sort lists.

When creating new workbooks
When creating new workbooks are options that apply to all new workbooks you create.
• Use this font enables you to choose a default font for new worksheets and workbooks.
• Font size lets you set the default font size for new worksheets and workbooks.
• Default view for new sheets enables you to choose the default view for new worksheets and workbooks: Normal View, Page Break Preview, or Page Layout View.
• Include this many sheets lets you set the number of sheets automatically included in all new workbooks you create.
Personalize your copy of Microsoft Office
Personalize your copy of Microsoft Office enables you to set user information and language options. The options you set in this subcategory affect all Microsoft Office applications installed on your computer.
• User name is the name you want associated with every document you create or edit with your copy of Excel.
• Choose the languages you want to use with Microsoft Office lets you specify the languages to be used with Excel’s proofing tools. Click the Language Settings button to display the Microsoft Office Language Settings 2007 dialog (Figure 5), select one or more languages, and click OK.
Figure 5. Office supports multiple languages for use with its proofing features.

Formulas Options
Calculation options (Figure 6) control the way Excel works with formulas. There are four subcategories of options: Calculation options, Working with formulas, Error Checking, and Error checking rules.
Figure 6. Formulas settings in the Excel Options dialog.

Calculation options
Calculation options control workbook calculation automation and iterative calculations.
• Workbook Calculation enables you to select one of three options for specifying how formulas should be calculated:
• Automatic tells Excel to recalculate all dependent formulas whenever you change a value, formula, or name.
• Automatic except for data tables is the same as Automatic, but does not recalculate data tables. With this option selected, you must click Formulas > Calculation > Calculate Now or press ![]() to recalculate data tables.
to recalculate data tables.
• Manual recalculates formulas only when you click Formulas > Calculation > Calculate Now or press ![]() . With this option selected, you can turn on the Recalculate workbook before saving check box to ensure that the worksheet is recalculated each time you save it.
. With this option selected, you can turn on the Recalculate workbook before saving check box to ensure that the worksheet is recalculated each time you save it.
• Enable iterative calculation sets limits for the number of times Excel tries to resolve circular references or complete goal seeking calculations. Turn on the check box, then enter values below it:
• Maximum iterations is the maximum number of times Excel should attempt to solve the problem.
• Maximum change is the maximum amount of result change below which iteration stops.
Working with formulas
Working with formulas controls formula-related features such as references and AutoComplete.
• R1C1 reference style changes the style of cell references so both rows and columns have numbers (Figure 7).
Figure 7. With the R1C1 reference style, both columns and rows have numbers.

• Formula AutoComplete displays a list of applicable functions (Figure 8) and defined names as you enter a formula into a cell. You can complete the entry by selecting one of the displayed options.
Figure 8. Formula AutoComplete displays possible formula options as you type in a formula.

• Use table names in formulas enables you to reference a table by its name when writing a formula.
• Use GetPivotData functions for PivotTable references instructs Excel to use GETPIVOTTABLE function cell references when working with PivotTables.
Error Checking
Error Checking lets you enable or disable Excel’s error-checking feature.
• Enable backround error checking enables or disables the error checking feature.
• Indicate errors using this color enables you to set the color of the tiny triangle that appears in each cell in which there might be an error. Choose a color from the menu (Figure 9); Automatic is green.
Figure 9. Use a pop-up menu to set the error indicator color.

• Reset Ignored Errors tells Excel to forget about any errors you told it to ignore.
Error checking rules
Error checking rules enable you to determine the types of errors that should be marked by Excel’s error checking feature.
• Cells containing formulas that result in an error displays an error indicator when the cell’s formula results in an error.
• Inconsistent calculated column formula in tables displays an error indicator for cells in a column that don’t contain the same formula as other cells in the column.
• Cells containing years represented as 2 digits displays an error indicator when a formula contains text formatted cells with years represented as two digits.
• Numbers formatted as text or preceded by an apostrophe displays an error indicator when numbers are formatted as text or begin with an apostrophe character.
• Formulas inconsistent with other formulas in the region displays an error indicator when a formula differs from other formulas in the same region of the worksheet.
• Formulas which omits cells in a region displays an error indicator when a formula omits certain cells.
• Unlocked cells containing formulas displays an error indicator when a cell containing a formula is formatted as unlocked and the worksheet is locked.
• Formulas referring to empty cells displays an error indicator if a formula includes any references to empty cells.
• Data entered in a table is invalid displays an error indicator if data in a table is of a type inconsistent with other data in the same column.
Proofing Options
The Proofing options in the Excel Options dialog (Figure 10) control how Excel automatically corrects text in your documents. There are two subcategories: AutoCorrect options and When correcting spelling in Microsoft Office programs.
Figure 10. The Proofing options in the Excel Options dialog.

The options in this category affect how all installed Microsoft Office programs work—not just Excel.
AutoCorrect Options
AutoCorrect options enables you to set a variety of automatic correction options.
Click the AutoCorrect Options button to display the AutoCorrect tab of the AutoCorrect dialog (Figure 11). You can then toggle check boxes to set how the Microsoft Office AutoCorrect feature works:
• Show AutoCorrect Options buttons displays a button beside a cell in which Excel has made an automatic correction. Clicking the button displays a menu of options related to the correction.
• Correct TWo INitial CApitals sets the second character to lowercase when you type two uppercase characters in a row.
• Capitalize first letter of sentences automatically capitalizes the first letter of a sentence.
• Capitalize names of days automatically capitalizes the first letter of day names.
• Correct accidental use of cAPS LOCK key automatically corrects incorrect capitalization that occurs when you type with ![]() down.
down.
• Replace text as you type enables automatic text replacement as defined in the table in the bottom half of the dialog.
Figure 11. Use this dialog to set how the AutoCorrect feature should work.

When you are finished setting options in the AutoCorrect dialog, click OK to save your settings and return to the Excel Options dialog.
When correcting spelling in Microsoft Office programs
When correcting spelling in Microsoft Office programs enables you to set options for the way the Microsoft Office spelling checker flags a possible misspelled word.
• Ignore words in UPPERCASE tells Excel not to check words in all uppercase characters, such as acronyms.
• Ignore words that contain numbers tells Excel not to check words that include numbers, such as MariaL1.
• Ignore Internet and file addresses tells Excel not to check any words that appear to be URLs, e-mail addresses, file names, or file pathnames.
• Flag repeated words marks the second occurrence of a repeated word.
• Enforce accented uppercase in French tells Excel that accents should be applied in French text for both uppercase and lowercase characters.
• Suggest from main dictionary only tells Excel to suggest replacement words from the main dictionary—not from your custom dictionaries.
• Custom Dictionaries displays a dialog you can use to specify custom dictionary files (Figure 12).
Figure 12. Use this dialog to set up custom dictionaries for working with Microsoft Office programs.

• French modes enables you to select a spelling mode for French text.
• Dictionary language enables you to select the language of the dictionary that should be used for spelling checks. The drop-down list (Figure 13) includes all available dictionaries.
Figure 13. Microsoft Office comes with quite a few dictionaries.

Save Options
Save options (Figure 14) control how workbooks are saved. There are four subcategories of options: Save Workbooks, AutoRecover exceptions for, Offline editing options for document management server files, and Preserve visual appearance of the workbook.
Figure 14. The Save options in the Excel Options dialog.

Save workbooks
Save Workbooks controls the default workbook file format and AutoRecover settings.
• Save files in this format enables you to choose a default Excel format for saving files. Choose an option from the drop-down list (Figure 15). Remember, you can use options in the Save As dialog to save a file in a format other than the default format, as discussed in Chapter 4.
Figure 15. Choose a default file format from this drop-down list.

• Save AutoRecover information every n minutes enables you to set a frequency for automatically saving a special document recovery file.
• AutoRecover file location enables you to specify a directory for saving document recovery files.
• Default file location enables you to specify a default directory for saving Excel files.
AutoRecover exceptions for
AutoRecover exceptions for enables you to turn off the AutoRecover feature for a specific workbook file.
• Disable AutoRecover for this workbook only turns off the AutoRecovery feature for the workbook you select from the drop-down list. The list includes only those workbook files that are currently open, so you must open a workbook before displaying the Excel Options dialog and choosing it from the list.
Offline editing options for document management server files
Offline editing options for document management server files control the location of documents shared over a SharePoint server. These options only apply if your network includes a Microsoft Office SharePoint Server.
• Save checked-out files to enables you to choose one of two possible locations for saving shared files as you edit them.
• Server drafts location is the directory on your computer in which SharePoint draft files are saved.
Preserve visual appearance of the workbook
Preserve visual appearance of the workbook enables you to set color options for files opened in previous versions of Excel.
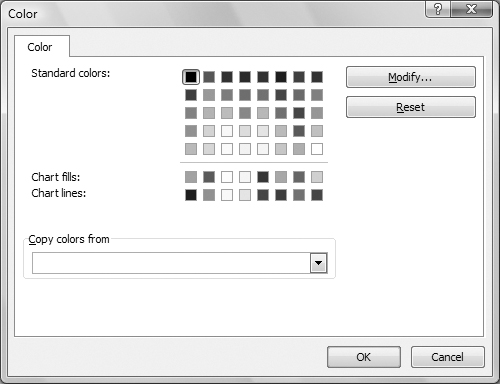
• Choose what colors will be seen in previous versions of Excel enables you to modify the color palette for the current workbook when it is opened in previous versions of Microsoft Excel. Click the Colors button and use the Color dialog that appears (Figure 16) to modify selected colors and build a new color palette.
Figure 16. Use the Color dialog to change the default color palette for workbook files opened with previous versions of Excel.
Advanced Options
Excel’s Advanced options (Figure 17) control how most of Excel’s features appear or work. There are many subcategories of options:
• Editing options
• Cut, copy, and paste
• Display
• Display options for this workbook
• Display options for this worksheet
• Formulas
• When calculating this workbook
• General
• Lotus compatibility
• Lotus compatibility Settings for
Figure 17. As you can see, there are quite a few Advanced options in the Excel Options dialog.

In the remaining pages of this chapter, I explain what all of these settings are for.
Editing options
Editing options control the way certain editing tasks work.
• After pressing Enter, move selection tells Excel to move the cell pointer when you press ![]() . With this option turned on, you can use the Direction drop-down list to choose a direction: Down, Right, Up, or Left.
. With this option turned on, you can use the Direction drop-down list to choose a direction: Down, Right, Up, or Left.
• Automatically insert a decimal point instructs Excel to automatically place a decimal point when you enter a value. Turn on the check box and enter a value in the Places text box. A positive value moves the decimal to the left; a negative value moves the decimal to the right.
• Enable fill handle and cell drag and drop turns on the fill handle and makes it possible to copy or move cells by dragging them to a new location. With this option turned on, you can also turn on the Alert before overwriting cells check box to have Excel warn you if a fill or drag-and-drop operation will overwrite the contents of destination cells.
• Allow editing directly in cells enables you to edit a cell’s value or formula by double-clicking the cell (Figure 18). With this option turned off, you must edit a cell’s contents in the formula bar.
Figure 18. You can edit the contents of a cell, right within the cell.

• Extend data range formats and formulas tells Excel that it should copy the formats and formulas in table cells to new rows added at the bottom of the table.
• Enable automatic percent entry tells Excel to multiply by 100 all numbers less than 1 that you enter in cells formatted with a Percentage format.
• Enable AutoComplete for cell values turns on the AutoComplete feature for entering values in cells based on entries in the same column.
• Zoom on roll with IntelliMouse sets the roll button on a Microsoft IntelliMouse to zoom instead of scroll.
• Alert the user when a potentially time-consuming operation occurs displays a dialog when an operation could take a long time to process. With this option enabled, you can specify how many cells must be affected to display the warning.
• Use system separators tells Excel to use the decimal and thousands separator set within Windows. With this option turned off, you can specify your own decimal and thousands separators by entering them in the appropriate boxes.
Cut, copy, and paste
Cut, copy, and paste options control how the cut, copy, and paste commands and their related features work.
• Show Paste Options buttons displays the button for the Paste Options menu (Figure 19) after you use a Paste or Fill command.
Figure 19. The Paste Options button gives you access to a number of options after you use the Paste command.

• Show Insert Options buttons displays the button for the Insert Options menu (Figure 20) after you use an Insert command.
Figure 20. The Insert Options button displays a menu of options after you insert cells.

• Cut, copy, and sort objects with their parent cells keeps objects (such as graphics) with cells that you cut, copy, filter, or sort.
print options set print quality for graphics.
• High quality mode for graphics enables high quality printing for graphic objects, including pictures, drawings, and clip art images.
Display
display options control what appears onscreen as you work with Excel.
• Show this number of recent documents enables you to specify the number of recently opened files that should appear on the right side of the Microsoft Office menu (Figure 1). Enter a value in the text box. This feature is handy for quickly reopening recently accessed files.
• Ruler units enables you to choose the units for the Layout View ruler: Default Units, Inches, Centimeters, or Millimeters.
• Show all windows in the Taskbar displays a Windows Taskbar icon for each open Excel document window.
• Show formula bar displays the formula bar above the document window.
• Show function ScreenTips displays information about function arguments as you enter a function (Figure 21).
Figure 21. A function ScreenTip can help you enter the correct arguments for a function.

• Show chart element names on hover displays the name of a chart element when you point to it.
• Show data point values on hover displays the value of a chart’s data point when you point to it.
• For cells with comments, show enables you to select one of three options for displaying comments:
• No comments or indicators does not display comments or comment indicators.
• Indicators only, and comments on hover displays a small red triangle in the upper-right corner of a cell containing a comment. When you point to the cell, the comment appears in a box.
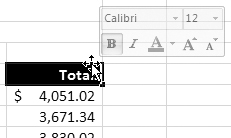
• Comments and indicators displays cell comments in boxes as well as a small red triangle in the upper-right corner of each cell containing a comment (Figure 22).
Figure 22. A worksheet displaying both comment indicators and comments.
Display options for this workbook
Display options for this workbook enables you to set additional display options for the workbook file you select from a drop-down list. Only the workbook files that are currently open appear in the list.
• Show horizontal scroll bar displays a scroll bar along the bottom of the window.
• Show vertical scroll bar displays a scroll bar along the right side of the window.
• Show sheet tabs displays tabs at the bottom of the window for each sheet in the workbook file.
• Group dates in the AutoFilter menu changes the way dates are listed in the AutoFilter menu for a date filter in a table.
• For objects, show enables you to specify how objects should appear. Choose an options:
• All displays all objects.
• Nothing (hide objects) does not display any objects. Excel will not print objects with this option selected.
Display options for this worksheet
Display options for this worksheet enables you to set additional display options for the worksheet file you select from a drop-down list. Only the sheets in currently open workbook files appear in the list.
• Show row and column headers displays the row headings and column headings.
• Show formulas in cells instead of their calculated results displays formulas instead of formula results (Figure 23).
Figure 23. You can display formulas instead of their results in cells.
• Show page breaks displays horizontal and vertical page breaks.
• Show a zero in cells that have zero values displays a 0 (zero) in cells that contain zero values. Turning off this check box instructs Excel to leave a cell blank if it contains a zero value.
• Show outline symbols if an outline is applied displays outline symbols when the worksheet includes an outline.
• Show gridlines displays the boundaries of cells as lines.
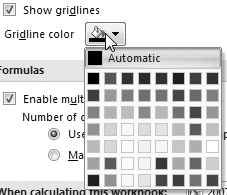
• Gridlines color is a pop-up menu (Figure 24) for selecting a gridline color. Automatic (the default option) displays gridlines in gray.
Figure 24. Choose a color for the gridline from the pop-up menu.
Formulas
Formulas options enable you to customize how Excel uses your computer’s processor(s) to perform calculations.
• Enable multi-threaded calculation tells Excel to use all the processors on your computer or the number you specify. With this option enabled, you can set the Number of calculation threads by selecting an option:
• Use all processors on this computer uses all the processors on your computer, which is indicated by a number after the colon.
• Manual enables you to specify the number of processors Excel should use. This value must be the same as or less than the number of processors your computer has.
When calculating this workbook
When calculating this workbook enables you to set calculation options for the workbook you select from a drop-down list.
• Update links to other documents calculates formulas with references to documents created with other programs.
• Set precision as displayed permanently changes values stored in cells from 15-digit precision to the precision of the applied formatting. This may result in rounding.
• 1904 date system changes the starting date from which all dates are calculated to January 2, 1904. This is the date system used on Macintosh computers. Windows computers begin dates at January 1, 1900. Turning on this option enhances compatibility with Excel for Mac OS.
• Save external link values saves copies of values from linked documents within the workbook file.
General
General options control a variety of other Excel features.
• Provide feedback with sound plays sounds at certain events, such as opening, saving, and printing files and displaying error messages.
• Provide feedback with animation displays worksheet movement when you insert or delete cells.
• Ignore other applications that use Dynamic Data Exchange (DDE) prevents the exchange of data with other applications that use DDE.
• Ask to update automatic links prompts you to update links when you open a workbook containing links to other files.
• Show add-in user interface errors displays error messages in the user interface for Excel add-ins you install and use.
• Scale content for A4 or 8.5 x 11” paper sizes automatically scales documents so they print properly on A4 or standard U.S. letter sized paper.
• At startup, open all files in enables you to specify a directory containing files you want automatically opened each time you run Excel.
• Web Options button displays the Web Options dialog, which you can use to edit the default settings for saving workbooks as Web pages.
• General options (Figure 25) control compatibility with other programs and browsers.
Figure 25. The General tab of the Web Options dialog.

• Browsers options (Figure 26) control various compatibility and formatting options for Web pages created by Excel.
Figure 26. The Browsers tab of the Web Options dialog.

• Files options (Figure 27) control file naming and locations and the default editor for Web pages.
Figure 27. The Files tab of the Web Options dialog.

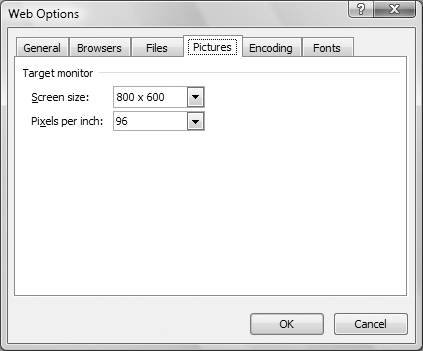
• Pictures options (Figure 28) control the size and resolution of the typical target monitor.
Figure 28. The Pictures tab of the Web Options dialog.
• Encoding options (Figure 29) control how a Web page is coded when saved.
Figure 29. The Encoding tab of the Web Options dialog.

• Fonts options (Figure 30) control the character set and default fonts.
Figure 30. The Fonts tab of the Web Options dialog.

• Service Options displays the Service Options dialog, which you can use to set workspace or SharePoint server document options.
Lotus compatibility
Lotus compatibility options enable you to set up Excel so it works more like Lotus 1-2-3.
• Microsoft Office Excel menu key enables you to specify a key to invoke mouseless menus. By default, the key is a slash (/) character, which is also used by Lotus.
• Transition navigation keys activates the Lotus 1-2-3 keystrokes for worksheet navigation, entries, and other actions.
Lotus compatibility Settings for
Lotus compatibility Settings for options enables you to set Lotus-related options for specific workbooks. Choose a workbook from the drop-down list; only the workbooks that are currently open appear in the list.
• Transition formula evaluation instructs Excel to evaluate Lotus 1-2-3 formulas without changing them. This option may be extremely helpful if you often open files created with Lotus 1-2-3.
• Transition formula entry converts formulas entered in Lotus 1-2-3 release 2.2 syntax to Excel syntax and changes the behavior of Excel-defined names to Lotus-defined names. This makes it possible for a Lotus 1-2-3 user to use Excel with less retraining.