
MySQL Shell is the second-generation command-line client which stands out compared to the traditional mysql command-line client by supporting the X Protocol as well as the Python and JavaScript languages. It also comes with several utilities and is highly extensible. This makes it a great tool for not only day-to-day tasks but also when investigating performance issues.
This chapter starts out with an overview of what the MySQL Shell offers including the built-in help and the rich prompt. The second part of the chapter covers how you can extend the functionality of MySQL Shell through the use of external code modules, the reporting infrastructure, and plugins.
Overview
The first MySQL Shell release with the status of general availability was in 2017, so it is still a very new tool in the MySQL toolbox. Yet, it already has a large array of features well beyond what the traditional mysql command-line client has. These features are not limited to those required to use MySQL Shell as part of the MySQL InnoDB Cluster solution; there are also several features that are useful for day-to-day database administration tasks and performance optimization.
An advantage of MySQL Shell over the mysql command-line client is that the MySQL Shell editor behaves the same on Linux and Microsoft Windows, so if you work on both platforms, you get a consistent user experience. This means that Ctrl+D exists the shell both on Linux, macOS, and Microsoft Windows, Ctrl+W deletes the previous word, and so forth.
Charles Bell (the technical reviewer of this book and a MySQL developer) has written the book Introducing MySQL Shell (Apress) with a comprehensive introduction to MySQL Shell: www.apress.com/gp/book/9781484250822. Additionally, the author of this book has published several blogs about MySQL Shell. See https://mysql.wisborg.dk/mysql-shell-blogs/.
This section will look at installing MySQL Shell, invoking it, and some of the basic features. It is however not possible to go into details with all features of MySQL Shell. You are encouraged to consult the online manual at https://dev.mysql.com/doc/mysql-shell/en for more information as you are using MySQL Shell.
Installing MySQL Shell
MySQL Shell is installed in the same way as other MySQL products (except for MySQL Enterprise Monitor). You can download it from https://dev.mysql.com/downloads/shell/; and it is available for Microsoft Windows, Linux, and macOS and as a source code. For Microsoft Windows, you can also install it through MySQL Installer.
If you install MySQL Shell using a native package format and MySQL Installer for Microsoft Windows, the installation instructions are the same as for MySQL Workbench except for the names. Please see the previous chapter for details.
You can also install MySQL Shell using a ZIP archive on Microsoft Windows or a TAR archive on Linux and macOS. If you choose that option, you simply unpack the downloaded file, and you are done.
Invoking MySQL Shell
MySQL Shell is invoked using the mysqlsh (or mysqlsh.exe on Microsoft Windows) binary which is in the bin directory of the installation directory. When you install MySQL Shell using a native package, the binary will be in your PATH environment variable, so the operating system can find it without you explicitly providing the path.
The prompt will look different than in this output as the default prompt cannot be fully represented in plain text. Unlike the mysql command line, MySQL Shell does not require a connection to be present, and by default none is created.
Creating Connections
There are several ways to create a connection for MySQL Shell including from the command line and from inside MySQL Shell.
The first time you connect, you will be asked to enter the password for the account. If MySQL Shell finds the mysql_config_editor command in the path or you are on Microsoft Windows where MySQL Shell can use the Windows keyring service, MySQL Shell will offer to save the password for you, so you do not need to enter it in the future.
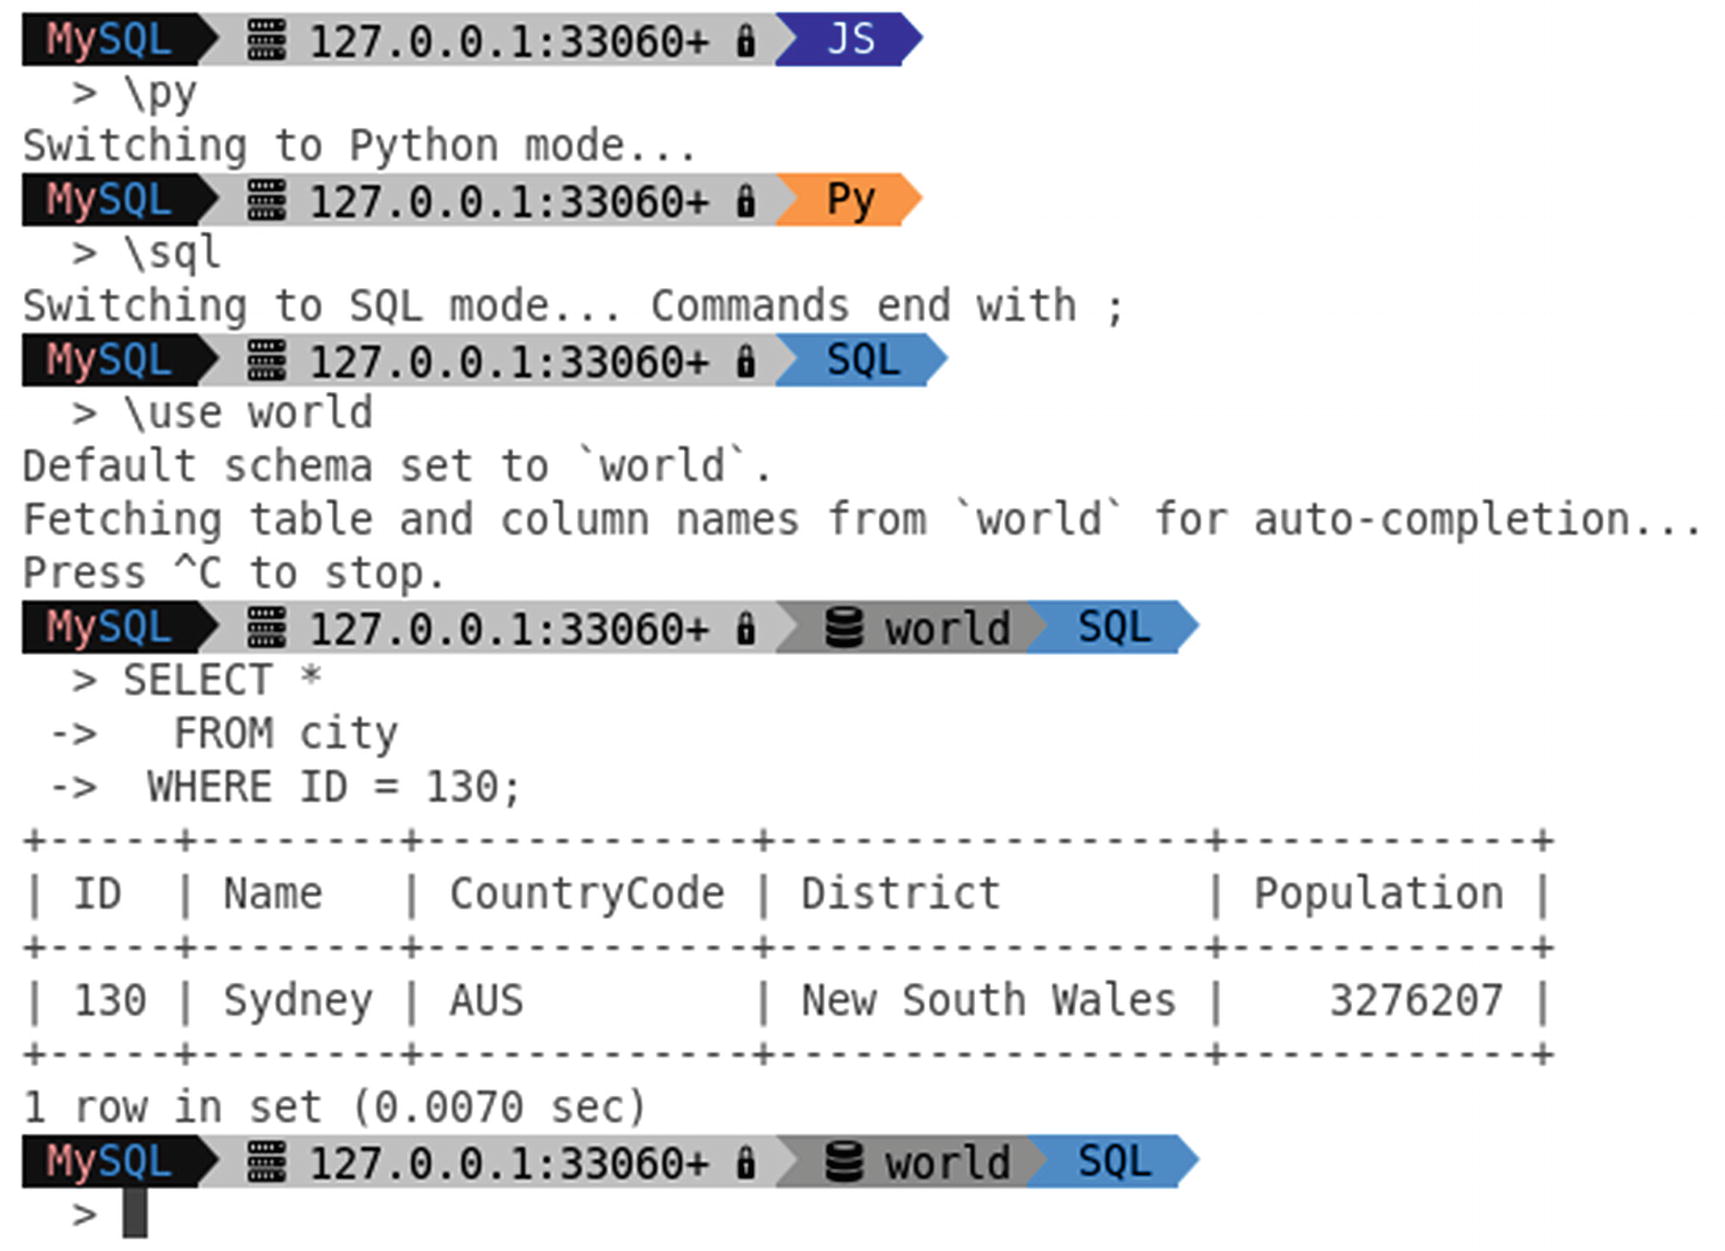
After MySQL Shell has started up, notice how the prompt has changed. MySQL Shell features an adaptive prompt that changes to reflect the status of your connection. The default prompt includes the port number you are connected to. If you connect to MySQL Server 8, then the default port used is 33060 instead of port 3306 as MySQL Shell by default uses the X Protocol when the server supports it rather than the traditional MySQL protocol. That is the reason the port number is not what you may expect.
Various ways to create and work with a connection
Method | Language Commands | Description |
|---|---|---|
Global session | All modes: connect (or c for short) | Creates a global session (the default session). This is the equivalent of a connection in the mysql command-line client. |
General session | JavaScript: mysqlx.getSession() Python: mysqlx.get_session() | Returns the session so it can be assigned to a variable. Can be used both for a connection using the X Protocol and the classic protocol. |
Classic session | JavaScript: mysql.getClassicSession() Python: mysql.get_classic_session() | Similar to a general session, but always returns a classic session. |
Set global session | JavaScript: shell.setSession() Python: shell.set_session() | Sets the global session from a variable containing a session. |
Get global session | JavaScript: shell.getSession() Python: shell.get_session() | Returns the global session, so it can be assigned to a variable. |
Reconnect | All modes: econnect | Reconnects using the same arguments as for the existing global connection. |
The language mode has been mentioned a few times. The next subsection will look at how you work with it.
Language Modes
One of the biggest features of MySQL Shell is that you are not restricted to executing SQL statements. You have the full power of both JavaScript and Python at your disposal – and of course SQL statements. This makes MySQL Shell very powerful for automating tasks.
Choosing the MySQL Shell language mode
Mode | Command-Line | MySQL Shell |
|---|---|---|
JavaScript | --js | js |
Python | --py | py |
SQL | --sql | sql |
The default mode is JavaScript. The prompt reflects which language mode you are in, so you always know which mode you are using.
In MySQL Shell 8.0.16 and later, you can in the Python and JavaScript modes prefix a command with sql which makes MySQL Shell execute the command as an SQL statement.
One thing to be aware of that also was hinted when listing how to create connections is that MySQL Shell like the X DevAPI tries to keep the naming convention normally used for the language. This means that in JavaScript mode, the functions and methods use camel case (e.g., getSession()), whereas in Python mode snake case (get_session()) is used. If you use the built-in help, the help will reflect the names used for the language mode you are in.
Built-in Help
It can be hard to keep on top of all of the features of MySQL Shell and how to use them. Fortunately, there is an extensive built-in help feature that lets you get information on the features without having to go back to the online manual each time.
If you execute mysqlsh with the --help argument , you will get information about all the supported command-line arguments. After starting a shell, you can also get help about the commands, objects, and methods. The topmost help is obtained using the h, ? or help command which is available from all language modes. This lists the commands and the global objects and how to get further help.
The two first commands retrieve the same help text. It is worth familiarizing yourself with the help feature as it can greatly improve how efficiently you can work with MySQL Shell.
The reason MySQL Shell can provide the help for the SELECT statement in the SQL mode without considering the X DevAPI is that the X DevAPI methods can only be accessed from Python and JavaScript. On the other hand, all three meanings of “select” make sense in the Python and JavaScript modes.
As noted earlier, there exist several global objects. What are those?
Built-in Global Objects
MySQL Shell uses global objects to group features. Much of the functionality that makes MySQL Shell so powerful can be found in the global objects. As you will see in the “Plugins” section, it is also possible to add your own global objects.
db: When a default schema has been set, db holds the X DevAPI schema object for the default schema. X DevAPI table objects can be found as properties of the db object (unless the table or view name is the same as an existing property). The session object can also be obtained from the db object.
dba: For administrating MySQL InnoDB Cluster.
mysql: For connecting to MySQL using the classic MySQL protocol.
mysqlx: For working with MySQL X Protocol sessions.
session: For working with the current global session (connection to a MySQL instance).
shell: Various general-purpose methods and properties.
util: Various utilities such as the upgrade checker, importing JSON data, and importing data in CSV files to relational tables.
That concludes the general overview of MySQL Shell. Next, you will learn more about the prompt and how to customize it.
The Prompt
One of the features setting MySQL Shell apart from the traditional command-line client is the rich prompt which not only makes it easy to see which host and schema you are working with but also can add information such as whether you are connected to a production instance, whether SSL is used, and custom fields.
Built-in Prompts
The MySQL Shell installation comes with several predefined prompt templates that you can choose from. The default is to use a prompt that provides information about the connection and supports 256 colors, but there are also simpler prompts.
ZIP and TAR archives: The share/mysqlsh/prompt directory in the archive.
RPM on Oracle Linux 7: /usr/share/mysqlsh/prompt/
MySQL Installer on Microsoft Windows: C:Program FilesMySQLMySQL Shell 8.0sharemysqlshprompt
prompt_16.json: A colored prompt limited to use 16/8 color ANSI colors and attributes.
prompt_256.json: The prompt uses 256 indexed colors. This is the one that is used by default.
prompt_256inv.json: Like the prompt_256.json, but with an “invisible” background color (it just uses the same as for the terminal) and with different foreground colors.
prompt_256pl.json: Same as prompt_256.json but with extra symbols. This requires a Powerline patched font such as the one that is installed with the Powerline project. This will add a padlock with the prompt when you use SSL to connect to MySQL and use “arrow” separators. An example of installing the Powerline font is shown later.
prompt_256pl+aw.json: Same as prompt_256pl.json but with “awesome symbols.” This additionally requires the awesome symbols to be included in the Powerline font. An example of installing the awesome symbols is shown later.
prompt_classic.json: This is a very basic prompt that just shows mysql-js>, mysql-py>, or mysql-sql> based on the mode in use.
prompt_dbl_256.json: A two-line version of the prompt_256.json prompt.
prompt_dbl_256pl.json: A two-line version of the prompt_256pl.json prompt.
prompt_dbl_256pl+aw.json: A two-line version of the prompt_256pl+aw.json prompt.
prompt_nocolor.json: Gives the full prompt information, but completely without colors. An example of a prompt is MySQL [localhost+ ssl/world] JS>.
The two-line templates are particularly useful if your shell window is of limited width as they will put the information on one line and allow you to type your command on the next without having it preceded by the full prompt.
Linux and macOS: ~/.mysqlsh/prompt.json – that is in the .mysqlsh directory in the user’s home directory.
Microsoft Windows: %AppData%MySQLmysqlshprompt.json – that is in AppDataRoamingMySQLmysqlsh directory from the user’s home directory.
You can change the directory by setting the MYSQLSH_HOME environment variable. If you prefer a different prompt than the default, you can copy that definition into the directory and name the file prompt.json.
This can be useful if you temporarily want to use a different prompt than your usual prompt.

The default MySQL Shell prompt
There are several parts to the prompt. First, it says PRODUCTION on a red background which is to warn you that you are connected to a production instance. Whether an instance is considered a production instance is based on whether the hostname you are connected to is included in the PRODUCTION_SERVERS environment variable. The second element is the MySQL string which does not have any special meaning.
Third is the host and port you are connected to, whether you use the X Protocol, and whether SSL is used. In this case, there is a + after the port number which indicates that the X Protocol is in use. The fourth element is the default schema.
The fifth and last element (not counting the > at the end) is the language mode. It will show SQL, Py, or JS depending on whether you have enabled the SQL, Python, or JavaScript mode, respectively. The background color of this element also changes with the language. SQL uses orange, Python blue, and JavaScript yellow.
In general, you will not see all elements of the prompt as MySQL Shell only includes those that are relevant. For example, the default schema is only included when you have set a default schema, and the connection information is only present when you are connected to an instance.
As you work with MySQL Shell, you may realize that you would like to make some changes to the prompt definition. Let’s look at how you can do that.
Custom Prompt Definition
The prompt definitions are JSON files, and there is nothing that prevents you from editing a definition to change according to your preferences. The best way to do this is to copy the template that is closest to what you want and then make your changes.
The best source for help to create your own prompt definition is the README.prompt file that is located in the same directory as the template files.
The definition of the elements of the prompt
So a host is considered to be a production instance if it is included in the environment variable PRODUCTION_SERVERS.
The second thing to note about the list of elements is that there are some special fields such as shrink which can be used to define how the text is kept relatively short. For example, the host element uses truncate_on_dot, so only the part before the first dot in the hostname is displayed if the full hostname is too long. Alternatively ellipsize can be used to add … after the truncated value.
By Name: There are a few colors that are known by name: black, red, green, yellow, blue, magenta, cyan, and white.
By Index: A value between 0 and 255 (both inclusive) where 0 is black, 63 light blue, 127 magenta, 193 yellow, and 255 white.
By RGB: Use a value in the #rrggbb format. This requires that the terminal supports TrueColor colors.
%env:varname%: This uses an environment variable. The way it is determined whether you are connected to a production server is an example of using an environment variable.
%sysvar:varname%: This uses the value of a global system variable from MySQL, that is, the value returned by SELECT @@global.varname.
%sessvar:varname%: Similar to the previous but using a session system variable.
%status:varname%: This uses the value of a global status variable from MySQL, that is, the value returned by SELECT VARIABLE_VALUE FROM performance_schema.global_status WHERE VARIABLE_NAME = 'varname'.
%status:varname%: Similar to the previous, but using a session status variable.
You are encouraged to play around with the definition until you get a color scheme and the elements that work best for you. An alternative way to improve the prompt on Linux is to install the Powerline and Awesome fonts.
Powerline and Awesome Fonts
If you feel that the normal MySQL Shell prompts are too square and you use MySQL Shell on Linux, you can consider using one of the templates that rely on the Powerline and the Awesome fonts. The fonts are not installed by default.
This example will show you how to do a minimal installation of the Powerline fonts1 and install the Awesome font using the patching-strategy branch of gabrielelana’s awesome-terminal-fonts project on GitHub.2
Another option is the Fantasque Awesome Powerline fonts (https://github.com/ztomer/fantasque_awesome_powerline) which include both the Powerline and Awesome fonts. These fonts look a little different from those installed in this example. Choose those that you prefer.
Installing the Awesome fonts
Installing the Powerline font
This does not do a full installation of the Powerline font, but it is all that is required if you just want to use the Powerline font with MySQL Shell. The two wget commands download the font and configuration files, and the fc-cache command rebuilds the font information cache files. You will need to restart Linux for the changes to take effect.
The double-line Powerline + Awesome fonts prompt
This example also shows how the prompt changes as you change the language mode and set a default schema. Regarding support for multiple modules, then that is largely why MySQL Shell is such a powerful tool, so the next section will look at how you can use external modules in MySQL Shell.
Using External Modules
The support for JavaScript and Python makes it easy to perform tasks in MySQL Shell. You are not limited to the core functionality but can also import both standard modules and your own custom modules. This section will start out with the basics of using external modules (as opposed to the built-in MySQL Shell modules). The next section will go into the reporting infrastructure, and after that plugins will be covered.
The discussion in this book focuses on Python. If you prefer JavaScript, the usage is very similar. One main difference is that Python uses snake case (e.g., import_table()), whereas JavaScript uses camel case (importTable()). See also https://dev.mysql.com/doc/mysql-shell/en/mysql-shell-code-execution.html for general information about code execution in MySQL Shell.
The exact output depends on the version of MySQL Shell and the platform you use it on.
MySQL Shell 8.0.17 and earlier provide Python 2.7, whereas MySQL Shell 8.0.18 and later come with Python 3.7.
Modifying the path this way is fine for a one-off use of a module; however, it is inconvenient if you have created a module you will be using on a regular basis.
- 1.
%PROGRAMDATA%MySQLmysqlsh
- 2.
%MYSQLSH_HOME%sharedmysqlsh
- 3.
<mysqlsh binary path>
- 4.
%APPDATA%MySQLmysqlsh
- 1.
/etc/mysql/mysqlsh/
- 2.
$MYSQLSH_HOME/shared/mysqlsh/
- 3.
<mysqlsh binary path>/
- 4.
$HOME/.mysqlsh/
All four paths are always searched, and if the file is found in multiple locations, each file will be executed. This means that the last found file takes precedence if the files affect the same variables. If you make changes meant for you personally, the best place to make the changes is in the fourth location. The path in step 4 can be overridden with the MYSQLSH_USER_CONFIG_HOME environment variable.
If you add modules that you want to use on a regular basis, you can modify the search path in the mysqlshrc.py file. That way, you can import the module as any other Python module.
A great example of the power of the support for external modules is the MySQL Shell port of Innotop (https://github.com/lefred/mysql-shell-innotop). It also reveals two of the limitations. Because the reporting part of Innotop is implemented using the curses library, it does not work on Microsoft Windows, and because the implementation uses Python, it requires that you execute Innotop in the Python language mode. The reporting infrastructure and plugins discussed later in the chapter avoid these limitations.
This is the simplest way of extending MySQL Shell. Another way is to add reports to the reporting infrastructure.
Reporting Infrastructure
Starting with MySQL Shell 8.0.16, there is a reporting infrastructure available that you can use with both built-in reports and your own custom reports. This is a very powerful way to use MySQL Shell to monitor a MySQL instance and collect information when you encounter performance problems.
Since the reporting infrastructure is still very new, it is recommended to check each new release for new built-in reports.
This section will start out showing how you get help about the available reports and then discuss how to execute the reports and finally how to add your own reports.
Report Information and Help
Obtaining a list of reports and help for the query report
The output of the show command shows there are three reports available. These are the built-in reports as of version 8.0.18. The second command returns the help for the query report which shows it takes one or more arguments and has two options: --help for returning the help text and --vertical or -E to return the query result in the vertical format.
query: Execute the query provided as an argument.
thread: Return information about the current connection.
threads: Return information about all connections for the current user, foreground threads, or background threads.
The help output is rather verbose, so it has been omitted here. Instead, the next subsection will discuss how to use the two commands.
Executing Reports
There are two different ways to execute a report. You can either ask for the report to be executed a single time, or you can request the report to be executed over and over at a fixed interval.
show: Execute the report a single time.
watch: Keep executing the report at the interval provided like the watch command on Linux.
--interval=float, -i float: The number of seconds to wait between each execution of the report. The value must be in the range 0.1–86400 (one day) seconds. The default is 2 seconds.
--nocls: Do not clear the screen when outputting the result of the report. This appends the new result below the previous ones and allows you to see the history of the report results until the oldest scroll out of view.
When you execute a report with the watch command, you stop the execution with Ctrl+C.
Using the query report
If you execute the same commands, your output will depend on which statements are executing in other threads at the time the report is run. The query used for the report adds a condition that the connection id must be different from the one for the connection generating the report. The show command with the query report has little value on its own as you could just as well execute the query. It is more useful with other reports and to check the query before using it with watch command.
The watch command is more interesting as it allows you keep getting the result updated. In the example, the report runs five times before it is stopped. The four first times, there is another connection executing a query, and the fifth time the report generates no data. Notice that more than five seconds are added to the statement latency for the query between successive executions. That is because the 5 seconds is the time MySQL Shell waits from the result of one iteration has been displayed until it starts executing the query again. So the overall time between two outputs is the interval plus the query execution time plus the time it takes to process the result.
The reporting infrastructure not only allows you to use the built-in reports. You can also add your own reports.
Adding Your Own Reports
The real power of the reporting infrastructure is that it is easily extendable, so both the MySQL development team and you can add more reports. While you can use the support for external modules to add reports as it is done with Innotop, that approach requires you to implement the reporting infrastructure yourself, and you must use the language mode of the modules to execute the report. When you use the reporting infrastructure, that is all handled for you, and the report is available for all language modes.
The report code in this section is not meant to be executed in a MySQL Shell session (and it will cause errors if you copy and paste it as the code stands because blank lines inside a block are used by MySQL Shell in interactive mode to exit the block). Instead, the code must be saved to a file that is loaded when invoking MySQL Shell. Instructions how to install the code follow at the end of the example.
Report querying the sys.session view
session: This is a MySQL Shell Session object (what defines the connection to the MySQL instance).
args: A list with the unnamed arguments passed to the report. This is what is used for the query report where you just specify the query without adding an argument name before the query.
options: A dictionary with the named arguments for the report.
The sessions report uses named options, so the args argument is not used.
The next eight lines use the X DevAPI to define the base query. First, the schema object for the sys schema is obtained from the session. Then the sessions view is obtained from the schema object (you use get_table() both to fetch a view and a table). Finally, a select query is created with the arguments specifying which columns that should be retrieved and which aliases to use for the columns.
Next, the --sort argument is handled which is available as the sort key in the options dictionary. If the key does not exist, the report falls back to sorting by latency. The sort order is defined as descending in case the output is sorted according to the latency or memory usage; otherwise, the sort order is ascending. The order_by() method is used to add the sorting information to the query. Additionally, when sorting by latency, only sessions where the latency is not NULL are included.
The --limit argument is handled in a similar fashion, and a value of 0 is taken to mean all matching sessions. Finally, the query is executed. The report is generated as a list with the first item being the column headers and the rest the rows in the result. The report returns a dictionary with the report list in the report item.
List Type: The result is returned as a list with the first item the headers and the remaining the rows in the order they should be displayed. The headers and the rows are themselves lists.
Report Type: The result is a list with a single item. MySQL Shell uses YAML to display the result.
Print Type: The result is printed directly to the screen as is.
Registering the sessions report
name: The name of the report. You can choose the name relatively freely as long as it is a single word and it is unique for all reports.
type: The result format: 'list', 'report', or 'print'.
report: The object of the function generating the report, in this case sessions.
description: An optional argument that describes the report. If you provide the description, you use a dictionary as described shortly.
brief: A short description of the report.
details: A detailed description of the report provided as a list of strings.
options: The named arguments as a list of dictionaries.
argc: The number of unnamed arguments. You specify that either as an exact number like in this example, an asterisk (*) for any number of arguments, a range with exact numbers (like '1-3'), or a range with a minimum number of arguments ('3-*').
The dictionary keys used to define the report argument
Key | Default Value | Description |
|---|---|---|
name | The argument name which is used with double dashes (e.g., --sort) when invoking the report. | |
brief | A short description of the argument. | |
details | A detailed description of the argument provided as a list of strings. | |
shortcut | A single alphanumeric character that can be used to access the argument. | |
type | string | The argument type. Supported values at the time of writing are string, bool, integer, and float. When a Boolean is chosen, the argument works as a switch defaulting to False. |
required | False | Whether the argument is mandatory. |
values | The allowed values for a string argument. If values are not provided, all values are supported. This is what is used in the example to restrict the allowed sorting options. |
The typical way you import a report is to save the report definition and registration code in the init.d directory under the user configuration path which defaults to %AppData%MySQLmysqlsh on Microsoft Windows and $HOME/.mysqlsh/ on Linux and Unix (the same as the fourth path searched for the configuration files). All scripts with the filename extension .py will be executed as a Python script (and .js for JavaScript) when starting up MySQL Shell.
If there are errors in the scripts, information about the problems will be logged to the MySQL Shell log which is stored in the file mysqlsh.log in the user configuration path.
Using the sessions report
The new sessions report shows up in the same way as the built-in reports, and you have the same features as for the built-in report, for example, support for displaying the result in the vertical output. The reason the vertical output is supported is because the report returns the result as a list, so MySQL Shell handles the formatting. Notice also how the report can be used in all three language modes even though it was written in Python.
There is an alternative way to import the report. Instead of saving the file to the init.d directory, you can include the report as part of a plugin.
Plugins
MySQL Shell added support for plugins in version 8.0.17. A plugin consists of one or more code modules which can include reports, utilities, or anything else that may be of use to you and that can be executed as Python or JavaScript code. This is the most powerful way to extend MySQL Shell. The price is that it is also relatively complex, but the benefit is that it is easier to share and import a package of features. Another benefit of plugins is that not only can reports be executed from any language mode; the rest of your code can also be used from both Python and JavaScript.
For all the details of adding plugins including the description of the parameters for the methods used to create plugin objects and register them, see https://dev.mysql.com/doc/mysql-shell/en/mysql-shell-plugins.html. There is also an example plugin available at Mike Zinner’s (MySQL development manager whose team includes the MySQL Shell developers) GitHub repository that is worth studying: https://github.com/mzinner/mysql-shell-ex.
You create a plugin by adding a directory with the name of the plugin to the plugins directory under the user configuration path which defaults to %AppData%MySQLmysqlsh on Microsoft Windows and $HOME/.mysqlsh/ on Linux and Unix (the same as the fourth path searched for the configuration files). The plugin can consist of any number of files and directories, but all files must use the same programming language.
All code within a plugin must use the same programming language. If you need to use both Python and JavaScript, you must split the code into two different plugins.
An example plugin called myext is included in the directory Chapter_12/myext in this book’s GitHub repository. It includes the directories and files depicted in Figure 12-3. The light-colored (yellow) rectangles with rounded corners represent directories, and the darker (red) document shapes are a list of files in a directory.
The example plugin is very basic with the aim at demonstrating how the plugin infrastructure works. If you use plugins in productions, make sure to add appropriate validation and error handling to your code.
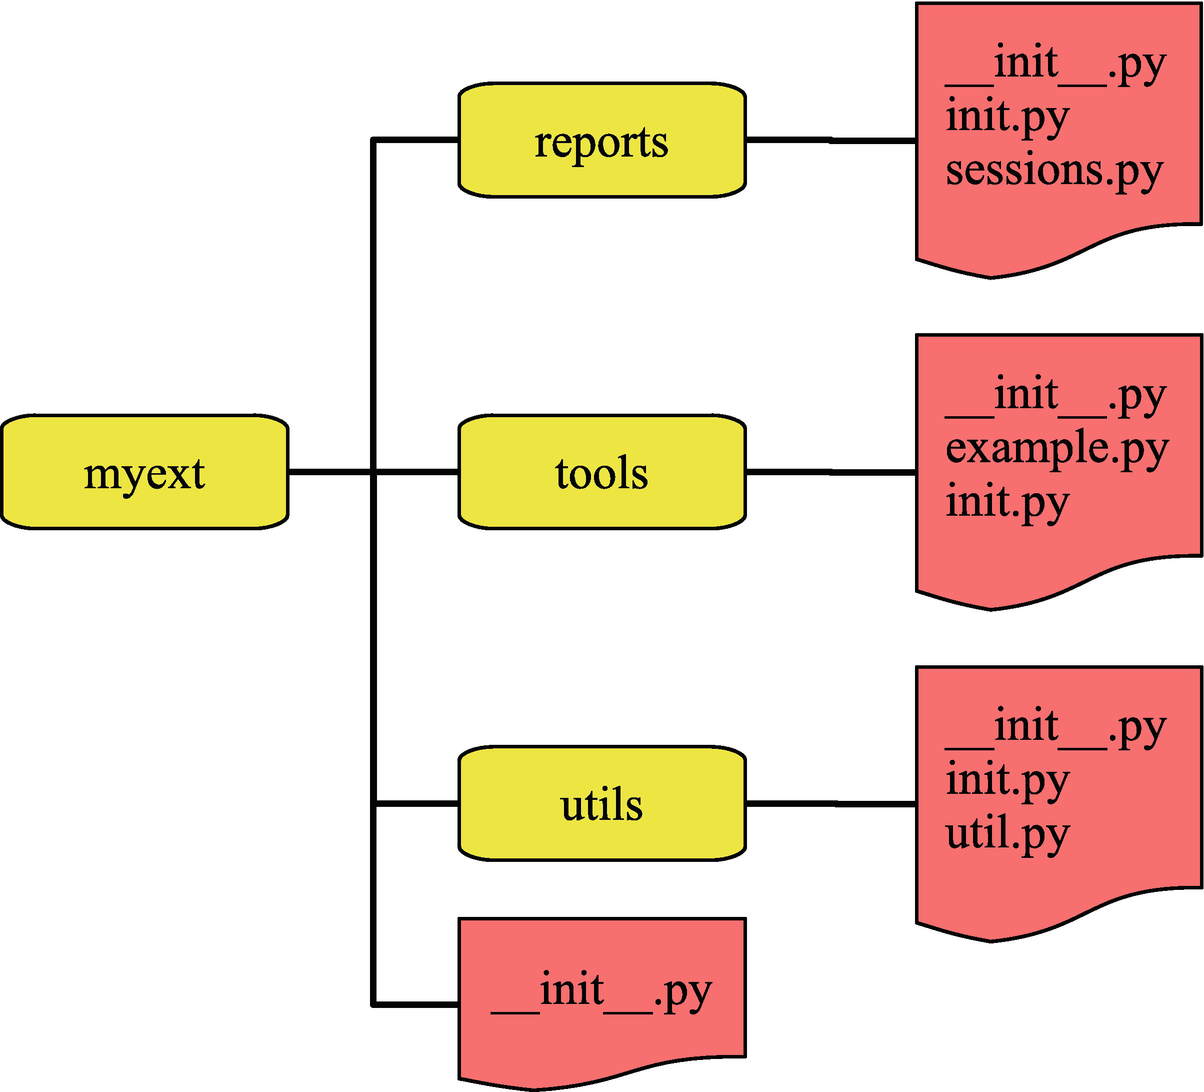
The directories and files for the myext plugin
You can view the structure of the plugin like Python packages and modules. Two important things to be aware of are that there must be a __init__.py file in each directory and when the plugin is imported, only the init.py files (init.js for a JavaScript module) are executed. This means that you must include the code that is necessary to register the public parts of the plugin in init.py files. In this example plugin, all the __init__.py files are empty.
Plugins are not meant to be created interactively. Make sure you save the code to files and at the end restart MySQL Shell to import the plugin. More details are given in the remainder of this section.
The sessions.py file in the reports directory is the same as the sessions report that was generated in Listing 12-6 except that the registration of the report is done in reports/init.py and the report is renamed to sessions_myext to avoid two reports with the same name.
The get_columns() function from utils/util.py
The function takes a table object and uses the X DevAPI to construct a query against the information_schema.COLUMNS view. Notice how the function obtains the session and schema through the table object. At the end, the result object of executing the query is returned.
Registering the get_columns() function as util.get_columns()
The first important observation is that the mysqlsh module is imported. Both the shell and the session objects can be obtained through the mysqlsh module, so this is an important module when working with extensions in MySQL Shell. Notice also how the util module is imported. It is always required to use full paths starting from the plugin name to import plugin modules.
In order to register the function, first, it is checked whether the myext plugin already exists in mysqlsh.globals. If not, it is created with shell.create_extension_object() and registered using the shell.register_global() method . This dance is necessary as there are multiple init.py files and you should not rely on the order they are executed.
Next, the utils module is registered in a similar fashion using the shell.create_extension_object() and shell.add_extension_object_member() methods . There is potential for ending up duplicating code and performing similar steps a lot if you have a large plugin, so you can consider creating utility functions to avoid repeating yourself.
Finally, the function itself is registered using the shell.add_extension_object_member() method . Since the table argument takes an object, it is possible to specify the type of object that is required.
For the registration of the module and function, there is no requirement that the name in the code and the registered name are the same. The registration of the report in reports/init.py includes an example of changing the name, if you are interested. However, in most cases, it is the preferred way to keep the names the same to make it easier to find the code behind a feature.
The describe() function in tools/example.py
The most important thing to notice is that the shell object is obtained as mysqlsh.globals.shell and from there the session, schema, and table objects can be obtained. The shell.dump_rows() method is used to generate the output of the result. The method takes a result object and optionally the format (defaults to the table format). In the process of outputting the result, the result object is consumed.
You are now ready to try the plugin. You need to copy the whole myext directory into the plugins directory and restart MySQL Shell. Listing 12-12 shows the global objects from the help content.
If MySQL Shell encounters errors importing the plugin, a line like WARNING: Found errors loading plugins, for more details look at the log at: C:UsersmyuserAppDataRoamingMySQLmysqlshmysqlsh.log will be generated when starting MySQL Shell.
The global objects in the help content
Obtaining help for myext.tools
Using the describe() and get_columns() methods in Python
First, the describe() method is used. The schema and table are provided as strings using their names, and the result is printed as a table. Then, the current schema is set to the world schema which allows you to access the tables as properties of the db object. The shell.dump_rows() method is then used to print the result as pretty printed JSON.
Because MySQL Shell detects if you use a method interactively, if you do not assign the result of get_columns() to a variable, MySQL Shell will output it directly to the console.
That concludes the discussion of MySQL Shell. If you do not already take advantage of the features it provides, you are encouraged to start using it.
Summary
This chapter has introduced MySQL Shell. It started out with an overview of how to install and use MySQL Shell, including working with connections; the SQL, Python, and JavaScript language modes; the built-in help; and the global objects. The rest of the chapter covered customization of MySQL Shell, reports, and extending MySQL.
The MySQL Shell prompt is more than a static label. It adapts according to the connection and default schema, and you can customize it to include information such as the version of MySQL you are connected to, and you can change the theme that is used.
The power of MySQL Shell comes from the built-in complex features and its support for creating complex methods. The simplest way to extend the features is to use external modules for JavaScript or Python. You can also use the reporting infrastructure including creating your own custom reports. Finally, MySQL Shell 8.0.17 and later have support for plugins which you can use to add your features in a global object. The reporting infrastructure and plugins have the advantage that the features you add become language independent.
All examples that use a command-line interface in the remainder of the book are created with MySQL Shell unless noted otherwise. To minimize the space used, the prompt has been replaced with just mysql> unless the language mode is important in which case the language mode is included, for example, mysql-py> for Python mode.
That concludes the discussion about tools for performance turning. Part IV covers schema considerations and the query optimizer with the next chapter discussing data types.