
Open source software for image processing and analysis: picture this with ImageJ
Abstract:
Image processing and analysis is fundamental to extract useful information from images. To achieve this end, open source image analysis software, exemplified by the Java application ImageJ, can be used very flexibility to create workflows and is open to customisation due to its open source architecture. ImageJ has a strong academic community with many macros, Java scripts and plug-ins available online, a help forum, regular updates and face to face conferences. Furthermore, running Java ensures that ImageJ is platform-independent so that executable code can be shared easily between researchers using different operating systems. Lastly, ImageJ can be integrated into workflows of other open source applications such as KNIME.
5.1 Introduction
Pablo Picasso's words ring true with imaging software in that all you get out is the answers to the questions you ask. Asking the right question is something the computer cannot do. Only with a scientist asking the right question coupled with a programmer who can translate that question into code does the computer become useful rather than useless!
In fact the computer becomes invaluable when performing imaging tasks in a non-subjective manner and at a speed that might take a human operator a lifetime to complete. Microprocessor performance has increased according to the predictions of Moore's law [1]. Around 20 years ago the desktop PC would have been stretched to perform image analysis on a 20 megapixel, 24 bit image, having just 32 MB RAM and a 25 MHz CPU. Today's PCs can cope with this high demand, having increased data-handling speeds, multicore processors in combination with GBs of RAM and clock speeds in the GHz range.
The aim of this chapter is to provide users with an introduction to the capabilities and potential applications of open source image processing tools, and to help find solutions to problems. The predecessor of ImageJ first appeared in the 1990s, when it was known as NIH image and was available to run under the Macintosh operating system. The author and collaborator Iain Couzin created a custom imaging suite of bespoke tools to address the challenging visual research questions, the software produced was known as ICBiovision [2]. Such a bespoke piece of software had some advantages in that it fully met the requirements for which it was designed. However, when an analysis outside the defined scope was required, there was no way to achieve this goal without the further effort of low-level coding – the software was not easily extensible.
In the 1990s, desktop PCs increased in power and digital camera specification followed a similar upwards curve. The need for, and utility of, image analysis as a way to non-subjectively and quantitatively assess many different biological questions therefore increased. The utility of ICbiovision made clear the potential for image analysis in many different scientific arenas and a new tool box was needed to provide imaging solutions. Another imaging software package utilised was Aphelion [3]. This piece of software provides the user with access to a large number of tools that could be threaded together into macros. One downside with Aphelion is that it is a commercial piece of software, with a restrictive licence. Also, the application was dependent on a particular operating system. As the company upgraded its operating system then Aphelion was left behind. There were many other pieces of commercial image analysis software available but these came shackled with licence fees. It was at this point that ImageJ was rediscovered, after its metamorphosis from NIH image, to an open source Java language program on the PC. Java enabled ImageJ to be platform-independent and its free distribution made it suitable to roll out as an imaging platform across a wide network of imaging enthusiasts without restrictive licensing issues.
5.2 ImageJ
ImageJ (J for Java) evolved from NIH image, was developed at the National Institutes of Health by Wayne Rasband [4] and has developed a large global following since being released in 1997. It was conceived with an open architecture that could be extended through Java scripts, plugins and recordable macros. Custom acquisition, analysis and processing can be created with ImageJ's built-in editor and Java compiler. ImageJ is platform-independent and only requires Java 5 or a later virtual machine. It can run on Microsoft Windows, Mac OS, Mac OS X and Linux, and its source code is freely available [4].
As ImageJ is open source, an ImageJ user has the four essential freedoms defined by Richard Stallman in 1986 [5]. First, the freedom to run the program, for any purpose. Second, the freedom to study how the program works, and change it to make it do what you wish. Third, the freedom to redistribute copies so you can help your neighbour. Lastly, the freedom to improve the program, and release your improvements to the public, so that the whole community benefits.
In addition to the many freely available macros, plug-ins and scripts, commercially available plug-ins have been developed for which a licence needs to be purchased. For example, Image-Pro Plus from Media Cybernetics is a commercially available ImageJ plug-in [6].
5.2.1 The many faces of ImageJ
The customisable nature of ImageJ has allowed users to design custom user interfaces, such as NeuronJ shown in Figure 5.1. Note that the menu titles remain the same but the bottoms can have custom icons that link to particular functionality imparted by linked scripts or macros.
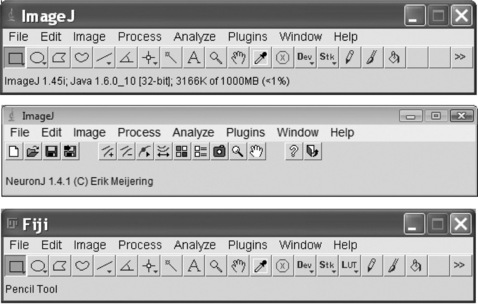
Figure 5.1 The many faces of ImageJ. The open source nature of ImageJ (native version shown top running on Windows Vista) allows for the main window to be fully customised to a particular function as has been done in the case of NeuronJ [7] (middle running on Windows XP) and for biological imaging Fiji (bottom running on Windows Vista)
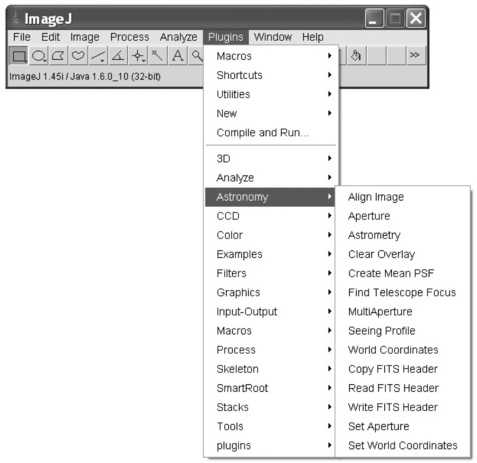
Alternatively, ImageJ can be customised by the production of custom folders in the plug-in menu, such as used for the astronomy plug-ins shown in Figure 5.2 [8].
5.2.2 Workflow
Before getting to grips to write a solution to an imaging problem in ImageJ, a clear workflow must be conceived incorporating any preprocessing of the images, the functions required, combining the functions into the programmable elements of ImageJ, internal calculations and finally the outputs. Once this has been clearly stated, a workflow within imageJ can be transcribed onto the plan and coding can begin. Customer input is invaluable to understand the exact nature of the input images and what the output should contain. Input images can be discrete image documents, such as lossless formats such as TIFFs, or more commonly the lossy formats such as JPGs, which are typical outputs from digital capture equipment. Alternatively, images can be in the form of an image sequence as in an AVI movie file, which can be read into ImageJ as a sequence of images. ImageJ can display multiple spatially or temporally related images in a single window. These image sets are called stacks and are often generated in biological imaging either by timelapse images or by Z stacks used in microscopy. The images that make up a stack are called slices. In stacks, a pixel (which represents 2D image data in a bitmap image) becomes a voxel (volumetric pixel), that is an intensity value on a regular grid in a 3D space. Furthermore, ImageJ can create and handle hyperstacks of images that are composed of multicolour channel images having multiple slices and frames.
The image itself may have data attached to it in the form of an EXIF data file and this too can be read by ImageJ and contains useful information for outputs such as the date the image was captured and many other image parameters. The image name may also contain useful information required in the output, which can be easily captured by ImageJ using the 'getTitle()' command. Images come in various bit depths from one bit binary to 24 bit colour. ImageJ can handle various bit depths but errors will occur if these images are processed by functions that require images at certain bit depths so it is important to appreciate this requirement. For example, the 'Analyse particles' function can only work on binary images in which objects have been segmented. As well as bit depth, the images can be of any physical pixel dimensions providing enough RAM has been allocated to ImageJ, which can be set in the menu Edit/Options/Memory and Threads. When running ImageJ under a 64 bit operating system, more RAM can be allocated than is possible with a 32 bit system. This is useful when working with large images or arrays of data. When opening large image sequences, the problem of running out of RAM memory can be averted by opening them in a virtual sequence. An alternative way of handling large sets of images is to handle images one at a time within a macro using the 'openNext' command.
The colour space of an image describes the gamut of colours and because human vision is based on trichromatic perception, most of the colour models use three values, others use more [9]. The colour models all form a 3D space where the colour components describe a location (i.e. colour) in that space. Images are opened as 24 bit images with 8 bits per red, green, blue (RGB) channel. In other words, each channel is assigned 8 bits per pixel, which is 256 possible shades of that colour channel. A colour space has to be described by a minimum of three different parameters and many different models exist. Within ImageJ it is possible to split an image up by either the RGB or hue, saturation, brightness (HSB) channels into a stack of three images.
The questions as to why you need to be able to work in different colour spaces and when is one more useful than another are often asked. The need to be able to do this becomes evident in particular imaging tasks where a particular parameter becomes critical to Segment your image. For example, when trying to separate yellow objects from purple objects using the RGB colour space this may result in a blurred segmentation; however, by switching to HSB and using the hue channel then objects of different colours can easily be segmented using this channel independently of their brightness or saturation. Besides 24 bit colour, ImageJ can also handle images with larger bit depths per pixel, for example 32 bit greyscale images. Look up tables (LUTs) can also be applied to 8 bit images to quickly make false colour images and ImageJ provides many LUT pallets of 256 colours ready to apply to 8 bit greyscale images. These can be particularly useful to apply to processed images to provide the user with a visual check of the numerical results.
In addition to opening and closing of images, the ImageJ macro language offers a good deal of file and folder handling to smooth your workflow. For example, result images, plots and data can be saved to particular locations and temporary images stored and then deleted at the end of the workflow. Making a plan of what you intend to do in terms of image processing on your images is the next important step in the workflow. It is a good working knowledge of all the ImageJ functions that allows the user to describe in his or her own words what they want to do and then translate this into the ImageJ commands. The macro language of ImageJ is focused in its functionality towards its core function of analysing images and is constantly being added to in new versions. Generally, macros containing these latest commands are not back compatible with older versions of ImageJ so using the ImageJ updater regularly is a good habit to get into. This command simply checks the web for a newer version and if found can download the update automatically and after a restart of ImageJ it will be running the latest release. To prevent older versions running macros that include functionality only available in later versions, a function call such as 'requires ("1.45e") can be added to the macro to prevent trying to run a macro using an outdated version. There are excellent guides available that give a full account of the ImageJ functions, some of these have links to examples of macros which use them and are included when downloading ImageJ. Further macro examples can be found on the ImageJ website [10] where, 300 + macros, 500 + plug-ins and 20 + scripts are available.
5.2.3 ImageJ community
ImageJ has a large following in academia and beyond due to its open source nature, being freely available for download and use without restriction. This has led to actual and virtual meetings of ImageJ users to share experience and, of course, knowhow, macros, scripts and more. Indeed, posting a request on how to do a task on the ImageJ forum often meets with a quick and successful response from within the community. Users can also search the archives to see if a question has already been answered [11]. This global network of ImageJ users is a great source of knowhow and advice to help get a novice user up and running. In addition to the ImageJ forum, the ImageJ web site hosts a large selection of macros that not only provide useful functionality but also demonstrate how the different ImageJ command functions work. It is beneficial to spend time becoming familiar with ImageJ, trawling through these macros to understand the capabilities these functions bring by example and how these could be applied to the users own imaging problems. The size of the ImageJ user community is so large that it even has its own conference series [12].
5.2.4 Programming ImageJ with macros, plug-ins and Javascript
There are several methods of coding within ImageJ, namely with macros, scripts and Javascript. Each has their own advantages and disadvantages, which are now discussed. Macros are simple programs and are the easiest way to automatically execute a series of ImageJ commands. The native ImageJ macro language is Java-like and contains a set of control structures, operators and built-in functions, and can be used to call built-in commands and other macros, which are saved simply as text files.
Plug-ins are much more powerful, flexible and faster than macros (most of ImageJ's built-in menu commands are actually plug-ins), but harder to write and debug. Plug-ins are written in the Java programming language (.java source files) and compiled to .class files.
Scripts within ImageJ use the Mozilla Rhino interpreter to run Javascripts. Similar to plug-ins, scripts have full access to all ImageJ and Java application programming interfaces (APIs) but do not need to be compiled (scripts and macros run interpretively). On the other hand, scripts lack the simplicity of the macro language and feel less integrated in ImageJ. They do provide a much richer language together with documentation and standardisation. Support for other languages is possible in ImageJ using Fiji and its powerful editor. Fiji adds extra support for the Java scripting and programming languages of BeanShell, Clojure, Python and Ruby. Several packages exist that allow ImageJ to interact with other applications/environments. R is a free software environment for statistical computing and graphics and RImageJ provides the linkage between the two software packages [13]. MATLAB is a commercial package and MIJ provides a bi-directional communication data exchange between MATLAB and ImageJ. MIJ also allows MATLAB to access all built-in functions of ImageJ as well as third-party ImageJ plug-ins. Fiji features MIJ, which makes it even more convenient to use the libraries and functions provided by Fiji's components from within MATLAB.
A couple of disadvantages exist in that scripts cannot access most of the ImageJ built-in macro functions and also they do not support 'batch mode'. Batch mode is a function within the macro language and is used to effectively speed up ImageJ processing times by turning off the image display allowing the macro to run up to 20 times faster.
An example of an executable Javascript is SmartRoot [14], an ImageJ plug-in that is a semi-automated image analysis software which streamlines the quantification of root growth and architecture for complex root systems measuring parameters such as root angle, area, branching, growth, length, topology and volume. Because this is a Javascript plug-in, the greater flexibility in software expression is evident over the macro language with a tailored graphical user interface (Figure 5.3). Furthermore, SmartRoot is an operating system-independent freeware based on ImageJ and uses cross-platform standards (XML, SQL, Java) for communication with a database and data analysis software.
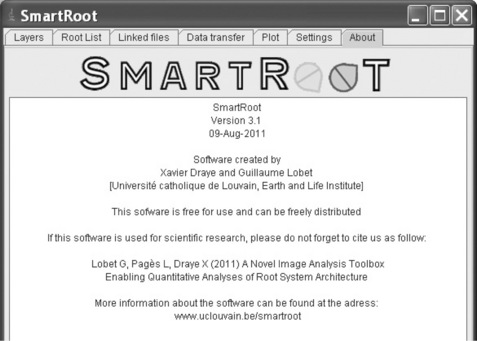
Figure 5.3 Smartroot displays a graphical user interface that only Javascript can deliver within ImageJ
ImageJ can also be a node in integration, processing, analysis and exploration platforms such as KNIME (Konstanz Information Miner (see Chapter 6)) [15], which is a user-friendly and comprehensive open source workflow software toolkit. This is an attractive proposition for ImageJ users who effectively take images and extract the useful data from them into a results table. Although a certain amount of calculations and graphs can be plotted within ImageJ, a specialist package to interrogate and visualise large data sets that can directly interface with ImageJ is welcome. In addition to ImageJ functionality, KNIME can also run ImageJ macros to make a node in a large data workflow, which is shown in Figure 5.4.
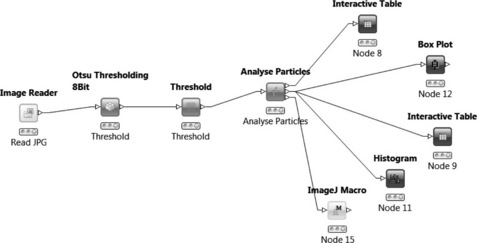
Figure 5.4 A KNIME workflow that integrates ImageJ functions in nodes as well as custom macros and the outputted data can be taken on by nodes to display the data in sophisticated plots or interactive tables
The use of quick response (QR) codes is ever increasing due to their popularity among mobile phone users who take an image of the code which, say, encodes a URL, which can then be used to direct the user to a web site (Figure 5.5). QR codes can be generated online [16], and, if placed in an image, then there is a Java plug-in available for ImageJ that can read the codes and this information can then be used to rename the image or used in a results table, for example [17].

Figure 5.5 Example of a QR code that can be read by a plug-in based on ZXing (pronounced 'zebra crossing'), an open source, multiformat 1D/2D barcode image processing library implemented in Java for ImageJ, which will decipher this QR code as 'Open source software for image processing: Picture this with ImageJ'
5.3 ImageJ macros: an overview
The most basic form of macro creation is to simply use the ImageJ recorder to record actions, and then use the write macro function to output to a text file. This can then be saved. It is important that the suffix '.txt' is applied, otherwise ImageJ will not recognise the file as a text file which contains a macro. To install a recorded macro, the plug-ins menu has the ability to install it under plug-ins/macros/install, after which it will appear in the plug-ins/macros menu. However, a far easier method to access macros is to make a new subfolder in the ImageJ plug-ins folder and place personal macros there, as earlier shown for the astronomy plug-ins. It is important that the macro name contains an underscore for ImageJ to recognise it and for it to appear in the plug-ins menu. Alternatively, macros can be assigned to buttons on the menu bar and, of course, being an open source piece of software even a custom icon can be applied to the button! It is in this fashion that the ImageJ interface can be customised such as in the case of NeuronJ, for example, as shown in Figure 5.1. This makes it a much more intuitive environment with which users can interact.
The Java-like macro language within ImageJ has function commands as a cornerstone, but much more is required to put some cement between these stones to define the workflow from start to finish, and make it interactive with the user where necessary. Inputs from the user can be captured and assigned as variables to create a semi-automatic macro, whereas a fully automatic macro needs no input other than an open image, for example.
5.3.1 Macro language in ImageJ
The macro language used by ImageJ is much like Java, so some knowledge of similar languages will help get a user up and running. There are some basic elements within the language, which are now discussed, which can be blended together to provide a sophisticated and fairly rich functionality dedicated to image processing.
Variables
Variables can be assigned within a macro which are case-sensitive. For example, counter = 0, where 'counter' is the variable and 0 is its initial value. Variable names must not contain only numbers or any spaces. Variable values can also be strings, for example, day = 'Tuesday', in this example the value is not a number so must be encased in speech marks. Without speech marks ImageJ would assume that 'Tuesday' was already a variable and if it has not been defined an error message would ensue! Alphanumeric strings can be constructed in ImageJ as in the following example.
In this case, the variable 'date' is built from a string containing other variables. When such a macro is run, the result is printed in the log window as the 'print' command is used. However, the variable can be used for many other functions such as giving a file a name or appearing in a custom results table. Note in this example it is a true macro and each line is followed by a semi colon to evaluate this statement. Comments are an important part of writing a macro to help users understand what the code is doing and are denoted using '//', whereby the macro language will ignore any following code in that line. It is good practice to have as many comments as there is code in a macro, which helps when it comes to debugging!
For loops
For loops are a long-established programming statement, having been available in the late 1970s with the Basic language on the Commodore PET, enabling much more compact code. They are as invaluable now in ImageJ as they were back then and are more often than not the main driving element of macros. ImageJ does not offer the luxury of 2D arrays that may negate for loops, so they are an essential way of either running through images within a folder, or pixels within an image, for example. Indeed, to run through every pixel in an image, then a for loop nested within a for loop may be required to scan through every pixel in the x direction first, before starting scanning through a new y row of pixels. Multidimensional arrays can, however, be implemented in ImageJ using Java coding by the more experienced programmer. Additionally, another take on the for loop can be executed using a 'do . . . while' loop.
Arrays
Arrays are essentially sequences of numbers or alphanumeric values, which can be defined up front or captured by the macro to later be used as output. When they are numeric they can be processed by ImageJ, for example they can be sorted. An example of an array within a for loop is:
Arrays are particularly useful to capture long strings of data coming from a macro, which can be stored in a results table on which further analysis can be performed. Arrays may also be used to input pixel values from an image, which can then be modified and the new array saved back as an image. There are built-in functions within ImageJ to handle arrays, such as to trim, sort and invert them as well as output statistics. When used in collaboration with for loops to populate and read them, they provide an alternative to using the central results table used by ImageJ to output measured parameters. This is useful when it is inconvenient to clear the results table to make way for a new set of measurements. Arrays can be large in size and are only limited by the RAM allocation to ImageJ.
Results and custom tables
ImageJ delivers all measured results into a central results table. In addition to ImageJ adding results to the table, the user can also add columns and rows of results with the 'setResults' command. These can be new results or calculations. However, in macros the user often wants to capture many different sets of results throughout the macro by clearing the results table. To bring all the results back together, several options exist. First, copies of the results table can be made with the 'IJ.renameResults(name)' function, which can be saved out to compile with others in a different application such as Microsoft Excel. Second, all results can be saved in a single 1D array, which can be read back into the results table using the 'setResults' command using offset for loops to turn the 1D array back into a 2D array of rows and columns.
Other elements in ImageJ macro language
Lastly, the conditional statements of 'if' and 'else' are implemented within ImageJ to provide a dichotomous selection of which piece of code to execute.
The statements in ImageJ are supported by standard Java boolean operators, but with fewer precedence levels. Care must taken to use these correctly, for example ' = ' is used to assign a value to a variable and '==' is used as an operator to check if variables are equal.
The macro language can also call on plug-ins that are installed within the plug-in folder. This allows the user to blend bespoke code and discrete functionality of a plug-in within the workflow. The syntax to call on a plug-in is straightforward using the run command shown below, which in this case calls on a plug-in called 'colour transformer' and provides an input variable for the plug-in, in this case the colour space to convert to.
5.4 Graphical user interface
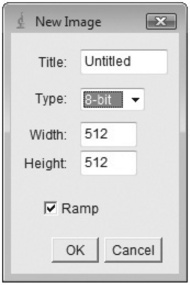
The main tool and menu bar in ImageJ (Figure 5.1) allows the user to interact with all the functionality and tools, and, in addition, to access links to service ImageJ such as updates and help, and to get started with macros and Javascript. The macro language allows the display of splash screens, input boxes and dialog boxes. If more complex GUIs are needed, then this requires involvement of Javascripts as in the example of SmartRoot (Figure 5.3). The following macro is given as an example of a macro that comes ready installed with ImageJ to demonstrate dialog boxes and how to use them to capture user information that can then be subsequently used by the macro.
When executed, this macro provides the following GUI, which incorporates free text fields, drop-down options and tick boxes with options to confirm these or cancel the macro (Figure 5.6).
5.5 Industrial applications of image analysis
In the field of plant sciences, image analysis provides a way to non-subjectively measure many parameters specific to plants. Two examples are discussed here that have different objectives and associated challenges, to phenotype seeds and whole plants. The phenotype is the physical appearance of the plant and is linked both to its genome and environment, so measuring its parameters accurately is a core competency within plant sciences. Before image processing or analysis can be done, the image has first to be captured consistently and this is as important as the subsequent in silico steps.
The first example used a flat bed scanner, which gave the advantage of consistent lighting across the field of view, and a known image scale often expressed in dots per inch (DPI). The disadvantage of using the scanner is that only small or 2D subjects are suitable for scanning. The starting and fully processed and analysed image is shown in Figure 5.7.
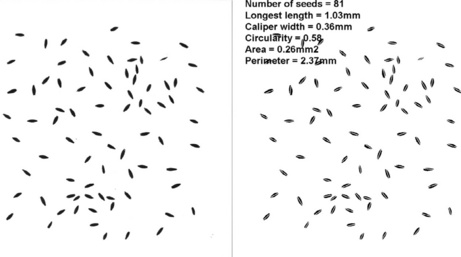
Figure 5.7 Imaging of seeds using a flat bed scanner (left-hand side). Image analysis can be used to measure many morphological features of the seeds and return the mean scores of longest length (shown on the false colour image of the seeds as a white line in the right-hand side), calliper width, circularity (in which a value of 1 is a perfect circle and values are from 0–1), area and, finally, perimeter
When imaging at industrial scales, automation is crucial so the macro written within ImageJ was fully automatic and only had to be directed towards the folder of starting images. Using the control structures of for loops, if and else statements and arrays together with the ImageJ commands and macro functions, a creative workflow was built to fully automate image analysis tasks. Output was in the form of a comma delimited text file, which can be further manipulated in applications such as Microsoft Excel. The output of false colour images of the seeds showed exactly which objects were classified as seeds, with a white line drawn on them that represented the feret distance (also known as the maximum calliper), which was the longest dimension of the seed.
The next example is a type of analysis which is challenging to the human observer, and measures both colour and sizes. Plant leaves can take on a variety of hues and the goal was to classify them into different categories. Furthermore, the plant spread, represented by measuring the convex hull, was also needed. The starting image and the processed and analysed image are shown in Figure 5.8.
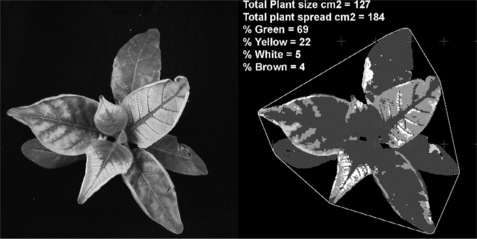
Figure 5.8 Plant phenotyping to non-subjectively quantify the areas of different colour classifications. The starting image is shown on the left-hand side and the segmented plant in classified false colour is shown on the right-hand side (converted here to a greyscale image). Note that the convex hull area to measure plant spread is shown surrounding the plant. False colour images are as important as the actual text results as they demonstrate to the user that the parameters have been measured correctly
The starting point to achieve accurate measurement of parameters is capturing consistent images in terms of lighting, focus, exposure and quality. Setting a digital SLR camera to full manual settings ensures a consistent focus, exposure and quality. The lighting is crucial, and consistency in this department is made by the use of grey cards and colour checking cards, such as those made by xrite (http://www.xrite.com). During imaging, inclusion of a QR code could be made to automatically assign the results in the image against a treatment identifier.
As with the seed images, automation is key within industry and in this case a semi-automatic approach is taken as the image scale was undefined. The user must first ascribe this to the images either by using a calibration object in the image of a known size, to allow a fully automatic solution (it could be the QR code for example), or by drawing a line of a known length just once if all images are to the same scale. Once this has been completed, the ImageJ macro is pointed at a folder hosting all the images, which are then automatically processed into false colour images and a results table produced. Importantly, false colour images can be used to allow the user to check that the parameters have been measured correctly, and to check whether any erroneous results may have been recorded. A key advantage of image analysis is that the original images are stored and can be reprocessed should novel parameters be identified that need to be subsequently measured. In this example, plants could also be imaged at different wavelengths, for example using infrared to examine water content, or using a laser scanner to generate 3D information. This information can be used in conjunction to allow a multiparameterisation of plant features to measure phenotype.
5.6 Summary
ImageJ is a freely distributed, open source solution for image analysis, which affords the user many different levels of interaction ranging from performing simple tasks from the menus through to high levels of automation by its in-built macro language, plug-ins and Javascripts. It benefits greatly from the large number of users in a global community that comes together virtually online in forums and in reality at conferences, which leads to its continual development, support and new version releases.
From a user and company perspective, ImageJ offers some unique characteristics associated with open source software. First, its free distribution means that everyone in a 20 000 + organisation can potentially run it on their PC without licensing issues. Second, it is platform-independent so that macros and plug-ins can be shared easily between researchers using different operating systems. Third, it is robust to use and the author has encountered few error messages apart from the unintentional ones in your own code (!) and running out of memory when trying to open too many images at once! Lastly, the way ImageJ integrates with other open sources packages to provide seamless workflows allows much flexibility to extract the useful data from your images, which is the very essence of image analysis.
5.7 References
[1] Moore, G.E. Cramming more components onto integrated circuits. Electronics. 1965; 38:8.
[2] ICBiovision (http://icouzin.princeton.edu/).
[3] Aphelion (http://www.adcis.net).
[4] Rasband, W.S., ImageJ. U. S. National Institutes of Health, Bethesda, Maryland, USA, 1997–2011. http://imagej.nih.gov/ij/
[5] Free software definition http://www.gnu.org/philosophy/free-sw.html.
[6] Media cybernetics. http://www.mediacy.com.
[7] http://www.imagescience.org/meijering/software/neuronj/.
[8] http://www.astro.physik.uni-goettingen.de/ hessman/ImageJ/Book/ The%20Astronomy%20Plugin%20Tools/index.html#intro.
[9] Colour Models http://en.wikipedia.org/wiki/Colour_models.
[10] ImageJ Macro functions http://rsb.info.nih.gov/ij/developer/macro/functions.html.
[11] ImageJ interest group https://list.nih.gov/cgi-bin/wa.exe?A0=IMAGEJ.
[12] ImageJ user and developer conference http://imagejconf.tudor.lu/archive/imagej-user-and-developer-conference-2010.
[13] ImageJ package for R http://cran.r-project.org/web/packages/RImageJ/RImageJ.pdf.
[14] Draye, X., Yangmin, K., Lobet, G., Javaux, M. Model-assisted integration of physiological and environmental constraints affecting the dynamic and spatial patterns of root water uptake from soils. Journal of Experimental Botany. 2010; 61(8):2145–2155.
[15] KNIME workflow tool http://www.knime.org/.
[16] Online QR code generator http://qrcode.kaywa.com/.
[17] QR code usage example http://elliottslaughter.com/2011/07/qr-decoder-imagej.