
Sometimes a webpage can be very chaotic, especially when there are many items on the screen. In that case, it may be a good idea to group items into logical sections. The sections can be displayed separately to save room for the rest of the items. We will make a webpage where the user can edit the user profile. This user profile will be divided into three categories: person, communication, and favorites. The user will be able to click on a button just to see only the category the user is interested in.
We will use the table APP_USER_PROFILES, so make sure this table exists and is accessible.
First, make a form based on a table:
- Click the Create page button.
- Select Form.
- Select Form on a table or view.
- Select the table/view owner and click Next.
- Enter the name of the table. You can use the button next to the field to select the table. Click Next.
- Enter a page name, for example, User profile.
- Enter a region title, for example, user.
- In the region template list box, select APEX 4.0 Reports region. Click Next.
- Select Do not use tabs and click Next.
- Select the primary key column of the table. In this case it is named ID. Click Next.
- Select Exisiting trigger and click Next.
- Select All columns and click Next.
- In the next step, you can enter different names for the button labels. Click Next.
- Enter the page numbers APEX should navigate to after the user has clicked the cancel or create button. For example, you can enter page 1 for the cancel button, which means that APEX returns to page 1 if the user clicks on the cancel button. Click Next to continue.
- Click Finish to confirm.
The page is now ready but we will now split the various items into three categories.
- Click the Edit icon.
- Create a new region (click the Add icon in the region section).
- Select HTML.
- In the type of region, select HTML.
- Enter a title for the region. We will call this region Person.
- In the region template list box, select APEX 4.0 Region without title. Click the Create button.
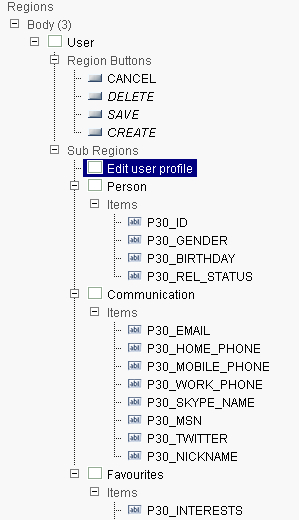
- Repeat the steps two more times: one for the Communication and one for the Favourites. In the end, you should have four regions: User, Person, Communication, and Favourites.
- Make sure you switch to tree view.
- Drag the items ID, gender, birthday, and rel_status to the Person region.
- Drag the items email, home_phone, mobile_phone, work_phone, Skype_name, msn, twitter, and nickname to the Communications region.
- Drag the items Interests, favourite_music, favourite_movies, and favourite_books to the Favourites region.
Now we have three regions with items from the APP_USER_PROFILES table. It will look like the following:
In order to create a region selector, we will have to indicate that the regions can be selected by the region selector.
- In the regions section, click on the edit region link for the Person region.
- In the attributes section, select Yes in the Region display selector.
- Click the Apply changes button.
- Apply the same for the Communication and the Favorites regions.
The last step is to create a region selector.
- In the regions section, click the Add icon to create a new region.
- Select Region display selector.
- Enter a name for the region title, for example, Edit user profile.
- Click the Create button.
The region display selector is now ready but we will include the region in the User region so that it looks like this all is part of one region:
- Click the Region display selector region in the regions section.
- In the user interface section, select the User region in the Parent region list box.
- Click the Apply changes button.
Now we will do the same for the three other regions:
- Click the Person region in the regions section.
- In the user interface section, select the user region in the Parent region list box.
- In the template list box, select APEX 4.0 Region without title.
- Click the Apply changes button.
- Repeat this step for the other regions: Communication and Favorites.
- The page is ready now. Run the page and try it out.
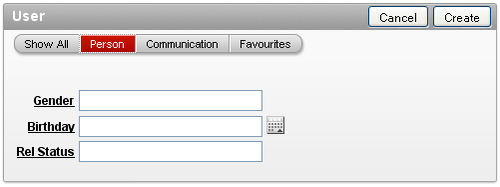
The region display selector is actually an unnumbered list. This list contains list items and each list item has a reference to a region. In HTML, this looks like the following:
<ul id="96054411561206575_RDS" class="apex-rds">
<li class="apex-rds-first apex-rds-selected"><a href="#SHOW_ALL"><span>Show All</span></a></li>
<li><a href="#R96048122465171863"><span>Person</span></a></li>
<li><a href="#R96048531469174507"><span>Communication</span></a></li>
<li class="apex-rds-last"><a href="#R96050120519180839"><span>Favourites</span></a></li>
</ul>
The<a> tag has a reference to a region. The regions are actually divs with an ID. You can find the ID's in the code behind the hash ("#") sign. You can assign your own ID by entering your own ID in the static ID text field in the attributes section of the region. In that case, you would have seen something like this:
<li><a href="#person"><span>Person</span></a></li>
You can also see the<span> tag. A div and a span are almost identical, with the difference that a div applies to a section of a document of the page and a span applies to the inline text but keeps the formatting of the outside text. That is the default behavior but this can be changed by the use of cascading style sheets.
Furthermore, you saw that the three regions with items have the region without title template. This is done because otherwise you would have seen the entire region including the title, which is too much information in this little space.
The three regions with items and the region display selector all have the same parent: the User region. This is not necessary. You can also display them as separate regions.