
Over the years, quite a few applications have offered both PC and Mac users the ability to paint and draw — using their mouse, or in more recent years, a pen and tablet. Most of these applications have faded into obscurity, and for good reason. Frankly, there isn't that much painting going on, and the tools for manipulating the brush tools are either skimpy or hard to work with.
Of course, Photoshop's great painting tools and the plentiful options for completely customizing them have helped nail the coffins shut for many of these alleged painting programs. While Photoshop was originally designed to be (and remains) an image-editing program, it has always had painting tools, and it turned out that most people wanted to edit images rather than paint them from scratch. Of course, you can in fact paint or draw an image from scratch in Photoshop, but strangely, scores of the artistically challenged who would rate themselves unable to draw a stick figure with pencil and paper become quite adventurous with a computerized painting program. Professional photographers and graphic artists are among Photoshop's painting tool fans, too — for the tools' ability to add and change image content on a large or small scale.
As for Photoshop CS3, the tradition of great painting tools continues, with improved access to brush options, two new brush modes, and for those of you who've used Photoshop before, all the great core painting features, right where you left them. If you're new to Photoshop, get ready to unleash your inner artiste.
Photoshop provides two basic varieties of brush tools. There are paint tools, which allow you to apply colors to an image, and there are edit tools, which modify existing colors in an image. Both types of tools work the same way — you activate the tool and drag your cursor within the image window, much like you drag a brush across a canvas or a sheet of paper.
Now, don't think that these tools require any sort of artistic ability, because they don't. If you can drag a mouse or a tablet's pen, you can paint and edit with Photoshop. The tools are designed to cater to users of all levels, and they provide simple ways to apply straight, curved, and free-form strokes to an image as well as more complex tool options that make it possible for true visionaries with great eye-hand coordination to create serious works of art.
So what are these tools? Photoshop CS3 provides the big two that you'll find in any fledgling or accomplished artist's studio: the Brush and the Pencil. You also get seven editing tools: Blur, Sharpen, Smudge, Dodge, Burn, Sponge, and — housed with the Brush and Pencil — Color Replacement, which debuted with Photoshop CS2. Figure 5.1 shows all the tools along with the keyboard shortcuts for selecting them.
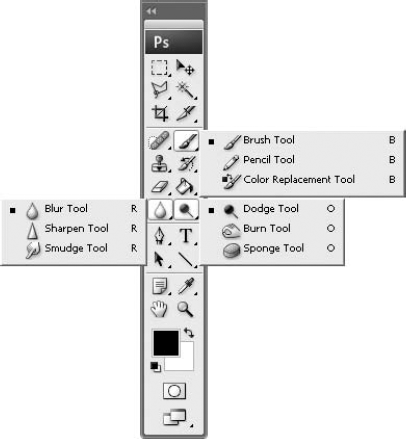
Figure 5.1. Sharing three spots in the Toolbox, you find all nine of Photoshop's painting and editing tools.
You'll know when a button in the Toolbox represents multiple tools — a small triangle appears in the lower-right corner of the button. When you see that triangle, you can click and hold the button to display a flyout menu of tools (refer to Figure 5.1). Of course, unlike that illustration, you can't activate three different tools and show their flyout menus simultaneously — you can activate only one button (and its flyout menu) at a time.
Tip
Did you know the Eraser tool offers nearly all the same tool options and settings that the Brush does? That's right. You can select from the same brush presets and apply the same brush dynamics to the Eraser that you can with the Brush. Of course, the Eraser removes content from your image rather than applying it, but because it works just like the Brush in so many ways, many people consider it a painting and editing tool. You'll find out more about the Eraser's other features in Chapter 9, and you can get to know more about the basic Eraser in Chapter 2.
To activate any tool, you can select it from the Toolbox and click it in the flyout menu, or you can skip using your mouse entirely and just press the keyboard shortcut. When more than one tool shares a single shortcut, you can simply press Shift along with the shortcut key (B, for example, to select the Brush or Pencil) and the tool you want appears in the Toolbox and on the Options bar at the top of the workspace. If you want to avoid having to press two keys, you can deselect the Use Shift Key for Tool Switch option in the General Preferences dialog box, and then all you have to do is keep pressing the single keyboard shortcut key to cycle through the tools associated with that key until the tool you want is selected.
The paint tools apply strokes of color. In most cases, you'll be painting with the foreground color, though you also can create multicolored brushstrokes using the Color Dynamics options in the Brushes palette, as you'll see later. Here's how the paint tools work:
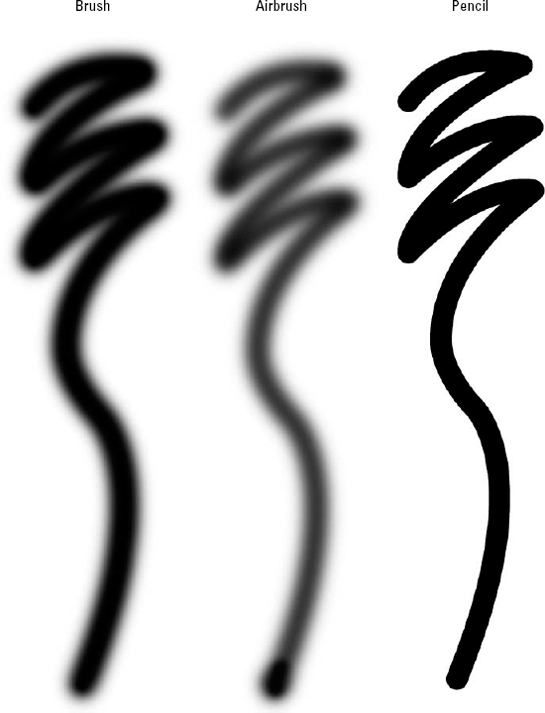
Brush: This tool paints a line of any thickness that you specify, using the Options bar or the Brushes palette. You can make the line sharp or blurry, but it's always slightly soft — that is to say, the edges of the brushstroke blend to some extent with the background. Known as anti-aliasing, this softness produces halftone dots when printing, ensuring smooth transitions between a brushstroke and its surroundings. If the stroke doesn't look soft to you when you make it, try zooming in a bit — you'll see those smooth transitions, even on lines that look quite crisp at lower-level magnification.
Normally, the Brush tool applies a continuous stream of color and stops applying paint whenever you stop dragging. However, if you activate the Airbrush function by clicking the Airbrush icon next to the Flow setting in the Options bar, the color continues to build as long as you press the mouse button, even when holding the cursor in a stationary position. This pooling of paint, shown in Figure 5.2, is the most obvious impact of the airbrush option. Also shown in this figure are similar strokes made with a hard and a soft brush of the same dimension.
Pencil: Like the Brush tool, the Pencil paints a line of any thickness, in the current foreground color. However, whereas Brush tool lines are always soft, Pencil lines are always hard edged, with no interaction between the Pencil line and background colors. At high resolutions, Pencil lines appear sharp. At low resolutions, Pencil lines have jagged edges. Again, zooming in on your pencil strokes helps you see this if it's not obvious at your current zoom.
When you select the Pencil tool, a unique check box, Auto Erase, appears in the Options bar. When selected, this option instructs Photoshop to paint with the background color — thereby erasing — whenever you begin painting on an area already colored with the foreground color.
Tip
As when painting in real life, one of the keys to painting in Photoshop is choosing the color you'll apply with your brush. The Colors palette is handy and is certainly more convenient than opening the Color Picker to change colors, but if you need color quickly, and see it there in front of you, try the Eyedropper. The Eyedropper lets you sample (and simultaneously select as your Foreground color) any color in any open Photoshop image window, the Color palette, or the Swatches palette, and if you're on a Mac, anywhere on the desktop or the visible areas of any other running application. To activate the Eyedropper, click it in the Toolbox, press the letter I, or if you're using the Brush or Pencil, just press the Alt key (Option key on the Mac) and then click the color you want to sample. You'll know you've activated the Eyedropper because your mouse pointer changes to an actual dropper icon, waiting to sip up some color from anywhere onscreen.
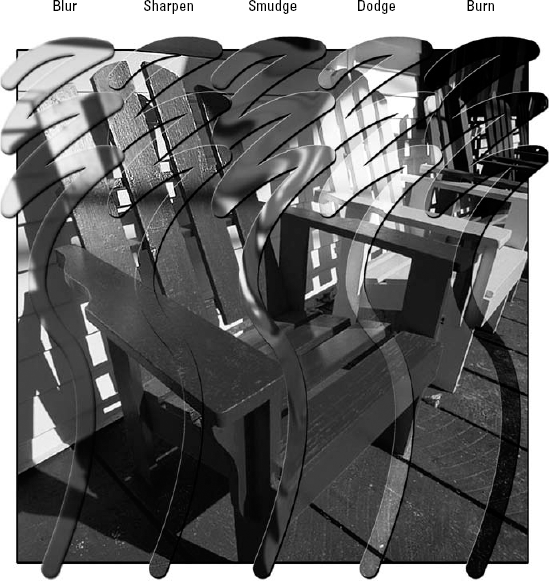
Rather than applying color, the edit tools influence existing colors in an image. Figure 5.3 shows the effect of dragging with each of the edit tools, except the Sponge and Color Replacement tools, both of which work best with color images (and whose effects would therefore be lost in a black and white image here). Future sections cover these tools in more detail, but here's a brief introduction:
Blur: The first of the two focus tools, the Blur tool blurs an image by reducing the amount of color contrast between neighboring pixels.
Sharpen: The second focus tool selectively sharpens by increasing the contrast between neighboring pixels.
Smudge: The Smudge tool smears colors in an image. The effect is rather like dragging your finger across wet paint. Although simple, this tool can be effective for smoothing out colors and textures. See the section "Painting with the Smudge tool" for more information.
Dodge: The first of three toning tools, the Dodge tool lets you lighten a portion of an image by dragging across it. Named after a traditional darkroom technique, the Dodge tool is supposed to look like a little paddle. Before computers, a technician would wave such a paddle (or anything, really) over photographic paper to prevent light from hitting the paper, thereby leaving areas less exposed.
Burn: The Burn tool is the Dodge tool's opposite, darkening an area as you drag over it. Again referencing old darkroom techniques, technicians would create a mask over the developing print, using their hands or a piece of paper with a hole cut in it. The mask would protect areas of photographic paper that had already been exposed and darken the area inside the hole. Photoshop's metaphor for this is found in the Burn tool's button, which depicts a hand in the shape of an O.
Sponge: The Sponge tool has two modes — Saturate and Desaturate. In Desaturate mode, the Sponge tool robs an image of color when working inside a color image, or contrast when working in grayscale. If you switch to Saturate mode, the Sponge tool adds more color (in color images), or contrast in grayscale images.
Color Replacement: At its most basic level, the Color Replacement tool provides a great way to get rid of any color in favor of a preferred shade. Through the tool's Options bar, you can pick which color goes and which color replaces it. The intricacies of the tool's use are covered in detail later.
Tip
Some tools are often used together — not at the same time, of course, but you'll find yourself hopping from one to the other and wishing you could do so more quickly. The Sharpen and Blur tools are an example of this, because you often need to soften one area and add more focus to another, all in the same image. To access the Sharpen tool temporarily when the Blur tool is selected, press and hold Alt or Option while using the tool. The Sharpen tool remains available only as long as you press Alt (Option on the Mac). Likewise, you can press Alt (Option on the Mac) to access the Blur tool when the Sharpen tool is selected. You can use the same Alt/Option technique with other likely pairs such as the Dodge and Burn tools.
Even if you're one of the people who think they can't draw at all (and I'd argue with you, because most people can draw much better than they think), Photoshop makes it possible for anyone to paint and draw. In this section, we hope you'll feel freed to unleash your creativity and let that artist within you loose — with Photoshop's painting and editing tools as the means to that end. Don't say that "I can't even draw stick figures!" line — you have no idea what you can do until you try.
Let's start with the most basic of drawing skills, the straight line. With the Brush and Pencil tools, drawing straight lines is easy, because all you need is the tool (either one) and the Shift key. Pressing Shift while you drag the tool keeps the line straight and eliminates the little bumps and detours that occur when you try to create a freehand straight line. You can use the same technique with the Blur, Sharpen, Smudge, Dodge, and Burn tools, applying their editing effects in a straight line as you click and/or drag your mouse.
Tip
If you find the Shift key technique to be too limiting, Photoshop also provides a Line tool (one of the Shape tool variants) that lets you draw straight lines. This surprisingly flexible tool permits you to draw vector-based layers or pixel-based lines, and you can even add arrowheads.
Note
The Line tool and others like it are explained in greater detail in Chapter 15.
To get started, try this Shift technique with the Brush and Pencil tools. First, using the Brush tool, click at one point in your image, and then press Shift and click at another point. Photoshop connects the start and endpoints with a straight stroke of paint. Try it again with the Pencil tool, and enhance your experiments by trying different Brush and Pencil presets to see the results. You also can create free-form polygons by continuing to Shift-click with the Brush or Pencil tool, creating a series of straight lines as shown in Figure 5.4. Figure 5.4 shows effects created by Shift-clicking with the Brush tool. Note that different brush sizes were used throughout the image and that at no point did I drag the mouse — every line shown was created by Shift-clicking with the Brush tool and then made more visually interesting with blending modes.
Note
For more information on blending modes, see Chapter 14.
To create a line that runs parallel to either the top, bottom, or sides of your image — that is, a line that is either vertical or horizontal — with any of the paint or edit tools, Shift-drag with the tool. Unlike the click and click again method just discussed, which allows a straight line to be drawn at any angle, dragging with the Shift key allows you to draw a line of any length you want, running either horizontally or vertically — and that's it.
Of course, releasing the Shift key returns the line to free form, as illustrated in Figure 5.5, which shows a mix of straight, perpendicular, and free-form lines. For example, I started by pressing Shift to draw a vertical line — the spinal column. Then I moved the cursor out to where I wanted the first rib to end and released the Shift key to make the line hop out to that point. After that, I released the Shift key and the mouse so as not to draw anything, and returned the cursor to the spinal column — just a little further down from where the rib originally began. Then I Shift-clicked with the mouse to snap a slightly diagonal line back to the spinal column from the last point I drew anything. This gives a triangular appearance to the ribs.
After I finished the first side, I simply duplicated the layer, flipped it, and repositioned it to get the other side. The rest of the bones were accomplished using the Shift-click technique, and I freehanded the skull.
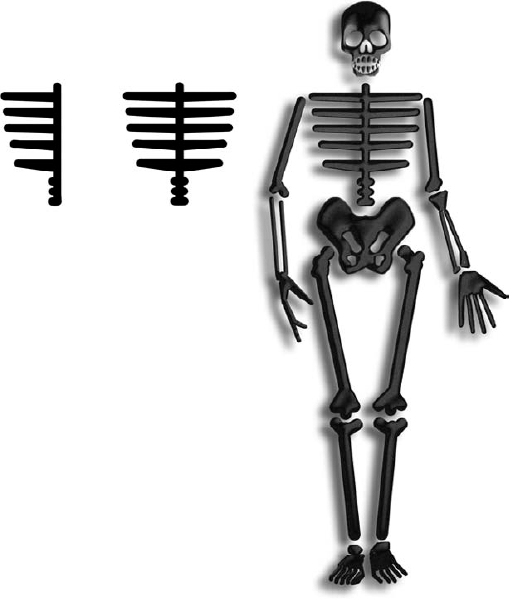
Figure 5.5. Periodically pressing and releasing the Shift key allowed me to define the ribs of my thin little friend.
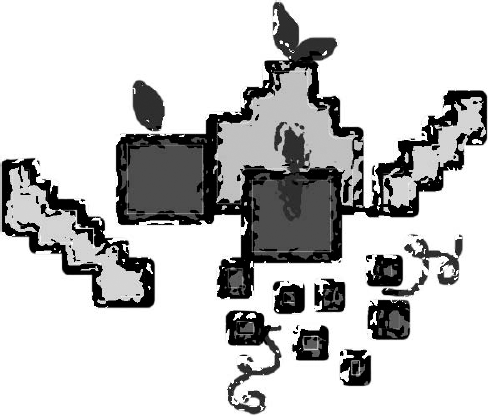
Remember one thing, however, as you create serial straight lines: When you press Shift to create a subsequent straight line, instead of a line going in the direction you want, you get a diagonal line connecting your last straight line with the starting point of your next one. You can avoid this by clicking once without the Shift key before clicking with the Shift key to make the next straight line. As long as you don't move the mouse on the non-Shift-accompanied click, the technique does not reveal itself in your resulting image. Photoshop's further tendency to snap to creating perpendicular lines is another potential problem, but you can use this to your advantage. For example, to create the lines shown in Figure 5.6, I dragged from right to left with the brush tool. I painted by intermittently pressing and releasing Shift as I dragged. In each case, pressing Shift snapped the line to the horizontal axis, the location of which was established by the beginning of the drag. After drawing the lines, I applied fill colors and then used the Watercolor filter to create a more visually interesting effect for this stylized still life.
Note
You can read more about applying fills in Chapter 6 and about Filters in Chapters 10, 11, and 12.
Many first-time Photoshop artists misuse the Smudge tool to soften color transitions, which is actually the purpose of the Blur tool. That's not to say that every tool in the Photoshop Toolbox has specific jobs and should never be used in new and different ways — feel free to experiment with non-traditional methods at any time. However, you should know that the Smudge tool is designed to smear colors by shoving them into each other. The process bears more resemblance to finger painting than to any traditional photographic-editing technique, especially if you have the tool set to a high Strength setting. At a low Strength, you can get subtle effects that may well allow you to do a little blending between areas of your image, especially if you zoom in tight on the area in question.
Returning to traditional use of the Smudge tool, in Photoshop, the performance of the Smudge tool depends in part on the settings of the Strength and Finger Painting controls in the Options bar. Here's what you need to know about these options:
Strength: The Smudge tool works by stamping the image hundreds of times throughout the length of a brushstroke. The effect is that the color appears to get pushed across the length of the stroke. The Strength value determines the intensity of each stamping, so higher values push colors the farthest. A Strength setting of 100 percent equates to infinity, meaning the Smudge tool pushes a color from the beginning of your drag until you release your mouse button. Figure 5.7 shows three examples.
Finger Painting: In the distant Photoshop past, the people at Adobe called this effect dipping, which may accurately express the results of this option. When you select this option, the Smudge tool begins by applying a very small amount of the current foreground color, which it eventually blends in with the colors in the image. It's as if you dipped your finger in a color and then dragged it through an oil painting. Use the Strength setting to specify the amount of foreground color applied. If you turn on Finger Painting and set the Strength to 100 percent, the smudge tool behaves like the Brush tool. Figure 5.8 shows examples of Finger Painting with the Smudge tool when the foreground color is set to white.
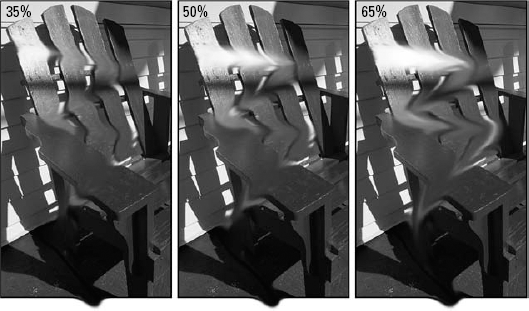
Figure 5.8. This figure shows the same three drags pictured in Figure 5.7, but this time with the Finger Painting option turned on and the foreground color set to white.
Tip
You can reverse the Finger Painting setting by pressing Alt (Option on the Mac) and dragging. If the option is off, Alt-dragging dips the tool into the foreground color. If Finger Painting is turned on, Alt-dragging smudges normally.
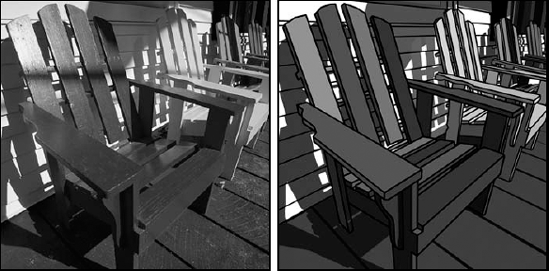
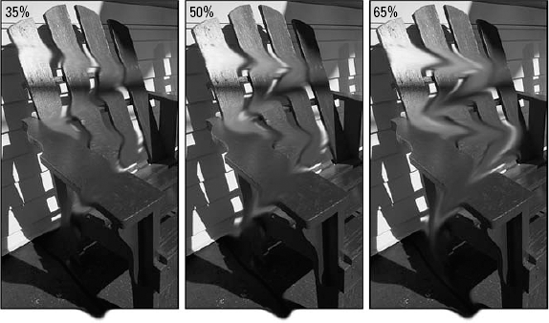
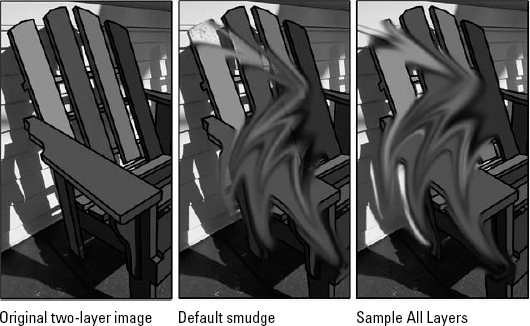
Sample All Layers: Selecting this option on the Options bar instructs the Smudge tool to grab colors in all visible layers and smudge them into the current layer. Whether the option is on or off, only the current layer is affected; the background and other layers remain intact. Figure 5.9 shows the effects this setting can produce. The "before image" image (left) features the Shift-click sketch of the Adirondack chair on the topmost layer, above the layer containing the original photograph. In the center panel, only the top layer's content is included in the smudging. The last panel shows how both layers get in on the act when the Sample All Layers option is checked.
The Sponge tool is actually a really simple tool that works in one of two modes — Desaturate or Saturate. You choose the mode from the tool's Options bar, and then choose how much color the sponge removes or adds, respectively, by adjusting the Flow setting. When you pick one of the modes, this is what happens:
Desaturate: When set to Desaturate, the Sponge tool reduces the saturation of the colors over which you drag. When you're editing a grayscale image, the tool reduces contrast.
Saturate: If you select Saturate, the Sponge tool increases the saturation of the colors over which you drag or increases contrast in a grayscale image.
You can switch between the Desaturate and Saturate modes from the keyboard. Press Shift+Alt+D (Shift+Option+D on the Mac) to select the Desaturate option. Press Shift+Alt+S (Shift+Option+S on the Mac) for Saturate. No matter which mode you choose, higher Flow settings produce more dramatic results. Figure 5.10 shows an image that was both saturated and desaturated, with a Flow setting of 50.
Tip
You may find it helpful to turn on the Airbrush setting in the Options bar when using the Sponge tool (as well as the other toning tools, Dodge and Burn). This way, you can gradually build up effects. When you find a section of an image that needs more sponging than most, hold your cursor in place, watch Photoshop airbrush in the effect, and then move the cursor when you see that the desired effect has been achieved.
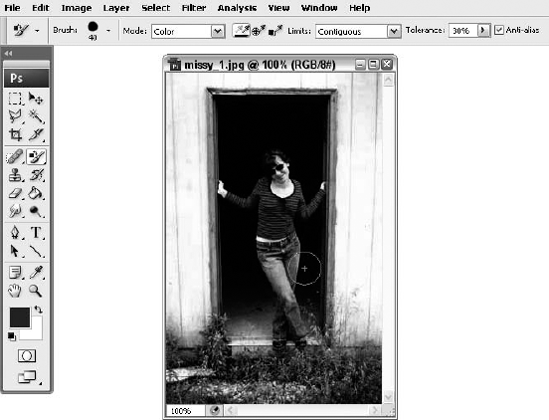
The Color Replacement tool works by taking a color sample from the area in which you first click and then applying the foreground color to any area that matches the sample. For example, if you were trying to change the color of someone's clothing in a photo, you could use the Color Replacement tool to sample the unwanted color and then replace it with another color. This requires only that you set the Foreground color to the desired shade, and then activate the Color Replacement tool (found sharing a button with the Brush and Pencil tools) and drag it over the parts of your image where the offending color can be found. In Figure 5.12, a pair of blue jeans goes from denim blue to bright red (with an obvious stroke through the pant legs to make the change visible in black and white).
You control the behavior and sensitivity of the Color Replacement tool using the settings in the Options bar. Here's how they break down:
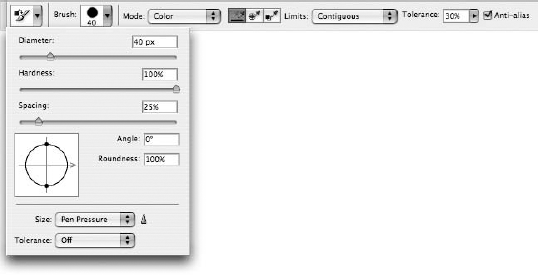
Brush: You don't get many brush choices when using the Color Replacement tool, as shown in Figure 5.11. You can set the Diameter, Hardness, and Spacing, and you can adjust the Angle and Roundness of the brush. You also can tinker with settings for your pen and tablet, if you're using one. You'll find these settings familiar if you've dabbled with the Brushes palette, specifically playing with Brush Presets. These options are covered later in this chapter.
Mode: This setting tells the tool how to combine the newly painted pixels with the existing ones in your image. By default, the Mode option is set to Color, and you're generally going to want to leave it there. Because the Color mode affects hue and saturation, or the color values of an image, but doesn't affect luminance, or lightness values, it's generally the way to go. Your alternatives? Hue, Saturation, and Luminosity.
Sampling: The Sampling option lets you set how Photoshop decides what color you're replacing. The first (and default) option, Continuous, causes the tool to keep sampling colors, nonstop, for as long as you're using the tool.
Much more useful than Continuous is the second Sampling option, Once.. This sets the color on which you click when you begin your drag as the target of your replacement. This means that for as long as you continue dragging, only the original color is affected. The third and final Sampling setting is Background Swatch. Choosing this option tells the color replacement tool to alter only pixels in your image that share a color with the current background color. It can be a neat way of providing even more control over what the tool affects, but I still recommend you stick with the Once setting.
Limits: The Limits option lets you set even more guidelines for determining which pixels the tool affects. Select Discontiguous to replace colors anywhere you drag with the tool. Select Contiguous to replace colors only in areas that are contiguous with, or connected by color to, the color currently under your cursor. The Find Edges option is designed to work the same way as Contiguous while better preserving edge details in the image.
Tolerance: The Tolerance value determines how exact of a color match is required to deem a pixel suitable for replacement. Lower values replace colors similar to the sampled color, and higher values replace a broader range of colors. Most of your work with the Color Replacement tool lives or dies based on this setting, and getting it right can be a bit tricky. Keep in mind that a value that works for one section of color in an image may not be the correct setting to affect a lighter or darker section of the same color in the image.
Anti-alias: This option lets you toggle anti-aliasing, or softening, on or off. It's almost certainly a good idea to keep it turned on.
If you make a mistake in the course of painting an image, stop and choose Edit
Note
You also can undo a brushstroke by selecting a previous state in the History palette. As explained in Chapter 7, the History palette lists brushstrokes and other changes according to the tool you used to create them.
If you like the basic look of a brushstroke but you'd like to fade it back a bit, choose Edit
Now that you have a feel for the purpose and basics of using the paint and edit tools, let's take a look at how you modify the performance of these tools. For example, every tool behaves differently according to the size and shape of your cursor, known in the case of the Brush tool, as the brush tip. Different styles of brush tips are known as brush shapes, or just plain brushes (not to be confused with the Brush tool, which people sometimes call "the brush" as well). The concept behind the brush shape is very simple. A big, round brush paints in broad strokes. A small, elliptical brush is useful for performing hairline adjustments. And if that's not enough — which it rarely is — there is a world of options in between these two extremes, plus an assortment of specialized brushes that come in handy in unique situations.
Provided that a paint or edit tool (other than the Color Replacement tool, which does not offer a full set of brushes from which to choose) is active, you can modify the brush shape in a number of ways in Photoshop:
Right-clicking: Right-click anywhere in the image window (Control-click on the Mac) to display a small palette of preset brush shapes complete with a menu of additional options, as seen in Figure 5.13. Scroll through the list of brush shapes, click the one you want to use, and then press Enter or Return to hide the palette. You also can press Escape to hide the palette and leave the brush shape unchanged.

Figure 5.13. The Presets palette lets you select from a list of predefined brush shapes and load other ones from disk.
Note
The Presets palette previews how the brush looks both when you click and when you drag. If your computer setup includes a pressure-sensitive drawing tablet, or if you've adjusted the Fade parameter in the brush's Shape Dynamics settings (as explained in the upcoming "Shape dynamics" section), the strokes appear to taper, as in the figure. Otherwise, they appear uniform. To dispense with the stroke previews, choose Large Thumbnail from the palette menu (displayed by clicking the right-pointing arrow button in the upper-right corner of the palette). To restore the stroke previews, choose Stroke Thumbnail.
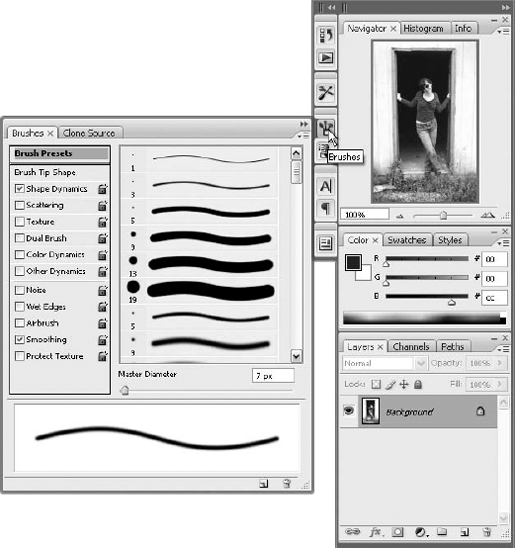
Brushes palette: Choose Window

The palette displays a visual list of the default brush presets. The category list on the left provides an interface for changing the size, shape, and other brush attributes, such as angle roundness, scatter, and color dynamics.
To tinker with these settings, click the actual words, such as "Shape Dynamics," and the settings for that aspect of the brush settings appear on the right. To turn specific settings on (whether or not you tinker with them), place a check mark in the box to the right of the setting name.
Tip
Simply mousing over the presets changes what appears in the preview pane at the bottom of the palette so you can quickly determine the result of a possible choice without necessarily committing to it first.
Master Diameter: With the Presets palette or Brushes palette onscreen, you can change the size of the brush by adjusting the Master Diameter value. Measured in pixels, this value represents the thickest stroke the brush will paint. (It can get thinner based on the Shape Dynamic settings, as I explain later in this chapter.) This means you're never locked into a preset brush diameter, even when painting with custom (nonround) brushes.
Tip
Changing the brush diameter is so useful that you can do it from the keyboard. Press the left bracket key ([) to make the brush smaller. Press the right bracket key (]) to make the brush bigger. Keep an eye on the brush icon in the Options bar to see how much smaller or larger the brush diameter gets.
Preset shortcuts: You can cycle between presets even when no palette is visible. Press the comma (,) to toggle to the previous brush shape in the list. Press the period (.) to select the next brush shape. You also can press Shift+, (comma) to select the first brush shape in the list (1 pixel wide) and Shift+. (period) to select the last brush.
By default, your cursor outline reflects the active brush shape. If your cursor looks like a cross hair or tool icon instead, press Ctrl+K (
Tip
When you use a very small brush, four dots appear around the cursor perimeter, making the cursor easier to locate. If you need a little more help, press Caps Lock to access the more obvious cross-hair cursor.
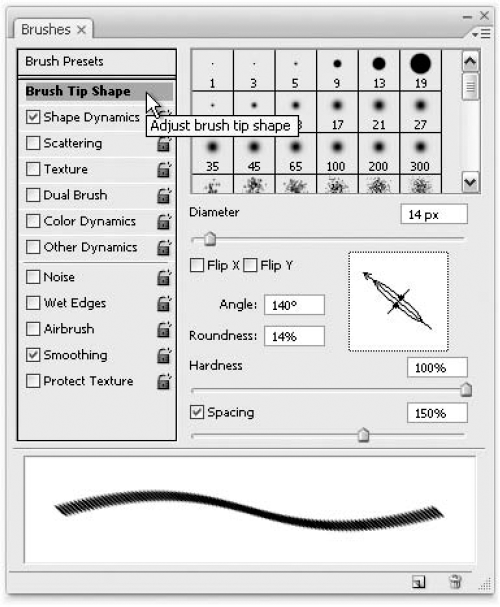
To create a custom brush shape, click Brush Tip Shape in the Brushes palette, which displays the options shown in Figure 5.15. Photoshop displays thumbnails for the predefined brushes on the right side of the palette, just above the settings for how the selected shape is applied. Select a brush to serve as a starting point for your custom creation, and then you can tweak the settings until you've created the brush you have in mind. These are the settings you can change:
Diameter: This option determines the width of the brush. If the brush shape is elliptical instead of circular, the Diameter value determines the longest dimension. You can type any value from 1 to 2,500 pixels.
Warning
Brush shapes with diameters of 15 pixels or higher are too large to display accurately in the Options bar; the stroke preview at the bottom of the Brushes palette is accurate to no higher than 50 pixels. Therefore, you should essentially ignore the previews of such brushes, rather than assume that you've done something wrong with the setup.
Flip X and Flip Y: Select the Flip X option to flip the brush shape into a mirror image of itself. Select the Flip Y option to flip the brush shape upside-down. These options are most obvious when you're using one of the more detailed brushes or a brush preset you've created from an image.
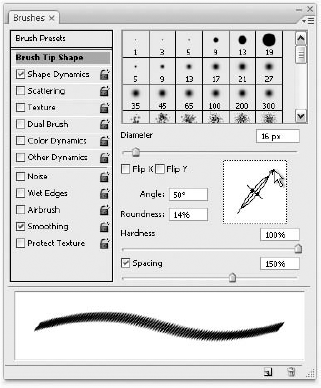
Angle: This option pivots a brush shape on its axis. Unless the brush is elliptical, though, you won't see a difference. So it's best to first adjust the Roundness value and then adjust the Angle. You can use the Angle text box to enter a value, or as shown in Figure 5.16, you can drag the arrow on the ellipse in the box to the right of the Angle and Roundess settings.
Roundness: Type a Roundness value of less than 100 percent to create an elliptical brush shape. The value modifies the height of the brush as a percentage of the Diameter value, so a Roundness of 50 percent results in a short, fat brush.
Tip
Not only can you adjust the Angle of the brush dynamically by dragging the gray arrow inside the box to the right of the Angle and Roundness options, but you can drag the handles on either side of the black circle to make the brush shape elliptical, as demonstrated in Figure 5.16. Drag the arrow tip to angle the brush, or click anywhere in the white box to move the arrow to that point.
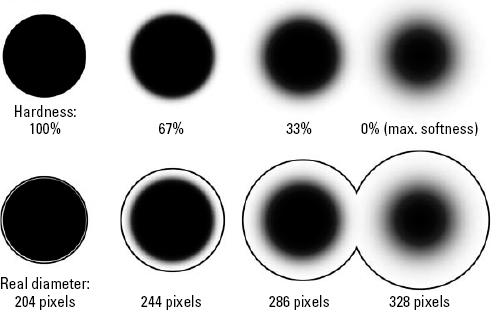
Hardness: Except when using the Pencil tool, brushes are always anti-aliased. You can further soften the edges of a brush by dragging the Hardness slider bar away from 100 percent. The softest setting, 0 percent, gradually tapers the brush from a single solid-color pixel at its center to a ring of transparent pixels around the brush's perimeter. Figure 5.17 shows how low Hardness percentages expand the size of a 200-pixel brush beyond the Diameter value (as demonstrated by the examples in the bottom row). Even a 100-percent hard-brush shape expands slightly because it is anti-aliased. The Hardness setting is ignored when you use the Pencil tool.
Tip
Like Diameter, Hardness is one of those settings that you need regular access to. So the ever-helpful Photoshop lets you change the Hardness from the keyboard. Press Shift+[ (Shift+left bracket) to make the brush softer; press Shift+] (Shift+right bracket) to make the brush harder. Both shortcuts work in 25-percent increments. For example, you have to press Shift+] four times to go from 0 percent Hardness to 100 percent.
Spacing: As you paint in Photoshop, the brush blasts out a continuous stream of colored spots. The Spacing option controls how frequently the spots are emitted, measured as a percentage of the brush shape. For example, suppose the Diameter of a brush is 40 pixels and the Spacing is set to 25 percent (the default setting for all predefined brushes). For every 10 pixels (25 percent of 40) you drag with the Brush tool, Photoshop lays down a 40-pixel-wide spot of color. A Spacing of 1 percent provides the most coverage but also slows down the performance of the tool. If you deselect the Spacing option, the effect of the tool is wholly dependent on the speed at which you drag; this can be useful for creating splotchy or oscillating lines. Figure 5.18 shows examples.
Tip
You may see ridges begin to appear at the default Spacing value of 25 percent, especially when painting with a mouse. If you notice lumps in your brush strokes, lower the Spacing to 15 percent, which ensures a good mix of speed and smoothness. When using a soft-edged brush, lower Spacing values result in a denser, fatter stroke, and higher values result in a lighter, thinner stroke. High Spacing values are great for creating dotted lines.
After you edit a brush, you can save the brush for later use by clicking the tiny page icon at the bottom of the palette; it's called Create New Brush, which displays as a screen tip if you hover your mouse over the button. In the resulting dialog box, Photoshop suggests a name, which you can then change to something that'll remind you of the brush's purpose and/or appearance. To save a brush without being asked to name it, Alt-click the Page icon (Option-click on the Mac). Whether or not you name it, Photoshop stores the brush with your program preferences so that it's preserved between editing sessions.
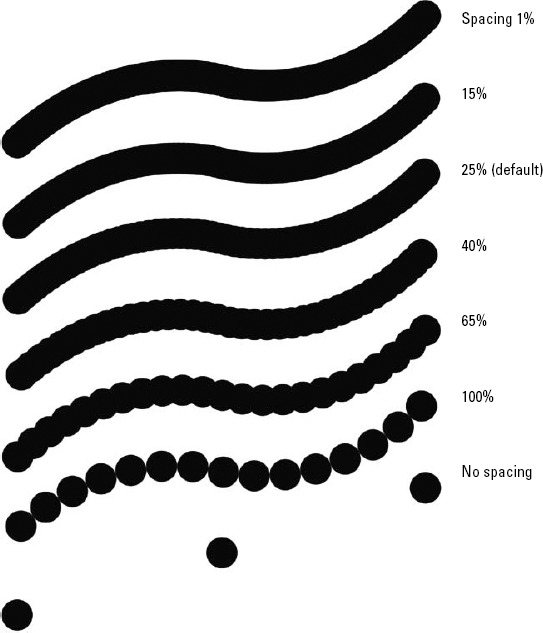
Figure 5.18. Examples of lines drawn with the Brush tool subject to different Spacing values. Values greater than 100 percent are useful for creating dotted-line effects.
Warning
If you delete the preferences file (as discussed in Chapter 2), you lose your custom brushes. To ensure that your custom brushes are saved in case you delete the preferences file or for use on another machine, choose Save Brushes from the Palette menu. See the section "Saving and loading brush sets" for more information.
To delete a brush from the list, switch back to the Brush Presets view and drag the brush to the trash icon at the bottom of the palette.
Photoshop allows you to not only modify the size and roundness of a brush, but define your own completely customized brushes as well. Start by making a new image and doodling a bit with your brush tip — just to test and experiment with the procedure. Doodle a bit with the brush, and don't worry about creating the perfect custom brush just yet. Next, use the rectangular marquee tool to select the doodle. You don't have to be particularly careful; just select the general area around the doodle, as shown in Figure 5.19. Photoshop is smart enough to distinguish the confines of the brush from its background.
Note
For more information on the Rectangular Marquee tool, see Chapter 8.
Next, choose the Define Brush Preset command from the Edit menu. Photoshop invites you to give your brush a name; if you're not feeling inspired, just press Enter or Return and accept the default name, Sampled Brush #1. A name is a good idea, though, if you can come up with one — "Sampled Brush #1" isn't going to mean much to you a week from now, and its thumbnail (which appears in the Brushes palette) may not tell the whole story as to why you created the preset, either.
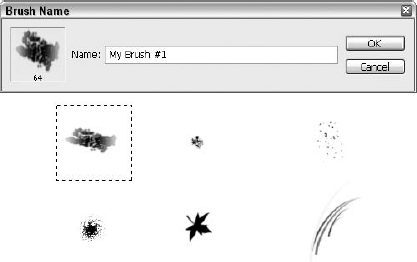
Figure 5.19. After selecting a doodle against a white background, choose Edit
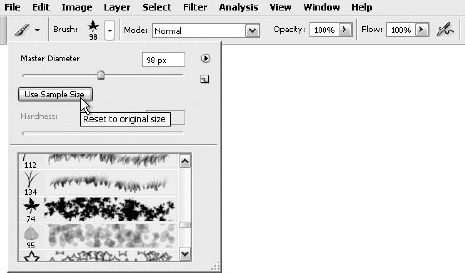
After you define a custom brush, you can tweak it just like any other brush inside the Brush Tip Shape panel of the Brushes palette. You can adjust the Diameter, Angle, and Roundness (height versus width) of your new brush. The only option that appears dimmed is Hardness; you have to accept the sharpness of the brush as it was originally defined (so if you want a very soft or very hard brush, start with one before you begin doodling). A custom brush even grows and shrinks according to stylus pressure if you're using a graphic tablet, or you can use the left and right bracket ([ ]) keys.
To restore any brush to its original size, click the Use Sample Size button on the Presets panel, shown in Figure 5.20.
After you define a handful of brushes, you may want to save them for use on a different computer or to avoid losing them in the event of any problem that might require you to reinstall Photoshop. Photoshop saves these brush groups in what are known as libraries, some of which ship with the software, and are found in the Presets/Brushes folder inside the folder that contains the Photoshop application. Brush libraries have the .abr file extension, as you'll see when you go to save one of your own.
You can save brush sets — as well as load and edit them — by choosing commands from the Brushes palette menu when the Brush Presets panel is displayed. You also can choose commands from the Presets palette that you get when right-clicking with a paint or edit tool (other than the Color Replacement tool) in the image window. You can manage libraries (those you've saved and those that ship with Photoshop) by choosing Edit
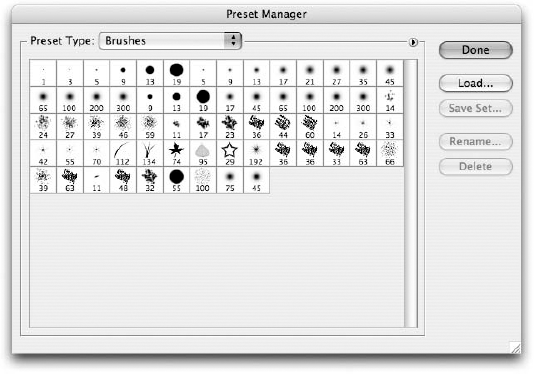
Figure 5.21. Choose Edit
By default, the Brushes palette displays a list of nearly 70 predefined brushes, including both elliptical and custom varieties. You can't delete this brush set, but you can prevent brushes you don't use from taking up space in the palette. You also can load or create a different set, combine two or more sets, and add or delete brushes from your custom brush sets. Here's the drill:
Save a brush set: To save all brushes currently displayed in the Brushes palette, choose Save Brushes from the palette menu. If you want to save only some of the brushes as a set, however, choose Edit
Regardless of where you initiate the save, Photoshop takes you to the Save dialog box, where you can name your brush set. By default, brushes are saved in the Presets/Brushes folder. The next time you start Photoshop, your new brush set appears on the Brushes palette menu along with other available sets.
Use a different brush set: If you want to put the current brush set away and use a different set, choose Replace Brushes from the Brushes palette menu and select the brush set you want to use. Alternatively, click the arrowhead in the upper-right corner of the Preset Manager dialog box to display a similar menu, and then choose Replace Brushes from that menu.
Load multiple brush sets: You can keep multiple brush sets active if you want. After loading the first set, choose Load Brushes from the Brushes palette menu or click Load in the Preset Manager dialog box. Photoshop appends the second brush set onto the first. If you want to keep using the two sets together, you may want to save them as a new, custom brush set. If you're picking a brush set from the list that appears at the bottom of the palette menu (such as Dry Media Brushes or Faux Finish Brushes), you are asked if you want to replace the current set with the newly selected one or if you want to append the new set.
Delete a brush: To delete a brush from the current brush set, select it from the Brush Presets panel of the Brushes palette and click the trash icon. Or choose Delete Brush from the palette menu. This command (and the trash icon) are dimmed if the brush preset is one of the ones that came with Photoshop — it's only those you've made that can be deleted.
Tip
Want to give a bunch of brushes the axe? Cut them loose through the Preset Manager dialog box. Select the brushes you no longer want, and then click Delete.
Restore default brushes: To return to the default Photoshop brush set, choose Reset Brushes from the menu in the palette or the dialog box. You then have the option of either replacing the existing brushes with the default brushes or simply adding them to the end of the palette.
Rename a brush: If you want to rename a brush, select it in the Preset Manager dialog box and click Rename. Or, even easier, double-click the brushstroke in the Brush Presets panel of the Brushes palette — a dialog box appears, showing the current name, which you can replace by typing the new name.
Warning
If you want your new brush names to live in perpetuity, resave the brush set. Otherwise, the names revert to their previous labels when and if you replace the brush set.
For a long time now, Photoshop has allowed you to vary the size, opacity, and color of paint according to input from a pressure-sensitive drawing tablet. Available from companies such as Wacom (www.wacom.com), pressure-sensitive drawing tablets respond to how hard you press on the stylus (the pen that is drawn across the surface of the tablet), as well as the angle of the stylus and other attributes.
Even if you don't have a tablet, Photoshop permits mouse users to enjoy much of the same flexibility as their stylus-wielding colleagues. Whether you use a stylus, a mouse, or even a finger on a notebook trackpad (and my hat's off to you if that's how you're drawing and painting), you can introduce an element of spontaneity into what seems at times like an absolute world of computer imaging.
Photoshop calls these imaginative options brush dynamics, and they open up lots of opportunities for faking pressure sensitivity. For example, you can make a brush shape twirl as you paint. You can add noise to the edges of a stroke. You can spray shapes, add texture, combine brushes, or even paint in rainbows. And most of the settings work every bit as well with, say, the Sponge tool as they do with the Brush tool. You may find this tinkering and experimenting with brush dynamics to be rather addictive — and the things you discover as you play will come back to you when you're editing or creating an image later, so it's time well spent.
To access Photoshop's brush dynamics when a paint or edit tool (other than the Color Replacement tool) is active, open the Brushes palette (press F5 if it's hidden) and be sure the Brush Tip Shape option is chosen. This displays the Shape Dynamics option, along with 10 additional options — Scattering, Texture, Dual Brush, Color Dynamics, Other Dynamics, and another group (below the horizontal divider) that apply special effects to the brush settings in place. As you click each option by name, settings for that option appear on the right side of the palette.
Note
Note that all check boxes and options are available when using the Brush tool, but they come and go for the other paint and edit tools. For example, the Wet Edges option is unavailable when using the Pencil tool, Color Dynamics is dimmed when using the Dodge and Burn tools, and so on. And for the Eraser, which many users rightly consider to be a painting and editing tool, many of the brush options are available, making it quite powerful. Even with the lack of options for some tools, the sheer number of options available for even the most limited of the edit tools verges on fantastic, especially when compared with older versions of Photoshop. Also, each tool observes an independent set of defaults. So activating, say, Shape Dynamics, Texture, and Smoothing for the Brush tool does not turn them on for other tools. However, they will again be turned on the next time you return to the Brush tool.
If you want to save a group of brush dynamics for use with a variety of tools, click the Page icon along the bottom of the Brushes palette. Brush dynamics are considered part of a saved brush shape and transfer from one tool to another. To save a group of brush dynamics for use with a single tool, visit the Tool Presets palette (Window
Tip
As you experiment with these options, don't forget to keep one eye on the big stroke preview at the bottom of the palette. It really is useful, especially when trying out settings that you haven't used before or combining options to achieve specific effects. Of course, there's no substitute for actually using the brush settings after you've set them, so be prepared to have to do some additional tinkering if you find that the brush settings, whether you've saved them or not, need some further adjustment.
Inside the Brushes palette, click the Shape Dynamics option — the name, not the check box — to display the panel of options illustrated in Figure 5.22. Notice that the panel is divided into three sections, which start with the words Size Jitter, Angle Jitter, and Roundness Jitter. These options permit you to vary the diameter, angle, and roundness, respectively, of the brush over the course of a single stroke. But the repetition of the word "Jitter" may be misleading. It implies (to many users) that each group of options is related to jittering — Photoshop's word for random brush shape fluctuations — when in fact jittering is a minor element of shape dynamics.
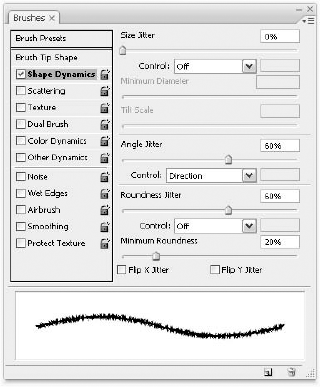
The first group of options controls the thickness of the brushstroke. The most important of these is the Control pop-up menu, which links the diameter of the brush to one of several variables. If you own a pressure-sensitive tablet, the most obvious setting is Pen Pressure, which is the default. This turns the brush into a traditional, pressure-sensitive painting tool, growing when you bear down on the stylus and shrinking with you let up.
Note
Three settings — Pen Pressure, Pen Tilt, and Stylus Wheel — require compatible hardware. If your only pointing device is a standard mouse, as is typical, selecting one of these options displays a triangular warning icon. This is Photoshop's way of telling you that, although you are welcome to select the option, it isn't really going to work. If you get the message in error — say, you get a warning for Pen Pressure even though you have a tablet installed — try clicking with the stylus on the Brushes palette. If that doesn't work, open the control panel or utility that manages the tablet to make sure the tablet is properly installed.
Note
As it turns out, you can take advantage of the Pen Pressure option even if you don't own a pressure-sensitive tablet. In Photoshop, you can simulate pressure by stroking a paint or edit tool along a path. For complete information, see Chapter 8.
In addition to Pen Pressure, the Control pop-up menu lets you select among the following options:
Off: Select this option to turn off the capability to vary the thickness of the brushstroke. You can still add random variations to the thickness using the Size Jitter value.
Fade: This option works every bit as well whether you use a mouse or tablet. Select Fade to reduce the size of the brush over the course of the drag, and then type a value in the option box on the right to specify the distance over which the fading should occur, enabling you to mimic painting with an actual paintbrush, which will run out of paint over the course of a stroke. This fading distance is measured in steps — that is, the number of spots of color the brush plops down before reducing the size of the brush to its minimum (defined by the Minimum Diameter setting). The default value is 25, which means 25 spots of color. Exactly how long such a stroke is in, say, inches, depends on the Diameter and the Spacing values in the Brush Tip Shape panel. In other words, be prepared to experiment.
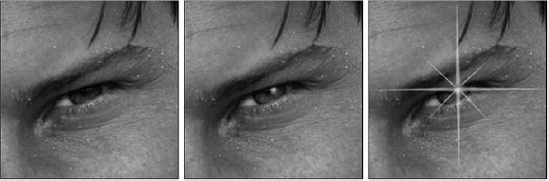
The Fade option can be most useful in the creation of a specular reflection, or in layman's terms, a sparkle. Figure 5.23 shows before and after versions of an image to which I applied a sparkle, or glow, using a series of strokes with a soft brush. The horizontal and vertical brush stroke settings use a diameter of 20 pixels and a Fade value of 100 steps. The diagonal brush stroke settings cut those values in half. To make each stroke, I clicked in the center and Shift-clicked farther out (creating a straight line).
Pen Tilt: The tilt of a pen is its angle with respect to the tablet, as illustrated in Figure 5.24. Straight up and down, the pen communicates no tilt; at a severe angle, the pen communicates maximum tilt. When you set the Control option to Pen Tilt, you do two things. First, you vary the size of the brush according to pressure, just as you do when using Pen Pressure. Second, you add an element of vertical scaling so that the brush shape is oblong during a tilt. This scaling is defined by the Tilt Scale slider. All in all, it's an interesting idea, but for my money, Pen Tilt works more predictably when applied to roundness.
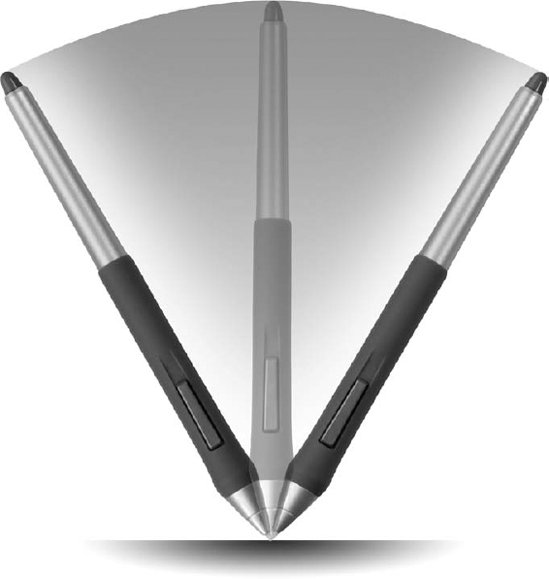
Stylus Wheel: If tablet owners account for 10 percent of Photoshop users, airbrush owners account for about 1 percent of tablet users. That's still enough people to populate a small town, so Photoshop might as well support them. Figure 5.25 shows Wacom's Intuos 3 airbrush, with stylus wheel. Unlike the scroll wheels included with many PC mice — which are exceptionally useful for scrolling Web pages and Word documents — the wheel on an airbrush locks into position. This means you can nudge it higher or lower and leave it there. Although typically associated with properties such as Flow (which you can set from the Other Dynamics panel), the airbrush wheel is surprisingly useful for diameter as well. Move the wheel up, and the brush gets thick and stays thick; move the wheel down, and you lock in a fine line, all in the middle of painting a brushstroke. This all sounds great, so is there a downside? Why, yes! A Wacom airbrush can cost upwards of $100, not including the tablet. So it's not a spur-of-the-moment gift for most of us.

Accompanying the Control pop-up menu are three slider bars:
Minimum Diameter: Use this option to determine the thinnest that a brushstroke can go. You can go as low as 1 percent.
Tilt Scale: Available only when you set the Control option to Pen Tilt, this setting stretches the height of the brush to make it elliptical when you tilt the stylus and attempts to mimic the way painting with a real brush feels. You can do this just as well with the roundness options, though, so you may not use this setting — then again, you may like it. It's up to you and your personal preferences.
Size Jitter: Use this slider to add an element of randomness to the thickness of a brushstroke. It doesn't matter whether you use a mouse or a stylus; the brush jitters every bit as well either way. Higher values produce a wider range of jitter. Keep an eye on the preview at the bottom of the palette to get a sense of what different settings will do.
Now that you understand the diameter settings, the angle and roundness settings are pretty simple stuff. But to confirm your knowledge and make sure that we're all on the same page, here's how they work:
Angle Control: As with diameter, you can link the angle of the brush to such variables as Pen Pressure, Pen Tilt, and Stylus Wheel. More pressure or tilt equals more rotation of the brush. Naturally, the changes show up best with elliptical or asymmetrical brushes. You also can link the angle to Fade, which rotates the brush over the course of a specific number of steps, and then returns the brush to its normal angle (as specified in the Brush Tip Shape panel).
But this Control pop-up menu adds two more settings: Direction and Initial Direction. The first rotates the brush according to the direction of your drag. A horizontal drag is considered the normal angle; when dragging vertically, the brush rotates 90 degrees. For maximum effect, after setting this option to Direction, go to the Brush Tip Shape panel and set the Angle value to 90 degrees (or something close) with an elliptical brush. Then raise the Spacing value to something higher than 100 percent.
Meanwhile, the Initial Direction option rotates the brush according to the very start of your drag and then locks it into position. It's a nice idea, but the angle is locked down about 2 pixels into your drag, which means Photoshop is aware of your initial direction before you are.
Angle Jitter: This option rotates the brush randomly as you paint. As always, be sure to adjust the roundness of the brush so you can see the randomness at work.
Roundness Control: Set this option to Fade to reduce the roundness to its minimum over the course of a specified number of steps. You also can associate the roundness with Pen Pressure, Pen Tilt, or Stylus Wheel. Of these, Pen Tilt makes by far the most sense to me because that's what Pen Tilt does in real life.
Minimum Roundness: This value determines the minimum roundness or maximum flatness of the brush available to the Control and Jitter settings. If the Control option is set to Off and the Roundness Jitter is 0 percent, the Minimum Roundness slider is dimmed.
Roundness Jitter: Use this option to introduce random variations in roundness to your brushstroke.
Flip X Jitter and Flip Y Jitter: Two check boxes at the bottom of the Shape Dynamics panel give you the ability to flip the jitter on its x-axis, y-axis, or both at once, much like you can flip the brush shape. Flipping the jitter on its axis may be more control than most of us will ever need, but it was nice of Photoshop's designers to make this option available.
For many, the Shape Dynamics settings are enough. They certainly permit you to achieve an enormous range of effects. But if you're feeling ambitious, you can venture much deeper. Fortunately, the other panels of options — Scattering, Texture, and so on — follow the same logic we've seen thus far, and you'll find they're quite simple to deal with, based on your having looked at the Shape Dynamics settings already.
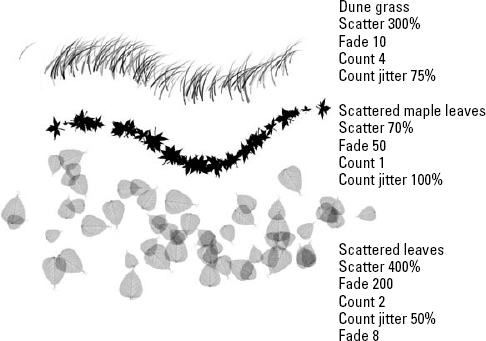
Figure 5.26 demonstrates several dynamic permutations as applied to the Scattered Leaves predefined custom brush. Here's how these options work:
Scattering: Highlight the Scattering option to spread the position of the spots of color around the brushstroke. When using a custom brush, such as Scattered Leaves in Figure 5.26, the effect is like spraying a pattern of images. Raise the Scatter value to increase the spread. Select Both Axes to scatter the brush spots along the stroke as well as perpendicularly to it. Use the Control pop-up menu to link it to stylus pressure or some other variable. Finally, use the Count options to increase the population of brush spots.
Texture: Select this option to apply a texture to a brushstroke, useful for conveying a surface such as paper or canvas. After selecting a predefined texture, set the Scale and Depth values to determine the size and degree of texture applied. Use the Mode option to define how brush and texture mix. (You can find out more about modes in the "Brush Modes" section near the end of this chapter, but for now, just experiment with an eye on the preview.)
If you want to vary the depth of texture throughout a stroke, turn on the Texture Each Tip option. Then use the Control option to vary the depth according to, say, stylus pressure or add some random Depth Jitter.
Dual Brush: The Dual Brush panel lets you mix two brushes together. Select the second brush from the list of thumbnails, and use the Mode option to specify how the brushes intermix. You also can throw in settings such as Spacing, Scatter, and Count, all of which affect the second brush. Figure 5.27 shows another example, complete with settings in the Brushes palette. Notice how by mixing a standard round brush with one of Photoshop's predefined Dry Brush options, a complex brush that imparts its own texture is generated.
Color Dynamics: Use these options to vary the color of the stroke between the foreground and background colors depending on a fade or stylus pressure. You also can apply random changes to the hue, saturation, and brightness. The final slider bar, Purity, increases or decreases the saturation of colors throughout the brushstroke.
Other Dynamics: The final set of brush dynamics permits you to associate the opacity, strength, flow, or exposure of the brush, depending on what tool you're using. You can find a discussion of each of these attributes in more detail in the section "Opacity and Strength, Flow and Exposure." If you happen to own an airbrush, settings such as the Flow and Exposure are what the wheel was originally designed for.
Tip
You'll notice that you have the ability to lock the settings you choose in the various brush dynamics panels. Click the Lock icon next to a panel name in the Brushes palette to toggle the lock option on or off. When a panel is locked, Photoshop retains the panel's settings even if you select a new brush preset that would normally contain different settings.

The list along the left side of the Brushes palette ends with five options that you can use to add highlights and constraints to your brushstrokes. Not all options work with all tools — none is compatible with the Smudge tool, for example — but when available, they're as effective as they are easy to use. And they work equally well with a mouse or a tablet.
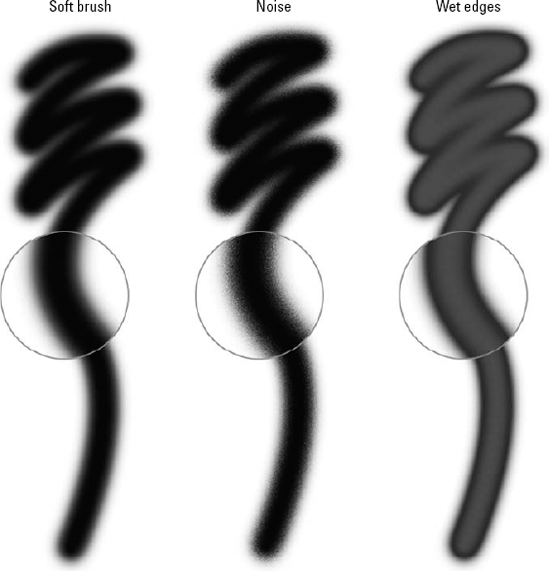
Noise: This option randomizes the pixels along the edge of a brushstroke. Because the option affects only the edge, softer brushes result in more noise. The middle line in Figure 5.28 shows an example.
Wet Edges: When you select the Wet Edges option, the brush creates a translucent line with darkened edges, much as if you were painting with watercolors. Soft brush shapes produce more naturalistic effects. The final example in Figure 5.28 shows a brushstroke with wet edges, painted in black.
Airbrush: This option duplicates the Airbrush icon in the Options bar. When turned on, paint builds up even when you hold the cursor in place, as if you were spraying color from a real airbrush. The Airbrush option is not available when using the pencil tool or any of the three focus tools (Blur, Sharpen, and Smudge).
Smoothing: If you have difficulty drawing smooth lines and curves, turn this option on to even out the rough spots. It slows down Photoshop's tracking time a little, but it may be worth it in many cases. Adobe recommends this option when using a stylus, but I've found it most helpful when using optical mice, which are notoriously bad at tracking evenly on patterned surfaces, such as wood tabletops.
Protect Texture: If you plan to paint lots of textured lines and you want your textures to match, select this option. It maintains a consistent pattern from one brushstroke to the next. The effect can be subtle, but I usually advise working with this option turned on.
In the old days, pressure-sensitive lines were a pain to undo. Because a stylus is so sensitive to gradual pressure, you can unwittingly let up and repress the stylus during what you perceive as a single drag. If, after doing so, you decide you don't like the line and press Ctrl+Z (
This is why it's a good idea to get in the habit of using Ctrl+Alt+Z (
Note
See Chapter 7 for complete information on Photoshop's multiple undos.
Tip
Save time, aggravation, and your remaining hair by creating a new layer (by pressing Ctrl+Shift+N on the PC or
Another way to change the performance of a paint or edit tool is to adjust the Opacity and Flow values, which also go by the terms Strength and Exposure, respectively, depending on the tool you're using. When available, these controls appear in the Options bar. Regardless of which setting you want to change, you click the triangle to display a slider bar, drag the slider to raise or lower the value, and then press Enter or Return. Alternatively, you can double-click the option box, type a value, and press Enter.
Here's a look at how these options work:
Opacity: The Opacity value determines the translucency of colors applied with the Brush or Pencil tool. The option is available also when using the Gradient tool, Paint Bucket tool, History Brush tool, both stamp tools, and the Eraser tool, all of which I discuss in future chapters. At 100 percent, the applied colors appear opaque, completely covering the image behind them. (Exceptions occur when using the Brush tool with Wet Edges active, which produces a translucent stroke, and when applying Mode options, discussed in the "Brush Modes" section.) At lower settings, the applied colors mix with the existing colors in the image.
Tip
You can change the opacity of brushstrokes or edits that you just applied by choosing Edit
Strength: When using the Blur or Sharpen tool, the Opacity option changes to Strength. The value determines the degree to which the tool changes the focus of the image; 1 percent is the minimum, and 100 percent is the maximum. Strength also appears when using the Smudge tool, in which case it governs the distance the tool drags colors in the image. Another difference between Strength and Opacity is that the default Opacity value for each tool when you begin using Photoshop is 100 percent, but the default Strength value is 50 percent. Whether Strength is stronger than Opacity or these tools merely happen to know their own Strength is uncertain; but 50 percent is the baseline.
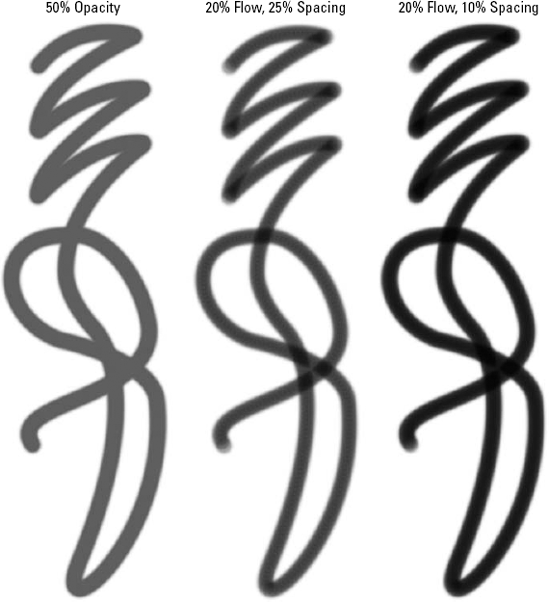
Flow: The Flow option appears when using the Brush, Sponge, and Eraser tools, both stamp tools, and the History Brush. Although it is always accompanied by the Airbrush icon, you can use Flow and Airbrush independently. The Flow value controls the opacity of each spot of color a tool delivers. So as a tool lays each spot of color onto the previous spot, the spots mix together and become more opaque. This means three things. First, a particular Flow setting produces a more opaque line than an equivalent Opacity setting. In Figure 5.29, for example, a Flow value of 50 percent comes in slightly darker than an Opacity value of 50 percent. Second, Flow results in a progressive effect that compounds as a brushstroke overlaps itself, also demonstrated in the figure. Third, because Flow works on a spot-by-spot basis, you can increase or decrease the opacity of a line further by lowering or raising, respectively, the Spacing value in the Brush Tip Shape panel.
When using the Brush, History Brush, Stamp, and Eraser tools, you can combine Opacity and Flow values to achieve unique effects. You also can add the Airbrush, which compounds Flow further by adding spots of color when you slow down a brushstroke or hold the cursor still.
Exposure: Available when using the Dodge or Burn tool, Exposure controls how much the tools lighten or darken the image, respectively. As with Flow, Exposure compounds when you corner or overlap a brushstroke, and it includes an airbrush variation. A setting of 100 percent applies the maximum amount of lightening or darkening, which is still far short of either absolute white or black. As with Strength, the default is 50 percent.
Tip
You can change the Opacity, Strength, or Exposure setting for the active tool in 10 percent increments by pressing a number key on the keyboard or keypad. Press 1 to change the setting to 10 percent, press 2 for 20 percent, and so on, all the way up to 0 for 100 percent. If you want to change the Opacity, Strength, or Exposure setting in 1 percent increments, just press two keys in a row. Press 4 twice for 44 percent, 0 and 7 for 7 percent, and so on. This works whether or not the Options bar is visible. Get in the habit of using the number keys, and you'll thank yourself later.
Changing the Flow value on the fly is trickier but still possible. When the Sponge tool is active, Flow works just like Opacity: Type a number to change the value in 10 percent increments; type two numbers to enter a specific value. But what about the Brush tool and others that offer both Opacity and Flow? Typing a number changes the Opacity value unless the Airbrush icon is active, in which case typing a number changes Flow. If the Airbrush is turned off, press Shift plus a number key to change the Flow value. When the Airbrush is turned on, pressing Shift plus a number key changes the Opacity value.
When certain painting or editing tools are active, the Options bar provides access to Photoshop's brush modes. The brush modes control how the colors applied by the tool mix with existing colors inside an image or layer. Figure 5.30 shows which brush modes are available when you select various tools.
With the exception of the specialized modes available for the Dodge, Burn, and Sponge tools, these brush modes are merely variations on the blend modes available in the Layers palette, which are discussed in Chapter 13. The difference is that the blend modes in the Layers palette mix colors between layers, but the brush modes in the Options bar mix colors inside a single layer. Because of this subtle distinction, the modes are covered twice, once in the following section and again in Chapter 13. The latter discussion is more detailed, so if you don't get all the info you need here, read Chapter 13 to find out more.
Tip
You can change brush modes from the keyboard by pressing Shift+plus (+) or Shift+minus (−). Shift+plus takes you to the next brush mode listed in the pop-up menu; Shift+minus selects the previous brush mode. It's a great way to cycle through the brush modes without losing your place in the image.
Photoshop offers a total of 27 brush modes (two of them are new to Photoshop CS3) when you use the Brush, the Pencil, or any of the other tools shown in Figure 5.30. Of course, not all of them are available for each of the painting tools, but they all appear in the Mode drop list. Note that an additional mode, Threshold, is an alternative to Normal in certain color modes. The brush modes are organized into six groups, and the individual modes — what they do and how you might use them — are described here.
Tip
Just as you can cycle from one brush mode to the next from the keyboard, you can jump directly to a specific brush mode as well. Just press Shift+Alt (Win) or Shift+Option (Mac) and a letter key. For example, Shift+Alt+N (Shift+Option+N on the Mac) selects the Normal mode; Shift+Alt+C (Shift+Option+C on the Mac) selects the Color mode. The letter key for each brush mode is in parentheses along with its description.
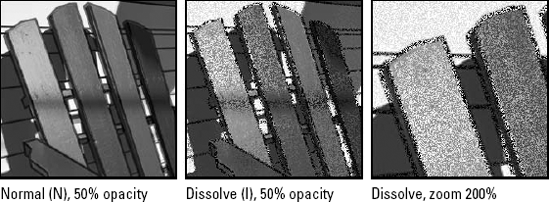
Normal (N): Choose this mode to paint or edit an image normally. A paint tool coats the image with the foreground color, and an edit tool manipulates the existing colors in an image according to the Opacity, Strength, Flow, and Exposure values.
Two color modes prevent Photoshop from rendering soft or translucent edges. The Black-and-White and Indexed modes (Image
Dissolve (I): Dissolve scatters a random pattern of colors to simulate translucency. The pattern shows up along the edges of opaque brush strokes or inside translucent strokes, like those in Figure 5.31. Note that this mode and the two that follow are not applicable to the edit tools. To get something resembling Dissolve with, say, the Smudge tool, try applying the Noise setting in the Brushes palette.
Behind (Q): This mode is applicable exclusively to layers with transparency. When Behind is selected, the paint tools apply color behind the image on the active layer, showing through only in the transparent and translucent areas.
Clear (R): When working on a layer other than Background, the Clear mode turns the Brush, Pencil, or Paint Bucket into an erasing tool, clearing away pixels. Given that the Eraser tool already emulates the behavior of both the Brush and Pencil tools (as explained in Chapter 7), there's not much reason to use Clear mode with either of these tools. However, it creates a unique effect when combined with the Paint Bucket, as explained in Chapter 6.
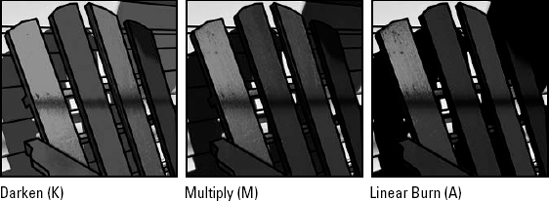
Darken (K): The first of the four darkening modes, Darken applies a new color to a pixel only if that color is darker than the pixel's present color. Otherwise, the pixel is left unchanged. The mode works on a channel-by-channel basis, so it may change a pixel in the green channel, for example, without changing the pixel in the red or blue channel. For more information on channels, see Chapter 4.
Multiply (M): The Multiply mode combines the foreground color with an existing color in an image to create a third color, darker than the other two. Using the multiply analogy, cyan times magenta is blue, magenta times yellow is red, yellow times cyan is green, and so on. Discussed in Chapter 4, this is the subtractive (CMYK) color theory at work. The effect is almost exactly like drawing with felt-tip markers, except the colors don't bleed. The second example in Figure 5.32 shows the Multiply mode in action.
Color Burn (B) and Linear Burn (A): The two Burn modes are designed to simulate colored versions of the Burn tool. Typically (though not always), Color Burn results in a darker, more colorful stroke than Multiply. Linear Burn is darker still and more muted, as shown in the last example in Figure 5.32. When combined with low Opacity values, the two modes can be interesting, but I wouldn't go so far as to call them particularly helpful.
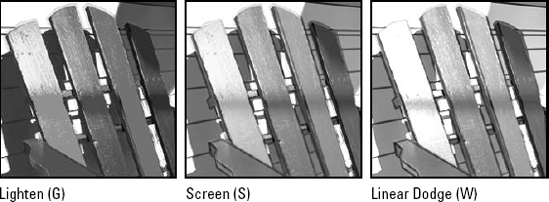
Lighten (G): Leading the lightening modes is the appropriately named Lighten, which ensures that Photoshop applies a new color to a pixel only if the color is lighter than the pixel's present color. The first panel in Figure 5.33 shows an example.
Screen (S): The inverse of the Multiply mode, Screen combines the foreground color with each colored pixel you paint to create a third color, lighter than the other two. Red on green is yellow, green on blue is cyan, blue on red is magenta. In other words, Screen obeys the rules of the additive (RGB) color theory. You can see an example in the center panel in Figure 5.33.
Color Dodge (D) and Linear Dodge (W): Intended to emulate the Dodge tool, these modes radically lighten an image. Check out the last panel in Figure 5.33 to see an example. Color Dodge produces the more colorful effect; Linear Dodge works out to be the lightest. As with the Color and Linear Burn modes, low Opacity values are likely to give you the best results.
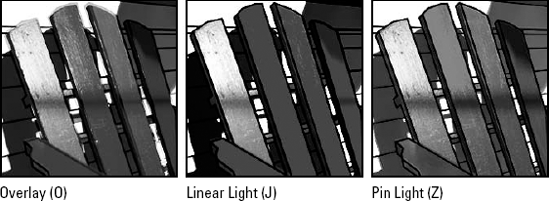
Overlay (O): The seven modes starting with Overlay are cousins, each multiplying the dark pixels in an image and screening the light pixels. Of the seven, Overlay is the kindest and arguably the most useful. It enhances contrast and boosts the saturation of colors, rather like a colored version of the Sponge tool set to Saturate. The first pane in Figure 5.34 shows the overlay mode in action.
Soft Light (F) and Hard Light (H): The Soft Light mode applies a subtle glazing of color to an image. Even black or white applied at 100 percent Opacity does no more than darken or lighten the image, but it does slightly diminish contrast.
Vivid Light (V) and Linear Light (J): These two modes simultaneously burn the darkest colors in your image while dodging the lightest ones. Vivid Light works like a more colorful variation on the Hard Light mode, much like a Color Burn and Color Dodge effect combined. Linear Light produces an even higher contrast effect, as shown in the middle panel of Figure 5.34.
Pin Light (Z): This peculiar mode drops out all but the so-called "high-frequency" colors, which are the lightest, darkest, and most saturated color values, and in the last panel of Figure 5.34 has hardly any effect. It is almost never useful for brushing, though it can come in handy when applied to layers, as discussed in Chapter 13.
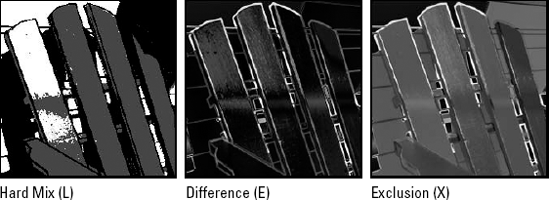
Hard Mix (L): This mode paints using the Vivid Light brush mode and then applies a threshold operation to each color channel. The result is a stark, high-contrast mix consisting of only eight primary colors: red, green, blue, cyan, magenta, yellow, white, and black. The chair, shown in the first example in Figure 5.35, is reduced to three colors — red, black, and white.
Note
For more information on thresholds, see Chapter 17.
Difference (E): When a paint tool is set to the Difference mode, Photoshop subtracts the brightness value of the foreground color from the brightness value of the pixels in the image. If the result is a negative number, Photoshop simply makes it positive. The result of this complex-sounding operation is an inversion effect, as shown on the middle chair in Figure 5.35. Painting with black has no effect on an image; painting with white inverts it. In the case of our chair, red paint on top of the red image results in black.
Tip
Because the Difference mode inverts an image, it results in an outline around the brushstroke. You can make this outline thicker by using a softer brush shape, which you get by pressing Shift+[ (left bracket).
Exclusion (X): Exclusion, demonstrated in the last panel of Figure 5.35, inverts an image in much the same way as Difference, except colors in the middle of the spectrum mix to form lighter colors. As you can see in the example, painting the red on top of red resulting in a "photo negativistic" effect — a greening of the colors.
Hue (U): Understanding this and the next few modes requires a color theory recap. Remember how the HSL color model calls for three color channels? One is for hue, the value that explains the colors in an image; the second is for saturation, which represents the intensity of the colors; and the third is for luminosity, which explains the lightness and darkness of colors. If you choose the Hue brush mode, therefore, Photoshop applies the hue from the foreground color without changing any saturation or luminosity values in the existing image, as in the first panel in Figure 5.36.
Note
All HSL brush modes — Hue, Saturation, Color, and Luminosity — are exclusively applicable to color and are therefore unavailable when painting in grayscale images.
Saturation (T): If you choose this mode, Photoshop changes the intensity of the colors in an image without changing the colors themselves or the lightness and darkness of individual pixels.
Color (C): This mode combines Hue and Saturation to change the colors in an image and the intensity of those colors without changing the lightness and darkness of individual pixels.
Tip
In concert with the Brush tool, the Color mode is most often used to colorize grayscale photographs. Here's how it works: Open a grayscale image and then choose Image
Luminosity (Y): The opposite of the Color mode, Luminosity changes the lightness and darkness of pixels, but leaves the Hue and Saturation values unaffected. The last panel in Figure 5.36 shows how Luminosity mode maintained the lines and shadows of the top layer without altering the color values of the underlying image.
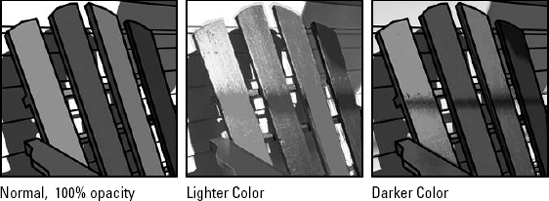
Lighter Color: Not to be confused with the aforementioned Lighten blend mode, which is applied to one channel at a time, the new Lighter Color mode applies to all channels at once. If you're blending two ore more colors with Lighter Color, guess which one is visible? That's right, the lighter one.
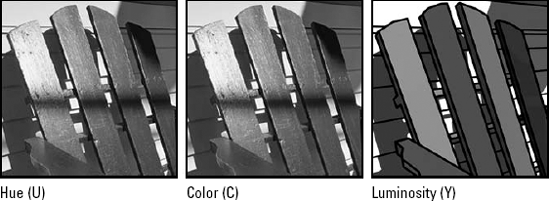
Figure 5.36. Hue mode mixes the hue values from the brush strokes with the saturation and luminosity values of the underlying image. Color is only slightly different, preserving the saturation values from the brush strokes also. Luminosity is Color's opposite, brushing in lights and darks but leaving colors unchanged.
Darker Color: Much like it's pale partner, the new Darker Color mode applies to all the channels at one time. This, like Lighter Color and Lighten, can be confused with Darken, which applies to only one channel at a time. If you're blending two or more colors with Darker Color, the darker color is visible (big surprise, huh?). Figure 5.37 compares the results of the Normal, Lighter Color, and Darker Color modes.
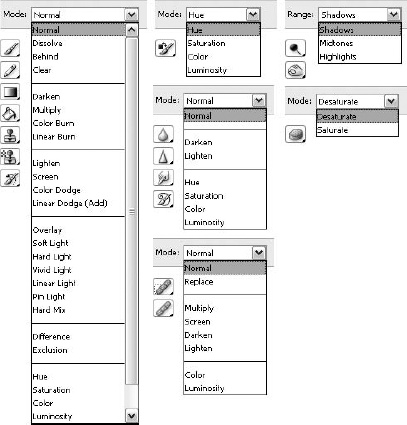
The three modes available with the Dodge and Burn tools are accessed through the Range pop-up menu in the Options bar. As with other brush modes, you can select the Dodge and Burn modes from the keyboard. Just press Shift+Alt (Win) or Shift+Option (Mac) and the letter in parentheses as follows:
Midtones (M): Selected by default, the Midtones mode applies the Dodge or Burn tool equally to all but the very lightest or darkest pixels in an image. Midtones enables you to adjust the brightness of colors without blowing out highlights or filling in shadows.
Shadows (S): When you select this mode, the Dodge or Burn tool affects dark pixels in an image more dramatically than light pixels. As illustrated in Figure 5.38, medium values are likewise affected, so the Shadows option modifies a wider range of colors than Midtones.
Highlights (H): This option lets you lighten or darken the midtones and lightest colors in an image.
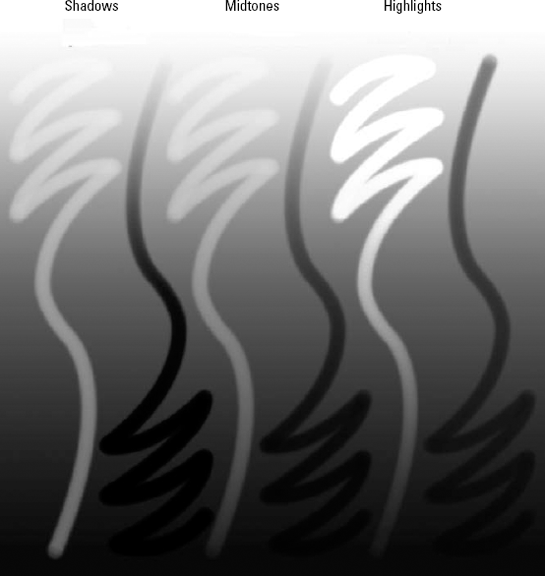
Selecting Shadows when using the Dodge tool or Highlights when using the Burn tool has an equalizing effect on an image. For example, the first brushstroke in Figure 5.38 shows the Shadows option combined with the Dodge tool. As a result, Photoshop paints an almost consistent brightness value across the course of a white-to-black gradient. The same is true for the last brushstroke, which combines Highlights with the Burn tool.
In this chapter, you explored Photoshop's paint and edit tools, learned how to apply the airbrush control, and learned to paint straight and perpendicular lines. You also learned to use the Smudge and Sponge tools to play with your image colors and to use the Color Replacement tool.
In mastering all brush-based tools, you learned to change the brush size, shape, and hardness, to save and load custom brush sets, and to work with a pressure-sensitive drawing tablet.
Customizing brushes was discussed at length, and you learned to create lines that fade away or taper to a point, to use scatter, texture, and other dynamics that adjust opacity and flow, and finally, to work with brush modes.