
Selections, and your ability to make and edit them successfully, are key to your efficient and effective use of Photoshop. Why? Because a selection tells Photoshop what portion of your image or layer you want to address — that is, where it is you intend to make a deletion, change, or addition. It's like selecting text in a word processing document — dragging through some of the text tells that word processor which text you want bolded, indented, whatever. If you can't tell Photoshop which part of the image you're about to deal with, it assumes your next move should affect the entire active layer, and unless that's your goal, your ability to use all the tools that can be applied to a selection is compromised.
With that said, it also should be noted that no other program gives you as much control over the size and shape of selections as Photoshop. You can finesse selection outlines with unparalleled flexibility, alternatively adding to and subtracting from selected areas and moving and rotating selections independently of the pixels inside them. With the new Refine Edge dialog box, which accompanies all selection tools in Photoshop CS3, your abilities to control every selection down to the pixel are greatly increased, making Photoshop's selection tools even better than before.
Tip
You also can mix masks and selection outlines together, as covered in Chapter 9.
That's why this chapter and Chapter 9 are probably the most important chapters in this book — and you probably want to pay close attention to the fundamental concepts and approaches documented throughout this chapter. Although every technique couldn't be labeled "essential" — lots of artists get by without paying much attention to paths, for example, while other artists swear by them — a working knowledge of selection outlines is key to using Photoshop successfully.
If you want to edit a portion of an image without fear that you might accidentally mess up another portion of the image, you must first select it, indicating the boundaries of the area you want to edit. To select part of an image in an image-editing program, you surround it with a selection outline or a marquee, which tells Photoshop where to apply your editing instructions. The selection outline appears as a moving pattern of dash marks, colloquially termed marching ants, as shown in Figure 8.1, by users who had probably been sitting in front of the computer screen for too long, looking at the marquee.
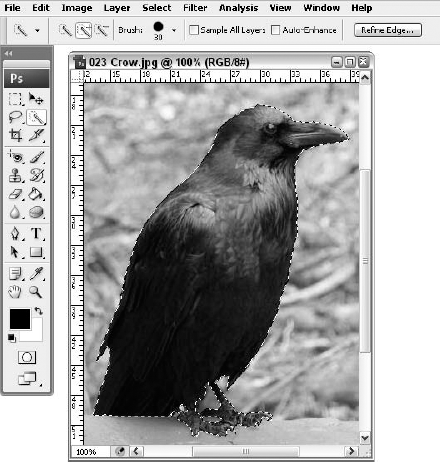
Figure 8.1. The dashed line, while static in this image, seems to dance around the selection in the image window, leaving no doubt as to which part of the picture is selected.
Visible selection outlines can be helpful sometimes, but they can just as readily impede your view of an image. If they do manage to annoy you, press Ctrl+H (
As for creating selections, you have at your disposal a whole bunch of tools and options, all shown in Figure 8.2 and described briefly in the following list. You can access most of the tools by using keyboard shortcuts, which appear in parentheses. In-depth discussion of each of the selection tools follows, so don't think the quick descriptions you're about to read are "it"; rather, think of it as a fast guide that will help you decide which particular selection tool to focus on, or to give you a leg-up on playing around on your own to get a feel for one or more of the tools.
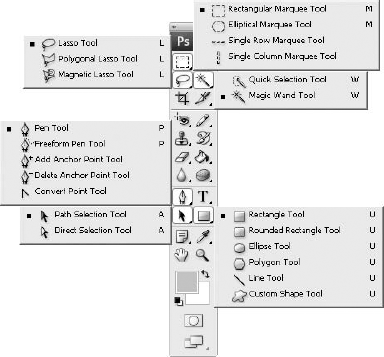
Figure 8.2. Selection tools abound in Photoshop. Add to this the Options bars that appear as each of these tools is selected (shown in later figures), and there's no limit to your selection potential.
When multiple tools share the same shortcut, you press the key once to activate the tool that's visible in the Toolbox and press the key repeatedly to cycle through the other tools. This assumes that you have deselected the Use Shift Key for Tool Switch option in the Preferences dialog box. Otherwise, press Shift and the shortcut key to cycle through the following tools:
Rectangular Marquee (M): Long a staple of painting programs, this tool enables you to select rectangular or square portions of an image.
Elliptical Marquee (M): The Elliptical Marquee tool works like the Rectangular Marquee except it selects elliptical or circular portions of an image.
Single-Row and Single-Column: The Single-Row and Single-Column tools enable you to select a single row or column of pixels that stretches the entire width or height of the image. These tools are used so rarely that Adobe didn't give them keyboard shortcuts.
Lasso (L): Click and drag with the Lasso tool to select a free-form portion of an image. Unlike the lasso tools in most painting programs, which shrink selection outlines to disqualify pixels in the background color, Photoshop's Lasso tool selects the exact portion of the image you enclose in your drag.
Polygonal Lasso (L): Click different points in your image to set corners in a straight-sided selection outline. This is a great way to select free-form areas if you're not good at controlling the mouse with the Lasso tool — your "sides" in the polygonal selection can be so small that in the end, the edges of the selection are as smooth and curvy as any Lasso-made selection. You can achieve the same effect by Alt-clicking or Option-clicking with the Lasso tool; you can learn more about this later in this chapter.
Magnetic Lasso (L): Click with the Magnetic Lasso along the edge of an image element that you want to select independently from its background. Then move (you don't have to drag) the Magnetic Lasso around the edge of the element. It's a tricky tool to use, but its Options bar, which makes it easier, is discussed later in the chapter.
Magic Wand (W): First introduced by Photoshop (not by any of its competitors), this tool lets you select a contiguous region of similarly colored pixels by clicking inside the region. For example, you might click inside the boundaries of a face to isolate it from the hair and background elements. You also can select all similarly colored pixels throughout an image, even if they're not contiguous — it can be a very powerful tool. As a result, novices tend to gravitate toward the Magic Wand because it seems like it performs selection miracles, but you may find that it can be the least predictable tool of the bunch.
Quick Selection Tool (W): This is a selection tool that's been desired by users for a long time. Its ease of use, its ability to be sized and used like a brush, and its ability to sample from all layers or just one make it very powerful and sensitive. To use it, simply click and drag (after having chosen a brush size and decided on your layer-sampling option), and watch your selection grow as you drag the brush. The Auto Enhance option, along with the new Refine Edge button (present on the Options bar for all CS3 selection tools), might make this your favorite tool for both general and fine selections.
Pen (P): The Pen tool is difficult to master, but it's the most accurate and versatile of the selection tools. You use the Pen tool to create a path, which is an object-oriented breed of selection outline. You click and drag to create individual points in the path. You can edit the path after the fact by moving, adding, and deleting points. You can even transfer a path by dragging and dropping between Photoshop, Illustrator, and FreeHand. For a discussion of the Pen tool, read the section "Drawing and Editing Paths."
Freeform Pen and Magnetic Pen (P): If you hate setting points but you need to create a clipping path, the Freeform Pen is the tool for you. You just click and drag with the tool as if you were selecting with the Lasso tool and let Photoshop define the points automatically. Obviously, you can't expect the same level of accuracy that you get from the standard Pen tool, but it's very simple to use.
Selecting the Magnetic option in the Options bar transforms the Freeform Pen into the Magnetic Pen, which once upon a time was a tool in its own right. The Magnetic Pen is basically an object-oriented version of the Magnetic Lasso tool. Click to set the first point, and then move your mouse and watch Photoshop create the other points automatically. It's not a great tool, but it can prove handy when selecting image elements that stand out very clearly from their backgrounds.
Shape tools (U): To draw paths in simple geometric shapes, give the Shape tools a shot. First, put the tools in the path mode by clicking the Paths icon at the left end of the Options bar. Then simply click and drag to create the path. To find out more about working with these tools, visit Chapter 14.
Path and shape selection tools: Use the Path Selection tool (the black arrow) and the Direct Selection tool (the white arrow) to select and edit paths and vector shapes. You can read more about these tools later in the section "Drawing and Editing Paths."
Note
Photoshop's Horizontal Type Mask tool and Vertical Type Mask tool technically are selection tools because Photoshop converts each character of type to a selection outline. But type involves other issues that would merely confuse the contents of this chapter, so type and its uses as a selection tool are found in Chapter 16. Also, if your purpose for selecting an area is to separate it from its background, you should investigate the Extract command and the Magic Eraser and Background Eraser (covered in Chapter 9).
If this were all you needed to know to use the selection tools in Photoshop, the application would be on par with the average paint program. Part of what makes Photoshop exceptional, however, is that it provides literally hundreds of options, commands, and tricks to increase the functionality of every selection tool. Furthermore, all of Photoshop's selection tools work together in perfect harmony. You can exploit the specialized capabilities of multiple selection tools to create a single selection boundary, or maybe just tweak the way one selection tool works to achieve the desired effect. After you understand which tool best serves which purpose, you can isolate any element in an image, no matter how complex or how delicate its outline.
At the top of the Toolbox, just below the Move tool, you'll find the first of the three main selection tools. If your Toolbox is set to be two tools wide (rather than the default single vertical column), the selection tools begin in the top row, next to the Move tool. The selection tools are bundled, and like tools share single buttons (refer to Figure 8.2).
By default, in either configuration of the Toolbox, the Rectangular Marquee tool appears on the Toolbox button, and with good reason — it's probably the most often-used selection tool. You can select its alternates — the Elliptical, Single-Row, and Single-Column Marquee tools — from the flyout menu that appears when you click and drag from the Marquee tool icon.
Tip
Press M to select the tool that's currently visible in the Toolbox. Press M again to toggle between the Rectangular and Elliptical Marquee tools. Alternatively, Alt-click (Win) or Option-click (Mac) the tool icon to toggle among all four marquee tools.
The marquee tools are more versatile than they may appear at first glance. You can adjust the performance of each tool as follows:
Constraining to a square or circle: Press and hold Shift after beginning your drag to draw a perfect square with the Rectangular Marquee tool or a perfect circle with the Elliptical Marquee tool. (Pressing Shift before dragging also works if no other selection is active; otherwise, this adds to an existing selection, as explained later in this chapter.)
Drawing a circular marquee: Remember to press Shift after you begin to drag, and assuming you've selected the Elliptical Marquee tool to make the selection, the ellipse (which most people think of as an oval) becomes a circle. Pretty simple, huh?
Drawing out from the center: Press and hold Alt (Option on the Mac) after you begin dragging to draw the marquee from the center outward instead of from corner to corner. (Again, pressing Alt or Option before dragging works if no selection outline is active; otherwise, this subtracts from the selection.) This technique is especially useful when you draw an elliptical marquee. Locating the center of the area you want to select is frequently easier than locating one of its corners — particularly because ellipses don't have corners.
Moving the marquee on the fly: While drawing a marquee, press and hold the spacebar to move the marquee rather than resize it. When you get the marquee in place, release the spacebar and keep dragging to modify the size. The spacebar is most helpful when drawing elliptical selections or when drawing a marquee out from the center — this eliminates the guesswork, so you can position your marquees exactly on target.
Selecting a single-pixel line: Use the Single-Row or Single-Column tools to select a single row or column (respectively) of pixels stretching across the width or length of your image. I use these tools to fix small mishaps, such as a missing line of pixels in a screen shot or to delete random pixels around the perimeter of an image. You also can use it to create perpendicular lines in a fixed space — giving you more control over the length of the line than you have if you use the Line tool (one of the Shape tool's variants).
Constraining the aspect ratio: If you want to create an image that conforms to a certain aspect ratio, you can constrain either a rectangular or an elliptical marquee so that the ratio between height and width remains fixed, no matter how large or small a marquee you create. To accomplish this, select Fixed Ratio from the Style pop-up menu in the Options bar, as shown in Figure 8.3. Type the desired ratio values in the Width and Height option boxes.

Figure 8.3. Select Fixed Ratio from the Style pop-up menu in the Options bar to constrain the proportions of a rectangular selection outline.
Tip
If you work with a digital camera, you may find this feature especially helpful. Many digital cameras produce images that fit the 4×3 aspect ratio used by computer screens and televisions. If you want to crop an image to a standard photo size — say, 6×4 inches — type 6 and 4, respectively, in the Width and Height option boxes. Then drag the marquee around to select the portion of the picture you want to retain, as shown in the figure, and choose Image

Remember that you're just establishing the image aspect ratio here, not setting the output width and height. So you could just as easily type 2 and 3 in the Width and Height option boxes. The size of the final, cropped image depends on how large you draw the marquee and the Resolution value you set in the Image Size dialog box.
Sizing the marquee numerically: If you're editing a screen shot or some other form of regular or schematic image, you may find it helpful to specify the size of the marquee numerically. To do so, select Fixed Size from the Style pop-up menu and type size values in the Width and Height option boxes. To match the selection to a 800×600-pixel screen, for example, change the Width and Height values to 800 and 600, respectively. Then click in the image to create the marquee.
Note
You can set the marquee size in any unit of measurement you like. Just type the number followed by one of these units: px (pixels), in, mm, cm, pt (points), pica, or %.
Drawing feathered selections: A Feather option box is available in the Options bar when you use any of the marquee tools. To feather a selection is to blur its edges beyond the automatic anti-aliasing afforded by most tools. For more information on feathering, refer to the coverage of softening selections found later in this chapter.
Creating jagged ellipses: By default, elliptical selection outlines are anti-aliased. If you don't want anti-aliasing — you might prefer harsh edges when editing screen shots or designing screen interfaces — deselect the Anti-aliased option. (This option is dimmed when you use the Rectangular Marquee because anti-aliasing is always off for this tool.)
Refine Edge: This button, which appears on the Options bar for all of Photoshop CS3's selection tools, spawns a powerful dialog box that gives you several ways to do just what the button says — refine the edges of your selection. Because a selection is only as good as its accuracy in terms of including only the content you want, being able to fine-tune the edges of your selection is a really great addition to the software. The dialog box, shown in Figure 8.4, looks and works the same way for each selection tool, and a discussion of all its options appears later in this chapter.
Note
Photoshop novices often misunderstand the Rectangular and Elliptical Marquee tools and expect them to create filled and stroked shapes. For these tasks, Photoshop provides the shape tools, which can create filled vector and raster shapes. You can apply strokes and other effects to these shapes if you like. Chapter 15 takes you on a guided tour of the shape tools.
In comparison to the Rectangular and Elliptical Marquee tools, the Lasso tool provides a rather limited range of options. Generally speaking, you click and drag in a free-form path around the image you want to select. The few special considerations are as follows:
Feathering and anti-aliasing: Just as you can feather rectangular and elliptical marquees, you can feather selections drawn with the Lasso tool by first selecting the Feather option in the Options bar. To soften the edges of a lasso outline, select the Anti-aliased option.
Note
Although you can adjust the feathering of any selection after you draw it by choosing Select
Drawing polygons: When you press and hold Alt (Option on the Mac), the Lasso tool functions like (and the icon even looks like) the Polygonal Lasso tool. (Polygon, incidentally, means a shape with multiple straight sides.) With the Alt or Option key pressed, click to specify corners in a free-form polygon. If you want to add curves to the selection outline, drag with the tool while still pressing Alt or Option. Photoshop closes the selection outline the moment you release both the mouse button and the Alt or Option key (see Figure 8.5).
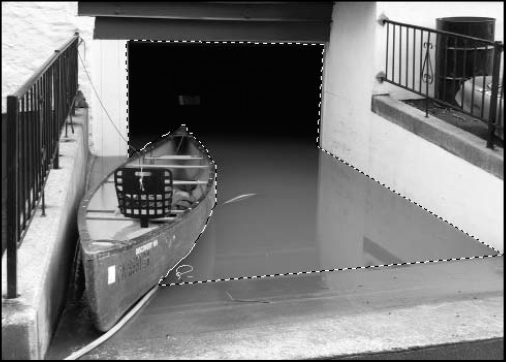
Figure 8.5. We started with an original image by Krisha Martzall, and by combining single mouse clicks and the Alt (Option) key, we formed straight lines, as needed. When we wanted to select free-form lines, we simply dragged.
Tip
You can extend a polygon selection outline to the absolute top, right, or bottom edges of an image. You also can Alt-click (Win) or Option-click (Mac) with the Lasso tool beyond the confines of the image window — clicking and creating a selection that exceeds the image window's dimensions. To prove that the selection shape you drew was retained, if you move the selection so that the portions that were outside of the window are now within it, you can see the corners and sides you drew.
The Polygonal Lasso tool: If you don't want to bother with pressing Alt (Win) or Option (Mac), select the Polygonal Lasso. When the Lasso is active, you can switch to the Polygonal Lasso by pressing L or Shift+L, depending on your Use Shift Key for Tool Switch setting in the Preferences dialog box. Or drag from the Lasso tool icon to display the Lasso flyout menu and select the Polygonal Lasso that way. Then click inside the image to set corners in the selection. Click the first point in the selection or double-click with the tool to complete the selection outline. To create free-form curves with the Polygonal Lasso tool, press Alt (or Option on the Mac) and drag.
Tip
If you make a mistake while creating a selection outline with the Polygonal Lasso, press Backspace (Delete on the Mac) to eliminate the last segment you drew. Keep pressing Backspace or Delete to eliminate more segments in the selection outline. This technique works until you close the selection outline and it turns into marching ants.
Adobe added the Polygonal Lasso for those times when Alt-clicking (Option-clicking on the Mac) isn't convenient. If no portion of the image is selected, it's no trick to Alt-click (Win) or Option-click (Mac) with the standard Lasso to draw a straight-sided selection. But if some area in the image is selected, pressing Alt or Option tells Photoshop that you want to subtract from the selection outline. For this reason, using the Polygonal Lasso is often easier — although you still can make it work by pressing Alt or Option after you click with the Lasso tool, as explained later in this chapter.
Note
The very same Refine Edge dialog box introduced earlier and explained later in this chapter allows you fine-tune your Lasso selections as well.
Tip
If you're using a tablet and pen instead of a mouse, you can click the Use Tablet Pressure to Change Pen Width button on the Options bar for any of the Lasso selection tools. If you click the button and turn this option on, pressing harder with your pen creates the effect of a thicker pen, much like you'd press harder with a pen on paper to make a more prominent line. This button is new to Photoshop CS3, although previous versions offered ways to use pen pressure to your advantage.
In the old days of black-and-white painting programs, black pixels were considered foreground elements (the strokes you painted) and white pixels were the background (the electronic paper or canvas). To select a black element, you had only to vaguely drag around it with the lasso tool and the program would automatically omit the white pixels and "shrink" the selection around the black ones.
The Magnetic Lasso tool is Adobe's attempt to transfer shrinking into the world of color. Under ideal conditions a selection drawn with the Magnetic Lasso automatically shrinks around the foreground element and omits the background. Of course, it rarely works this well, but it does produce halfway decent selection outlines with very little effort — provided that you know how to tweak the tool's options in your favor.
Typically, when people have a problem using the magnetic lasso tool, it's because they're trying to make the process too complex. Work less, and the tool works better. Here are the basic steps for using this unusual tool:
STEPS: Making Sense of the Magnetic Lasso Tool
Select an image with very definite contrast between the foreground image and its background. The content in Figure 8.6 is a good example of when you'd be compelled to use the Magnetic Lasso, because the central object stands out against the background and the tool will have no trouble discerning its edges. Here's something that Photoshop can really sink its teeth into.
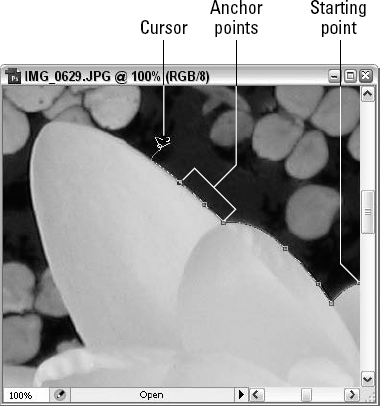
Figure 8.6. Drag as long as you see the Magnetic Lasso doing its job — that is, following the edge of your desired content and creating a nice, tight selection up against that edge. When it wavers, click to keep the tool on track. You also can press Backspace to step back to the previous anchor point when the tool goes astray.
Select the Magnetic Lasso. If any tool but a Lasso tool is active, press L to grab the Lasso that's showing in the Toolbox. Then press L as necessary to cycle to the Magnetic Lasso.
Click anywhere along the edge of the foreground element. Note the starting point, labeled in Figure 8.6 — of course, your image and its content may suggest another strategy.
Move the cursor around the edge of the foreground element. Just move the mouse, don't drag — that is, there's no need to press the mouse button. As your cursor passes over the image, Photoshop lays down a line along the edge of the element. The Magnetic Lasso also lays down anchor points at significant locations around the image. If you don't like where the program puts a point, press Backspace (Delete on the Mac). Each time you press Backspace or Delete, Photoshop deletes the most recent point along the line. To set your own anchor points, just click.
When you make it all the way around to the beginning of the shape, click the first point in the outline to close the selection. Photoshop makes it easy to spot this by displaying a tiny circle with your mouse pointer, just as you close in on the starting point of your selection. If you can't wait for that to appear or if you simply want to end things wherever you are in the selection process, just double-click in your current location to close with a straight edge back to the starting point.
Tip
To create a straight segment while working with the Magnetic Lasso tool, press Alt (Option on the Mac), click to set the start of the segment, and click again at the endpoint. The next time you click without holding down Alt or Option, the tool reverts to its normal magnetic self.
You modify the performance of the Magnetic Lasso tool by adjusting the values in the Options bar. The Feather and Anti-aliased options define the softness of the final selection outline, just as they do for the standard Lasso tool. The others control how the Magnetic Lasso positions lines and lays down points:
Width: This option determines how close to an edge you have to move the cursor for Photoshop to accurately see the image element. Large values are great for smooth elements that stand out clearly from their backgrounds. If you raise the Width to 20, for example, you can move the cursor 20 pixels away from the edges of the content you're trying to select and Photoshop still shrinks the selection tight around the content's edge. That gives even the shakiest mouse-users a pretty workable margin for error and makes your life easier. When you're selecting small areas or where there is little difference between what you want to select and the surrounding pixels, you need a low value to keep Photoshop from veering off to the wrong edge.
Tip
The great advantage to the Width value is that you can change it on the fly by pressing a bracket key. Press [ (left bracket) to lower the Width value; press ] (right bracket) to raise the value. Shift+[ lowers the value to its minimum, 1, and Shift+] raises it to the maximum, 256.
If you have a pressure-sensitive tablet and select the Pen Pressure option, you can control the edge-tracking accuracy by adjusting how hard you press on the pen. Bear down to be careful; let up to be more casual about the selection's accuracy. Because this is the way you probably work naturally, you'll be able to adjust the width as needed without even thinking much about it.
Contrast: This is the simplest of the options. It tells Photoshop how much contrast there has to be between the element you're trying to select and its background to even be recognized. If the foreground element stands out clearly, you may want to raise the Edge Contrast value to avoid selecting random flack around the edges. If the contrast between foreground and background is subtle, lower the value.
Frequency: This option tells the Magnetic Lasso when to lay down points. As you drag with the tool, the line around the image changes to keep up with your movements. When some point in the line stays still for a few moments, Photoshop decides it must be on target and anchors it down with a point. If you want Photoshop to anchor points more frequently, raise the value. For less frequent anchoring, lower the option. High values tend to be better for rough edges; lower values are better for smooth edges.
Most of the time, you can rely on the bracket keys to adjust the Width and leave the Frequency and Edge Contrast values set to their defaults. When dealing with a low-contrast image, lower the Edge Contrast value to 5 percent or so. And when selecting unusually rough edges, raise the Frequency to 70 or more. But careful movements with the Magnetic Lasso tool go further than adjusting any of these settings. If you need the ability to further control the confines of your selection, click the Refine Edge button to open a dialog box that allows you to use a variety of settings to increase, decrease, soften, and view your selection in greater detail. Find out more about this button and its effects later in this chapter.
Using the Magic Wand tool seems like — what's the word — magic, right? You just click with the tool, and it selects all colors that fall within a selected range. The problem, though, and where the magic can kind of wear off is in getting the wand to recognize the same range of colors that you see onscreen. For example, if you're editing a photo of a red flower amongst pink flowers, how do you tell the Magic Wand to select the red one and leave the pink ones alone?
For some users, adjusting the Wand seems too complicated, and it can be kind of frustrating to use. Other times, it seems like a gift from on high, in that it selects exactly what you want, without any difficulty. Its success as a selection tool depends on several factors, so try to resist the temptation to either write it off as too complex or really easy — because it's neither. Just read on, and then play with the tool and try it in different selection scenarios.
When the Magic Wand is active, you'll see the following four controls in the Options bar:
Tolerance: This option determines the range of colors the tool selects when you click with it in the image window.
Anti-aliased: This option softens the selection, just as it does for the Lasso tools.
Contiguous: When selected, this option tells Photoshop to select a contiguous region of pixels emanating from the pixel on which you click — this means that if you click a pixel in that hypothetical red flower, only the red pixels in that flower, touching the pixel you clicked (or touching one of the pixels that were touching the pixel you clicked) are selected. Red pixels in a flower on the other side of the image are not. To select all similarly colored pixels throughout the picture, deselect the option.
Sample All Layers: Select this option to take all visible layers into account when defining a selection.
You now know all you need to know about the Anti-aliased and Contiguous options; the next two sections explain Tolerance and Use All Layers.
You may have heard the standard explanation for adjusting the Tolerance value: You can type any number from 0 to 255 in the Tolerance option box. Type a low number to select a small range of colors; increase the value to select a wider range of colors.
When you click a pixel with the Magic Wand tool, Photoshop first reads the brightness value that each color channel assigned to that pixel. If you're working with a grayscale image, Photoshop reads a single brightness value from the one channel only; if you're working with an RGB image, it reads three brightness values, one each from the red, green, and blue channels; and so on. Because each color channel permits 8 bits of data, brightness values range from 0 to 255.
Next, Photoshop applies the Tolerance value, or simply tolerance, to the pixel. The Tolerance describes a range that extends in both directions — lighter and darker — from each brightness value.
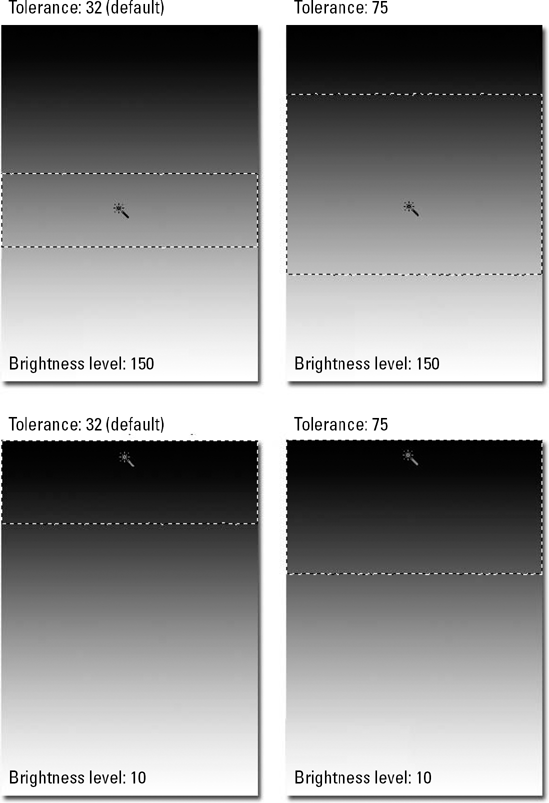
Suppose you're editing a standard RGB image. The Tolerance is set to 32 (as it is by default). You click with the Magic Wand on a turquoise pixel, whose brightness values are 40 red, 210 green, and 170 blue. Photoshop subtracts and adds 32 from each brightness value to calculate the Magic Wand range that, in this case, is 8 to 72 red, 178 to 242 green, and 138 to 202 blue. Photoshop selects any pixel that both falls in this range and, if the Contiguous option is turned on, can be traced back to the original pixel through an uninterrupted line of other pixels that also fall within the range.
From this information, you can draw the following basic conclusions about the Magic Wand tool:
Clicking on midtones maintains a higher range: Because the Tolerance range extends in two directions, you cut off the range when you click a light or dark pixel, as demonstrated in Figure 8.7. In all cases, the Contiguous option is selected, and in the top two boxes, a pixel with a brightness level of 150 was clicked. In the upper-right example, the Tolerance value is set to 75, and the range shrinks. But when a pixel with a brightness value of 10 is clicked, as in the bottom gradations (Tolerance set to 32 on the left, 75 on the right), the range shrinks to 0 to 70. Clicking on a medium-brightness pixel, therefore, permits the most generous range.
Selecting brightness ranges: Many people have the impression that the Magic Wand selects color ranges. The Magic Wand, in fact, selects brightness ranges within color channels. So if you want to select a flesh-colored region — regardless of shade — set against an orange or a red background that is roughly equivalent in terms of brightness values, you probably should use a different tool.
Selecting from a single channel: If the Magic Wand repeatedly fails to select a region of color that appears unique from its background, try isolating that region inside a single-color channel. You'll probably have the most luck isolating a color on the channel that least resembles it. For example, to select the background shown in Figure 8.8, each color channel was examined closely to see which provided the greatest contrast between the elements in the photo. In this case, the Red channel (top) won. Experiment with this technique, and it will prove even more useful over time.
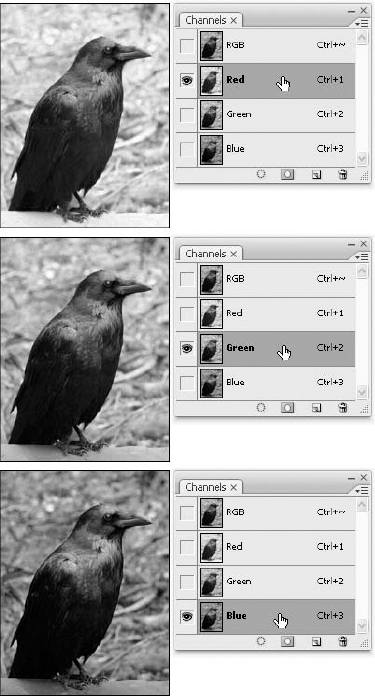
Figure 8.8. Make your selection within the channel that provides the most difference in brightness — between your desired content and the rest of the image.
Note
Here's one more important twist in the Tolerance story: The Magic Wand is affected by the Sample Size option that you select for the Eyedropper tool. If you select Point Sample, the Wand bases its selection solely on the single pixel that you click. But if you select 3 by 3 Average or 5 by 5 Average, the Wand takes into account 9 or 25 pixels, respectively. As you can imagine, this obscure option can have a noticeable effect on the extent of the selection that you get from the Wand.
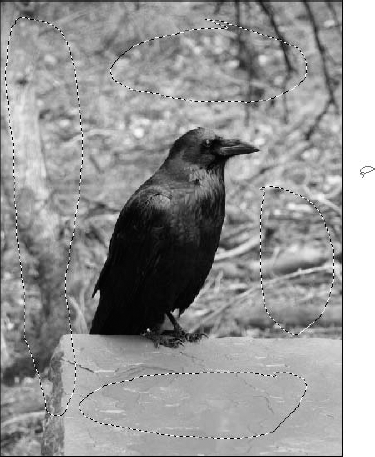
The Use All Layers option enables you to create a selection based on pixels from different layers (see Chapter 12 for more about layers). With the image in use thus far (the crow) in mind, imagine that the crow is on its own layer, the flowers on another layer, and the sky behind them on yet a third layer. Without using the Sample All Layers option for the Magic Wand, one could only select a particular shade of gray in the crow's wings, and not that same shade as it appears in the flowers or the sky — at least not at the same time.
Mind you, while the Sample All Layers option enables the Wand to consider pixels on different layers when creating a selection, it does not permit the Wand to actually select content on two separate layers. Strange as this may sound, no selection tool is capable of that. Every one of the techniques explained in this chapter is applicable to only a single layer at a time. The Sample All Layers option merely allows the Wand to draw selection outlines that appear to encompass colors on many layers.
Well, if it's not actually sampling and selecting all the content on all the layers, what good is this? Well, imagine that you want to change all the blue in the image to purple — using any number of tools to tweak the blue and change its color. With the help of Sample All Layers, you can draw a selection outline that encompasses all the pixels that match the sampled pixel, and then you can hop between layers (with that same selection in place) and make the color changes to each individual layer. Of course, it would be easier if you could literally select content on multiple layers, but the ability to map out a selection that will work on all the individual layers will just have to do.
This selection tool, new to Photoshop CS3 and sharing a button with the aforementioned Magic Wand, is a long-awaited addition to your selection arsenal. It's got a little bit of the wand's magic, a little bit of the magnetic lasso's "shrink" effect, and it's really simple to use.
First, let's look at the tool's Options bar. We begin with a variation on the buttons that allow you to add to, subtract from, and intersect with a selection, and three buttons are offered:
New Selection: Make sure this button is on if you want each click of the mouse to start a new selection, ignoring whatever you'd selected with your previous stroke.
Add to Selection: This is the default mode, and it allows you to continue sampling and selecting pixels as you drag, click, and drag some more.
Subtract from Selection: Here, you can remove selected pixels by painting over previously selected pixels.
You cannot create a selection out of the intersection of existing and new selections, but that makes sense given how this tool works. To use it, click the tool to activate it, and then set your Brush size using the Options bar. If you click the triangle to the right of the current brush size, you'll see the set of options shown in Figure 8.9 — you can change the brush Diameter, Hardness, Spacing, Angle, and Roundness. These are much like the tools you can set in the Brushes palette, when you're in Expanded View of that palette and viewing the Brush Tip Shape settings (refer to Chapter 5). You can also choose at this point whether to use the Sample All Layers option, which does just what its name implies — it considers all the pixels at your starting point, regardless of the active layer, and establishes your selection based on that.
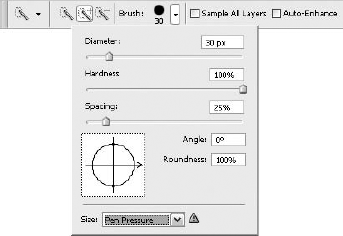
Figure 8.9. Want to control the Quick Selection by tweaking the size and shape of your selection brush? Use these settings to create the perfect brush for painting a selection from within your image.
After setting your brush options (which you can change as you work, or deselect, reset, and start over), you can begin making your selection. Just click and drag, and watch as the Quick Selection tool selects an area around your brush, selecting those pixels that match the pixels you sampled by clicking to begin the selection. Of course, while this works much the way the Magic Wand does and also like the Magnetic Lasso: It shrinks around the pixels that it considers a "match" to the sampled ones; in other words, it allows you to keep selecting more and more pixels, widening the net, if you will, and increasing the amount of the layer that's selected.
You can hop between the three modes (New, Add to, Subtract from) between drags of the mouse, and after your selection is complete, you can use the Refine Edge dialog box (discussed in the following section) to gain more control than this very (intentionally) simple tool allows on its own.
Tip
The Auto-Enhance option increases the accuracy of the selection, based on the pixels you're encompassing with the tool as you paint to make a selection. With this option on (as it is by default), you're getting a more precise selection than you would if you turned the option off. Of course, as ever, you have a Refine Edge button, which opens the much-heralded Refine Edge dialog box, which we discuss in the next section.
If you don't draw a selection outline correctly the first time, you have two options. You can draw it again from scratch, which can be really tedious and time consuming, or you can change your botched selection outline, correcting the selection. Now, which one sounds more appealing? Assuming you chose the latter solution, it's time to talk about Photoshop's tools for changing the nature of selections — removing some or all of them, adding new stuff to them, resizing them, and changing their edges.
First, here are some fast and easy changes you can make. The following list explains how a few commands work. You'll find them all in the Select menu along with handy keyboard shortcuts you can use.
Deselect (Ctrl+D or
+D): You can deselect the selected portion of an image in three ways. You can select a different portion of the image; click anywhere in the image window with the Rectangular Marquee tool, the Elliptical Marquee tool, or the Lasso tool; or choose Select
Reselect (Ctrl+Shift+D or
+Shift+D): If you accidentally deselect an image, you can retrieve the most recent selection outline by choosing SelectInverse (Ctrl+Shift+I or
+Shift+I): Choose SelectTip
You also can access the Inverse and Deselect commands from a shortcut menu in the image window. Right-click (Control-click if you have a one-button mouse) to make the menu appear underneath your cursor.
Imagine a portrait. How would you go about selecting both eyes and not selecting or otherwise affecting any other portion of the face? Well, if you're new to the selection tools, you might think that you'd have to select one eye and then do whatever you want to it, and then go select the other eye and repeat whatever was done to the first eye. This, however, is not tapping one of Photoshop's best set of options — found in the first group of four buttons on the Options bar for the Marquee, Lasso, Magic Wand, and even the Shape, Pen, and Path tools (though the buttons are not the first group on the Options bar for the last three tools listed).
With these buttons, Photoshop lets you add a bit more to a selection, whittle away at a selection, and create new selections out of overlapping areas within two or more selections. This makes it possible, too, to combine selection tools — starting out, for example, with the Marquee, and then tacking on a selection made with the Lasso or the Magic Wand. You can use the buttons shown in Figure 8.10, or you can use these handy-dandy keyboard shortcuts:
Adding to a selection outline: To increase the area enclosed in an existing selection outline, Shift-drag with one of the marquee or lasso tools. You also can Shift-click with the Magic Wand tool or Shift-click with one of the marquee tools when the Fixed Size option is active (as described in the section "Geometric Selection Outlines" earlier in this chapter).
Subtracting from a selection outline: To take a bite from an existing selection outline, press Alt (Win) or Option (Mac) while using one of the selection tools.
Intersecting one selection outline with another: Another way to subtract from an existing selection outline is to Shift+Alt-drag (Shift+Option-drag on the Mac) around the selection with the Rectangular Marquee, Elliptical Marquee, or Lasso tool. You also can Shift+Alt-click (Shift+Option-click on the Mac) with the Magic Wand tool. Shift+Alt-dragging instructs Photoshop to retain only the portion of an existing selection that also falls inside the new selection outline.
If the keyboard shortcuts seem cumbersome, use the selection state buttons (labeled in Figure 8.10) at the left end of the Options bar to set your selection tool to the Add, Subtract, or Intersect mode. After clicking a button, simply drag to alter the selection outline. To toggle the tool back to the normal operating mode, click the first button in the bunch. Note that the keyboard techniques described in the preceding list work no matter what button you select in the Options bar. For example, if you click the Intersect button, Alt-dragging (Option-dragging on the Mac) still subtracts from the selection outline. Remember, too, that you can switch selection tools and then use the Add to, Subtract from, or Intersect with buttons, creating a selection that's created with a combination of tools.
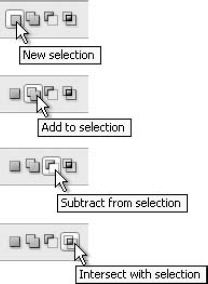
Figure 8.10. You can use the selection state buttons as well as the Shift and Alt keys (Shift and Option keys on the Mac) when modifying a selection outline.
Tip
When you're working with the Magic Wand, you can right-click (Control-click on the Mac) to display a shortcut menu that contains the Add, Subtract, and Intersect mode options. Click the mode you want to use.
Tip
Photoshop displays special cursors to help you keep track of a tool's selection state. Suppose that you select part of an image and the Lasso tool is active. When you press Shift or click the Add button in the Options bar, Photoshop appends a little plus sign to the Lasso cursor to show you're about to add. A minus sign indicates that you're set to subtract from the selection outline; a multiply sign appears when you work in Intersect mode. If you're pressing keys to switch tool modes, Photoshop temporarily selects the corresponding selection state button in the Options bar as well.
The roles of the Shift and Alt keys (Shift and Option keys on the Mac) in adding, subtracting, and intersecting selection outlines can interfere with your ability to take advantage of other functions of the selection tools. For example, when no portion of an image is selected, you can Shift-drag with the Rectangular Marquee tool to draw a square. But after a selection is active, Shift-dragging adds a rectangle — not a square — to the selection outline.
This is one reason for the selection state buttons in the Options bar. After you click a button, the tool adds, subtracts, or intersects, with no additional keypresses on your part, depending on which button you click. But if you want to hide the Options bar or you just prefer pressing keys to clicking buttons, you can control the selection tools from the keyboard without giving up any selection flexibility.
The trick is to learn when to press Shift and Alt (Option on the Mac). Sometimes you have to press the key before you begin your drag; other times you must press the key after you begin the drag but before you release. For example, to add a square to a selection outline with the Rectangular Marquee tool, Shift-drag, release Shift while keeping the mouse button pressed, and press Shift again to snap the rectangle to a square. The same goes for adding a circle with the Elliptical Marquee tool.
The following list introduces you to a few other techniques. They may seem a little elaborate or complicated, but with a little practice, they will become second nature — really, they will. Before you try any of them, be sure to select Normal from the Style pop-up menu in the Options bar.
Note
To keep things visually simple in the text, the following list refers only to Windows users' keystrokes and commands. On a Mac, press Option instead of Alt.
Subtract a square or a circle from a selection. Alt-drag, release Alt, press Shift, drag until you get it right, release the mouse button, and then release Shift.
Add a rectangle or an ellipse by drawing from the center outward. Shift-drag, release Shift, press Alt, and hold Alt until after you release the mouse button. You can even press the spacebar during the drag to move the marquee around, if you like.
Subtract a marquee drawn from the center outward. Alt-drag, release Alt, press Alt again, and hold the key down until after you release the mouse button.
Add a straight-sided area to an existing selection. Shift-drag with the tool for a short distance. With the mouse button still down, release Shift and press Alt. Then click around as you normally would, while keeping the Alt key down.
Subtract a straight-sided area. Alt-drag with the Lasso, release Alt, press Alt again, and click around with the tool.
The last two might be easier if you switch to the Polygonal Lasso instead of using the regular Lasso. In fact, one of the reasons Adobe provided the Polygonal Lasso tool was to accommodate people who don't want to have to press Alt or Option many times during the creation of a selection — so by all means, use the tool and make your life easier.
Photoshop provides several commands under the Select menu that automatically increase or decrease the number of selected pixels in an image according to numeric specifications. The commands in the Select
Border: This command selects an area of a specified thickness around the perimeter of the current selection outline and deselects the rest of the selection. For example, to select a 20-pixel-thick border around the current selection, choose Select
Smooth: This command rounds off the sharp corners and weird anomalies in the outline of a selection. When you choose Select
Tip
The Smooth command is especially useful in combination with the Magic Wand. After you make one of those weird, scraggly selection outlines with the Wand tool (or the Lasso, where eye-hand coordination deficits can be really obvious), use Select
Expand and Contract: Both of these commands do exactly what they say, either expanding or contracting the selected area by a specified amount. For example, if you want an elliptical selection to grow by 8 pixels, choose Select
Tip
Both Expand and Contract have a flattening effect on a selection. To round things off, apply the Smooth command with a Sample Radius value equal to the number you just typed in the Expand Selection or Contract Selection dialog box. This isn't the technique for making very precise selections, but that's the downside (and one that's usually worth it, for all the effort it saves you) of using automated commands. If the results are almost what you wanted but there are some areas where extra stuff was selected and you need to pare the selection down a bit, you can always zoom in very close and use one of the Lasso selection tools set to Subtract from Selection mode and whittle away at the selection as needed.
In addition to the Expand command, Photoshop provides two other commands — Grow and Similar — that increase the area covered by a selection outline. Both commands resemble the Magic Wand tool because they measure the range of eligible pixels by way of a Tolerance value. In fact, the commands rely on the same Tolerance value that you set for the Magic Wand (in the Options bar). So if you want to adjust the impact of either command, you must first select the Magic Wand and then apply the commands:
Grow: Choose Select
Similar: Another member of the Select menu, Similar works like Grow, except the pixels needn't be adjacent. When you choose Select
Note
Although both Grow and Similar respect the Magic Wand's Tolerance value, they pay no attention to the other Wand options — Contiguous, Sample All Layers, and Anti-alias. Grow always selects only contiguous regions; Similar selects noncontiguous areas. Neither can see beyond the active layer nor produce anti-aliased selection outlines.
One of the best applications for the Similar command is to isolate a complicated image set against a consistent background whose colors are significantly lighter or darker than the image. Figure 8.11, which features just such a scenario, contains some sample selections made to "train" Photoshop as to what the Similar command should look for when choosing pixels for selection.
Sometimes, you want to make sure that whatever you're selecting, or the hole left by deleting it, has a soft edge — for artistic reasons or simply to make the changes or deletion less jarring to the image, avoiding any hard, obvious edges. When you feel the need for such an effect, you can soften a selection in two ways. The first method is anti-aliasing, introduced in Chapter 5. Anti-aliasing is an intelligent and automatic softening algorithm that mimics the appearance of edges you'd expect to see in a sharply focused photograph.
Note
Where did the term anti-alias originate? Anytime you try to fit the digital equivalent of a square peg into a round hole — say, by printing a high-resolution image to a low-resolution printer — the data gets revised during the process. This revised data, called an alias, is frequently inaccurate and undesirable. Anti-aliasing is the act of revising the data ahead of time, essentially rounding off the square peg so it looks nice as it goes into the hole.
When you draw an anti-aliased selection outline in Photoshop, the program calculates the hard-edged selection at twice its actual size. The program then shrinks the selection in half using bicubic interpolation (described in Chapter 2). The result is a crisp image with no visible jagged edges.
The second softening method, feathering, is more dramatic. Feathering gradually dissipates the selection outline, giving it a blurry edge. Photoshop accommodates partially selected pixels; feathering fades the selection both inward and outward from the original edge.
You can specify the number of pixels affected either before or after drawing a selection. To feather a selection before you draw it with a Marquee or Lasso tool, type a value in the Feather option box, found in the Options bar — the option is set to 0 pixels by default. To feather a selection after drawing it, choose Select
The Feather Radius value (in the Feather Selection dialog box) determines the approximate distance over which Photoshop fades a selection, measured in pixels in both directions from the original selection outline. Figure 8.12 shows the effects of feathering a selection. In the first example, no feathering was used. In the second example, a 24-pixel feather was applied, and the resulting selection has a very soft edge. A pattern also was made from a selection on the stalk on which the bird is sitting, and this was used to fill the background — and then a Gaussian Blur was applied to it. If you missed it, creating patterns from selections within your image was covered in Chapter 6, and the Blur filters are covered in Chapter 10.
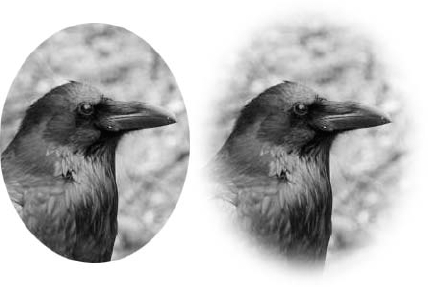
Figure 8.12. One with, one without. In the second image, the Feather was set to 10 pixels, creating this fuzzy frame around the selection.
In case you, like previous readers who've written to ask, might wonder why feathering blurs a selection outline more than the number of pixels stated in the Feather Radius value, here's how it works. A radius of 4 pixels actually affects a total of 20 pixels: 10 inward and 10 outward. The reason revolves around Photoshop's use of a mathematical routine called the Gaussian bell curve, which exaggerates the distance over which the selection outline is blurred.
Tip
If exact space is an issue, you can count on the Feather command affecting about 2.7 times as many pixels as you type in the Feather Radius option box, both in and out from the selection. That's a total of 5.4 times as many pixels as the radius in all.
You can use feathering to remove an element from an image while leaving the background intact, a process described in the following steps. The image in Figure 8.13 has some problem items in it — namely, a particular child who insists on making a crazy face every time a camera is pointed in his direction — but the one that can be removed without causing any family discord is the bright dot of light in the left side of the photo. A selection has been drawn around the offending spot.
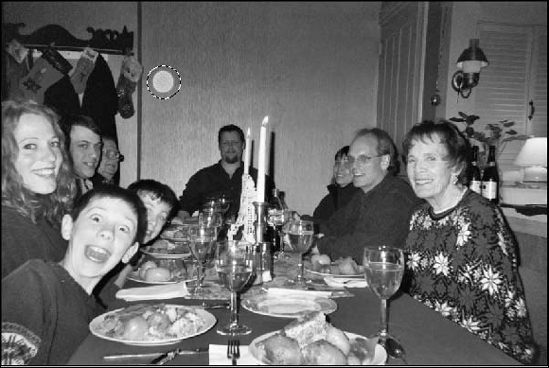
Figure 8.13. Got something to hide? The smoother the edges of the patch you use to obscure it, the more convincing your cover up.
STEPS: Removing an Element from an Image
Draw a selection around the element using the selection tool that's most appropriate for the element you want to get rid of. As shown in Figure 8.13, the offending spot is encircled in an elliptical marquee selection, which is perfect for this unwanted "orb".
Drag the selection outline over a patch in the image. Now that you've specified the element you want to remove, you must find a patch — that is, some portion of the image to cover the element in a manner that matches the surroundings. In Figure 8.14, the best match was clearly from some of the wall to the right of the spot. To select this area, move the selection outline independently of the image merely by dragging it with the selection tool (the Marquee in this case). Dragging a selection with a selection tool moves the outline without affecting the pixels, unlike dragging a selection with the Move tool, which moves whatever's in the selection. Make certain you allow some space between the selection outline and the element you're trying to cover.
Choose Select
Clone the patch onto the area you want to cover. Select the Move tool by pressing V. Then Alt-drag (Option-drag on the Mac) the feathered selection to clone the patch and position it over the element you want to cover, as shown in Figure 8.15. To align the patch correctly, choose Select
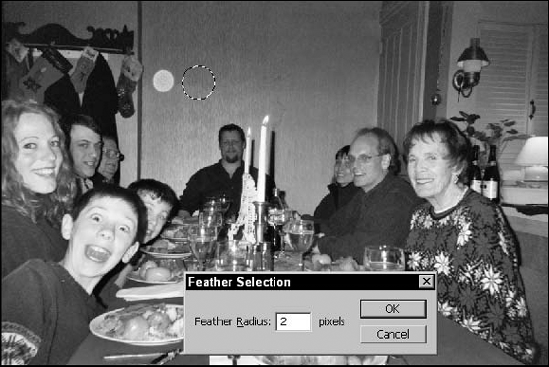
Figure 8.14. After drawing a circle around the spot with the Marquee tool, the selection outline was moved to the right to select another portion of the wall. Feathering the selection is the next step.
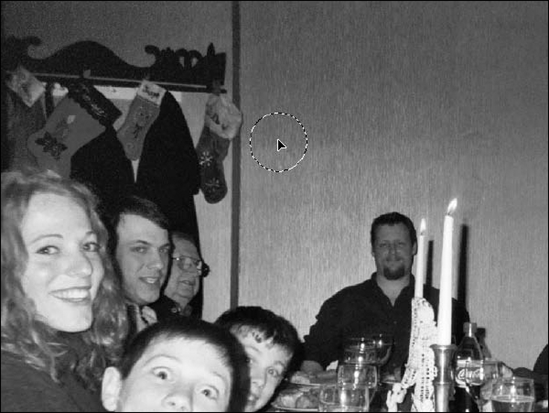
Figure 8.15. Next, I used the Move tool to Alt-drag (Option-drag on the Mac) the feathered selection over the bright spot. As long as you have something to use in covering the offending content, this technique can mask just about anything, and often with fewer steps and better results than the Clone Stamp.
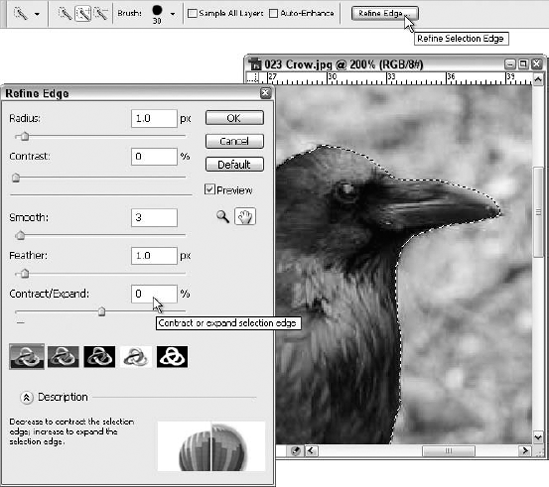
As mentioned throughout this chapter, each time the potential need to clean up or customize a selection is discussed, CS3 now offers a very handy and powerful feature — the Refine Edge dialog box. Opened by clicking the Refine Edge button on any selection tool's options bar or by choosing Refine Edge from the Select menu (the menu command is available whenever a selection is in place — even if none of the selection tools are active), the resulting dialog box appears in Figure 8.4 and here in Figure 8.16.
The dialog box is divided into four sections, four of which consist of tools for helping you change or view your selection to do a better job for you within the image at hand. You also can zoom in on the selection (use the Magnifying glass button) or pan around in the image (use the Hand button), and of course, you can preview the effects of the changes you're making by leaving the Preview option on.

Figure 8.16. Choose how to view your selection, and tweak its confines through the use of five different sliders.
In terms of tweaking your selection, you have the ability to adjust the Radius and Contrast (see the top section of the dialog box) and to manipulate the Smooth, Feather, and Contract/Expand sliders to clean up, soften, and change the size of your selection (see the second section of the dialog box). Here's the skinny on each of these options:
Radius: Use this slider to clean up a selection where fine or tiny details run along that selection's edges. The lower the number you set here, the crisper the edge of the selection.
Contrast: To make a crisp, clean edge, drag this slider to the right. Using this refining method allows you to shear off the artifacts along the edges of an object in an image, clean up fuzzy contact points between elements in an image, and give your selection a nice, sharp edge.
Smooth: Get rid of choppy, jagged edges in your selection with this slider. The higher the number, the smoother the edges of the selection, although without using Radius or Feather, the edges of the selection will not blur or soften the effects applied within the selection.
Feather: If you want to blur or soften the edges of whatever's done to the area within (and directly outside of) your selection, use this slider, dragging it to the right for increased feathering.
Contract/Expand: As the name implies, this slider allows you to reduce the size of your selection (drag to the left) or increase it (drag to the right).
Tip
As you mouse over each slider, you can check the Description section for an explanation of each option's purpose, often accompanied by a visual to help you get the idea.
The last functional part of the dialog box consists of five View buttons, allowing you to take a different visual perspective on your selection. Note that you can press the F key on your keyboard to cycle through these views and choose the one that makes the most sense in your current image.
Standard: You can choose the Standard view, which shows the regular "marching ants" edge on your selection, and displays the image content within and outside of your selection normally.
Quick Mask: Pick this one if you want a rubylith (slightly see-through red wash) to cover all but your selected area/s.
Black Background: This view puts your selection on top of a black background.
White Background: Big surprise here, this one puts your selection on top of a white background.
Mask: Choose this view to see your selection as a mask — a white shape on a black background.
The idea, of course, is to pick the view that gives you the best look at your selection so you can use the rest of the controls in the dialog box to make the necessary changes to the selection itself. If you're cleaning up the edges of a selection, for example, viewing it against a solid color (black or white) may be helpful. If you want to be able to see the rest of the image, but want your selection to stand out, Quick Mask might be better than Standard.
In the preceding steps, you discovered that you can move the selected pixels or the empty selection outline to a new location, and with feathering the selection, make the moved content blend in with its new surroundings. Now it's time to examine these techniques in greater depth.
To move selected pixels, you need the Move tool. This may seem rather obvious, but there are so many other ways to select and reposition content that you may not realize exactly what the Move tool does and how many other tools it can replace (in some situations) if you use it properly. When you want to use it, you can select the Move tool at any time by pressing V (for mooV). One of the chief advantages of using the Move tool is that there's no chance of deselecting an image or harming the selection outline. Drag inside the selected area to move the selection; drag outside the selection to move the entire layer, selection included. Layers are covered in more detail in Chapter 13.
Tip
To access the Move tool on a temporary basis, press and hold Ctrl (
Photoshop provides three methods for moving selections in prescribed increments. In each case, the Move tool is active, unless otherwise indicated:
First, you can nudge a selection in 1-pixel increments by pressing an arrow key on the keyboard or nudge in 10-pixel increments by pressing Shift while pressing an arrow key. This technique is useful for making precise adjustments to the position of an image. Note that a series of consecutive nudges is recorded in the History palette (see Chapter 7) as only one history state, regardless of how far you move the selection. Choosing Undo takes the selection back to its original position in the image.
Tip
To nudge a selected area when the move tool is not active, press Ctrl (Win) or
Second, you can press Shift during a drag to constrain a move to a 45-degree direction — that is, horizontally, vertically, or diagonally.
And third, you can use the Info palette to track your movements and to help locate a precise position in the image.
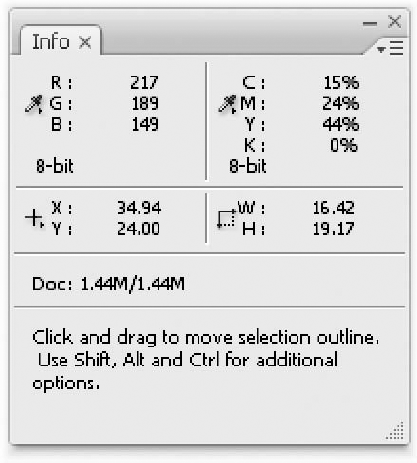
To display the Info palette, shown in Figure 8.17, choose Window
X, Y: These values show the coordinate position of your cursor. The distance is measured from the upper-left corner of the image in the current unit of measure. The unit of measure in Figure 8.16 is pixels.
ΔX, ΔY: These values indicate the distance of your move as measured horizontally and vertically.
A, D: The A and D values reflect the angle and direct distance of your drag.
W, H: These values reflect the width and height of your selection.
When you move a selection, you leave a hole in your image in the background color, as shown in the top half of Figure 8.18. If you prefer to leave the original in place during a move, you have to clone the selection — that is, create a copy of the selection without upsetting the contents of the Clipboard. Photoshop offers several ways to clone a selection:
Alt-dragging (Option-dragging on the Mac): When the Move tool is active, press Alt (Option on the Mac) and drag a selection to clone it. Figure 8.18 shows a selection that was moved once and Alt-dragged three times.
Ctrl+Alt-dragging (
+Option-dragging on the Mac): If some tool other than the Move tool is active, press Ctrl+Alt (
Figure 8.18. When you move a selection, you leave a gaping hole in the selection's wake — and you can also see the edges where you may have missed some of the desired content (see edges of hole). When you clone an image, you leave a copy of the selection behind. To illustrate this point, the selection was moved once, and then duplicated three times.
Alt+arrowing (Option+arrowing on the Mac): When the Move tool is active, press Alt (Win) or Option (Mac) and one of the arrow keys to clone the selection and nudge it one pixel away from the original. If you want to move the image multiple pixels, press Alt+arrow (Option+arrow on the Mac) the first time only. Then nudge the clone using the arrow key alone. Otherwise, you'll create a bunch of clones, which probably isn't what you want to do.
Ctrl+Alt+arrowing (
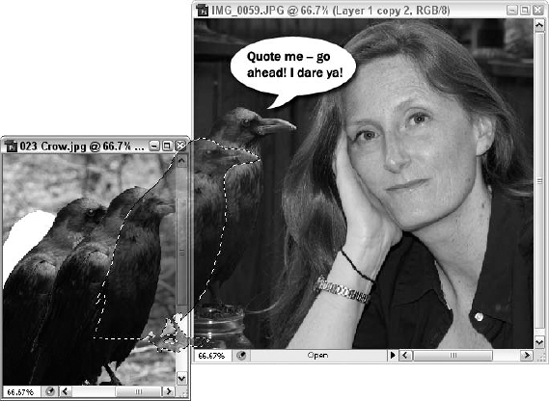
+Option+arrowing on the Mac): If some other tool is active, press Ctrl and Alt (Drag-and-drop: Like about every other program on the planet, Photoshop lets you clone a selection between documents by dragging it with the move tool from one open window and dropping it in another, as demonstrated in Figure 8.19. As long as you manage to drop into the second window, the original image remains intact and selected in the first window. Notice that the layer from the image on the right appears smaller in the left image where it was dropped because the image on the left was captured at a higher resolution.
Tip
Don't worry about exact positioning during a drag-and-drop; first get the selection into the second window and then worry about placement.
Note
You can drag-and-drop multiple layers if you link the layers first. For more information on this subject, see Chapter 13.
Shift-drop: If the two images are exactly the same size — pixel for pixel — press Shift when dropping the selection to position it in the same spot that it occupied in the original image. This is called registering the selection.
Tip
If an area is selected in the destination image, Shift-dropping positions the selection you're moving in the center of the selection in the destination image. This tip works regardless of whether the two images are the same size.
Ctrl-drag-and-drop (
-drag-and-drop on the Mac): Again, if some other tool than the Move tool is selected, you must press Ctrl (Win) or
After all this talk about the Move tool and the Ctrl key (
Tip
You can nudge a selection outline independently of its contents by pressing an arrow key when a selection tool is active. Press Shift and an arrow key to move the outline in 10-pixel increments.
You also can drag and drop empty selection outlines between images. Again, the selection tool — the Marquee, Lasso, or Magic Wand — must be active. Just drag the outline from one image window and drop it into another. The difference is that only the selection outline gets cloned; the pixels remain behind. This is a great way to copy pixels back and forth between images. You can set up an exact selection outline in Image A, drag it into Image B with the Marquee tool, move it over the pixels you want to clone, and Ctrl-drag-and-drop (
So remember: The selection tools affect only the selection outline. The selection tools never affect the pixels themselves; that's the Move tool's job, as you'll see as you read on.
In case you were distracted while reading the last two sentences, here's the important thing to remember: Selection outlines stay independent — and entirely changeable — as long as a selection tool is active. In addition to moving a selection outline, you can transform it by choosing Select
When you select this command, Photoshop displays a transformation boundary framed by eight handles, as shown in Figure 8.20. This is known as a bounding box. You can drag the handles to adjust the outline as described in the upcoming list. In addition, the Options bar gives you access to a slew of mysterious option boxes, as shown at the top of the figure. You can type specific values to relocate, size, rotate, and skew the selection outline precisely.
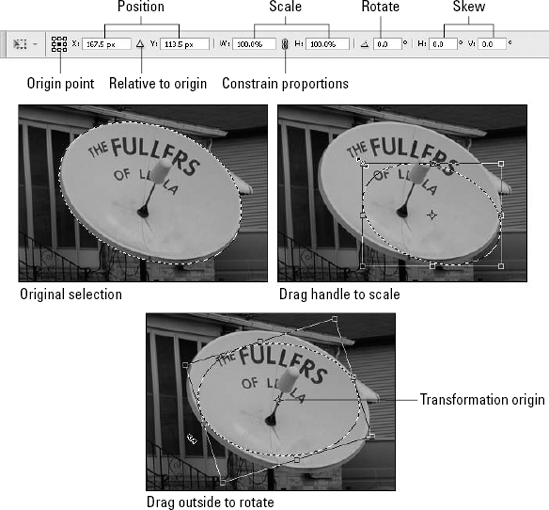
Figure 8.20. Much like using the Transform and Free Transform commands on actual image content, after choosing Select
The handles and Options bar controls work just as they do for the Edit
Scale: Drag any of the handles to scale the selection, as shown in Figure 8.20. Shift-drag to scale proportionally, Alt-drag (Option-drag on the Mac) to scale with respect to the origin (little cross hair/circle thing labeled in the figure). You can move the origin just by dragging it.
Alternatively, type a scale percentage in the W (width) and H (height) boxes in the Options bar. By default, Photoshop maintains the original proportions of the outline. If that doesn't suit you, click the Constrain Proportions button (it looks like a little chain) between the two boxes.
Note
See that little replica of the transformation boundary near the left end of the Options bar? The black square represents the current origin. You can click the boxes to relocate the origin to one of the handles. Use the X and Y values to change the position of the origin numerically. Click the triangular delta symbol, labeled in Figure 8.20, to measure positioning relative to the transformation origin.
Rotate: Type a value in the Rotate option box or drag outside the transformation boundary to rotate the selection, as in the second example in Figure 8.20. The rotation always occurs with respect to the origin.
Tip
To rotate the outline by 90 or 180 degrees, right-click (Control-click on the Mac) the image window and choose the rotation amount you want from the resulting pop-up menu.
Flip: You can flip a selection outline by dragging one handle past its opposite handle, but this is lots of work. The easier way is to right-click (Control-click on the Mac) inside the image window and choose Flip Horizontal or Flip Vertical from the pop-up menu.
Skew and distort: To skew the selection outline, Ctrl-drag (
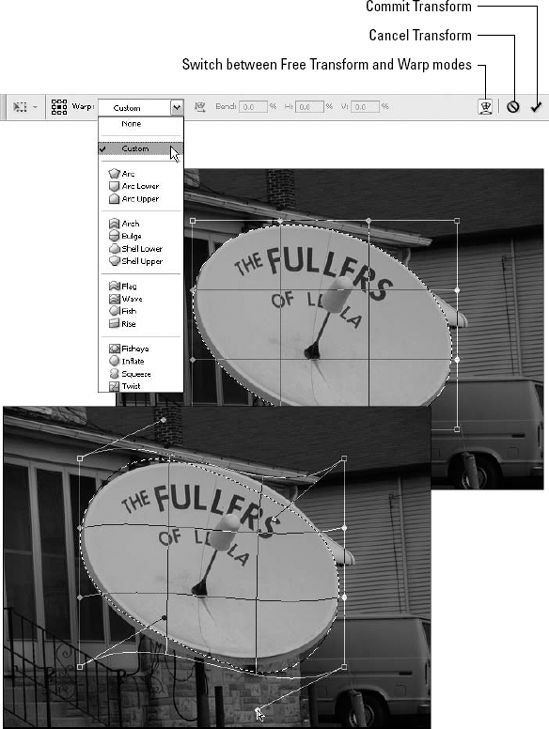
Warp: Photoshop's Warp capabilities now extend to selections as well as image content. In Warp mode, you can distort the selection using the grid and additional handles shown in Figure 8.21. You can drag any of the grid intersections, the gray solid handles on the perimeter, the corner box handles, or points along any of the gridlines.
You can click the Warp list (shown in Figure 8.21) and select a preset grid. The grid appears in the shape you choose, and the Bend, Height, and Width fields become available. The top image in Figure 8.18 shows the default Custom warp grid in place. The image on the bottom shows a warp in progress. When you drag from a handle once, additional handles appear to allow you to change the angle of the corner or slide in question. To commit to your warp changes, click the check mark button (shown in Figure 8.21), or press Return or Enter. Esc abandons the Warp and restores your selection to its prewarp state.
Note
Read more about warping image content in Chapter 13.
When you get the selection outline the way you want it, press Enter or Return or double-click inside the boundary. To cancel the transformation, press Escape. You also can click the check mark button near the right end of the Options bar to apply the transformation or click the "no" symbol button to cancel the operation.
Now that you know all about the main, basic selection tools and how to manipulate their selections, it's time to move on to one of the more powerful, yet complex tools that can be used to create selections. Photoshop's path tools provide the most flexible and precise ways to define a selection short of masking, but they can be something of a mystery and a technical challenge to novices and intermediate-level users. Given that most people underestimate their knowledge of Photoshop (other than total novices, who know they have little or no experience), you may not know which level you're on — but don't worry. Most people take some time to grow comfortable with the Pen tool, for example, because it requires you to draw a selection outline one point at a time.
Note
If you're familiar with Illustrator's Pen tool and other path-editing functions, you'll find Photoshop's tools nearly identical. Users of other illustration programs, such as CorelDRAW, also will recognize many similarities with the Bézier tool, used to draw curved lines and shapes. Of course, Photoshop doesn't provide the breadth of options available in Illustrator and these other program's Pen/Bézier tools, but the basic techniques are the same. Photoshop also includes a set of path-drawing tools to help smooth out the learning curve — and the possibly undesirable paths you've drawn — for inexperienced users. You can use any of the shape tools — Rectangle, Rounded Rectangle, Line, Ellipse, Polygon, and Custom Shape — to draw a simple geometric path.
The following pages get you up and running with all the path features. You learn how to draw a path, edit it, convert it to a selection outline, and stroke it with a paint or edit tool. You'll be a path-drawing, editing, converting, painting maniac just a few pages from now.
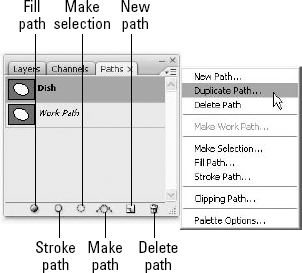
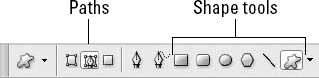
You create and edit paths from scratch by using the various pen tools or shape tools. (Figure 8.2, earlier in this chapter, shows all the path-related tools along with their selection tool counterparts.) Path management options — which enable you to convert paths to selections, fill and stroke paths, and save and delete them — reside in the Paths palette, shown in Figure 8.22.
Paths differ from normal selections because they exist on the equivalent of a distinct, object-oriented layer that sits in front of the bitmapped image. This setup enables you to edit a path with point-by-point precision with no fear that you'll accidentally make any change to the image, as you can when you edit ordinary selection outlines. After you get a path just so, one of the things you can do with it is convert it to a standard selection outline. This allows you to take advantage of the fine tools available for the creation and editing of a path, and then use that path as a regular selection to edit the contents of the image. Of course, you can do many other things with paths — and you'll find out about them as you read on in this and the following sections.
The following steps explain the basic process of drawing a selection outline with the path tools. The individual steps are explained in greater detail later in the chapter, but this procedure should enable you to sort of sneak up to the pool and dip your toe in — diving comes later.
STEPS: Creating a Selection with the Path Tools
Draw the path. Make sure the Paths button is selected in the Options bar, and then use a Pen tool or a Shape tool to draw the outline of your prospective selection.
Note
If your goal is to select multiple areas of the image, draw outlines around all of them. A path can include as many separate segments as you like. Technically, the individual segments in a path are called subpaths.
Edit the path. If the path requires some adjustment, reshape it using the other path tools.
Save the path. When you get the path exactly as you want it, save the path by choosing the Save Path command from the Paths palette menu. Or double-click the Work Path item in the scrolling list.
Convert the path to a selection. You can make the path a selection outline by choosing the Make Selection command or by pressing Enter on the numeric keypad when a path or selection tool is active.
That's it. After you convert the path to a selection, it works like any of the selection outlines described earlier. You can feather a selection, move it, copy it, clone it, or apply one of the special effects described in future chapters. The path remains intact in case you want to do further editing or use it again.
Before you get into how you draw and edit paths, here's a quick introduction to the path tools. To start, take a look at the tools on the Pen tool flyout:

Pen: Use the Pen tool to draw paths in Photoshop one point at a time. Click to create a corner in a path; click and drag to make a smooth point that results in a continuous arc. Fear not, this tool is explained ad nauseam in the section "Drawing paths with the Pen tool" later in this chapter. You can select the Pen tool by pressing P; press P again to toggle to the Freeform Pen, described next. (As always, the shortcuts assume that you have deselected the Use Shift Key for Tool Switch option in the Preferences dialog box.)

Freeform Pen: Click and drag with this tool to create a path that automatically follows the twists and turns of your drag. Simplicity at its best; control at its lowest. Luckily, you can turn around and edit the path after you initially draw it, so the lack of control when drawing the path can be made up afterward as you edit it.

Magnetic Pen: The Magnetic Pen doesn't actually appear in the Toolbox. But if you select the Freeform Pen and then select the Magnetic option in the Options bar, the Freeform Pen dashes into a phone booth and becomes the Magnetic Pen. Click the edge of the foreground element you want to select and then move the cursor along the edge of the shape. Photoshop automatically assigns points as it deems appropriate.

Add Anchor Point: Click an existing path to add a point to it.

Delete Anchor Point: Click an existing point in a path to delete the point without creating a break in the path's outline.

Convert Point: Click or drag a point to convert it to a corner or smooth point. You also can drag a handle to convert the point. To access the Convert Point tool, press Alt (Win) or Option (Mac) when the Pen is active. Press Ctrl+Alt (
You can use the Pen tool to add, delete, and convert points, too, providing that you select the Auto Add/Delete option in the Options bar. Pass the cursor over a segment in a selected path to toggle to the Add Anchor Point tool; move the cursor over a point to get the Delete Anchor Point tool. Press Alt (Option on the Mac) over a point to get the Convert Point tool.
If all you need is a simple, geometric path, you can save time by creating the path with the shape tools. The shape tools are covered in detail in Chapter 15, so there's no need to repeat everything here. Just know that after you select a shape tool, you shift it into Path-Drawing mode by clicking the Paths button in the Options bar, labeled in Figure 8.23. (The pen that appears on the button face serves as a reminder that you're in path country.) Photoshop sets the shape tools to that mode automatically if you select them while working on an existing path.
As you draw, Photoshop automatically adds whatever points are needed. You only need to worry about selecting a path overlap button, which determines how paths intersect and interact. See the next section to find out which button to choose when.
After you create a path, you can select it or edit it by using the two tools on the flyout directly above the pen tools flyout:

Path Selection tool (black arrow): This tool selects an entire path. Just click inside the path to select it. If you created subpaths, the tool selects only the one under your cursor. You also use this tool to select vector objects, as explained in Chapter 14.

Direct Selection tool (white arrow): This tool permits you to click and drag points and handles to reshape a path. You can access the tool when any other path tool is active by pressing and holding Ctrl (
Note
From this point on, these two tools are referred to as the black arrow and white arrow. Why? Because Photoshop users are a visually oriented group, and it's a safe bet that you can find the right tool more quickly if you're told to "click with the black arrow" or "drag with the white arrow" than if you were to see the technical tool names in all references to the tools.
You can access the arrow tools from the keyboard by pressing A. You know the drill: Press A to switch to the tool that's currently active; press A again to toggle to the other tool. (Add Shift if you selected the Use Shift Key for Tool Switch option in the Preferences dialog box.)
When drawing with the regular Pen tool, you build a path by creating individual points. Photoshop automatically connects the points with segments, which are simply straight or curved lines. It will be hard not to drag (unless you're using the Freeform Pen), so be prepared to curse and start over a few times.
Note
Adobe prefers the term anchor points rather than points because the points anchor the path into place. But most people just call them points. Given that all points associated with paths are anchor points, it's not like there's some potential for confusion, right? Right.
All paths in Photoshop are Bézier (pronounced bay-zee-ay) paths, meaning they rely on the same mathematical curve definitions that make up the core of the PostScript printer language. The Bézier curve model allows for zero, one, or two levers to be associated with each point in a path. These levers, labeled in Figure 8.24, are called Bézier control handles or simply handles. You can move each handle in relation to a point, enabling you to bend and tug at a curved segment like it's a piece of soft wire.

Figure 8.24. Click and drag with the Pen tool to create a smooth point and then adjust the curve using Bézier control handles.
The following list summarizes how you can use the Pen tool to build paths in Photoshop:
Adding segments: To build a path, create one point after another until the path is the desired length and shape. Photoshop automatically draws a segment between each new point and its predecessor. (The next section gets specific about how you use the tool to create points.)
Closing the path: If you plan to convert the path to a selection outline, you need to complete the outline by clicking again on the first point in the path. Every point then has one segment entering it and another segment exiting it. Such a path is called a closed path because it completely encloses the desired area.
Leaving the path open: If you plan to apply the Stroke Path command (explained later), you may not want to close a path. To leave the path open, so it has a specific beginning and ending, deactivate the path by saving it (choose the Save Path command from the Paths palette menu).
Extending an open path: To reactivate an open path, click or drag one of its endpoints. Photoshop draws a segment between the endpoint and the next point you create.
Joining two open subpaths: To join one open subpath with another, click or drag an endpoint in the first subpath and then click or drag an endpoint in the second.
Specifying path overlap: You can set the path tools to one of four settings that control how Photoshop treats overlapping areas in a path when you convert the path to a selection.
To make your intentions known, click one of the buttons near the right end of the Options bar, identical to those seen back in Figure 8.10. The button you click remains in effect until you choose another button.
These buttons also appear when you draw paths with the shape tools. With either set of tools, your choices are as follows:
Add to path area: Select this button if you want all areas, overlapping or not, to be selected.
Subtract from path area: Select this button to draw a subpath that eats a hole in an existing path. Any areas that you enclose with the subpath are not selected. Note that if you select a path and the Make Selection command is dimmed in the Paths palette, it's probably because you drew the path with the Subtract option in force.
Intersect path areas: The opposite of Exclude, this option selects only overlapping areas.
Exclude overlapping path areas: Any overlapping regions are not included in the selection.
You can change the overlap setting for a subpath after you draw it if necessary. Select the paths with the black arrow tool, and then click the overlap button for the setting you want to use.
Deactivating paths: At any time, you can press Enter or Return to dismiss — deactivate — the path. When you do, Photoshop hides the path from view. To retrieve the path, click its name in the Paths palette. Be careful with this one, though: If you dismiss an unsaved path and then start drawing a new path, you can lose the dismissed one. For more details, see the section "Converting and saving paths" later in this chapter.
Hiding paths: If you merely want to hide paths from view, press Ctrl+H (
To get a better sense of how the Pen tool works, click the arrow button at the right end of the row of path-drawing icons to access the Pen Options (or "Option," in this case). Here you can select the Rubber Band option. This tells Photoshop to draw an animated segment between the last point drawn and the cursor.
Points in a Bézier path act like little road signs, each point steering the path by specifying how a segment enters it and how another segment exits it. You specify the identity of each little road sign by clicking, dragging, or Alt-dragging (Option-dragging on the Mac) with the Pen tool. The following items explain the specific kinds of points and segments you can create in Photoshop. See Figure 8.25 for examples.
Corner point: Click with the Pen tool to create a corner point, which represents the corner between two straight segments in a path.
Straight segment: Click at two different locations to create a straight segment between two corner points. Shift-click to draw a 45-degree-angle segment between the new corner point and its predecessor.
Smooth point: Drag to create a smooth point with two symmetrical Bézier control handles. A smooth point ensures that one segment meets with another in a continuous arc.
Curved segment: Drag at two different locations to create a curved segment between two smooth points.
Straight segment followed by curved: After drawing a straight segment, drag from the corner point you just created to add a Bézier control handle. Then drag again at a different location to append a curved segment to the end of the straight segment.
Curved segment followed by straight: After drawing a curved segment, Alt-click (Option-click on the Mac) the smooth point you just created to delete the forward Bézier control handle. This converts the smooth point to a corner point with one handle. Then click at a different location to append a straight segment to the end of the curved segment.
Cusp point: After drawing a curved segment, Alt-drag (Option-drag on the Mac) from the smooth point you just created to redirect the forward Bézier control handle, converting the smooth point to a corner point with two independent handles, sometimes known as a cusp point. Then click and drag again at a new location to append a curved segment that proceeds in a different direction than the previous curved segment.
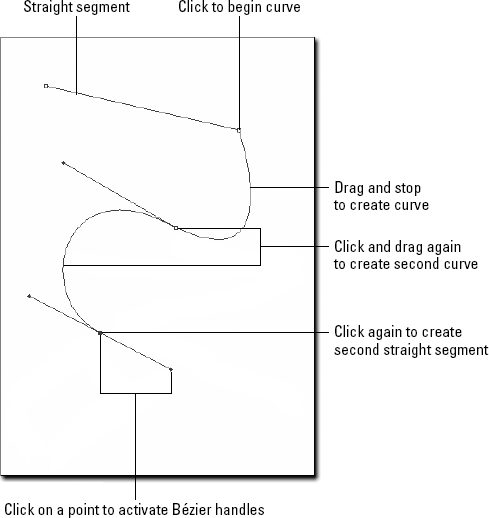
If the Pen tool is still a little hard for you to use or for any reason seems like overkill, try the Freeform Pen tool. Just click the P key while you already have the standard Pen in use, and you're there. As you drag, Photoshop tracks the motion of the cursor with a continuous line. After you release the mouse button, the program automatically assigns and positions the points and segments needed to create the Bézier path, which you can then edit as though you drew it with the regular Pen.
Tip
Despite its popularity for drawing freeform, wavy paths, you can draw straight segments with the Freeform Pen: As you're dragging, press and hold Alt (Win) or Option (Mac). Then click around to create points. When you're finished drawing straight segments, drag again and release Alt (Option on the Mac).
Sometimes, even such a powerful tool (in the hands of such a capable artisan) can mess up. When the program finishes its calculations, a path may appear riddled with far too many points or equipped with too few. What to do? Fortunately, you can adjust the performance of the Freeform Pen to accommodate your personal drawing style using the Curve Fit control, which you can access by clicking the arrow at the end of the row of path-drawing tool icons in the Options bar. Set before you begin drawing (changing the setting won't affect existing paths), you can type any value between 0.5 and 10, which Photoshop interprets in screen pixels. The default value of 2, for example, instructs the program to ignore any jags in your mouse movements that do not exceed 2 pixels in length or width. Setting the value to 0.5 makes the Freeform Pen extremely sensitive; setting the value to 10 smoothes the roughest of gestures.
A Curve Fit from 2 to 4 is generally adequate for most people, but you should experiment to determine the best setting. Like the Magic Wand's Tolerance setting, you can't alter the Curve Fit value for a path after you've drawn it. Photoshop calculates the points for a path only once, after you release the mouse button.
To use the Magnetic Pen tool, first select the Freeform Pen tool and then select the Magnetic option in the Options bar. The Magnetic Pen works like a combination of the Magnetic Lasso and the Freeform Pen. As with the Magnetic Lasso, you begin by clicking anywhere along the edge of the image element you want to select. (For a refresher on magnetism, go back and review Figure 8.6.) Then move the cursor — no need to drag — around the perimeter of the element, and watch Photoshop do its work. To set an anchor point, click. When you come full circle, click the point where you started to close the path.
You can create straight segments by Alt-clicking (Option-clicking on the Mac), just as you can when using the Freeform Pen without Magnetic selected. And the Curve Fit option, in the Freeform Pen Options drop-down palette shown in Figure 8.26, controls the smoothness of the path. Lower values trace the edges more carefully; higher values result in fewer points and smoother edges. The other options here give you access to the Width, Contrast, Frequency, and Pen Pressure, all of which should be familiar from your playing with the Lasso tool earlier in this chapter.
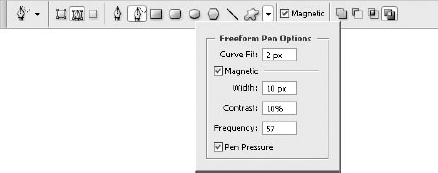
If you take time to master the default Pen tool, you'll find yourself drawing accurate paths more and more frequently. Even after mastering the tool's use and features, however, don't feel bad if you don't get it right 100 percent of the time — or even 50 percent of the time. When you rely on the Freeform or Magnetic Pen tools, the results are rarely, if ever, totally accurate – simply because your arm and hand are not robotic. From your first fledgling steps through to the point where you've developed into a maestro, you'll rely heavily on Photoshop's capability to reshape paths by moving points and handles, adding and deleting points, and converting points to change the curvature of segments. So don't worry too much if your path looks terrible. The path-editing tools provide all the correction capabilities you could ever want or need.
The white arrow tool — known officially as the Direct Selection tool — represents the foremost path-reshaping function in Photoshop. To select this tool from the keyboard, first press A to select the black arrow tool and then press A again to toggle to the white arrow. Or just Alt-click (Win) or Option-click (Mac) the black arrow tool in the Toolbox. You use the black arrow to select, relocate, and duplicate entire paths or subpaths, as explained in an upcoming section.
Tip
Press and hold Ctrl (Win) or
However you choose to activate the white arrow, you can perform any of the following functions with it:
Select points: Click a point to select it independently of other points in a path. Shift-click to select an additional point, even if the point belongs to a different subpath than other selected points. Alt-click (Win) or Option-click (Mac) a path to select all its points in one fell swoop. You can even select marquee points by dragging a rectangle around them. You cannot, however, apply commands from the Select menu, such as All or Deselect, to the selection of paths.
Drag selected points: To move one or more points, select them and then drag one of the selected points. All selected points move the same distance and direction. When you move a point while a neighboring point remains stationary, the segment between the two points shrinks, stretches, and bends to accommodate the change in distance. Segments located between two selected or deselected points remain unchanged during a move.
Tip
You can move selected points in 1-pixel increments by pressing arrow keys. If both a portion of the image and points in a path are selected, the arrow keys move the points only. Because paths reside on a higher layer, they take precedence in all functions that might concern them.
Drag a straight segment: You also can reshape a path by dragging its segments. When you drag a straight segment, the two corner points on either side of the segment move as well.
Warning
This technique works best with straight segments drawn with the default Pen tool. Segments created by Alt-clicking (Option-clicking on the Mac) with the Freeform or Magnetic Pen may include trace control handles that make Photoshop think that the segment is actually curved.
Drag a curved segment: When you drag a curved segment, you stretch, shrink, or bend that segment.
Tip
When you drag a curved segment, drag from the middle of the segment, approximately equidistant from both its points. This method provides the best leverage and ensures that the segment doesn't go flying off in some weird direction you hadn't anticipated.
Drag a Bézier control handle: Select a point and drag either of its Bézier control handles to change the curvature of the corresponding segment without moving any of the points in the path. If the point is a smooth point, moving one handle moves both handles in the path. If you want to move a smooth handle independently of its partner, you must use the convert point tool, as discussed in the section "Converting points" later in this chapter.
The quantity of points and segments in a path is always subject to change. Whether a path is closed or open, you can reshape it by adding and deleting points, which, in turn, forces the addition or deletion of a segment:
Appending a point to the end of an open path: If a path is open, you can activate one of its endpoints by clicking or dragging it with the Pen tool, depending on the identity of the endpoint and whether you want the next segment to be straight or curved. Photoshop is then prepared to draw a segment between the endpoint and the next point you create.
Closing an open path: You also can use the technique just described to close an open path. Select one endpoint, click or drag it with the Pen tool to activate it, and then click or drag the opposite endpoint. Photoshop draws a segment between the two endpoints, closing the path and eliminating both endpoints by converting them to interior points, which simply means the points are bound on both sides by segments.
Joining two open subpaths: You can join two open subpaths to create one longer open path. To do so, activate an endpoint of the first subpath and then, using the Pen tool, click or drag an endpoint of the second subpath.
Inserting a point in a segment: Using the Add Point tool, click anywhere along an open or closed path to insert a point and divide the segment into two segments. Photoshop automatically inserts a corner or smooth point, depending on its reading of the path. If the point does not exactly meet your needs, use the Convert Point tool to change it. In addition to using the Add Point tool, you can select the Auto Add/Delete option in the Options bar. Then, whenever you pass the Pen tool cursor over a segment, you see the little plus sign next to your cursor, indicating that the Add Point tool is temporarily in the house. This trick works only if the path is selected, however.
Deleting a point and breaking the path: The simplest way to delete a point and break the path is to select it with the white arrow and press Delete or Clear. (You also can choose Edit
Removing a point without breaking the path: Select the Delete Point tool and click a point in an open or closed path to delete the point and draw a new segment between the two points that neighbor it. The Delete Point tool ensures that no break occurs in a path.
Tip
To access the Delete Point tool when using the Pen tool, select the Auto Add/Delete option in the Options bar and then hover your cursor over a selected interior point in an existing path. You see the minus sign next to the cursor, indicating that the Delete Point tool is active. Click the point, and it goes away. Alternately, you can remove a point when the Add Point tool is active by Alt-clicking (Option-clicking on the Mac), and vice versa.
Deleting a segment: You can delete a single interior segment from a path without affecting any point. To do so, first click outside the path with the white arrow tool to deselect the path. Then click the segment you want to delete and press Delete. When you delete an interior segment, you create a break in your path.
Photoshop lets you change the identity of an interior point. You can convert a corner point to a smooth point, and vice versa. You perform all point conversions using the convert point tool as follows:
Smooth to corner: Click an existing smooth point to convert it to a corner point with no Bézier control handle.
Smooth to cusp: Drag one of the handles of a smooth point to move it independently of the other, thus converting the smooth point to a cusp.
Corner to smooth: Drag from a corner point to convert it to a smooth point with two symmetrical Bézier control handles.
Cusp to smooth: Drag one of the handles of a cusp point to lock both handles back into alignment, thus converting the cusp to a smooth point.
Tip
Press Alt (Win) or Option (Mac) to access the Convert Point tool temporarily when one of the three pen tools is active and positioned over a selected point. To do the same when an arrow tool is active, press Ctrl+Alt (
In addition to all the aforementioned path-altering techniques, you can scale, rotate, skew, and otherwise transform paths using the following techniques:
To transform all subpaths in a group — such as shown in the left example of Figure 8.27 — select either arrow tool and click off a path to make sure all paths are deselected. Then choose Edit
To transform a single subpath independently of others in a group, click it with the black arrow and then select the Show Bounding Box option in the Options bar. Or click the path with the white arrow, and choose Edit
Photoshop even lets you transform some points independently of others inside a single path. Just use the white arrow to select the points you want to modify, and then choose Edit
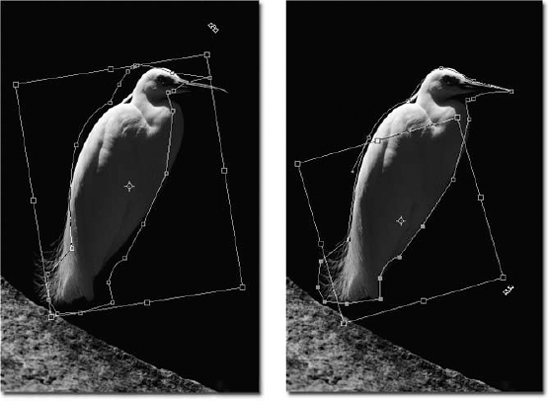
Figure 8.27. To transform multiple paths at once, deselect all paths and press Ctrl+T (
Tip
The keyboard shortcut for all of these operations is Ctrl+T (
While the topic of transformation is found in one central location — in a major section of Chapter 13 — it's probably a good idea to repeat some of the concepts here. Read on for a brief rundown of your transformation options after you press Ctrl+T (
Scale: To scale a path, drag one of the eight square handles that adorn the transformation boundary. Alt-drag (Win) or Option-drag (Mac) a handle to scale with respect to the origin point. You can move the origin by dragging it or by clicking one of the boxes in the little bounding box icon at the left end of the Options bar. To scale the path and maintain proportions, press the Shift key as you drag any of the corner handles.
Rotate: Drag outside the boundary to rotate the paths or points, as demonstrated in Figure 8.26.
Flip: Right-click (Control-click on the Mac) to access a pop-up menu of transformation options. Choose Flip Horizontal or Flip Vertical to create a mirror image of the path.
Skew: Ctrl-drag (Win) or
Distort: Ctrl-drag (Win) or
Perspective: Press Ctrl+Shift+Alt (
Note
You can't take advantage of the distortion or perspective feature when individual points are selected. These techniques apply to whole paths only.
Numerical transformations: If you need to transform a path by a very specific amount, use the controls in the Options bar, which are the same ones you get when transforming a regular selection. Modify the values as desired and press Enter or Return.
Warp: Click the Warp button on the Options bar while you're in Transformation mode for your path. The same grid and preset warp options that were discussed earlier in this chapter (remember the section on transforming selections?) appear for your warping pleasure.
When you finish stretching and distorting your paths, press Enter or Return or double-click inside the boundary to apply the transformation. You also can click the check mark button at the right end of the Options bar. To undo the last transformation in the transform mode, press Ctrl+Z (
Tip
To repeat the last transformation on another path, press Ctrl+Shift+T (
You can relocate and duplicate paths as follows:
Clone a path: Click inside the path with the black arrow tool to select it. To select multiple subpaths, Shift-click them, or marquee-drag around them. Then Alt-drag (Option-drag on the Mac) to clone all selected paths.
Move a path: After selecting the path with the black arrow, drag the path to its new home.
Align and distribute paths: You can align two or more paths by selecting them with the black arrow and then clicking an alignment button in the Options bar. To space the paths evenly across the image, click one of the distribution buttons, which are shown in Figure 8.28. Press Enter or Return or click the check mark button in the Options bar to apply the transformation.

When the black arrow is selected, the Options bar contains a Combine button (refer to Figure 8.28). Clicking this button merges all selected subpaths into one. When Photoshop combines the subpaths, it does so according to which path overlap options were active when you drew the subpaths. Remember, you can select a subpath with the black arrow to change its overlap setting if necessary. Just select the subpath, and then click the appropriate overlap button in the Options bar (refer to Figure 8.28). Refer to the section "Drawing paths with the Pen tool" for more information about overlap options.
To get rid of a path, click inside it with the black arrow or drag around it with the white arrow. Then press Delete. It's that simple!
After you finish drawing a path, you can convert it to a selection outline as described in the section "Converting paths to selections," or you can paint it. You can paint the interior of the path by choosing the Fill Path command from the Paths palette menu, or you can paint the outline of the path by choosing Stroke Path. In either case, Photoshop applies the fill on the active image layer.
The Fill Path command works much like Edit
Note
If you select one or more subpaths, the Fill Path command changes to Fill Subpaths, enabling you to fill only the selected subpaths. The fill path icon also affects only the selected subpaths.
When applying the fill, Photoshop adheres to the overlap option you used when creating the path. Suppose that you draw two round paths, one fully inside the other. If you drew both circles with the Add overlap option active, both circles get filled. If you drew the interior circle with the Invert option active, Photoshop fills only the area between the two paths, resulting in the letter O.
If the Fill Path command fills only part or none of the path, the path probably falls outside a selection outline. Choose Select
Unlike the Fill Path command, which works much like the Edit
To paint a path, choose the Stroke Path command from the Paths palette menu to display the Stroke Path dialog box shown in Figure 8.29. In this dialog box, you can choose the paint or edit tool with which you want to stroke the path (which only means to paint a brushstroke along a path). Photoshop drags the chosen tool along the exact route of the path, retaining any tool or brush shape settings that were in force when you chose the tool.
The Stroke Path dialog box includes a Simulate Pressure option, which is particularly useful for people who don't have a pressure-sensitive tablet. Provided you use appropriate settings in the Brushes palette, this option begins your stroke with a thin line, widens it as it reaches the middle, and then tapers it off as it reaches the end. The effect is similar to what you could achieve with a pressure-sensitive drawing tablet. Try experimenting with different settings in the Shape Dynamics dialog box (activated through the Brush Options bar), and tinker with pen pressure, pen shape, angle, and so forth. The more you play with this feature, the more you'll be able to anticipate the results of tweaking various settings and the more control you'll have over the tools in question — especially when they're applied to a path.
Tip
You also can display the Stroke Path dialog box by Alt-clicking (Option-clicking on the Mac) the Stroke Path icon, the second icon at the bottom of the Paths palette. If you prefer to bypass the dialog box, select a paint or edit tool and then click the Stroke Path icon or simply press Enter or Return. Instead of displaying the dialog box, Photoshop assumes that you want to use the selected tool and strokes away. If any tool but a paint or edit tool is active, Photoshop strokes the path using the tool you previously selected in the Stroke Path dialog box.
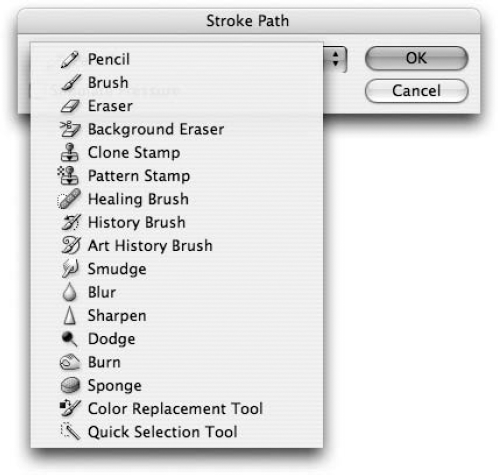
Photoshop provides two commands to switch between paths and selections, both of which are located in the Paths palette menu. The Make Selection command converts a path to a selection outline; the Make Work Path command converts a selection to a path. Regardless of how you create a path, you can save it with the current image, which enables you not only to reuse the path, but also to hide and display it as needed.
When you choose the Make Selection command or Alt-click (Option-click on the Mac) the make selection icon, Photoshop displays the dialog box shown in Figure 8.30. You can specify whether to anti-alias or feather the selection and to what degree. You also can instruct Photoshop to combine the prospective selection outline with any existing selection in the image. The Operation options correspond to the keyboard functions discussed in the section "Manually adding and subtracting" earlier in this chapter.
Figure 8.30. When you choose the Make Selection command, you have the option of combining the path with an existing selection.
Photoshop offers several alternatives to convert a path to a selection outline, all of which are more convenient than the Make Selection command:
Press Ctrl+Enter (Win) or
+Return (Mac). As long as a path, shape, or selection tool is active, this keyboard shortcut converts the path to a selection.Ctrl-click (Win) or
-click (Mac) the path name. If a tool other than a path, shape, or selection tool is active, you can Ctrl-click (Win) orCtrl+Shift+Enter or Ctrl+Shift-click (
+Shift+Return or+Shift-click on the Mac). To add the path to an existing selection, press Shift with one of the previous techniques.Alt+Enter or Ctrl+Alt-click (Option+Return or
+Option-click on the Mac). Naturally, if you can add, you can subtract.Shift+Alt+Enter or Ctrl+Shift+Alt-click (Shift+Option+Return or
+Shift+Option-click on the Mac). Now we're starting to get into some obscure stuff, but what's possible is possible. You select the intersection of a path and a selection outline by pressing a whole mess of keys.
All these techniques offer the advantage of hiding the path when converting the path to a selection, giving you full, unobstructed access to your selection outline.
Warning
By contrast, the Make Selection command leaves the path onscreen in front of the converted selection. If you try to copy, cut, delete, or nudge the selection, you perform the operation on the path instead.
You turn a selection into a path by choosing the Make Work Path command from the Paths palette. When you choose the command, Photoshop produces a dialog box containing a single option, Tolerance. Unlike the Tolerance options you've encountered so far, this one is accurate to 1/10 pixel and has nothing to do with colors or brightness values. Rather, it works like the Curve Fit option for the Freeform Pen and Magnetic Pen. That is, it permits you to specify Photoshop's sensitivity to twists and turns in a selection outline. The value you type determines how far the path can vary from the original selection. The lowest possible value, 0.5, not only ensures that Photoshop retains every nuance of the selection, but also can result in overly complicated paths with an abundance of points. If you type the highest value, 10, Photoshop rounds the path and uses few points. If you plan on editing the path, you probably won't want to venture any lower than 2.0, the default setting.
To bypass the Make Work Path dialog box and turn your selection into a path using the current Tolerance settings, click the Make Path icon at the bottom of the Paths palette.
As mentioned at the beginning of the paths discussion, saving a path is an integral step in the path-creation process. You can store every path you draw and keep it right where you need it in case you decide later to reselect an area. Because Photoshop defines paths as compact mathematical equations, they take up virtually no room when you save an image to disk — so you can make as many paths as you need in a given image and not worry about the impact on your hard drive.
You save one or more paths by choosing the Save Path command from the Paths palette menu or by simply double-clicking the italicized Work Path item in the scrolling list. After you perform the save operation, during which you name the path, the path name appears in non-italicized characters in the palette.
A path listed in the palette can include any number of separate paths. In fact, if you save a path and then set about drawing another one, Photoshop automatically adds the new path in with the saved path. To start a new path under a new name, you first must hide the existing path. Or click the new path icon — the little page at the bottom of the Paths palette — to establish an independent path. To hide paths, you can click the empty portion of the scrolling list below the last saved path name. You can even hide unsaved paths in this way. If you hide an unsaved path and then begin drawing a new one, however, the unsaved path is deleted, never to return again.
Paths are useful not only for working in Photoshop, but also for importing images into drawing programs, such as Illustrator and FreeHand, and into page-layout programs, such as InDesign and QuarkXPress. By saving a path as a clipping path, you can mask a region of an image so that it appears transparent when placed in other programs that support clipping paths.
In addition, you can swap paths directly with the most recent versions of Illustrator and FreeHand. That way, you can take advantage of the more advanced path-creation features found in those programs. You can even copy and paste paths into After Effects for use as masks or even motion paths.
The last few sections of this chapter explain some of these added uses for your Photoshop paths.
You can exchange paths between Photoshop and Illustrator or FreeHand by using the Clipboard. This special cross-application compatibility feature expands and simplifies a variety of path-editing functions.
Warning
To avoid having problems transferring data between Photoshop and Illustrator, go into Illustrator, choose Edit
Suppose that you want to scale and rotate a path. Select the path in Photoshop with the black arrow tool and copy it to the Clipboard by pressing Ctrl+C (
When you paste an Illustrator path into Photoshop, the dialog box that opens gives you the option of rendering the path to pixels (just as you can render an Illustrator EPS document using File
Note
You can copy paths from Photoshop and paste them into Illustrator or some other drawing program regardless of the setting of the Export Clipboard option in the Preferences dialog box. That option affects only pixels. Paths are so tiny that Photoshop always exports them.
If you don't have enough memory to run both Illustrator and Photoshop at the same time, you can export Photoshop paths to disk and then open them in Illustrator. To export all paths in the current image, choose File
Note
Unfortunately, Illustrator provides no equivalent function to export paths for use in Photoshop, nor can Photoshop open Illustrator documents from disk and interpret them as paths. This means the Clipboard is the only way to take a path created or edited in Illustrator and use it in Photoshop.
Adobe's object-oriented design programs, InDesign 2 (or later) and Illustrator 10 (or later), can read transparency straight from a native Photoshop (PSD) file. However, in virtually every other program — including popular applications like QuarkXPress and FreeHand — any image file, whether it contains transparent pixels or not, comes in as a fully opaque rectangle. Even if the image appeared partially transparent in Photoshop — on a layer, for example — the pixels will be filled with white or some other color. In cases like this, you need to establish a clipping path to mask portions of an image that you want to appear transparent. Elements that lie inside the clipping path are opaque; elements outside the clipping path are transparent. Photoshop allows you to export an image in the EPS format with an object-oriented clipping path intact. When you import the image, it appears premasked with a perfectly smooth perimeter, as illustrated by the clipped image in Figure 8.31.
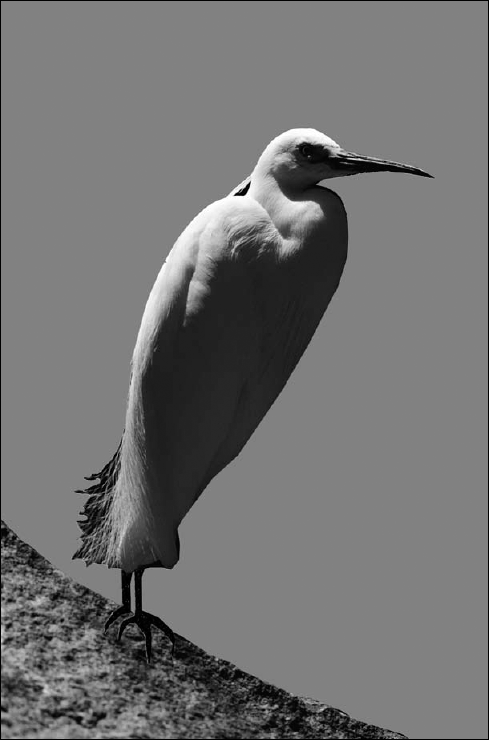
In this chapter, you learned about making selections in many ways. You learned special tricks that work with only the marquee tools, and found out how to gain greater control over your fine selections with the Polygonal and Magnetic Lasso tools, as well as the new Refine Edge dialog box, which is available with all of CS3's selection tools. You also learned to select based on pixels with the Magic Wand, and to create paths and selections with the Pen tool.
Because selections are often in need of a tweak, you learned manual and automatic methods for editing selection outlines, and how to use the Feather command. You also learned to move and clone selections and selection outlines, and to fill and stroke your selections and paths.