Target Tones
What you see is not what you always get - target your levels to your output device for predictable results
Setting the levels in a digital image is only the first step to achieving optimized images. It is also necessary to optimize the image for the intended output device. To achieve optimum tonal quality in your digital images it is important to target both the highlight and shadow tones within each image. When using Elements the Eyedropper Tool is a key to unlock the quality that lies dormant in any one of your images that has been correctly exposed.
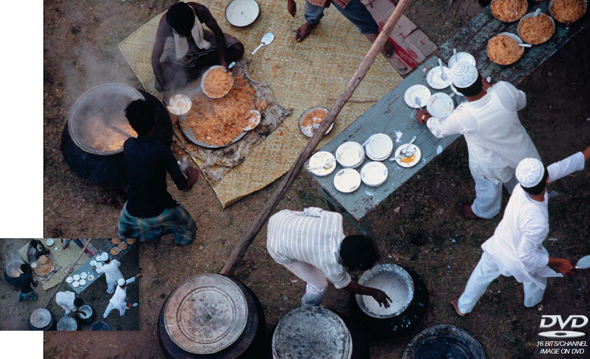
To achieve maximum quality set the target levels in images that are in 16 Bits/Channel mode (accessed through the camera RAW format or via scans from film that have been requested as 48-bit output scans. If you are optimizing your files in 8 Bits/Channel (via JPEG files) be sure to use an adjustment layer rather than an adjustment from the Enhance menu.
Ansel Adams was responsible for creating the famous/infamous ‘Zone System’ in order to precisely control the tonal range of each of his masterpieces. If you look carefully at one of his beautiful landscape photographs you will notice that only the light source (or its reflection - something termed a ‘specular highlight’) appears as paper white. All the rest of the bright highlights reveal tone or texture. Likewise, the shadows may appear very dark, but they are not devoid of detail. Ansel was careful only to render black holes as black. Any surface, even those in shadow, would render glorious amounts of subtle detail.

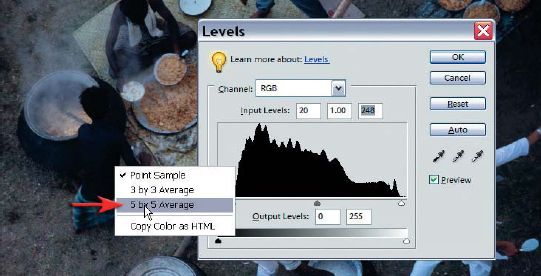
Even though you have set your levels (as guided in Project 2 or 3) it is no guarantee that your highlight or shadow tones will be visible in the final print. To make sure the highlight detail does not ‘blow out’ (become white) and the shadow detail is not lost in a sea of black ink it is possible to target, or set specific tonal values to these important tones. The tones that should be targeted are the lightest and darkest areas in the image that contain detail. The default settings of the eyedroppers to be found in the Levels dialog box are set to 0 (black) and 255 (white). These settings are only useful for targeting the white overexposed areas or black underexposed areas. These tools can however be recalibrated to something much more useful, i.e. tones with detail. A typical photo quality inkjet printer printing on premium grade photo paper will usually render detail between the levels 15 and 250. Precise values can be gained by printing a ‘step wedge’ of specific tones to evaluate the darkest tone that is not black and the brightest tone that is not paper white (see ‘Project 8 - Printing’ for more guidance on this subject).
PERFORMANCE TIP
The precise target values for images destined for the commercial printing industry are dependent on the inks, papers and processes in use. Images are sometimes optimized for press by skilled operatives during the conversion to CMYK. Sometimes they are not. If in doubt you should check with the publication to get an idea of what you are expected to do and what you should be aiming for if the responsibility is yours.
1. For maximum quality you would be wise to optimize your histogram in camera RAW or in 16 Bits/Channel mode. If the file is in 16 Bits/Channel mode you will need to access a levels adjustment from the Enhance >Adjust Lighting submenu. If the file is in 8 Bits/Channel mode (due to being captured using the JPEG file format you are advised to create a levels adjustment layer by clicking on the ‘Create new fill or adjustment layer’ icon in the Layers palette. A tall peak at either level 0 or level 255 is a strong indicator that detail has already been lost either by excessive subject contrast or inappropriate exposure during the capture stage. If this is the case your shadow or highlight detail is already irrecoverable.
2. Hold down the Alt key and drag the Shadow slider to the right. Keep dragging the slider until the darkest shadows become visible in the Image window. Carefully view the image to locate the darkest shadow or surface within the image. Be careful to make a mental note of the position of a representative tone, e.g. a dark surface rather than a black hole and then return the Shadow slider to level 0.
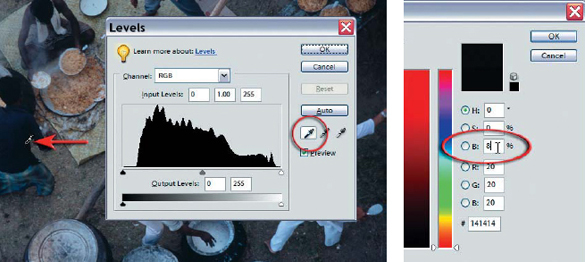
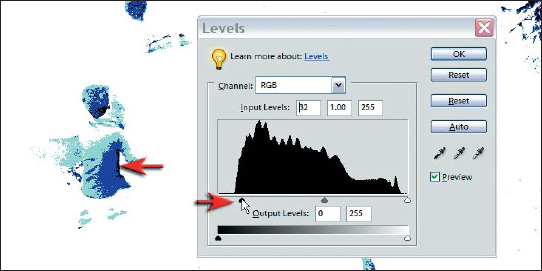
4. Double-click the Set Black Point eyedropper in the Levels dialog box to display the Color Picker. Enter a value of 6 to 8 in the ‘Brightness’ field (part of the hue, saturation and brightness or ‘HSB’ controls) and select OK. The precise value is dependent on your printer, paper and ink choice. You can experiment with alternative values later when you have completed the printing project. Move your mouse cursor into the image window and click on the darkest shadow tone that requires visible detail. This action will set your shadow tone.
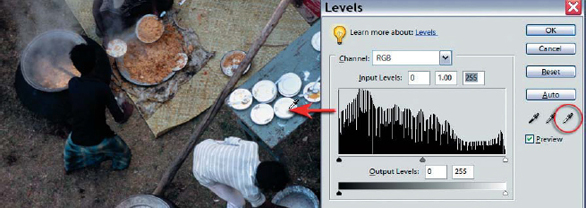
5. Double-click the Set White Point eyedropper to display the Color Picker again. This time enter a value of 98 in the ‘Brightness’ field and select OK. Locate the brightest highlight within the image. Do not select a specular highlight such as a light source or a reflection of the light source that should be 255. With the Set White Point eyedropper still selected move into the image window and click on the target highlight to set this as the brightest highlight tone within your image.
Note >When targeting highlights and shadows of a color image a color cast may be introduced into the image if the tones to be targeted are not neutral or desaturated. This can be rectified using the Gray eyedropper to correct any cast introduced.
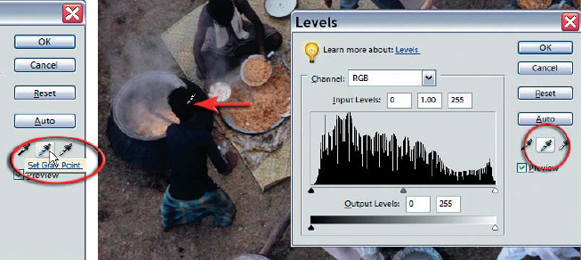
6. Select the Set Gray Point eyedropper (between the black and white point eyedroppers). Click on a suitable tone you wish to desaturate in an attempt to remove the color cast present in the image (try clicking on the black hair or cooking pots). The neutral tone selected to be the ‘Gray Point’ can be a dark or light tone within the image. If the tone selected is not representative of a neutral tone the color cast cannot be rectified effectively.
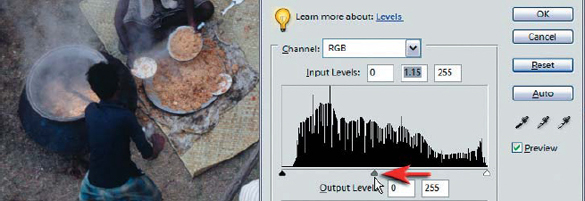
7. Move the Gamma slider to fine-tune the overall brightness of the midtones. Excessive movement of the Gamma slider however will upset the targeted tones set previously.
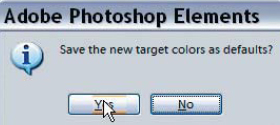
8. Click OK to apply the tonality changes to the image. When presented with the dialog box that reads ‘Save the new target colors as defaults?’ you can select ‘Yes’. This will ensure that when you use the eyedroppers on your next image all you need do is click once with each of the three eyedroppers.