
Contrast
Create dramatic images by building in some non-destructive contrast
One of the most important image adjustment features in a professional photographer’s workflow is Curves (a sort of Levels command on steroids). Adobe in their wisdom decided not to include this feature in their user-friendly Elements version. Curves does not appear in the Enhance menu or Adjustment layer menu – but this project shows you a way to hot-wire your version of Elements to increase your post-production editing power to maximum performance.
The problem with Brightness/Contrast
If you have been editing your images for some time you will understand that Levels is a superior option to enhance the brightness of your image than the Brightness/Contrast feature. Adjusting the brightness or contrast of an image using the Brightness/Contrast adjustment feature can be very destructive, e.g. if you want to make the shadows brighter and elect to use the Brightness/Contrast control, all of the pixels in the image are made brighter (not just the shadows) - causing the pixels that were already bright to fall off the end of the histogram and lose their detail or become white (level 255).
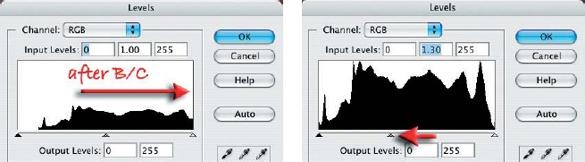
Moving the Gamma slider to the left in levels makes the image brighter without clipping the highlights
Using the Levels control you can move the center (Gamma) slider to make the image brighter whilst preserving the black point and white point within the image. This is a far less destructive way to edit the tonality of the image as the highlight detail is preserved and does not become ‘clipped’. The only problem with levels is that it cannot focus its attention on a limited range of tones or increase the midtone contrast of the image.
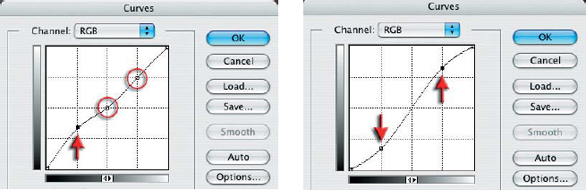
The curves adjustment feature in the full version of Photoshop allows the user to target tones within the image and move them independently, e.g. the user can decide to make only the darker tones lighter whilst preserving the value of both the midtones and the highlights. It is also possible to move the shadows in one direction and the highlights in another. In this way the midtone contrast of the image can be increased without losing valuable detail in either the shadows or the highlights. Impressed? You should be - and you should expect nothing less from your image-editing software.
Now there are three ways of overcoming the problem when using Adobe Elements to enable you to harness the power of Curves as an everyday editing tool. The first way is a bit cheeky and is available if you have access to a multilayered file created in the full version of Photoshop (check out the supporting DVD to download the file used in the example below).
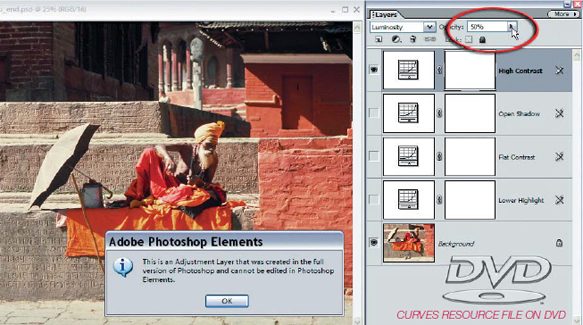
A Photoshop file opened in Photoshop Elements will allow the user limited functionality to modify the adjustments
Method 1 - Grand theft
One of the great mysteries of life is that although you can’t ‘create’ a curves adjustment layer in Photoshop Elements you can ‘open’ an image that already has one. Photoshop Elements allows you to see the effects of the curves adjustment layer (that was created in the full version of Photoshop), switch it off and on, and lower the opacity of the curves adjustment layer (enabling you to lower the effect of the adjustment layer gradually). You can also drag this curves adjustment layer into any other image file that is open in Elements (just click on the adjustment layer thumbnail in the Layers palette and drag it into another image window). Theoretically this means that if you had a single file that was created in Photoshop with a wide range of curves adjustment layers to suit your everyday image-editing tasks you could use this as a ‘Curves resource’ - just drag, drop and adjust the opacity to suit the needs of each image you are editing. The sort of adjustment layers that would be particularly useful would be those that enabled the Photoshop Elements user to increase and decrease image contrast, raise or lower shadow brightness independently, and raise or lower highlight brightness independently. If the adjustment layers contain generous adjustments they can be simply tailored to suit each new image-editing task by simply lowering or increasing the layer opacity. The adjustment layers are resolution independent, which is another way of saying that they will fit any image, big or small - naughty but very nice!
The second version is for users of Elements who want a little more control, have a guilty conscience or prefer to explore the advanced features of the package they have purchased rather than the one they have not. This second method allows you to access the ultimate tonal control that Curves has to offer using a different adjustment feature not really designed for the job but, when push comes to shove, can be adapted to fit the needs of the cash strapped image editor seeking quality and control.
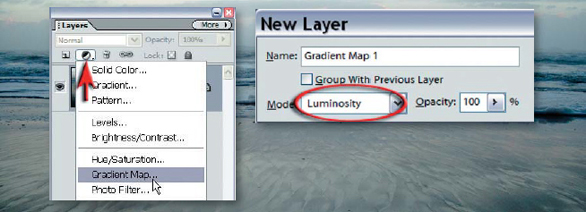
1. The first step is to hold down the Alt key, whilst selecting the ‘Gradient Map’ adjustment layer from the Create adjustment layer menu in the Layers palette. This will open the New Layer dialog box. Select Luminosity from the Mode menu and select OK.
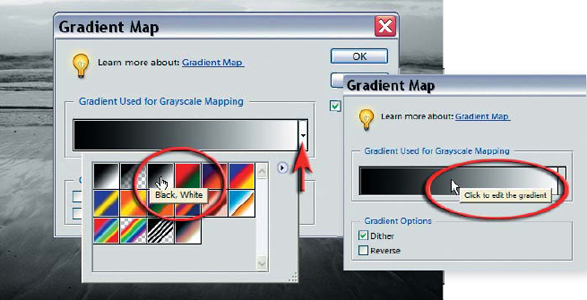
2. Click on the third gradient swatch in the presets menu (Black, White). Click on the gradient in the dialog box to open the Gradient Editor.
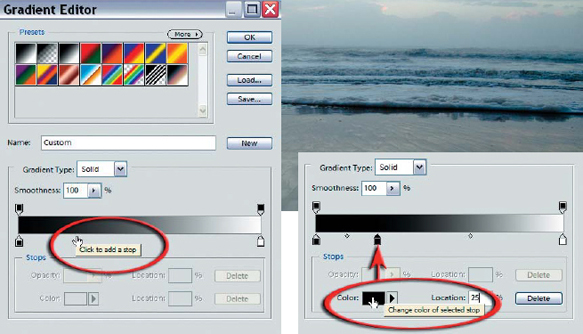
3. Move the cursor to just below the gray ramp and click to add a ‘stop’ slightly left of center. Type in 25% as the location and double-click on the color swatch to open the Color Picker.
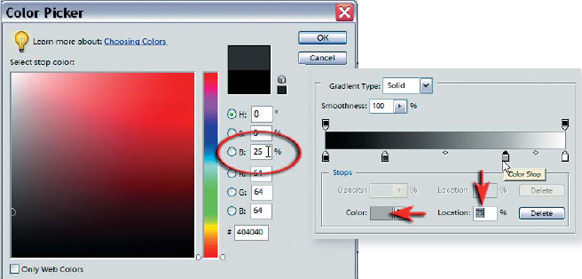
4. Choose a brightness value of 25% and click OK (ensure a value of 0 is entered in the other two fields of the HSB radio buttons). Add another stop right of center (at a location of approximately 75%) and again click on the color swatch to open the Color Picker. This time choose a brightness value of 75% and again click OK.
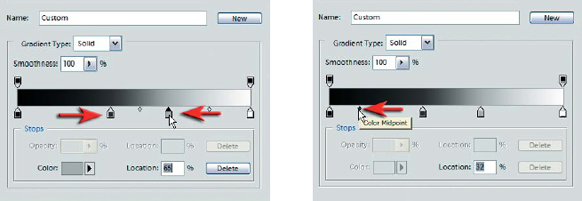
4. The ‘Black/White’ Gradient Map In Luminosity mode will leave the existing tonal values of your image the same as before. The magic starts when you start to drag the stops you created to new positions on the gray ramp. Moving the two sliders further apart will lower the contrast whilst dragging them closer together will increase contrast. A ‘Color Midpoint’ also appears between the two stops that you are adjusting to allow you to fine-tune your adjustment. In this project drag the two sliders together to increase the contrast but move the color midpoint to the left so that deep shadows do not become too dark. Be amazed - you are exercising absolute control over the brightness values of your image! This technique allows all of the versatility of a curves adjustment layer when editing the luminosity of your image.
PERFORMANCE TIP
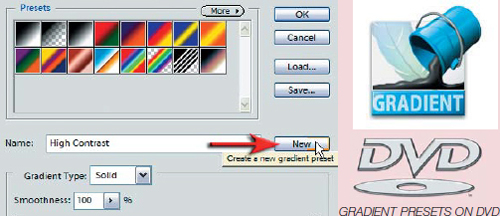
When you have created a modified gradient map you can name and add the map to the list of presets for future use. Download the Gradient presets file (Tonal_Gradients.grd) from the supporting DVD and use either your ‘Preset Manager’ from the Edit menu to add them to your gradient library or load them directly using the Gradient Editor by clicking on the ‘load’ button.
Note >Moving stops too close together can create steps or bands in the tonality of your image, creating an effect that is said to be ‘posterized’ and unnatural. It is important to realize there are limits to how much tonal manipulation an image is capable of handling before the quality suffers.
The gradient map adjustment layer set to Luminosity mode acts like a ‘hot-wired’ levels adjustment layer. Its advantage is that you can set as many stops or ‘sliders’ as you like, giving the user total control. Any localized areas that require further attention can simply be masked on the adjacent layer mask and tackled separately on a second Gradient Map layer.
Note >If you have a selection active when you choose the gradient map adjustment layer it automatically translates the selection into a layer mask, restricting any adjustments to the selected area.
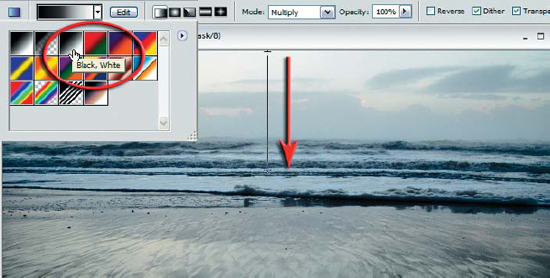
5. If you are looking to achieve a simple global contrast adjustment the project is complete. If however you want to enhance the image further using more gradients try the following techniques. Choose the Gradient Tool from the Tools palette (or type the letter G on the keyboard). Choose the ‘Black/White’ and ‘Linear’ options and then drag a gradient from the top of the image window to just below the horizon line. This will shield the sky from the contrast adjustment.
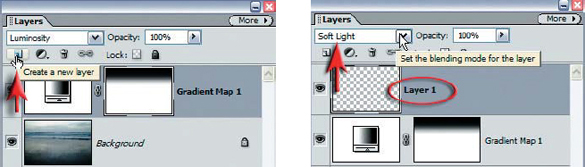
6. We will now balance the tonality in the image by darkening the sky. Click on the ‘Create a new layer’ icon in the Layers palette and set the blending mode of this new layer to ‘Soft Light’.
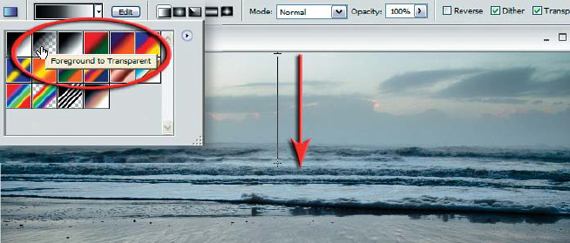
7. Ensure that black is the foreground default color (type the letter D on the keyboard) and then choose the ‘Foreground to Transparent’ gradient. Drag a gradient from the top of the image to a position just below the horizon line. Holding down the Shift key as you drag a gradient will ‘constrain’ the gradient to ensure that it is absolutely straight. Try changing the blend mode of this gradient layer to ‘Overlay’ and ‘Multiply’ to see the variations of tonality that can be achieved.
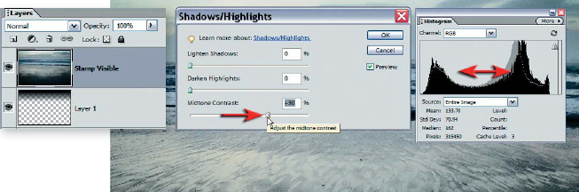
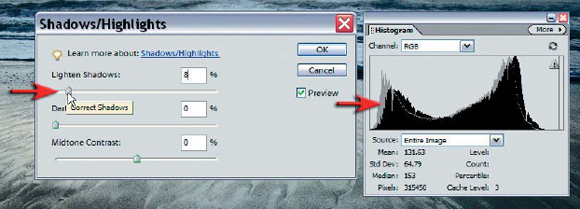
8. Yet another way of targeting tones for adjustment is using the Shadows/Highlights adjustment feature. This very useful adjustment feature is not available as an adjustment layer so you will need to create a ‘composite’ layer of the work carried out so far before you can apply it. This action of creating a composite layer (merging the visible elements from all of the other layers) is called ‘Stamp Visible’ by professional image editors (Adobe does not list this command in their menus). Select the top layer in the Layers palette and then hold down the Shift+Alt+Ctrl keys whilst you type the letter E on the keyboard. The new layer should appear on top of the layers stack. Double click the name of the layer to rename it ‘Stamp Visible’. Now choose ‘Shadows/Highlights’ from the Enhance >Adjust Lighting submenu. Set the Lighten Shadows and Darken Highlights sliders to 0 and raise the Midtone Contrast to +30. You can watch the effects of raising this slider by clicking on the ‘Preview’ box and by viewing the histogram in the Histogram palette.
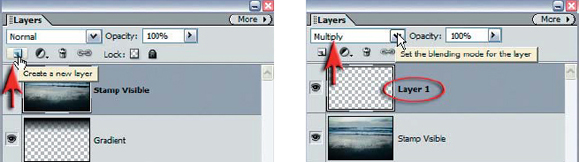
9. Create another new layer and this time set the blend mode to ‘Multiply’. As with the previous gradient you can experiment with alternative blend modes after you have finished creating this second gradient.
Note > You can also set the blend mode for a new layer in the New Layer dialog box.
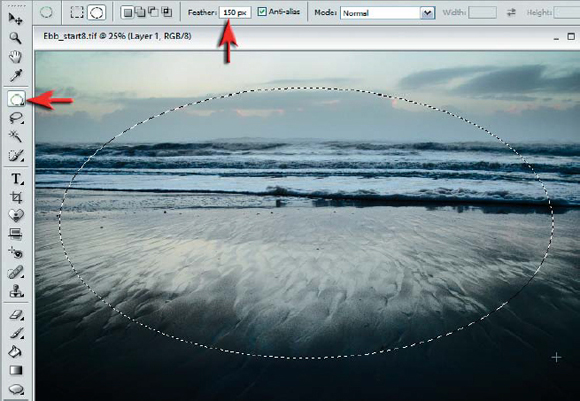
10. Choose the ‘Elliptical Marquee Tool’ from the Tools palette and choose a large amount of feather (increase the amount of feather as the resolution of the file gets bigger). Draw an elliptical selection in the Image window.
Note > You can check how soft this edge is by choosing the ‘Selection Brush Tool’ and clicking on the ‘Mask’ option.
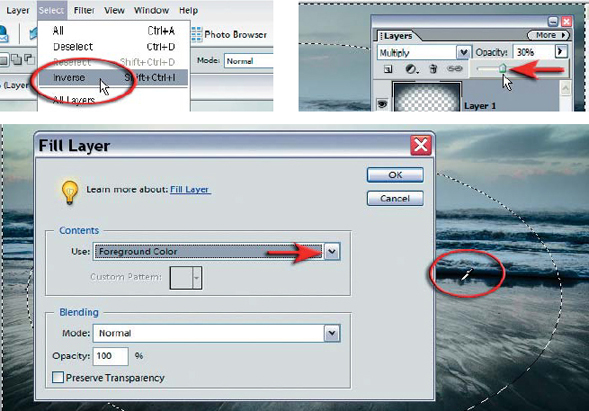
11. From the Select menu choose ‘Inverse’ (Shift+Ctrl+I) and then from the Edit menu choose the command ‘Fill Selection’. From the Contents section of the dialog box choose ‘Foreground Color’. Move the mouse cursor into the image and choose a deep blue color from the image window and then click OK. Lower the opacity of the layer until the vignette is subtle.
PERFORMANCE TIP
Use the Shadows/Highlights adjustment feature on the ‘Stamp Visible’ layer if the darkening of the shadows becomes excessive as a result of the vignette.

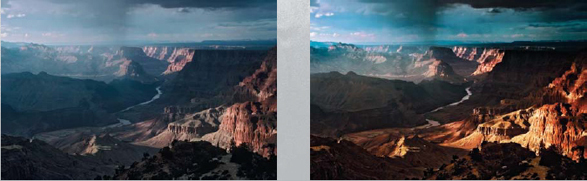
Method 3 - Blend modes
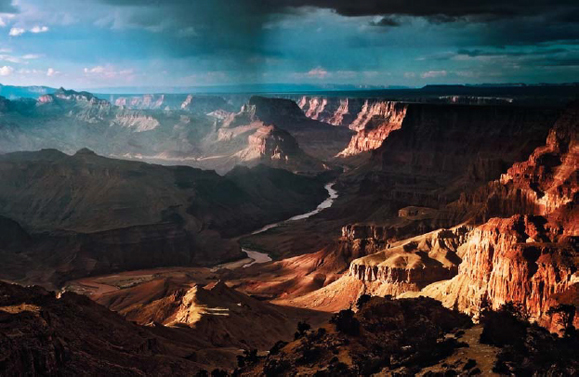
Blend modes are one of the most useful, but least understood, editing features to be found in Elements. One of the groups of layer blend modes that can be applied to layers leads to an increase in contrast of the resulting image, but without the destructive tendencies of the Brightness/Contrast adjustment feature.
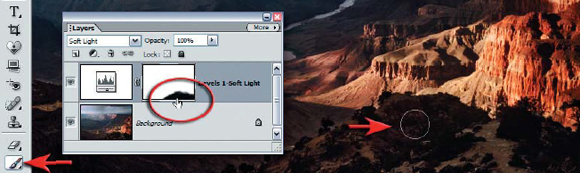
1. Open the canyon image from the supporting DVD and hold down the Alt key as you select a Levels adjustment layer. In the New Layer dialog box that opens select ‘Soft Light’ as the mode. What you now see (if you have the preview box checked in the dialog box) is instant contrast. This contrast is adjustable by moving any of the sliders beneath the histogram. You are able to target shadows, midtones or highlights using these sliders. Select OK to apply the changes.
2. Select black as the foreground color and with a soft edged brush at a reduced opacity paint out any localized contrast that is not beneficial to the final image. You should see the effects of the painting in the image and in the layer mask of the adjustment layer.
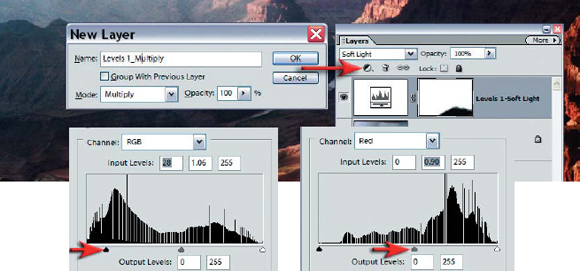
3. Create another new levels adjustment layer and this time set the blend mode of the layer to ‘Multiply’. This blend mode will darken the entire image but we will mask the lower portion of the image later. Focus your attention on just the sky and when you have increased the drama a little select OK. Although we are focussing our attention primarily on the tonality it is still possible to change the color using the individual color channels in the Levels dialog box.
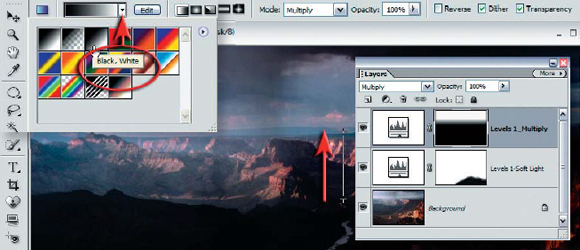
4. Select the ‘Gradient Tool’ from the Tools palette. Select the ‘Black, White’ option and drag a short gradient from the centre of the image up to the horizon line. The resulting mask will release the lower portion of the image from the grip of the ‘Multiply’ mode but leave the drama and depth in the sky and distant landscape.
PERFORMANCE TIP
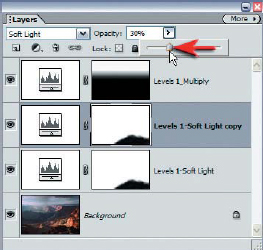
For even more drama and depth duplicate the ‘Soft Light’ levels adjustment layer (Ctrl+J). Lower the opacity of this layer until you achieve the contrast you are looking for. As with the previous method it is worth keeping the Histogram palette open when making these contrast adjustments so you will notice when the deepest shadows are possibly getting so dark that they will be difficult to print (below level 15). Use the Shadows/Highlights adjustment feature if this becomes the case - either on the background layer or on a new ‘Stamp Visible’ layer.
Summary
The gradient map adjustment layer in ‘Luminosity’ mode, a levels adjustment in ‘Soft Light’ mode and the targeted adjustments offered by the Shadows/Highlights adjustment feature make the need for a curves adjustment feature redundant. Absolute tonal and color control is just a blend mode away.