
Advanced AsyncTask and Progress Dialogs
In Chapter 13, we covered handlers and worker threads to run long-running tasks while the main thread kept the UI house in order. Android SDK has recognized this as a pattern and abstracted the handler and thread details into a utility class called AsyncTask. You can use AsyncTask to run tasks that take longer than five seconds in the context of UI. (We will cover how to run really long-running tasks, ranging from minutes to even hours, through “Long-Running Receivers and Services” in Chapter 16.)
This chapter will start with the basics of an AsyncTask and move to the code needed to present progress dialogs and progress bars that show the status of an AsyncTask correctly even if the device changes its configuration. Let’s start by introducing the AsyncTask through pseudocode in Listing 15-1.
Listing 15-1. Usage Pattern for an AsyncTask by an Activity
public class MyActivity  {
    void respondToMenuItem()    { //menu handler
       performALongTask();
    }
    void performALongTask()    { //using an AsyncTask
        //Derive from an AsyncTask, and Instantiate this AsyncTask
        MyLongTask myLongTask = new MyLongTask(...CallBackObjects...);
        myLongTask.execute(...someargs...); //start the work on a worker thread
        //have the main thread get back to its UI business
    }

    //Hear back from the AsyncTask
    void someCallBackFromAsyncTask(SomeParameterizedType x)    {
        //Although invoked by the AsyncTask this code runs on the main thread.
        //report back to the user of the progress
    }
}
Use of an AsyncTask starts with extending from AsyncTask first like the MyLongTask in Listing 15-1. Once you have the AsyncTask object instantiated, you can call execute() method on that object. The execute() method internally starts a separate thread to do the actual work. The AsyncTask implementation will in turn invoke a number of callbacks to report the beginning of the task, the progress of the task, and the end of the task. Listing 15-2 shows pseudocode to extend an AsyncTask and the methods that need to be overridden. (Please note that this is pseudocode and not intended to be compiled. The @override annotation is added to explicitly state that they are overridden from the base class.)
Listing 15-2. Extending an AsyncTask: An Example
public class MyLongTask extends AsyncTask<String,Integer,Integer> {
    //... constructors stuff
    //Calling execute() will result in calling all of these methods
    @Override
    void onPreExecute(){} //Runs on the main thread

    //This is where you do all the work and runs on the worker thread
    @Override
    Integer doInBackground(String... params){}

    //Runs on the main thread again once it finishes
    @Override
    void onPostExecute(Integer result){}

    //Runs on the main thread
    @Override
    void onProgressUpdate(Integer... progressValuesArray){}
    //....other methods
}
execute() method in Listing 15-1 is called on the main thread. This call will trigger a series of methods in Listing 15-2, starting with onPreExecute(). The onPreExecute() is called on the main thread as well. You can use this method to set up your environment to execute the task. You can also use this method to set up a dialog box or initiate a progress bar to indicate to the user that the work has started. After the completion of the onPreExecute(), execute() method will return and the main thread of the activity continues with its UI responsibilities. By that time the execute() would have spawned a new worker thread so that doInBackground() method is scheduled to be executed on that worker thread. You will do all your heavy lifting in this doInBackground() method. As this method runs on a worker thread, the main thread is not affected and you will not get the “application not responding” message. From the doInBackground() method you have a facility (you will see this shortly) to call the onProgressUpdate() to report the progress. This onProgressUpdate() method runs on the main thread so that you can affect the UI on the main thread.
Essentials of a Simple AsyncTask
Let’s get into the details of extending the AsyncTask. The AsyncTask class uses generics to provide type safety to its methods, including the overridden methods. You can see these generics when you look at the partial definition (Listing 15-3) of the AsyncTask class. (Please note that Listing 15-3 is an extremely pruned-down version of the AsyncTask class. It’s really just the elements of its interface most commonly used by client code.)
Listing 15-3. A Quick Look at the AsyncTask Class Definition
public class AsyncTask<Params, Progress, Result> {
    //A client will call this method
    AsyncTask<Params, Progress, Result>    execute(Params... params);

    //Do your work here. Frequently triggers onProgressUpdate()
    Result doInBackGround(Params... params);

    //Callback: After the work is complete
    void onPostExecute(Result result);

    //Callback: As the work is progressing
    void onProgressUpdate(Progress... progressValuesArray);
}
Studying Listing 15-3, you can see that the AsyncTask (through generics) needs the following three parameterized types (Params, Progress, and Result) when you extend it. Let’s explain these types briefly:
- Params (The type of parameters to the execute() method): When extending AsyncTask, you will need to indicate the type of parameters that you will pass to the execute() method. If you say your Params type is String, then the execute() method will expect any number of strings separated by commas in its invocation such as execute(s1,s2,s3) or execute(s1,s2,s3,s4,s5).
- Progress (Parameter types to the progress callback method): This type indicates the array of values passed back to the caller while reporting progress through the callback onProgressUpdate(Progress... progressValuesArray). The ability to pass an array of progress values allows situations where multiple aspects of a task can be monitored and reported on. For example, this feature could be used if an AsyncTask is working on multiple subtasks.
- Result (Type used to report the result through onPostExecute() method): This type indicates the type of the return value that is sent back as the final result from the execution through the callback onPostExecute(Result finalResult).
Knowing now the needed generic types for an AsyncTask, suppose we decide on the following parameters for our specific AsyncTask: Params: A String, Result: An int, Progress: An Integer. Then, we can declare an extended AsyncTask class as shown in Listing 15-4.
Listing 15-4. Extending the Generic AsyncTask Through Concrete Types
public class MyLongTask
extends AsyncTask<String,Integer,Integer>
{
    //...other constructors stuff
    //...other methods
    //Concrete methods based on the parameterized types
    protected Integer doInBackground(String... params);
    protected void onPostExecute(Integer result);
    protected void onProgressUpdate(Integer... progressValuesArray);

    //....other methods
}
Notice how this concrete class in Listing 15-4, MyLongTask, has disambiguated the type names and arrived at function signatures that are type safe.
Implementing Your First AsyncTask
Let’s now look at a simple, but complete, implementation of MyLongTask. We have amply commented the code in Listing 15-5 inline to indicate which methods run on which thread. Also pay attention to the constructor of MyLongTask where it receives object references of the calling context (usually an activity) and also a specific simple interface such as IReportBack to log progress messages.
The IReportBack interface is not critical to your understanding because it is merely a wrapper to a log. Same is true with the Utils class as well. You can see these additional classes in both of the downloadable projects for this chapter. The URL for the downloadable projects is in the references section at the end of this chapter. Listing 15-5 shows the complete code for MyLongTask.
Listing 15-5. Complete Source Code for Implementing an AsyncTask
//The following code is in MyLongTask.java (ProAndroid5_Ch15_TestAsyncTask.zip)
//Use menu item: Test Async1 to invoke this code
public class MyLongTask extends AsyncTask<String,Integer,Integer>
{
    IReportBack r; // an interface to report back log messages
    Context ctx;   //The activity to start a dialog
    public String tag = null;  //Debug tag
    ProgressDialog pd = null;  //To start, report, and stop a progress dialog

    //Constructor now
    MyLongTask(IReportBack inr, Context inCtx, String inTag)   {
        r = inr;  ctx = inCtx;  tag = inTag;
    }
    //Runs on the main ui thread
    protected void onPreExecute()    {
        Utils.logThreadSignature(this.tag);
        pd = ProgressDialog.show(ctx, "title", "In Progress...",true);
    }
    //Runs on the main ui thread. Triggered by publishProgress called multiple times
    protected void onProgressUpdate(Integer... progress)  {
        Utils.logThreadSignature(this.tag);
        Integer i = progress[0];
        r.reportBack(tag, "Progress:" + i.toString());
    }
    protected void onPostExecute(Integer result)     {
        //Runs on the main ui thread
        Utils.logThreadSignature(this.tag);
        r.reportBack(tag, "onPostExecute result:" + result);
        pd.cancel();
    }
    //Runs on a worker thread. May even be a pool if there are more tasks.
    protected Integer doInBackground(String...strings)    {
        Utils.logThreadSignature(this.tag);
        for(String s :strings)        {
            Log.d(tag, "Processing:" + s);
        }
        for (int i=0;i<3;i++)        {
            Utils.sleepForInSecs(2);
            publishProgress(i); //this calls onProgressUpdate
        }
        return 1; //this value is then passed to the onPostExecute as input
    }
}
We will go into the details of each of the methods highlighted in Listing 15-5 after covering briefly how a client would make use of (or call) MyLongTask.
Calling an AsyncTask
Once we have the class MyLongTask implemented, a client will utilize this class as shown in Listing 15-6.
Listing 15-6. Calling an AsyncTask
//You will find this class AsyncTester.java(ProAndroid5_Ch15_TestAsyncTask.zip)
//Use menu item: Test Async1 to invoke this code
void respondToMenuItem() {
   //An interface to log some messages back to the activity
   //See downloadable project if you need the details.
   IReportBack reportBackObject = this;
   Context ctx = this;   //activity
   String tag = "Task1"; //debug tag

   //Instantiate and execute the long task
   MyLongTask mlt = new MyLongTask(reportBackObject,ctx,tag);
   mlt.execute("String1","String2","String3");
}
Notice how the execute() method is called in Listing 15-6. Because we have indicated one of the generic types as a String and that the execute() methods takes a variable number of arguments for this type, we can pass any number of strings to the execute() method. In the example in Listing 15-6, we have passed three string arguments. You can pass more or less as you need.
Once we call the execute() method on the AsyncTask, this will result in a call to the onPreExecute() method followed by a call to the doInBackground() method. The system will also call the onPostExecute() callback once the doInBackground() method finishes. Refer to Listing 15-5 for how these methods are implemented.
Understanding the onPreExecute( ) Callback and Progress Dialog
Going back to MyLongTask implementation in Listing 15-5, in the onPreExecute() method we started a progress dialog to indicate that the task is in progress. Figure 15-1 shows an image of that dialog. (Use menu item Test Async1 to invoke this view from project download ProAndroid5_Ch15_TestAsyncTask.zip.)
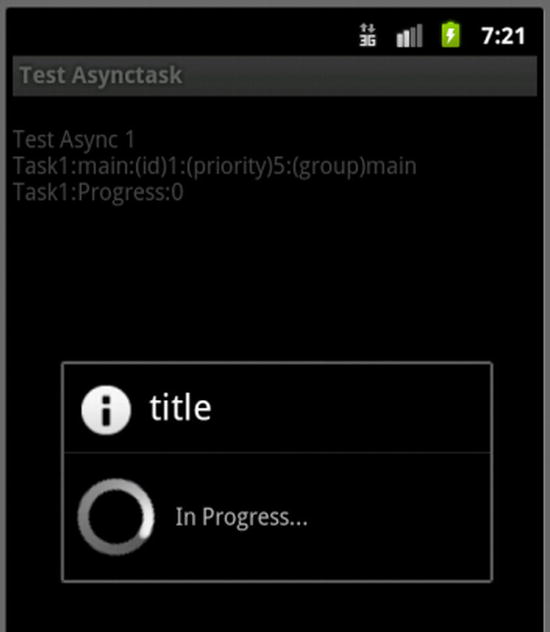
Figure 15-1. A simple progress dialog interacting with an AsyncTask
The code segment (taken from Listing 15-5) that shows the progress dialog is reproduced in Listing 15-7.
Listing 15-7. Showing an Indeterminate Progress Dialog
pd = ProgressDialog.show(ctx, "title", "In Progress...",true);
The variable pd was already declared in the constructor (see Listing 15-5). This call in Listing 15-7 will create a progress dialog and display it as shown in Figure 15-1. The last argument to the show() method in Listing 15-7 indicates if the dialog is indeterminate (whether the dialog can estimate beforehand how much work there is). We will cover the deterministic case in a later section.
Note Showing progress of an AsyncTask reliably is quite involved. This is because an activity can come and go, because of either a configuration change or another UI taking precedence. We will cover this essential need and solutions later in the chapter.
Understanding the doInBackground( ) Method
All the background work carried out by the AsyncTask is done in the doInBackground() method. This method is orchestrated by the AsyncTask to run on a worker thread. As a result, this work is allowed to take more than five seconds, unlike the work done on a main thread.
In our example from Listing 15-5, in the doInBackground() method we simply retrieve each of the input strings to the task as if they are an array. In this method definition we haven’t defined an explicit string array. However, the single argument to this function is defined as a variable-length argument, as shown in Listing 15-8.
Listing 15-8. doInBackground() Method Signature
protected Integer doInBackground(String...strings)
Java then treats the argument as if it is an array inside the function. So in our code in the doInBackground() method, we read each of the strings and log them to indicate that we know what they are. We then wait long enough to simulate a long-running operation. Because this method is running in a worker thread, we have no access to the UI functionality of Android from this worker thread. For instance, you won’t be able to update any Views directly even if you have access to them from this thread. You cannot even send a Toast from here. The next two methods allow us to overcome this.
Triggering onProgressUpdate( ) through publishProgress( )
In the doInBackground() method, you can trigger onProgressUpdate() by calling the publishProgress() method. The triggered onProgressUpdate() method then runs on the main thread. This allows the onProgressUpdate() method to update UI elements such as Views appropriately. You can also send a Toast from here. In Listing 15-5, we simply log a message. Once all the work is done, we return from the doInBackground() method with a result code.
Understanding the onPostExecute( ) Method
The result code from the doInBackground() method is then passed to the onPostExecute() callback method. This callback is also executed on the main thread. In this method, we tell the progress dialog to close. Being on the main thread, you can access any UI elements in this method with no restrictions.
Upgrading to a Deterministic Progress Dialog
In the previous example in Listing 15-5, we used a progress dialog (Figure 15-1) that doesn’t tell us what portion of the work is complete. This progress dialog is called an indeterminate progress dialog. If you set the indeterminate property to false on this progress dialog, you will see a progress dialog that tracks progress in steps. This is shown in Figure 15-2. (Use menu item “Test Async2” to invoke this view from project download ProAndroid5_Ch15_TestAsyncTask.zip.)
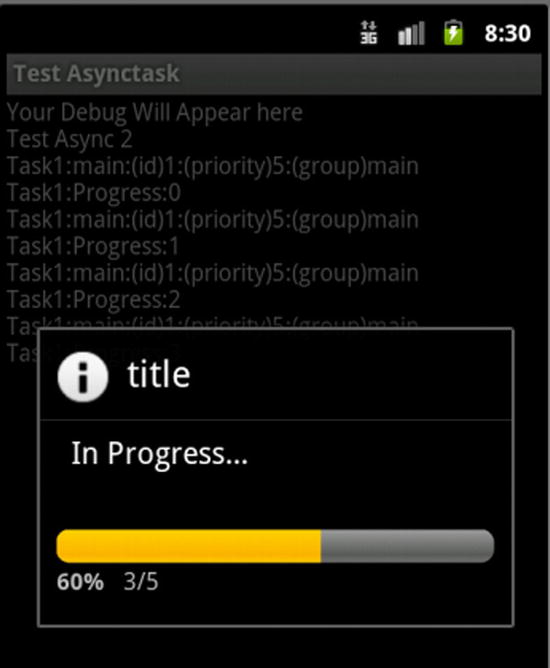
Figure 15-2. A progress dialog showing explicit progress, interacting with an AsyncTask
Listing 15-9 shows the previous task from Listing 15-5 rewritten to change the behavior of the progress dialog to a deterministic progress dialog. We have also added an onCancelListener to see if we need to cancel the task on cancelling the dialog. A user can click the back button in Figure 15-2 to cancel the dialog. Key portions of the code are given in Listing 15-9 (for the full code, see the download file ProAndroid5_Ch15_TestAsyncTask.zip).
Listing 15-9. A Long Task Utilizing a Deterministic Progress Dialog
//Following code is in MyLongTask1.java(ProAndroid5_Ch15_TestAsyncTask.zip)
//Use menu item: Test Async2 to invoke this code
public class MyLongTask1 extends AsyncTask<String,Integer,Integer>
implements OnCancelListener
{
    //..other code taken from Listing 15-5
    //Also refer to the java class MyLongTask1.java in the downloadable project
    //for full code listing.
    protected void onPreExecute()    {
         //....other code
        pd = new ProgressDialog(ctx);
        pd.setTitle("title");
        pd.setMessage("In Progress...");
        pd.setCancelable(true);
        pd.setOnCancelListener(this);
        pd.setIndeterminate(false);
        pd.setProgressStyle(ProgressDialog.STYLE_HORIZONTAL);
        pd.setMax(5);
        pd.show();
    }
    public void onCancel(DialogInterface d)    {
        r.reportBack(tag,"Cancel Called");
        this.cancel(true);
    }
    //..other code taken from Listing 15-5
}
Notice how we have prepared the progress dialog in Listing 15-9. In this case we haven’t used the static method show(), in contrast to what we did in Listing 15-5, on the progress dialog. Instead, we explicitly instantiated the progress dialog. The variable ctx stands for the context (or activity) in which this UI progress dialog operates. Then we individually set the properties on the dialog, including its deterministic or indeterminate behavior. The method setMax() indicates how many steps the progress dialog has. We have also passed the self reference (the AsyncTask itself) as a listener when cancel is triggered. In the cancel callback, we explicitly issue a cancel on the AsyncTask. The cancel() method will try to stop the worker thread if we call it with the boolean argument of false. A boolean argument of true will force-stop the worker thread.
AsyncTask and Thread Pools
Consider the code in Listing 15-10, where a menu item is invoking two AsyncTasks one after the other.
Listing 15-10. Invoking Two Long-Running Tasks
void respondToMenuItem() {
    MyLongTask mlt = new MyLongTask(this.mReportTo,this.mContext,"Task1");
    mlt.execute("String1","String2","String3");

    MyLongTask mlt1 = new MyLongTask(this.mReportTo,this.mContext,"Task2");
    mlt1.execute("String1","String2","String3");
}
Here we are executing two tasks on the main thread. You may expect that both the tasks get started close to each other. The default behavior, however, is that these tasks run sequentially using a single thread drawn out of a pool of threads. If you want a parallel execution, you can use the executeOnExecutor() method on the AsyncTask. See SDK docs for details on this method. Also as per the SDK documentation, it is not valid to call the execute() method more than once on a single AsyncTask. If you want that behavior, you have to instantiate a new task and call the execute() method again.
Issues and Solutions for Correctly Showing the Progress of an AsyncTask
If your primary goal with this chapter is to learn just the essentials of AsyncTask, then what we have covered so far is sufficient. However, there are some issues when an AsyncTask is paired with a progress dialog as shown in the previous listings so far. One of those issues is that an AsyncTask will lose the correct activity reference when the device is rotated, thereby also losing its reference to the progress dialog. The other issue is that the progress dialog we used earlier in the code is not a managed dialog. Let’s understand these issues now.
Dealing with Activity Pointers and Device Rotation
The activity pointer that is held by the AsyncTask becomes stale when the activity is re-created because of a configuration change. This is because Android has created a new activity and the old activity is no longer shown on the screen. So holding on to the old activity and its corresponding dialog is bad for a couple of reasons. The first is that the user is not seeing that activity or dialog that the AsyncTask is trying to update. The second reason is that the old activity needs to be garbage collected and you are stopping it from getting garbage collected because the AsyncTask is holding on to its reference. If you were to be smart and use a Java weak reference for the old activity, then you wouldn’t leak memory but you would get a null pointer exception. The case of stale pointer is true not only of the activity pointer but any other pointer that indirectly points to the activity.
There are two ways to address the stale activity reference issue. The recommended way is to use headless retained fragments. (Fragments are covered in Chapter 8. Retained fragments are fragments that stay around while the activity is re-created due to a configuration change. These fragments are also called headless because they don’t necessarily have to hold any UI.) Another way to solve the stale activity pointers is to use the retained objects callback from the activity. We will present both of these approaches for addressing the stale activity pointer issue.
Dealing with Managed Dialogs
Even if we are able to solve the stale activity reference issue and reestablish the connectivity to the current activity, there is a flaw in the way progress dialogs were used so far in this chapter. We have instantiated a ProgressDialog directly. A ProgressDialog created in this manner is not a “managed” dialog. If it is not a managed dialog, the activity will not re-create the dialog when the device undergoes rotation or any other configuration change. So, when the device rotates the AsyncTask is still running uninterrupted but the dialog will not show up. There are a couple of ways to solve this problem as well. The recommended way is not to use progress dialogs but instead use an embedded UI control in the activity itself, such as a progress bar. Because a progress bar is part of the activity view hierarchy, the hope is that it will be re-created. Although a progress bar sounds good, there are times when a modal progress dialog makes more sense. For example, that would be the case if you don’t want the user to interact with any other part of the activity while the AsyncTask is running. In those cases, we see little contradiction in using fragment dialogs instead of progress bars.
It’s time we step into the solutions to deal with the activity references issues and the managed dialogs issue. We will present three different solutions. The first one uses retained objects and fragment dialogs. The second one uses headless retained fragments and fragment dialogs. The third solution uses headless retained fragments and progress bars.
Testing Scenarios for a Well-Behaved Progress Dialog
Of the three solutions we have in this chapter, whichever you use to correctly display a progress dialog for an AsyncTask, the solution should work in all of the following test scenarios:
- Without an orientation change the progress dialog must start, show its progress, end, and also clean up the reference to the AsyncTask. This must work repeatedly to show that there are no vestiges left from the previous run.
- The solution should handle the orientation changes while the task is in the middle of its execution. The rotation should re-create the dialog and show progress where it left off. The dialog should properly finish and clean up the AsyncTask reference. This must work repeatedly to show that there are no vestiges left behind.
- The back should be disabled when the task starts to run.
- Going Home should be allowed even when the task is in the middle of execution.
- Going Home and revisiting the activity should show the dialog and correctly reflect the current progress, and the progress should never be less than the one before.
- Going Home and revisiting the activity also should work when the task finishes before returning. The dialog should be properly dismissed and the AsyncTask reference removed.
This set of test cases should always be performed for all activities dealing with AsyncTasks. Now that we have laid out how each solution should satisfy, let’s start with the first solution, the one that uses retained objects and fragment dialogs.
Using Retained Objects and Fragment Dialogs
In this first solution, let’s show you how to use retained objects and fragment dialogs for displaying progress correctly for an AsyncTask. This solution involves the following steps:
- The activity must keep track of an external object through its onRetainNonConfigurationInstance() callback. This external object must stick around and its reference validated as the activity is closed and brought back. That is why this object is referred to as a retained object. This retained object can either be the AsyncTask object itself or an intermediate object that holds a reference to the AsyncTask. Let’s call that a root retained activity-dependent object (or a root RADO). It is called a “root” because the onRetainNonConfigurationInstance() can use only one retained object reference.
- A root RADO then will have a pointer to the AsyncTask and can set and reset the activity pointer on AsyncTask as the activity comes and goes. So, this root RADO acts as an intermediary between the activity and the AsyncTask.
- The AsyncTask then will instantiate a fragment progress dialog instead of a plain non-managed progress dialog. The AsyncTask will use the activity pointer that is set by the root RADO to accomplish this, as you will need an activity to create a fragment including a fragment dialog.
- The activity will re-create the dialog fragment as it rotates and keeps its state properly because dialog fragments are managed. The AsyncTask can proceed to increment progress on the fragment dialog as long as the activity is set and available. Note that this dialog fragment is not, by itself, a retained fragment. It gets re-created as part of the activity life cycle.
- The fragment dialog can further disallow the cancel on it so that the user cannot go back to the activity from the dialog while the AsyncTask is in progress.
- However, a user can go Home by tapping Home and use other apps. This will push our activity, and the dialog with it, into the background. This must be handled. When the user returns to the activity or app, the dialog can continue to show the progress. The AsyncTask must know how to dismiss the fragment dialog if the task finishes while the activity is hidden. Being a fragment dialog, dismissing this dialog throws an invalid state exception if the activity is not in the foreground. So, the AsyncTask has to wait until the activity is reopened and in the right state to dismiss the dialog.
Exploring Corresponding Key Code Snippets
We will present now the key pieces of code that are used to implement the outlined approach. The rest of the implementation can be found in the downloadable project ProAndroid5_Ch15_TestAsyncTaskWithConfigChanges.zip for this chapter. As all solutions for this problem require the dialog to be a fragment dialog, so that the dialog can be managed, Listing 15-11 presents the source code of this fragment dialog first.
Listing 15-11. Encapsulating a ProgressDialog in a DialogFragment
//The following code is in ProgressDialogFragment.java
//(ProAndroid5_Ch15_TestAsyncTaskWithConfigChanges.zip)
/**
 * A DialogFragment that encapsulates a ProgressDialog.
 * This is not expected to be a retained fragment dialog.
 * Gets re-created as activity rotates following any fragment protocol.
 */
public class ProgressDialogFragment extends DialogFragment  {
    private static String tag = "ProgressDialogFragment";
    ProgressDialog pd; //Will be set by onCreateDialog

    //This gets called from ADOs such as retained fragments
    //typically done when activity is attached back to the AsyncTask
    private IFragmentDialogCallbacks fdc;
    public void setDialogFragmentCallbacks(IFragmentDialogCallbacks infdc)  {
        Log.d(tag, "attaching dialog callbacks");
        fdc = infdc;
    }

    //This is a default constructor. Called by the framework all the time
    //for reintroduction.
    public ProgressDialogFragment()    {
        //Should be safe for me to set cancelable as false;
        //wonder if that is carried through rebirth?
        this.setCancelable(false);
    }
    //One way for the client to attach in the beginning when the fragment is reborn.
    //The reattachment is done through setFragmentDialogCallbacks
    //This is a shortcut. Your compiler if enabled for lint may throw an error.
    //You can use the newInstance pattern and setbundle (see the fragments chapter)
    public ProgressDialogFragment(IFragmentDialogCallbacks infdc)    {
        this.fdc = infdc;
        this.setCancelable(false);
    }
    /**
     * This can get called multiple times each time the fragment is
     * re-created. So storing the dialog reference in a local variable should be safe
     */
    @Override
    public Dialog onCreateDialog(Bundle savedInstanceState)    {
        Log.d(tag,"In onCreateDialog");
        pd = new ProgressDialog(getActivity());
        pd.setTitle("title");
        pd.setMessage("In Progress...");
        pd.setIndeterminate(false);
        pd.setProgressStyle(ProgressDialog.STYLE_HORIZONTAL);
        pd.setMax(15);
        return pd;
    }
    //Called when the dialog is dismissed.I should tell my corresponding task
    //to close or do the right thing! This is done through call back to fdc
    //fdc: fragment dialog callbacks could be the Task, or Activity or the rootRADO
    //See Listing 15-12 to see how FDC is implemented by the task
    @Override
    public void onDismiss(DialogInterface dialog)    {
        super.onDismiss(dialog);
        Log.d(tag,"Dialog dismissed");
        if (fdc != null)        {
            fdc.onDismiss(this, dialog);
        }
    }
    @Override
    public void onCancel(DialogInterface dialog)    {
        super.onDismiss(dialog);
        Log.d(tag,"Dialog cancelled");
        if (fdc != null)    {
            fdc.onCancel(this, dialog);
        }
    }
    //will be called by a client like the task
    public void setProgress(int value)    {
        pd.setProgress(value);
    }
}
Code in Listing 15-11 shows how to wrap a regular non-managed ProgressDialog in a managed fragment dialog. We extend a DialogFragment and override its onCreateDialog() to return the ProgressDialog object. In addition to that basic feature, we added the ability to monitor when the progress dialog gets dismissed or cancelled. We also provide a setProgress() method on the wrapped class to call the setProgress() on the internal ProgressDialog. You can see the source code for the IFragmentDialogCallbacks in the downloadable project (ProAndroid5_Ch15_TestAsyncTaskWithConfigChanges.zip), as it is not that critical to understanding this fragment progress dialog.
Let’s see now how an AsyncTask can create and control this fragment progress dialog. Listing 15-12 presents the pseudocode for the AsyncTask in order to aid this understanding. For the complete source code, refer to downloadable project.
Listing 15-12. Pseudocode for an AsyncTask That Uses a Fragment Progress Dialog
//The following code is in MyLongTaskWithRADO.java
//(ProAndroid5_Ch15_TestAsyncTaskWithConfigChanges.zip)
//You can start this task through menu item: Flip Dialog with ADOs
public class MyLongTaskWithRADO extends AsyncTask<String,Integer,Integer>
implements IRetainedADO, IFragmentDialogCallbacks
{
    //....other code
    @Override public void onPreExecute()    {
        //....other code
        //get the activity as it would have been set by the root RADO
        Activity act = this.getActivity();

        //Create the progress diaolg
        ProgressDialogFragment pdf = new ProgressDialogFragment();
        //the show method will add and commit the fragment dialog
        pdf.show(act.getFragmentManager(), this.PROGRESS_DIALOG_FRAGMENT_TAG_NAME);
    }
    @Override public void onProgressUpdate()    {
        //if activity is available, get the fragment dialog from it
        //call setProgress() on it
        //otherwise ignore the progress
    }
    @Override public void onPostExecute()    {
        //if activity is in a good state
        //dismiss the dialog and tell the root RADO to drop the pointer to the AsyncTask
        //if not remember it through a flag to close it when you come back
    }
    @Override public void attach()    {
        //called when the activity is back
        //check to see if you are done
        //if so dismiss the dialog and remove yourself from the RADO
        //if not continue to update the progress
    }
}
Because this AsyncTask implements the idea of a retained activity-dependent object (IRetainedADO), it knows when the activity is available and when it is not. It also knows the state of the activity, such as whether the UI is ready or not. Although it takes some code to implement activity-dependent objects (ADOs), it is not a hard concept. We leave it to you due to space considerations to look into the downloadable project ProAndroid5_Ch15_TestAsyncTaskWithConfigChanges .zip and see how this is done.
This AsyncTask in Listing 15-12 also takes over the management of its fragment dialog so that it acts like a cohesive unit and thereby doesn’t contaminate the main activity with the details of this AsyncTask. Another key detail in Listing 15-12 is what happens when the dialog is dismissed as the AsyncTask finishes. At this instant if the activity is hidden, or not there due to rotation, it is important to dismiss the dialog when the activity is re-created. In order to do this, the onPostExecute() remembers the last state of the AsyncTask whether it is done or in progress. This AsyncTask then waits for the attach() method, which gets called when the UI ready activity is reattached to this ADO. Once in the attach() method, the AsyncTask can then dismiss the fragment dialog.
You can download the project named ProAndroid5_Ch15_TestAsyncTaskWithConfigChanges.zip and see how the interaction presented in Listing 15-12 is fully realized.
This particular approach of using retained objects is a bit involved when compared to using retained fragments instead. But it has the elegance of solving it in a more generic form using the idea of ADOs, be they fragments or otherwise. We have links in the reference section that outline this idea and provide background. With that, let’s turn our attention to the recommended idea of retained fragments in our second solution.
Using Retained Fragments and Fragment Dialogs
In the second solution, we will stick with the fragment dialogs but we will use headless retained fragments instead of simple retained objects. Android has deprecated the retained objects in favor of retained fragments. In Android a retained object is just an object and has no in-built ability to track the state of the activity. (This is why we had to invent the framework of ADOs on top.) This deficiency is not there with the introduction of fragments in later releases of Android. Although fragments are tightly woven into the fabric of UI, they can exist without UI as well. These are called headless fragments. In addition to being able to track the state of the activity, fragments can also be retained, much like retained objects.
Outlining the Retained Fragments Approach
The approach in this solution is to use a headless retained fragment as an anchor to communicate between the activity and the AsyncTask. Here are the key aspects of this approach:
- Continue to use a fragment progress dialog, as in the solution before.
- Have the activity create a headless retained fragment which then holds a pointer to the AsyncTask. This headless retained fragment takes the place of the retained object in the previous solution. Being a retained fragment, the fragment object sticks around while the activity is re-created with a new pointer. The AsyncTask then always relies on the retained fragment to retrieve the most current activity pointer.
- The AsyncTask relies on the headless retained fragment to be informed of the activity state to accomplish all of the test cases indicated in the previous solution.
Exploring Corresponding Key Code Snippets
We have already shown you the code for the fragment dialog during the previous solution. As we continue to use the same object in this solution, we will focus on the retained fragment and also how the AsyncTask uses the fragment dialog through the retained fragment.
In the sample program (ProAndroid5_Ch15_TestAsyncTaskWithConfigChanges.zip) we have provided in the download, we called the retained fragment AsyncTesterFragment. Listing 15-13 shows the pseudocode for this class, which demonstrates, among other things, what makes this class a headless fragment.
Listing 15-13. Pseudocode for a Headless Fragment
//The following code is in AsyncTesterFragment.java
//(ProAndroid5_Ch15_TestAsyncTaskWithConfigChanges.zip)
//You can start this task through menu item: Flip Dialog with Fragment
public class AsyncTesterFragment
extends Fragment (or another object that is derived from Fragment) {
   //No need to override the key onCreateView() method
   //which otherwise would have returned a view loaded from a layout.
   //Thus having no View makes this fragment a headless fragment

   //Use this name to register with the activity
   public static String FRAGMENT_NAME="AsyncTesterRetainedFragment";

   //Local variable for the asynctask. You can use a menu to start work on this task
   //Nullify this reference when the asynctask finishes
   MyLongTaskWithFragmentDialog taskReference;

   //Have an init method to help with inheritance
   public void init(arg1, arge2, etc) {
       super.init(arg1,...); //if there is one
       setArguments(....); //or pass the bundle to the super init
   }
   public static AsyncTesterFragment newInstance(arg1, arg2, ...){
       AsyncTesterFragment f = new AsyncTesterFragment();
       f.init(arg1,arg2,...);
   }
   //have more static methods to create the fragment, locate the fragment etc.
}
There are three things worth mentioning about the code in Listing 15-13. By not overriding the onCreateView(), this fragment becomes a headless fragment. Because a fragment gets re-created using its default constructor, we followed the newInstance() pattern and also extended that pattern to use init() methods which can be virtual and inherited. This latter approach is useful if you are extending the Fragment class in a deeper hierarchy.
Listing 15-14 shows a static method on this AsyncTesterFragment object that can create this fragment, make it retain its state, and then register it with the activity.
Listing 15-14. Registering a Fragment as a Retained Fragment
//The following code is in AsyncTesterFragment.java
//(ProAndroid5_Ch15_TestAsyncTaskWithConfigChanges.zip)
//You can start this task through menu item: Flip Dialog with Fragment
public static AsyncTesterFragment createRetainedAsyncTesterFragment(Activity act) {
    AsyncTesterFragment frag = AsyncTesterFragment.newInstance();
    frag.setRetainInstance(true);
    FragmentManager fm = act.getFragmentManager();
    FragmentTransaction ft = fm.beginTransaction();
    ft.add(frag, AsyncTesterFragment.FRAGMENT_TAG);
    ft.commit();
    return frag;
}
Once this retained fragment is available with the activity, it can be retrieved any time and asked to start an AsyncTask. Listing 15-15 shows the pseudocode for the AsyncTask that is able to interact with this retained fragment to control the fragment dialog
Listing 15-15. An AsyncTask That Uses a Fragment Dialog Through a Retained Fragment
//The following code is in MyLongTaskWithFragment.java
//(ProAndroid5_Ch15_TestAsyncTaskWithConfigChanges.zip)
//You can start this task through menu item: Flip Dialog with Fragment
public class MyLongTaskWithFragment extends AsyncTask<String,Integer,Integer> {
    //...other code
    //The following reference passed in and set from the constructor
    AsyncTesterFragment retainedFragment;

    //....other code
    @Override protected void onPreExecute()    {
        ....other code
        //get the activity from the retained fragment
        Activity act = retainedFragment.getActivity();
        //Create the progress dialog
        ProgressDialogFragment pdf = new ProgressDialogFragment();
        //the show method will add and commit the fragment dialog
        pdf.show(act.getFragmentManager(), this.PROGRESS_DIALOG_FRAGMENT_TAG_NAME);
    }
    @Override protected void onProgressUpdate()    {
        //if activity is available, get the fragment dialog from it, call setProgress() on it
        //otherwise ignore the progress
    }
    @Override protected void onPostExecute()    {
        //if activity is in a good state
        //dismiss the dialog and tell the root RADO to drop the pointer to the AsyncTask
        //if not remember it through a flag to close it when you come back
    }
    @Override public void attach()    {
        //called when the activity is back. check to see if this task is done
        //if so dismiss the dialog and remove yourself from the retained fragment
        //if not continue to update the progress
    }
    @Override protected Integer doInBackground(String...strings)
    {
       //Do the actual work here which occurs on a separate thread
    }
}
This AsyncTask in Listing 15-15 behaves much like the AsyncTask that used the retained object. Once this task knows how to get access to the progress dialog fragment from the retained fragment, it is pretty straightforward to set the progress on it. As before, this task also needs to know when the activity is reattached in case the task is done beforehand. If this happens, the AsyncTask needs to remember this and close the dialog on reattach. The pseudocode in Listing 15-15 satisfies all the test conditions set forth earlier.
This concludes our second solution. Let’s shift now to the third solution, where we will use a progress bar instead of a progress dialog to show the progress of an AsyncTask.
Using Retained Fragments and ProgressBars
Android SDK documentation on ProgressDialog (http://developer.android.com/guide/topics/ui/dialogs.html) is recommending that we use a ProgressBar in a number of scenarios instead as a better practice. The purported reason is that a progress bar is less intrusive, as it allows interaction with other areas of the activity. A progress bar, like a progress dialog, can be indeterminate or fixed in duration. It can also be a continuously revolving circle or a horizontal bar. You can find these modes by looking up the docs for ProgressBar. Listing 15-16 gives a quick rundown of a sampling of ProgressBar styles in a layout file.
Listing 15-16. Different Ways to Style a Progress Bar in a Layout File
//The following code is in spb_show_progressbars_activity_layout.xml
//(ProAndroid5_Ch15_TestAsyncTaskWithConfigChanges.zip)
//You can see these progress bars through menu item: Show Progress bars
<!--  A regular progress bar - A large spinning circle -->
<ProgressBar
    android:id="@+id/tpb_progressBar1"
    android:layout_width="match_parent"
    android:layout_height="wrap_content"
    android:background="@android:color/background_light"/>

<!--  Small spinning circle -->
<ProgressBar
    android:id="@+id/tpb_progressBar4"
    style="?android:attr/progressBarStyleSmall"
    android:layout_width="match_parent"
    android:layout_height="wrap_content"
    android:background="@android:color/background_light"/>

<!--  Horizontal indefinite Progress bar: a line -->
<ProgressBar
    android:id="@+id/tpb_progressBar3"
    style="?android:attr/progressBarStyleHorizontal"
    android:layout_width="match_parent"
    android:layout_height="wrap_content"
    android:indeterminate="true"
    />

 <!--  Horizontal fixed duration Progress bar: a line -->
 <ProgressBar
    android:id="@+id/tpb_progressBar3"
    style="?android:attr/progressBarStyleHorizontal"
    android:layout_width="match_parent"
    android:layout_height="wrap_content"
    android:indeterminate="false"
    android:max="50"
    android:progress="10"
    />
Figure 15-3 shows how the progress bar layouts shown in Listing 15-16 look when loaded into an activity. Each type of progress bar is labeled to indicate its mode or behavior. (Use menu item Show Progress Bars to invoke this view from project download ProAndroid5_Ch15_TestAsyncTaskWithConfigChanges.zip.)
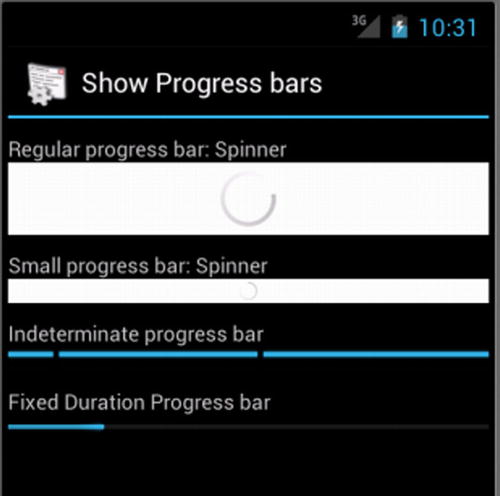
Figure 15-3. A sampling of progress bars in Android
Outlining the ProgressBar Approach
The approach to report the progress of an AsyncTask through a progress bar is similar to the previous approach that used a retained headless fragment and a fragment progress dialog.
- As in the previous solution, have the activity create a headless retained fragment that holds a pointer to the AsyncTask.
- Embed the progress bar in the activity layout. AsyncTask will get to this progress bar through the headless retained fragment.
- The AsyncTask relies on the headless retained fragment to be informed of the activity state to accomplish all of the test cases indicated earlier.
Walking Through Corresponding Key Code Snippets
Let’s walk through the key code snippets that you would need to make this solution work. Let’s begin with the local variables the AsyncTask holds to interact with the retained fragment and the activity (Listing 15-17).
Listing 15-17. Local Variables of an AsyncTask to Work with a ProgressBar
//The following code is in MyLongTaskWithProgressBar.java
//(ProAndroid5_Ch15_TestAsyncTaskWithConfigChanges.zip)
//You can start this task through menu item: Test ProgressBar
public class MyLongTaskWithProgressBar
extends AsyncTask<String,Integer,Integer>
implements IWorkerObject
{
    public String tag = null;    //Debug tag
    private MonitoredFragment retainedFragment; //Reference to the retained fragment
    int curProgress = 0; //To track current progress
....
Listing 15-18 shows how the AsyncTask initializes the progress bar when it starts.
Listing 15-18. Initializing a ProgressBar
//Part of MyLongTaskWithProgressBar.java
private void showProgressBar()    {
    Activity act = retainedFragment.getActivity();
    ProgressBar pb = (ProgressBar) act.findViewById(R.id.tpb_progressBar1);
    pb.setProgress(0);
    pb.setMax(15);
    pb.setVisibility(View.VISIBLE);
}
Listing 15-19 shows how the AsyncTask sets the progress on the progress bar after locating it.
Listing 15-19. Setting Progress on a ProgressBar
//Part of MyLongTaskWithProgressBar.java
private void setProgressOnProgressBar(int i) {
    this.curProgress = i;
    ProgressBar pbar = getProgressBar();
    if (pbar == null)   {
        Log.d(tag, "Activity is not available to set progress");
        return;
    }
    pbar.setProgress(i);
}
The method getProgressBar() that locates the activity is quite simple; you just use the find() method to locate the ProgressBar view. If the activity is not available due to device rotation, the ProgressBar reference will be null and we will ignore setting the progress. Listing 15-20 shows how the AsyncTask closes the progress bar.
Listing 15-20. Closing the ProgressBar on AsyncTask Completion
//Part of MyLongTaskWithProgressBar.java
private void closeProgressBar(){
    ProgressBar pbar = getProgressBar();
    if (pbar == null)    {
        Log.d(tag, "Sorry progress bar is null to close it!");
        return;
    }
    //Dismiss the dialog
    pbar.setVisibility(View.GONE);
    detachFromParent();
}
Once the ProgresBar is removed from the view, the code in Listing 15-20 informs the retained fragment that it can let go of the AsyncTask pointer should it be holding it. Depending on how the retained fragment holds this pointer, this step may or may not be needed. But it is a good practice to tell the parent it no longer needs to hold on to a reference that it doesn’t need anymore. So, Listing 15-21 shows how the AsyncTask informs the parent that it no longer needs to hold a pointer to the AsyncTask.
Listing 15-21. Informing Clients, Like the Retained Fragment, of the Completion of AsyncTask
//To tell the called object that I, the AsyncTask, have finished
//The Activity or retained fragment can act as a client to this AsyncTask
//AsyncTask is imagined to be a WorkerObject and hence understands the IWorkerObjectClient

//MyLongTaskWithProgressBar implements IWorkerObject
//AsyncTesterFragment implements the IWorkerObjectClient

//Code below is taken from MyLongTaskWithProgressBar.java
//This implements the IWorkerObject contract
IWorkerObjectClient client = null;
int workerObjectPassbackIdentifier = -1;

public void registerClient(IWorkerObjectClient woc,
     int inWorkerObjectPassbackIdentifier) {
    client = woc;
    this.workerObjectPassbackIdentifier = inWorkerObjectPassbackIdentifier;
}
private void detachFromParent()    {
    if (client == null)        {
        Log.e(tag,"You have failed to register a client.");
        return;
    }
    //client is available
    client.done(this,workerObjectPassbackIdentifier);
}
Addressing Key Differences with the ProgressBar Solution
There are some unexpected differences you must be aware of when we use a progress bar instead of a progress dialog.
Initially, in the layout file, visibility of the progress bar is set to GONE so that it represents the state that the AsyncTask has not even started. Once the AsyncTask starts it will set the visibility to VISIBLE and subsequently set the progress as it goes along. However, when the activity is re-created, the state management of the activity requires that the control is visible coming out of the onCreate() method. Because in the layout the visibility is set to be GONE, the activity will not restore the progress bar state and you will not see the progress bar when the device is rotated. Because of this, the AsyncTask needs to take over the control of this progress bar state management and reinitialize it properly when the activity is reattached. Listing 15-22 shows how we do this in the AsyncTask code.
Listing 15-22. Managing the ProgressBar State from the AsyncTask
//Taken from MyLongTaskWithProgressBar.java
//On activity start
public void onStart(Activity act) {
    //dismiss dialog if needed
    if (bDoneFlag == true)        {
        Log.d(tag,"On my start I notice I was done earlier");
        closeProgressBar();
        return;
    }
    Log.d(tag,"I am reattached. I am not done");
    setProgressBarRightOnReattach();
}
private void setProgressBarRightOnReattach()    {
    ProgressBar pb = getProgressBar();
    pb.setMax(15);
    pb.setProgress(curProgress);
    pb.setVisibility(View.VISIBLE);
}
The onStart() method in Listing 15-22 is called by the retained fragment on the AsyncTask when the activity is reattached to the retained fragment and the fragment detects that the activity’s UI is ready to be used.
Another difference when using a progress bar is the behavior of the back button. Unlike a progress dialog, for the activity, you may want to allow the back button. As the back button completely removes the activity, you may want to take this opportunity to cancel the task. The releaseResources() method in Listing 15-23 is called by the retained fragment when it detects that the activity is not going to be back by monitoring the isFinishing() flag in the onDestroy() method.
Listing 15-23. Cancelling the AsyncTask on Activity Back
//Taken from MyLongTaskWithProgressBar.java
public void releaseResources()    {
    cancel(true); //cancel the task
    detachFromParent(); //remove myself
}
All three solutions outlined in this latter part of the chapter will work to correctly show the progress of an AsyncTask. The SDK-recommended approach is to use the ProgressBar as the right UI component to display the progress. Our preference for quick tasks that take just a second or two is to use the progress bars as well. For a task that takes a little longer—and you don’t want the user to disturb the state of the UI—then use the ProgressDialog in conjunction with a headless retained fragment. When your solutions require a deep hierarchy of objects, then use of the ADO framework could come handy irrespective of whether you use them through retained fragments or through the retained objects. You can see all of the solutions outlined here fully implemented in the downloadable project ProAndroid5_Ch15_TestAsyncTaskWithConfigChanges.zip.
There are further considerations if the AsyncTask were doing updates and changing state. If that is the case, you may want to use a background service so that it can be restarted if the process is to be reclaimed and restarted later. The approaches presented here are adequate for quick- to medium-level reads as you are expecting the user to wait. However, for longer-time reads or writes, you may want to adapt a service-based solution.
References
The following references will help you learn more about the topics discussed in this chapter:
- http://developer.android.com/reference/android/os/AsyncTask.html: A key resource that definitively documents the behavior of AsyncTask.
- http://www.shanekirk.com/2012/04/asynctask-missteps/: Another look at a well-behaved AsyncTask.
- http://www.androidbook.com/item/3536: Research notes on AsyncTask that we gathered in preparing this chapter.
- http://www.androidbook.com/item/3537: Android uses Java generics often in its API. This URL documents a few basics on Java generics to get you started.
- http://www.androidbook.com/fragments: As this chapter has demonstrated, to work with an AsyncTask authoritatively you need to know a lot about activity life cycle, fragments, their life cycle, headless fragments, configuration changes, fragment dialogs, AsyncTask, ADOs, and more. This URL has a number of articles focusing on all these areas.
- http://www.androidbook.com/item/4660: ADO is an abstraction that one of our authors espoused as a handy tool to deal with configuration change. This URL documents what ADOs are and how they could be used, and it also provides a preliminary implementation.
- http://www.androidbook.com/item/4674: This URL documents the background, helpful URLs, code snippets, and helpful hints to work with a ProgressBar.
- http://www.androidbook.com/item/4680: This URL has a good bit of research on activity life cycle in the event of configuration changes.
- http://www.androidbook.com/item/4665: It is quite hard to write programs that work well when devices rotate. This URL outlines some basic test cases you must successfully run for validating AsyncTask.
- http://www.androidbook.com/item/4673: This URL suggests an enhanced pattern for constructing inherited fragments.
- http://www.androidbook.com/item/4629: The best way to understand a fragment, including a retained fragment, is to study its callbacks diligently. This URL provides documented sample code for all the important callbacks of a fragment.
- http://www.androidbook.com/item/4668: The best way to understand an activity life cycle is study its callbacks diligently. This URL provides documented sample code for all the important activity callbacks.
- http://www.androidbook.com/item/3634: This URL outlines our research on fragment dialogs.
- http://www.androidbook.com/proandroid5/projects: A list of downloadable projects from this book is at this URL. For this chapter, look for a zip file named ProAndroid5_Ch15_TestAsyncTask.zip and also ProAndroid5_Ch15_TestAsyncTaskWithConfigChanges. The latter zip file is the one that implements the three proposed solutions for a well-behaved AsyncTask.
Summary
In this chapter, in addition to covering AsyncTask, we have introduced you to progress dialogs, progress bars, headless retained fragments, and ADOs. Reading this chapter, you not only understood AsyncTask but also got to apply your understanding of activity life cycle and a deep understanding of fragments. We have also documented a set of key test cases that must be satisfied for a well-behaved Android application.