
Exploring 2D Animation
Animation allows an object on a screen to change its color, position, size, or orientation over time. Animation capabilities in Android are practical, fun, and simple. They are used frequently in applications.
Android 2.3 and prior releases support three types of animation: frame-by-frame animation, which occurs when a series of frames is drawn one after the other at regular intervals; layout animation, where you animate the layout of the views inside a container such as lists and tables; and view animation, in which any view can be animated. In layout animation the focus is not any given view but the way views come together to form the composite layout. Android 3.0 enhanced animation by extending it to any Java property including the properties of UI elements. We will cover the pre-2.3 features first and then cover the 3.0 features right after. Both features are applicable based on your use case.
Exploring Frame-by-Frame Animation
Frame-by-frame animation is where a series of images are shown in succession at quick intervals so that the final effect is that of an object moving or changing. Figure 18-1 shows a set of circles each with a ball at a different position. With a few of these images (which are the frames) you can use animation to have the ball going around the circle.
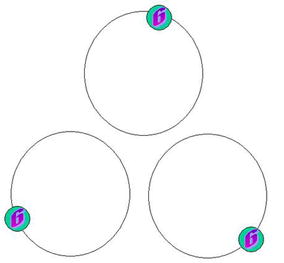
Figure 18-1. Example image frames for animation
Each circle in Figure 18-1 is a separate image. Give the image a base name of colored_ball and store eight of these images in the /res/drawable subdirectory so that you can access them using their resource IDs. The name of each image will have the pattern colored-ballN, where N is the digit representing the image number. The animation activity we are planning will look like Figure 18-2.
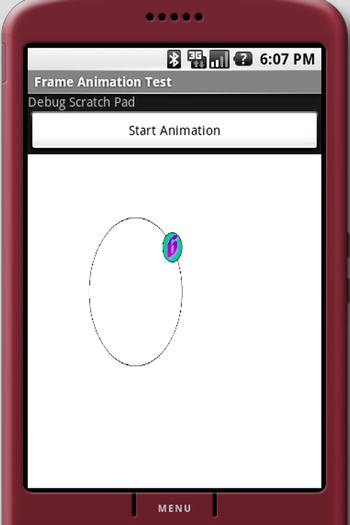
Figure 18-2. A frame-by-frame animation test harness
Primary control in Figure 18-2 is the animation view showing the ball placed on an oval/circle. Button at the top is used to start and stop the animation. There is a debug scratch pad at the top to log events. Listing 18-1 shows the layout used to create the activity in Figure 18-2.
Listing 18-1. XML Layout File for the Frame Animation Example
<?xml version="1.0" encoding="utf-8"?>
<!--
filename: /res/layout/frame_animations_layout.xml
Download: ProAndroid5_ch18_TestFrameAnimation.zip
-->
<LinearLayout xmlns:android="http://schemas.android.com/apk/res/android"
    android:orientation="vertical"
    android:layout_width="fill_parent" android:layout_height="fill_parent">
<TextView android:id="@+id/textViewId1"
    android:layout_width="fill_parent"
    android:layout_height="wrap_content" android:text="Debug Scratch Pad"/>
<Button
    android:id="@+id/startFAButtonId"
    android:layout_width="fill_parent" android:layout_height="wrap_content"
    android:text="Start Animation"/>
<ImageView
    android:id="@+id/animationImage"
    android:layout_width="fill_parent" android:layout_height="wrap_content"/>
</LinearLayout>
The first control is the debug-scratch text control, which is a simple TextView. You then add a button to start and stop the animation. The last view is the ImageView, which is used to play the animation.
In Android, frame-by-frame animation is implemented through the class AnimationDrawable. This class is a Drawable. These objects are commonly used as backgrounds for views. AnimationDrawable, in addition to being a Drawable, can take a list of other Drawable resources (like images) and render them at specified intervals. To use this AnimationDrawable class, start with a set of Drawable resources (for example, a set of images) placed in the /res/drawable subdirectory. You will then construct an XML file that defines the AnimationDrawable using a list of these images (see Listing 18-2). This XML file needs to be placed in the /res/drawable subdirectory as well.
Listing 18-2. XML File Defining the List of Frames to Be Animated
<!--
filename: /res/drawable/frame_animation.xml
Download: ProAndroid5_ch18_TestFrameAnimation.zip
-->
<animation-list xmlns:android="http://schemas.android.com/apk/res/android"
android:oneshot="false">
   <item android:drawable="@drawable/colored_ball1" android:duration="50" />
   <item android:drawable="@drawable/colored_ball2" android:duration="50" />
   <item android:drawable="@drawable/colored_ball3" android:duration="50" />
   <item android:drawable="@drawable/colored_ball4" android:duration="50" />
   <item android:drawable="@drawable/colored_ball5" android:duration="50" />
   <item android:drawable="@drawable/colored_ball6" android:duration="50" />
   <item android:drawable="@drawable/colored_ball7" android:duration="50" />
   <item android:drawable="@drawable/colored_ball8" android:duration="50" />
</animation-list>
Each frame points to one of the colored-ball images you have assembled through their resource IDs. The animation-list tag gets converted into an AnimationDrawable object representing the collection of images. You then need to set this AnimationDrawable as a background resource for our ImageView control in the activity layout. Assuming that the file name for this XML file is frame_animation.xml and that it resides in the /res/drawable subdirectory, you can use the following code to set the AnimationDrawable as the background of the ImageView:
view.setBackgroundResource(R.drawable.frame_animation); //See Listing 18-3
With this code, Android realizes that the resource ID R.drawable.frame_animation is an XML resource and accordingly constructs a suitable AnimationDrawable Java object for it before setting it as the background. Once this is set, you can access this AnimationDrawable object by doing a get on the view object like this:
Object  backgroundObject = view.getBackground();
AnimationDrawable ad = (AnimationDrawable)backgroundObject;
Once you have the AnimationDrawable object, you can use its start()and stop() methods to start and stop the animation. Here are two other important methods on this object:
setOneShot(boolean);
addFrame(drawable, duration);
The setOneShot(true) method runs the animation once and then stops. The addFrame() method adds a new frame using a Drawable object and sets its display duration. The functionality of the addFrame() method resembles that of the XML tag android:drawable in Listing 18-2. Put this all together to get the complete code for our frame-by-frame animation activity of Figure 18-1.
Listing 18-3. Complete Code for the Frame-by-Frame Animation Test Harness
// filename: FrameAnimationActivity.java
// Download: ProAndroid5_ch18_TestFrameAnimation.zip
public class FrameAnimationActivity extends Activity {
    @Override
    public void onCreate(Bundle savedInstanceState)   {
        super.onCreate(savedInstanceState);
        setContentView(R.layout.frame_animations_layout);
        this.setupButton();
    }
    private void setupButton(){
       Button b = (Button)this.findViewById(R.id.startFAButtonId);
       b.setOnClickListener(
             new Button.OnClickListener(){
                public void onClick(View v) {animate();}
             });
    }
    private void animate()  {
        ImageView imgView = (ImageView)findViewById(R.id.animationImage);
        imgView.setVisibility(ImageView.VISIBLE);
        imgView.setBackgroundResource(R.drawable.frame_animation);

        AnimationDrawable frameAnimation = (AnimationDrawable)imgView.getBackground();
        if (frameAnimation.isRunning()) {
            frameAnimation.stop();
        }
        else {
            frameAnimation.stop();
            frameAnimation.start();
        }
    }
}//eof-class
animate()method in Listing 18-3 locates the ImageView in the activity and sets its background to the AnimationDrawable identified by the resource R.drawable.frame_animation. This animation resource ID points to the earlier animation definition in Listing 18-3. The rest of the code in the method retrieves this AnimationDrawable object and calls animation methods on that object. In the same Listing 18-3, Start/Stop button is set up so that if animation is running, the button could stop it; if animation is not running, the button could start it. If you set the oneshot attribute in the animation definition in Listing 18-2 to true, the animation stops after once.
LayoutAnimation is used to animate the views in an Android layout. You can use this type of animation for example with common layout controls like ListView and GridView. Unlike frame-by-frame animation, layout animation is not achieved through repeating frames but by changing the transformation matrix of a view. Every view in Android has a transformation matrix that maps the view to the screen. By changing this matrix you can accomplish scaling, rotation, and movement (translation) of the view. This type of animation that relies on changing properties and redrawing an image is referred to as tweening animation. Essentially LayoutAnimation is tweening animation of the transformation matrix of the views in a layout. A LayoutAnimation that is specified on a layout is applied to all the views in that layout.
These are the tweening animation types that can be applied to a layout:
- Scale animation: Used to make a view smaller or larger either along the x axis, on the y axis, or on both. You can also specify the pivot point around which you want the animation to take place.
- Rotate animation: Used to rotate a view around a pivot point by a certain number of degrees.
- Translate animation: Used to move a view along the x axis or the y axis.
- Alpha animation: Used to change the transparency of a view.
These animations are defined as XML files in the /res/anim subdirectory. Listing 18-4 shows a scale animation declared in an XML file.
Listing 18-4. A Scale Animation Defined in an XML File at /res/anim/scale.xml
<set xmlns:android="http://schemas.android.com/apk/res/android"
android:interpolator="@android:anim/accelerate_interpolator">
   <scale
         android:fromXScale="1"
         android:toXScale="1"
         android:fromYScale="0.1"
         android:toYScale="1.0"
         android:duration="500"
         android:pivotX="50%"
         android:pivotY="50%"
         android:startOffset="100" />
</set>
Parameters in the animation XMLs have a “from” and a “to” flavor to indicate start and end values of that property. Other properties of an animation also include animation duration and a time interpolator. Interpolators determine the rate of change of the animated argument such as scale in Listing 18-4 during animation. We will cover interpolators shortly. XML file in Listing 18-4 can be associated with a layout to animate that layout’s constituent views.
Note Animations like the Scale animation in Listing 18-4 are represented as Java classes in the android.view.animation package. Java documentation for these classes describes not only Java methods but also the allowed XML arguments for each type of animation.
We can use the ListView in Figure 18-3 to test a number of layout animations. This activity is what you see when you run the sample project for this chapter. ProAndroid5_ch18_TestLayoutAnimation.zip
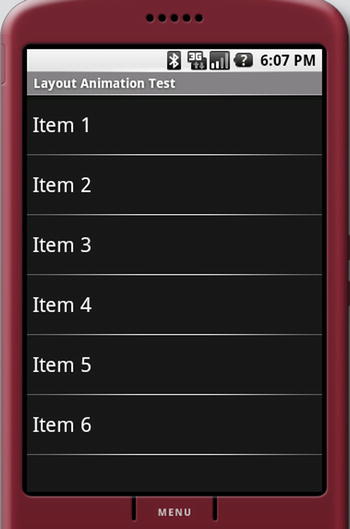
Figure 18-3. The ListView to be Animated
The layout for this activity is in Listing 18-5.
Listing 18-5. ListView XML Layout File
<?xml version="1.0" encoding="utf-8"?>
<!--
filename: /res/layout/list_layout.xml
project: ProAndroid5_ch18_TestLayoutAnimation.zip
-->
<LinearLayout xmlns:android="http://schemas.android.com/apk/res/android"
    android:orientation="vertical"
    android:layout_width="fill_parent"
    android:layout_height="fill_parent">
    <ListView
        android:id="@+id/list_view_id"
        android:layout_width="fill_parent"
        android:layout_height="fill_parent"/>
</LinearLayout>
Listing 18-5 shows a simple LinearLayout with a single ListView in it. The activity code to show the layout from 18-5 as Figure 18-3 is in Listing 18-6.
Listing 18-6. Layout-Animation Activity Code
//filename: LayoutAnimationActivity.java
//project: ProAndroid5_ch18_TestLayoutAnimation.zip
public class LayoutAnimationActivity extends Activity  {
    @Override
    public void onCreate(Bundle savedInstanceState)  {
        super.onCreate(savedInstanceState);
        setContentView(R.layout.list_layout);
        setupListView();
    }
    private void setupListView()  {
      String[] listItems = new String[] {
             "Item 1", "Item 2", "Item 3", "Item 4", "Item 5", "Item 6",
      };
      ArrayAdapter<String> listItemAdapter =
       new ArrayAdapter<String>(this, android.R.layout.simple_list_item_1, listItems);
      ListView lv = (ListView)this.findViewById(R.id.list_view_id);
      lv.setAdapter(listItemAdapter);
    }
}
Let’s see now how to apply scale animation from Listing 18-4 to this ListView. The ListView requires another XML file that acts as a mediator between itself and the scale animation in Listing 18-4. This is because the animations defined in Listing 18-4 are generic and apply to any view. On the other hand a layout is a collection of views. So the mediator layout animation XML file in Listing 18-7 reuses the generic animation XML file and specifies the additional attributes that are applicable to a collection of views. This mediator layout animation XML file is shown in Listing 18-9.
Listing 18-7. Layout-Controller XML File
<?xml version="1.0" encoding="utf-8"?>
<!--
filename: /res/anim/list_layout_controller.xml (ProAndroid5_ch18_TestLayoutAnimation.zip)
-->
<layoutAnimation xmlns:android="http://schemas.android.com/apk/res/android"
        android:delay="100%"
        android:animationOrder="reverse"
        android:animation="@anim/scale" />
This XML file needs to be in /res/anim subdirectory. This XML file specifies that the animation in the list should proceed in reverse, and the animation for each item should start with a 100% delay with respect to the total animation duration. A 100% duration ensures that the animation of one item is complete before the animation of the next item starts. You can change this percentage to suit the needs of your animation. Anything less than 100% will result in an overlapping animation of items. This mediator XML file also refers to the individual animation file, scale.xml (Listing 18-4) through the resource reference @anim/scale. Listing 18-8 shows how to attach the animation of Listing 18-4 to the activity layout of Listing 18-5 via the mediator of Listing 18-7.
Listing 18-8. The Updated Code for the list_layout.xml File
<?xml version="1.0" encoding="utf-8"?>
<!--
filename: /res/layout/list_layout.xml(ProAndroid5_ch18_TestLayoutAnimation.zip)
-->
<LinearLayout xmlns:android="http://schemas.android.com/apk/res/android"
    android:orientation="vertical"
    android:layout_width="fill_parent" android:layout_height="fill_parent">
    <ListView android:id="@+id/list_view_id"
        android:persistentDrawingCache="animation|scrolling"
        android:layout_width="fill_parent" android:layout_height="fill_parent"
        android:layoutAnimation="@anim/list_layout_controller" />
</LinearLayout>
In Listing 18-8 android:layoutAnimation is the tag that points to the mediating XML file of Listing 18-7, which in turn points to the scale.xml of Listing 18-5. In Listing 18-8 Android SDK docs recommend setting the persistentDrawingCache tag on the list view to optimize for animation and scrolling. If you were to run the application ProAndroid5_ch18_TestLayoutAnimation.zip, you would see the scale animation take effect on the individual list items as the activity gets loaded. We have set the animation duration to 500 ms so that scale change can be observed as each list item is drawn.
With this sample program you can experiment with different animation types. You can try alpha animation with the code in Listing 18-9.
Listing 18-9. The alpha.xml File to Test Alpha Animation
<?xml version="1.0" encoding="utf-8"?>
<!-- file: /res/anim/alpha.xml(ProAndroid5_ch18_TestLayoutAnimation.zip) -->
<alpha xmlns:android="http://schemas.android.com/apk/res/android"
       android:interpolator="@android:anim/accelerate_interpolator"
       android:fromAlpha="0.0" android:toAlpha="1.0" android:duration="1000" />
Alpha animation controls fading (of color). In Listing 18-9 alpha animation color goes from invisible to full intensity in 1 second. Don’t forget to change the mediator XML file (see Listing 18-7) to point to the new animation file if you intend to use the same mediator file.
Listing 18-10 shows an animation that combines a change in position with a change in color gradient.
Listing 18-10. Combining Translate and Alpha Animations Through an Animation Set
<?xml version="1.0" encoding="utf-8"?>
<!-- file:/res/anim/alpha_translate.xml(ProAndroid5_ch18_TestLayoutAnimation.zip)-->
<set xmlns:android="http://schemas.android.com/apk/res/android"
  android:interpolator="@android:anim/accelerate_interpolator">
  <translate android:fromYDelta="-100%" android:toYDelta="0"android:duration="500"/>
  <alpha android:fromAlpha="0.0" android:toAlpha="1.0" android:duration="500"/>
</set>
Notice two animations are in the animation set of Listing 18-10. Translate animation will move the text from top to bottom in its currently allocated display space. Alpha animation will change the color gradient from invisible to visible as the text item descends into its slot. To see this animation in action, change the layoutAnimation mediator XML file with reference to file name @anim/alpha_translate.xml. Listing 18-11 shows the definition for a rotation animation.
Listing 18-11. Rotate Animation XML File
<!-- file: /res/anim/rotate.xml(ProAndroid5_ch18_TestLayoutAnimation.zip) -->
<rotate xmlns:android="http://schemas.android.com/apk/res/android"
      android:interpolator="@android:anim/accelerate_interpolator"
      android:fromDegrees="0.0" android:toDegrees="360"
      android:pivotX="50%"  android:pivotY="50%"
      android:duration="500" />
Listing 18-11 spins each text item in the list one full circle around the midpoint of the text item. Let’s talk about the interpolators that you have seen used in the animation XML files.
Understanding Interpolators
Interpolators tell how a property changes over time from its start value to the end value. Will the change occur linearly or exponentially? Will the change start quickly and slow down toward the end?
Alpha animation in Listing 18-9 identifies the interpolator as accelerate_interpolator. There is a corresponding Java object that defines the behavior of this interpolator. As we’ve specified this interpolator as a resource reference in Listing 18-9, there must be a file corresponding to the @anim/accelerate_interpolator that describes what this Java object is and what additional parameters it might take. Listing 8-12 shows the resource XML file definition pointed to by the resource reference @android:anim/accelerate_interpolator:
Listing 18-12. An Interpolator Definition as an XML Resource
<accelerateInterpolator
  xmlns:android="http://schemas.android.com/apk/res/android"
  factor="1" />
You can see this XML file in the subdirectory /res/anim/accelerate_interpolator.xml in the root Android SDK package. (Caution: This file could look differently depending on the release.) The accelerateInterpolator XML tag corresponds to the Java class android.view.animation.AccelerateInterpolator. You can look up the corresponding Java documentation to see what XML tags are available. This interpolator’s goal is to provide a multiplication factor given a time interval based on a hyperbolic curve. The source code snippet in Listing 18-13 for this interpolator illustrates this. (Caution: This code could look different depending on the Android release.)
Listing 18-13. Sample Code from AccelerateInterpolator in the Core Android SDK
public float getInterpolation(float input) {
   if (mFactor == 1.0f)   {
      return (float)(input * input);
   }
   else   {
      return (float)Math.pow(input, 2 * mFactor);
   }
}
Every interpolator implements the getInterpolation method differently. In case of the AccelerateInterpolator, if the interpolator is set up in the resource file with a factor of 1.0, it will return the square of the input at each interval. Otherwise, it will return a power of the input that is further scaled by the factor amount. If the factor is 1.5, you will see a cubic function instead of a square function.
The supported interpolators include AccelerateDecelerateInterpolator, AccelerateInterpolator, CycleInterpolator, DecelerateInterpolator, LinearInterpolator, AnticipateInterpolator, AnticipateOvershootInterpolator, BounceInterpolator, and OvershootInterpolator.
To see how flexible these interpolators can be, take a quick look in Listing 18-14 at the BounceInterpolator which bounces the object (that is, moves it back and forth) toward the end of the animation cycle:
Listing 18-14. BounceInterpolator Implementation in the Core Android SDK
public class BounceInterpolator implements Interpolator {
     private static float bounce(float t) {
         return t * t * 8.0f;
     }
     public float getInterpolation(float t) {
         t *= 1.1226f;
         if (t < 0.3535f) return bounce(t);
         else if (t < 0.7408f) return bounce(t - 0.54719f) + 0.7f;
         else if (t < 0.9644f) return bounce(t - 0.8526f) + 0.9f;
         else return bounce(t - 1.0435f) + 0.95f;
     }
 }
You can find the behavior of these various interpolators described at the following URL:
http://developer.android.com/reference/android/view/animation/package-summary.html
Java documentation for each of these classes also points out the XML tags available to control them.
Through view animation you can animate a view by manipulating its transformation matrix. A transformation matrix is like a lens that projects a view on to the display. A transformation matrix can affect the projected views scale, size, position, and color.
Identity transformation matrix preserves the original view. You start with an identity matrix and apply a series of mathematical transformations involving size, position, and orientation. You then set the final matrix as the transformation matrix for the view you want to transform.
Android exposes the transformation matrix for a view by allowing registration of an animation object with that view. The animation object will be passed to the transformation matrix.
Consider Figure 18-4 as a demonstration of view animation. The Start Animation button animates the list view to start small in the middle of the screen and gradually fill the full space. Listing 18-15 shows the XML layout file used for this activity.
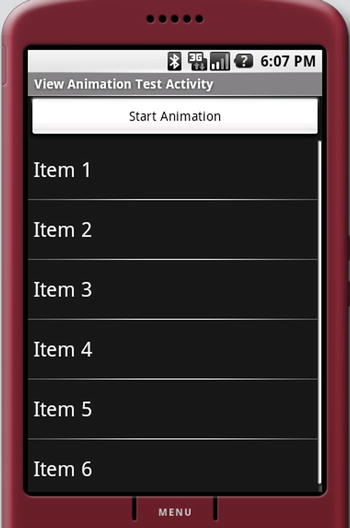
Figure 18-4. A View Animation Activity
Listing 18-15. XML Layout File for the View-Animation Activity
<?xml version="1.0" encoding="utf-8"?>
<!-- filen: at /res/layout/list_layout.xml(ProAndroid5_ch18_TestViewAnimation.zip) -->
<LinearLayout xmlns:android="http://schemas.android.com/apk/res/android"
    android:orientation="vertical"
    android:layout_width="fill_parent"
    android:layout_height="fill_parent">
<Button
   android:id="@+id/btn_animate"
    android:layout_width="fill_parent"
    android:layout_height="wrap_content"
    android:text="Start Animation"/>
<ListView
     android:id="@+id/list_view_id"
     android:persistentDrawingCache="animation|scrolling"
     android:layout_width="fill_parent"
     android:layout_height="fill_parent"/>
</LinearLayout>
Listing 18-16 shows the activity code that loads this layout.
Listing 18-16. Code for the View-Animation Activity, Before Animation
//filename: ViewAnimationActivity.java(ProAndroid5_ch18_TestViewAnimation.zip)
public class ViewAnimationActivity extends Activity {
    @Override
    public void onCreate(Bundle savedInstanceState)    {
        super.onCreate(savedInstanceState);
        setContentView(R.layout.list_layout);
        setupListView();
        this.setupButton();
    }
    private void setupListView()    {
      String[] listItems = new String[] {
            "Item 1", "Item 2", "Item 3","Item 4", "Item 5", "Item 6",
      };
      ArrayAdapter<String> listItemAdapter =
        new ArrayAdapter<String>(this,android.R.layout.simple_list_item_1,listItems);
      ListView lv = (ListView)this.findViewById(R.id.list_view_id);
      lv.setAdapter(listItemAdapter);
    }
    private void setupButton()    {
       Button b = (Button)this.findViewById(R.id.btn_animate);
       b.setOnClickListener(
           new Button.OnClickListener(){
             public void onClick(View v)   {
                //animateListView();
             }
           });
    }
}
With this code you will see the UI as laid out in Figure 18-4. To add animation to the ListView shown in Figure 18-4 we need a class that derives from android.view.animation.Animation. Listing 18-17 shows this class.
Listing 18-17. Code for the ViewAnimation Class
//filename: ViewAnimation.java project: ProAndroid5_ch18_TestViewAnimation.zip
public class ViewAnimation extends Animation {
 @Override
 public void initialize(int width, int height, int parentWidth, int parentHeight){
        super.initialize(width, height, parentWidth, parentHeight);
        setDuration(2500); setFillAfter(true);
        setInterpolator(new LinearInterpolator());
  }
  @Override
  protected void applyTransformation(float interpolatedTime, Transformation t) {
        final Matrix matrix = t.getMatrix();
        matrix.setScale(interpolatedTime, interpolatedTime);
  }
}
In Listing 18-7 initialize method is a callback method with the dimensions of the view. Animation parameters can be initialized here. Here the animation duration is set to 2.5 seconds. We have set the animation effect to remain intact after the animation completes by setting FillAfter to true. We’ve set a linear interpolator. All of these properties come from the base android.view.animation.Animation class.
The main part of the animation occurs in the applyTransformation method. Android SDK calls this method again and again to simulate animation. Every time Android calls the method, interpolatedTime has a different value. This value changes from 0 to 1 depending on where the animation is in the 2.5-second duration that you set during initialization. When interpolatedTime is 1, the animation is at the end. Our goal in this method is to change the transformation matrix that is available through the transformation object called t. First get the matrix and change something about it. When the view gets painted, the new matrix will take effect. Methods available on the Matrix object are documented in the SDK at
http://developer.android.com/reference/android/graphics/Matrix.html
In Listing 18-17, the code that changes the matrix is
matrix.setScale(interpolatedTime, interpolatedTime);
setScale method takes two parameters: the scaling factor in the x direction and the scaling factor in the y direction. Because interpolatedTime goes between 0 and 1, you can use that value directly as the scaling factor. At the start of the animation, the scaling factor is 0 in both the x and y directions. Halfway through the animation, this value will be 0.5 in both x and y directions. At the end of animation, the view will be at its full size because the scaling factor will be 1 in both the x and y directions. The end result of this animation is that the ListView starts out tiny and grows to full size. Listing 18-18 shows the function you need to add the activity class in Listing 18-15 and call it from the button click.
Listing 18-18. Code for the View-Animation Activity, Including Animation
private void animateListView()   {
   ListView lv = (ListView)this.findViewById(R.id.list_view_id);
   lv.startAnimation(new ViewAnimation());
}
Note In this section on View Animation we are going to suggest alternate implementations for the ViewAnimation class of Listing 18-18. In the supplied project there are variations of this class available as ViewAnimation, ViewAnimation1, ViewAnimation2, and ViewAnimation3. Code snippets in the subsequent discussions will indicate in comments which of these classes hold that code. There is only one menu item in the sample project for animation. To test each variation you have to replace the ViewAnimation() class in Listing 18-18 with the respective version of it and rerun the program to see the altered animation.
When you run the code with the ViewAnimation class as in Listing 18-17, you will notice something odd. Instead of uniformly growing larger from the middle of the screen, the ListView grows larger from the top-left corner. This is because the origin for matrix operations is at the top-left corner. To get the desired effect, you first have to move the whole view so that the view’s center matches the animation center (top left). Then, you apply the matrix and move the view back to the previous center. The rewritten code from Listing 18-16 for doing this is shown in Listing 18-19.
Listing 18-19. View Animation using preTranslate and postTranslate
//filename: ViewAnimation1.java project: ProAndroid5_ch18_TestViewAnimation.zip
public class ViewAnimation extends Animation {
    float centerX, centerY;
    public ViewAnimation(){}

    @Override
    public void initialize(int width, int height, int parentWidth, int parentHeight) {
        super.initialize(width, height, parentWidth, parentHeight);
        centerX = width/2.0f;  centerY = height/2.0f;
        setDuration(2500);  setFillAfter(true);
        setInterpolator(new LinearInterpolator());
    }
    @Override
    protected void applyTransformation(float interpolatedTime, Transformation t) {
        final Matrix matrix = t.getMatrix();
        matrix.setScale(interpolatedTime, interpolatedTime);
        matrix.preTranslate(-centerX, -centerY); matrix.postTranslate(centerX, centerY);
    }
}
The preTranslate and postTranslate methods set up a matrix before the scale operation and after the scale operation. This is equivalent to making three matrix transformations in tandem. Consider the following code in Listing 18-20
Listing 18-20. Standard pattern for Pre and Post Translate of Transformation Matrices
matrix.setScale(interpolatedTime, interpolatedTime);
matrix.preTranslate(-centerX, -centerY);
matrix.postTranslate(centerX, centerY);
Code in Listing 18-20 is equivalent to
move to a different center
scale it
move to the original center
You will see this pattern of pre and post applied often. You can also accomplish this result using other methods on the Matrix class, but this technique is common as it is succinct.
The Matrix class allows you not only to scale a view but also to move it around through translate methods or change its orientation through rotate methods. You can experiment with these methods and see the resulting animations. The animations presented in the preceding “Layout Animation” section are all implemented internally using the methods on this Matrix class.
Using Camera to Provide Depth Perception in 2D
The graphics package in Android provides another transformation matrix–related feature through the Camera class. This class provides depth perception to a 2D view. You can take our ListView example and move it back from the screen by 10 pixels along the z axis and rotate it by 30 degrees around the y axis. Listing 18-21 is an example of manipulating the transformation matrix using a Camera.
Listing 18-21. Using Camera Object
//filename: ViewAnimation2.java project: ProAndroid5_ch18_TestViewAnimation.zip
public class ViewAnimation extends Animation {
    float centerX, centerY;
    Camera camera = new Camera();
    public ViewAnimation(float cx, float cy){
        centerX = cx;  centerY = cy;
    }
    @Override
    public void initialize(int width, int height, int parentWidth, int parentHeight) {
        super.initialize(width, height, parentWidth, parentHeight);
        setDuration(2500); setFillAfter(true);
        setInterpolator(new LinearInterpolator());
    }
    @Override
    protected void applyTransformation(float interpolatedTime, Transformation t) {
        final Matrix matrix = t.getMatrix();
        camera.save();
        camera.translate(0.0f, 0.0f, (1300 - 1300.0f * interpolatedTime));
        camera.rotateY(360 * interpolatedTime);
        camera.getMatrix(matrix);

        matrix.preTranslate(-centerX, -centerY);
        matrix.postTranslate(centerX, centerY);
        camera.restore();
    }
}
This code animates the ListView by first placing the view 1,300 pixels back on the z axis and then bringing it back to the plane where the z coordinate is 0. While doing this, the code also rotates the view from 0 to 360 degrees around the y axis. The camera.translate(x,y,z) method in Listing 18-21 tells the camera object to translate the view such that when interpolatedTime is 0 (at the beginning of the animation), the z value will be 1300. As the animation progresses, the z value will get smaller and smaller until the end, when the interpolatedTime becomes 1 and the z value becomes 0.
The method camera.rotateY(360 * interpolatedTime) takes advantage of 3D rotation around an axis by the camera. At the beginning of the animation, this value will be 0. At the end of the animation, it will be 360.
The method camera.getMatrix(matrix) takes the operations performed on the Camera so far and imposes those operations on the matrix that is passed in. Once the code does that, the matrix has the translations it needs to get the end effect of having a Camera. Now the Camera object is no longer necessary because the matrix has all the operations embedded in it. Then, you do the pre and post on the matrix to shift the center and bring it back. At the end, you set the Camera to its original state that was saved earlier. With this code in Listing 18-21 you will see the ListView arriving from the center of the view in a spinning manner toward the front of the screen. As this version of ViewAnimation takes additional construction arguments, Listing 18-22 shows how to invoke this version of the AnimationView:
Listing 18-22. View Animation using preTranslate and postTranslate
//filename: ViewAnimationActivity.java
//project: ProAndroid5_ch18_TestViewAnimation.zip
ListView lv = (ListView)this.findViewById(R.id.list_view_id);
float cx = (float)(lv.getWidth()/2.0);
float cy = (float)(lv.getHeight()/2.0);
lv.startAnimation(new ViewAnimation(cx, cy));
As part of our discussion about view animation, we showed you how to animate any view by extending an Animation class and then applying it to a view. In addition to letting you manipulate matrices (both directly and indirectly through a Camera class), the Animation class also lets you detect various stages in an animation. We will cover this next.
Exploring the AnimationListener Class
Android SDK has a listener interface, AnimationListener, to monitor animation events. Listing 18-23 demonstrates these animation events by implementing the AnimationListener interface.
Listing 18-23. An Implementation of the AnimationListener Interface
//filename: ViewAnimationListener.java
//project: ProAndroid5_ch18_TestViewAnimation.zip
public class ViewAnimationListener implements Animation.AnimationListener {
    public ViewAnimationListener(){}
    public void onAnimationStart(Animation animation) {
        Log.d("Animation Example", "onAnimationStart");
    }
    public void onAnimationEnd(Animation animation) {
        Log.d("Animation Example", "onAnimationEnd");
    }
    public void onAnimationRepeat(Animation animation) {
        Log.d("Animation Example", "onAnimationRepeat");
    }
}
The ViewAnimationListener class in Listing 18-23 just logs messages. Code in Listing 18-24 shows how to attach an animation listener to an Animation object.
Listing 18-24. Attaching an AnimationListener to an Animation Object
private void animateListView(){
   ListView lv = (ListView)this.findViewById(R.id.list_view_id);
   //Init width,height and assuming ViewAnimation from Listing 18-21
   ViewAnimation animation = new ViewAnimation(width,height);
   animation.setAnimationListener(new ViewAnimationListener());
   lv.startAnimation(animation);
}
Notes on Transformation Matrices
As you have seen in this chapter, matrices are key to transforming views and animations. Let’s explore some key methods of the Matrix class.
- Matrix.reset(): Resets a matrix to an identity matrix, which causes no change to the view when applied
- Matrix.setScale(...args ..): Changes size
- Matrix.setTranslate(...args ..): Changes position to simulate movement
- Matrix.setRotate(... args ..): Changes orientation
- Matrix.setSkew(...args ..): Distorts a view
The last four methods have input parameters.
You can multiply matrices together to compound the effect of individual transformations. In Listing 18-25, consider three matrices, m1, m2, and m3, which are identity matrices:
Listing 18-25. View Animation using preTranslate and postTranslate
m1.setScale(..scale args..);
m2.setTranslate(..translate args..)
m3.setConcat(m1,m2)
Transforming a view by m1 and then transforming the resulting view with m2 is equivalent to transforming the same view by m3. Note that m3.setConcat(m1,m2) is different from m3.setConcat(m2,m1). setConcat(matrix1, matrix2) multiplies two matrices in that given order.
You have already seen the pattern used by the preTranslate and postTranslate methods to affect matrix transformation. In fact, pre and post methods are not unique to translate, and you have versions of pre and post for every one of the set transformation methods. Ultimately, a preTranslate such as m1.preTranslate(m2) is equivalent to
m1.setConcat(m2,m1)
In a similar manner, the method m1.postTranslate(m2) is equivalent to
m1.setConcat(m1,m2)
Consider the code in Listing 18-26
Listing 18-26. Pre and Post Translate Pattern
matrix.setScale(interpolatedTime, interpolatedTime);
matrix.preTranslate(-centerX, -centerY);
matrix.postTranslate(centerX, centerY);
The code in this Listing 18-26 is equivalent to the code in Listing 18-27
Listing 18-27. Equivalence of Pre and Post Translate Pattern
Matrix matrixPreTranslate = new Matrix();
matrixPreTranslate.setTranslate(-centerX, -centerY);

Matrix matrixPostTranslate = new Matrix();
matrixPostTranslate.setTranslate(centerX, centerY);

matrix.setConcat(matrixPreTranslate,matrix);
matrix.setConcat(matrix,matrixPostTranslate);
Exploring Property Animations: The New Animation API
The animation API is overhauled in 3.0 and 4.0 of Android. This new approach to animations is called property animation. The property animation API is extensive and different enough to refer to the previous animation API (prior to 3.x) as the legacy API even though the previous approach is still valid and not deprecated. The old animation API is in the package android.view.animation. The new animation API is in the package android.animation. Key concepts in the new property animation API are:
- Animators
- Value animators
- Object animators
- Animator sets
- Animator builders
- Animation listeners
- Property value holders
- Type evaluators
- View property animators
- Layout transitions
- Animators defined in XML files
We will cover most of these concepts in the rest of the chapter.
Understanding Property Animation
The property animation approach changes the value of a property over time. This property can be anything, such as a stand-alone integer, a float, or a specific property of an object such as a view. For example, you can change an int value from 10 to 200 over a time period of 5 seconds by using an animator class called ValueAnimator (see Listing 18-28).
Listing 18-28. A Simple Value Animator
//file: TestBasicValueEvaluator.java(ProAndroid5_ch18_TestPropertyAnimation.zip)
//Define an animator to change an int value from 10 to 200
ValueAnimator anim = ValueAnimator.ofInt(10, 200);

//set the duration for the animation
anim.setDuration(5000); //5 seconds, default 300 ms

//Provide a callback to monitor the changing value
anim.addUpdateListener(
    new ValueAnimator.AnimatorUpdateListener()  {
        public void onAnimationUpdate(ValueAnimator animation) {
            Integer value = (Integer) animation.getAnimatedValue();
            // this code gets called many many times for 5 seconds.
            // The value will range from 10 to 200
        }
    }
);
anim.start();
The idea is easy to grasp. A ValueAnimator is a mechanism to do something every 10 ms (this is the default framerate). Although this is the default framerate, depending on the system load you may not get called that many times. For the example given we could expect to get called 500 times over a span of 5 seconds. On an emulator our tests show that it may be as few as 10 times. However the last call will be close to the 5-second duration.
In the corresponding callback that is called for every frame (every 10 ms), you can choose to update a view or any other aspect to affect animation. In addition to the onAnimationUpdate, other useful callbacks are available on the general purpose Animator.AnimatorListener interface (Listing 18-28) from the Android SDK which can be attached to the ValueAnimator through its base class Animator. So on a ValueAnimator, you can do addListener(Animator.AnimatorListener listener). See Listing 18-29.
Listing 18-29. AnimatorListener Callback Interface
public static interface Animator.AnimatorListener {
  abstract void onAnimationStart(Animator animation);
  abstract void onAnimationRepeat(Animator animation);
  abstract void onAnimationCancel(Animator animation);
  abstract void onAnimationEnd(Animator animation);
}
You can use these callbacks in Listing 18-29 to further act on objects of interest during or after an animation.
Property Animation relies on the availability of an android.os.Looper on the thread that is initiating the animation. This is generally the case for the UI thread. The callbacks happen on the UI thread as well when the animating thread is the main thread.
As you use ValueAnimators and their listeners, keep in mind the lifetime of these objects. Even if you let the reference of a ValueAnimator go from your local scope, the ValueAnimator will live on until it finishes the animation. If you were to add a listener then all the references that the listener holds are also valid for the lifetime of the ValueAnimator.
Planning a Test Bed for Property Animation
Starting with the basic idea of value animators, Android provides a number of derived ways to animate any arbitrary object, especially views. To demonstrate these mechanisms, we will take a simple text view in a linear layout and animate its alpha property (simulating transparency animation) and also the x and y positions (simulating movement). We will use Figure 18-5 as an anchor to explain property animation concepts.
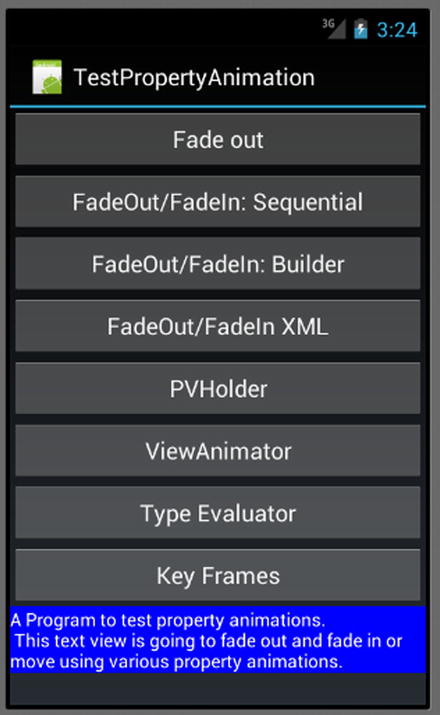
Figure 18-5. Activity to demonstrate Property animations
Each button in Figure 18-5 uses a separate mechanism to animate the text view at the bottom of the figure. The mechanisms we will demonstrate are as follows:
- Button 1: Using object animators, fade out and fade in a view alternatively at the click of a button.
- Button 2: Using an AnimatorSet, run a fade-out animation followed by fade-in animation in a sequential manner.
- Button 3: Use an AnimatiorSetBuilder object to tie multiple animations together in a “before,” “after,” or “with” relationship. Use this approach to run the same animation as button 2.
- Button 4: Define an XML file for button 2’s sequence animation and attach it to the text view for the same animation affect.
- Button 5: Using a PropertyValuesHolder object, animate multiple properties of the text view in the same animation. We will change the x and y values to move the text view from bottom right to top left.
- Button 6: Use ViewPropertyAnimator to move the text view from bottom right to top left (same animation as button 5).
- Button 7: Use a TypeEvaluator on custom point objects to move the text view from bottom right to top left (same animation as button 5).
- Button 8: Use key frames to affect movement and also alpha changes on the text view (same animation as button 5, but staggered).
Constructing the activity in Figure 18-5 is straightforward. You can see the layout for this activity and the activity code in the download project file ProAndroid5_ch18_TestPropertyAnimation.zip. Let’s start with the first button.
Animating Views with Object Animators
The first button in Figure 18-5 (Fadeout: Animator) invokes the toggleAnimation(View) method that is in Listing 18-30.
Listing 18-30. Basic View Animation with Object Animators
//file:TestPropertyAnimationActivity.java(ProAndroid5_ch18_TestPropertyAnimation.zip)
public void toggleAnimation(View btnView) {
    Button tButton = (Button)btnView; //The button we have pressed
    //m_tv: is the pointer to the text view
    //Animate the alpha from current value to 0 this will make it invisible
    if (m_tv.getAlpha() != 0)  {
        ObjectAnimator fadeOut = ObjectAnimator.ofFloat(m_tv, "alpha", 0f);
        fadeOut.setDuration(5000);
        fadeOut.start();
        tButton.setText("Fade In");
    }
    //Animate the alpha from current value to 1 this will make it visible
    else   {
        ObjectAnimator fadeIn = ObjectAnimator.ofFloat(m_tv, "alpha", 1f);
        fadeIn.setDuration(5000);
        fadeIn.start();
        tButton.setText("Fade out");
    }
}
The code in Listing 18-30 first examines the alpha value of the text view. If this value is greater than 0, then the code assumes that the text view is visible and runs a fade-out animation. At the end of the fade-out animation, the text view will be invisible. If the alpha value of the text view is 0, then the code assumes the text view is invisible and runs a fade-in animation to make the text view visible again.
The ObjectAnimator code in Listing 18-30 is really simple. An ObjectAnimator is obtained on the text view (m_tv) using the static method ofFloat(). The first argument to this method is an object (m_tv). The second argument is the property name of the object that you want the ObjectAnimator to modify or animate. In the case of the text view m_tv this property name is alpha. The target object needs to have a public method to match this name. For a property named alpha, the corresponding view object needs to have the following set method:
view.setAlpha(float f);
The third argument to ofFloat() is the value of the property at the end of the animation. If you specify a fourth argument, then the third argument is the starting value and the fourth is the target value. You can pass more arguments as long as they are all floats. The animation will use those values as intermediate values in the animation process.
If you specify just the “to” value, then the “from” value is taken from the current value by using
view.getAlpha();
When you play this animation, the text view will gradually disappear first. The code in Listing 18-30 then renames the button to “Fade in.” Now if you click the button again, which is now called “Fade in,” the second animation in Listing 18-30 is run, and the text view will appear gradually over a period of 5 seconds.
Achieving Sequential Animation with AnimatorSet
Button 2 in Figure 18-5 runs two animations one after the other: a fade-out followed by a fade-in. We could use animation listener callbacks to wait for the first animation to finish and then start the second animation. There is an automated way to run animations in tandem through the class AnimatorSet to get the same effect. Button 2 demonstrates this in Listing 18-31.
Listing 18-31. Sequential Animation Through an AnimatorSet
//file:TestPropertyAnimationActivity.java(ProAndroid5_ch18_TestPropertyAnimation.zip)
public void sequentialAnimation(View bView) {
    ObjectAnimator fadeOut = ObjectAnimator.ofFloat(m_tv, "alpha", 0f);
    ObjectAnimator fadeIn = ObjectAnimator.ofFloat(m_tv, "alpha", 1f);
    AnimatorSet as = new AnimatorSet();
    as.playSequentially(fadeOut,fadeIn);
    as.setDuration(5000); //5 secs
    as.start();
}
In Listing 18-31, we have created two animators: a fade-out animator and a fade-in animator. Then we created an animator set and tell it to play both animations sequentially.
You can also choose to play animations together using an animator set by calling the method playTogether(). Both of these methods, playSequentially() and playTogether(), can take a variable number of Animator objects.
When you play this animation, the text view will gradually disappear and then reappear, much like the animation you saw earlier.
Setting Animation Relationships with AnimatorSet.Builder
AnimatorSet also provides a bit more elaborate way to link animations through a utility class called AnimatorSet.Builder. Listing 18-32 demonstrates this.
Listing 18-32. Using an AnimatorSetBuilder
//filename: TestPropertyAnimationActivity.java (ProAndroid5_ch18_TestPropertyAnimation.zip)
public void testAnimationBuilder(View v) {
    ObjectAnimator fadeOut = ObjectAnimator.ofFloat(m_tv, "alpha", 0f);
    ObjectAnimator fadeIn = ObjectAnimator.ofFloat(m_tv, "alpha", 1f);
    AnimatorSet as = new AnimatorSet();
    //play() returns the nested class: AnimatorSet.Builder
    as.play(fadeOut).before(fadeIn);
    as.setDuration(5000); //5 secs
    as.start();
}
The play method on an AnimatorSet returns a class called AnimatorSet.Builder. This is purely a utility class. The methods on this class are after(animator), before(animator), and with(animator). This class is initialized with the first animator you supply through the play method. Every other call on this object is with respect to this original animator. Consider Listing 18-33:
Listing 18-33. Using AnimationSet.Builder
AnimatorSet.Builder builder = someSet.play(main_animator).before(animator1);
With this code animator1 will play after the main_animator. When we say builder.after(animator2), the animation of animator2 will play before main_animator. The method with(animator) plays the animations together.
The key point with an AnimationBuilder is that the relationship established via before(), after(), and with() is not chained but only tied to the original animator that was obtained from play() method. Also, the animation start() method is not on the builder object but on the original animator set. When you play this animation through Button3, the text view will gradually disappear and then reappear, much as in the previous animation.
Using XML to Load Animators
It is only to be expected that the Android SDK allows animators to be described in XML resource files. Android SDK has a new resource type called R.animator to distinguish animator resource files. These XML files are stored in the /res/animator subdirectory. Listing 18-34 is an example of an animator set defined in an XML file.
Listing 18-34. An Animator XML Resource File
<?xml version="1.0" encoding="utf-8" ?>
<!-- file: /res/animator/fadein.xml (ProAndroid5_ch18_TestPropertyAnimation.zip) -->
<set xmlns:android="http://schemas.android.com/apk/res/android"
    android:ordering="sequentially">
<objectAnimator
    android:interpolator="@android:interpolator/accelerate_cubic"
    android:valueFrom="1"  android:valueTo="0"
    android:valueType="floatType"  android:propertyName="alpha"
    android:duration="5000" />
<objectAnimator
    android:interpolator="@android:interpolator/accelerate_cubic"
    android:valueFrom="0"  android:valueTo="1"
    android:valueType="floatType" android:propertyName="alpha"
    android:duration="5000" />
</set>
You will naturally wonder what XML nodes are available for you to define these animations. As of 4.0 the allowed XML tags are as follows:
- animator: Binds to ValueAnimator
- objectAnimator: Binds to ObjectAnimator
- set: Binds to AnimatorSet
You can see a basic discussion of these tags at the following Android SDK URL:
http://developer.android.com/guide/topics/graphics/prop-animation.html#declaring-xml
The complete XML reference for the animation tags can be found at the following URL:
http://developer.android.com/guide/topics/resources/animation-resource.html#Property
Once you have this XML file, you can play this animation using the method shown in Listing 18-35.
Listing 18-35. Loading an Animator XML Resource File
//file: TestPropertyAnimationActivity.java(ProAndroid5_ch18_TestPropertyAnimation.zip)
public void sequentialAnimationXML(View bView) {
  AnimatorSet set = (AnimatorSet)AnimatorInflater.loadAnimator(this, R.animator.fadein);
  set.setTarget(m_tv);
  set.start();
}
Notice how it is necessary to load the animation XML file first followed by explicitly setting the object to animate. In our case, the object to animate is the text view represented by m_tv. The method in Listing 18-35 is called by button 4 (FadeOut/FadeIn XML). When this animation runs, the text view will fade out first and then reappear by fading in, just as in the previous alpha animations.
Using PropertyValuesHolder
So far, we have seen how to animate a single value in a single animation. The class PropertyValuesHolder lets us animate multiple values during the animation cycle. Listing 18-36 demonstrates the use of the PropertyValuesHolder class.
Listing 18-36. Using the PropertyValueHolder Class
//file: TestPropertyAnimationActivity.java(ProAndroid5_ch18_TestPropertyAnimation.zip)
public void testPropertiesHolder(View v) {
    //Get the current coordinates of the text view.
    //This allows us to know starting and ending positions to animate
    float h = m_tv.getHeight(); float w = m_tv.getWidth();
    float x = m_tv.getX(); float y = m_tv.getY();

    //Set the view to the bottom right as a starting point
    m_tv.setX(w); m_tv.setY(h);

    //from the right bottom animate "x" to its original position: top left
    PropertyValuesHolder pvhX = PropertyValuesHolder.ofFloat("x", x);

    //from the right bottom animate "y" to its original position
    PropertyValuesHolder pvhY = PropertyValuesHolder.ofFloat("y", y);

    //when you do not specify the from position, the animation will take the current position
    //as the from position.

    //Tell the object animator to consider both
    //"x" and "y" properties to animate to their respective target values.
    ObjectAnimator oa = ObjectAnimator.ofPropertyValuesHolder(m_tv, pvhX, pvhY);

    //set the duration
    oa.setDuration(5000); //5 secs

    //here is a way to set an interpolator on any animator
    oa.setInterpolator(new  AccelerateDecelerateInterpolator());
    oa.start();
}
A PropertyValuesHolder class holds a property name and its target value. Then you can define many of these PropertyValuesHolders with their own property to animate. You can supply this set of PropertyValuesHolders to the object animator. The object animator will then set these properties to their respective values on the target object. With each refresh of the animation, all the values from each PropertyValuesHolder will be applied all at once. This is more efficient than applying multiple animations in parallel.
Button 5 in Figure 18-5 runs the code in Listing 18-36. When this animation runs, the text view will emerge from bottom right and migrate toward the top left in 5 seconds.
Understanding View Properties Animation
Android SDK has an optimized approach to animate various properties of views. This is done through a class called ViewPropertyAnimator. Listing 18-37 uses this class to move the text view from bottom right to top left.
Listing 18-37. Using a ViewPropertyAnimator
//file: TestPropertyAnimationActivity.java(ProAndroid5_ch18_TestPropertyAnimation.zip)
public void testViewAnimator(View v) {
    //Remember current boundaries
    float h = m_tv.getHeight(); float w = m_tv.getWidth();
    float x = m_tv.getX(); float y = m_tv.getY();

    //Position the view at bottom right
    m_tv.setX(w);  m_tv.setY(h);

    //Get a ViewPropertyAnimator from the text view
    ViewPropertyAnimator vpa = m_tv.animate();

    //Set as many target values you want to set
    vpa.x(x);  vpa.y(y);

    //Set duration and interpolators
    vpa.setDuration(5000); //2 secs
    vpa.setInterpolator(new  AccelerateDecelerateInterpolator());

    //The animation automatically starts when the UI thread gets to it.
    //No need to explicitly call the start method.
    //vpa.start();
}
The steps to use ViewPropertyAnimator are as follows:
- Get a ViewPropertyAnimator by calling the animate() method on a view.
- Use the ViewPropertyAnimator object to set various final properties of that view, such as x, y, scale, alpha, and so on.
- Let the UI thread proceed by returning from the function. The animation will automatically start.
This animation is invoked by button 6. When this animation runs, the text view will migrate from bottom right to top left.
Understanding Type Evaluators
As we have seen, an object animator directly sets a particular value on a target object with each animation cycle. These values so far have been single point values such as floats, ints, and so on. What happens if your target object has a property that is an object itself? This is where type evaluators come into play.
To illustrate this consider a view on which we want to set two values such as ‘x’ and ‘y’. Listing 18-35 shows how we encapsulate a regular view for which we know how to change x and y. The encapsulation will allow the animation to call once for both x and y through the PointF abstraction available in the Android graphics package. We will provide a setPoint(PointF) method and then, inside that method, parse out x and y and set them on the view. Take a look at Listing 18-38.
Listing 18-38. Animating a View Through a TypeEvaluator
//file: AnimatableView.java(ProAndroid5_ch18_TestPropertyAnimation.zip)
public class MyAnimatableView {
    PointF curPoint = null; View m_v = null;
    public MyAnimatableView(View v)    {
        curPoint = new PointF(v.getX(),v.getY());
        m_v = v;
    }
    public PointF getPoint()    {
        return curPoint;
    }
    public void setPoint(PointF p) {
        curPoint = p;
        m_v.setX(p.x);
        m_v.setY(p.y);
    }
}
In code Listing 18-38 TypeEvaluator is a helper object that knows how to set a composite value such as a two-dimensional or three-dimensional point during an animation cycle. In a scenario involving composite fields (represented as an object), an ObjectAnimator will take the starting composite value (like the PointF object which is a composite of x and y), an ending composite value and pass them to a TypeEvaluator helper object to get the intermediate object value. This composite value is then set on the target object. Listing 18-39 shows how a TypeEvlautor calculates this intermediate value through its evaluate method.
Listing 18-39. Coding a TypeEvaluator
//file: MyPointEvaluator.java(ProAndroid5_ch18_TestPropertyAnimation.zip)
public class MyPointEvaluator implements TypeEvaluator<PointF> {
  public PointF evaluate(float fraction, PointF startValue, PointF endValue) {
        PointF startPoint = (PointF) startValue;
        PointF endPoint = (PointF) endValue;
        return new PointF(
            startPoint.x + fraction * (endPoint.x - startPoint.x),
            startPoint.y + fraction * (endPoint.y - startPoint.y));
    }
}
From Listing 18-39 you can see that you need to inherit from the TypeEvaluator interface and implement the evaluate() method. In this method, you will be passed the fraction of the animation’s total progress. You can use that fraction to adjust your intermediate composite value and return it as a typed value.
Listing 18-40 shows how an ObjectAnimator uses MyAnimatableView and the MyPointEvaluator to animate composite values for a View.
Listing 18-40. Using a TypeEvaluator
//file: TestPropertyAnimationActivity.java(ProAndroid5_ch18_TestPropertyAnimation.zip)
public void testTypeEvaluator(View v) {
    float h = m_tv.getHeight(); float w = m_tv.getWidth();
    float x = m_tv.getX(); float y = m_tv.getY();

    PointF startingPoint = new PointF(w,h);
    PointF endingPoint = new PointF(x,y);

    //m_atv: You will need this code in your activity earlier as a local variable:
    MyAnimatableView m_atv = new MyAnimatableView(m_tv);

    ObjectAnimator viewCompositeValueAnimator =
        ObjectAnimator.ofObject(m_atv
            ,"point", new MyPointEvaluator()
            ,startingPoint, endingPoint);

    viewCompositeValueAnimator.setDuration(5000);
    viewCompositeValueAnimator.start();
}
Notice in Listing 18-40 that the ObjectAnimator is using the method ofObject() as opposed to ofFloat() or ofInt(). Also notice that the starting value and ending value for the animation are composite values represented by the class PointF. The goal of the object animator is now to come up with an intermediate value for PointF and then pass it to the method setPoint(PointF) on the custom class MyAnimatableView. The class MyAnimatableView can accordingly set the respective individual properties on the contained text view. This animation in Listing 18-40 using the TypeEvaluator is invoked by button 7. When this animation runs, the view will migrate from bottom right to top left.
Understanding Key Frames
Key frames are useful places during an animation cycle to put key time markers (significant instances in time). A key frame specifies a particular value for a property at a given moment in time. The key marker’s time is between 0 (beginning of animation) and 1 (end of animation). Once you gather these key-frame values, you set them against a particular property such as alpha, x, or y. This association of key frames to their respective properties is done through the PropertyValuesHolder class. You then tell the ObjectAnimator to animate the resulting PropertyValuesHolder. Listing 18-41 demonstrates key-frame animation.
Listing 18-41. Animating a View Using Key Frames
//file:TestPropertyAnimationActivity.java(ProAndroid5_ch18_TestPropertyAnimation.zip)
public void testKeyFrames(View v) {
    float h = m_tv.getHeight();   float w = m_tv.getWidth();
    float x = m_tv.getX();  float y = m_tv.getY();

    //Start frame : 0.2, alpha: 0.8
    Keyframe kf0 = Keyframe.ofFloat(0.2f, 0.8f);

    //Middle frame: 0.5, alpha: 0.2
    Keyframe kf1 = Keyframe.ofFloat(.5f, 0.2f);

    //end frame: 0.8, alpha: 0.8
    Keyframe kf2 = Keyframe.ofFloat(0.8f, 0.8f);

    PropertyValuesHolder pvhAlpha =
        PropertyValuesHolder.ofKeyframe("alpha", kf0, kf1, kf2);
    PropertyValuesHolder pvhX =
        PropertyValuesHolder.ofFloat("x", w, x);

    //end frame
    ObjectAnimator anim =
        ObjectAnimator.ofPropertyValuesHolder(m_tv, pvhAlpha,pvhX);
    anim.setDuration(5000);
    anim.start();
}
The animation in Listing 18-41 is invoked by button 8. When this animation runs, you will see the text move from right to left. When 20% of the time has passed, alpha will change to 80%. The alpha value will reach 20% at half way and change back to 80% at the 80th percentile of the animation time.
Understanding Layout Transitions
The property animation API also provides layout-based animations through the LayoutTransition class. This class is well documented as part of the standard API Java doc at the following URL.
http://developer.android.com/reference/android/animation/LayoutTransition.html
We will summarize here only the key points of layout transitions. To enable layout transitions on a view group (most layouts are view groups), you will need to use the code shown in Listing 18-42.
Listing 18-42. Setting a Layout Transition
viewgroup.setLayoutTransition(
  new LayoutTransition()
);
With the code in Listing 18-42 the layout container (ViewGroup) will exhibit default transitions as views are added and removed. A LayoutTransition object has four different default animations that cover each of the following scenarios:
- Add a view (animation for the view that is appearing due to an add or a show)
- Change appearing (animation for the rest of the items in the layout as they could change their size or appearance due to a new item being added)
- Remove a view (animation for the view that is disappearing due to a remove or a hide)
- Change disappearing (animation for the rest of the items in the layout as they could their size or appearance due to an item being removed)
If you want custom animators for each of these cases, you can set them on the LayoutTransition object. Here is an example in Listing 18-43.
Listing 18-43. Layout Transition Methods
//Here is how you get a new layout transition
LayoutTransition lt = new LayoutTransition();

//You can set this layout transition on a layout
someLayout.setLayoutTransition(lt);

//obtain a default animator if you need to remember
Animator defaultAppearAnimator = lt.getAnimator(APPEARING);

//create a new animator
ObjectAnimator someNewObjectAnimator1, someOtherObjectAnimator2;

//set it as your custom animator for the allowed set of animators
lt.setAnimator(APPEARING, someNewObjectAnimator1);
lt.setAnimator(CHANGE_APPEARING, someNewObjectAnimator1);
lt.setAnimator(DISAPPEARING, someNewObjectAnimator1);
lt.setAnimator(CHANGE_DISAPPEARING, someOtherObjectAnimator2);
Because the animator you supply to a layout transition applies to each view, the animators are internally cloned before being applied to each view.
Resources
Here are some useful links to when you are working with the Android Animation API:
- http://www.androidbook.com/item/3901: Author research notes on Android property animations.
- http://android-developers.blogspot.com/2011/02/animation-in-honeycomb.html: A key blog on property animations.
- http://android-developers.blogspot.com/2011/05/introducing-viewpropertyanimator.html: A blog on view property animations.
- http://developer.android.com/guide/topics/graphics/prop-animation.html: Primary documentation on property animations from the Android SDK.
- http://developer.android.com/guide/topics/graphics/animation.html: Android documentation links to all animation types, including property animations and old-style animations.
- http://developer.android.com/reference/android/view/animation/package-summary.html: Java doc API for the older animation package android.view.animation.
- http://developer.android.com/guide/topics/resources/animation-resource.html: XML tags for various animation types.
- http://www.androidbook.com/proandroid5/projects: Downloadable test projects for this chapter. The names of the zip files are ProAndroid5_ch18_TestFrameAnimation.zip, ProAndroid5_ch18_TestLayoutAnimation.zip, ProAndroid5_ch18_TestViewAnimation.zip, and ProAndroid5_ch18_TestPropertyAnimation.zip.
Summary
In this chapter we have covered frame-by-frame animation, layout animation, view animation, interpolators, transformation matrices, Camera, and various ways of using the new property animation API. All concepts are presented with working code snippets and supported by working downloadable projects.