
Building and Consuming Services
The Android platform provides a complete software stack. This means you get an operating system and middleware, as well as working applications (such as a phone dialer). Alongside all of this, you have an SDK that you can use to write applications for the platform. Thus far, we’ve seen that we can build applications that directly interact with the user through a user interface. We have not, however, discussed background services or the possibilities of building components that run in the background.
In this chapter, we are going to focus on building and consuming services in Android. First we’ll discuss consuming HTTP services, and then we’ll cover a nice way to do simple background tasks, and finally we’ll discuss interprocess communication—that is, communication between applications on the same device.
Android applications and mobile applications in general are small apps with a lot of functionality. One of the ways that mobile apps deliver such rich functionality on such a small device is that they pull information from various sources. For example, most Android smartphones come with the Maps application, which provides sophisticated mapping functionality. We, however, know that the application is integrated with the Google Maps API and other services, which provide most of the sophistication.
That said, it is likely that the applications you write will also leverage information from other applications and APIs. A common integration strategy is to use HTTP. For example, you might have a Java servlet available on the Internet that provides services you want to leverage from one of your Android applications. How do you do that with Android? Interestingly, the Android SDK ships with a variation of Apache’s HttpClient (http://hc.apache.org/httpcomponents-client-ga/), which is universally used. The Android version has been modified for Android, but the APIs are very similar to the APIs in the Apache version.
The Apache HttpClient is a comprehensive HTTP client. It offers full support for the HTTP protocol. In this section, we will discuss using the HttpClient to make HTTP GET and HTTP POST calls. If you are working with RESTful services, you would probably use the other HTTP operations as well (PUT, DELETE, etc.).
Using the HttpClient for HTTP GET Requests
Here’s one of the general patterns for using the HttpClient:
- Create an HttpClient (or get an existing reference).
- Instantiate a new HTTP method, such as PostMethod or GetMethod.
- Set HTTP parameter names/values.
- Execute the HTTP call using the HttpClient.
- Process the HTTP response.
Listing 14-1 shows how to execute an HTTP GET using the HttpClient.
Note We give you a URL at the end of the chapter that you can use to download projects from this chapter. This will allow you to import these projects into your IDE directly. Also, because the code attempts to use the Internet, you will need to add android.permission.INTERNET to your manifest file when making HTTP calls using HttpClient.
Also note that in the following examples, all web services calls should be put into background threads so as not to block the main UI thread. See later in this chapter, as well as Chapter 15, for an excellent deep-dive on how to do that. For the purposes of this chapter, those details are excluded to help with understanding services.
Listing 14-1. Using HttpClient and HttpGet: HttpGetDemo.java
public class HttpGetDemo extends Activity {
    /** Called when the activity is first created. */
    @Override
    public void onCreate(Bundle savedInstanceState) {
        super.onCreate(savedInstanceState);
        setContentView(R.layout.main);

        BufferedReader in = null;
        try {

            HttpClient client = new DefaultHttpClient();
            HttpGet request = new HttpGet("http://code.google.com/android/");
            HttpResponse response = client.execute(request);

            in = new BufferedReader(
                    new InputStreamReader(
                        response.getEntity().getContent()));

            StringBuffer sb = new StringBuffer("");
            String line = "";
            String NL = System.getProperty("line.separator");
            while ((line = in.readLine()) != null) {
                sb.append(line + NL);
            }
            in.close();

            String page = sb.toString();
            System.out.println(page);
        } catch (Exception e) {
            e.printStackTrace();
        } finally {
            if (in != null) {
                try {
                    in.close();
                } catch (IOException e) {
                    e.printStackTrace();
                }
            }
        }
    }
}
The HttpClient is able to consume the various HTTP request types, such as HttpGet, HttpPost, and so on. Listing 14-1 uses the HttpClient to get the contents of the http://code.google.com/android/ URL. The actual HTTP request is executed with the call to client.execute(). After executing the request, the code reads the entire response into a string object. Note that the BufferedReader is closed in the finally block, which also closes the underlying HTTP connection.
For our example we embedded the HTTP logic inside of an activity, but we don’t need to be within the context of an activity to use HttpClient. You can use it from within the context of any Android component or use it as part of a stand-alone class. In fact, you shouldn’t use HttpClient directly within an activity, because a web call could take a while to complete and cause an Application Not Responding (ANR) pop-up. We’ll cover that topic later in this chapter. For now we’re going to cheat a little so we can focus on how to make HttpClient calls.
The code in Listing 14-1 executes an HTTP request without passing any HTTP parameters to the server. You can pass name/value parameters as part of the request by appending name/value pairs to the URL, as shown in Listing 14-2.
Listing 14-2. Adding Parameters to an HTTP GET Request
HttpGet request =
    new HttpGet("http://somehost/Upload.aspx?one=value1&two=value2");
client.execute(request);
When you execute an HTTP GET, the parameters (names and values) of the request are passed as part of the URL. Passing parameters this way has some limitations. Namely, the length of a URL should be kept below 2,048 characters. If you have more than this amount of data to submit, you should use HTTP POST instead. The POST method is more flexible and passes parameters as part of the request body.
Using the HttpClient for HTTP POST Requests (a Multipart Example)
Making an HTTP POST call is very similar to making an HTTP GET call (see Listing 14-3). This example is called SimpleHTTPPost.
Listing 14-3. Making an HTTP POST Request with the HttpClient
HttpClient client = new DefaultHttpClient();
HttpPost request = new HttpPost(
        "http://www.androidbook.com/akc/display");
List<NameValuePair> postParameters = new ArrayList<NameValuePair>();
postParameters.add(new BasicNameValuePair("url", "DisplayNoteIMPURL"));
postParameters.add(new BasicNameValuePair("reportId", "4788"));
postParameters.add(new BasicNameValuePair("ownerUserId", "android"));
postParameters.add(new BasicNameValuePair("aspire_output_format", "embedded-xml"));
UrlEncodedFormEntity formEntity = new UrlEncodedFormEntity(
        postParameters);
request.setEntity(formEntity);
HttpResponse response = client.execute(request);
The code in Listing 14-3 would replace the three lines in Listing 14-1 where the HttpGet is used. Everything else could stay the same. To make an HTTP POST call with the HttpClient, you have to call the execute() method of the HttpClient with an instance of HttpPost. When making HTTP POST calls, you generally pass URL-encoded name/value form parameters as part of the HTTP request. To do this with the HttpClient, you have to create a list that contains instances of NameValuePair objects and then wrap that list with a UrlEncodedFormEntity object. The NameValuePair wraps a name/value combination, and the UrlEncodedFormEntity class knows how to encode a list of NameValuePair objects suitable for HTTP calls (generally POST calls). After you create a UrlEncodedFormEntity, you can set the entity type of the HttpPost to the UrlEncodedFormEntity and then execute the request.
In Listing 14-3, we created an HttpClient and then instantiated the HttpPost with the URL of the HTTP endpoint. Next, we created a list of NameValuePair objects and populated it with several name/value parameters. We then created a UrlEncodedFormEntity instance, passing the list of NameValuePair objects to its constructor. Finally, we called the setEntity() method of the POST request and then executed the request using the HttpClient instance.
HTTP POST is actually much more powerful than this. With an HTTP POST, we can pass simple name/value parameters, as shown in Listing 14-3, as well as complex parameters such as files. HTTP POST supports another request-body format known as a multipart POST. With this type of POST, you can send name/value parameters as before, along with arbitrary files. Unfortunately, the version of HttpClient shipped with Android does not directly support multipart POST. To achieve this goal in the past, we’ve recommended that you grab three other libraries: Apache Commons IO, Mime4j, and HttpMime.
Now we recommend that you download the Ion library, which has two dependencies. All three jar files can be found at these two sites:
- https://github.com/koush/ion#jars (ion and androidasync)
- https://code.google.com/p/google-gson/downloads/list (gson)
Listing 14-4 demonstrates a multipart POST using Android. This example is called MultipartHTTPPost.
Listing 14-4. Making a Multipart POST Call
public class TestMultipartPost extends Activity {
    /** Called when the activity is first created. */
    @Override
    public void onCreate(Bundle savedInstanceState) {
        super.onCreate(savedInstanceState);
        setContentView(R.layout.main);

        try {
            Ion.with(this, "http://www.androidbook.com/akc/update/PublicUploadTest")
            .setMultipartParameter("field1", "This is field number 1")
            .setMultipartParameter("field2", "Field 2 is shorter")
            .setMultipartFile("datafile",
                    new File(Environment.getExternalStorageDirectory()+"/testfile.txt"))
            .asString()
            .setCallback(new FutureCallback<String>() {
                   @Override
                    public void onCompleted(Exception e, String result) {
                       System.out.println(result);
                    }});

        } catch(Exception e) {
            // Do something about exceptions
            System.out.println("Got exception: " + e);
        }
    }
}
Note The multipart example uses several .jar files that are not included as part of the Android runtime. To ensure that the .jar files will be packaged as part of your .apk file, you need to add them as external .jar files in Eclipse. To do this, right-click your project in Eclipse, select Properties, choose Java Build Path, select the Libraries tab, and then select Add External JARs.
Following these steps will make the .jar files available during compile time as well as runtime.
To execute a multipart POST using the Ion library, you simply put together the appropriate calls to build a URL, add parameters, define the return type, and set up a callback method. This will run asynchronously and the callback will be invoked on the UI thread once a response is received from the web server. In the example, the result string is written to LogCat. Your application is probably going to receive back a JsonObject which the callback would then process. But realize that the response from the web server has already been converted into a JsonObject for you, making the processing in the callback that much easier. Listing 14-4 adds three parts to the request: two string parts and a text file. To run this example yourself you will need to put a testfile.txt file onto the external storage area of your device or emulator.
Finally, if you are building an application that requires you to pass a multipart POST to a web resource, you’ll likely have to debug the solution using a dummy implementation of the service on your local workstation. When you’re running applications on your local workstation, normally you can access the local machine by using localhost or IP address 127.0.0.1. With Android applications, however, you will not be able to use localhost (or 127.0.0.1) because the device or emulator will be its own localhost. You don’t want to point this client to a service on the Android device; you want to point to your workstation. To refer to your development workstation from the application running in the device or emulator, you’ll have to use your workstation’s IP address in the URL.
SOAP, JSON, and XML Parsers
What about SOAP? There are lots of SOAP-based web services on the Internet, but to date, Google has not provided direct support in Android for calling SOAP web services. Google instead prefers REST-like web services, seemingly to reduce the amount of computing required on the client device. However, the tradeoff is that the developer must do more work to send data and to parse the returned data. Ideally, you will have some options for how you can interact with your web services. Some developers have used the kSOAP2 developer kit to build SOAP clients for Android. We won’t be covering that approach, but it’s out there if you’re interested.
Note The original kSOAP2 source is located here: http://ksoap2.sourceforge.net/. The open source community has (thankfully!) contributed a version of kSOAP2 for Android, and you can find out more about it here: http://code.google.com/p/ksoap2-android/.
One approach that’s been used successfully is to implement your own services on the Internet, which can talk SOAP (or whatever) to the destination service. Then your Android application only needs to talk to your services, and you now have complete control. If the destination services change, you might be able to handle that without having to update and release a new version of your application. You’d only have to update the services on your server. A side benefit of this approach is that you could more easily implement a paid subscription model for your application. If a user lets their subscription lapse, you can turn them off at your server.
Android does have support for JavaScript Object Notation (JSON). This is a fairly common method of packaging data between a web server and a client. The JSON parsing classes make it very easy to unpack data from a response so your application can act on it. Or dig deeper into the Gson package referenced earlier in this chapter. Gson is a JSON Java library from Google, and its main benefit is how easy it is to parse JSON input into Java objects, and vice versa. It’s also very fast.
Android also has a couple of XML parsers that you can use to interpret the responses from the HTTP calls; the recommended one is XMLPullParser.
Dealing with Exceptions
Dealing with exceptions is part of any program, but software that makes use of external services (such as HTTP services) must pay additional attention to exceptions because the potential for errors is magnified. There are several types of exceptions that you can expect while making use of HTTP services. These are transport exceptions, protocol exceptions, and timeouts. You should understand when these exceptions could occur.
Transport exceptions can occur due to a number of reasons, but the most likely scenario with a mobile device is poor network connectivity. Protocol exceptions (e.g., ClientProtocolException) are exceptions at the HTTP protocol layer. These include authentication errors, invalid cookies, and so on. You can expect to see protocol exceptions if, for example, you have to supply login credentials as part of your HTTP request but fail to do so. Timeouts, with respect to HTTP calls, come in two flavors: connection timeouts and socket timeouts. A connection timeout (e.g., ConnectTimeoutException) can occur if the HttpClient is not able to connect to the HTTP server—if, for example, the server is not available. A socket timeout (e.g., SocketTimeoutException) can occur if the HttpClient fails to receive a response within a defined time period. In other words, the HttpClient was able to connect to the server, but the server failed to return a response within the allocated time limit.
Now that you understand the types of exceptions that might occur, how do you deal with them? Fortunately, the HttpClient is a robust framework that takes most of the burden off your shoulders. In fact, the only exception types that you’ll have to worry about are the ones that you’ll be able to manage easily. The HttpClient takes care of transport exceptions by detecting transport issues and retrying requests (which works very well with this type of exception). Protocol exceptions are exceptions that can generally be flushed out during development. Timeouts are the most likely exceptions that you’ll have to deal with. A simple and effective approach to dealing with both types of timeouts—connection timeouts and socket timeouts—is to wrap the execute() method of your HTTP request with a try/catch and then retry if a failure occurs.
When using the HttpClient as part of a real-world application, you need to pay some attention to multithreading issues that might come up. Let’s delve into these now.
Addressing Multithreading Issues
The examples we’ve shown so far created a new HttpClient for each request. In practice, however, you could create one HttpClient for the entire application and use that for all of your HTTP communication. It’s possible to associate a connection pool with this HttpClient, which you’ll now see. With one HttpClient servicing all of your HTTP requests, you should pay attention to multithreading issues that could surface if you make simultaneous requests through the same HttpClient. Fortunately, the HttpClient provides facilities that make this easy—all you have to do is create the DefaultHttpClient using a ThreadSafeClientConnManager, as shown in Listing 14-5. This example project is HttpSingleton.
Listing 14-5. Creating an HttpClient for Multithreading: CustomHttpClient.java
public class CustomHttpClient {
    private static HttpClient customHttpClient;

    /** A private Constructor prevents instantiation */
    private CustomHttpClient() {
    }

    public static synchronized HttpClient getHttpClient() {
        if (customHttpClient == null) {
            HttpParams params = new BasicHttpParams();
            HttpProtocolParams.setVersion(params, HttpVersion.HTTP_1_1);
            HttpProtocolParams.setContentCharset(params,
                    HTTP.DEFAULT_CONTENT_CHARSET);
            HttpProtocolParams.setUseExpectContinue(params, true);
            HttpProtocolParams.setUserAgent(params,
                    System.getProperty("http.agent")
                    // Could also have used the following which is browser-oriented as opposed to
                    // device-oriented:
                    // new WebView(getApplicationContext()).getSettings().getUserAgentString()
            );

            ConnManagerParams.setTimeout(params, 1000);

            HttpConnectionParams.setConnectionTimeout(params, 5000);
            HttpConnectionParams.setSoTimeout(params, 10000);

            SchemeRegistry schReg = new SchemeRegistry();
            schReg.register(new Scheme("http",
                            PlainSocketFactory.getSocketFactory(), 80));
            schReg.register(new Scheme("https",
                            SSLSocketFactory.getSocketFactory(), 443));
            ClientConnectionManager conMgr = new
                            ThreadSafeClientConnManager(params,schReg);

            customHttpClient = new DefaultHttpClient(conMgr, params);
        }
        return customHttpClient;
    }

    public Object clone() throws CloneNotSupportedException {
        throw new CloneNotSupportedException();
    }
}
If your application needs to make more than a few HTTP calls, you should create an HttpClient that services all your HTTP requests. The simplest way to do this is to create a singleton class that can be accessed from anywhere in the application, as we’ve shown here. This is a fairly standard Java pattern in which we synchronize access to a getter method, and that getter method returns the one and only HttpClient object for the singleton, creating it the first time as necessary.
Now, take a look at the getHttpClient() method of CustomHttpClient. This method is responsible for creating our singleton HttpClient. We set some basic parameters, some timeout values, and the schemes that our HttpClient will support (that is, HTTP and HTTPS). Notice that when we instantiate the DefaultHttpClient(), we pass in a ClientConnectionManager. The ClientConnectionManager is responsible for managing HTTP connections for the HttpClient. Because we want to use a single HttpClient for all the HTTP requests (requests that could overlap if we’re using threads), we create a ThreadSafeClientConnManager.
We also show you a simpler way of collecting the response from the HTTP request, using a BasicResponseHandler. The code for our activity that uses our CustomHttpClient is in Listing 14-6.
Listing 14-6. Using Our CustomHttpClient: HttpActivity.java
public class HttpActivity extends Activity
{
    private HttpClient httpClient;
    @Override
    public void onCreate(Bundle savedInstanceState)
    {
        super.onCreate(savedInstanceState);
        setContentView(R.layout.main);

        httpClient = CustomHttpClient.getHttpClient();
        getHttpContent();
    }

    public void getHttpContent()
    {
        try {
            HttpGet request = new HttpGet("http://www.google.com/");
            String page = httpClient.execute(request,
                    new BasicResponseHandler());
            System.out.println(page);
        } catch (IOException e) {
            // covers:
            //      ClientProtocolException
            //      ConnectTimeoutException
            //      ConnectionPoolTimeoutException
            //      SocketTimeoutException
            e.printStackTrace();
        }
    }
}
For this sample application, we do a simple HTTP get of the Google home page. We also use a BasicResponseHandler object to take care of rendering the page as a big String, which we then write out to LogCat. As you can see, adding a BasicResponseHandler to the execute() method is very easy to do.
You may be tempted to take advantage of the fact that each Android application has an associated Application object. By default, if you don’t define a custom application object, Android uses android.app.Application. Here’s the interesting thing about the application object: there will always be exactly one application object for your application, and all of your components can access it (using the global context object). It is possible to extend the Application class and add functionality such as our CustomHttpClient. However, in our case there is really no reason to do this within the Application class itself, and you will be much better off not messing with the Application class when you can simply create a separate singleton class to handle this type of need.
Fun with Timeouts
There are other terrific advantages to setting up a single HttpClient for our application to use. We can modify the properties of it in one place, and everyone can take advantage of it. For example, if we want to set up common timeout values for our HTTP calls, we can do that when creating our HttpClient by calling the appropriate setter functions against our HttpParams object. Please refer to Listing 14-5 and the getHttpClient() method. Notice that there are three timeouts we can play with. The first is a timeout for the connection manager, and it defines how long we should wait to get a connection out of the connection pool managed by the connection manager. In our example, we set this to 1 second. About the only time we might ever have to wait is if all connections from the pool are in use. The second timeout value defines how long we should wait to make a connection over the network to the server on the other end. Here, we used a value of 2 seconds. And lastly, we set a socket timeout value to 4 seconds to define how long we should wait to get data back for our request.
Corresponding to the three timeouts described previously, we could get these three exceptions: ConnectionPoolTimeoutException, ConnectTimeoutException, or SocketTimeoutException. All three of these exceptions are subclasses of IOException, which we’ve used in our HttpActivity instead of catching each subclass exception separately.
If you investigate each of the parameter-setting classes that we used in getHttpClient(), you might discover even more parameters that you would find useful.
We’ve described for you how to set up an HttpClient with a pool of connections for use across your application. And the implication is that every time you need to use a connection, the various settings will apply to your particular needs. But what if you want different settings for a particular message? Thankfully, there’s an easy way to do that as well. We showed you how to use an HttpGet or an HttpPost object to describe the request to be made across the network. In a similar way to how we set HttpParams on our HttpClient, you can set HttpParams on both HttpGet and HttpPost objects. The settings you apply at the message level will override the settings at the HttpClient level without changing the HttpClient settings. Listing 14-7 shows what this might look like if we wanted to have a socket timeout of 1 minute instead of 4 seconds for one particular request. You would use these lines in place of the lines in the try block of getHttpContent() in Listing 14-6.
Listing 14-7. Overriding the Socket Timeout at the Request Level
HttpGet request = new HttpGet("http://www.google.com/");
HttpParams params = request.getParams();
HttpConnectionParams.setSoTimeout(params, 60000);   // 1 minute
request.setParams(params);
String page = httpClient.execute(request,
                    new BasicResponseHandler());
System.out.println(page);
Android provides another way to deal with HTTP services, and that is using the java.net.HttpURLConnection class. This is not unlike the HttpClient classes we’ve just covered, but HttpURLConnection tends to require more statements to get things done. HttpURLConnection is also not threadsafe. On the other hand, this class is much smaller and lightweight than HttpClient, so you can simply create the ones you need. Starting with the Gingerbread release, it is also fairly stable, so you should consider it for apps on more recent devices when you just need basic HTTP features and you want a compact application.
Using the AndroidHttpClient
Android 2.2 introduced a new subclass of HttpClient called AndroidHttpClient. The idea behind this class is to make things easier for the developer of Android apps by providing default values and logic appropriate for Android apps. For example, the timeout values for the connection and the socket (that is, operation) default to 20 seconds each. The connection manager defaults to the ThreadSafeClientConnManager. For the most part, it is interchangeable with the HttpClient we used in the previous examples. There are a few differences, though, that you should be aware of:
- To create an AndroidHttpClient, you invoke the static newInstance() method of the AndroidHttpClient class, like this:
AndroidHttpClient httpClient = AndroidHttpClient.newInstance("my-http-agent-string");
- Notice that the parameter to the newInstance() method is an HTTP agent string. You most likely don’t want to hardcode this, so you have two options as follows, which unfortunately can return different strings. The second one is probably the one you want to use as it looks more like what a browser would send (at least in our experiments).
// The first option is a device-level agent string
String httpAgent = System.getProperty("http.agent");
// This second option looks like a browser’s agent string
httpAgent = new WebView(context).getSettings().getUserAgentString();
Of course, you are also free to build your own agent string using anything available to your app; it’s the server that’s going to parse it to better understand the device, and if you control the server, you can use whatever values you sent from the app.
- When execute() is called on this client, you must be in a thread separate from the main UI thread. This means that you’ll get an exception if you simply attempt to replace our previous HttpClient with an AndroidHttpClient. It is bad practice to make HTTP calls from the main UI thread, so AndroidHttpClient won’t let you. We’ll be covering threading issues in the next section.
- You must call close() on the AndroidHttpClient instance when you are done with it. This is so memory can be freed up properly.
- There are some handy static methods for dealing with compressed responses from a server, including
- modifyRequestToAcceptGzipResponse(HttpRequest request)
- getCompressedEntity(byte[] data, ContentResolver resolver)
- getUngzippedContent(HttpEntity entity)
Once you’ve acquired an instance of the AndroidHttpClient, you cannot modify any parameter settings in it, nor can you add any parameter settings to it (such as the HTTP protocol version, for example). Your options are to override settings within the HttpGet object as shown previously or to not use the AndroidHttpClient.
This concludes our discussion of using HTTP services with the HttpClient. For a great tutorial on using HttpClient and these other concepts, please check out the Apache site at http://hc.apache.org/httpcomponents-client-ga/tutorial/html/.
We’ve shown you how to operate with HTTP-based services. But what if we wanted to run some background processing that lasted longer than a short while, or what if we wanted to invoke some non-UI functionality that exists in another Android application? For these needs, Android provides services. We will discuss them next.
Android supports the concept of services. Services are components that run in the background, without a user interface. You can think of these components as similar to Windows services or Unix daemons. Similar to these types of services, Android services can be always available but don’t have to be actively doing something. More important, Android services can have life cycles separate from activities. When an activity pauses, stops, or gets destroyed, there may be some processing that you want to continue. Services are good for that too.
Android supports two types of services: local services and remote services. A local service is a service that is only accessible to the application that is hosting it, and it is not accessible from other applications running on the device. Generally, these types of services simply support the application that is hosting the service. A remote service is accessible from other applications on the device in addition to the application hosting the service. Remote services define themselves to clients using Android Interface Definition Language (AIDL). We’re going to talk about both of these types of services, although in the next few chapters, we’re going deep into local services. Therefore, we will introduce them here but not spend that much time on them. We’ll cover remote services in more detail in this chapter.
Understanding Services in Android
The Android Service class is a wrapper of sorts for code that has service-like behavior. However, a Service object does not create its own threads automatically. For a Service object to use threads, the developer must make it happen. This means that without adding threading to a service, the code of the service will run on the main thread. If our service is performing operations that will complete quickly, this won’t be a problem. If our service might run for a while, we definitely want to involve threading. Keep in mind there is nothing wrong with using AsyncTasks to do threading within services.
Android supports the concept of a service for two reasons:
- First, to allow you to implement background tasks easily.
- Second, to allow you to do interprocess communication between applications running on the same device.
These two reasons correspond to the two types of services that Android supports: local services and remote services. An example of the first case might be a local service implemented as part of an e-mail application. The service could handle the sending of a new e-mail to the e-mail server, complete with attachments and retries. As this could take a while to complete, a service is a nice way of wrapping up that functionality so the main thread can kick it off and get back to the user. Plus, if the e-mail activity goes away, you still want the sent e-mails to be delivered. An example of the second case, as we’ll see later, is a language translation application. Suppose you have several applications running on a device, and you need a service to accept text that needs to be translated from one language to another. Rather than repeat the logic in every application, you could write a remote translation service and have the applications talk to the service.
A local service gets initialized either by a client binding to it using bindService(), or by a client starting it using startService(). Remote services are typically always initialized with bindService(). A bound service gets instantiated when the first client binds to it, and destroyed when the last client unbinds from it. As clients come in and out of the foreground, they can bind and unbind as needed, to ensure that the service isn’t running unnecessarily. This helps to preserve battery life. However, it is unwise to bind in onResume() and unbind in onPause() because that could cause a lot of unnecessary starting and stopping of the service. It’s better to bind and unbind in onCreate() and onDestroy(), or in onStart() and onStop(). Binding is only allowed from an Application Context, an Activity, another Service, or a Content Provider. That means not from Fragments and not from Broadcast Receivers.
When a service is instead started with startService(), it will remain running until it is stopped, either by a client or by telling itself to stop. For a local service that wants to perform work in the background, consider instantiating it with startService() so it can remain running even if the activity that started it goes away. Technically a Broadcast Receiver can start a service using startService(), since the service can then continue to exist once the short-lived Broadcast Receiver terminates. If you do create a service that will run in the background even when the activities have gone away, you may want to implement onBind() for when the user wants to regain control of the service. A new activity could bind to the existing service and then call service methods on it.
There are examples of local services that do not create background threads, but this may not be very useful in practice. A service does not inherently create any threads, so code of a service will by default run on the main UI thread. There may not be any real advantage to wrapping this code in a service then, since you could just call methods of a class to execute that logic. It is more common for a local service to have its own threads of execution, which can be started either when the first client binds to it, or because of a startService() command.
Now, we can begin a detailed examination of the two types of services. We will start by talking about local services and then discuss remote services. As mentioned before, local services are services that are called only by the application that hosts them. Remote services are services that support a remote procedure call (RPC) mechanism. These services allow external clients, on the same device, to connect to the service and use its facilities. There are two main ways of calling remote services: using an AIDL interface and using a Messenger. Both will be covered.
Note The second type of service in Android is known by several names: remote service, AIDL-supporting service, AIDL service, external service, and RPC service. These terms all refer to the same type of service—one that’s meant to be accessed remotely by other applications running on the device.
Understanding Local Services
Local services are services that are generally started via Context.startService(). Once started, these types of services will continue to run until a client calls Context.stopService() on the service or the service itself calls stopSelf(). Note that when Context.startService() is called and the service has not already been created, the system will instantiate the service and call the service’s onStartCommand() method. Keep in mind that calling Context.startService() after the service has been started (that is, while it exists) will not result in another instance of the service, but will reinvoke the running service’s onStartCommand() method. Here are a couple of examples of local services:
- A service to monitor sensor data from the device and do analysis, issuing alerts if a certain condition is realized. This service might run constantly.
- A task-executor service that lets your application’s activities submit jobs and queue them for processing. This service might only run for the duration of the operation to submit the job.
Listing 14-8 demonstrates a local service by implementing a service that executes background tasks. We’ll end up with four artifacts required to create and consume the service: BackgroundService.java (the service itself), main.xml (a layout file for the activity), MainActivity.java (an activity class to call the service), and AndroidManifest.xml. Listing 14-8 only contains BackgroundService.java. We’ll dissect this code first and then move on to the other three.
Listing 14-8. Implementing a Local Service: BackgroundService.java
public class BackgroundService extends Service
{
    private static final String TAG = "BackgroundService";
    private NotificationManager notificationMgr;
    private ThreadGroup myThreads = new ThreadGroup("ServiceWorker");

    @Override
    public void onCreate() {
        super.onCreate();

        Log.v(TAG, "in onCreate()");
        notificationMgr =(NotificationManager)getSystemService(
               NOTIFICATION_SERVICE);
        displayNotificationMessage("Background Service is running");
    }

    @Override
    public int onStartCommand(Intent intent, int flags, int startId) {
        super.onStartCommand(intent, flags, startId);

        int counter = intent.getExtras().getInt("counter");
        Log.v(TAG, "in onStartCommand(), counter = " + counter +
                ", startId = " + startId);

        new Thread(myThreads, new ServiceWorker(counter),
            "BackgroundService")
                .start();

        return START_STICKY;
    }

    class ServiceWorker implements Runnable
    {
        private int counter = -1;
        public ServiceWorker(int counter) {
            this.counter = counter;
        }

        public void run() {
            final String TAG2 = "ServiceWorker:" +
                Thread.currentThread().getId();
            // do background processing here... we'll just sleep...
            try {
                Log.v(TAG2, "sleeping for 10 seconds. counter = " +
                    counter);
                Thread.sleep(10000);
                Log.v(TAG2, "... waking up");
            } catch (InterruptedException e) {
                Log.v(TAG2, "... sleep interrupted");
            }
        }
    }

    @Override
    public void onDestroy()
    {
        Log.v(TAG, "in onDestroy(). Interrupting threads and cancelling notifications");
        myThreads.interrupt();
        notificationMgr.cancelAll();
        super.onDestroy();
    }

    @Override
    public IBinder onBind(Intent intent) {
        Log.v(TAG, "in onBind()");
        return null;
    }

    private void displayNotificationMessage(String message)
    {

        PendingIntent contentIntent =
            PendingIntent.getActivity(this, 0,
                new Intent(this, MainActivity.class), 0);

        Notification notification = new NotificationCompat.Builder(this)
            .setContentTitle(message)
            .setContentText("Touch to turn off service")
            .setSmallIcon(R.drawable.emo_im_winking)
            .setTicker("Starting up!!!")
            // .setLargeIcon(aBitmap)
            .setContentIntent(contentIntent)
            .setOngoing(true)
            .build();

        notificationMgr.notify(0, notification);
    }
}
The structure of a Service object is somewhat similar to an activity. There is an onCreate() method where you can do initialization, and an onDestroy() where you do cleanup. Services don’t pause or resume the way activities do, so we don’t use onPause() or onResume() methods. In this example, we won’t be binding to the local service, but because Service requires an implementation of the onBind() method, we provide one that simply returns null. It’s worth mentioning that you could have a local service that implements onBind() and does not use onStartCommand().
Going back to our onCreate() method, we don’t need to do much except to notify the user that this service has been created. We do this using the NotificationManager. You’ve probably noticed the notification bar at the top left of an Android screen. By pulling down on this, the user can view messages of importance, and by touching notifications can act on the notifications, which usually means returning to some activity related to the notification. With services, because they can be running, or at least existing, in the background without a visible activity, there has to be some way for the user to get back in touch with the service, perhaps to turn it off. Therefore, we create a Notification object, populate it with a PendingIntent, which will get us back to our control activity, and post it. This all happens in the displayNotificationMessage() method. Note that our Notification object needs to exist as long as our service exists, so we use setOngoing(true) to keep it in the notifications list until we clear it ourselves from our service’s onDestroy() method. The method we used in onDestroy() to clear our notification is cancelAll() on the NotificationManager.
There’s another thing you need to have for this example to work. You’ll need to create a drawable named emo_im_winking and place it within your project’s drawable folder. A good source of drawables for this demonstration purpose is to look under the Android platform folder at Android SDK/platforms/<version>/data/res/drawable, where <version> is the version you’re interested in. Unfortunately, you can’t reliably refer to Android system drawables from your code, so you’ll need to copy what you want over to your project’s drawables folder. If you choose a different drawable file for your example, just go ahead and rename the resource ID in the constructor for the Notification.
When an intent is sent into our service using startService(), onCreate() is called if necessary, and our onStartCommand() method is called to receive the caller’s intent. In our case, we’re not going to do anything special with it, except to unpack the counter and use it to start a background thread. In a real-world service, we would expect any data to be passed to us via the intent, and this could include URIs, for example. Notice the use of a ThreadGroup when creating the Thread. This will prove to be useful later when we want to get rid of our background threads. Also notice the startId parameter. This is set for us by Android and is a unique identifier of the service calls since this service was started.
Our ServiceWorker class is a typical runnable and is where the work happens for our service. In our particular case, we’re simply logging some messages and sleeping. We’re also catching any interruptions and logging them. One thing we’re not doing is manipulating the user interface. We’re not updating any views for example. Because we’re not on the main thread anymore, we cannot touch the UI directly. There are ways for our ServiceWorker to effect changes in the user interface, and we’ll get into those details in the next few chapters.
The last item to pay attention to in our BackgroundService is the onDestroy() method. This is where we perform the cleanup. For our example, we want to get rid of the threads we created earlier, if any are still around. If we don’t do this, they could simply hang around and take up memory. Second, we want to get rid of our notification message. Because our service is going away, there’s no longer any need for the user to get to the activity to get rid of it. In a real-world application, however, we might want to keep our workers working. If our service is sending e-mails, we certainly don’t want to simply kill off the threads. Our example is overly simple, because we imply through the use of the interrupt() method that you can easily kill off background threads. In reality, however, the most you can do is interrupt. This won’t necessarily kill off a thread, though. There are deprecated methods for killing threads, but you should not use these. They can cause memory and stability problems for you and your users. Interrupting works in our example, because we’re doing sleeps, which can be interrupted.
It’s worthwhile taking a look at the ThreadGroup class because it provides ways for you to get access to your threads. We created a single ThreadGroup object within our service and then used that when creating our individual threads. Within our onDestroy() method of the service, we simply interrupt() on the ThreadGroup, and it issues an interrupt to each thread in the ThreadGroup.
So there you have the makings of a simple local service. Before we show you the code for our activity, Listing 14-9 shows the XML layout file for our user interface.
Listing 14-9. Implementing a Local Service: main.xml
<?xml version="1.0" encoding="utf-8"?>
<!-- This file is /res/layout/main.xml -->
<LinearLayout xmlns:android="http://schemas.android.com/apk/res/android"
    android:orientation="vertical"
    android:layout_width="fill_parent"
    android:layout_height="fill_parent"
    >
<Button  android:id="@+id/startBtn"
    android:layout_width="wrap_content"
    android:layout_height="wrap_content"
    android:text="Start Service"  android:onClick="doClick" />
<Button  android:id="@+id/stopBtn"
    android:layout_width="wrap_content"
    android:layout_height="wrap_content"
    android:text="Stop Service"  android:onClick="doClick" />
</LinearLayout>
We’re going to show two buttons on the user interface, one to do startService() and the other to do stopService(). We could have chosen to use a ToggleButton, but then you would not be able to call startService() multiple times in a row. This is an important point. There is not a one-to-one relationship between startService() and stopService(). When stopService() is called, the service object will be destroyed, and all threads created from all startService() calls should also go away. Now, let’s look at the code for our activity in Listing 14-10.
Listing 14-10. Implementing a Local Service: MainActivity.java
public class MainActivity extends Activity
{
    private static final String TAG = "MainActivity";
    private int counter = 1;

    @Override
    public void onCreate(Bundle savedInstanceState)
    {
        super.onCreate(savedInstanceState);
        setContentView(R.layout.main);
    }

    public void doClick(View view) {
        switch(view.getId()) {
        case R.id.startBtn:
            Log.v(TAG, "Starting service... counter = " + counter);
            Intent intent = new Intent(MainActivity.this,
                    BackgroundService.class);
            intent.putExtra("counter", counter++);
            startService(intent);
            break;
        case R.id.stopBtn:
            stopService();
        }
    }

    private void stopService() {
        Log.v(TAG, "Stopping service...");
        if(stopService(new Intent(MainActivity.this,
                    BackgroundService.class)))
            Log.v(TAG, "stopService was successful");
        else
            Log.v(TAG, "stopService was unsuccessful");
    }

    @Override
    public void onDestroy()
    {
        stopService();
        super.onDestroy();
    }
}
Our MainActivity looks a lot like other activities you’ve seen. There’s a simple onCreate() to set up our user interface from the main.xml layout file. There’s a doClick() method to handle the button callbacks. In our example, we’re calling startService() when the Start Service button is pressed, and we’re calling stopService() when the Stop Service button is pressed. When we start the service, we want to pass in some data, which we do via the intent. We chose to pass the data in the Extras bundle, but we could have added it using setData() if we had a URI. When we stop the service, we check to see the return result. It should normally be true, but if the service was not running, we could get a return of false. Last, when our activity dies, we want to stop the service, so we also stop the service in our onDestroy() method. There’s one more item to discuss, and that’s the AndroidManifest.xml file, which we show in Listing 14-11.
Listing 14-11. Implementing a Local Service: AndroidManifest.xml
<?xml version="1.0" encoding="utf-8"?>
<manifest xmlns:android="http://schemas.android.com/apk/res/android"
      package="com.androidbook.services.simplelocal"
      android:versionCode="1"
      android:versionName="1.0">
    <uses-sdk android:minSdkVersion="8" />
    <application android:icon="@drawable/icon"
             android:label="@string/app_name">
        <activity android:name=".MainActivity"
                android:label="@string/app_name"
                android:launchMode="singleTop" >
           <intent-filter>
             <action android:name="android.intent.action.MAIN" />
             <category android:name="android.intent.category.LAUNCHER" />
           </intent-filter>
        </activity>
        <service android:name="BackgroundService"/>
    </application>

</manifest>
In addition to our regular <activity> tags in the manifest file, we now have a <service> tag. Because this is a local service that we’re calling explicitly using the class name, we don’t need to put much into the <service> tag. All that is required is the name of our service. But there is one other thing to point out about this manifest file. Our service creates a notification so that the user can get back to our MainActivity if, for example, the user pressed the Home key on MainActivity without stopping the service.
The MainActivity is still there; it’s just not visible. One way to get back to the MainActivity is to click the notification that our service created. The notification manager delivers our intent back to our application and would normally cause a new instance of MainActivity to handle the new intent. To prevent this from happening, we set an attribute in our manifest file for MainActivity called android:launchMode, and we set it to singleTop. This will help ensure that the existing invisible MainActivity will be brought forward and displayed, rather than creating another MainActivity.
When you run this application, you will see our two buttons. By clicking the Start Service button, you will be instantiating the service and calling onStartCommand(). Our code logs several messages to LogCat, so you can follow along. Go ahead and click Start Service several times in a row, even quickly. You will see threads created to handle each request. You’ll also notice that the value of counter is passed along through to each ServiceWorker thread. When you press the Stop Service button, our service will go away, and you’ll see the log messages from our MainActivity’s stopService() method, from our BackgroundService’s onDestroy() method, and possibly from ServiceWorker threads if they got interrupted.
You should also notice the notification message when the service has been started. With the service running, go ahead and press the Back button from our MainActivity and notice that the notification message disappears. This means our service has gone away also. To restart our MainActivity, click Start Service to get the service going again. Now, press the Home button. Our MainActivity disappears from view, but the notification remains, meaning our service is still in existence. Go ahead and click the notification, and you’ll again see our MainActivity.
Note that our example uses an activity to interface with the service, but any component in your application can use the service. This includes other services, activities, generic classes, and so on. Also note that our service does not stop itself; it relies on the activity to do that for it. There are some methods available to a service to allow the service to stop itself, namely stopSelf() and stopSelfResult(). Obviously, if we have multiple clients for this service, we wouldn’t want the service to be stopped by one if the others are still using it. For a started service with multiple clients, it is more likely you’d put logic in the service itself to decide when the service can or should be stopped, and the service would use one of the stop*() methods to do that.
Our BackgroundService is a typical example of a service that is used by the components of the application that is hosting the service. In other words, the application that is running the service is also the only consumer. Because the service does not support clients from outside its process, the service is a local service. The critical methods of a local service are onCreate(), onStartCommand(), onBind(), stop*(), and onDestroy().
There’s another option with a local service, and that is for the case where you’ll only have one instance of the service with one background thread. In this case, in the onCreate() method of the BackgroundService, we could create a thread that does the service’s heavy lifting. We could create and start the thread in onCreate() rather than onStartCommand(). We could do this because onCreate() is called only once, and we want the thread to be created only once during the life of the service. One thing we wouldn’t have in onCreate(), though, is the content of the intent passed by startService(). If we need that, we might as well use the pattern as described previously, and we’d just know that onStartCommand() should be called only once.
Android has yet another way to implement a local service that includes a background thread automatically: the IntentService. A subclass of Service, IntentService receives the incoming Intent from a startService() call, creates a background (worker) thread for you, and invokes the callback onHandleIntent(Intent intent). If another intent is delivered to this service before the worker thread has completed the earlier intent, the new intent will sit and wait until the previous intent has been processed, at which time the next intent in the queue will get passed to the onHandleIntent() method. When all intents from the inbound queue have completed processing, the service will stop itself (no need for you to do that).
This concludes our introduction to local services. Remember that we’ll get into more details of local services in subsequent chapters. Let’s move on to AIDL services—the more complicated type of service.
Understanding AIDL Services
In the previous section, we showed you how to write an Android service that is consumed by the application that hosts the service. Now, we are going to show you how to build a service that can be consumed by other processes via remote procedure call (RPC). As with many other RPC-based solutions, in Android you need an interface definition language (IDL) to define the interface that will be exposed to clients. In the Android world, this IDL is called Android Interface Definition Language (AIDL). To build a remote service, you do the following:
- Write an AIDL file that defines your interface to clients. The AIDL file uses Java syntax and has an .aidl extension. Use the same package name inside your AIDL file as the package for your Android project.
- Add the AIDL file to your Eclipse project under the src directory. The Android Eclipse plug-in will call the AIDL compiler to generate a Java interface from the AIDL file (the AIDL compiler is called as part of the build process).
- Implement a service, and return the interface from the onBind() method.
- Add the service configuration to your AndroidManifest.xml file. The sections that follow show you how to execute each step.
Defining a Service Interface in AIDL
To demonstrate an example of a remote service, we are going to write a stock-quoter service. This service will provide a method that takes a ticker symbol and returns the stock value. To write a remote service in Android, the first step is to define the service interface definition in an AIDL file. Listing 14-12 shows the AIDL definition of IStockQuoteService. This file goes into the same place as a regular Java file would for your StockQuoteService project.
Listing 14-12. The AIDL Definition of the Stock-Quoter Service
// This file is IStockQuoteService.aidl
package com.androidbook.services.stockquoteservice;
interface IStockQuoteService
{
        double getQuote(String ticker);
}
The IStockQuoteService accepts the stock-ticker symbol as a string and returns the current stock value as a double. When you create the AIDL file, the Android Eclipse plug-in runs the AIDL compiler to process your AIDL file (as part of the build process). If your AIDL file compiles successfully, the compiler generates a Java interface suitable for RPC communication. Note that the generated file will be in the package named in your AIDL file—com.androidbook.services.stockquoteservice in this case.
Listing 14-13 shows the generated Java file for our IStockQuoteService interface. The generated file will be put into the gen folder of our Eclipse project.
Listing 14-13. The Compiler-Generated Java File
 /*
 * This file is auto-generated.  DO NOT MODIFY.
 * Original file: C:\android\StockQuoteService\src\com\androidbook\
services\stockquoteservice\IStockQuoteService.aidl
 */
package com.androidbook.services.stockquoteservice;
import java.lang.String;
import android.os.RemoteException;
import android.os.IBinder;
import android.os.IInterface;
import android.os.Binder;
import android.os.Parcel;
public interface IStockQuoteService extends android.os.IInterface
{
/** Local-side IPC implementation stub class. */
public static abstract class Stub extends android.os.Binder implements
com.androidbook.services.stockquoteservice.IStockQuoteService
{
private static final java.lang.String DESCRIPTOR =
"com.androidbook.services.stockquoteservice.IStockQuoteService";
/** Construct the stub at attach it to the interface. */
public Stub()
{
this.attachInterface(this, DESCRIPTOR);
}
/**
 * Cast an IBinder object into an IStockQuoteService interface,
 * generating a proxy if needed.
 */
public static com.androidbook.services.stockquoteservice.IStockQuoteService
asInterface(android.os.IBinder obj)
{
if ((obj==null)) {
return null;
}
android.os.IInterface iin = (android.os.IInterface)obj.queryLocalInterface(DESCRIPTOR);
if (((iin!=null)&&(iin instanceof com.androidbook.services.stockquoteservice.IStockQuoteService))) {
return ((com.androidbook.services.stockquoteservice.IStockQuoteService)iin);
}
return new com.androidbook.services.stockquoteservice.IStockQuoteService.Stub.Proxy(obj);
}
public android.os.IBinder asBinder()
{
return this;
}
@Override public boolean onTransact(int code, android.os.Parcel data,
     android.os.Parcel reply, int flags) throws android.os.RemoteException
{
switch (code)
{
case INTERFACE_TRANSACTION:
{
reply.writeString(DESCRIPTOR);
return true;
}
case TRANSACTION_getQuote:
{
data.enforceInterface(DESCRIPTOR);
java.lang.String _arg0;
_arg0 = data.readString();
double _result = this.getQuote(_arg0);
reply.writeNoException();
reply.writeDouble(_result);
return true;
}
}
return super.onTransact(code, data, reply, flags);
}
private static class Proxy implements
        com.androidbook.services.stockquoteservice.IStockQuoteService
{
private android.os.IBinder mRemote;
Proxy(android.os.IBinder remote)
{
mRemote = remote;
}
public android.os.IBinder asBinder()
{
return mRemote;
}
public java.lang.String getInterfaceDescriptor()
{
return DESCRIPTOR;
}
public double getQuote(java.lang.String ticker) throws android.os.RemoteException
{
android.os.Parcel _data = android.os.Parcel.obtain();
android.os.Parcel _reply = android.os.Parcel.obtain();
double _result;
try {
_data.writeInterfaceToken(DESCRIPTOR);
_data.writeString(ticker);
mRemote.transact(Stub.TRANSACTION_getQuote, _data, _reply, 0);
_reply.readException();
_result = _reply.readDouble();
}
finally {
_reply.recycle();
_data.recycle();
}
return _result;
}
}
static final int TRANSACTION_getQuote = (IBinder.FIRST_CALL_TRANSACTION + 0);
}
public double getQuote(java.lang.String ticker) throws android.os.RemoteException;
}
Note the following important points regarding the generated classes:
- The interface we defined in the AIDL file is implemented as an interface in the generated code (that is, there is an interface named IStockQuoteService).
- A static abstract class named Stub extends android.os.Binder and implements IStockQuoteService. Note that the class is an abstract class.
- An inner class named Proxy implements the IStockQuoteService that proxies the Stub class.
- The AIDL file must reside in the package where the generated files are supposed to be (as specified in the AIDL file’s package declaration).
Now, let’s move on and implement the AIDL interface in a service class.
Implementing an AIDL Interface
In the previous section, we defined an AIDL file for a stock-quoter service and generated the binding file. Now, we are going to provide an implementation of that service. To implement the service’s interface, we need to write a class that extends android.app.Service and implements the IStockQuoteService interface. The class we are going to write we’ll call StockQuoteService. To expose the service to clients, our StockQuoteService will need to provide an implementation of the onBind() method, and we’ll need to add some configuration information to the AndroidManifest.xml file. Listing 14-14 shows an implementation of the IStockQuoteService interface. This file also goes into the src folder of the StockQuoteService project.
Listing 14-14. The IStockQuoteService Service Implementation
public class StockQuoteService extends Service
{
    private static final String TAG = "StockQuoteService";
    public class StockQuoteServiceImpl extends IStockQuoteService.Stub
    {
        @Override
        public double getQuote(String ticker) throws RemoteException
        {
            Log.v(TAG, "getQuote() called for " + ticker);
            return 20.0;
        }
    }

    @Override
    public void onCreate() {
        super.onCreate();
        Log.v(TAG, "onCreate() called");
    }

    @Override
    public void onDestroy()
    {
        super.onDestroy();
        Log.v(TAG, "onDestroy() called");
    }

    @Override
    public IBinder onBind(Intent intent)
    {
        Log.v(TAG, "onBind() called");
        return new StockQuoteServiceImpl();
    }
}
The StockQuoteService.java class in Listing 14-14 resembles the local BackgroundService we created earlier, but without the NotificationManager. The important difference is that we now implement the onBind() method. Recall that the Stub class generated from the AIDL file was an abstract class and that it implemented the IStockQuoteService interface. In our implementation of the service, we have an inner class that extends the Stub class called StockQuoteServiceImpl. This class serves as the remote-service implementation, and an instance of this class is returned from the onBind() method. With that, we have a functional AIDL service, although external clients cannot connect to it yet.
To expose the service to clients, we need to add a service declaration in the AndroidManifest.xml file, and this time, we need an intent filter to expose the service. Listing 14-15 shows the service declaration for the StockQuoteService. The <service> tag is a child of the <application> tag.
Listing 14-15. Manifest Declaration for the IStockQuoteService
<?xml version="1.0" encoding="utf-8"?>
<manifest xmlns:android="http://schemas.android.com/apk/res/android"
      package="com.androidbook.services.stockquoteservice"
      android:versionCode="1"
      android:versionName="1.0">
    <application android:icon="@drawable/icon"
        android:label="@string/app_name">
      <service android:name="StockQuoteService">
        <intent-filter>
                <action android:name=
                            "com.androidbook.services.stockquoteservice.IStockQuoteService" />
        </intent-filter>
      </service>
    </application>
    <uses-sdk android:minSdkVersion="4" />
</manifest>
As with all services, we define the service we want to expose with a <service> tag. For an AIDL service, we also need to add an <intent-filter> with an <action> entry for the service interface we want to expose.
With this in place, we have everything we need to deploy the service. When you are ready to deploy the service application from Eclipse, just go ahead and choose Run As the way you would for any other application. Eclipse will comment in the Console that this application has no Launcher, but it will deploy the app anyway, which is what we want. Let’s now look at how we would call the service from another application (on the same device, of course).
Calling the Service from a Client Application
When a client talks to a service, there must be a protocol or contract between the two. With Android, the contract is in our AIDL file. So the first step in consuming a service is to take the service’s AIDL file and copy it to your client project. When you copy the AIDL file to the client project, the AIDL compiler creates the same interface-definition file that was created when the service was implemented (in the service-implementation project). This exposes to the client all of the methods, parameters, and return types on the service. Let’s create a new project and copy the AIDL file:
- Create a new Android project named StockQuoteClient. Use a different package name, such as com.androidbook.stockquoteclient. Use MainActivity for the Create Activity field.
- Create a new Java package in this project named com.androidbook.services.stockquoteservice in the src directory.
- Copy the IStockQuoteService.aidl file from the StockQuoteService project to this new package. Note that after you copy the file to the project, the AIDL compiler will generate the associated Java file.
The service interface that you regenerate serves as the contract between the client and the service. The next step is to get a reference to the service so we can call the getQuote() method. With remote services, we have to call the bindService() method rather than the startService() method. Listing 14-16 shows an activity class that acts as a client of the IStockQuoteService service. Listing 14-17 contains the layout file for the activity.
Listing 14-16 shows our MainActivity.java file. Realize that the package name of the client activity is not that important—you can put the activity in any package you’d like. However, the AIDL artifacts that you create are package-sensitive because the AIDL compiler generates code from the contents of the AIDL file.
Listing 14-16. A Client of the IStockQuoteService Service
public class MainActivity extends Activity {
    private static final String TAG = "StockQuoteClient";
    private IStockQuoteService stockService = null;
    private ToggleButton bindBtn;
    private Button callBtn;

    /** Called when the activity is first created. */
    @Override
    public void onCreate(Bundle savedInstanceState) {
        super.onCreate(savedInstanceState);
        setContentView(R.layout.main);

        bindBtn = (ToggleButton)findViewById(R.id.bindBtn);
        callBtn = (Button)findViewById(R.id.callBtn);
    }

    public void doClick(View view) {
        switch(view.getId()) {
        case R.id.bindBtn:
            if(((ToggleButton) view).isChecked()) {
                bindService(new Intent(
                    IStockQuoteService.class.getName()),
                    serConn, Context.BIND_AUTO_CREATE);
            }
            else {
                unbindService(serConn);
                callBtn.setEnabled(false);
            }
            break;
        case R.id.callBtn:
            callService();
            break;
        }
    }

    private void callService() {
        try {
            double val = stockService.getQuote("ANDROID");
            Toast.makeText(MainActivity.this,
                    "Value from service is " + val,
                    Toast.LENGTH_SHORT).show();
        } catch (RemoteException ee) {
            Log.e("MainActivity", ee.getMessage(), ee);
        }
    }

    private ServiceConnection serConn = new ServiceConnection() {

        @Override
        public void onServiceConnected(ComponentName name,
            IBinder service)
        {
            Log.v(TAG, "onServiceConnected() called");
            stockService = IStockQuoteService.Stub.asInterface(service);
            bindBtn.setChecked(true);
            callBtn.setEnabled(true);
        }

        @Override
        public void onServiceDisconnected(ComponentName name) {
            Log.v(TAG, "onServiceDisconnected() called");
            bindBtn.setChecked(false);
            callBtn.setEnabled(false);
            stockService = null;
        }
    };

    protected void onDestroy() {
        Log.v(TAG, "onDestroy() called");
        if(callBtn.isEnabled())
            unbindService(serConn);
        super.onDestroy();
    }
}
The activity displays our layout and grabs a reference to the Call Service button so we can properly enable it when the service is running and disable it when the service is stopped. When the user clicks the Bind button, the activity calls the bindService() method. Similarly, when the user clicks UnBind, the activity calls the unbindService() method. Notice that three parameters are passed to the bindService() method: an Intent with the name of the AIDL service, a ServiceConnection instance, and a flag to autocreate the service.
Listing 14-17. The IStockQuoteService Service Client Layout
<?xml version="1.0" encoding="utf-8"?>
<!-- This file is /res/layout/main.xml -->
<LinearLayout xmlns:android="http://schemas.android.com/apk/res/android"
    android:orientation="vertical"
    android:layout_width="fill_parent"
    android:layout_height="fill_parent" >

<ToggleButton android:id="@+id/bindBtn"
    android:layout_width="wrap_content"
    android:layout_height="wrap_content"
    android:textOff="Bind"  android:textOn="Unbind"
    android:onClick="doClick" />

<Button android:id="@+id/callBtn"
    android:layout_width="wrap_content"
    android:layout_height="wrap_content"
    android:text="Call Service"  android:enabled="false"
    android:onClick="doClick" />
</LinearLayout>
With a bound service, such as an AIDL service, you need to provide an implementation of the ServiceConnection interface. This interface defines two methods: one called by the system when a connection to the service has been established and one called when the connection to the service has been destroyed. In our activity implementation, we define the ServiceConnection for the IStockQuoteService. When we call the bindService() method, we pass in the reference to this (i.e., serConn). When the connection to the service is established, the onServiceConnected() callback is invoked, and we then obtain a reference to the IStockQuoteService using the Stub and enable the Call Service button.
Note that the bindService() call is an asynchronous call. It is asynchronous because the process or service might not be running and thus might have to be created or started. And we cannot wait on the main thread for the service to start. Because bindService() is asynchronous, the platform provides the ServiceConnection callback, so we know when the service has been started and when the service is no longer available. These ServiceConnection callbacks will run on the main thread though, so they’ll have access to the UI components if necessary.
Please notice the onServiceDisconnected() callback. This does not get invoked when we unbind from the service. It is invoked if the service crashes or if Android decides to kill the service, for example if memory is getting low. If this callback fires, we should not think that we’re still connected, and we might need to reinvoke the bindService() call. That is why we change the status of our buttons in the UI when this callback is invoked. But notice we said “we might need to reinvoke the bindService() call.” Android could restart our service for us and invoke our onServiceConnected() callback. You can try this yourself by running the client, binding to the service, and using DDMS to do a Stop on the Stock Quote Service application.
When you run this example, watch the log messages in LogCat to get a feel for what is going on behind the scenes.
In our service examples thus far, we have strictly dealt with passing simple Java primitive types. Android services actually support passing complex types, too. This is very useful, especially for AIDL services, because you might have an open-ended number of parameters that you want to pass to a service, and it’s unreasonable to pass them all as simple primitives. It makes more sense to package them as complex types and then pass them to the service.
Let’s see how we can pass complex types to services.
Passing Complex Types to Services
Passing complex types to and from services requires more work than passing Java primitive types. Before embarking on this work, you should get an idea of AIDL’s support for nonprimitive types:
- AIDL supports String and CharSequence.
- AIDL allows you to pass other AIDL interfaces, but you need to have an import statement for each AIDL interface you reference (even if the referenced AIDL interface is in the same package).
- AIDL allows you to pass complex types that implement the android.os.Parcelable interface. You need to have an import statement in your AIDL file for these types.
- AIDL supports java.util.List and java.util.Map, with a few restrictions. The allowable data types for the items in the collection include Java primitive, String, CharSequence, and android.os.Parcelable. You do not need import statements for List or Map, but you do need them for the Parcelables.
- Nonprimitive types, other than String, require a directional indicator. Directional indicators include in, out, and inout. in means the value is set by the client, out means the value is set by the service, and inout means both the client and service set the value. Android avoids serializing the values if they’re not flowing in the indicated direction, which helps overall performance.
The Parcelable interface tells the Android runtime how to serialize and deserialize objects during the marshalling and unmarshalling process. Listing 14-18 shows a Person class that implements the Parcelable interface.
Listing 14-18. Implementing the Parcelable Interface
// This file is Person.java
package com.androidbook.services.stock2;
import android.os.Parcel;
import android.os.Parcelable;

public class Person implements Parcelable {
    private int age;
    private String name;
    public static final Parcelable.Creator<Person> CREATOR =
        new Parcelable.Creator<Person>()
    {
        public Person createFromParcel(Parcel in) {
            return new Person(in);
        }

        public Person[] newArray(int size) {
            return new Person[size];
        }
    };

    public Person() {
    }

    private Person(Parcel in) {
        readFromParcel(in);
    }

    @Override
    public int describeContents() {
        return 0;
    }

    @Override
    public void writeToParcel(Parcel out, int flags) {
        out.writeInt(age);
        out.writeString(name);
    }

    public void readFromParcel(Parcel in) {
        age = in.readInt();
        name = in.readString();
    }

    public int getAge() {
        return age;
    }

    public void setAge(int age) {
        this.age = age;
    }

    public String getName() {
        return name;
    }

    public void setName(String name) {
        this.name = name;
    }
}
To get started on implementing this, create a new Android Project in Eclipse called StockQuoteService2. For Create Activity, use a name of MainActivity, and use a package of com.androidbook.services.stock2. Then add the Person.java file from Listing 14-18 to the com.androidbook.services.stock2 package of our new project.
The Parcelable interface defines the contract for the marshalling and unmarshalling of objects. Underlying the Parcelable interface is the Parcel container object. The Parcel class is a fast serialization/deserialization mechanism specially designed for interprocess communication within Android. The class provides methods that you use to flatten your members to the container and to expand the members back from the container. To properly implement an object for interprocess communication, we have to do the following:
- Implement the Parcelable interface. This means that you implement writeToParcel() and readFromParcel(). The write method will write the object to the parcel, and the read method will read the object from the parcel. Note that the order in which you write properties must be the same as the order in which you read them.
- Add a static final property to the class with the name CREATOR. The property needs to implement the android.os.Parcelable.Creator<T> interface.
- Provide a constructor for the Parcelable that knows how to create the object from the Parcel.
- Define a Parcelable class in an .aidl file that matches the .java file containing the complex type. The AIDL compiler will look for this file when compiling your AIDL files. An example of a Person.aidl file is shown in Listing 14-19. This file should be in the same place as Person.java.
Note Seeing Parcelable might have triggered the question, why is Android not using the built-in Java serialization mechanism? It turns out that the Android team came to the conclusion that the serialization in Java is far too slow to satisfy Android’s interprocess-communication requirements. So the team built the Parcelable solution. The Parcelable approach requires that you explicitly serialize the members of your class, but in the end, you get a much faster serialization of your objects.
Also realize that Android provides two mechanisms that allow you to pass data to another process. The first is to pass a bundle to an activity using an intent, and the second is to pass a Parcelable to a service. These two mechanisms are not interchangeable and should not be confused. That is, the Parcelable is not meant to be passed to an activity. If you want to start an activity and pass it some data, use a Bundle. Parcelable is meant to be used only as part of an AIDL definition.
Listing 14-19. An Example of a Person.aidl File
// This file is Person.aidl
package com.androidbook.services.stock2;
parcelable Person;
You will need an .aidl file for each Parcelable in your project. In this case, we have just one Parcelable, which is Person. You may notice that you don’t get a Person.java file created in the gen folder. This is to be expected. We already have this file from when we created it previously.
Now, let’s use the Person class in a remote service. To keep things simple, we will modify our IStockQuoteService to take an input parameter of type Person. The idea is that clients will pass a Person to the service to tell the service who is requesting the quote. The new IStockQuoteService.aidl looks like Listing 14-20.
Listing 14-20. Passing Parcelables to Services
// This file is IStockQuoteService.aidl
package com.androidbook.services.stock2;
import com.androidbook.services.stock2.Person;

interface IStockQuoteService
{
    String getQuote(in String ticker,in Person requester);
}
The getQuote() method now accepts two parameters: the stock’s ticker symbol and a Person object to specify who is making the request. Note that we have directional indicators on the parameters because the parameters include nonprimitive types and that we have an import statement for the Person class. The Person class is also in the same package as the service definition (com.androidbook.services.stock2).
The service implementation now looks like Listing 14-21, with the MainActivity layout in Listing 14-22.
Listing 14-21. The StockQuoteService2 Implementation
package com.androidbook.services.stock2;
// This file is StockQuoteService2.java

import android.app.Notification;
import android.app.NotificationManager;
import android.app.PendingIntent;
import android.app.Service;
import android.content.Intent;
import android.os.IBinder;
import android.os.RemoteException;

public class StockQuoteService2 extends Service
{
    private NotificationManager notificationMgr;

    public class StockQuoteServiceImpl extends IStockQuoteService.Stub
    {
        public String getQuote(String ticker, Person requester)
                throws RemoteException {
            return "Hello " + requester.getName() +
                "! Quote for " + ticker + " is 20.0";
        }
    }

    @Override
    public void onCreate() {
        super.onCreate();

        notificationMgr =
          (NotificationManager)getSystemService(NOTIFICATION_SERVICE);

        displayNotificationMessage(
              "onCreate() called in StockQuoteService2");
    }

    @Override
    public void onDestroy()
    {
        displayNotificationMessage(
              "onDestroy() called in StockQuoteService2");
        // Clear all notifications from this service
        notificationMgr.cancelAll();
        super.onDestroy();
    }

    @Override
    public IBinder onBind(Intent intent)
    {
        displayNotificationMessage(
              "onBind() called in StockQuoteService2");
        return new StockQuoteServiceImpl();
    }

    private void displayNotificationMessage(String message)
    {
        PendingIntent contentIntent =
                PendingIntent.getActivity(this, 0, new Intent(this, MainActivity.class), 0);

        Notification notification = new NotificationCompat.Builder(this)
            .setContentTitle("StockQuoteService2")
            .setContentText(message)
            .setSmallIcon(R.drawable.emo_im_happy)
            .setTicker(message)
            // .setLargeIcon(aBitmap)
            .setContentIntent(contentIntent)
            .setOngoing(true)
            .build();

        notificationMgr.notify(R.id.app_notification_id, notification);
    }
}
Listing 14-22. The StockQuoteService2 Layout
<?xml version="1.0" encoding="utf-8"?>
<!-- This file is /res/layout/main.xml -->
<LinearLayout xmlns:android="http://schemas.android.com/apk/res/android"
    android:orientation="vertical"
    android:layout_width="fill_parent"
    android:layout_height="fill_parent" >
<TextView
    android:layout_width="fill_parent"
    android:layout_height="wrap_content"
    android:text="This is where the service could ask for help." />
</LinearLayout>
The differences between this implementation and the previous one are that we brought back the notifications, and we now return the stock value as a string and not a double. The string returned to the user contains the name of the requester from the Person object, which demonstrates that we read the value sent from the client and that the Person object was passed correctly to the service.
There are a few other things that need to be done to make this work:
- Find the emo_im_happy.png image file from under Android SDK/platforms/android-19/data/res/drawable-mdpi, and copy it to the /res/drawable directory of our project. Or change the name of the resource in the code, and put whatever image you want in the drawables folder.
- Add a new <item type="id" name="app_notification_id"/> tag to the /res/values/strings.xml file.
- We need to modify the application in the AndroidManifest.xml file as shown in Listing 14-23.
Listing 14-23. Modified <application> in AndroidManifest.xml File for StockQuoteService2
<?xml version="1.0" encoding="utf-8"?>
<manifest xmlns:android="http://schemas.android.com/apk/res/android"
      package="com.androidbook.services.stock2"
      android:versionCode="1"
      android:versionName="1.0">
    <uses-sdk android:minSdkVersion="8" />
    <application android:icon="@drawable/icon"
            android:label="@string/app_name">
        <activity android:name=".MainActivity"
                android:label="@string/app_name"
                android:launchMode="singleTop" >
            <intent-filter>
                <action android:name="android.intent.action.MAIN" />
            </intent-filter>
        </activity>
      <service android:name="StockQuoteService2">
        <intent-filter>
            <action android:name="com.androidbook.services.stock2.IStockQuoteService" />
        </intent-filter>
      </service>
    </application>

</manifest>
While it is OK to use the dot notation for our android:name=".MainActivity" attribute, it is not OK to use dot notation inside of our <action> tag inside the service’s <intent-filter> tag. We need to spell it out; otherwise, our client will not find the service specification.
Last, we’ll use the default MainActivity.java file that simply displays a basic layout with a simple message. We showed you earlier how to launch to the activity from a notification. This activity would serve that purpose also in real life, but for this example, we’ll keep that part simple. Now that we have our service implementation, let’s create a new Android project called StockQuoteClient2. Use com.dave for the package and MainActivity for the activity name. To implement a client that passes the Person object to the service, we need to copy everything that the client needs from the service project to the client project. There needs to be a new src package called com.androidbook.services.stock2 to receive these copied files. In our previous example, all we needed was the IStockQuoteService.aidl file. We also need to copy the Person.java and Person.aidl files, because the Person object is now part of the interface. After you copy these three files to the com.androidbook.services.stock2 src package of the client project, modify main.xml according to Listing 14-24, and modify MainActivity.java according to Listing 14-25. Or simply import this project from the source code on our web site.
Listing 14-24. Updated main.xml for StockQuoteClient2
<?xml version="1.0" encoding="utf-8"?>
<!-- This file is /res/layout/main.xml -->
<LinearLayout xmlns:android="http://schemas.android.com/apk/res/android"
    android:orientation="vertical"
    android:layout_width="fill_parent"
    android:layout_height="fill_parent" >

<ToggleButton android:id="@+id/bindBtn"
    android:layout_width="wrap_content"
    android:layout_height="wrap_content"
    android:textOff="Bind"  android:textOn="Unbind"
    android:onClick="doClick" />
<Button android:id="@+id/callBtn"
    android:layout_width="wrap_content"
    android:layout_height="wrap_content"
    android:text="Call Service" android:enabled="false"
    android:onClick="doClick" />
</LinearLayout>
Listing 14-25. Calling the Service with a Parcelable
package com.dave;
// This file is MainActivity.java
import com.androidbook.services.stock2.IStockQuoteService;
import com.androidbook.services.stock2.Person;

public class MainActivity extends Activity {

    protected static final String TAG = "StockQuoteClient2";
    private IStockQuoteService stockService = null;
    private ToggleButton bindBtn;
    private Button callBtn;

    /** Called when the activity is first created. */
    @Override
    public void onCreate(Bundle savedInstanceState) {
        super.onCreate(savedInstanceState);
        setContentView(R.layout.main);

        bindBtn = (ToggleButton)findViewById(R.id.bindBtn);
        callBtn = (Button)findViewById(R.id.callBtn);
    }

    public void doClick(View view) {
        switch(view.getId()) {
        case R.id.bindBtn:
            if(((ToggleButton) view).isChecked()) {
                bindService(new Intent(
                    IStockQuoteService.class.getName()),
                    serConn, Context.BIND_AUTO_CREATE);
            }
            else {
                unbindService(serConn);
                callBtn.setEnabled(false);
            }
            break;
        case R.id.callBtn:
            callService();
            break;
        }
    }

    private void callService() {
        try {
            Person person = new Person();
            person.setAge(47);
            person.setName("Dave");
            String response = stockService.getQuote("ANDROID", person);
            Toast.makeText(MainActivity.this,
                        "Value from service is "+response,
                        Toast.LENGTH_SHORT).show();
        } catch (RemoteException ee) {
            Log.e("MainActivity", ee.getMessage(), ee);
        }
    }

    private ServiceConnection serConn = new ServiceConnection() {

        @Override
        public void onServiceConnected(ComponentName name,
            IBinder service)
        {
            Log.v(TAG, "onServiceConnected() called");
            stockService = IStockQuoteService.Stub.asInterface(service);
            bindBtn.setChecked(true);
            callBtn.setEnabled(true);
        }

        @Override
        public void onServiceDisconnected(ComponentName name) {
            Log.v(TAG, "onServiceDisconnected() called");
            bindBtn.setChecked(false);
            callBtn.setEnabled(false);
            stockService = null;
        }
    };

    protected void onDestroy() {
        if(callBtn.isEnabled())
            unbindService(serConn);
        super.onDestroy();
    }
}
This is now ready to run. Remember to send over the service to the device or emulator before you send over the client to run. The user interface should look like Figure 14-1.
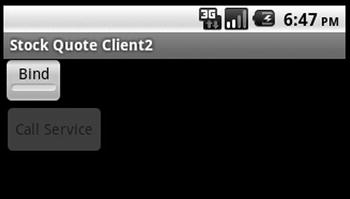
Figure 14-1. User interface of StockQuoteClient2
Let’s take a look at what we’ve got. As before, we bind to our service, and then we can invoke a service method. The onServiceConnected() method is where we get told that our service is running, so we can then enable the Call Service button so the button can invoke the callService() method. As shown, we create a new Person object and set its Age and Name properties. We then execute the service and display the result from the service call. The result looks like Figure 14-2.

Figure 14-2. Result from calling the service with a Parcelable
Notice that when the service is called, you get a notification in the status bar. This is coming from the service itself. We briefly touched on Notifications earlier as a way for a service to communicate to the user. Normally, services are in the background and do not display any sort of UI. But what if a service needs to interact with the user? While it’s tempting to think that a service can invoke an activity, a service should never invoke an activity directly. A service should instead create a notification, and the notification should be how the user gets to the desired activity. This was shown in our last exercise. We defined a simple layout and activity implementation for our service. When we created the notification within the service, we set the activity in the notification. The user can touch the notification, and it will take the user to our activity that is part of this service. This will allow the user to interact with the service.
Notifications are saved so that you can get to them by pulling down from the status bar to see them. Note the fact that we reuse the same ID for every message. This means that we are updating the one and only notification every time, rather than creating new notification entries. Therefore, if you go to the Notifications screen in Android after clicking Bind, Call Again, and Unbind a few times, you will only see one message in Notifications, and it will be the last one sent by StockQuoteService2. If we used different IDs, we could have multiple notification messages, and we could update each one separately. Notifications can also be set with additional user “prompts” such as sound, lights, and/or vibration.
It is also useful to see the artifacts of the service project and the client that calls it (see Figure 14-3).
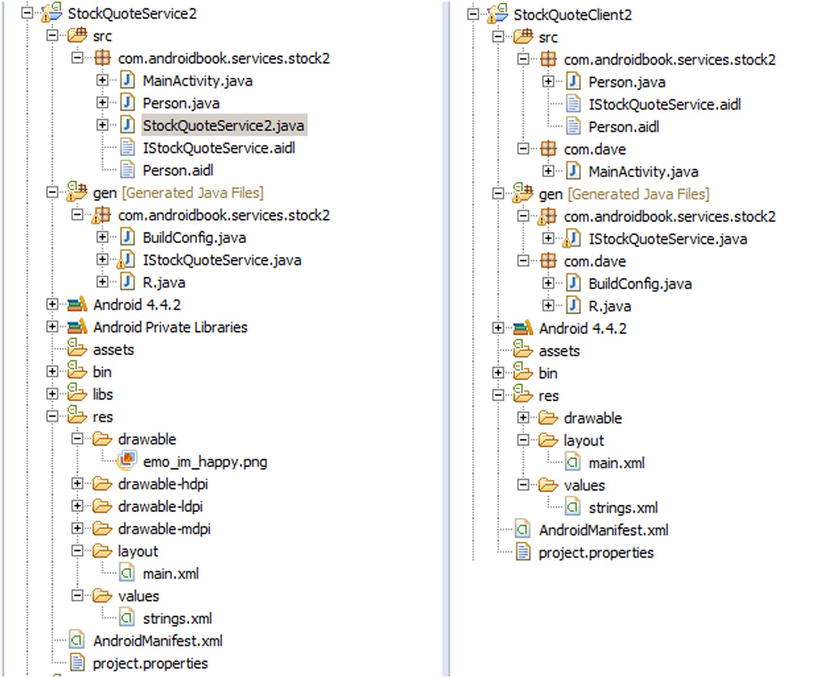
Figure 14-3. The artifacts of the service and the client
Figure 14-3 shows the Eclipse project artifacts for the service (left) and the client (right). Note that the contract between the client and the service consists of the AIDL artifacts and the Parcelable objects exchanged between the two parties. This is the reason that we see Person.java, IStockQuoteService.aidl, and Person.aidl on both sides. Because the AIDL compiler generates the Java interface, stub, proxy, and so on from the AIDL artifacts, the build process creates the IStockQuoteService.java file on the client side when we copy the contract artifacts to the client project.
Now you know how to exchange complex types between services and clients. Let’s briefly touch on another important aspect of calling services: synchronous versus asynchronous service invocation.
All of the calls that you make on services are synchronous. This brings up the obvious question: Do you need to implement all of your service calls in a worker thread? Not necessarily. On most other platforms, it’s common for a client to use a service that is a complete black box, so the client would have to take appropriate precautions when making service calls. With Android, you will likely know what is in the service (generally because you wrote the service yourself), so you can make an informed decision. If you know that the method you are calling is doing a lot of heavy lifting, you should consider using a secondary thread to make the call. If you are sure that the method does not have any bottlenecks, you can safely make the call on the UI thread. If you conclude that it’s best to make the service call within a worker thread, you can create the thread and then call the service. You can then communicate the result to the UI thread.
Messengers and Handlers
There is one more way to communicate with a service in Android, and that is with Messengers and Handlers. This mechanism is built on top of AIDL services, but without you having to see or deal with AIDL. Like AIDL services, you use it when the service is in a separate process from the client. Both the client and the service will implement a Messenger and a Handler, and proceed to send messages back and forth. You don’t need to specify any .aidl files; everything is coded in your Java classes. This is a fairly common way to do inter-process service calls on Android, and is significantly easier than messing with AIDL yourself.
Here’s a quick overview of how it works. The client binds to the service, and sets up a Messenger and Handler to receive responses from the service. A callback within the Handler takes care of messages sent back by the service. The client also creates a Messenger to send messages to the service. On the service side, there’s a similar Messenger and Handler to receive the incoming messages from clients. A message coming in from a client includes a Messenger to use for any replies to that client. Therefore, the service creates only one Messenger while a client creates two. The client side is asynchronous, with the service response coming later. A problem with the service call generates a RemoteException that the client can capture and act upon.
Let’s see an example of how this works. This sample application has two parts: a MessengerClient and a MessengerService. They will run as separate processes on a device. The client will use a non-UI fragment to contain the service client connection. This means the client activity can go away and be recreated due to a configuration change, and the underlying service connection remains in place. This is a preferred way to connect to a service from an activity since you don’t want to have to reconstruct the service client connection just because the device has been rotated for example. Listing 14-26 shows the significant code from MessengerService.java to set up the Handler and Messenger. For a full listing, refer to the MessengerService source project for this chapter.
Listing 14-26. Messenger/Handler-Based Service Code
public class MessengerService extends Service {
    NotificationManager mNM;
    ArrayList<Messenger> mClients = new ArrayList<Messenger>();
    int mValue = 0;
    public static final int MSG_REGISTER_CLIENT = 1;
    public static final int MSG_UNREGISTER_CLIENT = 2;
    public static final int MSG_SET_SIMPLE_VALUE = 3;
    public static final int MSG_SET_COMPLEX_VALUE = 4;
    public static final String TAG = "MessengerService";
    /**
     * Handler of incoming messages from clients.
     */
    class IncomingHandler extends Handler {
        @Override
        public void handleMessage(Message msg) {
            switch (msg.what) {
                case MSG_REGISTER_CLIENT:
                    mClients.add(msg.replyTo);
                    Log.v(TAG, "Registering client");
                    break;
                case MSG_UNREGISTER_CLIENT:
                    mClients.remove(msg.replyTo);
                    Log.v(TAG, "Unregistering client");
                    break;
                case MSG_SET_SIMPLE_VALUE:
                    mValue = msg.arg1;
                    Log.v(TAG, "Receiving arg1: " + mValue);
                    showNotification("Received arg1: " + mValue);
                    for (int i=mClients.size()-1; i>=0; i--) {
                        try {
                            mClients.get(i).send(Message.obtain(null,
                                    MSG_SET_SIMPLE_VALUE, mValue, 0));
                        } catch (RemoteException e) {
                            // The client is dead.  Remove it from the list;
                            // we are going through the list from back to front
                            // so this is safe to do inside the loop.
                            mClients.remove(i);
                        }
                    }
                    break;
                case MSG_SET_COMPLEX_VALUE:
                    Bundle mBundle = msg.getData();
                    Log.v(TAG, "Receiving bundle: ");
                    if(mBundle != null) {
                        showNotification("Got complex msg: myDouble = "
                                + mBundle.getDouble("myDouble"));
                        for(String key : mBundle.keySet()) {
                            Log.v(TAG, "    " + key);
                        }
                    }
                    break;
                default:
                    Log.v(TAG, "Got some other message: " + msg.what);
                    super.handleMessage(msg);
            }
        }
    }

    // Target for clients to send messages to IncomingHandler.
    final Messenger mMessenger = new Messenger(new IncomingHandler());

    @Override
    public void onCreate() {
        mNM = (NotificationManager)getSystemService(NOTIFICATION_SERVICE);

        // Display a notification about us starting.
        Log.v(TAG, "Service is starting");
        showNotification(getText(R.string.remote_service_started));
    }

    @Override
    public void onDestroy() {
        // Cancel the persistent notification.
        mNM.cancel(R.string.remote_service_started);

        // Tell the user we stopped.
        Toast.makeText(this, R.string.remote_service_stopped, Toast.LENGTH_SHORT).show();
    }

    /**
     * When binding to the service, we return an interface to our messenger
     * for sending messages to the service.
     */
    @Override
    public IBinder onBind(Intent intent) {
        return mMessenger.getBinder();
    }

    /**
     * Show a notification while this service is running. Note that
     * we don't include an intent since we're just a service here. The
     * service stops when the client tells it to.
     */
    private void showNotification(CharSequence text) {
        Notification notification = new NotificationCompat.Builder(this)
            .setContentTitle("MessengerService")
            .setContentText(text)
            .setSmallIcon(android.R.drawable.ic_dialog_info)
            .setTicker(text)
            .setOngoing(true)
            .build();

        mNM.notify(R.string.remote_service_started, notification);
    }

}
In this sample, clients register with the service, unregister with the service, send a simple message, or send a complex message. When a client registers, the service remembers it by saving the passed-in client Messenger (i.e., msg.replyTo) in mClients. If a simple message is received, the service sends a copy of the received argument value to all known clients. Notice how replies are sent to each client using the Messengers in mClients that came from each client. The Message’s what field is just an int to indicate what service operation is being called. Based upon the what operation, the service will extract the appropriate arguments. Since a Message object has two int arguments available, the simple case uses just one of those Message fields. When more complex data must be sent, a Bundle object is created, populated, and attached to the Message for transmission to the service.
Be aware that a service has a 1MB buffer for passed data (in and out) for all in-process service calls, so you’ll want to keep Message data to a minimum. If there are a lot of simultaneous service calls, you could exceed the buffer and get a TransactionTooLargeException.
On the client side, there’s a MainActivity and a ClientFrag (the non-UI fragment). For simplicity’s sake the activity provides the UI to the user without using a UI fragment. Listing 14-27 shows the MainActivity. For a full listing of the project, please see the MessengerClient project for this chapter.
Listing 14-27. Messenger/Handler-Based Client Activity Code
public class MainActivity extends FragmentActivity implements ISampleServiceClient {

    protected static final String TAG = "MessengerClient";
    private TextView mCallbackText;
    private ClientFrag clientFrag;

    @Override
    protected void onCreate(Bundle savedInstanceState) {
        super.onCreate(savedInstanceState);
        setContentView(R.layout.activity_main);

        mCallbackText = (TextView)findViewById(R.id.callback);

        // Get a non-UI fragment to handle the service interface.
        // If our activity gets destroyed and recreated, the fragment
        // will still be around and we just need to re-fetch it.
        if((clientFrag = (ClientFrag) getSupportFragmentManager()
                .findFragmentByTag("clientFrag")) == null) {
            updateStatus("Creating a clientFrag. No service yet.");
            clientFrag = ClientFrag.getInstance();
            getSupportFragmentManager().beginTransaction()
                .add(clientFrag, "clientFrag")
                .commit();
        }
        else {
            updateStatus("Found existing clientFrag, will use it");
        }
    }

    public void doClick(View view) {
        switch(view.getId()) {
        case R.id.startBtn:
            clientFrag.doBindService();
            break;
        case R.id.stopBtn:
            clientFrag.doUnbindService();
            break;
        case R.id.simpleBtn:
            clientFrag.doSendSimple();
            break;
        case R.id.complexBtn:
            clientFrag.doSendComplex();
            break;
        }
    }

    @Override
    public void updateStatus(String status) {
        mCallbackText.setText(status);
    }
}
Notice how there’s no mention of a service in this activity, just a TextView, buttons, and a client fragment. The updateStatus() method is as a result of the ISampleServiceClient interface that this activity implements, and all it needs to do is set the text in the UI as passed in. The buttons simply invoke a method of the client fragment. In a real application, there would be more business and UI logic in this activity or in other fragments that are separate from the service call.
The client fragment is where the fun is. Listing 14-28 shows the code from the client fragment.
Listing 14-28. Messenger/Handler-Based Client Fragment Code
public class ClientFrag extends Fragment {
    private static final String TAG = "MessengerClientFrag";
    static private ClientFrag mClientFrag = null;
    // application context will be used to bind to the service because
    // fragments can't bind and activities can go away.
    private Context appContext = null;

    // Messenger for sending to service.
    Messenger mService = null;
    // Flag indicating whether we have called bind on the service.
    boolean mIsBound;

    // Instantiation method for the client fragment. We just want one
    // and we use setRetainInstance(true) so it hangs around during
    // configuration changes.
    public static ClientFrag getInstance() {
        if(mClientFrag == null) {
            mClientFrag = new ClientFrag();
            mClientFrag.setRetainInstance(true);
        }
        return mClientFrag;
    }

    // Handler for response messages from the service
    class IncomingHandler extends Handler {
        @Override
        public void handleMessage(Message msg) {
            switch (msg.what) {
                case MessengerService.MSG_SET_SIMPLE_VALUE:
                    updateStatus("Received from service: " + msg.arg1);
                    break;
                default:
                    break;
            }
            super.handleMessage(msg);
        }
    }

    // Need a Messenger to receive responses. Send this with the
    // Messages to the service.
    final Messenger mMessenger = new Messenger(new IncomingHandler());

    private ServiceConnection mConnection = new ServiceConnection() {
        public void onServiceConnected(ComponentName className,
                IBinder service) {
            // This is called when the connection with the service has been
            // established, giving us the service object we can use to
            // interact with the service.  We are communicating with our
            // service through a Messenger, so get a client-side
            // representation of that from the raw service object.
            mService = new Messenger(service);
            updateStatus("Attached.");

            // We want to monitor the service for as long as we are
            // connected to it. This is not strictly necessary. You
            // do not need to register with the service before using
            // it. But if this failed you'd have an early warning.
            try {
                Message msg = Message.obtain(null,
                        MessengerService.MSG_REGISTER_CLIENT);
                msg.replyTo = mMessenger;
                mService.send(msg);
            } catch (RemoteException e) {
                // In this case the service has crashed before we could even
                // do anything with it; we can count on soon being
                // disconnected (and then reconnected if it can be restarted)
                // so there is no need to do anything here.
                Log.e(TAG, "Could not establish a connection to the service: " + e);
            }
        }

        public void onServiceDisconnected(ComponentName className) {
            // This is called when the connection with the service has been
            // unexpectedly disconnected -- that is, its process crashed.
            mService = null;
            updateStatus("Disconnected.");
        }
    };

    public void doBindService() {
        // Establish a connection with the service. We use the String name
        // of the service since it exists in a separate process and we do
        // not want to require the service jar in the client. We also grab
        // the application context and bind the service to that since the
        // activity context could go away on a configuration change but the
        // application context will always be there.
        appContext = getActivity().getApplicationContext();
        if(mIsBound = appContext.bindService(
            new Intent("com.androidbook.messengerservice.MessengerService"),
                    mConnection, Context.BIND_AUTO_CREATE)
            ) {
            updateStatus("Bound to service.");
        }
        else {
            updateStatus("Bind attempt failed.");
        }
    }

    public void doUnbindService() {
        if (mIsBound) {
            // If we have received the service, and hence registered with
            // it, then now is the time to unregister. Note that the
            // replyTo value is only used by the service to unregister
            // this client. No response message will come back to the client.
            if (mService != null) {
                try {
                    Message msg = Message.obtain(null,
                            MessengerService.MSG_UNREGISTER_CLIENT);
                    msg.replyTo = mMessenger;
                    mService.send(msg);
                } catch (RemoteException e) {
                    // There is nothing special we need to do if the service
                    // has crashed.
                }
            }

            // Detach our existing connection.
            appContext.unbindService(mConnection);
            mIsBound = false;
            updateStatus("Unbound.");
        }
    }

    // If you can simplify and send only one or two integers, this
    // is the easy way to do it.
    public void doSendSimple() {
        try {
            Message msg = Message.obtain(null,
                MessengerService.MSG_SET_SIMPLE_VALUE, this.hashCode(), 0);
            mService.send(msg);
            updateStatus("Sending simple message.");
        } catch (RemoteException e) {
            Log.e(TAG, "Could not send a simple message to the service: " + e);
        }
    }

    // If you have more complex data, throw it into a Bundle and
    // add it to the Message. Can also pass Parcelables if you like.
    public void doSendComplex() {
        try {
            Message msg = Message.obtain(null,
                MessengerService.MSG_SET_COMPLEX_VALUE);
            Bundle mBundle = new Bundle();
            mBundle.putString("stringArg", "This is a string to pass");
            mBundle.putDouble("myDouble", 1138L);
            mBundle.putInt("myInt", 42);
            msg.setData(mBundle);
            mService.send(msg);
            updateStatus("Sending complex message.");
        } catch (RemoteException e) {
            Log.e(TAG, "Could not send a complex message to the service: " + e);
        }
    }

    private void updateStatus(String status) {
        // Make sure the latest status is updated in the GUI, which
        // is handled by the parent activity.
        ISampleServiceClient uiContext = (ISampleServiceClient) getActivity();
        if(uiContext != null) {
            uiContext.updateStatus(status);
        }
    }
}
The client fragment code is fairly straightforward. When the user clicks the Bind Service button, the client fragment binds to the remote service and sets up the ServiceConnection. Binding is done from the application context. This is preferred because fragments can’t bind services, but activities and applications can. However, because the activity could go away during a configuration change, it’s better to bind to the application which will always be there. When the ServiceConnection gets connected, an outgoing Messenger is set up to send the MSG_REGISTER_CLIENT register client message to the service. The client does not wait for a reply from the service but does go back to waiting for the user’s next interaction. This prevents the dreaded ANR pop-up. Pressing Send Simple creates a simple message and sends it.
For a simple message, the service does a reply message which is received by the client’s handler and processed. All the client handler does is update the TextView with the value received from the service. Notice that the client fragment uses the parent activity’s ISampleServiceClient interface to call an appropriate method to update the UI. This is because the client fragment is non-UI and we would prefer not to embed UI logic within it. An interface keeps the client fragment separate from the activity and makes it easy to let the activity go away and come back during a configuration change. Pressing Send Complex creates a message with a bundle containing several different values, which is sent to the service. The service will use the double value in a notification to prove that the value was properly transmitted from client to service. The service does not send a reply message for the complex message.
One thing to be aware of with this mechanism for inter-process service calls: the service’s handler is working from a queue of incoming messages and is therefore single-threaded by default. There will not be multiple threads processing the incoming service messages unless you create some yourself. Since the client is not blocking on a reply from the service, a client application would not crash if the service took a while to respond to a message. However, it would be something to keep in mind if you’ll have multiple clients of the service. AIDL services can more easily handle requests simultaneously, so it might be a better choice if you need more predictable response times.
If your client is sending messages to multiple services, you could use a single Messenger/Handler pair to process reply messages from those services. You just have to put that same Messenger into each outbound Message and each service should reply back.
The other thing to be aware of is that the client has no guarantee that the service will ever respond. There are no timeouts inherent in a Messenger/Handler interaction. You will be notified through onServiceDisconnected() if the service dies, but not if it hangs or takes too long. Therefore, to be sure that the service responds in a timely fashion, the client could choose to set a timer, or an alarm to wake it up again. If the reply comes back before the timer/alarm goes off, the client handler could clear it. If the timer/alarm wakes up the client, it means the service took too long and the client could then take appropriate action.
References
Here are some helpful references to topics you may wish to explore further:
- www.androidbook.com/proandroid5/projects: A list of downloadable projects related to this book. For this chapter, look for a ZIP file called ProAndroid5_Ch14_Services.zip. This ZIP file contains all projects from this chapter, listed in separate root directories. There is also a README.TXT file that describes exactly how to import projects into your IDE from one of these ZIP files.
- http://hc.apache.org/httpcomponents-client-ga/tutorial/html/: Great tutorials on using the HttpClient classes, including authentication and the use of cookies.
- http://developer.android.com/guide/components/bound-services.html: Android Developer Guide on Bound Services.
Summary
This chapter was all about services, specifically:
- We talked about consuming external HTTP services using the Apache HttpClient.
- With regard to using the HttpClient, we showed you how to do HTTP GET calls and HTTP POST calls.
- We also showed you how to do multipart POSTs.
- You learned that SOAP can be done from Android, but it’s not the preferred way to call web services.
- We talked about how you could set up an Internet proxy to manage a SOAP service on your application’s behalf from a server somewhere, so your application can use RESTful services to your proxy and keep the application simpler.
- We then covered exception handling and the likely types of exceptions that your application is likely to experience (timeouts mostly).
- You saw how to use the ThreadSafeClientConnManager to share a common HttpClient inside your application.
- You learned how to check and set timeout values for connections to the network.
- We covered a couple of options for making connections to web services, including HttpURLConnection and AndroidHttpClient.
- We explained the difference between local services and remote services. Local services are services that are consumed by the components (such as activities) in the same process as the service. Remote services are services whose clients are outside the process hosting the services.
- You learned that even though a service is meant to be on a separate thread, it is still up to the developer to create and manage the background threads associated with services.
- You discovered how to start and stop local services, and how to create and bind to a remote service.
- You saw how the NotificationManager is used to track running services.
- We covered how to pass data to a service, using Parcelables for the complex types.
- You learned how to use Messengers and Handlers to call remote services.