Deploying Your Application: Google Play Store and Beyond
Creating a great application that people will love is one thing, but you also need an easy way for people to find and download it. Google created the Play Store for this purpose. From an icon right on the device, users can click straight into the Play Store to browse, search, review, and download applications. Users can also access Play Store over the Internet to do those same things, although the downloading is not to the computer but rather apps are sent directly to the user’s device. Many applications are free; for those that are not, the Play Store provides payment mechanisms for easy purchasing.
The Play Store is even accessible from intents inside of applications, making it easy for applications to reach out to the Play Store to guide users into getting what they need for your application to be successful. For example, when a new version of your application becomes available, you can make it easy for the user to go straight to that Play Store page to get or buy the new version. Google Play Store is not the only way to get applications to devices, however; other channels are all over the Internet.
The Google Play Store application is not available from within the emulator (although hacks exist to make it available). This makes things a little more difficult for a developer. Ideally you will have a device of your own that you can use with Google Play Store. In this chapter, we’ll explore how to get you set up for publishing applications to the Play Store; how to prepare your application for sale through the Play Store; how you can protect yourself from piracy; how users will find, download, and use your applications; and finally, alternative ways to make your applications available.
Becoming a Publisher
Before you can upload an application to Google Play Store, you need to become a publisher. To do so, you must create a Google Play Publisher Account. Once that’s done, you will be able to upload your applications to the Play Store so they can be found and downloaded by users. If you will be charging money for your app, or accepting in-app purchases, you will also need to set up a Google Wallet Merchant Account. Google has made the process to get these accounts relatively painless and reasonably priced.
A good place to start is this page: http://developer.android.com/distribute/googleplay/start.html. From here you can click the big Start button to begin the process. If you don’t already have a Google Account you will be prompted to create one. To be a publisher, you will also need to provide a developer name, an e-mail address, a web site address, and a phone number where you can be contacted. You will be able to change these values later, once your account is set up. You will also need to pay the registration fee. This is done via Google Wallet. In order to complete the payment transaction, you will need to use your Google account.
One of the options presented to you during the payment process is “Keep my email address confidential.” This refers to the current transaction between you and Google Play Store to purchase publisher access. If you choose yes, you’ll keep your e-mail address secret from Google Play Store. This has nothing to do with keeping your e-mail address secret from buyers of your application. Buyers’ ability to see your e-mail address has nothing to do with this option. More on that later.
Next up is the Google Play Developer Distribution Agreement (GPDDA). This is the legal contract between Google and you. It spells out the rules for distributing apps, collecting payments, granting refunds, feedback, ratings, user rights, developer rights, and so on. There’s more on these in the “Following the Rules” section of this chapter.
Upon accepting the Agreement, you will be taken to a page commonly called the Developer Console at https://play.google.com/apps/publish/.
Following the Rules
The GPDDA spells out a lot of rules. You might want legal counsel to review the contract before agreeing to it, depending on how seriously you plan to operate within the Google Play Store. This section describes some highlights you might be interested in:
- You have to be a developer in good standing to use the Google Play Store. This means you must go through the process as described to get registered, you must accept the Agreement, and you must abide by the rules in the Agreement. Breaking the rules could get you barred and your products removed from the Play Store.
- You can distribute products for free or for a price. The Agreement applies either way. Payments must be collected via an authorized Google Play Store Payment Processor. This includes Google Checkout (credit, debit, Google Play gift cards), carrier billing (e.g., Verizon, AT&T), and PayPal.
- Paid apps will incur a transaction fee, and possibly a fee from the device carrier, to be deducted from the sale price. As of March 2015, the transaction fee is 30 percent, so if the sale price is $10, Google collects $3 and you get $7 (assuming no carrier fees).
- For EU countries, Google is required to remit the taxes for you. Outside of the EU, it is your responsibility to remit appropriate taxes to your taxing authorities. For some of those non-EU countries, you can choose to let Google remit the taxes for you. When you set up your merchant account, you specify the appropriate tax rates to apply to purchases. Google Checkout will collect the appropriate taxes based on how you set up Google Checkout. This money will be provided to you if Google is not remitting for you, and you must remit it appropriately. For additional information on sales taxes in the United States, try http://biztaxlaw.about.com/od/businesstaxes/f/onlinesalestax.htm and www.thestc.com.
- You are allowed to distribute a free demo version of your application, with an option to pay to unlock the application’s full set of features; however, you must collect the payment via an authorized Google Play Store Payment Processor. You are not allowed to redirect users of your free application to some other payment processor to collect upgrade fees. You could think of it this way: if you’re making money via Google Play Store, Google wants its share.
- In-app billing allows an application to charge for digital goods or assets used within the application. A digital asset could be something like a virtual weapon or new levels for a game, or a music or graphics file. The checkout process is the same as for purchasing applications.
- If your application requires a user to have a login on a web server somewhere, and that web server charges the user a subscription fee, that web server could collect the subscription fee any way it wants to. In this way, you have disconnected the subscription fee from the application, and it’s OK by Google to make the application available in Google Play Store—as long as your free application is not directing users to the web site. Some people just decide to distribute their free Android app from the same web server as the service, but this does require the user to enable installation of apps from unknown sources, which can discourage some users from installing.
- It seems that you can use alternate payment processors to accept donations from users of your free app, but you cannot create incentives within your app to encourage those donations.
- While the GPDDA says refunds can be requested up to 48 hours after purchase, as of March 2015 refunds can be requested by the user up to 2 hours after purchasing for an automatic refund. Refunds are not given to users who can preview the product prior to download. This includes ringtones and wallpapers.
- Google Checkout, however, does allow the developer to issue a refund even if the refund window has passed. The user can go to their Google Play activity history, and from there can request a refund even well after the initial 2 hours. If it is less than 48 hours from the purchase, the refund will probably be automatic. Otherwise, it is up to the developer whether or not to return any money.
- You are required to provide adequate support for your product. If adequate support is not provided, users can request refunds through Google, and these will be charged back to you, possibly including handling fees.
- Users get unlimited reinstalls of applications downloaded from the Google Play Store. If a user does a factory reset of their device, this feature allows them to get all their apps back without having to repurchase.
- Developers agree to protect the privacy and legal rights of users. This includes protecting (securing) any data that might be collected in the process of using the application. It is possible to change the rules regarding users’ data protection, but only by displaying and having the user accept a separate agreement between you and that user.
- Your application must not compete with the Google Play Store. Google does not want an application from within Google Play Store to sell Android products from outside Google Play Store, thus bypassing its payment processor. This does not mean that you can’t also sell your application through other channels, but your application on Google Play Store cannot itself be doing the selling of Android products outside of Google Play Store.
- Google will assign product ratings to your products. The ratings could be based on user feedback, install rates, uninstall rates, refund rates, and/or a Developer Composite Score. The Developer Composite Score may be calculated by Google using past history across applications, and this could influence the rating of new applications. For this reason, it is important to release good-quality applications associated with you, even the free ones. It’s not clear that the Developer Composite Score even exists, but if it does there’s no way to see yours.
- By selling your application through Google Play Store, you are granting the user a “non-exclusive, worldwide, perpetual license to perform, display and use the Product on the device.” However, it is quite alright for you to write a separate End User License Agreement (EULA) that supersedes this statement. Make this EULA available on your web site, or provide another way for shoppers and users to be able to read it.
- Google requires that you abide by the branding rules for Android. These include restrictions on the use of the word Android, as well as use of the robot graphic, logo, and custom typeface. For more details, go to http://developer.android.com/distribute/tools/promote/brand.html.
Developer Console
The Developer Console is your landing page for controlling your applications in Google Play Store. From the Developer Console, you can set up a merchant account in Google Checkout (so you can charge for your applications), upload applications, and get information about your uploaded applications. You can also edit your account details including developer name, e-mail address, web address, and phone number. Figure 30-1 shows the Developer Console.
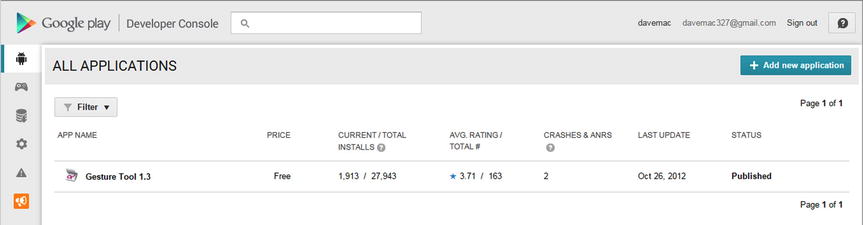
Figure 30-1. The Google Play Store Developer Console
If you do not set up a merchant account, you will be unable to charge for your products in Google Play Store. Setting up a merchant account is not difficult. Click the link from the Developer Console, fill out the application, agree to the Terms of Service, and you’re all set. You will need to provide a US Federal tax ID (EIN), a credit card number plus a US Social Security Number (SSN), or just a credit card number. The tax information is used to verify your credit status to ensure timely deposits. The credit card information is used to handle chargebacks due to buyer disputes when there are insufficient funds in your Google Checkout account. You can also supply bank account information to enable electronic funds transfers from the proceeds of your sales.
Note that Google Checkout is a service for more than just Google Play Store. Therefore, do not get confused by the transaction fee information for Google Checkout for non–Google Play Store sales. The 30 percent mentioned previously is the transaction fee rate for Google Play Store. There is also additional Google Checkout transaction fee information for non–Google Play Store sales, and those do not apply to Google Play Store.
Uploading and monitoring your applications are probably the main functions of the Developer Console that you will use, although the Console is also where you can sign up for access to Google APIs and game services and link to your AdWords account(s).
For monitoring, the Play Store provides tools to see how your application is doing in terms of total downloads and how many users still have it installed. You can see the overall rating of your apps in terms of 0 to 5 stars, and how many people have submitted a rating. There are various reports, charts, and graphs in the Developer Console so you can see how your application is doing in different versions of Android, on different devices, in different countries, and in different languages.
Users can submit comments in addition to rating your application. It is in your best interest to read the comments in order to address any problems quickly. Included with a comment is the user’s rating of your app, a name of the user as typed by them, and the date the comment was submitted. You are able to reply to specific comments and that user will receive an e-mail to let them know. You can only leave one reply per review, but you can always edit your reply later. In an extreme case, where a comment is particularly harmful or inappropriate, you can contact Google support by starting here at the Help Center web site: https://support.google.com/googleplay/android-developer/.
The Developer Console allows you to republish your application—for upgrades, for example—or to unpublish the application. Unpublishing does not remove it from devices, nor does it even necessarily remove the app from the Google servers, especially if it’s a paid app. A user who has paid for your application and who has uninstalled it, but not requested a refund, is allowed to reinstall it later even if you’ve unpublished it. The only way it is truly unavailable to users is if Google pulls it due to a violation of the rules.
You can also look at errors that were generated by your application and see application freezes and crashes. Figure 30-2 shows the Crashes & ANRs screen.
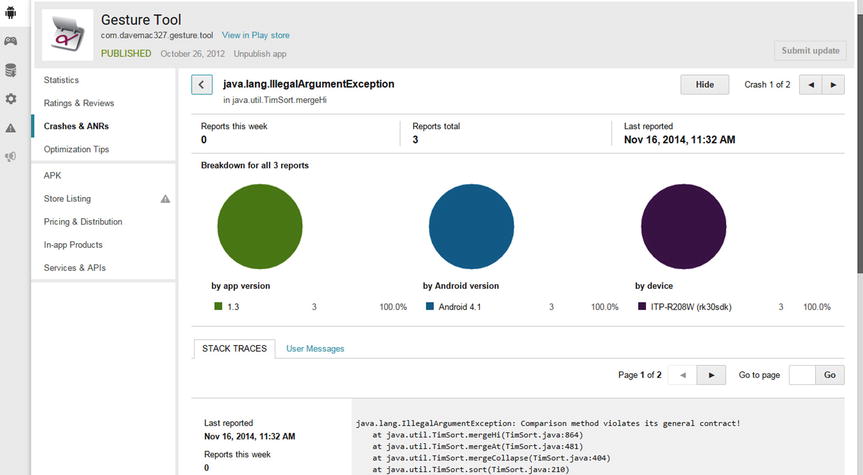
Figure 30-2. The Crashes & ANRs screen
Drilling into the details of a crash report, you can see the stack trace of the crash, as well as which type of device was running the application and the time of the crash. Unfortunately, you cannot communicate back to the user who experienced the problem to get additional details or to help them get the issue resolved. You have to hope that the affected users will get in touch with you through comments, e-mail, or your web site. Otherwise, you’ll just have to figure out from the crash report what went wrong and try to fix it.
If you really want to know how a user got to a crash, you’ll want to implement one of the mobile analytics packages into your app. These will generate event records as a user steps through your application, and will also report crashes. The breadcrumbs (event records) will let you know the steps a user took up to the point of the crash. This capability is separate from the Google Play Store, however.
There’s one more feature of the Developer Console you may need to use: the Help portion of the web site. The Help button is in the upper-right corner. Clicking it shows you some inline help, but also has a link to the Help Center web site. There are also links for submitting e-mail or for an online chat (during business hours).
We’ve now introduced you to some of the nice features of the Developer Console, but you probably want to get into the most useful part, which is getting your applications into the Google Play Store so users can find them and download them. But before we do that, let’s go over how to prepare your application for upload and sale.
Preparing Your Application for Sale
There are quite a few things to think about and do to take an application from code complete to Google Play Store. This section will help you through those items.
With more and more Android devices becoming available, and each one potentially having some new hardware configuration, it is very important that you test for a variety of devices you want to support. You could purchase some of the devices that you want to support, but you probably can’t purchase them all. There are some online services that make real devices available over the Internet. Your other option is to configure Android Virtual Devices (AVDs) for each type of device, specify the appropriate hardware configuration, and then test with the emulator and each AVD. Some device manufacturers make Android emulator packages available that are specific to their devices, so check out their web sites for download options.
The Android SDK provides various classes to assist with testing, as well as the UI/Application Exerciser Monkey. These tools will help you do automated testing so you don’t spend forever testing your application manually. See these web pages for more details:
https://developer.android.com/tools/testing/index.html
https://developer.android.com/tools/testing-support-library/index.html
Before you begin testing, you probably want to remove from your code any development artifacts that you no longer need, and also any development artifacts from /res. You want your application to be as small as possible and to run as quickly as possible with the least amount of memory. Finally, be sure to disable or remove any debugging features from your application that you don’t want distributed to production.
Supporting Different Screen Sizes
Android supports many screen sizes. In order to run on the smallest size, you must set a specific <supports-screens> element as a child element of <manifest> within the AndroidManifest.xml file. Without this tag specifying that your application supports the small screen size, your application will not be visible in the Play Store to devices that have a small screen.
To support different screen sizes, you may need to create alternate resource files under /res. For example, for files in /res/layout, you may need to create corresponding files in /res/layout-small to support small screens. This does not mean you must also create corresponding files in /res/layout-large and /res/layout-normal, since Android will look in /res/layout if it can’t find what it needs in a more specific resource directory such as /res/layout-large. Remember, too, that you can have combinations of qualifiers for these resource files; for example, /res/layout-small-land would contain layouts for small screens in landscape mode. Supporting small screens probably means creating alternate versions of drawables such as icons, too. For drawables, you may need to create alternate resource directories, taking into account screen resolution as well as screen size.
Tablets of course go in the opposite direction in terms of screen size, using the label xlarge. The same <supports-screens> tag as before is used to specify if your application will run on extra-large screens, and the attribute to use inside of this tag is android:xlargeScreens. In some cases, you may have a tablet-only application, in which case you would specifically indicate that for the other sizes, the attribute value is false.
Preparing AndroidManifest.xml for Uploading
Your AndroidManifest.xml file may need to be tweaked a little bit before you can upload it to Google Play Store. ADT normally puts the android:icon attribute in the <application> tag, and not in <activity> tags. If you have more than one activity that can be launched, you’ll want to specify separate icons for each activity so the user can more easily tell them apart. But you’ll still need an icon specified in <application>, which also serves as the default activity icon for any activities that don’t specify their own icon. Your application will work fine on devices and in the emulator with the android:icon only specified in the <activity> tags, but when Google Play Store inspects your application’s .apk file when uploading, it looks for icon information in the <application> tag.
Google Play Store prevents uploading your application if the package name you’ve used starts with com.google, com.android, android, or com.example, but we hope you didn’t use one of those in your application.
There are many other compatibilities to consider for your application. Some devices have cameras, some don’t have physical keyboards, and some have trackballs instead of directional pads. Use <uses-configuration> and <uses-feature> tags in your AndroidManifest.xml file as needed to define what hardware/platform requirements your application has. Google Play Store will enforce this and not let your application be shown to a user on a device that won’t support your application. Note that these tags are different and separate from the <uses-permission> tags of the AndroidManifest.xml file. In most cases, you would end up with both tags in your AndroidManifest.xml file, for specifying that a camera is required, and for specifying that permission to use the camera is required. But not all features require permission, so it is in your best interest to specify the features you need.
There is another big difference between <uses-permission> and <uses-feature>: the <uses-feature> tag can say that your application requires that feature or that your application can function without it. That is, there is an attribute called android:required that can be set to either true or false; by default it’s true. If there is a permission for a feature, but you don’t supply the corresponding <uses-feature> tag, then by default it’s as if you specified <uses-feature> and the feature is required. For example, your application may take advantage of Bluetooth if it’s available, but will work just fine if it is not. Therefore, in the manifest file, in addition to the Bluetooth permission element, you’d have something like this:
<uses-feature android:name="android.hardware.bluetooth" android:required="false" />
Within your application’s code, you should make a call to the PackageManager to find out if Bluetooth is available or not, which you could do with the following:
boolean hasBluetooth = getPackageManager().hasSystemFeature(
                PackageManager.FEATURE_BLUETOOTH);
Then take appropriate action in your application if Bluetooth is not there. The Android documentation can be confusing in this area. If you look at the Developer Guide page for <uses-feature>, you will not see as many features as are described on the PackageManager reference page, which defines a FEATURE_* constant for each available feature.
The <uses-configuration> tag is a little different. It specifies what sort of keyboard, touchscreen, and/or navigational controls the device must have. But instead of being independent choices such as <uses-feature>, you would put the combinations of configuration choices together into what your application requires. For example, if your application requires a five-way navigation control (that is, a D-pad or a trackball) and a touchscreen (using either a stylus or a finger), you would specify two tags as follows:
<uses-configuration android:reqFiveWayNav="true" android:reqTouchScreen="stylus" />
<uses-configuration android:reqFiveWayNav="true" android:reqTouchScreen="finger" />
Localizing Your Application
If your application will be used in other countries, you might want to consider localizing it. This is relatively easy to do technically. Finding someone to do the localizing is another matter. From the technical point of view, you simply create another folder under /res—for example, /res/values-fr to hold a French version of strings.xml. Take your existing strings.xml file, translate the string values to the new language, and save the new translated file under the new resource folder using the same file name as the original file. At runtime, if the device’s language is set to French, Android will look for strings that were placed under /res/values-fr. If it can’t find strings from there, it will then look for strings from /res/values.
The same technique works for the other types of resource files—for example, drawables and menus. Images and colors may work better for your users if they are different for different countries or cultures. For this reason, it is a good idea to not use true color names for your resource names for colors. In the online documentation for colors, it is common to see something like this:
<color name="solid_red">#f00</color>
This means that in your code or other resource files, you’re referring to the color by the actual name of the color, in this case, solid_red. In order to localize the color to something more appropriate for the other country or culture, it would be better to use a color name such as accent_color1 or alert_color. In English, red might be the appropriate color value to use, while in Spanish it might be better to use a shade of yellow. Because a color name like alert_color does not reveal the actual color that you’re using, it is less confusing when you want to change the actual color value to something else. At the same time, you can design a pleasing color scheme, with base colors and accent colors, and be more confident that you’re using the correct colors in the correct places.
Menu choices might need to be changed in different countries, using fewer or more menu items, or be organized differently, depending on where the application is being used. Menus are typically stored under /res/menu. If you are faced with this situation, you are probably better off putting all your string text into strings.xml, or other files located under the /res/values directory, and using string IDs in the appropriate resource files everywhere else. This makes it far less likely that you will miss translating a string value in some obscure resource file. Your language translation work is then limited to the files under /res/values.
Preparing Your Application Icon
Shoppers and your users will see your application’s icon and label prominently in both Google Play Store and on their device once they’ve downloaded it. Please take special care to create good icons and good labels for your application and its activities. Localize them as necessary or desired. And remember that for different screen sizes, your icons may need to be tweaked to look good. Check out what other developers have done with their icons, especially those applications in the same category as your application. You want your application to get noticed, so it’s better not to blend in with all the others. At the same time, you want your icon and label to work well on a device when surrounded by lots of other application icons that do other things. You don’t want a user to be confused about what your application does, so make the icon representative of the functionality of your application.
When creating any image for your application, but especially your icon, you need to consider the screen density of the target device. Density means the number of pixels per inch. Don’t think that a small screen is low density and a large screen is high density—you could see any combination of size and density. For a high-density screen, you will probably choose an icon with 72 × 72 pixels. The medium-density icon will usually be of size 48 × 48 pixels. And for extra-high density, it’s 96 × 96 pixels. For a low-density screen, making an icon appear to be the right size means making the icon with fewer pixels, typically 36 × 36. Android helps you in the low-density case because it will automatically downscale your HDPI icon by half, so you don’t need to provide a low-density icon yourself. In general, you’ll find it easiest to only worry about density for images such as icons. You’ll worry about screen size when defining layouts.
Directing Users Back to the Play Store
Android has a URI scheme to help facilitate finding applications in Google Play Store: market://. [Google Play Store was formerly called Android Market.] For example, if you want to direct your users to the Play Store to locate a needed component, or to upsell to an additional app that unlocks features in your application, you would do something as shown here, where MY_PACKAGE_NAME would be replaced by your real package name:
Intent intent = new Intent(Intent.ACTION_VIEW,
          Uri.parse("market://search?q=pname:MY_PACKAGE_NAME"));
startActivity(intent);
This will launch the Play Store app on the device and take the user to that package name. The user can then choose to download or buy the application. Note that this scheme does not work in a normal web browser. In addition to searching using package name (pname), you can search by developer name using market://search?q=pub:"Fname Lname" or against any of the public fields (application title, developer name, and application description) in Google Play Store using market://search?q=<querystring>.
The way that Android apps are constructed unfortunately makes them targets for piracy. It is possible to make copies of Android apps that can then be distributed to other devices. So how can you ensure that users who have not purchased your application cannot run it? The Android team has created something called the License Verification Library (LVL) to meet this need. Here’s how it works.
If your application was downloaded via Google Play Store, then there must be a copy of the Google Play Store app on the device. In addition, the Google Play Store app has elevated permissions to be able to read values from the device such as the user’s Google account name, the IMSI, and other information. The Google Play Store app will respond to a license verification request from an application. You make calls into the LVL from your application, LVL communicates with the Google Play Store app, the Google Play Store app communicates with Google servers, and your application gets an answer back indicating whether or not this user on this device is licensed to use your application. This means the app must have been purchased through Google Play Store; otherwise the Google servers won’t know about it. There are settings under your control to decide what to do if the network is unavailable. A full description of the process of implementing LVL can be found at https://developer.android.com/google/play/licensing/index.html.
One thing to be aware of, though, is that the LVL mechanism is subject to hacking. If someone can get to your application’s .apk file, they can disassemble the app and then patch it if they know where to look for the return value from the LVL call. If you use the obvious pattern of a switch statement after getting the response from LVL, to branch to the appropriate logic based on the return code, a hacker can simply force a successful return code value, and they own your app. For this reason, the Android team highly recommends that you implement obfuscation of your app to hide the part of your application where you check the return code from LVL. This gets fairly complicated, as you can imagine.
Using ProGuard for Optimization, Fighting Piracy
Google provides some support for obfuscation in the form of the ProGuard feature. ProGuard is not a Google product, but has been integrated into ADT and Android Studio so it’s easy to use. ProGuard does more than just provide obfuscation for fighting piracy; it also makes your application smaller and faster. It does all this by stripping out debugging information, cutting out code that will never run, and changing names (of classes, methods, and so on) to meaningless strings. Examples of code that will never run include library classes and methods that are never called, and logging that depends on a constant that you set to false (for production). It can also recognize optimizations such as binary-shifting a value left by one bit position instead of multiplying it by 2. By stripping out debugging information and changing the names, the resulting compiled .apk file won’t reveal variable names, class names, methods, and so on, so it becomes extremely difficult to figure out what the code does and therefore how to steal it, modify it, and release it as something else.
When you create your application, it should automatically get a proguard-project.txt file. The default file will look something like Listing 30-1.
You also need to uncomment the proguard.config property in the application’s project.properties file to the location of the proguard-project.txt file. The line looks like this:
proguard.config=${sdk.dir}/tools/proguard/proguard-android.txt:proguard-project.txt
As you can see, there is a stock set of ProGuard configurations provided to you by a file under the tools/proguard directory of the Android SDK. You can then augment the ProGuard configuration in the proguard-project.txt file as part of your application project. Note that the provided configuration does not in fact enable optimizations, as these require more testing to be sure that your application still works correctly. If you want to try optimizations, change the reference in the project.properties file to ${sdk.dir}/tools/proguard/proguard-android-optimize.txt.
As mentioned, ProGuard does its work by stripping stuff out. Sometimes it strips out too much, and that is why you see the -keep options specified in the proguard-android.txt file. When you produce an .apk file, you need to test it to make sure ProGuard didn’t take out too much. If you find errors due to missing classes or methods, you can edit the proguard-project.txt file to include another -keep option for the item you’re missing. Rebuild your .apk file, and test again. We recommend using the Export Signed Application Package option under the Android Tools menu option in Eclipse, because it will take care of calling ProGuard for you as it builds the .apk file. Exporting is covered in the next section.
You can also configure Ant to obfuscate using ProGuard if you use Ant to do your builds.
When ProGuard does its thing, you’ll get a file called mapping.txt along with your .apk file. Hang on to this file because you will need it to de-obfuscate a stack trace from your application. If you use Eclipse to export your .apk file, you will see a new proguard directory created within your Eclipse project. The mapping.txt file will be in there. The command to use is retrace, and it’s located in the Android SDK directory under tools/proguard/bin. The arguments to retrace include the mapping.txt file and the stacktrace file, but be aware that you need to specify the full pathname to each. Also, you should keep track of which version of your application goes with which mapping.txt file.
One more caution about testing your application. Android KitKat introduced an experimental runtime engine called the Android RunTime (ART), and in Lollipop it became the one and only runtime engine. You should test your application with both, especially if you use ProGuard and do optimizations.
Preparing Your .apk File for Uploading
To get your tested application ready for uploading—that is, to create the .apk file to upload—you need to create a signed export of your application. This can be done a number of ways, but the simplest are to use the built-in IDE features. For Eclipse you would right-click on the project name and choose Android Tools ![]() Export Signed Application Package.... For Android Studio, you would select the project name and choose the Build menu
Export Signed Application Package.... For Android Studio, you would select the project name and choose the Build menu ![]() Generate Signed APK… Follow the dialogs to choose a proper signing certificate key and create your production APK.
Generate Signed APK… Follow the dialogs to choose a proper signing certificate key and create your production APK.
Uploading Your Application
Uploading is easy to do but takes some preparation. Before you begin an upload, there are some things you will need to have ready and decisions you have to make. This section covers that preparation and those decisions. Then, when you’ve got everything you need, go to the Developer Console and choose + Add new application. You’ll be prompted to supply lots of information about your application, the Play Store will run some processing on your application and the information, and then your application will be ready to publish to the Play Store.
The previous section covered preparing your application .apk file for uploading. Making your application attractive to shoppers requires some marketing on your part. You need good descriptions of what it is and does, and you need good images so shoppers understand what they might download.
The Google Play Store understands that you could market your application in different countries. Therefore, you have the ability to provide text and graphics localized for the different countries with just one application.
You’ll be asked to upload screenshots for your application. The easiest way to capture screenshots of your application is to use DDMS. Fire up Eclipse, launch your application in the emulator or on a real device, and then switch Eclipse perspectives to DDMS and the Device view. From within the Device view, select the device where your application is running and then click the Screen Capture button (it looks like a little camera in the upper-right corner) or choose it from the View menu. If you have a choice when saving, choose 24-bit color. The Android Device Monitor is very similar to DDMS and is available as a stand-alone tool (called monitor) from under the SDK tools directory, or from the Tools menu of Android Studio.
Google Play Store will convert your screenshots to compressed JPEG; starting with 24-bit will produce better results than starting with 8-bit color. Choose screenshots that will make your application stand out from the rest but that also show the important functionality. You must supply at least two screenshots, and you can provide up to eight. Be aware that you have the ability to upload screenshots for your application for other languages. If your application has been localized for another country and/or language, you’ll want the screenshots to correspond.
Next up is a high-res application icon. This could be the exact same design as your application icon, but Google Play Store wants a 512 × 512 pixel icon image. This is required.
The feature graphic is required and is a large 1024 × 500 pixels in size. This graphic is used in the Featured section of Google Play Store so you want this to look really good.
You can provide a promotional graphic as well, but its size is smaller than a screenshot. Although this graphic is optional, it is a good idea to include it. You never know when the graphic could be displayed; without one, you don’t know what will be displayed in its place, if anything. One place the Promo Graphic appears is at the top of your application’s Details page in Google Play Store.
By the time you read this, there could be other graphics you could upload. For example, Google now accepts a TV Banner graphic for apps that would be viewed on a TV.
The last bit of graphics related to your application is an optional video that you can put out on YouTube and link to from your Google Play Store page.
The Google Play Store asks for textual information about your application to display to shoppers, including the title, short description (formerly called promotional text), and full description.
There’s a Short Description field that has only 80 characters, and it’s mandatory. When your app is shown at the top of a list in Google Play Store, it’s the Promo Graphic and the Short Description that get displayed.
The full description is also mandatory, and it allows up to 4,000 characters. If you have written a separate EULA for your users, provide a link to it in your full description text so shoppers can view it prior to downloading your application. Consider that shoppers will likely use search to locate applications, so be sure to put appropriate words into your text to maximize your hit rate on searches related to your application’s functionality. It’s worthwhile to put a short comment in the text that says to e-mail you if the user runs into problems. Without this simple prompt, people are more likely to leave a negative comment, and a negative comment really limits your ability to troubleshoot and solve the problem, as compared to an e-mail exchange with the affected user.
One drawback to the user comments mechanism described earlier is that it does not distinguish to users the specific version of your application. If negative reviews are received against version 1, and you release version 2 with everything fixed, the reviews from version 1 are still there, and shoppers may not realize that those comments don’t apply to the new version. When releasing a new version of an application, the application rating (number of stars) does not get reset, either. Partly for this reason, Google started providing a Recent Changes text field where you can describe what’s new in this release. This is where you could indicate that a certain problem has been fixed or tell what the new features are. The Play Store also provides the ability to see just the reviews/comments for the latest version, but by default the reviews and comments are shown for all versions.
One of your responsibilities when writing the text for your application is to disclose the permissions that are required. These are the same permissions as set in the <uses-permission> tags of your AndroidManifest.xml file within your application. When the user downloads your application to their device, Android will check the AndroidManifest.xml file and ask the user about all of the uses-permission requirements before completing the install. So you might as well disclose this up front. Otherwise, you risk negative reviews from users surprised that an application requires some permission that they are not prepared to grant, not to mention the refunds, which also count against your Developer Composite Score. Similar to permissions, if your application requires a certain type of screen, a camera, or other device feature, this should be disclosed in your text descriptions of your application. As a best practice, you should disclose not only what permissions and features your application needs, but also what your application will do with them. You should answer the user’s question in advance: why does this app require X?
When uploading your application, you will need to choose an application type and a category. As these values change with time, we won’t list them here, but it’s easy to go to the Add new application screen to see what they are.
You must choose two content ratings. The idea is to give consumers an idea of the appropriateness of an application for certain age groups. The scale for the first (older) content rating includes High, Medium, and Low Maturity, and Everyone. Choosing the right level depends on the content in your application and how much of that content there is. Google has rules about location-awareness and posting or publishing locations. It’s best to read the rules for yourself here: https://support.google.com/googleplay/android-developer/answer/188189. The second content rating is derived after you complete a questionnaire. You will actually get several content ratings, by country, depending on how you answer the questionnaire. The questionnaire takes some of the subjectivity out of the content rating.
Next you set the price of your application. By default the price is Free, and you must have previously set up a Merchant Account in Google Checkout if you want to charge for your application. Setting the right price for an application is tricky, unless you’ve got some sophisticated market research capabilities, and even then it’s still tricky. Prices set too high could turn people off, and you risk the effects of refunds if people don’t feel the price was worth it. Prices set too low could also turn people off because they might think it’s a cheap application.
One of the last decisions to make before uploading your application is to choose the locations and carriers for your application to be visible to. By choosing All, your application will be available everywhere. However, you may want to restrict distribution geographically or by carrier. Depending on what functionality is in your application, you may need to restrict by location in order to comply with US export law. You may choose to restrict your application by carrier if your application has compatibility issues with certain carriers’ devices or policies. To see carriers, click the Show options link next to the country, and the available carriers for that country will be displayed, allowing you to choose the ones you want. Choosing all also means that any new locations or carriers that Google adds will automatically see your application with no intervention from you.
In addition to country and carrier choices, Google Play Store also allows you to restrict your application to certain devices. By default, the devices list is filtered based on your manifest file, in which you’ve specified the features and so on that your application requires. This section of the Upload screen allows you to further restrict other devices. You would probably only want to do this if there was a known issue with a particular device such that you were unable to get your application to work on that device even though it ought to.
Android also offers the option to upload multiple APKs for the same application. It enables you to have a single entry on Google Play Store but to have separate build for phones and tablets. See http://android-developers.blogspot.com/2011/07/multiple-apk-support-in-android-market.html and http://developer.android.com/google/play/publishing/multiple-apks.html.
Contact Information
Even though your developer profile contains your contact information, you can set different information when uploading each application. The Play Store asks for a web site, e-mail address, and phone number as contact information related to this application. You must supply at least one of these so buyers can get support, but you don’t need to supply all three. It is a good idea to not use your personal e-mail address here, just as you probably wouldn’t really want to give out your personal phone number. When you’ve made millions of dollars from selling your application, you’ll want to let someone else receive and deal with the e-mails from users. By setting up an application-support type of e-mail address in advance, you can easily separate the support e-mails from your personal e-mails. Of course, you can always change these values later if you need/want to.
With all these decisions made, you must then attest that your application abides by Android’s Content Guidelines (basically no nasty stuff) and make a second attestation that the software is OK for export from the United States. US export laws apply because Google’s servers are located inside the United States, even if you are outside of the United States, and even if both you and your customer are outside of the United States. Remember that you can always choose to distribute your application through other channels. When all your information is in and your graphics are uploaded, go ahead and click the Save button. This will prepare everything for your application to be ready to go live.
You can then publish your application by clicking the Publish button. Google Play Store will perform some checks on your application—for instance, checking your application’s certificate for the expiration date. If all goes well, your application will soon be available for download. Congratulations!
User Experience on Google Play Store
The Play Store app has been available on devices for some time now, and it is available over the Internet. Developers don’t have any control over how Google Play Store works, other than to provide good text and graphics for their application’s listing in the Play Store. Therefore, the user experience is pretty much up to Google. From a device, a user can search by keyword; look at top downloaded applications (both free and paid), featured applications, or new applications; or browse by categories. Once they find an application they want, they simply select it, which pops up an item details screen allowing them to install it or buy it. Buying will take the user to Google Checkout to conduct the financial part of the transaction. Once downloaded, the new application shows up with all the other applications.
From the Internet web site for Google Play Store (https://play.google.com), the user interface looks about the same, albeit much larger than most device screens. One difference is that the web-based Google Play Store expects the user to log in to their Google account to use the Play Store. This allows Google to connect your web experience on Google Play Store to your actual device. This means two things: when using the web site, Google Play Store knows what applications are already installed on your device; and when you make a purchase on the Google Play Store web site, the download can be sent to your device (or devices) and not to whatever computer you happen to be browsing on.
Google Play Store has an option to view downloaded applications in My Apps. This area contains all installed apps and any apps that you’ve purchased, even if you’ve removed them (perhaps you removed them just to make room for other applications). This means you could delete a paid app from your phone and then reinstall it later without having to repurchase it. Of course, if you opted for a refund, the app will not show up in My Apps.
The list of apps in My Apps is tied to your Google Account used across all your devices. This means you could switch to a new physical device and still have access to all the apps you’ve paid for. But beware. Since you might have multiple identities with Google, you must use the exact same identity as before to get your apps on a new device. When viewing apps in My Apps, any that have upgrades available will indicate this and allow you to get the upgrade.
Google Play Store filters applications available to users. It does this in a number of ways. Users in some countries can only see free applications because of the commerce legalities involved for Google in that country. Google is trying hard to overcome commerce hurdles so all paid apps will be available everywhere. Until that time comes, users in some countries will be unable to access paid apps. Users with devices running older versions of Android will not be able to see applications that require a newer version of the Android SDK. Users with device configurations that are not compatible with the requirements of the application (expressed via <uses-feature> tags in the AndroidManifest.xml file) will not be able to see those applications. For example, applications not specifically supporting small screens cannot be seen in Google Play Store by users on devices with small screens. This filtering is mostly intended to protect users from downloading applications that will not work on their device.
If you are purchasing apps in Google Play Store from other countries, your transaction may be subject to currency conversion, which can also carry an additional fee, unless the seller has specified pricing in your local currency. You’re really purchasing using the Google Checkout from the seller’s country. Google Play Store will display an approximate amount, but the actual charges could vary depending on when the transaction is placed and with which payment processor. Buyers may notice a pending transaction against their account for a small amount (for example, US $1). This is done by Google to ensure that the payment information provided is correct, and this pending charge will not actually go through.
A few web sites are available that mirror the Google Play Store app listings. Shoppers can search, browse categories, and find out about Google Play Store applications over the Internet without having a device. This gets around the filtering that Google Play Store does based on your device configuration and location. However, this does not get apps onto your device. Examples of these mirror sites are www.androlib.com, and www.appszoom.com.
Beyond Google Play Store
Google’s Play Store is not the only game in town. You are not forced into using Google Play Store at all. You should consider utilizing other channels of distribution, not only to make your app available to more people in more countries, but also to take advantage of other payment processors and opportunities to make money.
There are Android app stores completely separate from Google Play Store, the biggest of which is probably Amazon. Other examples of Android app stores are http://mall.soc.io/apps, http://slideme.org, www.getjar.com, and https://f-droid.org/. From these sites, you can search, browse, find out about apps, and also download apps, either from a device or via a web browser. These sites don’t have to abide by Google’s rules, including the transaction fees for paid apps and methods of payment. PayPal and other payment processors can be used to purchase apps on these separate sites. These sites also don’t necessarily restrict by location or device configuration. Some of them provide an Android client that can be installed, or in some cases may come preinstalled on a device. Users can simply launch a browser on their device and find the app they want to download via the web site; when the file is saved to the device, Android knows what to do with it. That is to say, a downloaded .apk file is treated as an Android application. If you click it in the Download history of the browser (not to be confused with My Apps, covered earlier), you will be prompted to see if you want to install it or not. This freedom means you can set up your own methods of downloading Android applications to users, even from your own web site and with your own payment methods. You must still deal though with collecting any necessary sales tax and remitting it to the appropriate authorities.
While not restricted by Google’s rules, these alternate methods of app distribution may not offer the same sort of buyer protections that are found in Google Play Store. It may be possible to purchase an application through an alternate market that will not work on the buyer’s device. Buyers may be at greater risk of malware on the alternate markets. The buyer may also be responsible for creating backups, in case they lose the application from their device, or for transferring applications if they switch to a new device.
These other markets allow you to make money on the sale of each app. You’ve also got the ability within these other markets to implement alternate payment mechanisms, or to implement ads and make money that way.
Remember that Google does not restrict developers from selling their applications in multiple markets at the same time they sell through Google Play Store. So consider all your options to make the most of your efforts.
References
Here are some helpful references to topics you may wish to explore further:
- http://developer.android.com/guide/topics/manifest/manifest-intro.html: The Developer Guide page to the AndroidManifest.xml file, with descriptions of how to use the supports-screens, uses-configuration, and uses-feature tags.
- http://developer.android.com/guide/practices/screens_support.html: The Developer Guide page “Supporting Multiple Screens,” which contains lots of good information on dealing with different screen sizes and densities.
- http://developer.android.com/design/style/iconography.html: The Design Guide page “Iconography,” which contains lots of good information on designing effective icons for your application.
- http://android-developers.blogspot.com/2010/09/securing-android-lvl-applications.html and http://android-developers.blogspot.com/2010/09/proguard-android-and-licensing-server.html: Blog posts on how to use the License Verification Library (LVL) in ways that prevent piracy.
- http://proguard.sourceforge.net/: The main site for ProGuard, which includes documentation.
Summary
You are now equipped to take on the world with your Android applications! Here is a rundown of the topics we covered in this chapter:
- How to get established as a Google Play Store Publisher (that is, Developer) so you can publish to Google Play Store.
- The rules as laid out in the Google Play Developer Distribution Agreement.
- Giving Google its share of your revenue if you are selling through Google Play Store. We also discussed how Google does not want to see competition from within the Play Store.
- Your responsibility for paying taxes on revenues from your applications.
- The Google Play Store refund policy, both the published and the real one.
- How users can get copies of your application anytime in the future as long as they paid for it once.
- The Android branding rules. Make sure you don’t violate any copyright associated with Android, images, or fonts.
- The Developer Console and its features. The Developer Console collects user feedback and error reports from users.
- Preparing your application for production, including testing, LVL and ProGuard to fight piracy, and using resource variations and tags in AndroidManifest.xml to filter which devices your application will be available to.
- Advice regarding localizing your application by language and/or culture.
- The Google Play Store user interface, both on device and on the Internet/Web.
- The fact that Google Play Store is not the only game in town, and that you can sell your application in other places on the Internet, all at the same time.