
Using Google Cloud Messaging with Android
As we approach the end of the book, you will have already developed a good understanding of, and appreciation for, the many communication protocols and architectural options you have available within Android when it comes to dealing with off-device services. In this chapter, we will explore Google’s Cloud Messaging (or GCM) platform and how you can use it as the plumbing for your application’s remote communication and service interaction needs.
What Is Google Cloud Messaging?
GCM is a service offered by Google to enable you to write multiple applications across different platforms that exchange messages in order to further their functionality. The primary examples of the multiple applications are an Android client application exchanging messages with a remote server application.
The actual messages sent, and their purpose, are up to you as a developer. It could be a message from the remote server letting your client application know (a “downstream” message) that a new update to a news feed, music service, or similar subscription is available. Messages from the client to the server (an “upstream” message) could be sending a chat message, picture thumbnail, or other new piece of data your user has captured or generated on the client. These are just examples—you are free to imagine any use, and any payload, for the messages exchanged in GCM.
Understanding the Key Building Blocks of GCM
Having read the introduction to GCM, you are already aware of two of the key components in any complete GCM configuration. The final part to complete the picture is the GCM server (in fact, servers) hosted by Google that perform the message queuing, forwarding, and so forth.
To recap, the three key building blocks for GCM are as follows:
- Client Application—An application you write, such as an Android application, that sends and/or receives messages from a remote server to help with functionality.
- GCM Connection Servers—Google’s messaging infrastructure, which manages all messaging traffic, message queuing in the event of delivery delays, ultimate delivery guarantees, etc.
- Remote Application Server—An application your write as a server, hosted in an Internet-accessible fashion, responsible for sending and/or receiving messages from client applications.
We can also represent this architecture in visual form. Figure 29-1 shows the components and message flow in a complete GCM setup.
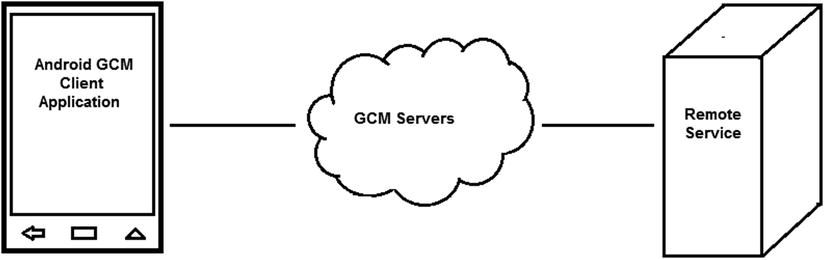
Figure 29-1. GCM architectural overview
Preparing to Use GCM in Your Application
Where previously we have jumped straight into Java code, layout XML, and so forth when constructing example applications, for GCM-based development we need to undertake a few preparatory steps in order to have Google’s servers accept traffic from our client and server.
Creating or Confirming Your GCM Project in Google Developer Console
To use any of Google’s online services and APIs, including GCM, you will need to create an API Project within the Google Developer Console, at cloud.google.com/console. You might already have a project you can reuse, but let’s assume you are creating one for the first time. Navigate to the console URL and click the Create Project button. Follow the prompts for account and billing details, etc., and you should end up with a new project (or confirm an existing one) as shown in Figure 29-2.
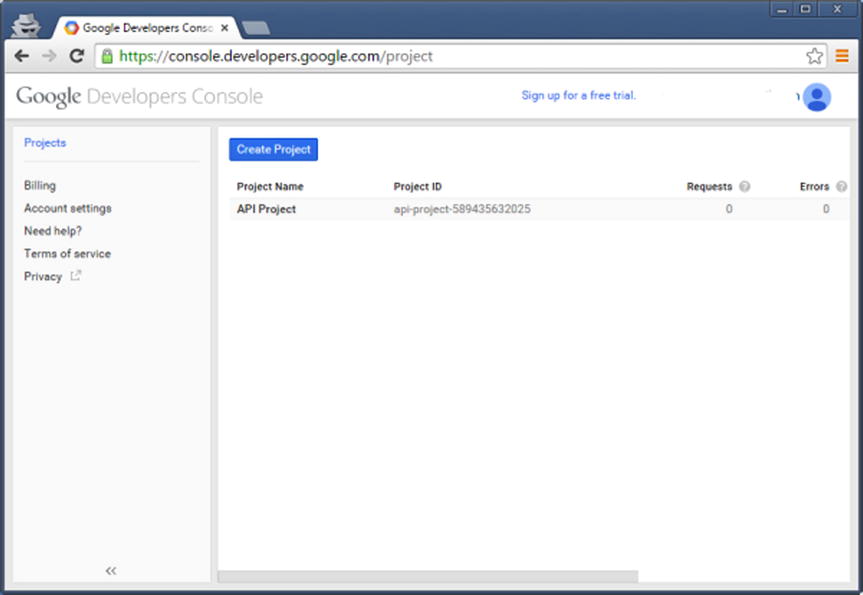
Figure 29-2. Your Google Developer Console with API Project in Place
Activating the GCM APIs for Your Project
With the API Project in place, you now need to activate the specific GCM APIs. Google supports dozens of separate APIs, all of which are disabled by default to ensure you do not accidentally trigger behavior or incur costs you were not expecting. Click on your API Project (in our case, api-project-589435632025) and under the APIs & Auth section on the left side, select APIs and scroll until you see Google Cloud Messaging for Android. Turn this on using the Enable API button. You will know you have successfully enabled the GCM API when the button changes from Enable API to Disable API, as shown in Figure 29-3.
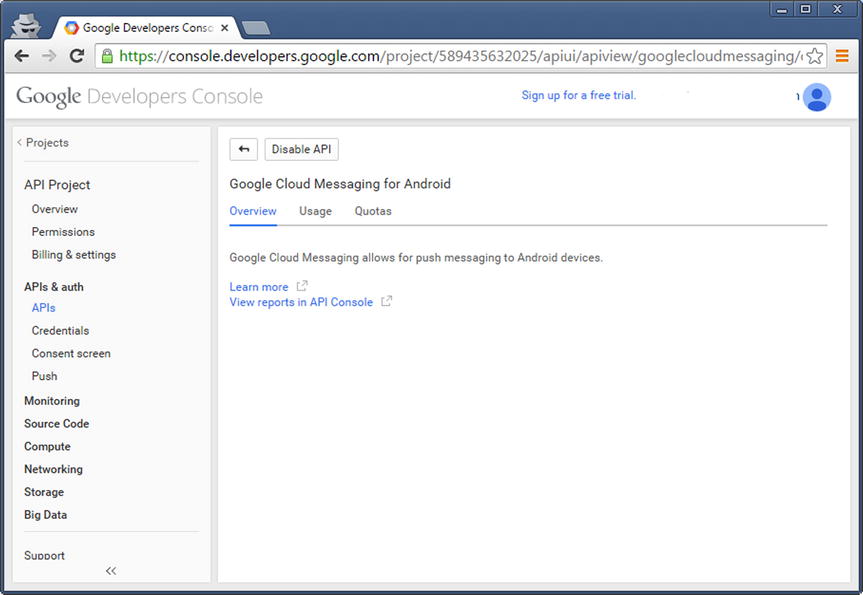
Figure 29-3. Your Google Developer Console API Project with GCM Enabled
Generating Your API Key
As with other Google APIs, access to the GCM API for your project requires your key. This helps ensure everything from traffic separation, so your GCM messages are not inadvertently mixed with those of other applications, through to billing, analytics, and so forth.
To generate your key, choose the Credentials option under APIs & Auth. Choose the Create New Key option, and when prompted for key properties, select Server for the key type. If you know the public IP address of your intended server, you can use that in the configuration section, otherwise you can use 0.0.0.0/0 for testing purposes. Then choose Create to have the key generated. When you are returned to the console, you should see your API key available under the Credentials submenu. Note down the key value as you will need it shortly.
Authenticating GCM Communication
The API key is not the only piece of identifying information used to authenticate and authorize message transfer within a GCM environment. You can find more detail on the uses of GCM tokens and keys on the developer.google.com website. In brief, the following four token types are used in your GCM applications:
- Sender ID The project ID code available from the Google developer console. Your server application will use this as part of the registration process with Google’s GCM servers to enable it to send messages to the Android client application and your users.
- Sender Auth Token Your API key, used in every message sent to the GCM servers to demonstrate the authenticity of the message and its provenance from your server application.
- Application ID For your Android application, this is the fully qualified Java package name, for instance com.androidbook.gcm. Because this is unique across all Android applications, it allows the GCM ecosystem to know which applications receive which types of messages.
- Registration ID Allocated to your client Android application when it registers with the GCM servers for message delivery. The registration ID is sensitive information and should be stored securely and not disclosed.
All of these items in combination allow client and server applications to register with GCM and be identified by it, and also to uniquely identify the applications and their messages.
Building an Android GCM-Enabled Application
Building a meaningful GCM-based Android application and the supporting server-side third-party service is a large undertaking—so large that we could almost write a small book just on that topic. Below we will cover the main configuration and coding points you need to consider when building the application, and you can check the book website for a more in-depth discussion on GCM with full examples.
Coding the Client Component for GCM
The client Android application needs to consider three broad areas. First, have your development environment set up correctly. Second, configure the Android project to include the right dependencies and privileges. Lastly, write the GCM registration methods and message handling methods into your Java code for your activity (or activities).
Configure Project Dependencies for Your Project
Before we can write the actual Java code and any related XML layout for our desired GCM-based application, we need to configure our project to have the necessary APIs available and invoke your IDE’s build tool (e.g., gradle) with the necessary dependencies to ensure a successful build.
Your development environment (Android Studio, Eclipse, etc.) will need to have the Google Play Services SDK installed. Double-check this with the SDK Manager from the IDE or command prompt.
Next, your project will need to be configured to work with the GoogleCloudMessaging API provided by the Google Play Services SDK. As an example, to add this to an Android Studio project, open your project’s build.gradle file and ensure the API is included as a dependency, as shown in Listing 29-1.
For Eclipse users, the equivalent task is to add google-play-services.jar as an external library dependency to your project, from your Google Play Services library collection. Lastly, any GCM application must run on Android 2.2 (with Play Store installed) or later. Update your manifest’s uses-sdk element to set android:minSdkVersion to at least 8.
Setting Manifest Properties for GCM
Over and above the minimum SDK version required for GCM, your application will require specific permissions in order to do the following:
- Register with GCM servers to receive messages, using com.google.android.c2dm.permission.RECEIVE permission.
- Use the device’s internet connection to send messages, using android.permission.INTERNET permission.
- Exclusively reserve messages intended for the application and prevent other applications registering for them. This uses the custom C2D_MESSAGE permission block with the application name prepended.
- GCM-specific permissions for the receiver you will also define, so that the GCM servers are allowed to send messages to your application. This uses the com.google.android.c2dm.permission.RECEIVE setting.
Note The earlier incarnation of GCM was known as C2DM, or Cloud to Device Messaging. Thus the references to the earlier name of C2DM and C2D.
The receiver you define should declare its intent-filter to act on com.google.android.c2dm.intent.RECEIVE and use the applicationPackage name as its category.
It can often be better to peruse a snippet of an example AndroidManifest.xml file to see all of these settings in place. Listing 29-2 shows example settings from the four key permissions your GCM application will require.
Coding Your Main Activity to Register for GCM
Before your application can receive messages from GCM servers (and your server-side application that sends them), and before it can send messages of its own back through GCM, your application must register with the GCM servers. This is so the GCM infrastructure knows how to route your messages, prevent traffic mix-ups, and so on. Listing 29-3 shows an example activity fragment that initiates registration in the onCreate() override. This example code is modeled on the github example GCM project Google makes available at developer.android.com.
This is a greatly simplified example so you can focus on the absolutely mandatory components and build from there. Our onCreate() method first instantiates a gcm object and a SharedPreferences object. It then retrieves the registration_id from the preferences. At this point your application may not be registered, which would mean the returned value from the preferences would be empty. We test for this empty value, and where an empty registration_id is detected we initiate our registration process by invoking the private method registerAppInBackground().
The implementation of registerAppInBackground() follows Google’s recommendation of performing the first-time registration asynchronously. We do this because we don’t want to block the main thread while we wait for the handshake and registration process to complete. The process could potentially take several seconds or more. You could enhance the application here by adding a range of intermediate status updates, error checking, and more.
Once we have an application that’s registered, we can carry out message exchange, and then all the other logic you might want your application to have, based on or driven by the messaging aspect. Listing 29-4 shows an example method to send a message based on a Bundle object constructed to hold your message details.
The logic of the sendMessage() method is entirely concerned with sending whatever it is you have constructed in the messagePayload parameter. This Bundle object is left to your imagination, but it could be the instant message, photo, voice message, or other content that your application is actually helping the user with.
We once again use AsyncTask to ensure we don’t block on message delivery. This is a universal design pattern when working with any kind of message bus or message delivery service. Within the asynchronous logic, we generate a unique message identifier with the messageID.incrementAndGet() method and then invoke the gcm.send() method, passing it the unique ID and our message payload.
Error trapping and retry logic are easy to add at this point. If you are going to assume any higher value to the message ID (which is normally not recommended), it is best to place the retry logic within the sendMessage() method so as to be able to reuse the message ID generated before it falls out of scope on method return.
Coding the Server Component for GCM
Your third-party service can be written in basically any language, so long as it can make calls to the GCM cloud endpoints and support the authorization message protocols we have described in the earlier sections of this chapter.
Because such services are not strictly Android products or code, we will save some precious pages from the book and point you to excellent examples that Google provides to give you inspiration into writing the back-end services.
You can review the options and approaches for this non-Android third-party service at developer.android.com/google/gcm/server.html.
Moving Beyond the GCM Introduction
Such a short chapter cannot cover the enormous breadth of possibilities and nuances for GCM-based applications. For more details on what is possible, check out the Android Stack Exhange site, android.stackechange.com, and the developer.android.com site.