
Understanding the Media Frameworks
Now we are going to explore a very interesting part of the Android SDK: the media frameworks. We will show you how to play audio and video from a variety of sources. We’ll also cover in the online companion section how to take photos with the camera and record audio and video.
Using the Media APIs
Android supports playing audio and video content under the android.media package. In this chapter, we are going to explore the media APIs from this package.
At the heart of the android.media package is the android.media.MediaPlayer class. The MediaPlayer class is responsible for playing both audio and video content. The content for this class can come from the following sources:
- Web: You can play content from the Web via a URL.
- .apk file: You can play content that is packaged as part of your .apk file. You can package the media content as a resource or as an asset (within the assets folder).
- The Storage Access Framework, new to Android KitKat 4.4, which provides access to media files stored across a range of providers and internet services.
- SD card: You can play content that resides on the device’s SD card or emulated local storage.
The MediaPlayer is capable of decoding quite a few different content formats, including 3rd Generation Partnership Project (3GPP, .3gp), MP3 (.mp3), MIDI (.mid and others), Ogg Vorbis (.ogg), PCM/WAVE (.wav), and MPEG-4 (.mp4). RTSP, HTTP/HTTPS live streaming, and M3U playlists are also supported, although playlists that include URLs are not, at least as of this writing. For a complete list of supported media formats, go to http://developer.android.com/guide/appendix/media-formats.html.
Whither SD Cards?
Before we dive in to the heart of the media frameworks, we should quickly address the topic of removable storage, and SD Cards in particular. Recent trends in Android devices have seen some manufacturers drop them from devices, while others continue to include them. Google itself has blurred the lines of what is and isn’t removal storage by obfuscating the low-level file systems in Android.
Regardless of your personal preference as a developer, some of your users will likely still have devices that support SD Cards and want to use them. Many of the examples we’ll cover here are equally applicable to sourcing media files from SD Cards. However, to save space, and spare you unneeded repetition, we’ve placed some extra examples that go into SD Card details and supporting material on the book’s website. Be sure to check it out at www.androidbook.com.
Playing Media
To get started, we’ll show you how to build a simple application that plays an MP3 file located on the Web (see Figure 20-1). After that, we will talk about using the setDataSource() method of the MediaPlayer class to play content from the .apk file. MediaPlayer isn’t the only way to play audio, though, so we’ll also cover the SoundPool class, as well as JetPlayer, AsyncPlayer, and, for the lowest level of working with audio, the AudioTrack class. After that, we will discuss some of the shortfalls of the MediaPlayer class. Finally, we’ll see how to play video content.
Figure 20-1 shows the user interface for our first example. This application will demonstrate some of the fundamental uses of the MediaPlayer class, such as starting, pausing, restarting, and stopping the media file. Look at the layout for the application’s user interface.
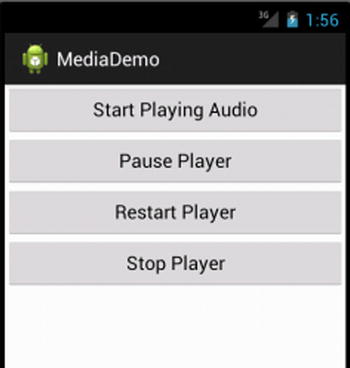
Figure 20-1. The user interface for the media application
The user interface consists of a RelativeLayout with four buttons: one to start the player, one to pause the player, one to restart the player, and one to stop the player. We could have made this easy and just coupled our example with a MediaController widget that does the same thing, but we want to show you the inner workings of controlling things yourself. The code and layout file for the application are shown in Listing 20-1. We’re going to assume you’re building against Android 2.2 or later for this example, because we’re using the getExternalStoragePublicDirectory() method of the Environment class. If you want to build this against an older version of Android, simply use getExternalStorageDirectory() instead and adjust where you put the media files so your application will find them.
Note See the “References” section at the end of this chapter for the URL from which you can import these projects into Eclipse directly, instead of copying and pasting code.
Listing 20-1. The Layout and Code for the Media Application
<RelativeLayout xmlns:android="http://schemas.android.com/apk/res/android"
    xmlns:tools="http://schemas.android.com/tools"
    android:layout_width="match_parent"
    android:layout_height="match_parent"
    tools:context=".MainActivity"
    android:orientation="vertical" >

  <Button android:id="@+id/startPlayerBtn"
    android:layout_width="match_parent"
    android:layout_height="wrap_content"
    android:text="Start Playing Audio"
    android:onClick="doClick" />

  <Button android:id="@+id/pausePlayerBtn"
    android:layout_width="match_parent"
    android:layout_height="wrap_content"
    android:text="Pause Player"
    android:layout_below="@+id/startPlayerBtn"
    android:onClick="doClick" />

  <Button android:id="@+id/restartPlayerBtn"
    android:layout_width="match_parent"
    android:layout_height="wrap_content"
    android:text="Restart Player"
    android:layout_below="@+id/pausePlayerBtn"
    android:onClick="doClick" />

  <Button android:id="@+id/stopPlayerBtn"
    android:layout_width="match_parent"
    android:layout_height="wrap_content"
    android:text="Stop Player"
    android:layout_below="@+id/restartPlayerBtn"
    android:onClick="doClick" />

</RelativeLayout>

// This file is MainActivity.java
import android.app.Activity;
import android.content.res.AssetFileDescriptor;
import android.media.AudioManager;
import android.media.MediaPlayer;
import android.media.MediaPlayer.OnPreparedListener;
import android.os.Bundle;
import android.os.Environment;
import android.util.Log;
import android.view.View;

public class MainActivity extends Activity implements OnPreparedListener
{
    static final String AUDIO_PATH =
     "http://www.androidbook.com/akc/filestorage/android/documentfiles/3389/play.mp3";

    private MediaPlayer mediaPlayer;
    private int playbackPosition=0;

    /** Called when the activity is first created. */
    @Override
    public void onCreate(Bundle savedInstanceState) {
        super.onCreate(savedInstanceState);
        setContentView(R.layout.main);
    }

    public void doClick(View view) {
        switch(view.getId()) {
        case R.id.startPlayerBtn:
            try {
            // Only have one of these play methods uncommented
                playAudio(AUDIO_PATH);
//              playLocalAudio();
//              playLocalAudio_UsingDescriptor();
            } catch (Exception e) {
                e.printStackTrace();
            }
            break;
        case R.id.pausePlayerBtn:
            if(mediaPlayer != null && mediaPlayer.isPlaying()) {
                playbackPosition = mediaPlayer.getCurrentPosition();
                mediaPlayer.pause();
            }
            break;
        case R.id.restartPlayerBtn:
            if(mediaPlayer != null && !mediaPlayer.isPlaying()) {
                mediaPlayer.seekTo(playbackPosition);
                mediaPlayer.start();
            }
            break;
        case R.id.stopPlayerBtn:
            if(mediaPlayer != null) {
                mediaPlayer.stop();
                playbackPosition = 0;
            }
            break;
        }
    }

    private void playAudio(String url) throws Exception
    {
        killMediaPlayer();

        mediaPlayer = new MediaPlayer();
        mediaPlayer.setAudioStreamType(AudioManager.STREAM_MUSIC);
        mediaPlayer.setDataSource(url);
        mediaPlayer.setOnPreparedListener(this);
        mediaPlayer.prepareAsync();
    }

    private void playLocalAudio() throws Exception
    {
        mediaPlayer = MediaPlayer.create(this, R.raw.music_file);
        mediaPlayer.setAudioStreamType(AudioManager.STREAM_MUSIC);
        // calling prepare() is not required in this case
        mediaPlayer.start();
    }

    private void playLocalAudio_UsingDescriptor() throws Exception {

        AssetFileDescriptor fileDesc = getResources().openRawResourceFd(
                    R.raw.music_file);
        if (fileDesc != null) {

            mediaPlayer = new MediaPlayer();
            mediaPlayer.setAudioStreamType(AudioManager.STREAM_MUSIC);
            mediaPlayer.setDataSource(fileDesc.getFileDescriptor(),
                    fileDesc.getStartOffset(), fileDesc.getLength());

            fileDesc.close();

            mediaPlayer.prepare();
            mediaPlayer.start();
        }
    }

    // This is called when the MediaPlayer is ready to start
    public void onPrepared(MediaPlayer mp) {
        mp.start();
    }

    @Override
    protected void onDestroy() {
        super.onDestroy();
        killMediaPlayer();
    }

    private void killMediaPlayer() {
        if(mediaPlayer!=null) {
            try {
                mediaPlayer.release();
            }
            catch(Exception e) {
                e.printStackTrace();
            }
        }
    }
}
In this first scenario, you are playing an MP3 file from a web address. Therefore, you will need to add android.permission.INTERNET to your manifest file. Listing 20-1 shows that the MainActivity class contains three members: a final string that points to the URL of the MP3 file, a MediaPlayer instance, and an integer member called playbackPosition. Our onCreate() method just sets up the user interface from our layout XML file. In the button-click handler, when the Start Playing Audio button is pressed, the playAudio() method is called. In the playAudio() method, a new instance of the MediaPlayer is created, and the data source of the player is set to the URL of the MP3 file.
The prepareAsync() method of the player is then called to prepare the MediaPlayer for playback. We’re in the main UI thread of our activity, so we don’t want to take too long to prepare the MediaPlayer. There is a prepare() method on MediaPlayer, but it blocks until the prepare is complete. If this takes a long time, or if the server takes a while to respond, the user could think the application is stuck or, worse, get an error message. Things like progress dialogs can help your user understand what is happening. The prepareAsync() method returns immediately but sets up a background thread to handle the prepare() method of the MediaPlayer. When the preparation is complete, our activity’s onPrepared() callback is called. This is where we ultimately start the MediaPlayer playing. We have to tell the MediaPlayer who the listener is for the onPrepared() callback, which is why we call setOnPreparedListener() just before the call to prepareAsync(). You don’t have to use the current activity as the listener; we do here because it’s simpler for this demonstration.
Now look at the code for the Pause Player and Restart Player buttons. You can see that when the Pause Player button is selected, you get the current position of the player by calling getCurrentPosition(). You then pause the player by calling pause(). When the player has to be restarted, you call seekTo(), passing in the position obtained earlier from getCurrentPosition(), and then call start().
The MediaPlayer class also contains a stop() method. Note that if you stop the player by calling stop(), you need to prepare the MediaPlayer again before calling start() again. Conversely, if you call pause(), you can call start() again without having to prepare the player. Also, be sure to call the release() method of the media player once you are done using it. In this example, you do this as part of the killMediaPlayer() method.
There is a second URL in the sample application source code for an audio source, but it is not an MP3 file, it’s a streaming audio feed (Radio-Mozart). This also works with the MediaPlayer and shows again why you need to call prepareAsync() instead of prepare(). Preparing an audio stream for playback can take a while, depending on the server, network traffic, and so on.
Listing 20-1 shows you how to play an audio file located on the Web. The MediaPlayer class also supports playing media local to your .apk file. Listing 20-2 shows how to reference and play back a file from the /res/raw folder of your .apk file. Go ahead and add the raw folder under /res if it’s not already there in the Eclipse project. Then, copy the MP3 file of your choice into /res/raw with the file name music_file.mp3. Note also the comment in the original code to uncomment the desired call to playLocalAudio(), and commenting out playAudio().
If you need to include an audio or video file with your application, you should place the file in the /res/raw folder. You can then get a MediaPlayer instance for the resource by passing in the resource ID of the media file. You do this by calling the static create() method, as shown in Listing 20-2. Note that the MediaPlayer class provides a few other static create() methods that you can use to get a MediaPlayer rather than instantiating one yourself. In Listing 20-2, the create() method is equivalent to calling the constructor MediaPlayer(Context context,int resourceId) followed by a call to prepare(). You should use the create() method only when the media source is local to the device, because it always uses prepare() and not prepareAsync().
Understanding the setDataSource Method
In Listing 20-2, we called the create() method to load the audio file from a raw resource. With this approach, you don’t need to call setDataSource(). Alternatively, if you instantiate the MediaPlayer yourself using the default constructor, or if your media content is not accessible through a resource ID or a URI, you’ll need to call setDataSource().
The setDataSource() method has overloaded versions that you can use to customize the data source for your specific needs. For example, Listing 20-3 shows how you can load an audio file from a raw resource using a FileDescriptor.
Listing 20-3 assumes that it’s within the context of an activity. As shown, you call the getResources() method to get the application’s resources and then use the openRawResourceFd() method to get a file descriptor for an audio file within the /res/raw folder. You then call the setDataSource() method using the AssetFileDescriptor, the starting position to begin playback, and the ending position. You can also use this version of setDataSource() if you want to play back a specific portion of an audio file. If you always want to play the entire file, you can call the simpler version of setDataSource(FileDescriptor desc), which does not require the initial offset and length.
In this case, we chose to use prepare() followed by start(), only to show you what it might look like. We should be able to get away with it because the audio resource is local, but it won’t hurt to use prepareAsync() as before.
We have one more source for audio content to talk about: the SD card. Refer to the online companion chapter for the basics on dealing with the SD card and its file system contents. In our example, we used setDataSource() to access content on the Internet by passing in a URL for an MP3 file. If you’ve got an audio file on your SD card, you can use the same setDataSource() method but instead pass it the path to your audio file on the SD card. For example, a file called music_file.mp3 in the Music directory can be played with the AUDIO_PATH variable set like so:
static final String AUDIO_PATH =
Environment.getExternalStoragePublicDirectory(
    Environment.DIRECTORY_MUSIC) +
    "/music_file.mp3";
You may have noticed that we did not implement onResume() and onPause() in our example. This means that when our activity goes into the background, it continues to play audio—at least, until the activity is killed, or until access to the audio source is turned off. For example, if we do not hold a wake lock, the CPU could be shut down, thus ending the playing of music. Many people choose to manage media playback in a service to aid in working around these issues. In our current example, additional issues include if MediaPlayer is playing an audio stream over Wi-Fi, and if our activity does not obtain a lock on Wi-Fi, Wi-Fi could be turned off, and we’ll lose our connection to the stream. MediaPlayer has a method called setWakeMode() that allows us to set a PARTIAL_WAKE_LOCK to keep the CPU alive while playing. However, in order to lock Wi-Fi, we need to do that separately through WifiManager and WifiManager.WifiLock.
The other aspect of continuing to play audio in the background is that we need to know when not to do so, perhaps because there’s an incoming phone call, or because an alarm is going off. Android has an AudioManager to help with this. The methods to call include requestAudioFocus() and abandonAudioFocus(), and there’s a callback method called onAudioFocusChange() in the interface AudioManager.OnAudioFocusChangeListener. For more information, see the Media page in the Android Developer’s Guide.
Using SoundPool for Simultaneous Track Playing
The MediaPlayer is an essential tool in our media toolbox, but it only handles one audio or video file at a time. What if we want to play more than one audio track simultaneously? One way is to create multiple MediaPlayers and work with them at the same time. If you only have a small amount of audio to play, and you want snappy performance, Android has the SoundPool class to help you. Behind the scenes, SoundPool uses MediaPlayer, but we don’t get access to the MediaPlayer API, just the SoundPool API.
One of the other differences between MediaPlayer and SoundPool is that SoundPool is designed to work with local media files only. That is, you can load audio from resource files, files elsewhere using file descriptors, or files using a pathname. There are several other nice features that SoundPool provides, such as the ability to loop an audio track, pause and resume individual audio tracks, or pause and resume all audio tracks.
There are some downsides to SoundPool, though. There is an overall audio buffer size in memory for all the tracks that SoundPool will manage of only 1MB. This might seem large when you look at MP3 files that are only a few kilobytes in size. But SoundPool expands the audio in memory to make the playback fast and easy. The size of an audio file in memory depends on the bit rate, number of channels (stereo versus mono), sample rate, and length of the audio. If you have trouble getting your sounds loaded into SoundPool, you could try playing with these parameters of your source audio file to make the audio smaller in memory.
Our example application will load and play animal sounds. One of the sounds is of crickets and it plays constantly in the background. The other sounds play at different intervals of time. Sometimes all you hear are crickets; other times you will hear several animals all at the same time. We’ll also put a button in the user interface to allow for pausing and resuming. Listing 20-4 shows our layout XML file and the Java code of our activity. Your best bet is to download this from our web site, in order to get the sound files as well as the code. See the “References” section at the end of this chapter for information on how to locate the downloadable source code.
The structure of this example is fairly straightforward. We have a user interface with a single ToggleButton on it. We’ll use this to pause and resume the active audio streams. When our app starts, we create our SoundPool and load it up with audio samples. When the samples are properly loaded, we start playing them. The crickets sound plays in a neverending loop; the other samples play after a delay and then set themselves up to play again after the same delay. By choosing different delays, we get a somewhat random effect of sounds on top of sounds.
Creating a SoundPool requires three parameters:
- The first is the maximum number of samples that the SoundPool will play simultaneously. This is not how many samples the SoundPool can hold.
- The second parameter is which audio stream the samples will play on. The typical value is AudioManager.STREAM_MUSIC, but SoundPool can be used for alarms or ringtones. See the AudioManager reference page for the complete list of audio streams.
- The SRC_QUALITY value should just be set to 0 when creating the SoundPool.
The code demonstrates several different load() methods of SoundPool. The most basic is to load an audio file from /res/raw as a resource. We use this method for the first four audio files. Then we show how you could load an audio file from the /assets directory of the application. This load() method also takes parameters that specify the offset and the length of the audio to load. This would allow us to use a single file with multiple audio samples in it, pulling out just what we want to use. Finally, we show in comments how you might access an audio file from the SD card. Up through Android 4.0, the PRIORITY parameter should just be 1.
For our example, we chose to use some of the features introduced in Android 2.2, specifically the onLoadCompleteListener interface for our activity, and the autoPause() and autoResume() methods in our button callback.
When loading sound samples into a SoundPool, we must wait until they are properly loaded before we can start playing them. Within our onLoadComplete() callback, we check the status of the load, and, depending on which sound it is, we then set it up to play. If the sound is the crickets, we play with looping turned on (a value of -1 for the fifth parameter). For the others, we queue the sound up to play after a short period of time. The time values are in milliseconds. Note the setting of the volume. Android provides the AudioManager to let us know the current volume setting. We also get the maximum volume setting from AudioManager so we can calculate a volume value for play() that is between 0 and 1 (as a float). The play() method actually takes a separate volume value for the left and right channels, but we just set both to the current volume. Again, PRIORITY should just be set to 1. The last parameter on the play() method is for setting the playback rate. This value should be between 0.5 and 2.0, with 1.0 being normal.
Our queueSound() method uses a Handler to basically set up an event into the future. Our Runnable will run after the delay period has elapsed. We check to be sure we still have a SoundPool to play from, then we play the sound once and schedule the same sound to play again after the same interval as before. Because we call queueSound() with different sound IDs and different delays, the effect is a somewhat random playing of animal sounds.
When you run this example, you’ll hear crickets, a chimp, a rooster, a dog, and a roar (a bear, we think). The crickets are constantly chirping while the other animals come and go. One nice thing about SoundPool is that it lets us play multiple sounds at the same time with no real work on our part. Also, we’re not taxing the device too badly, because the sounds were decoded at load time, and we simply need to feed the sound bits to the hardware.
If you click the button, the crickets will stop, as will any other animal sound currently being played. However, the autoPause() method does not prevent new sounds from being played. You’ll hear the animal sounds again within seconds (except for the crickets). Because we’ve been queuing up sounds into the future, we will still hear those sounds. In fact, SoundPool does not have a way to stop all sounds now and in the future. You’ll need to handle stopping on your own. The crickets will only come back if we click the button again to resume the sounds. But even then, we might have lost the crickets because SoundPool will throw out the oldest sound to make room for newer sounds if the maximum number of simultaneously playing samples is reached.
Playing Sounds with JetPlayer
SoundPool is not too bad a player, but the memory limitations can make it difficult to get the job done. An alternative when you need to play simultaneous sounds is JetPlayer. Tailored for games, JetPlayer is a very flexible tool for playing lots of sounds and for coordinating those sounds with user actions. The sounds are defined using Musical Instrument Digital Interface (MIDI).
JetPlayer sounds are created using a special JETCreator tool. This tool is provided under the Android SDK tools directory, although you’ll also need to install Python in order to use it, and it is limited to the Mac OSX and Windows SDK packages. The resulting JET file can be read into your application, and the sounds set up for playback. The whole process is somewhat involved and beyond the scope of this book, so we’ll just point you to more information in the “References” section at the end of this chapter.
Playing Background Sounds with AsyncPlayer
If all you want is some audio played, and you don’t want to tie up the current thread, the AsyncPlayer may be what you’re looking for. The audio source is passed as a URI to this class, so the audio file could be local or remote over the network. This class automatically creates a background thread to handle getting the audio and starting the playback. Because it is asynchronous, you won’t know exactly when the audio will start. Nor will you know when it ends, or even if it’s still playing. You can, however, call stop() to get the audio to stop playing. If you call play() again before the previous audio has finished playing, the previous audio will immediately stop and the new audio will begin at some time in the future when everything has been set up and fetched. This is a very simple class that provides an automatic background thread. Listing 20-5 shows how your code should look to implement this.
Low-Level Audio Playback Using AudioTrack
So far, we’ve been dealing with audio from files, be they local files or remote files. If you want to get down to a lower level, perhaps playing audio from a stream, you need to investigate the AudioTrack class. Besides the usual methods like play() and pause(), AudioTrack provides methods for writing bytes to the audio hardware. This class gives you the most control over audio playback, but it is much more complicated than the audio classes discussed so far in this chapter. One of our online companion sample applications uses the AudioRecord class. The AudioRecord class is very much like the AudioTrack class, so to get a better understanding of the AudioTrack class, refer to the AudioRecord sample later on.
More About MediaPlayer
In general, the MediaPlayer is very systematic, so you need to call operations in a specific order to initialize a MediaPlayer properly and prepare it for playback. The following list summarizes some of the other details you should know for using the media APIs:
- Once you set the data source of a MediaPlayer, you cannot easily change it to another one—you’ll have to create a new MediaPlayer or call the reset() method to reinitialize the state of the player.
- After you call prepare(), you can call getCurrentPosition(), getDuration(), and isPlaying() to get the current state of the player. You can also call the setLooping() and setVolume() methods after the call to prepare(). If you used prepareAsync(), you should wait until onPrepared() is called before using any of these other methods.
- After you call start(), you can call pause(), stop(), and seekTo().
- Every MediaPlayer you create uses a lot of resources, so be sure to call the release() method when you are done with the media player. The VideoView takes care of this in the case of video playback, but you’ll have to do it manually if you decide to use MediaPlayer instead of VideoView. More about VideoView in the next sections.
- MediaPlayer works with several listeners you can use for additional control over the user experience, including OnCompletionListener, OnErrorListener, and OnInfoListener. For example, if you’re managing a playlist of audio, OnCompletionListener will be called when a piece is finished so you can queue up the next piece.
This concludes our discussion about playing audio content. Now we’ll turn our attention to playing video. As you will see, referencing video content is similar to referencing audio content.
In this section, we are going to discuss video playback using the Android SDK. Specifically, we will discuss playing a video from a web server and playing one from an SD card. As you can imagine, video playback is a bit more involved than audio playback. Fortunately, the Android SDK provides some additional abstractions that do most of the heavy lifting.
Note Playing back video in the emulator is not very reliable. If it works, great. But if it doesn’t, try running on a device instead. Because the emulator must use only software to run video, it can have a very hard time keeping up with video, and you will likely get unexpected results.
Playing video requires more effort than playing audio, because there’s a visual component to take care of in addition to the audio. To take some of the pain away, Android provides a specialized view control called android.widget.VideoView that encapsulates creating and initializing the MediaPlayer. To play video, you create a VideoView widget in your user interface. You then set the path or URI of the video and fire the start() method. Listing 20-6 demonstrates video playback in Android.
Listing 20-6 demonstrates video playback of a file located on the Web at www.androidbook.com/akc/filestorage/android/documentfiles/3389/movie.mp4, which means the application running the code will need to request the android.permission.INTERNET permission. All of the playback functionality is hidden behind the VideoView class. In fact, all you have to do is feed the video content to the video player. The user interface of the application is shown in Figure 20-2.
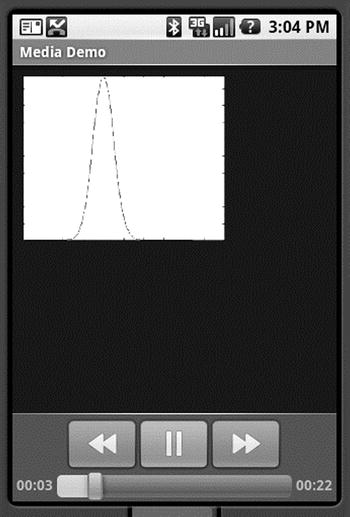
Figure 20-2. The video playback UI with media controls enabled
When this application runs, you will see the button controls along the bottom of the screen for about three seconds, and then they disappear. You get them back by clicking anywhere within the video frame. When we were doing playback of audio content, we needed to display the button controls only to start, pause, and restart the audio. We did not need a view component for the audio itself. With video, of course, we need button controls as well as something to view the video in. For this example, we’re using a VideoView component to display the video content. But instead of creating our own button controls (which we could still do if we chose to), we create a MediaController that provides the buttons for us. As shown in Figure 20-2 and Listing 20-6, you set the VideoView’s media controller by calling setMediaController() to enable the play, pause, and seek-to controls. If you want to manipulate the video programmatically with your own buttons, you can call the start(), pause(), stopPlayback(), and seekTo() methods.
Keep in mind that we’re still using a MediaPlayer in this example—we just don’t see it. You can in fact “play” videos directly in MediaPlayer. If you go back to the example from Listing 20-1, put a movie file on your SD card, and plug in the movie’s file path in AUDIO_PATH, you will find that it plays the audio quite nicely even though you can’t see the video.
Whereas MediaPlayer has a setDataSource() method, VideoView does not. VideoView instead uses the setVideoPath() or setVideoURI() methods. Assuming you put a movie file onto your SD card, you change the code from Listing 20-6 to comment out the setVideoURI() call and uncomment the setVideoPath() call, adjusting the path to the movie file as necessary. When you run the application again, you will now hear and see the video in the VideoView. Technically, we could have called setVideoURI() with the following to get the same effect as setVideoPath():
videoView.setVideoURI(Uri.parse("file://" +
    Environment.getExternalStoragePublicDirectory(
    Environment.DIRECTORY_MOVIES) + "/movie.mp4"));
You might have noticed that VideoView does not have a method to read data from a file descriptor as MediaPlayer did. You may also have noticed that MediaPlayer has a couple of methods for adding a SurfaceHolder to a MediaPlayer (a SurfaceHolder is like a view port for images or video). One of the MediaPlayer methods is create(Context context, Uri uri, SurfaceHolder holder), and the other is setDisplay(SurfaceHolder holder).
Bonus Online Chapter on Recording and Advanced Media
Now that you have mastered many of the aspects of media playback, including the variety of methods to build your own audio and video capabilities into your application, there are a few more areas to explore on the topic that are almost a book’s worth of content in their own right. So we have put them together into another bonus online chapter that explores the following:
- Audio recording with MediaRecorder, AudioRecord, and other techniques
- Video recording from the ground up
- Camera and camcorder profiles for video recording
- Using intents and the MediaStore class to have other applications do all your recording for you!
Take a look at the online material for the Audio and Video Recording bonus chapter.
References
Here are some helpful references to topics you may wish to explore further:
- www.androidbook.com/proandroid5/projects: A list of downloadable projects related to this book. For the projects in this chapter, look for a zip file called ProAndroid5_Ch20_Media.zip. This zip file contains all the projects from this chapter, listed in separate root directories. There is also a README.TXT file that describes exactly how to import projects into Eclipse from one of these zip files.
- http://developer.android.com/guide/topics/media/jet/jetcreator_manual.html: The user manual for the JETCreator tool. You can use this to create a JET sound file to be played using the JetPlayer. JETCreator is only available for Windows and Mac OS. To see JetPlayer in action, load the JetBoy sample project from the Android SDK into Eclipse, build it, and run it. Note that the Fire button is the center directional pad key.
Summary
Here is a summary the topics covered in this media chapter on audio and video:
- Playing audio through a MediaPlayer
- Several ways to source audio for MediaPlayer, from local application resources, to files, to streaming over the network
- Steps to take with a MediaPlayer to get the audio to come out properly
- SoundPool and its ability to play several sounds simultaneously
- SoundPool’s limitations in terms of the amount of audio it can handle
- AsyncPlayer, which is useful because sounds generally need to be managed in the background
- AudioTrack, which provides low-level access to audioPlaying video using VideoView