
Exploring Packages, Processes, Threads, and Handlers
In the book thus far, we have focused on the essentials of how to program for the Android platform. In this chapter we want to go under the hood a bit to address the process and threading model for Android programs. This discussion will lead us to signing packages, sharing data between packages, using compile-time libraries, the nature of Android components and how they use threads, and finally the need for handlers and how one can code handlers.
As you go through this chapter, keep in mind that the word “package” is overloaded. Sometimes it refers to the Java language package, and sometimes it refers to the APK files that Android applications are deployed as.
Understanding Packages and Processes
We will start with Android packages and the process model. When you develop an application in Android, you end up with an .apk file. You sign this .apk file and deploy it to the device. Each.apk file is uniquely identified by a unique java-language-style package name, as shown in the manifest file shown in Listing 13-1.
Listing 13-1. Providing a Package Name in the Manifest File
<manifest xmlns:android="http://schemas.android.com/apk/res/android"
      package="com.androidbook.testapp"
      ...>
      ...rest of the xml nodes
</manifest>
If you were the developer of this package, no one other than you could update this application once it is deployed. The Android application package name is reserved for you. This tie-up happens when you sign and register your app with various app publishers. So choose this Android application package name very similar to the way that Java packages are named. This needs to be unique in the world. Once you publish the app, you cannot change this package name, as this defines your application’s identity.
Android uses the package name as the name of the process that runs the components of this package. Android also allocates a unique user ID for this process to run under. This user ID is essentially the user ID for the underlying Linux OS. As this user ID is determined at the time of the install on a particular device, it will be different on each device where your app is installed. You can discover this information by looking at the details of the installed package through the developer tools in the Android Emulator. For example, a package detail screen for the installed browser application looks like Figure 13-1. (Please note that this image or tool where you look this up may vary from release to release. The image in Figure 13-1 is taken from the developer tools application on the Android Emulator.)
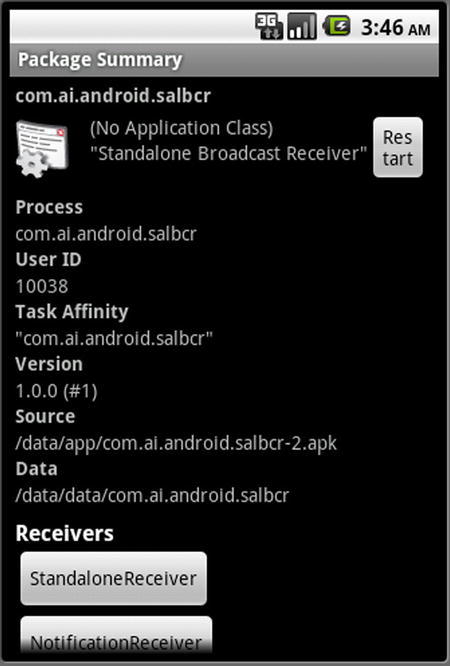
Figure 13-1. Android package details
Figure 13-1 shows the name of the process as indicated by the Java package name in the manifest file and the unique user ID allocated to this package. Any resources created by this process or package will be secured under that Linux user ID. This screen also lists the components inside this package. Examples of components are activities, services, and broadcast receivers. Do note that this image may vary depending on the Android release. Through the settings of the device or the emulator, you can also uninstall the package so that it can be removed.
Because a process is tied to a package name, and a package name is tied to its signature, signatures play a role in securing the data belonging to a package. A package is typically signed with a self-signed PKI (Public Key Infrastructure) certificate. A certificate identifies who the author of the package is. These certificates need not be issued by a certificate authority. This means the information in the certificate is not approved or validated by any authority. This means one can create a certificate that says that their name is Google. The only assurance is that this package name is reserved to that user if no one had claimed it in the marketplace before, and any subsequent updates to that package are given only to that user (identified by that certificate).
All assets that are installed or created through this package belong to the user whose ID is assigned to the package. If your intention is to allow a set of cooperating applications that depend on a common set of data, you have an option to explicitly specify a user ID that is unique to you and common for your needs. This shared user ID is also defined in the manifest file, similar to the definition of a package name. Listing 13-2 shows an example.
Listing 13-2. Shared User ID Declaration
<manifest xmlns:android="http://schemas.android.com/apk/res/android"
      package="com.androidbook.somepackage"
      sharedUserId="com.androidbook.mysharedusrid"
      ...
>
...the rest of the xml nodes
</manifest>
Multiple applications can specify the same shared user ID if they share the same signature (signed with the same PKI certificate). Having a shared user ID allows multiple applications to share data and even run in the same process. To avoid the duplication of a shared user ID, use a convention similar to naming a Java class. Here are some examples of shared user IDs found in the Android system:
"android.uid.system"
"android.uid.phone"
Note A shared ID must be specified as a raw string and not a string resource.
As a note of caution, if you are planning to use shared user IDs, the recommendation is to use them from the start. Otherwise, they don’t work well when you upgrade your application from a nonshared user ID to one with a shared ID. One of the cited reasons is that Android will not run chown on the old resources because of the user ID change.
A Code Pattern for Sharing Data
This section explores the opportunities when two applications want to share resources and data through the use of a shared user ID. The resources and data of each package are owned and protected by that package’s context during runtime. You need access to the context of the package from which you want to share the resources or data.
You can use the createPackageContext() API on any existing context object (such as your activity) to get a reference to the target context that you want to interact with. Listing 13-3 provides an example.
Listing 13-3. Using the createPackageContext() API
//Use the appropriate try/catch to detect errors
//Identify package you want to use
String targetPackageName="com.androidbook.samplepackage1";

//Decide on an appropriate context flag
int flag=Context.CONTEXT_RESTRICTED;

//Get the target context through one of your activities
//Need to catch NameNotFoundException
Activity myContext = ......;
Context targetContext =
         myContext.createPackageContext(targetPackageName, flag);

//Use context to resolve file paths
Resources res = targetContext.getResources();
File path = targetContext.getFilesDir();
Notice how we are able to get a reference to the context of a given package name such as com.androidbook.samplepackage1. This targetContext in Listing 13-3 is identical to the context that is passed to the target application when that application is launched. As the name of the method indicates (in its “create” prefix), each call returns a new context object. However, the documentation assures us that this returned context object is designed to be lightweight, meaning it doesn’t consume a lot of memory and is optimized to refer the target package’s resources, assets, and code.
This API is applicable regardless of whether both contexts share a user ID. If you share the user ID, it is well and good. If you don’t share a user ID, the target application would need to declare its resources accessible to outside users.
The CONTEXT_RESTRICTED flag indicates that you are interested in just loading the resources and the assets and not the code. So using this flag allows the system to detect if the layouts contain references to callback code. Example of a callback would be a button in a layout referring to a method that would be called. This callback code exists in the source context. So, you would want the system to throw an exception so that you can detect that condition or ignore that particular XML tag. In essence, you are telling the system that you are using the context in a restricted sense and the target context is free to make suitable assumptions based on that flag. The bottom line appears to be that if you are interested in not using the code from the target context, use this flag.
CONTEXT_INCLUDE_CODE allows you to load Java classes at runtime from the target context into your process and call that code. Documentation indicates that you may receive a security exception if it is not safe to load the code. However, it is not clear under what circumstances the code is considered unsafe. One educated guess is that the target context does not have a shared user ID as that of the source context. You can overcome this restriction by also specifying the CONTEXT_IGNOR_SECURITY along with the CONTEXT_INCLUDE_CODE. These two flags together load the target context code into the source context code all the time, ignoring even if the target context belongs to a different user. Although code is borrowed and runs in the client process, it will not have permissions to the target context data. So, be sure what that code does when let loose on your data. This approach is often used for utility code that can be shared.
Understanding Library Projects
As we talk through sharing code and resources, one question worth asking is, will the idea of a “library” project help? Starting with ADT 0.9.7 Eclipse plug-in, Android supports the idea of library projects. The approach to building libraries has been changing a bit since then, while the central idea remains in all recent releases.
A library project is a collection of Java code and resources that looks like a regular Android project but never ends up in an .apk file by itself. Instead, the code and resources of a library project become part of another project and get compiled into that main project’s .apk file. As libraries are purely a compile-time concept, each development tool may craft this facility differently.
Here are some additional facts about these library projects:
- A library project can have its own package name distinct from the main application.
- A library project can use other JAR files.
- Eclipse ADT will compile the library Java source files into a JAR file that is then compiled with the application project.
- Except for the Java files (which become a jar file), the rest of the files belonging to a library project (such as resources) are kept with the library project. The presence of the library project is required in order to compile the application project that includes that library as a dependency.
- Starting with SDK Tools 15.0, the resource IDs generated for library projects in their respective R.java files are not final. (This is explained later in the chapter.)
- Both the library project and the main project can access the resources from the library project through their respective R.java files. This means the ID names are duplicated and available in both R.java files.
- If you would like to distinguish resource IDs between the two projects (library and main), you can use different resource prefixes, such as lib_ for the library project resources.
- A main project can reference any number of library projects.
- Components, such as an activity, of a library need to be defined in the target main project manifest file. When this is done, the component name from the library package must be fully qualified with the library package name.
- It is not necessary to define the components in a library manifest file, although it may be a good practice to know quickly what components it supports.
- Creating a library project starts with creating a regular Android project and then choosing the Is Library flag in its properties window.
- You can set the dependent library projects for a main project through the project properties screen as well.
- Clearly, being a library project, any number of main projects can include a library project.
- One library project cannot reference another library project as of the releases (Android 4.4, API 19, SDK Tools 19, ADT 22.3), although there seems to be a desire to be able to do so in future releases.
To create a library project, you start by creating a regular Android project. Once the project is set up, right-click the project name and click the properties context menu to show the properties dialog for the library project. This dialog is shown in Figure 13-2. (The available build targets in this figure may vary with your version of the Android SDK.) Simply select Is Library from this dialog to set up this project as a library project.
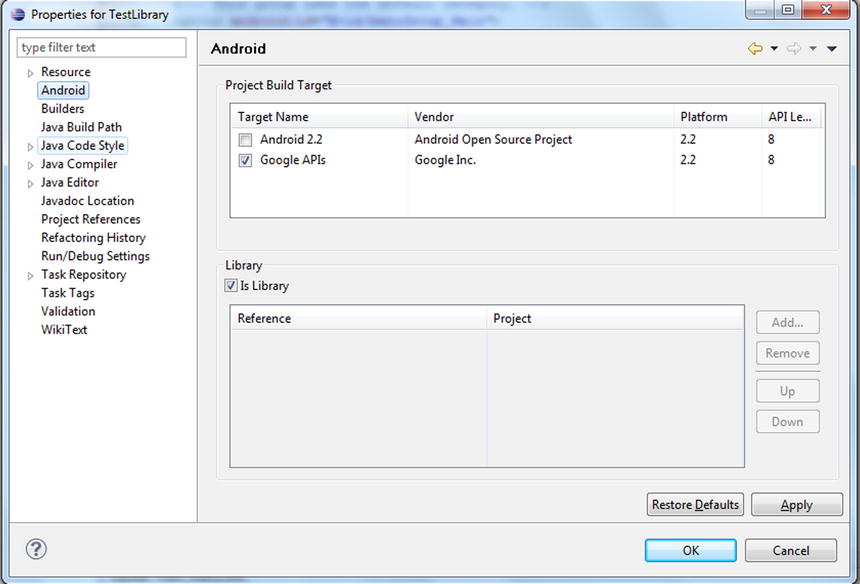
Figure 13-2. Designating a project as a library project
You can use the following project properties dialog (see Figure 13-3) to indicate that a main project depends on the library project that was created earlier.
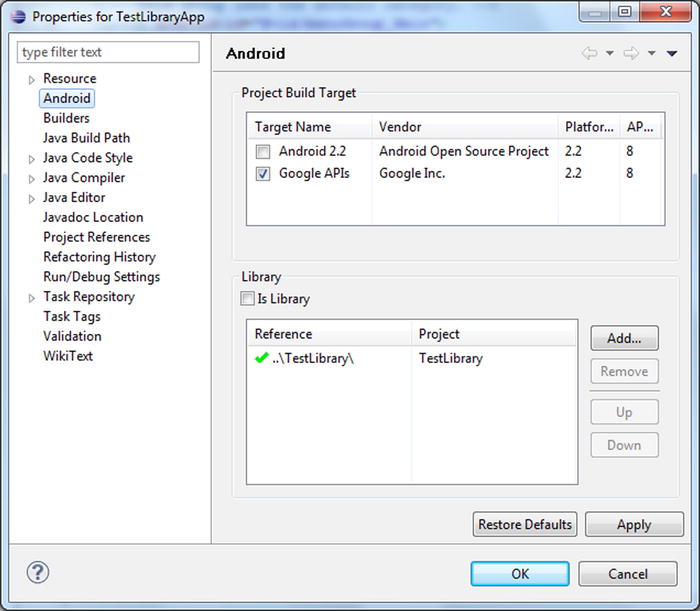
Figure 13-3. Declaring a library project dependency
Notice the Add button in the dialog. You can use this to add the library in Figure 13-3 as a reference. You don’t need to do anything else.
Once the library project is set up as a dependency for the main application project, the library project appears as a compiled JAR file in the application project under the node Android Dependencies.
Android doesn’t package R.class files from the libraries in their respective jar files. Instead, it relies on the source R.java file that is re-created and made available in the main application project for each of the libraries. That means you have an R.java file for each of the libraries in the gen subdirectory of the main project.
To avoid hard-coded constants being in the compiled source code of the libraries, Android creates the library R.java files such that all the constants in that file are non-final. During the final compilation of the main project, new constant values are allocated so that these constant values are unique across all the libraries and the main project. Had we given final constant values during library compilation, then those numbers could collide between libraries. Allocation of IDs uniquely for a given set of names must be done one time. Once these numbers are allocated to the IDs during the compile of the main project, they can become final in that main project.
There is an implication tied to the fact that IDs in the library’s R.java file are not final. It is common to use a switch statement to respond to menu items based on a menu item ID. This language construct will fail at compile time when done in the library code if the IDs are not final. This is because the case statement in a switch clause has to be a numerical constant number.
So, the switch statement in Listing 13-4 will not compile unless the IDs (such as R.id.menu_item_1) are actual literal numbers or static finals.
Listing 13-4. Sample switch Statement to Demonstrate Non-Final Variables
switch(menuItem.getItemId()) {
   case R.id.menu_item_1:
        Statement1;
        break;
   case 0x7778888: // as an example for R.id.menu_item_2:
       statement;
       statement;
       break;
   default:
       statement;
       statement;
}
Because the IDs are defined as non-final for library projects, we are forced to use if/else statements instead of switch/case clauses. Because the same constants re-created from the library’s R.java files are final, you can use freely the switch clause in your final project.
As you can see, library projects are compile-time constructs. Clearly, any resources that belong to the library get absorbed and merged into the main project. There is not a question of sharing at runtime, because there is just one package file with the name of the main package. In short, libraries offer a way to share resources between related projects at compile time.
Understanding Components and Threads
We started off this chapter establishing that each package runs in its own process. We will now explain the organization of threads within this process. This will lead us to why we need handlers to offload the work from the main thread and also to communicate with the main thread.
Most code in an Android application runs in the context of a component such as an activity or a service. Most of the time, there is only one thread running in an Android process, called the main thread. We will talk about the implications of sharing this main thread among various components. Primarily, this can lead to Application Not Responding (ANR) messages (the “A” stands for “application” and not “annoying”). We will show you how you can use handlers, messages, and threads to break the dependency on the main thread when long-running operations are needed.
An Android process has four primary component types: Activity, Service, ContentProvider, and a BroadcastReceiver. Most code you write in an Android application is part of one of these components or called by one of these components. Each of these components gets its own XML node under an application node specification in the Android project manifest file. To recall, here are these nodes in Listing 13-5:
Listing 13-5. How Components Are Declared in the Manifest File
<manifest...>
  <application>
     <activity/>
     <service/>
     <receiver/>
     <provider/>
  </application>
</manifest>
With some exceptions (such as external process calls to content providers), Android uses the same thread to process (or run through) code in these components. This thread is called the main thread of the application. When these components are called, the call can be either a synchronous call, such as when you call a content provider for data, or a deferred one through a message queue, such as when you invoke functionality by calling a start service or show a dialog.
Figure 13-4 describes the relationship between threads and these four components. This diagram shows how threads weave through the Android framework and its components. The diagram does not indicate the order in which a thread might weave through the various components. The diagram is merely showing that the processing continues from one component to another in a sequential fashion.
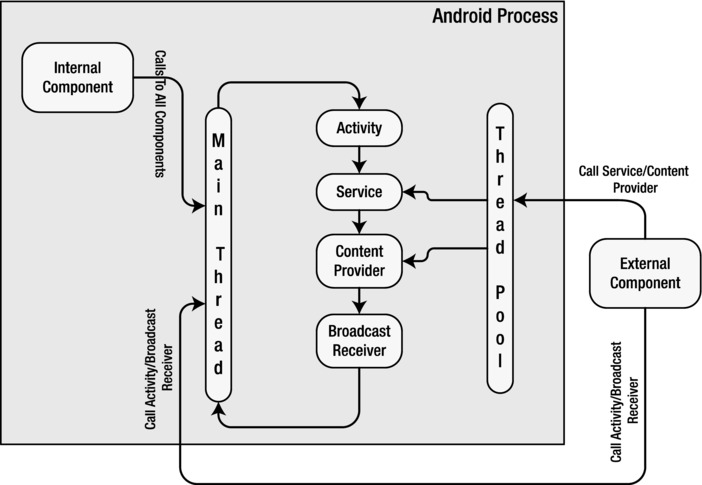
Figure 13-4. Android components and threading framework
As indicated in Figure 13-4, the main thread does the heavy lifting. It runs through all the components by using a message queue. As you select menus or buttons on the device screen, the device will translate these actions as messages and drop them onto the main queue of the process that is in focus. The main thread sits in a loop and processes each message. If any message takes more than five seconds or so, Android throws an ANR message.
Similarly, in response to a menu item, if you were to invoke a broadcast message, Android again drops a message on the main queue of the package process from which the registered receiver is to be invoked. The main thread will come around to that message at a later time to invoke the receiver. The main thread does the work for a broadcast receiver as well. If the main thread is busy responding to a menu action, the broadcast receiver will have to wait until the main thread gets freed up.
The same is true with a service. When you start a local service with Activity.startService from a menu item, a message is dropped onto the main queue, and the main thread will come around to process it via the service code.
Calls to a local content provider are slightly different. A content provider still runs on the main thread for a local call, but a call to it is synchronous and does not use message queues.
You may ask, “Why is it important whether most code in an Android application runs on the main thread or otherwise?” This is important because the main thread has the responsibility to get back to its queue so that UI events are responded to. As a consequence, you should not hold up the main thread. If there is something that is going to take longer than five seconds, you should get that done in a separate thread or defer it by asking the main thread to come back to it when it is freed up from other processing.
When external clients or components outside of the process make a call to the content provider for data, then that call is allocated a thread from a thread pool. The same is true with external clients connecting to services.
Let’s look at what handlers are and how they function in the next section.
Understanding Handlers
We have briefly referred to the idea of deferring work on a main thread if needed. This is done through handlers. Handlers are extensively used throughout Android so that the main UI thread is not held up. They also play a role in communicating with the main thread from other spawned worker threads.
A handler is a mechanism to drop a message on the main queue (more precisely, the queue attached to the thread on which the handler is instantiated) so that the message can be processed at a later point in time by that circulating thread. The message that is dropped has an internal reference pointing to the handler that dropped it.
When the main thread gets around to processing that message, it invokes the handler that dropped the message through a callback method on the handler object. This callback method is called handleMessage. Figure 13-5 presents this relationship between handlers, messages, and the main thread.
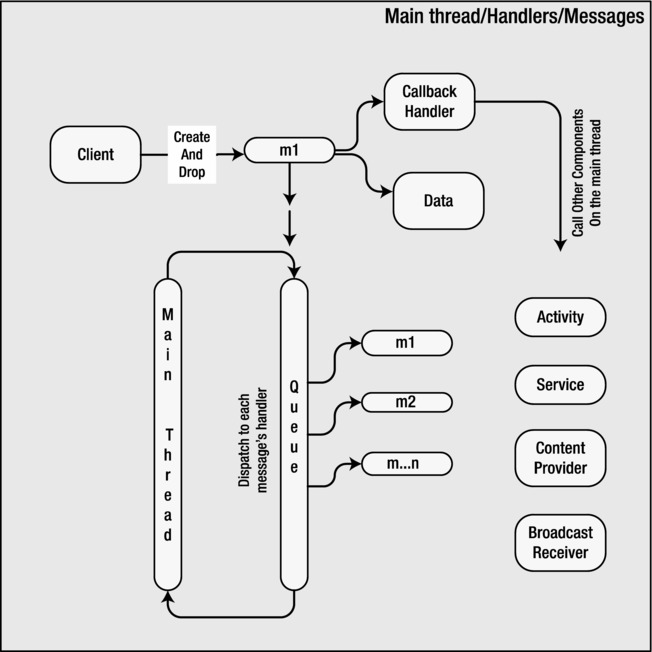
Figure 13-5. Handler, message, message queue relationship
Figure 13-5 illustrates the key players that work together when we talk about handlers: main thread, main thread queue, handler, and a message. Out of these four, we are not exposed to the main thread or the queue directly. We primarily deal with the handler object and the message object. Even between these two, the handler object coordinates most of the work.
Although a handler allows us to drop a message onto the queue, it is the message object that actually holds a reference back to the handler. The message object also holds a data structure that can be passed back to the handler.
Working with a handler and messages is best understood through an example. For the example, we will have a menu item that invokes a function, and that function, in turn, performs an action five times at one-second intervals and reports back to the invoking activity each time.
If we didn’t mind holding up the main thread, we could have coded this scenario like the pseudo code in Listing 13-6.
Listing 13-6. Holding Up the Main Thread with a Sleep Method
public class SomeActivity  {
    ....other methods
    void respondToMenuItem()    {
        //Prove that we are on the main thread
        Utils.logThreadSignature();
        //simulate an operation that takes longer than 5 seconds
        for (int i=0;i<6;i++)      {
            sleepFor(1000);// put main thread to sleep for 1 sec
            dosomething();
            SomeTextView.setText("did something. Counter:" + Integer.toString(i));
         }
   }
}
This will satisfy the requirement of the use case. However, if we do this, we are holding up the main thread, and we are guaranteed to have an ANR. We can use a handler to avoid the ANR in the previous example. Pseudo code to do this via a handler will look like Listing 13-7.
Listing 13-7. Instantiating a Handler from the Main Thread
void respondToMenuItem(){
    SomeHandlerDerivedFromHandler myHandler =
                 new SomeHandlerDerivedFromHandler();
    myHandler.doDeferredWork(); //invoke a function in 1 sec intervals
    //note that doDeferredWork() is not part of the SDK
    //we will show you the code for this shortly
}
Now, the call respondToMenuItem() will allow the main thread to go back to its loop. The instantiated handler knows that it is invoked on the main thread and hooks itself up to the queue. The method doDeferredWork() will schedule work so that the main thread can get back to this work once it is free.
To investigate this protocol, let’s see the actual source code for a proper handler. The code in Listing 13-8 in the next section demonstrates this handler, which is called DeferWorkHandler. In the previous pseudo code of Listing 13-7, the indicated handler SomeHandlerDerivedFromHandler is equivalent to this DeferWorkHandler. Similarly, the indicated method doDeferredWork() (of Listing 13-7) is implemented on the DeferWorkHandler in Listing 13-8.
Listing 13-8. DeferWorkHandler Source Code
public class DeferWorkHandler extends Handler  {
    //Keep track of how many times we sent the message
    private int count = 0;

    //A parent driver activity we can use to inform of status.
    private TestHandlersDriverActivity parentActivity = null;

    //During construction we take in the parent driver activity.
    public DeferWorkHandler(TestHandlersDriverActivity inParentActivity){
        parentActivity = inParentActivity;
    }
    //Callback method that gets called by the main thread
    @Override
    public void handleMessage(Message msg)     {
        //Use the message object to get to its data
        String pm = new String("message called:" + count + ":" +
                msg.getData().getString("message"));
        //you can access the parent activity and invoke UI calls on it here
        parentActivity.someControl.somemethod(); //example only

        //logic to invoke itself multiple times if needed
        if (count > 5)      {
            return;
        }
        count++; //increment count
        sendTestMessage(1); //reinvoke again by sending a message
    }
    //method called by the client
    public void doDeferredWork()    {
        count = 0;
        sendTestMessage(1);
    }
    //Preparing and sending the message
    public void sendTestMessage(long interval)    {
        Message m = this.obtainMessage();
        prepareMessage(m);
        this.sendMessageDelayed(m, interval * 1000);
    }
    public void prepareMessage(Message m)    {
        Bundle b = new Bundle();
        b.putString("message", "Hello World");
        m.setData(b);
        return ;
    }
}
Let’s look at the key aspects of this source code. The first is that the handler is derived from the base class handler. In the constructor of the handler, we use a pointer to the parent activity so that we can use the UI controls of the activity to report what needs to be reported or to act upon. Then we code a method (doDeferredWork) to encapsulate what this handler is expected to do for us. Notice that the doDeferredWork( ) is not an overridden method and you can call this method whatever name that you would like. It is in this method that you work with messages to eventually call the overridden handleMessage( ). Also, it is in this handleMessage( ) that you actually put the real code that is originally deferred from the main thread.
The base handler offers a series of methods to send messages to the queue to be responded to later. These methods are used in the doDeferredWork( ). sendMessage() and sendMessageDelayed() are two examples of these send methods. sendMessageDelayed(), which we used in the example, allows us to drop a message on the main queue with a given amount of time delay. sendMessage(), in contrast, drops the message immediately to be processed when the main thread gets around to it.
When you call sendMessage() or sendMessageDelayed(), you will need an instance of the message object. It is best that you ask the handler to give it to you, because when the handler returns the message object, it hides itself in the belly of the message. That way, when the main thread comes along, it knows which handler to call based solely on the message. In Listing 13-8, the message is obtained using the following code:
Message m = this.obtainMessage();
The variable this refers to is the handler object instance. As the name indicates, the method does not create a new message but instead gets one from a global message pool. At a later point, once this message is processed, it will be recycled. The method obtainMessage() has the variations shown in Listing 13-9.
Listing 13-9. Constructing a Message Through a Handler
obtainMessage();
obtainMessage(int what);
obtainMessage(int what, Object object);
obtainMessage(int what, int arg1, int arg2)
obtainMessage(int what, int arg1, int arg2, Object object);
Each method variation sets the corresponding fields on the message object. There are some restrictions on the object argument when the message crosses process boundaries. In such cases, it needs to be Parcelable. It is much safer and compatible in such cases to use the setData() method explicitly on the message object, which takes a Bundle. In Listing 13-8, we have used setData(). You are encouraged to use arg1 or arg2 instead if what you are intending to pass are simple indicators that can be accommodated with integer values.
The argument what (in Listing 13-9) allows you to dequeue message or enquire if there are messages of this type in the queue. See the operations on the handler class for more details.
Once we obtain a message from the handler, we can optionally modify the data contents of that message. In our example, we have used the setData() function by passing it a Bundle object. After we have categorized or identified the data of the message, we can send the message to the queue through sendMessage() or sendMessageDelayed(). When these methods are called, the main thread will return to attending the queue.
Once the messages are delivered to the queue, the handler sits and waits (figuratively speaking) until the main thread retrieves those messages and calls the handler’s handleMessage().
If you want to see this handler and main thread interaction more clearly, you can write a logcat message when you are sending the message and in the handleMessage() callback. You will notice the time stamps differ as the main thread would have taken a few more milliseconds to come back to the handleMessage() method.
In our example, each handleMessage(), after processing one message, sends another message to the queue so that it can be called again. It does this five times, and when the counter reaches five, it quits sending messages to the queue. This is one way to break up the work into multiple chunks, although there are better ways to do this either through a worker thread or through a class AsyncTask. The essential AsyncTask is covered in the next chapter. Let’s cover the explicit worker threads option briefly now.
Using Worker Threads
When we use a handler like the one in the previous section, the code is still executed on the main thread. Each call to handleMessage() still should return within the time stipulations of the main thread (in other words, each message invocation should complete in less than five seconds to avoid Application Not Responding). If your goal is to extend that time of execution further, you will need to start a separate thread, keep the thread running until it finishes the work, and allow for that subthread to report back to the main activity, which is running on the main thread. This type of a subthread is often called a worker thread.
It is a no-brainer to start a separate thread while responding to a menu item. However, the clever trick is to allow the worker thread to post a message to the queue of the main thread that something is happening and that the main thread should look at it when it gets to that message. It is also an error to call UI methods on a non-UI thread. So, you will need this handler that is tied to the main thread to call UI methods from a worker thread.
A reasonable solution that involves a worker thread is as follows:
- Create a handler in the main thread while responding to the menu item. Keep it aside.
- Create a separate thread (a worker thread) that does the actual work. Pass the handler from step 1 to the worker thread. This handler allows the worker thread to communicate with the main thread.
- The worker thread code can now do the actual work for longer than five seconds and, while doing it, can call the handler to send status messages to communicate with the main thread.
- These status messages now get processed by the main thread, because the handler belonged to the main thread. The main thread can process these messages while the worker thread is doing its work.
You can see the sample code for this interaction in the downloadable project for this chapter. An alternate and probably more straightforward way to communicate with the UI thread from a worker thread is to get hold of the activity pointer and call the method Activity.runOnUiThread(Runnable action). Of course you need to create a Runnable object for coordination.
References
Here are some useful links to further strengthen your understanding of this chapter:
- http://developer.android.com/guide/publishing/app-signing.html: A must-read for signing .apk files.
- http://developer.android.com/guide/developing/projects/projects-eclipse.html: Primary SDK reference for Android libraries.
- http://developer.android.com/guide/topics/fundamentals.html: SDK reference on Android component life cycles.
- http://www.androidbook.com/item/3493: A layman’s introduction to what it means to sign digitally.
- http://www.androidbook.com/item/3279: Our research on understanding Android packages. You will see how to sign .apk files, further links to how to share data between packages, more on shared user IDs, and instructions to install and uninstall packages.
- http://www.androidbook.com/item/3908: Our research notes on all aspects of Android library support, including older screen shots, newer screen shots, useful URLs, sample code, and more.
- http://android-developers.blogspot.com/2011/10/changes-to-library-projects-in-android.html: What has changed in libraries at the time of Android 4.0 and the reasons for the change? This blog also talks about future directions for working with libraries.
- http://tools.android.com/tips/non-constant-fields: Insightful discussion of the role of non-final variables and how they affect switch statements.
- http://tools.android.com/knownissues: Android documentation of known issues in the SDK Tools and the ADT releases. Also note the domain name of this URL; this site is dedicated to all aspects of Android tooling.
- http://docs.oracle.com/javase/7/docs/technotes/tools/windows/keytool.html: Excellent documentation on keytool, jarsigner, and the signing process itself.
- http://www.androidbook.com/proandroid5/projects: A list of downloadable projects related to this book. For this chapter, look for a file called ProAndroid5_Ch13_TestAndroidLibraries.zip. This ZIP file contains two projects: one a library and the other that uses this library. Also take a look at a project called ProAndroid5_Ch13_TestHandlers.zip, which contains the code to work with handlers including worker threads.
Summary
This chapter gave you a quick run-down on how packages, processes, components, and threads interact in an Android application. This chapter has also documented the library support for sharing assets between multiple applications. This chapter also has introduced handlers, a key concept in the Android SDK. In the next chapter, we will give detailed coverage of AsyncTask, which combines the worker threads and handlers into a simpler programming abstraction to use.