
Using the Compatibility Library for Older Devices
The Android platform has gone through an impressive evolution since it was first introduced several years ago. While the intention has always been for Android to power lots of different types of devices, it wasn’t architected from the beginning to meet that goal. Instead, the Google engineers have added, removed, and changed APIs in order to provide new features. One of the biggest changes was the creation of fragments in order to handle larger screen sizes such as on tablets and TVs. But there have been other changes such as with ActionBar and Menus.
The new APIs created a difficult problem for developers who wanted their applications to run on the new devices with the new APIs, as well as older devices that did not have those APIs. Many older devices do not get Android upgrades. Even if Google added the new APIs to a revision of the old Android OS, the old devices aren’t going to get that new revision, because of the testing and support required from both the device manufacturer and the cellular carrier. The solution that Google came up with was to create compatibility libraries that could be linked into an application so it could take advantage of the new API functionality yet still run on an older version of Android. The library figures out how to use the older APIs to implement the new features. If the same application runs on a newer version of Android that already has those new features, the compatibility library calls through to the underlying APIs present in that newer version of Android.
This chapter will dive into the compatibility libraries and explain how to use them and what to watch out for. If you aren’t developing applications for older versions of Android, you could safely skip this chapter as you won’t need the libraries. The libraries are only useful if you want to include the functionality of a new API in an application that will run on an old version of Android that doesn’t have that new API.
The Android operating system was doing fine until it came time to support tablets. The basic building block of an application was the activity, meant to perform a single task for the user and to fill the screen of the device. But tablets offered more real estate so the user could see and do a few things at a time on one screen. So with Honeycomb (Android 3.0), Google introduced fragments. This was a whole new concept, which changed how developers created UIs and the logic that ran behind them. And this would have been fine, except that there were still plenty of Android devices (e.g., smartphones) in the wild which did not support fragments. What Google figured out is that a compatibility library could be written to provide comparable implementations of Fragment, etc., that used the existing APIs in the older versions of Android. If an application linked in the compatibility library, it could work with fragments even though the older version of Android didn’t support fragments in the OS.
The Google engineers then looked at other features and APIs in new Android and provided compatibility library features and APIs to match, so that these features could also be used in older versions of Android without having to release updates to those older versions of Android. In addition to support for Fragments, compatibility libraries provide support for Loaders, RenderScript, ActionBar, and others.
The compatibility library doesn’t always make things perfectly the same between old and new. For example, the new Activity class is aware of fragments. To use the compatibility library, you must extend the FragmentActivity class instead of Activity; it is the FragmentActivity class that works with fragments in old Android versions.
When you use the compatibility library, you will use those classes for your application regardless of which version of Android it will run on. In other words, you would only use FragmentActivity in your application and it will do the right thing in all versions of Android, including Android 3.0 and later. You would not try to include in the same application both Activity for Android 3.0+ and FragmentActivity for Android below 3.0. When FragmentActivity is executing on Android 3.0 and above, it can pretty much call straight through to the underlying Activity class. There is no real penalty to using a compatibility library on a recent Android version.
Adding the Library to Your Project
As of this writing, there are four compatibility libraries; together the collection is called the Android Support Library, revision 22.1.1:
- v4—contains FragmentActivity, Fragment, Loader, and quite a few other classes introduced after Android 3.0. The number 4 represents Android API version 4 (i.e., Donut 1.6). It means this library can be used for applications that run on Android API version 4 and above.
- v7—makes available the ActionBar, CardView, GridLayout, MediaRouter, Palette and RecyclerView classes. This library can be used with Android API version 7 (i.e., Eclair 2.1) and above. There are actually six libraries here: appcompat, cardview, gridlayout, mediarouter, palette and recyclerview
- v8—adds RenderScipt capability to Android API version 8 (i.e., Froyo 2.2) and above. RenderScript allows for parallelization of work across device processors (CPU cores, GPUs, DSPs) and was introduced in Android API version 11 (i.e., Honeycomb 3.0).
- v13—adds some special Fragment functionality for things like tabbed and pager interfaces. This library also contains many of the classes from v4 so it can be included in your application without requiring other libraries.
- v17—adds Leanback features related to Android TV applications
For a complete list of all compatibility functionality by version number, please see the references at the end of this chapter.
To download the Android Support Library to your computer, use the Android SDK Manager and look for it at the bottom of the list under Extras. If you’re using Android Studio, download the Android Support Repository. Otherwise, download Android Support Library instead. The files will be placed under your Android SDK directory. The Android Support Library can be found in extras/android/support/, and the Android Support Repository can be found in extras/android/m2repository.
As you can see from the preceding bullet list, not all features of the Android Support Library are available on all older versions of Android. Therefore you must properly set android:minSdkVersion in your AndroidManifest.xml file. If you are using a compatibility library feature from v7, android:minSdkVersion should not be lower than 7.
Including the v7 Support Library
There’s very little chance that you’d ever want to include the v4 library and not the v7 library. Since the v7 library requires that the v4 library also be included to provide the necessary classes for v7 to function properly, you’ll want to include both. If you are using Eclipse, the ADT plug-in makes all of this pretty easy. When you create a new Android project in Eclipse, you specify the minimum version of Android that it will run on. If ADT thinks that you might want the compatibility library included, it will automatically include it.
For example, if you specify a target SDK of 16 (JellyBean 4.1) but a minimum SDK of 8 (Froyo 2.2), ADT will automatically set up an appcompat v7 library project, include that library project in your new application, and also include the v4 library as well in your application. The resources from the v7 library are therefore available to your application without you having to do extra work. However, if you want to use either of the other two v7 libraries (gridlayout and/or mediarouter), those will require a little extra work, as will now be explained. By creating a library project and including that in your application, it will include the compatibility library resources that your application will need.
You will manually do something similar to what ADT did to automatically include the v7 appcompat library into your project. To start, you will choose File ![]() Import, then Existing Android Code Into Workspace, then navigate to the extras folder where the Android SDK is on your workstation. Locate the v7 gridlayout or mediarouter folder and choose that. See Figure 12-1.
Import, then Existing Android Code Into Workspace, then navigate to the extras folder where the Android SDK is on your workstation. Locate the v7 gridlayout or mediarouter folder and choose that. See Figure 12-1.
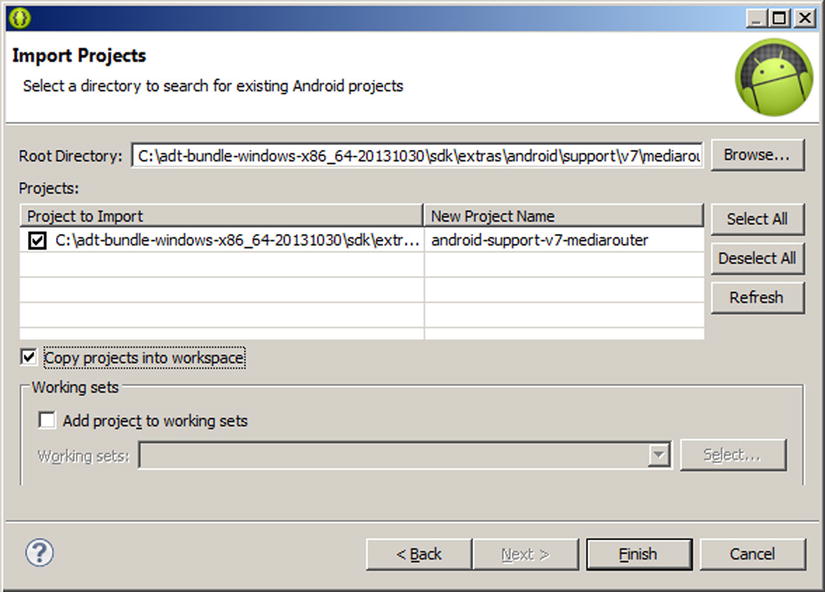
Figure 12-1. Importing the v7 mediarouter compatibility library
Click Finish and you will get a new library project. If you chose to create a library project for v7 mediarouter, you will see that it is missing some functionality so it has errors. You need to add in the v7 appcompat library to clear that up. Right-click the mediarouter library project in Eclipse and choose Properties. In the list on the left choose Android. Now click the Add… button in the Library section. See Figure 12-2.
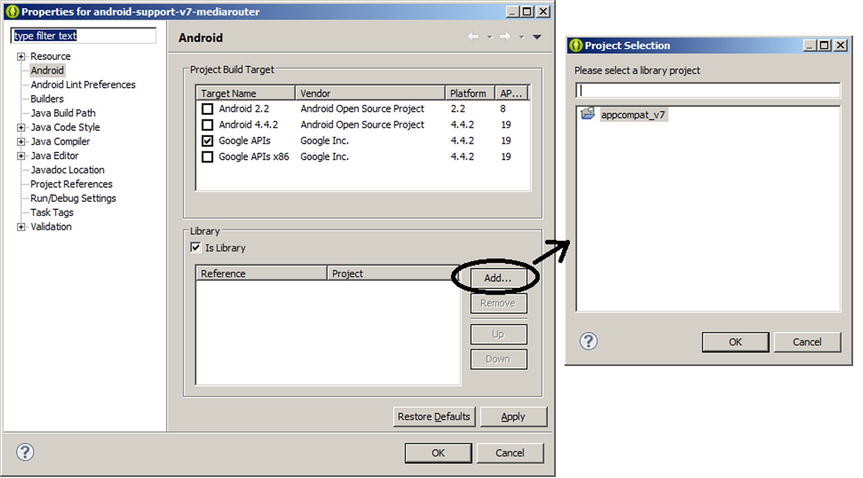
Figure 12-2. Adding appcompat_v7 to the v7 mediarouter compatibility library
Select the appcompat_v7 library and click OK. That should clear up the errors in mediarouter. Now when you want to include mediarouter in your application project, simply follow the same procedure but right-click your application project, and when you click the Add… button for Library, chose the mediarouter library.
With Android Studio, adding a v7 compatibility library is just as easy. By default, if you create a new project with a minimum SDK value less than your target SDK, you will very likely get the v7 appcompat library added in automatically. You can check this by looking for the following line in the app’s build.gradle configuration file in the dependencies section:
compile 'com.android.support:appcompat-v7:22.0.0'
Therefore, to add one of the other v7 libraries, you would insert another similar compile line to the dependencies section, but use the appropriate name such as cardview or mediarouter.
Including the v8 Support Library
If you want to use the v8 renderscript compatibility library, and you develop with Eclipse, you simply add the following three lines to the application project’s project.properties file regardless of the target version of your application:
renderscript.target=22
renderscript.support.mode=true
sdk.buildtools=22.1.1
At the time of this writing, the online Android documentation says that you should use a target of 18 and a buildtools of 18.1.0. However, using the old values generates an error saying to use a newer version of buildtools. If you see errors in the Eclipse Console regarding version numbers, try using a later version as indicated by the error.
If you develop with Android Studio, to include v8 renderscript you would edit the app’s build.gradle file and add these lines within the defaultConfig section:
renderscriptTargetApi 22
renderscriptSupportModeEnabled true
Within your code, make sure you import from android.support.v8.renderscript rather than android.renderscript. If you are modifying an existing RenderScript application for the v8 library, make sure to clean your project; the Java files that are generated from your .rs files need to be regenerated to also use the v8 library. You can now use RenderScript as usual and deploy your application to older versions of Android.
Including the v13 Support Library
To include the v13 compatibility library into your application using Eclipse, navigate to the SDK extras directory and find the v13 jar file. Copy this file to the /libs directory of your application project. Once the v13 jar file is in place, right-click it to pull up the menu, and then choose Build Path ![]() Add to Build Path. There’s a good chance you already have the v4 and v7 appcompat libraries in your application courtesy of ADT. You may choose to get rid of those if you don’t need the functionality from either one. For example, if the minimum SDK for your application is v11, you can use the native ActionBar class without the need for the v7 appcompat support library.
Add to Build Path. There’s a good chance you already have the v4 and v7 appcompat libraries in your application courtesy of ADT. You may choose to get rid of those if you don’t need the functionality from either one. For example, if the minimum SDK for your application is v11, you can use the native ActionBar class without the need for the v7 appcompat support library.
The v13 jar file contains many of the same classes as v4, so you don’t want to cause any problems by having the same classes in twice. If you’re going to have all three libraries in your application (i.e., v4, v7, and v13), then at least ensure that v13 is ordered before v4. This can be done in the Configure Build Path dialog box.
If you’re using Android Studio, just make sure the SDK Manager has downloaded the Support Repository, then add the following compile line to the app’s build.gradle file just like you do for v7 libraries:
compile 'com.android.support:support-v13:22.0.0'
Including the v17 Support Library
Finally, including the v17 compatibility library is done the same way as for the v13 support library.
Including Just the v4 Support Library
If you really must have the v4 support library and none of the others, you would follow the same procedure as for the v13 library.
Retrofitting an App with the Android Support Library
To get a better feel for how this all works, you’re going to bring back a fragment app you worked on in Chapter 8 and will make it work for older versions of Android that don’t natively support fragments.
Use File ![]() Import, choose General, then Existing Projects into Workspace. Navigate to the ShakespeareInstrumented project from Chapter 8 and choose that. Check “Copy projects into workspace” before hitting Finish.
Import, choose General, then Existing Projects into Workspace. Navigate to the ShakespeareInstrumented project from Chapter 8 and choose that. Check “Copy projects into workspace” before hitting Finish.
Now you’re going to retrofit this application to work on versions of Android lower than API version 11. The following works when you don’t need resources from the compatibility library, since it worries only about copying in the JAR file.
- Right-click your project and choose Android Tools
 Add Support Library.... Accept the license and click OK.
 - Now go into MainActivity.java and change the base class from Activity to FragmentActivity. You need to fix the import line from android.app.Activity to android.support.v4.app.FragmentActivity. Also fix the imports for Fragment, FragmentManager, and FragmentTransaction to use the ones from the support library.
- Find the method calls for getFragmentManager() and change these to getSupportFragmentManager(). Do this also for DetailsActivity.java.
- For DetailsFragment.java, change the import for Fragment to the one for the support library Fragment (i.e., android.support.v4.app.Fragment).
- In TitlesFragment.java, change the import for ListFragment to the one for the support library ListFragment (i.e., android.support.v4.app.ListFragment).
The newer versions of Android use different animators from old Android. You may need to fix animations in MainActivity.java in the showDetails() method. Pick one of the commented out calls to setCustomAnimations(), then play with the in and out animations. Anything that relies on an ObjectAnimator class will not work on older devices since this class was introduced with API version 11 (i.e., Honeycomb 3.0). It will compile but since that class has not been implemented in older Android and has not been included in the compatibility libraries, you will get a runtime exception. In other words, avoid R.animator. Try using R.anim instead. You can copy into your project anim resource files that you’d like to use, or you can try referring to android.R.anim files.
Now you can go into AndroidManifest.xml and change the minSdkVersion from 11 to 8. That should be all you need to do. Try running this application on a Froyo device or emulator. If all went well you should now be seeing a fragment-based application running on a pre–Android 3.0 OS.
References
Here are some helpful references to topics you may wish to explore further:
- http://developer.android.com/tools/support-library/index.html: The Android Developer’s Guide on the Support Library package.
- http://developer.android.com/tools/support-library/features.html: Android documentation on the main features of each compatibility library.
- http://developer.android.com/tools/support-library/setup.html: Android documentation on setting up a compatibility library for your project, for both Eclipse and Android Studio. At the time of this writing, these pages were not as current as this chapter. However, things change. If you experience trouble, check the online documentation or contact the book’s authors.
Summary
Let’s conclude this chapter by quickly enumerating what you have learned about the Android compatibility libraries:
- To get your application working on the broadest array of devices, use the compatibility libraries and code to their APIs rather than the latest and greatest APIs.
- The v7 support libraries come with resources that must be included in your application for the APIs to work properly.