
Exploring Security and Permissions
No exploration of modern development platforms or operating systems is complete without discussing security. In Android, security spans all phases of the application life cycle—from design-time policy considerations to runtime boundary checks. In this chapter you’ll learn Android’s security architecture and understand how to design secure applications.
Let’s get started with the Android security model.
Understanding the Android Security Model
Let’s dive right in, to cover security during the deployment and execution of any Android application. To deploy an Android application, it must be signed with a digital certificate in order for you to install it onto a device. With respect to execution, Android runs each application within a separate process, where each process has a unique and permanent user ID (assigned at install time). This places a boundary around the process and prevents one application from having direct access to another’s data. Moreover, Android defines a declarative permission model that protects sensitive features (such as the contact list).
In the next several sections, we are going to discuss these topics. But before we get started, let’s provide an overview of some of the security concepts that we’ll refer to later.
Overview of Security Concepts
Android requires that applications be signed with a digital certificate. One of the benefits of this requirement is that an application cannot be updated with a version that was not published by the original author or holder of the signing certificate. If we publish an application, for example, then you cannot update our application with your version (unless, of course, you somehow obtain our certificate). That said, what does it mean for an application to be signed? And what is the process of signing an application?
You sign an application with a digital certificate. A digital certificate is an artifact that contains information about you, such as your company name, address, and so on. A few important attributes of a digital certificate include its signature and public/private key. A public/private key is also called a key pair. Note that although you use digital certificates here to sign .apk files, you can also use them for other purposes (such as encrypted communication, signing documents, and so forth). You can obtain a digital certificate from a trusted certificate authority (CA) and you can also generate one yourself using tools such as the keytool, which we’ll discuss shortly. Digital certificates are stored in keystores. A keystore contains a list of digital certificates, each of which has an alias that you can use to refer to it in the keystore.
Signing an Android application requires three things: a digital certificate, the .apk file for the application you wish to sign, and a utility that knows how to apply a digital signature to the .apk file. We use a free utility that is part of the Java Development Kit (JDK) distribution called the jarsigner. This utility is a command-line tool that knows how to sign a .jar file using a digital certificate, and an .apk file is really just a zip-formatted file that collects together .jar files and a few other resources for your project. Other signing tools are available, so you are free to choose the tool that works best for you.
Now, let’s move on and talk about how you can sign an .apk file with a digital certificate.
Signing Applications for Deployment
To install an Android application onto a device, you first need to sign the Android package (.apk file) using a digital certificate. The certificate, however, can be self-signed—you do not need to purchase a certificate from a certificate authority such as VeriSign. Be aware that self-signed certificates are generally considered less trustworthy, and in some environments are considered insecure.
Signing your application for deployment involves three steps. The first step is to generate a certificate using keytool (or a similar tool). The second step involves using the jarsigner tool to sign the .apk file with the generated certificate. The third step aligns portions of your application on memory boundaries for more efficient memory usage when running on a device. Note that during development, both the ADT plug-in for Eclipse and Android Developer Studio take care of everything for you: signing your .apk file and doing the memory alignment, before deploying onto the emulator or a device.
Generating a Self-Signed Certificate Using the Keytool
The keytool utility manages a database of private keys and their corresponding X.509 certificates (a standard for digital certificates). This utility ships with the JDK and resides under the JDK bin directory. If you followed the instructions in Chapter 2 regarding changing your PATH, the JDK bin directory should already be in your PATH. In this section, we’ll show you how to generate a keystore with a single entry, which you’ll later use to sign an Android .apk file. To generate a keystore entry, do the following:
- Create a folder to hold the keystore, such as c:android elease. or /opt/android/release (depending on your operating system).
- Open a shell or command window, and execute the keytool utility with the parameters shown in Listing 28-1.
All of the arguments passed to the keytool are summarized in Table 28-1.
Table 28-1. Arguments Passed to the keytool Utility
|
Argument |
Description |
|---|---|
|
genkey |
Tells keytool to generate a public/private key pair. |
|
v |
Tells keytool to emit verbose output during key generation. |
|
keystore |
Path to the keystore database (in this case, a file). The file will be created if necessary. |
|
alias |
Unique name for the keystore entry. This alias is used later to refer to the keystore entry. |
|
keyalg |
Algorithm. |
|
validity |
Validity period. |
keytool will prompt you for two passwords during the creation of the keystore and the entry you are creating. The first password prompted is for the keystore itself and controls access to all the key material you will store. This can also be specified using the storepass parameter. The second password is the password for the private key and related certificate you are creating, also available via the keypass parameter. You should get used to not including these as parameters on the command line, and instead prefer to allow keytool to prompt you as good general security practice.
Be aware, that if you do use the parameters for password to keytool, anyone who gets access to your shell or command-line history can see the passwords, as can anyone who can list the running processes on your machine while keytool runs. The command in Listing 28-1 will generate a keystore database file in your keystore folder. The database will be a file named release.keystore. The validity of the entry will be 14,000 days (or approximately 38 years)—which is a long time from now. You should understand the reason for this. The Android documentation recommends that you specify a validity period long enough to surpass the entire lifespan of the application, which will include many updates to the application. It recommends that the validity be at least 25 years. If you plan to publish the application on Google Play, your certificate will need to be valid through at least October 22, 2033. Google Play checks each application when uploaded to make sure it will be valid at least until then.
Caution Because your certificate in any application update must match the certificate you used the first time, make sure you safeguard your key material. Keep either your keystore file, or the key pair if you choose to export them, safe! If you lose access to the keystore or underlying keys, and you can’t re-create it, you won’t be able to update your application, and you’ll have to issue a whole new application instead.
Going back to the keytool, the argument alias is a unique name given to the entry in the keystore database; you will use this name later to refer to the entry. When you run the keytool command in Listing 28-1, keytool will ask you a few questions (see Figure 28-1) and then generate the keystore database and entry.
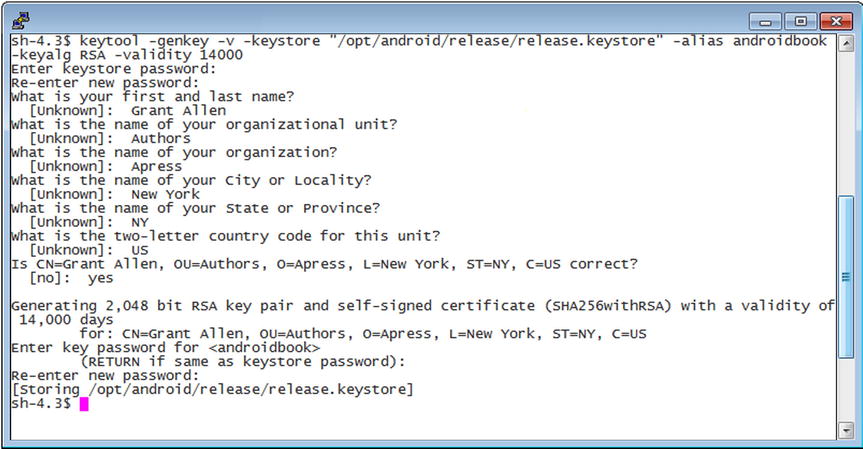
Figure 28-1. Additional questions asked by keytool
Once you have a keystore file for your production certificates, you can reuse this file to add more certificates. Just use keytool again, and specify your existing keystore file.
The Debug Keystore and the Development Certificate
We mentioned that the ADT plug-in for Eclipse, and Android Developer Studio, both take care of setting up a development keystore for you. However, the default certificate used for signing during development cannot be used for production deployment onto a real device. This is partly because the automatically generated development certificate is only valid for 365 days, which clearly does not get you past October 22, 2033. So what happens on the three hundred sixty-sixth day of development? You’ll get a build error. Your existing applications should still run, but to build a new version of an application, you need to generate a new certificate. The easiest way to do this is to delete the existing debug.keystore file, and as soon as it is needed again, the ADT (for instance) will generate a new file and certificate valid for another 365 days.
To find your debug.keystore file, assuming you are using Eclipse with ADT, open the Preferences screen of Eclipse and go to Android ![]() Build. The debug certificate’s location will be displayed in the Default Debug Keystore field, as shown in Figure 28-2 (see Chapter 2 if you have trouble finding the Preferences menu).
Build. The debug certificate’s location will be displayed in the Default Debug Keystore field, as shown in Figure 28-2 (see Chapter 2 if you have trouble finding the Preferences menu).
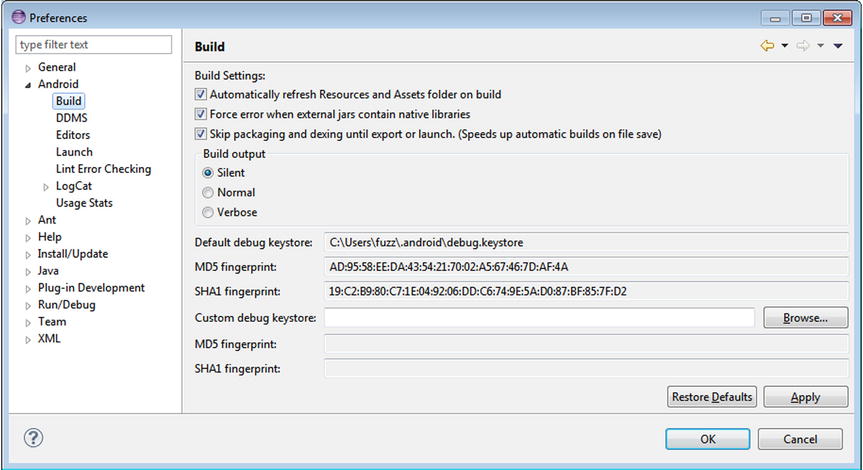
Figure 28-2. The debug certificate’s location
Of course, now that you’ve got a new development certificate, you cannot update your existing applications in Android Virtual Devices (AVDs) or on devices using a new development certificate. Eclipse will provide messages in the Console telling you to uninstall the existing application first using adb, which you can certainly do. If you have a lot of your applications installed onto an AVD, you may feel it is easier to simply re-create the AVD, so it does not contain any of your applications and you can start fresh. To avoid this problem a year from now, you could generate your own debug.keystore file with whatever validity period you desire. Obviously, it needs to have the same file name and be in the same directory as the file that ADT would create. The certificate alias is androiddebugkey, and the storepass and keypass are both "android". ADT sets the first and last name on the certificate as "Android Debug", the organizational unit as "Android", and the two-letter country code as "US". You can leave the organization, city, and state values as "Unknown".
If you acquired a map-api key from Google using the old debug certificate, you will need to get a new map-api key to match the new debug certificate. We covered map-api keys in Chapter 19.
Now that you have a digital certificate that you can use to sign your production .apk file, you need to use the jarsigner tool to do the signing. Here’s how to do that.
Using the Jarsigner Tool to Sign the .apk File
The keytool utility described in the previous section created a digital certificate, which is one of the parameters for the jarsigner tool. The other parameter for jarsigner is the actual Android package to be signed. To generate an Android package, you need to use the Export Unsigned Application Package utility in the ADT plug-in for Eclipse (or equivalent function in Android Developer Studio). You access the utility by right-clicking an Android project in Eclipse, selecting Android Tools, and selecting Export Unsigned Application Package. Running the Export Unsigned Application Package utility will generate an .apk file that will not be signed with the debug certificate.
To see how this works, run the Export Unsigned Application Package utility on one of your Android projects, and store the generated .apk file somewhere. For this example, we’ll use the keystore folder we created earlier and generate an .apk file called c:android eleasemyappraw.apk.
With the .apk file and the keystore entry, run the jarsigner tool to sign the .apk file (see Listing 28-2). Use the full path names to your keystore file and .apk file as appropriate when you run this.
To sign the .apk file, you pass the location of the keystore, the keystore password, the private-key password, the path to the .apk file, and the alias for the keystore entry. The jarsigner will then sign the .apk file with the digital certificate from the keystore entry. To run the jarsigner tool, you will need to either open a tools window (as explained in Chapter 2) or open a command or Terminal window and either navigate to the JDK bin directory or ensure that your JDK bin directory is on the system path. For security reasons, it is safer to leave off the password arguments to the command and simply let jarsigner prompt you as necessary for passwords. Figure 28-3 shows what the jarsigner tool invocation looks like. You may have noticed that jarsigner prompted for only one password in Figure 28-3. Jarsigner figures out not to ask for the keypass password when the storepass and keypass are the same. Strictly speaking, the jarsigner command in Listing 28-2 only needs –keypass if it has a different password than –storepass.
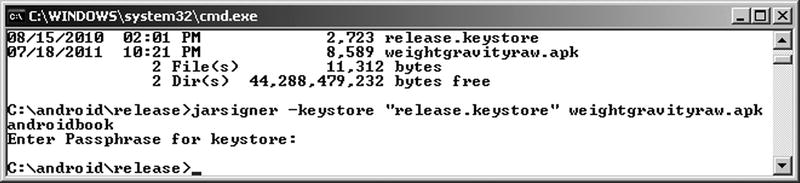
Figure 28-3. Using jarsigner
As we pointed out earlier, Android requires that an application be signed with a digital signature to prevent a malicious programmer from updating your application with their version. For this to work, Android requires that updates to an application be signed with the same signature as the original. If you sign the application with a different signature, Android treats them as two different applications. So we remind you again, be careful with your keystore file so it’s available to you later when you need to provide an update to your application.
Aligning Your Application with zipalign
You want your application to be as memory efficient as possible when running on a device. If your application contains uncompressed data (perhaps certain image types or data files) at runtime, Android can map this data straight into memory using the mmap() call. For this to work, though, the data must be aligned on a 4-byte memory boundary. The CPUs in Android devices are 32-bit processors, and 32 bits equals 4 bytes. The mmap() call makes the data in your .apk file look like memory, but if the data is not aligned on a 4-byte boundary, it can’t do that and extra copying of data must occur at runtime. The zipalign tool, found in the Android SDK build or build-tools/<version> directory, looks through your application and moves slightly any uncompressed data not already on a 4-byte memory boundary to a 4-byte memory boundary. You may see the file size of your application increase slightly but not significantly. To perform an alignment on your .apk file, use this command in a tools window (see also Figure 28-4):
zipalign –v 4 infile.apk outfile.apk
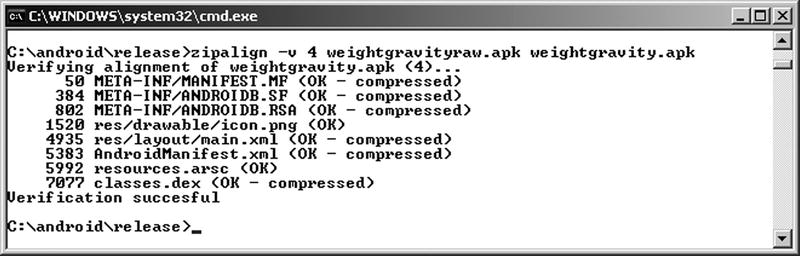
Figure 28-4. Using zipalign
Note that zipalign does not modify the input file, so this is why we chose to use “raw” as part of our file name when exporting from Eclipse. Now, our output file has an appropriate name for deployment. If you need to overwrite an existing outfile.apk file, you can use the –f option. Also note that zipalign performs a verification of the alignment when you create your aligned file. To verify that an existing file is properly aligned, use zipalign in the following way:
zipalign –c –v 4 filename.apk
It is very important that you align after signing; otherwise, signing could cause things to go back out of alignment. This does not mean your application would crash, but it could use more memory than it needs to.
Using the Export Wizard
In Eclipse, you may have noticed a menu choice under Android Tools called Export Signed Application Package. This launches what is called the export wizard, and it does all of the previous steps for you, prompting only for the path to your keystore file, key alias, the passwords, and the name of your output .apk file. It will even create a new keystore or new key if you need one. You may find it easier to use the wizard, or you may prefer to script the steps yourself to operate on an exported unsigned application package. Now that you know how each works, you can decide which is better for you.
Manually Installing Apps
Once you have signed and aligned an .apk file, you can install it onto the virtual device manually using the adb tool. As an exercise, start the virtual device from the AVD Manager, which will start without copying over any of your development projects from Eclipse. Now, open a tools window and run the adb tool with the install command:
adb install "PATH TO APK FILE GOES HERE"
This may fail for a couple of reasons, but the most likely are that the debug version of your application was already installed on the emulator, giving you a certificate error, or the release version of your application was already installed on the emulator, giving you an "INSTALL_FAILED_ALREADY_EXISTS" error. In the first case, you can uninstall the debug application with this command:
adb uninstall packagename
Note that the argument to uninstall is the application’s package name and not the .apk file name. The package name is defined in the AndroidManifest.xml file of the installed application.
For the second case, you can use this command, where –r says to reinstall the application while keeping its data on the device (or emulator):
adb install –r "PATH TO APK FILE GOES HERE"
Now, let’s see how signing affects the process of updating an application.
Installing Updates to an Application and Signing
Earlier, we mentioned that a certificate has an expiration date and that Google recommends you set expiration dates far into the future, to account for a lot of application updates. That said, what happens if the certificate does expire? Would Android still run the application? Fortunately, yes—Android tests the certificate’s expiration only at install time. Once your application is installed, it will continue to run even if the certificate expires.
But what about updates? Unfortunately, you will not be able to update the application once the certificate expires. In other words, as Google suggests, you need to make sure the life of the certificate is long enough to support the entire life of the application. If a certificate does expire, Android will not install an update to the application. The only choice left will be for you to create another application—an application with a different package name—and sign it with a new certificate. So as you can see, it is critical for you to consider the expiration date of the certificate when you generate it.
Now that you understand security with respect to deployment and installation, let’s move on to runtime security in Android.
Performing Runtime Security Checks
Runtime security in Android happens at the process and operation levels. At the process level, Android prevents one application from directly accessing another application’s data. It does this by running each application within a different process and under a unique and permanent user ID. At the operational level, Android defines a list of protected features and resources. For your application to access this information, you have to add one or more permission requests to your AndroidManifest.xml file. You can also define custom permissions with your application.
In the sections that follow, we will talk about process-boundary security and how to declare and use predefined permissions. We will also discuss creating custom permissions and enforcing them within your application. Let’s start by dissecting Android security at the process boundary.
Understanding Security at the Process Boundary
Unlike your desktop environment, where most of the applications run under the same user ID, each Android application generally runs under its own unique ID. By running each application under a different ID, Android creates an isolation boundary around each process. This prevents one application from directly accessing another application’s data.
Although each process has a boundary around it, data sharing between applications is obviously possible but has to be explicit. In other words, to get data from another application, you have to go through the components of that application. For example, you can query a content provider of another application, you can invoke an activity in another application, or—as you’ll see in Chapter 15—you can communicate with a service of another application. All of these facilities provide methods for you to share information between applications, but they do so in an explicit manner because you don’t directly access the underlying database, files, and so on.
Android’s security at the process boundary is clear and simple. Things get interesting when we start talking about protecting resources (such as contact data), features (such as the device’s camera), and our own components. To provide this protection, Android defines a permission scheme. Let’s dissect that now.
Declaring and Using Permissions
Android defines a permission scheme meant to protect resources and features on the device. For example, applications, by default, cannot access the contacts list, make phone calls, and so on. To protect the user from malicious applications, Android requires applications to request permissions if they need to use a protected feature or resource. From the introduction of Android Kit Kat, and continuing in Android Lollipop, permissions when presented to the end user are now clustered into groups to address their constantly growing number and complexity. This grouping brings with it some compromises as you will observe.
As we will cover shortly, permission requests go in the manifest file. At install time, the APK installer either grants or denies the requested permissions based on the signature of the .apk file and/or feedback from the user. If permission is not granted, any attempt to execute or access the associated feature will result in a permission failure.
Table 28-2 shows some commonly used features and the permissions they require. Although you are not yet familiar with all the features listed, you will learn about them later (either in this chapter or in subsequent chapters).
Table 28-2. Features and Resources and the Permissions They Require
|
Feature/Resource |
Description | |
|---|---|---|
|
Camera |
android.permission.CAMERA |
Enables you to access the device’s camera. |
|
Internet |
android.permission.INTERNET |
Enables you to make a network connection. |
|
User’s contact data |
android.permission.READ_CONTACTS android.permission.WRITE_CONTACTS |
Enables you to read from or write to the user’s contact data. |
|
User’s calendar data |
android.permission.READ_CALENDAR android.permission.WRITE_CALENDAR |
Enables you to read from or write to the user’s calendar data. |
|
Recording audio |
android.permission.RECORD_AUDIO |
Enables you to record audio. |
|
Wi-Fi location information |
android.permission.ACCESS_COARSE_LOCATION |
Enables you to access coarse-grained location information from Wi-Fi and cell towers. |
|
GPS location information |
android.permission.ACCESS_FINE_LOCATION |
Enables you to access fine-grained location information. This includes GPS location information. It is also sufficient for Wi-Fi and cell towers. |
|
Battery information |
android.permission.BATTERY_STATS |
Enables you to obtain battery-state information. |
|
Bluetooth |
android.permission.BLUETOOTH |
Enables you to connect to paired Bluetooth devices. |
For a complete list of permissions, see the following URL:
http://developer.android.com/reference/android/Manifest.permission.html
Application developers can request permissions by adding entries to the AndroidManifest.xml file. For example, Listing 28-3 asks to access the camera on the device, to read the list of contacts, and to read the calendar.
Note that you can either hard-code permissions in the AndroidManifest.xml file or use the manifest editor. The manifest editor is wired up to launch when you open (double-click) the manifest file. The manifest editor contains a drop-down list that has all of the permissions preloaded to prevent you from making a mistake. As shown in Figure 28-5, you can access the permissions list by selecting the Permissions tab in the manifest editor.
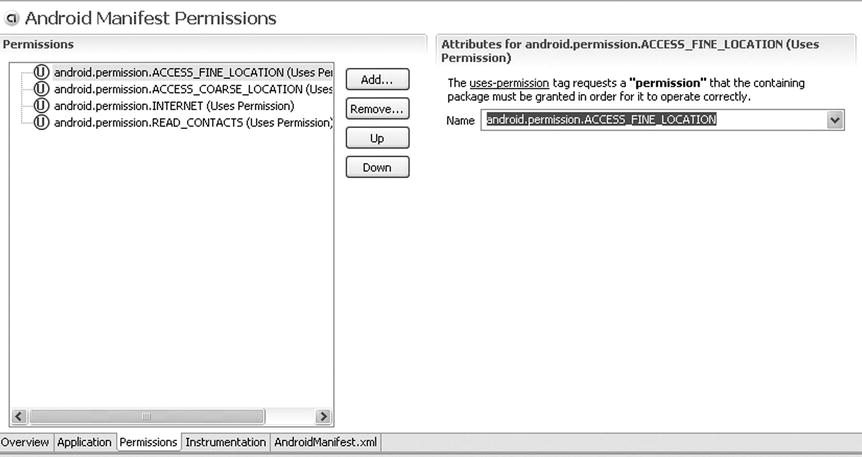
Figure 28-5. The Android manifest editor tool in Eclipse
You now know that Android defines a set of permissions that protects a set of features and resources. Similarly, you can define and enforce custom permissions with your application. Let’s see how that works.
Understanding and Using URI Permissions
Content providers (discussed in Chapter 4) often need to control access at a finer level than all or nothing. Fortunately, Android provides a mechanism for this. Think about e-mail attachments. The attachment may need to be read by another activity to display it. But the other activity should not get access to all of the e-mail data and does not need access even to all attachments. This is where URI permissions come in.
Passing URI Permissions in Intents
When invoking another activity and passing a URI, your application can specify that it is granting permissions to the URI being passed. But before your application can do this, it needs permission itself to the URI, and the URI content provider must cooperate and allow the granting of permissions to another activity. The code to invoke an activity with granting of permissions looks like Listing 28-4, which is actually from the Android Email program, where it is launching an activity to view an e-mail attachment.
The attachment is specified by contentUri. Notice how the intent is created with the action Intent.ACTION_VIEW, and the data is set using setData(). The flag is set to grant read permission of the attachment to whatever activity will match on the intent. This is where the content provider comes into play. Just because an activity has read permission to content doesn’t mean it can pass along that permission to some other activity that does not have the permission already. The content provider must allow it as well. As Android finds a matching intent filter on an activity, it consults with the content provider to make sure that permissions can be granted. In essence, the content provider is being asked to allow access to this new activity to the content specified by the URI. If the content provider refuses, then a SecurityException is thrown, and the operation fails. In Listing 28-4, this particular application is not checking for a SecurityException, because the developer is not expecting any refusals to grant permission. That’s because the attachment content provider is part of the Email application! There is a possibility though that no activity can be found to handle the attachment, so that is the only exception being watched for.
In the case where the activity being called to process the URI already has permission to access that URI, the content provider does not get to deny access. That is, the calling activity can grant permission, and if the activity on the receiving end of the intent already has the necessary permissions for contentURI, the called activity will be allowed to proceed with no problems.
In addition to Intent.FLAG_GRANT_READ_URI_PERMISSION, there is a flag for write permissions: Intent.FLAG_GRANT_WRITE_URI_PERMISSION. It is possible to specify both in an Intent. Also, these flags can apply to services and BroadcastReceivers as well as activities because they can receive intents too.
Specifying URI Permissions in Content Providers
So how does a content provider specify URI permissions? It does so in the AndroidManifest.xml file in one of two ways:
- In the <provider> tag, the android:grantUriPermissions attribute can be set to either true or false. If true, any content from this content provider can be granted. If false, the second way of specifying URI permissions can happen, or the content provider can decide not to let anyone else grant permissions.
- Specify permissions with child tags of <provider>. The child tag is <grant-uri-permission>, and you can have more than one within <provider>. <grant-uri-permission> has three possible attributes:
- Using the android:path attribute, you can specify a complete path which will then have permissions that are grantable.
- Similarly, android:pathPrefix specifies the beginning of a URI path.
- android:pathPattern allows wildcards (the asterisk, *, character) to specify a path.
As we stated before, the granting entity must also have appropriate permissions to the content before being allowed to grant them to some other entity. Content providers have additional ways of controlling access to their content, through the android:readPermission attribute of the <provider> tag, the android:writePermission attribute, and the android:permission attribute (a convenient way to specify both read and write permissions with one permission String value). The value for any of these three attributes is a String that represents the permission a caller must have in order to read or write with this content provider. Before an activity could grant read permission to a content URI, that activity must have read permission first, as specified by either the android:readPermission attribute or the android:permission attribute. The entity wanting these permissions would declare them in their manifest file with the <uses-permissions> tag.
References
Here are some helpful references to topics you may wish to explore further:
- http://developer.android.com/guide/topics/security/security.html: The Android Developer’s Guide section “Security Tips.” It provides an overview with links to lots of reference pages.
- http://developer.android.com/guide/publishing/app-signing.html: The Android Developer’s Guide section “Signing Your Applications.”
Summary
This security chapter covered the following topics:
- Unique application user IDs that help separate apps from each other to protect processing and data
- Digital certificates and their use in signing Android applications
- That an application can only be updated if the update is signed with the same digital certificate as the original
- Managing certificates in a keystore using keytool
- Running jarsigner to apply a certificate to an application .apk file
- zipalign and memory boundaries
- The Eclipse plug-in wizard takes care of generating the apk, applying the certificate and zipalign-ing for you
- Manually installing apps onto devices and emulators
- Permissions that applications can declare and use
- URI permissions and how content providers use them