
Styles and Themes
Thus far, we have covered some fundamentals of the Android user interface (UI). In this chapter, we are going to discuss styles and themes, which help to encapsulate control-appearance attributes for easier setup and maintenance. Android provides several ways to alter the style of views in your application, in XML and in code. We’ll first cover using markup tags in strings and then how to use spannables to change specific visual attributes of text. But what if you want to control how things look using a common specification for several views or across an entire activity or application? We’ll discuss Android styles and themes to show you how.
Sometimes, you want to highlight or style a portion of the View’s content. You can do this statically or dynamically. Statically, you can apply markup directly to the strings in your string resources, as shown here:
<string name="styledText"><i>Static</i> style in a <b>TextView</b>.</string>
You can then reference it in your XML or from code. Note that you can use the following HTML tags with string resources: <i>, <b>, and <u>, for italics, bold, and underlined, respectively, as well as <sup> (superscript), <sub> (subscript), <strike> (strikethrough), <big>, <small>, and <monospace>. You can even nest these to get, for example, small superscripts. This works not just in TextViews but also in other views, like buttons. Figure 7-1 shows what styled and themed text looks like, using many of the examples in this section.
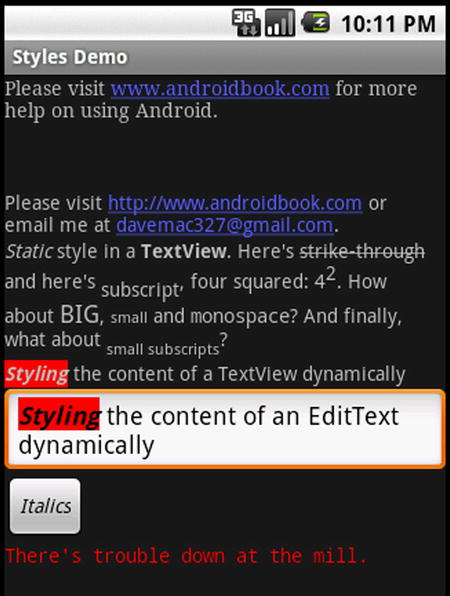
Figure 7-1. Examples of styles and themes
Styling a TextView control’s content programmatically requires a little additional work but allows for much more flexibility (see Listing 7-1), because you can style it at runtime. This flexibility can only be applied to a spannable, though, which is how EditText normally manages the internal text, whereas TextView does not normally use Spannable. Spannable is basically a String that you can apply styles to. To get a TextView to store text as a spannable, you can call setText this way:
tv.setText("This text is stored in a Spannable", TextView.BufferType.SPANNABLE);
Then, when you call tv.getText, you’ll get a spannable.
As shown in Listing 7-1, you can get the content of the EditText (as a Spannable object) and then set styles for portions of the text. The code in the listing sets the text styling to bold and italics and sets the background to red. You can use all the styling options as we have with the HTML tags as described previously, and then some.
Listing 7-1. Applying Styles Dynamically to the Content of an EditText
EditText et =(EditText)this.findViewById(R.id.et);
et.setText("Styling the content of an EditText dynamically");
Spannable spn = (Spannable) et.getText();
spn.setSpan(new BackgroundColorSpan(Color.RED), 0, 7,
             Spannable.SPAN_EXCLUSIVE_EXCLUSIVE);
spn.setSpan(new StyleSpan(android.graphics.Typeface.BOLD_ITALIC),
             0, 7, Spannable.SPAN_EXCLUSIVE_EXCLUSIVE);
These two techniques for styling only work on the one view they’re applied to. Android provides a style mechanism to define a common style to be reused across views, as well as a theme mechanism, which basically applies a style to an entire activity or the entire application. To begin with, we need to talk about styles.
A style is a collection of View attributes that is given a name so you can refer to that collection by its name and assign that style by name to views. For example, Listing 7-2 shows a resource XML file, saved in /res/values, that we could use for all error messages.
Listing 7-2. Defining a Style to Be Used Across Many Views
<?xml version="1.0" encoding="utf-8"?>
<resources>
    <style name="ErrorText">
        <item name="android:layout_width">fill_parent</item>
        <item name="android:layout_height">wrap_content</item>
        <item name="android:textColor">#FF0000</item>
        <item name="android:typeface">monospace</item>
    </style>
</resources>
The size of the view is defined as well as the font color (red) and typeface. Notice how the name attribute of the item tag (e.g., android:layout_width) is the XML attribute name we used in our layout XML files in earlier chapters, and the value of the item tag no longer requires double quotes. We can now use this style for an error TextView, as shown in Listing 7-3.
Listing 7-3. Using a Style in a View
<TextView  android:id="@+id/errorText"
    style="@style/ErrorText"
    android:text="No errors at this time"
    />
It is important to note that the attribute name for a style in this View definition does not start with android:. Watch out for this, because everything seems to use android: except the style. When you’ve got many views in your application that share a style, changing that style in one place is much simpler; you only need to modify the style’s attributes in the one resource file.
You can, of course, create many different styles for various controls. For example, buttons could share a common style that is different from the common style for text in menus. It is common to see text attributes managed with styles, including android:textColor, android:textStyle, and android:textSize. Other common attributes used with styles include the padding values, android:background, and colors.
One really nice aspect of styles is that you can set up a hierarchy of them. We could define a new style for really bad error messages and base it on the style of ErrorText. Listing 7-4 shows how this might look.
Listing 7-4. Defining a Style from a Parent Style
<?xml version="1.0" encoding="utf-8"?>
<resources>
    <style name="ErrorText.Danger" >
        <item name="android:textStyle">bold</item>
    </style>
</resources>
This example shows that we can simply name our child style using the parent style as a prefix to the new style name. Therefore, ErrorText.Danger is a child of ErrorText and inherits the style attributes of the parent. It then adds a new attribute for textStyle. This can be repeated again and again to create a whole tree of styles.
As was the case for adapter layouts, Android provides a large set of styles that we can use. To specify an Android-provided style, use syntax like this:
style="@android:style/TextAppearance"
This style sets the default style for text in Android. To locate the master Android styles.xml file, visit the Android SDK/platforms/<android-version>/data/res/values/ folder, where you installed the Android SDK; <android-version> is the particular version of Android you want to see styles for. Inside this file, you will find quite a few styles that are ready-made for you to use or extend. A quick note about @android:style/TextAppearance: this style does not set android:layout_height or android:layout_width, so a View specification would need more than this style to compile properly.
Here’s a word of caution about extending the Android-provided styles: the previous method of using a prefix won’t work with Android-provided styles. Instead, you must use the parent attribute of the style tag, like this:
<style name="CustomTextAppearance" parent="@android:style/TextAppearance">
    <item  ... your extensions go here ...    />
</style>
You don’t always have to pull in an entire style on your view. You could choose to borrow just a part of the style instead. For example, if you want to set the color of the text in your TextView to a system style color, you could do the following:
<TextView android:id="@+id/tv2"
    android:layout_width="fill_parent"  android:layout_height="wrap_content"
    android:textColor="?android:textColorSecondary"
    android:text="@string/hello_world" />
Notice that in this example, the name of the textColor attribute value starts with the ? character instead of the @ character. The ? character is used so Android knows to look for a style value in the current theme. Because we see ?android, we look in the Android system theme for this style value.
One problem with styles is that you need to add an attribute specification of style="@style/..." to every view definition that you want it to apply to. If you have some style elements you want applied across an entire activity, or across the whole application, you should use a theme instead. A theme is really just a style applied broadly; but in terms of defining a theme, it’s exactly like a style. In fact, themes and styles are fairly interchangeable: you can extend a theme into a style or refer to a style as a theme. Typically, only the names give a hint as to whether a style is intended to be used as a style or a theme.
To specify a theme for an activity or an application, you would add an attribute to the <activity> or <application> tag in the AndroidManifest.xml file for your project. The code might look like one of these:
<activity android:theme="@style/MyActivityTheme">
<application android:theme="@style/MyApplicationTheme">
<application android:theme="@android:style/Theme.NoTitleBar">
You can find the Android-provided themes in the same folder as the Android-provided styles, with the themes in a file called themes.xml. When you look inside the themes file, you will see a large set of styles defined, with names that start with Theme. It might be good to read that last line a few times. Put another way, all styles and themes are of type style, even if the style name has “Theme” in it. You will also notice that within the Android-provided themes and styles, there is a lot of extending going on, which is why you end up with styles called Theme.Dialog.AppError, for example.
References
Here are some helpful references to topics you may wish to explore further:
- www.androidbook.com/proandroid5/projects: A list of downloadable projects related to this book. For this chapter, look for a ZIP file called ProAndroid5_Ch07_Styles.zip. This ZIP file contains all projects from this chapter, listed in separate root directories. There is also a README.TXT file that describes exactly how to import projects into your IDE from one of these ZIP files.
- http://developer.android.com/guide/topics/ui/themes.html: The Android guide to styles and themes.
Summary
Let’s conclude this chapter by quickly enumerating what you have learned about styles and themes:
- Styles are just collections of view attributes for easy reuse across views, activities, and applications.
- You can make your own styles, use a predefined style, or extend an existing style.
- Themes are what you call a style when it is applied to an activity or application.