
Implementing Drag and Drop
In the last chapter, we covered touchscreens, the MotionEvent class, and gestures. You learned how to use touch to make things happen in your application. One area that we didn’t cover was drag and drop. On the surface, drag and drop seems like it should be fairly simple: touch an object on the screen, drag it across the screen (usually over some other object), and let go, and the application should take the appropriate action. In many computer operating systems, this is a common way to delete a file from the desktop; you just drag the file’s icon to the trash-bin icon, and the file gets deleted. In Android, you may have seen how to rearrange icons on the home screen by dragging them to new locations or to the trash.
This chapter is going to go in depth into drag and drop. Prior to Android 3.0, developers were on their own when it came to drag and drop. But because there are still quite a few phones out there running Android 2.3, we’ll show you how to do drag and drop on them. We’ll show you the old way in the first section of this chapter, and then we'll show you the new way in the second part.
Exploring Drag and Drop
In this next example application, we’re going to take a white dot and drag it to a new location in our user interface. We’re also going to place three counters in our user interface, and if the user drags the white dot to one of the counters, that counter will increment and the dot will return back to its starting place. If the dot is dragged somewhere else on the screen, we’ll just leave it there.
Note See the “References” section at the end of this chapter for the URL from which you can import these projects into your IDE directly. We’ll only show code in the text to explain concepts. You'll need to download the code to create a working example application.
The first sample application for this chapter is called TouchDragDemo. There are two key files we want to talk about in this section:
- /res/layout/main.xml
- /src/com/androidbook/touch/dragdemo/Dot.java
The main.xml file contains our layout for the drag-and-drop demo. It is shown in Listing 23-1. Some of the key concepts we want you to notice are the use of a FrameLayout as the top-level layout, inside of which is a LinearLayout containing TextViews and a custom View class called Dot. Because the LinearLayout and Dot coexist within the FrameLayout, their positions and sizes don’t really impact each other, but they will be sharing the screen real estate, one on top of the other. The UI for this application is shown in Figure 23-1.
Listing 23-1. Example Layout XML for Our Drag Example
<?xml version="1.0" encoding="utf-8"?>
<!-- This file is res/layout/main.xml -->
<FrameLayout xmlns:android="http://schemas.android.com/apk/res/android"
    android:layout_width="match_parent"
    android:layout_height="match_parent"
    android:background="#0000ff" >

  <LinearLayout android:id="@+id/counters"
    android:orientation="vertical"
    android:layout_width="match_parent"
    android:layout_height="match_parent" >

    <TextView android:id="@+id/top" android:text="0"
      android:background="#111111"
      android:layout_height="wrap_content"
      android:layout_width="60dp"
      android:layout_gravity="right"
      android:layout_marginTop="30dp"
      android:layout_marginBottom="30dp"
      android:padding="10dp" />

    <TextView android:id="@+id/middle" android:text="0"
      android:background="#111111"
      android:layout_height="wrap_content"
      android:layout_width="60dp"
      android:layout_gravity="right"
      android:layout_marginBottom="30dp"
      android:padding="10dp" />

    <TextView android:id="@+id/bottom" android:text="0"
      android:background="#111111"
      android:layout_height="wrap_content"
      android:layout_width="60dp"
      android:layout_gravity="right"
      android:padding="10dp" />
  </LinearLayout>

  <com.androidbook.touch.dragdemo.Dot android:id="@+id/dot"
    android:layout_width="match_parent"
    android:layout_height="match_parent" />

</FrameLayout>

Figure 23-1. User interface for TouchDragDemo
Note that the package name in the layout XML file for the Dot element must match the package name you use for your application. As mentioned, the layout of Dot is separated from the LinearLayout. This is because we want the freedom to move the dot around the screen, which is why we chose the layout_width and layout_height of "match_parent". When we draw the dot on the screen, we want it to be visible, and if we constrict the size of our dot’s view to the diameter of the dot, we won’t be able to see it when we drag it away from our starting place.
Note Technically, we could set android:clipChildren to true in the FrameLayout tag and set the layout width and height of the dot to wrap_content, but that doesn’t feel as clean.
For each of the counters, we simply lay them out with a background, padding, margins, and gravity to get them to show up along the right-hand side of the screen. We start them off at zero, but as you’ll soon see, we'll be incrementing those values as dots are dragged over to them. Although we chose to use TextViews in this example, you could use just about any View object as a drop target. Now we will look at the Java code for our Dot class in Listing 23-2.
Listing 23-2. Java Code for Our Dot Class
public class Dot extends View {
    private static final String TAG = "TouchDrag";
    private float left = 0;
    private float top = 0;
    private float radius = 20;
    private float offsetX;
    private float offsetY;
    private Paint myPaint;
    private Context myContext;

    public Dot(Context context, AttributeSet attrs) {
        super(context, attrs);

        // Save the context (the activity)
        myContext = context;

        myPaint = new Paint();
        myPaint.setColor(Color.WHITE);
        myPaint.setAntiAlias(true);
    }

    public boolean onTouchEvent(MotionEvent event) {
        int action = event.getAction();
        float eventX = event.getX();
        float eventY = event.getY();
        switch(action) {
        case MotionEvent.ACTION_DOWN:
            // First make sure the touch is on our dot,
            // since the size of the dot's view is
            // technically the whole layout. If the
            // touch is *not* within, then return false
            // indicating we don't want any more events.
            if( !(left-20 < eventX && eventX < left+radius*2+20 &&
                top-20 < eventY && eventY < top+radius*2+20))
                return false;

            // Remember the offset of the touch as compared
            // to our left and top edges.
            offsetX = eventX - left;
            offsetY = eventY - top;
            break;
        case MotionEvent.ACTION_MOVE:
        case MotionEvent.ACTION_UP:
        case MotionEvent.ACTION_CANCEL:
            left = eventX - offsetX;
            top = eventY - offsetY;
            if(action == MotionEvent.ACTION_UP) {
                checkDrop(eventX, eventY);
            }
            break;
        }
        invalidate();
        return true;
    }

    private void checkDrop(float x, float y) {
        // See if the x,y of our drop location is near to
        // one of our counters. If so, increment it, and
        // reset the dot back to its starting position
        Log.v(TAG, "checking drop target for " + x + ", " + y);

        int viewCount = ((MainActivity)myContext).counterLayout
                          .getChildCount();

        for(int i = 0; i<viewCount; i++) {
            View view = ((MainActivity)myContext).counterLayout
                          .getChildAt(i);
            if(view.getClass() == TextView.class){
                Log.v(TAG, "Is the drop to the right of " +
                            (view.getLeft()-20));
                Log.v(TAG, "  and vertically between " +
                          (view.getTop()-20) +
                          " and " + (view.getBottom()+20) + "?");
                if(x > view.getLeft()-20 &&
                        view.getTop()-20 < y &&
                        y < view.getBottom()+20) {
                    Log.v(TAG, "     Yes. Yes it is.");

                    // Increase the count value in the TextView by one
                    int count =
                        Integer.parseInt(
                            ((TextView)view).getText().toString());
                    ((TextView)view).setText(String.valueOf( ++count ));

                    // Reset the dot back to starting position
                    left = top = 0;
                    break;
                }
            }
        }
    }

    public void draw(Canvas canvas) {
        canvas.drawCircle(left + radius, top + radius, radius, myPaint);
    }
}
When you run this application, you will see a white dot on a blue background. You can touch the dot and drag it around the screen. When you lift your finger, the dot stays where it is until you touch it again and drag it somewhere else. The draw() method puts the dot at its current location of left and top, adjusted by the dot’s radius. By receiving MotionEvent objects in the onTouchEvent() method, we can modify the left and top values by the movement of our touch.
Because the user won’t always touch the exact center of the object, the touch coordinates will not be the same as the location coordinates of the object. That is the purpose of the offset values: to get us back to the left and top edges of our dot from the position of the touch. But even before we start a drag operation, we want to be sure that the user’s touch is considered close enough to the dot to be valid. If the user touches the screen far away from the dot, which is technically within the view layout of the dot, we don’t want that to start a drag sequence. That is why we look to see if the touch is within the white dot itself; if it is not, we simply return false, which prevents receiving any more touch events in that touch sequence.
When your finger starts moving across the screen, we adjust the location of the object by the deltas in x and y based on the MotionEvents that we get. When you stop moving (ACTION_UP), we finalize our location using the last coordinates of your touch. We don’t have to worry about scrollbars in this example, which could complicate the calculation of the object’s position of our object on the screen. But the basic principle is still the same. By knowing the starting location of the object to be moved and keeping track of the delta values of a touch from ACTION_DOWN through to ACTION_UP, we can adjust the location of the object on the screen.
Dropping an object onto another object on the screen has much less to do with touch than it does with knowing where things are on the screen. As we drag an object around the screen, we are aware of its position relative to one or more reference points. We can also interrogate objects on the screen for their locations and sizes. We can then determine if our dragged object is “over” another object. The typical process of figuring out a drop target for a dragged object is to iterate through the available objects that can be dropped on and determine if our current position overlaps with that object. Each object’s size and position (and sometimes shape) can be used to make this determination. If we get an ACTION_UP event, meaning that the user has let go of our dragged object, and the object is over something we can drop onto, we can fire the logic to process the drop action.
We used this approach in our sample application. When the ACTION_UP action is detected, we then look through the child views of the LinearLayout, and for each TextView that is found, we compare the location of the touch to the edges of the TextView (plus a little bit extra). If the touch is within that TextView, we grab the current numeric value of the TextView, increment it by one, and write it back. If this happens, the position of the dot is reset back to its starting place (left = 0, top = 0) for the next drag.
Our example shows you the basics of a way to do drag and drop in Android prior to 3.0. With this you could implement drag-and-drop features in your application. This might be the action of dragging something to the trash can, where the object being dragged should be deleted, or it could be dragging a file to a folder for the purposes of moving or copying it. To embellish your application, you could pre-identify which views are potential drop targets and cause them to visually change as a drag starts. If you wanted the dragged object to disappear from the screen when it is dropped, you could always programmatically remove it from the layout (see the various removeView methods in ViewGroup).
Now that you’ve seen the hard way to do drag and drop, we’d like to show you the drag-and-drop support that was added in Android 3.0.
Basics of Drag and Drop in 3.0+
Prior to Android 3.0, there was no direct support for drag and drop. You learned in the first section of this chapter how to drag a View around the screen; you also learned that it was possible to use the current location of the dragged object to determine if there was a drop target underneath. When the MotionEvent for the finger-up event was received, your code could figure out if that meant a drop had occurred. Although this was doable, it certainly wasn’t as easy as having direct support in Android for the drag-and-drop operation. You now have that direct support.
At its most basic, the drag-and-drop operation starts with a view declaring that a drag has started; then all interested parties watch the drag take place until the drop event is fired. If a view catches the drop event and wants to receive it, then a drag and drop has just occurred. If there is no view to receive the drop, or if the view that receives it doesn’t want it, then no drop takes place. Dragging is communicated through the use of a DragEvent object, which is passed to all of the drag listeners available.
Within the DragEvent object are descriptors for lots of information, depending on the initiator of the drag sequence. For example, the DragEvent can contain object references to the initiator itself, state information, textual data, URIs, or pretty much whatever you want to pass through the drag sequence.
Information could be passed that results in view-to-view dynamic communication; however, the originator data in a DragEvent object is set when the DragEvent is created, and it stays the same thereafter. In addition to this data, the DragEvent has an action value indicating what is going on with the drag sequence, and location information indicating where the drag is on the screen.
A DragEvent has six possible actions:
- ACTION_DRAG_STARTED indicates that a new drag sequence has begun.
- ACTION_DRAG_ENTERED indicates that the dragged object has been dragged into the boundaries of a specific view.
- ACTION_DRAG_LOCATION indicates that the dragged object has been dragged on the screen to a new location.
- ACTION_DRAG_EXITED indicates that the dragged object has been dragged outside the boundaries of a specific view.
- ACTION_DROP indicates that the user has let go of the dragged object. It is up to the receiver of this event to determine whether this truly means a drop has occurred.
- ACTION_DRAG_ENDED tells all drag listeners that the previous drag sequence has ended. The DragEvent.getResult() method indicates a successful drop or failure.
You might think that you need to set up a drag listener on each view in the system that could participate in a drag sequence; but, in fact, you can define a drag listener on just about anything in your application, and it will receive all of the drag events for all views in the system. This can make things a little confusing because the drag listener does not need to be associated with either the object being dragged or the drop target. The listener can manage all of the coordination of the drag and drop.
In fact, if you inspect the drag-and-drop example project that comes with the Android SDK, you will see that it sets up a listener on a TextView that has nothing to do with the actual dragging and dropping. The upcoming example project uses drag listeners that are tied to specific views. These drag listeners each receive a DragEvent object for the drag events that occur in the drag sequence. This means a view could receive a DragEvent object that can be ignored because it is really about a different view. This also means the drag listener must make that determination in code and that there must be enough information within the DragEvent object for the drag listener to figure out what to do.
If a drag listener got a DragEvent object that merely said there’s an unknown object being dragged and it’s at coordinates (15, 57), there isn’t much the drag listener can do with it. It is much more helpful to get a DragEvent object that says a particular object is being dragged, it’s at coordinates (15, 57), it’s a copy operation, and the data is a specific URI. When that drops, there’s enough information to be able to initiate a copy operation.
We’re actually seeing two different kinds of dragging going on. In our first example application, we dragged a view across a frame layout, and we could let go and that view would stay where it was. We only got drag-and-drop behavior when we dropped our view on top of something else. The supported form of drag and drop works differently than this. Now, when you drag a view as part of a drag-and-drop sequence, the dragged view doesn’t move at all. We get a shadow image of the dragged view which does travel across the screen, but if we let go of it, that shadow view goes away. What this means is that you might still have occasion to use the technique from the beginning of this chapter in an Android 3.0+ application, to move images around on the screen perhaps, without necessarily doing drag and drop.
Drag-and-Drop Example Application
For your next example application, you’re going to employ a staple of 3.0, the fragment. This, among other things, will prove that drags can cross fragment boundaries. You’ll create a palette of dots on the left and a square target on the right. When a dot is grabbed using a long click, you’ll change the color of that dot in the palette and Android will show a shadow of the dot as you drag. When the dragged dot reaches the square target, the target will begin to glow. If you drop the dot on the square target, a message will indicate that you’ve just added one more drop to the drop count, the glowing will stop, and the original dot will go back to its original color.
List of Files
This application builds upon concepts we’ve covered throughout this book. We’re only going to include the interesting files in the text. For the others, just look at them in your IDE at your leisure. Here are the ones that we’ve included in the text:
- palette.xml is the fragment layout for the dots on the left side (see Listing 23-3).
- dropzone.xml is the fragment layout for the square target on the right side, plus the drop-count message (see Listing 23-4).
- DropZone.java inflates the dropzone.xml fragment layout file and then implements the drag listener for the drop target (see Listing 23-5).
- Dot.java is your custom view class for the objects you’re going to drag. It handles beginning the drag sequence, watching drag events, and drawing the dots (see Listing 23-6).
Laying Out the Example Drag-and-Drop Application
Before we get into the code, Figure 23-2 shows what the application will look like.
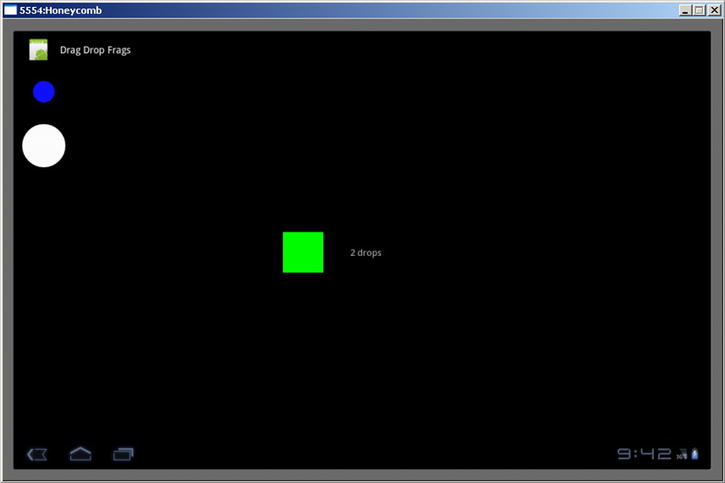
Figure 23-2. Drag Drop Frags example application user interface
The main layout file has a simple horizontal linear layout and two fragment specifications. The first fragment will be for the palette of dots and the second will be for the dropzone.
The palette fragment layout file (Listing 23-3) gets a bit more interesting. Although this layout represents a fragment, you don’t need to include a fragment tag within this layout. This layout will be inflated to become the view hierarchy for your palette fragment. The dots are specified as custom dots, and there are two of them arranged vertically. Notice that there are a couple of custom XML attributes in the definition of your dots (dot:color and dot:radius). As you can see, these attributes specify the color and the radius of your dots. You might also have noticed that the layout width and height are wrap_content, not match_parent as in the earlier example application in this chapter. The new drag-and-drop support makes things much easier.
Listing 23-3. The palette.xml Layout File for the Dots
<?xml version="1.0" encoding="utf-8"?>
<!-- This file is res/layout/palette.xml -->
<LinearLayout
  xmlns:android="http://schemas.android.com/apk/res/android"
  xmlns:dot=
    "http://schemas.android.com/apk/res/com.androidbook.drag.drop.demo"
  android:layout_width="match_parent"
  android:layout_height="match_parent"
  android:orientation="vertical">

  <com.androidbook.drag.drop.demo.Dot android:id="@+id/dot1"
    android:layout_width="wrap_content"
    android:layout_height="wrap_content"
    android:padding="30dp"
    android:tag="Blue dot"
    dot:color="#ff1111ff"
    dot:radius="20dp"  />

  <com.androidbook.drag.drop.demo.Dot android:id="@+id/dot2"
    android:layout_width="wrap_content"
    android:layout_height="wrap_content"
    android:padding="10dp"
    android:tag="White dot"
    dot:color="#ffffffff"
    dot:radius="40dp"  />

</LinearLayout>
The dropzone fragment layout file in Listing 23-4 is also easy to understand. There’s a green square and a text message arranged horizontally. This will be the dropzone for the dots you’ll be dragging. The text message will be used to display a running count of the drops.
Listing 23-4. The dropzone.xml Layout File
<?xml version="1.0" encoding="utf-8"?>
<!-- This file is res/layout/dropzone.xml -->
<LinearLayout
  xmlns:android="http://schemas.android.com/apk/res/android"
  android:layout_width="match_parent"
  android:layout_height="match_parent"
  android:orientation="horizontal" >

  <View android:id="@+id/droptarget"
    android:layout_width="75dp"
    android:layout_height="75dp"
    android:layout_gravity="center_vertical"
    android:background="#00ff00" />

  <TextView android:id="@+id/dropmessage"
    android:text="0 drops"
    android:layout_width="wrap_content"
    android:layout_height="wrap_content"
    android:layout_gravity="center_vertical"
    android:paddingLeft="50dp"
    android:textSize="17sp" />

</LinearLayout>
Responding to onDrag in the Dropzone
Now that you have the main application layout set, let’s see how the drop target needs to be organized by examining Listing 23-5.
Listing 23-5. The DropZone.java File
public class DropZone extends Fragment {

    private View dropTarget;
    private TextView dropMessage;

    @Override
    public View onCreateView(LayoutInflater inflater,
            ViewGroup container, Bundle icicle)
    {
        View v = inflater.inflate(R.layout.dropzone, container, false);

        dropMessage = (TextView)v.findViewById(R.id.dropmessage);

        dropTarget = (View)v.findViewById(R.id.droptarget);
        dropTarget.setOnDragListener(new View.OnDragListener() {
            private static final String DROPTAG = "DropTarget";
            private int dropCount = 0;
            private ObjectAnimator anim;

            public boolean onDrag(View v, DragEvent event) {
                int action = event.getAction();
                boolean result = true;
                switch(action) {
                case DragEvent.ACTION_DRAG_STARTED:
                    Log.v(DROPTAG, "drag started in dropTarget");
                    break;
                case DragEvent.ACTION_DRAG_ENTERED:
                    Log.v(DROPTAG, "drag entered dropTarget");
                    anim = ObjectAnimator.ofFloat(
                                (Object)v, "alpha", 1f, 0.5f);
                    anim.setInterpolator(new CycleInterpolator(40));
                    anim.setDuration(30*1000); // 30 seconds
                    anim.start();
                    break;
                case DragEvent.ACTION_DRAG_EXITED:
                    Log.v(DROPTAG, "drag exited dropTarget");
                    if(anim != null) {
                        anim.end();
                        anim = null;
                    }
                    break;
                case DragEvent.ACTION_DRAG_LOCATION:
                    Log.v(DROPTAG, "drag proceeding in dropTarget: " +
                            event.getX() + ", " + event.getY());
                    break;
                case DragEvent.ACTION_DROP:
                    Log.v(DROPTAG, "drag drop in dropTarget");
                    if(anim != null) {
                        anim.end();
                        anim = null;
                    }

                    ClipData data = event.getClipData();
                    Log.v(DROPTAG, "Item data is " +
                          data.getItemAt(0).getText());

                    dropCount++;
                    String message = dropCount + " drop";
                    if(dropCount > 1)
                        message += "s";
                    dropMessage.setText(message);
                    break;
                case DragEvent.ACTION_DRAG_ENDED:
                    Log.v(DROPTAG, "drag ended in dropTarget");
                    if(anim != null) {
                        anim.end();
                        anim = null;
                    }
                    break;
                default:
                    Log.v(DROPTAG, "other action in dropzone: " +
                                   action);
                    result = false;
                }
                return result;
            }
        });
        return v;
    }
}
Now you’re starting to get into interesting code. For the dropzone, you need to create the target upon which you want to drag the dots. As you saw earlier, the layout specifies a green square on the screen with a text message next to it. Because the dropzone is also a fragment, you’re overriding the onCreateView() method of DropZone. The first thing to do is inflate the dropzone layout and then extract out the view reference for the square target (dropTarget) and for the text message (dropMessage). Then you need to set up a drag listener on the target so it will know when a drag is underway.
The drop-target drag listener has a single callback method in it: onDrag(). This callback will receive a view reference as well as a DragEvent object. The view reference relates to the view that the DragEvent is related to. As mentioned, the drag listener is not necessarily connected to the view that will be interacting with the drag event, so this callback must identify the view for which the drag event is taking place.
One of the first things you likely want to do in any onDrag() callback is read the action from the DragEvent object. This will tell you what’s going on. For the most part, the only thing you want to do in this callback is log the fact that a drag event is taking place. You don’t need to actually do anything for ACTION_DRAG_LOCATION, for example. But you do want to have some special logic for when the object is dragged within your boundaries (ACTION_DRAG_ENTERED) that will be turned off either when the object is dragged outside of your boundaries (ACTION_DRAG_EXITED) or when the object is dropped (ACTION_DROP).
You’re using the ObjectAnimator class that was introduced in Chapter 18, only here you’re using it in code to specify a cyclic interpolator that modifies the target’s alpha. This will have the effect of pulsing the transparency of the green target square, which will be the visual indication that the target is willing to accept a drop of the object onto it. Because you turn on the animation, you must make sure to also turn it off when the object leaves or is dropped, or the drag and drop is ended. In theory, you shouldn’t need to stop the animation on ACTION_DRAG_ENDED, but it’s wise to do it anyway.
For this particular drag listener, you’re going to get ACTION_DRAG_ENTERED and ACTION_DRAG_EXITED only if the dragged object interacts with the view with which you’re associated. And as you’ll see, the ACTION_DRAG_LOCATION events happen only if the dragged object is inside your target view.
The only other interesting condition is the ACTION_DROP itself (notice that DRAG_ is not part of the name of this action). If a drop has occurred on your view, it means the user has let go of the dot over the green square. Because you’re expecting this object to be dropped on the green square, you can just go ahead and read the data from the first item and then log it to LogCat. In a production application, you might pay closer attention to the ClipData object that is contained in the drag event itself. By inspecting its properties, you could decide if you even want to accept the drop or not.
This is a good time to point out the result boolean in this onDrag() callback method. Depending on how things go, you want to let Android know either that you took care of the drag event (by returning true) or that you didn’t (by returning false). If you don’t see what you want to see inside of the drag event object, you could certainly return false from this callback, which would tell Android that this drop was not handled.
Once you log the information from the drag event in LogCat, you increment the count of the drops received; this is updated in the user interface, and that’s about it for DropZone.
If you look this class over, it’s really rather simple. You don’t actually have any code in here that deals with MotionEvents, nor do you even need to make your own determination of whether there is a drag going on. You just get appropriate callback calls as a drag sequence unfolds.
Setting Up the Drag Source Views
Let’s now consider how views corresponding to a drag source are organized, starting by looking at Listing 23-6.
Listing 23-6. The Java for the Custom View: Dot
public class Dot extends View
    implements View.OnDragListener
{
    private static final int DEFAULT_RADIUS = 20;
    private static final int DEFAULT_COLOR = Color.WHITE;
    private static final int SELECTED_COLOR = Color.MAGENTA;
    protected static final String DOTTAG = "DragDot";
    private Paint mNormalPaint;
    private Paint mDraggingPaint;
    private int mColor = DEFAULT_COLOR;
    private int mRadius = DEFAULT_RADIUS;
    private boolean inDrag;

    public Dot(Context context, AttributeSet attrs) {
        super(context, attrs);

        // Apply attribute settings from the layout file.
        // Note: these could change on a reconfiguration
        // such as a screen rotation.
        TypedArray myAttrs = context.obtainStyledAttributes(attrs,
                R.styleable.Dot);

        final int numAttrs = myAttrs.getIndexCount();
        for (int i = 0; i < numAttrs; i++) {
            int attr = myAttrs.getIndex(i);
            switch (attr) {
            case R.styleable.Dot_radius:
                mRadius = myAttrs.getDimensionPixelSize(attr,
                          DEFAULT_RADIUS);
                break;
            case R.styleable.Dot_color:
                mColor = myAttrs.getColor(attr, DEFAULT_COLOR);
                break;
            }
        }
        myAttrs.recycle();

        // Setup paint colors
        mNormalPaint = new Paint();
        mNormalPaint.setColor(mColor);
        mNormalPaint.setAntiAlias(true);

        mDraggingPaint = new Paint();
        mDraggingPaint.setColor(SELECTED_COLOR);
        mDraggingPaint.setAntiAlias(true);

        // Start a drag on a long click on the dot
        setOnLongClickListener(lcListener);
        setOnDragListener(this);
    }

    private static View.OnLongClickListener lcListener =
        new View.OnLongClickListener() {
        private boolean mDragInProgress;

        public boolean onLongClick(View v) {
            ClipData data =
            ClipData.newPlainText("DragData", (String)v.getTag());

            mDragInProgress =
            v.startDrag(data, new View.DragShadowBuilder(v),
                    (Object)v, 0);

            Log.v((String) v.getTag(),
              "starting drag? " + mDragInProgress);

            return true;
        }
    };

    @Override
    protected void onMeasure(int widthSpec, int heightSpec) {
        int size = 2*mRadius + getPaddingLeft() + getPaddingRight();
        setMeasuredDimension(size, size);
    }

    // The dragging functionality
    public boolean onDrag(View v, DragEvent event) {
        String dotTAG = (String) getTag();
        // Only worry about drag events if this is us being dragged
        if(event.getLocalState() != this) {
            Log.v(dotTAG, "This drag event is not for us");
            return false;
        }
        boolean result = true;

        // get event values to work with
        int action = event.getAction();
        float x = event.getX();
        float y = event.getY();

        switch(action) {
        case DragEvent.ACTION_DRAG_STARTED:
            Log.v(dotTAG, "drag started. X: " + x + ", Y: " + y);
            inDrag = true; // used in draw() below to change color
            break;
        case DragEvent.ACTION_DRAG_LOCATION:
            Log.v(dotTAG, "drag proceeding… At: " + x + ", " + y);
            break;
        case DragEvent.ACTION_DRAG_ENTERED:
            Log.v(dotTAG, "drag entered. At: " + x + ", " + y);
            break;
        case DragEvent.ACTION_DRAG_EXITED:
            Log.v(dotTAG, "drag exited. At: " + x + ", " + y);
            break;
        case DragEvent.ACTION_DROP:
            Log.v(dotTAG, "drag dropped. At: " + x + ", " + y);
            // Return false because we don't accept the drop in Dot.
            result = false;
            break;
        case DragEvent.ACTION_DRAG_ENDED:
            Log.v(dotTAG, "drag ended. Success? " + event.getResult());
            inDrag = false; // change color of original dot back
            break;
        default:
            Log.v(dotTAG, "some other drag action: " + action);
            result = false;
            break;
        }
        return result;
    }

    // Here is where you draw our dot, and where you change the color if
    // you're in the process of being dragged. Note: the color change
    // affects the original dot only, not the shadow.
    public void draw(Canvas canvas) {
        float cx = this.getWidth()/2 + getLeftPaddingOffset();
        float cy = this.getHeight()/2 + getTopPaddingOffset();
        Paint paint = mNormalPaint;
        if(inDrag)
            paint = mDraggingPaint;
        canvas.drawCircle(cx, cy, mRadius, paint);
        invalidate();
    }
}
The Dot code looks somewhat similar to the code for DropZone. This is in part because you’re also receiving drag events in this class. The constructor for a Dot figures out the attributes in order to set the correct radius and color, and then it sets up the two listeners: one for long clicks and another for the drag events.
The two paints are going to be used to draw your circle. You use the normal paint when the dot is just sitting there. But when the dot is being dragged, you want to indicate that by changing the color of the original to magenta.
The long-click listener is where you initiate a drag sequence. The only way you let the user start dragging a dot is if the user clicks and holds on a dot. When the long-click listener is firing, you create a new ClipData object using a string and the dot’s tag. You happen to know that the tag is the name of the dot as specified in the XML layout file. There are several other ways to specify data into a ClipData object, so feel free to read the reference documentation on other ways to store data in a ClipData object.
The next statement is the critical one: startDrag(). This is where Android will take over and start the process of dragging. Note that the first argument is the ClipData object from before; then it’s the drag-shadow object, then a local-state object, and finally the number zero.
The drag-shadow object is the image that will be displayed as the dragging is taking place. In your case, this does not replace the original dot image on the screen but shows a shadow of a dot as the dragging is taking place, in addition to the original dot on the screen. The default DragShadowBuilder behavior is to create a shadow that looks very much like the original, so for your purposes, you merely call it and pass in your view. You can get fancy here and create whatever sort of shadow view you want, but if you do override this class, you’ll need to implement a few methods to make it work.
The onMeasure() method is here to supply dimension information to Android for the custom view you’re using here. You have to tell Android how big your view is so it knows how to lay it out with everything else. This is standard practice for a custom view.
Finally, there’s the onDrag() callback. As mentioned, each drag listener can receive drag events. They all get ACTION_DRAG_STARTED and ACTION_DRAG_ENDED, for example. So, when events happen, you must be careful what you do with the information. Because there are two dots in play in this example application, whenever you do something with the dots, you must be careful that you’re affecting the correct one.
When both dots receive the ACTION_DRAG_STARTED action, only one should set the color of itself to magenta. To figure out which one is correct, compare the local state object passed in with yourself. If you look back where you set the local-state object, you passed the current view in. So now, when you’ve received the local-state object out, you compare it to yourself to see if you’re the view that initiated the drag sequence.
If you aren’t the same view, you write a log message to LogCat saying this is not for you, and you return false to say you’re not handling this message.
If you are the view that should be receiving this drag event, you collect some values from the drag event, then you mostly just log the event to LogCat. The first exception to this is ACTION_DRAG_STARTED. If you got this action and it’s for you, you then know that your dot has begun a drag sequence. Therefore, you set the inDrag boolean so the draw() method later on will do the right thing and display a different-colored dot. This different color only lasts until ACTION_DRAG_ENDED is received, at which time you restore the original color of the dot.
If a dot gets the ACTION_DROP action, this means the user tried to drop a dot on a dot—maybe even the original dot. This shouldn’t do anything, so you just return false from this callback in this case.
Finally, the draw() method of your custom view figures out the location of the center point of your circle (dot) and then draws it with the appropriate paint. The invalidate() method is there to tell Android that you’ve modified the view and that Android should redraw the user interface. By calling invalidate(), you ensure that the user interface will be updated very shortly with whatever is new.
You now have all the files and the background necessary to compile and deploy this example drag-and-drop application.
Testing the Example Drag-and-Drop Application
Following is some example output from LogCat when we ran this example application. Notice how the log message used Blue dot to indicate messages from the blue dot, White dot for messages from the white dot, and DropTarget for the view where the drops are allowed to go.
White dot:  starting drag? true
Blue dot:   This drag event is not for us
White dot:  drag started. X: 53.0, Y: 206.0
DropTarget: drag started in dropTarget
DropTarget: drag entered dropTarget
DropTarget: drag proceeding in dropTarget: 29.0, 36.0
DropTarget: drag proceeding in dropTarget: 48.0, 39.0
DropTarget: drag proceeding in dropTarget: 45.0, 39.0
DropTarget: drag proceeding in dropTarget: 41.0, 39.0
DropTarget: drag proceeding in dropTarget: 40.0, 39.0
DropTarget: drag drop in dropTarget
DropTarget: Item data is White dot
ViewRoot:   Reporting drop result: true
White dot:  drag ended. Success? true
Blue dot:   This drag event is not for us
DropTarget: drag ended in dropTarget
In this particular case, the drag was started with the white dot. Once the long click has triggered the beginning of the drag sequence, we get the starting drag message.
Notice how the next three lines all indicate that an ACTION_DRAG_STARTED action was received in three different views. Blue dot determined that the callback was not for it. It was also not for DropTarget.
Next, notice how the drag-proceeding messages show the drag happening through DropTarget, beginning with the ACTION_DRAG_ENTERED action. This means the dot was being dragged on top of the green square. The x and y coordinates reported in the drag event object are the coordinates of the drag point relative to the upper-left corner of the view. So, in the example app, the first record of the drag in the drop target is at (x, y) = (29, 36), and the drop occurred at (40, 39). See how the drop target was able to extract the tag name of the white dot from the event’s ClipData to write it to LogCat.
Also see how once again, all drag listeners received the ACTION_DRAG_ENDED action. Only White dot determined that it’s okay to display the results using getResult().
Feel free to experiment with this example application. Drag a dot to the other dot, or even to itself. Go ahead and add another dot to palette.xml. Notice how when the dragged dot leaves the green square, there’s a message saying that the drag exited. Note also that if you drop a dot somewhere other than the green square, the drop is considered failed.
References
Here are some helpful references to topics you may wish to explore further:
- www.androidbook.com/proandroid5/projects: A list of downloadable projects related to this book. For this chapter, look for a zip file called ProAndroid5_Ch23_DragnDrop.zip. This zip file contains all the projects from this chapter, listed in separate root directories. There is also a README.TXT file that describes exactly how to import projects into your IDE from one of these zip files.
- http://developer.android.com/guide/topics/ui/drag-drop.html: The Android developer’s guide to drag and drop.
Summary
Let’s summarize the topics covered in this chapter:
- Drag-and-drop support in Android 3.0, and implementing it prior to 3.0 using other methods
- Iterating through possible drop targets to see if a drop (that is, finger leaving the screen after dragging) occurred
- The difficulty of doing the math to keep track of where a dragged object is and whether it’s over a drop target
- Drag-and-drop support in Android 3.0+, which is much nicer because it eliminates a lot of guesswork
- Drag listeners, which can be any objects and do not need to be draggables or drop-target views
- The fact that a drag can occur across fragments
- The DragEvent object, which can contain lots of great information about what is being dragged and why
- How Android takes care of the math to determine whether a drop is occurring on top of a view