
8. File Management Basics
Pro Tools provides a number of smart file-management features that can help you work more efficiently and creatively. Mastering these tools for organizing, moving, and copying audio files will help you streamline your sessions and, most important, help you protect irreplaceable, one-of-a-kind sound recordings.
In Pro Tools most file-management functions mincorporate elements of DigiBase, a database-like utility that uses a powerful file-indexing protocol to keep track of audio files and session-related files on your hard drives. This chapter will show you how to use many of these basic but important file-management features. You’ll learn how to locate missing files, import audio, and convert audio file formats (when necessary). In addition, we’ll explain how to import entire tracks from a session using the import Session Data command. (We’ll get more into the specifics of DigiBase in the next chapter.)
Next, we’ll show you how to export audio files from a session; then we’ll look at Pro Tools’ features for saving hard drive space, including compacting and deleting audio files. We’ll wrap things up with a brief but important discussion on why you should always back up your audio files.
Locating Audio Files
Each time you create a new audio file, Pro Tools tags it with a unique ID. This lets Pro Tools locate the file even if its name or location has changed. When you open a session, Pro Tools looks for all audio files belonging to that session. In Pro Tools 7, if any audio files (or other session-related files) are missing, Pro Tools opens a Missing Files warning.
The Missing Files warning indicates how many files are missing. It also gives you the option of manually finding and relinking missing files with their sessions (using the Relink window), or letting Pro Tools find and relink missing files automatically.
Pro Tools also distinguishes between files found on volumes suitable for record and playback (Performance volumes) and files found on nonsuitable volumes, such as CD-ROM or network servers (Transfer volumes). If Pro Tools determines that a file is located on a Transfer volume, a dialog appears prompting you to copy them to a suitable Performance volume.
For more information on the Relink window, Performance volumes, and Transfer volumes, see Chapter 9: Managing Audio Files with DigiBase.
To locate audio files
1. Open a session.
If any audio files are missing, the Missing Files warning appears (Figure 8.1).
Figure 8.1. The Missing Files warning.
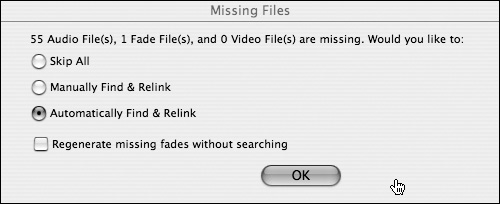
2. Choose one of the following options:
Automatically Find and Relink: Pro Tools searches all Performance volumes for matching files and automatically relinks matching files with the session.
or
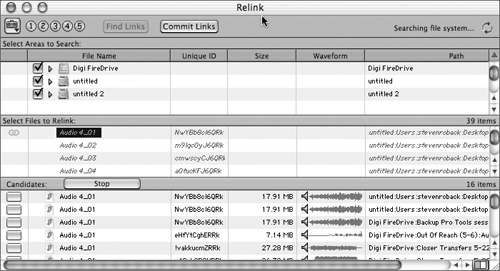
Manually Find and Relink: The Relink window opens (Figure 8.2). In the Relink window you can search, compare, verify, and relink missing files.
Figure 8.2. The Relink window lets you manually search, audition, and relink missing files.
or
Skip All: Ignores all missing audio files and fades. Missing files remain offline in the session.
or
Regenerate Missing Fades: Excludes fades from the relinking process and recalculates them instead.
For more information on relinking missing files, see Chapter 9: Managing Audio Files with DigiBase.
1. Open a session.
If any files are located on Transfer volumes unsuitable for playback, Pro Tools launches a warning.
2. Click Yes to open the Copy and Relink dialog box.
3. Specify a location for the copied files on a valid Performance volume.
4. Click OK.
• A region whose parent audio file cannot be located is called an offline region. The name of an offline region appears italicized and dimmed in the Audio Regions list (Figure 8.3); it appears in blue italicized letters in track playlists. Offline regions can be edited like other regions, but they cannot be processed with Real Time AudioSuite (RTAS) plug-ins.
Figure 8.3. Offline regions appear italicized in the Audio Regions list.
![]()
Importing Audio
Pro Tools lets you import audio files and audio regions from other sessions or applications. You can use either the Import Audio to Track command or the Import Audio to Region List command. Both commands open the Import Audio dialog box, which lets you audition, convert, and import audio files and regions.
When you use the Import Audio to Track command, Pro Tools automatically creates a new audio track and places the imported audio on it. When you use the Import Audio to Region List command, the audio file name appears in the Region list. You can then drag it onto a new or existing track.
You can also import audio by dragging it directly from a DigiBase browser into the Edit window of the current session.
You can import audio files in the following formats:
• AIFF
• WAV or BWF (.WAV)
• SDII
• SDI
• AAC audio (including audio with AAC, Mp4 and M4a file extensions)
Note: Pro Tools cannot import protected AAC or MP4 files with the .M4p file extension, as specified under digital copyright law.
• Sound Resource (AIFL), Macintosh only
• WMA (Windows Media), Windows only
• QuickTime (Macintosh only)
• RealAudio
• MXF Audio
• REX 1 and 2 files
• ACID files
Note: ACID files without slice data are imported as audio regions. Sliced ACID files and REX 1 and 2 files are imported as region groups.
Using the Import Audio dialog box
The Import Audio dialog box (Figure 8.4) includes the following options for handling imported audio files and regions:
Add: This option lets you add audio files that match the current session’s sample rate and bit depth. Adding files does not require any additional hard drive space because the files are not copied; they remain in their existing location.
Audio files whose bit depths do not match the current session must be converted to the correct bit depths before they can be added to Pro Tools. The application will let you add audio files whose sample rates do not match the current session; however, they’ll play at the wrong speed unless they’re converted to the appropriate sample rate.
For more information on bit depth and sample rate, see Chapter 4: Starting a New Session.
Copy: This option creates a copy of the audio file and places it in the folder of your choice. The Copy option is useful for organizing and consolidating imported audio files in a new location.
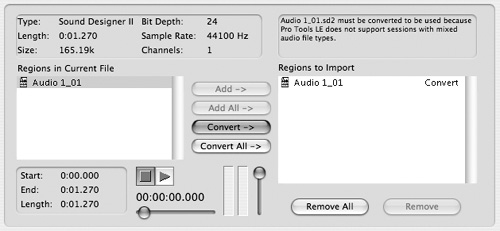
Convert: If an audio file does not match the current session’s sample rate, bit depth, and file type, the Import Audio dialog box displays a message prompting you to convert it (Figure 8.5). When you convert audio files, Pro Tools creates a new file with the correct attributes and places it in the folder of your choice.
Figure 8.4. The Import Audio dialog box.
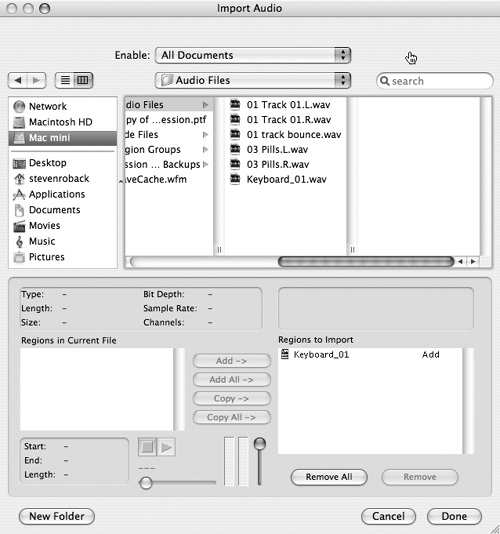
Figure 8.5. If an imported audio file’s attributes (such as sample rate, bit depth, and file type) do not match the current session, you are prompted to convert it in the Import Audio dialog box.
To import audio files or regions into a session
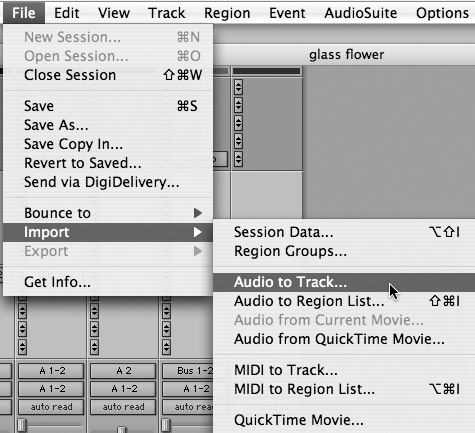
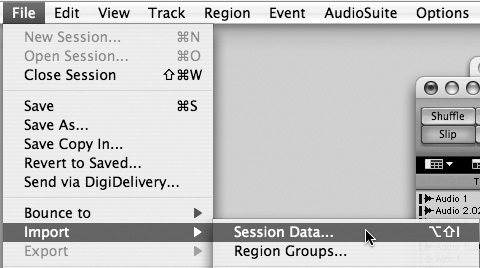
1. Choose File > Import > Audio to Track (Figure 8.6).
Figure 8.6. Choose File > Import > Audio to Track.
or
Choose File > Import > Audio to Region List (Figure 8.7).
Figure 8.7. Choose File > Import > Audio to Region Lists.

The Import Audio dialog box appears.
2. At the top of the Import Audio dialog box, click an audio file to display its properties and associated regions. Use the Enable pop-up menu to choose which audio file types are displayed (Figure 8.8).
Figure 8.8. The Enable pop-up menu in the Import Audio dialog box.

3. Click the Play button to audition selected files.
Use the horizontal slider to navigate to any location in the audio file. Use the vertical slider to adjust volume.
4. To place a file or region in the Import list, select the file (Shift-click to select multiple files) and click Add or Convert (Figure 8.9).
Figure 8.9. Click Add or Convert to place a file in the Import list.

You can also click Add All or Convert All to import all files and regions in the current directory.
5. To remove a file or region from the Import list, select it and click Remove.
To remove all files or regions, click Remove All.
6. Click Done.
7. If you’re copying or converting files, you’ll be prompted to choose a location for the new audio files.
Choose a folder on a valid audio drive.
If you choose File > Import > Audio to Track, the audio files and regions are converted (if applicable) and imported to individual audio tracks. They also appear as regions in the Audio Regions list.
or
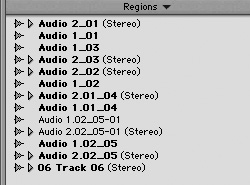
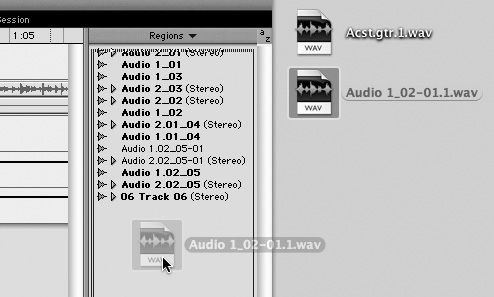
If you choose File > Import > Audio to Region List, the files and regions appear as regions in the Regions list (Figure 8.10). You can then drag them to new or existing tracks.
Figure 8.10. Imported audio files and regions appear in the Audio Regions list.
Using drag and drop to import audio
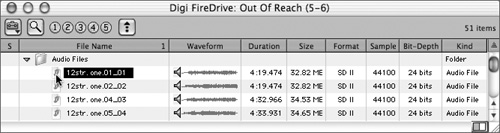
In Pro Tools 7, you can drag and drop audio files and regions directly from a DigiBase browser, the Macintosh Finder, or Windows Explorer to a track, the Track list, the Regions list, or the Edit Window’s Timeline (Figure 8.11).
Figure 8.11. You can import selected audio files using drag and drop from a DigiBase browser.
To import audio using drag and drop
1. Select the audio files or regions you want to import in a DigiBase browser, the Macintosh Finder, or Windows Explorer.
Click and drag the files or regions onto an existing track in the Edit window of the current session.
The imported audio files or regions appear within the existing track at the desired location.
or
Drag the files onto the Track list of the current session (Figure 8.12).
Figure 8.12. Importing audio files by dragging files onto the Track list.
The imported audio files or regions appear in the Track list and a new track is created containing the imported audio file or region.
or
Drag the files onto the Regions list of the current session (Figure 8.13).
Figure 8.13. Importing audio files by dragging files onto the Regions list.
The imported audio files or regions appear in the Regions list. You can then drag the audio file or region from the Regions list to a track of your choice.
or
Drag the files onto any empty space in the Edit window (or Shift-drag the files anywhere in the Edit window) of the current session.
The imported audio files appear in new tracks inside the Edit window.
For more information on using DigiBase to import audio, see Chapter 9: Managing Audio Files with DigiBase.
• To batch-load multiple audio files into a session, open a Pro Tools session, and drag the audio files you want to import onto the Pro Tools icon (the bit depth, sample rate, and file type must match the current session). The batch-loaded audio files will appear in the open session’s Audio Regions list. You can then drag them onto new or existing tracks.
Setting Sample Rate Conversion Quality
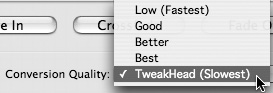
When you import audio files into Pro Tools, you may need to convert the sample rate to match the current session. Conversion quality settings include Low, Good, Better, Best, and TweakHead. The higher the quality, the longer the length of the conversion process. (TweakHead can take significantly longer than the other options.)
To set the sample rate conversion quality
1. Choose Setup > Preferences.
2. Click the Editing tab.
3. From the Conversion Quality pop-up menu, select a sample rate conversion quality (Figure 8.14).
Figure 8.14. The Conversion Quality pop-up menu.
• Keep in mind that converting audio can degrade sound quality: While Good or Better conversion quality settings are generally adequate, consider using Best or TweakHead settings whenever practical. This will help you maintain the highest-quality audio possible.
• When using the File > Import > Audio to Track command, interleaved (single-file) stereo files are automatically imported to stereo tracks. Split stereo files can also be imported to stereo tracks, but the split pair must be the same length, and they must be named “filename.L” and “filename.R.” These files will have a three-letter file extension appended after the “.L” or “.R.”
Importing Tracks
You can use the File > Import > Session Data command to import entire tracks from other sessions, including audio, MIDI, auxiliary input, instrument, and master fader tracks.
The Import Session Data dialog box lets you view the properties of the source session and select which tracks to import. It also gives you options for handling source media, placing imported tracks, and converting audio file type, sample rate, and bit depth to match the current session. (In Pro Tools HD systems, the Import Session Data dialog also lets you import track attributes, such as channel strip settings, track views, and automation.)
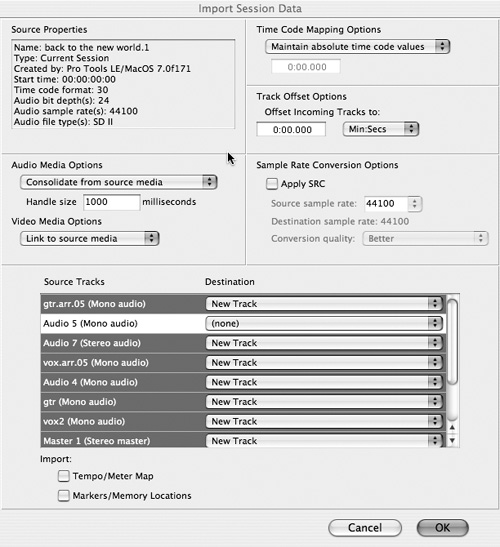
The Import Session Data dialog box (Figure 8.15) provides the following features:
Source Properties: The Source Properties area displays information about the source session, including source session name, type, start time, bit depth, and sample rate.
Figure 8.15. The Import Session Data dialog box.
Audio Media Options (Figure 8.16): These options provide alternatives for copying and consolidating imported audio files. They include:
Figure 8.16. Audio Media Options offer alternatives for copying and consolidating audio files.
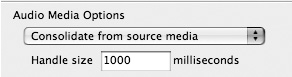
• Consolidate from Source Media: This option consolidates audio by copying only currently used portions of audio files. It also lets you set a handle value. A handle is a preserved segment of the original audio file before and after each region. It can be useful for fine-tuning the boundaries of a region.
• Copy from Source Media: This option copies all audio files related to the imported tracks from the source media to a new location.
• Link to Source Media (Where Possible): This option links the current session to the existing audio files, thus avoiding audio file duplication and saving hard drive space.
If the source files don’t reside on “playable” media (such as CD-ROM) or if the files require conversion, the files are copied.
• Force to Target Session Format: This option copies and converts any files that do not match the current session’s file format, bit depth, and sample rate.
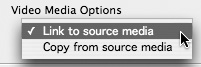
Video Media Options (Figure 8.17): This lets you choose between copying video files to a new location or linking to them in their original location.
Figure 8.17. Video Media options offer alternatives for copying and consolidating video files.
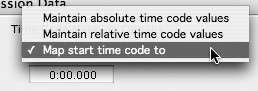
Time Code Mapping Options: These options provide alternatives for placing imported tracks in the current session. Options include:
• Maintain Absolute Time Code Values: This option places imported tracks at the same time location as in the source session.
• Maintain Relative Time Code Values: This option places imported tracks at the same time offset from the session start time as in the source session.
• Map Start Time Code To: This option lets you place imported tracks at a start time that you input in the Time Value field (Figure 8.18). Imported track start times are relative to start times in the source session.
Figure 8.18. The Map Start Time Code To option lets you input a start time for imported tracks.
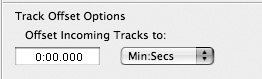
Track Offset Options (Figure 8.19): This option lets you specify a track offset in addition to any offset incurred with the Time Code Mapping options. Any imported audio is offset in the current session’s timeline by the specified amount.
Figure 8.19. Track Offset options
Sample Rate Conversion Options (Figure 8.20): These options let you convert the sample rate of imported audio files. If the source sample rate and the current session sample rate match, this area is dimmed. Sample Rate Conversion Options include:
Figure 8.20. Sample Rate Conversion options.
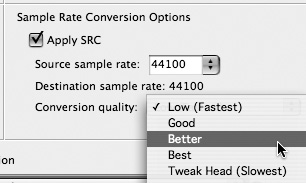
• Source Sample Rate: This option lets you choose a sample rate from which to begin the conversion process.
• Destination Sample Rate: The Destination Sample Rate always displays the sample rate of the current session.
• Conversion Quality: This option lets you change the quality of the sample-rate conversion process. At lower quality settings audio processing is faster; at higher settings audio processing is slower. For more information, see Setting Sample Rate Conversion Quality earlier in this chapter.
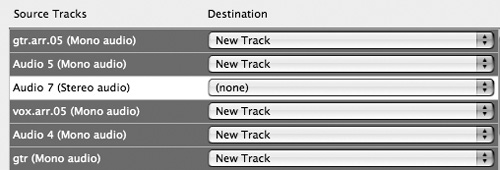
Source Tracks: The Source Tracks area lets you select source tracks to import. Each source track has a corresponding Destination pop-up menu, which lists options for importing the track. The Destination pop-up menu provides the following options:
• None: The source track is not imported.
• New Track: The source track is imported to a new track. (On HD systems, selected track attributes are imported as well.)
Import Tempo/Meter Map: This check box lets you import meter and tempo tracks from the source session. Tempo and meter events in the destination session are replaced.
Import Markers/Memory Locations: This check box lets you import markers and memory locations from the source session. Markers and memory locations in the destination session are retained.
1. Open a session or create a new one.
2. Chose File > Import > Session Data (Figure 8.21).
Figure 8.21. Choose File > Import > Session Data.
3. Select a session and click Open.
or
Drag the session file whose tracks you want to import from a DigiBase browser into the track playlist area in the current session’s Edit window.
The Import Session Data dialog box appears.
4. Select the tracks to import in the Source Tracks list (Figure 8.22).
Figure 8.22. The Source Tracks list lets you select tracks to import.
Shift-click to select multiple contiguous files. Command-click (Macintosh) or Alt-click (Windows) to select multiple noncontiguous files.
5. Choose the time code mapping option for imported audio files.
6. If the sample rates of the current session and the source session do not match, choose the sample rate of the source session.
7. Choose options for imported audio and video media files (if applicable).
8. Select Import Tempo/Meter Map if you want to import the configured Tempo and Meter rulers from the source session.
9. Select Import Markers/Memory Locations if you want to import markers and memory locations from the source session.
10. Click OK.
11. If you are copying or consolidating media, choose a location to place the media files.
• Imported tracks are made inactive if their source media is unavailable or if the current session’s I/O Setup has configuration conflicts.
Exporting Audio
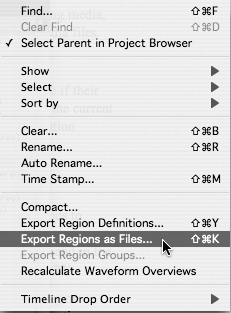
Pro Tools provides a variety of methods to export audio. The most straightforward way is to use the Export Regions as Files command in the Regions list pop-up menu (Figure 8.23).
Figure 8.23. The Export Regions as Files command in the Audio Regions list pop-up menu.
You can also export audio by bouncing or consolidating audio tracks. For information on the Bounce to Disk command, see Chapter 17: Mixdown and Mastering. For information on the Consolidate Selection command, consult the Pro Tools Reference Guide.
Exporting a region as a new audio file
The Export Regions as Files command lets you export audio regions as new audio files. It also lets you convert the audio file type, bit depth, and sample rate. This command is helpful if you want to extract a region as a distinct new audio file for use with another session.
To export a region as a new audio file
1. In the Regions list, select the audio regions you want to export.
2. From the Regions list pop-up menu, choose Export Selected As Files.
The Export Selected dialog box appears (Figure 8.24).
Figure 8.24. The Export Selected dialog box.
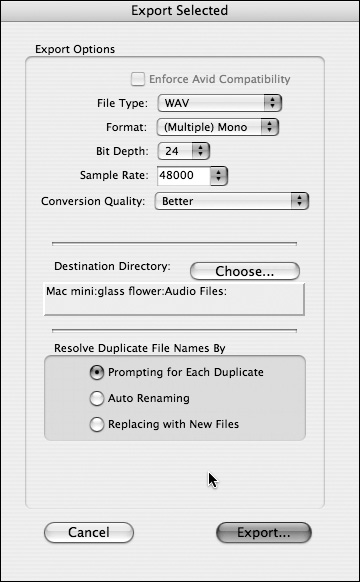
3. In the Export Options area, set a file type, format (mono or stereo), bit depth, and sample rate for the file you want to export (Figure 8.25).
Figure 8.25. The Export Options area lets you set multiple parameters for exported files.

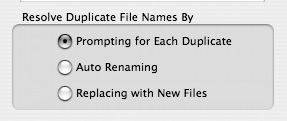
4. Choose one of the following options for resolving duplicate file names (Figure 8.26):
• Prompting for Each Duplicate: If a file in the destination directory already has the name of the file you’re trying to export, Pro Tools will prompt you to enter a new file name.
• Auto Renaming: This option automatically changes the name of a duplicate file by adding a number to its end (such as file-01).
• Replacing with New Files: This option replaces an existing audio file with a new audio file with the same name.
Figure 8.26. Select an option to resolve duplicate file names when exporting audio files.
5. Click Export.
The new audio files are exported.
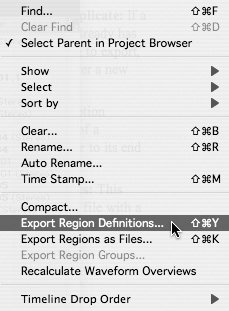
• If you want to reuse a region in another session, use the Export Region Definitions command in the Regions list pop-up menu (Figure 8.27). This command lets you export region information that points to the original audio on disk—without creating a new audio file.
Figure 8.27. Use the Export Region Definitions command in the Audio Regions list pop-up menu to export region definitions without creating a new audio file.
Compacting and Deleting Audio Files
A good way to free up valuable hard disk space is to compact or delete audio files. The Regions list pop-up menu provides commands for both compacting and deleting unused or unwanted audio files.
Removing audio regions
The Compact Selected command helps you reduce the size of an audio file. It does this by permanently deleting unused portions of an audio file that are not referenced by any region definitions.
Before running the Compact Selected command, remove any unused regions from a session. This eliminates unwanted region references and ensures that the maximum amount of file compacting takes place.
To remove audio regions from a session
1. In the Regions list pop-up menu, Click Select > Unused (Figure 8.28).
Figure 8.28. Select unused regions in a session by choosing Select > Unused Regions in the Audio Regions list pop-up menu.

The unused regions in the session are highlighted in the Regions list.
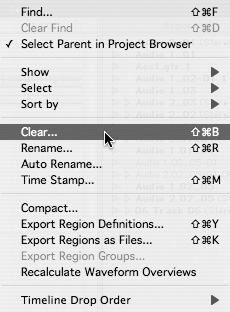
2. Choose the Clear command from the Regions list pop-up menu (Figure 8.29).
Figure 8.29. The Clear Selected command lets you remove audio regions from a session or delete audio files from a hard disk.
The Clear Regions dialog box appears (Figure 8.30).
Figure 8.30. The Clear Regions dialog box.
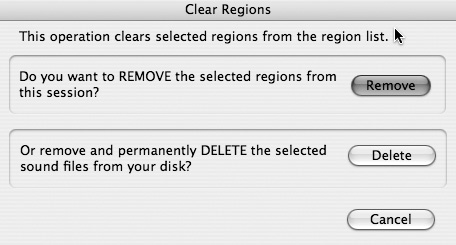
3. Click Remove.
Unused audio regions are removed from the session, although the audio files they reference remain intact on the hard drive. For more information on managing regions with the Regions list, see Chapter 10: Editing Basics.
Compacting audio files
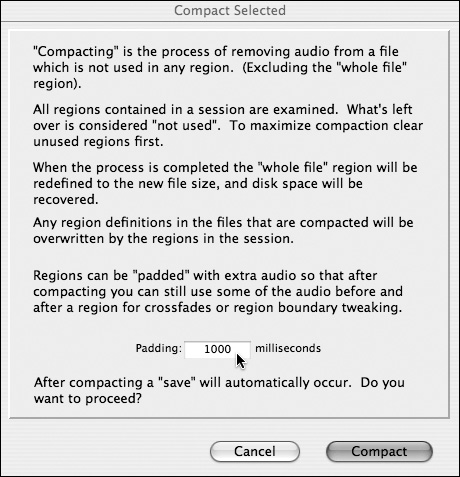
When you use the Compact command, the Compact Selected dialog box appears, which lets you pad regions (Figure 8.31). A pad is a small segment of audio before and after a region. It can be useful for creating fades or trimming region start and end times.
Figure 8.31. The Compact Selected dialog box.
To compact an audio file
1. Select the regions you want to compact in the Regions list.
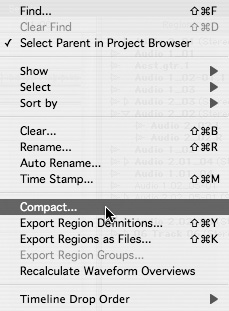
2. Choose Compact from the Regions list pop-up menu (Figure 8.32).
Figure 8.32. Choose Compact from the Regions list pop-up menu.
The Compact Selected dialog box appears.
3. Enter the amount of padding in milliseconds.
4. Click Compact.
• Keep in mind that the Compact command is destructive: It permanently alters the original audio file and cannot be undone. Therefore, use the command only after you’ve finished editing and are certain that you don’t need the audio data any longer.
Deleting audio files
The Clear command lets you permanently delete entire audio files from your hard disk.
To delete audio files from your hard disk
1. Select the audio files you want to delete in the Regions list.
2. Choose Clear from the Regions list pop-up menu.
The Clear Regions dialog box appears.
3. Click Delete (Figure 8.33).
Figure 8.33. Click Delete to permanently delete audio files from the hard disk. Use this command with care!

The Clear command is destructive and cannot be undone. Deleted files are permanently erased from the hard disk.
Importing Audio from Audio CDs
In Pro Tools 7, you can import audio tracks directly from an audio CD using File menu commands or drag and drop methods.
Keep in mind that CD audio is formatted at a resolution of 16 bits and a sample rate of 44.1 kHz. If your Pro Tools session is formatted at a sample rate of 48 kHz or higher, Pro Tools will convert the imported CD audio file format to match that of your session.
To import a CD audio track from the File menu
1. Insert an audio CD into the CD drive.
2. Choose File > Import > Audio to Track
or
Choose File > Import Audio to Region List.
The Import Audio dialog box opens.
3. Select the CD audio tracks to be imported (Figure 8.34).
Figure 8.34. To import a CD audio track, choose File > Import > Audio to Track.
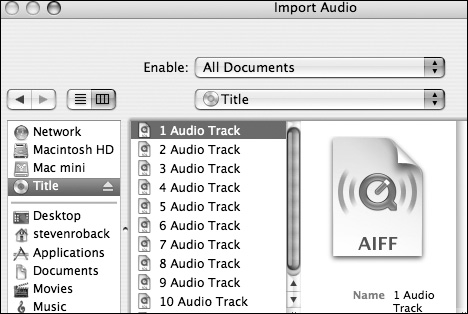
4. Select Convert.
5. Click Done.
6. Navigate to a destination for the imported audio, and click Choose.
Pro Tools converts the CD audio track to the session’s audio file format, bit depth, and sample rate, and saves it on your hard drive.
If you’re using File > Import > Audio to Track, the imported CD audio track appears in a new track inside the Edit Window and in the Regions list.
If you’re using File > Import > Audio to Region List, the imported CD audio track appears in the Regions list. From there you can drag the audio region to an existing track.
To import a CD audio track using drag and drop
1. Insert an audio CD into the CD drive.
2. Choose Window > Workspace.
The DigiBase Workspace browser opens.
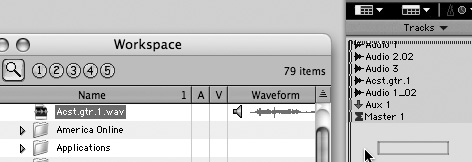
3. Click and drag the CD audio tracks you want to import from the Workspace Browser to either the Tracks list, the Regions list, or the anywhere in the Edit Window’s Timeline.
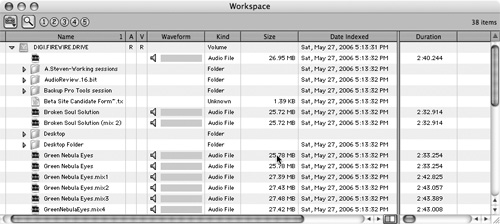
4. The selected CD audio tracks are imported and converted to match the file format of the current session (Figure 8.35).
Figure 8.35. The Workspace Browser window.
Backing Up Your Files
No chapter on file management would be complete without a discussion of backup. You only need to lose an irreplaceable recording once to appreciate the value of backing up your audio files. Get in the habit of backing up all new audio files—and session files—to a different hard drive immediately after a session.
To back up session files and audio files
1. Choose File > Save Copy In
The Save Session Copy In dialog box appears (Figure 8.36).
Figure 8.36. Use the Save Copy In dialog box to back up session files and audio files.
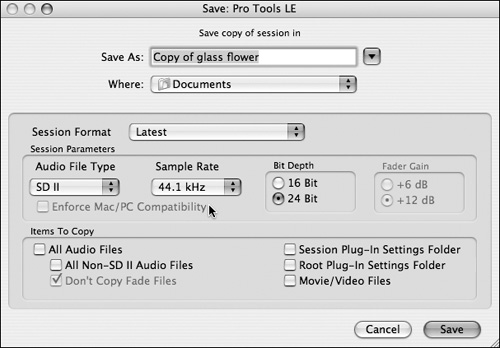
2. Select All Audio Files in the Items To Copy area.
3. Create a folder named Backup, followed by the current date.
4. Click Save.
or
1. On the desktop, navigate to the Pro Tools Session folder that you want to back up.
2. Copy the entire folder (including session files and the Audio Files and Fade Files folders) to a different hard drive.