
17. Mixdown and Mastering
Now that you’ve built and shaped your mix to your liking (and, you hope the liking of others), just one mixing step remains: final mixdown. This is where you combine all tracks, edits, effects, and automation events into a final two-track stereo master.
There are two basic ways to save a final mixdown in Pro Tools: You can output the main stereo mix to a two-track digital or analog recording machine such as a DAT or 1/4-inch tape machine. Or, you can bounce the final mix directly to hard disk, where it’s saved as a new audio file.
This chapter shows you how to perform a final mixdown using the latter method. We’ll cover the correct method for bouncing, as well as how to configure bounce output options according to your needs. We’ve also thrown in a brief discussion of mastering, which will help you understand how individual mixes are processed to create a sonically consistent final album.
Bouncing to Disk
Pro Tools’ Bounce to Disk command lets you mix down multiple tracks of audio (along with all DSP effects and automation events) directly to a stereo mix on your hard disk. In the process, a brand new file is created, which you can save to the location of your choice.
Bouncing to disk is a fast and efficient way to generate a final mix. Should you later decide that you don’t like the mix, no big deal—just make the desired adjustments to the mix and bounce it to disk again...as many times as you like.
When you bounce to disk, Pro Tools plays the mix back in real time so you can hear it as it’s being bounced. You can’t, however, make any adjustments at this point.
Bounced mixes include the following:
Audible tracks: All audible tracks are included in the bounce, including soloed tracks or regions. Muted tracks are not included.
Automation: All read-enabled automation is played back and incorporated into the bounced mix.
Inserts and sends: All active inserts (including real-time plug-ins and hardware inserts) and sends are applied to the bounced mix.
Selection or track length: If you make a selection in a track, only the selected area of the session will be bounced to disk. If no selection is made, the bounce will be the length of the longest audible track in the session.
Time stamp information: Bounced material is automatically time-stamped so you can drag it to the same track location as in the original material.
Delay compensation: Pro Tools compensates for any bus delays due to a bounce. This means that if you import a bounced file back into a session and place it directly in time against the source mix, it will be phase accurate with the original source mix.
To bounce a final mix to disk
1. Finalize all output levels and mix automation.
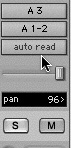
2. If you want to include a track’s automation in the bounced mix, set the track’s automation mode to Read (Figure 17.1).
Figure 17.1. If you want to include a track’s automation in the bounced mix, set the track’s automation mode to Read.
3. Make sure that all of the tracks you want to include in the bounce are audible (not muted or inactive).
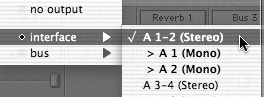
4. Assign the output of each track that you want to include in the bounce to the main mix outputs (Figure 17.2).
Figure 17.2. Assign the output of each track that you want to include in the bounce to the main mix outputs.
5. Do one of the following:
To bounce a portion of a file, link Edit and Timeline selections. Select the portion of the file that you want to include in the bounce.
or
To bounce the entire session, don’t make any selections. Press Return (Macintosh) or Enter (Windows) to go to the beginning of the session. The bounce will be the length of the longest audible track in the session.
6. Select File > Bounce to > Disk (Figure 17.3).
Figure 17.3. Select File > Bounce to > Disk.

The Bounce dialog box appears (Figure 17.4).
Figure 17.4. The Bounce dialog box.
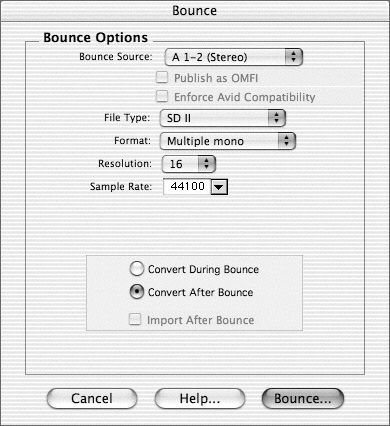
7. Choose a Bounce Source option to set the audio source for the bounced mix (Figure 17.5).
Figure 17.5. The Bounce Source option lets you choose the audio source for the bounced mix.

8. Configure other Bounce options as needed.
For detailed information on Bounce options, see Setting Bounce Options later in this chapter.
9. Click Bounce.
10. Select a destination for the new audio file, enter a name, and click Save.
Pro Tools bounces the mix in real time and performs Bounce option processing tasks.
Setting Bounce Options
The Bounce to Disk command provides several options for converting and processing bounced tracks:
Bounce Source: The Bounce Source option lets you choose the main output or bus path that supplies the audio source for the mix. All currently active paths (as defined in the I/O Setup) are available as the Bounce Source.
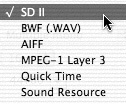
File Type: The File Type option (Figure 17.6) lets you select a file type for the bounced mix. Choose from the following:
• SDII (Sound Designer II)
• BWF (.WAV) (Broadcast .WAV Format)
• AIFF (Audio Interchange File Format)
• MP3 (MPEG-1 Layer 3)
• QuickTime
• Sound Resource (Macintosh only)
• Windows Media (.asf, .wma, or .swmv file extensions) (Windows only)
Figure 17.6. The File Type option lets you select a file type for the bounced mix.
Format: The Format option (Figure 17.7) lets you select the number of channels that a bounced file has. Choose from these file formats:
• Mono (summed): This format combines mix elements to create a single mono disk file.
• Multiple mono: This format creates the same number of mono files as the source path. For example, if the source is stereo, Multiple mono creates two mono files appended with “.L” (left) and “.R” (right) suffixes.
• Stereo interleaved: This format creates a single stereo interleaved file containing all of the bounced mix elements.
Figure 17.7. The Format option lets you select the number of channels that a bounced file has.

Resolution (or bit depth): The Resolution selector (Figure 17.8) lets you choose the bit depth of the bounced file:
• 8-bit: Some multimedia applications and dialogue-only recordings still use 8-bit resolution. Use this setting only if high-quality audio is not required.
• 16-bit: This is the standard resolution for audio CDs.
• 24-bit: Use this setting when you want to maintain the highest possible sound quality. The setting is also good for archiving master stereo mixdowns for future use.
Figure 17.8. The Resolution option lets you choose the bit depth of the bounced file.

Sample rate: You can convert bounced files to several sample rates. Generally, the higher the sample rate, the better the audio quality. There may be times, however, when smaller file size takes precedence over audio quality.
You can convert bounced files to the following sample rates (Figure 17.9):
• 44.1 kHz
• 48 kHz
• 88.2 kHz
• 96 kHz
• 176.4 kHz
• 192 kHz
• Custom sample rate
• Pull Up/Down sample rates
Figure 17.9. Choose a sample rate for the bounced mix.

To set sample rate conversion quality
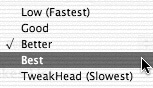
• Choose Setup > Preferences. In the Editing preferences window, select from the Conversion Quality pop-up menu (Figure 17.10). Generally, the higher the conversion quality, the longer it takes for Pro Tools to convert the sample rate. Choose from five conversion quality settings: Low (Fastest), Good, Better, Best, and TweakHead (Slowest).
Figure 17.10. Choose a conversion quality setting for your bounced mix.
Convert During or After Bounce: Pro Tools can process bounce options either during or after the bounce. Select Convert After Bounce (Figure 17.11) for the highest level of plug-in automation accuracy. Select Convert During Bounce for faster conversion, but less accuracy.
Figure 17.11. Select Convert After Bounce for more plug-in automation accuracy. Select Convert During Bounce for faster conversion, but less accuracy.
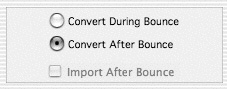
Import After Bounce: The Import After Bounce option automatically imports a newly bounced file into the current session’s Audio Regions list. This option applies only when you’re using the Bounce to Disk command to create submixes for use within the current session.
Mastering Basics
Mastering is the point at which you prepare your mixes for duplication. It’s also when you stop thinking about individual mixes and start thinking about how your mixes sound as a group.
Mastering usually involves optimizing dynamics and tonal balance, as well as matching the volume levels of all of your songs. Thus, EQ, compression, limiting, and other effects processing are frequently applied during this step.
If you’re mastering mixes for an album release, we strongly recommend hiring a professional mastering engineer. A good mastering engineer has the ears, the experience, the right gear, and perhaps most important, the perspective (usually in short supply at the end of a recording process) to make your mixes sound good together. You’ll be amazed how much better your mixes can sound after being professionally mastered.
Some of the basic steps involved in mastering include:
Song sequencing: Placing your songs in a sequence that flows is crucial to the listening experience. Think of a sequence theatrically, as if you’re taking listeners on a sort of musical odyssey. Be aware of how different rhythms, lyrics, textures, and fade-ins and fade-outs affect the mood. Begin with tracks that draw listeners in. Then take them through different moods and emotions as you move toward a musical and thematic climax.
Equalization: EQ is often used in mastering to help balance frequencies within the aural spectrum. Most good mixes are mastered with relatively flat EQ across the frequency spectrum, with some roll-off at the very top and bottom. Listen carefully to the tonal balance of your songs. If you hear any frequencies that sound too loud or soft, you may want to try gently cutting or boosting them. Keep in mind, however, that if a particular instrument is too loud, you can’t individually EQ it without affecting the entire mix. Thus, you may need to return to the mixing stage to correct it.
Compression and limiting: Dynamic effects, such as compression and limiting, are sometimes used in mastering to reduce transient volume peaks and boost a track’s overall volume. Be careful not to overuse these effects: A touch of compression or limiting gives a track a nice volume boost while retaining clarity and dynamic range. But too much compression or limiting diminishes dynamic range and contrast, making a mix sound thin, dull, and flat. If you want to bring out individual instruments in a mix, consider using a multiband compressor, which compresses only specific frequency ranges. For more information on dynamic effects, see Chapter 15: Adding Effects to a Mix.
Balancing levels: After you EQ and optimize the dynamics of each song, make sure the relative volume levels of your mixes are similar. This will keep listeners from having to make repeated trips to the volume knob. To balance levels, simply listen to your tracks and compare their volumes. If you hear any noticeable differences, just turn their levels up or down until they’re roughly the same.
Dither and noise shaping: Dither is a form of random noise that helps minimize quantization distortion in digital recordings. Quantization distortion is noise that occurs as a result of errors introduced when sampling low-level audio signals, or when digital audio is converted from higher to lower bit depths (such as when converting 24-bit audio to 16-bit for CD mastering). The DigiRack Dither and POWr Dither plug-ins use noise shaping to further reduce noise. Noise shaping uses digital filters to move noise from audible frequencies to less-audible frequencies. To use dither in Pro Tools, insert a Dither plug-in on the main mix’s master fader.