
5
Find and Replace and Help
QUICK FIND/REPLACE
The simplest means to search in Visual Studio 2017 is via the Quick Find dialog.
The find-and-replace functionality in Visual Studio 2017 is split into two broad tiers with a shared dialog and similar features: Quick Find and the associated Quick Replace are for searches that you need to perform quickly on the document or project currently open in the IDE. These two tools have limited options to filter and extend the search, but as you’ll see in a moment, even those options provide a powerful search engine that goes beyond what you can find in most applications.
Quick Find
Quick Find is the term that Visual Studio 2017 uses to refer to the most basic search functionality. By default, it enables you to search for a simple word or phrase within the current document, but even Quick Find has additional options that can extend the search beyond the active module, or even incorporate regular expressions in the search criteria.
To start a Find action, press the standard keyboard shortcut Ctrl+F or select Edit ➪ Find and Replace ➪ Quick Find. Visual Studio displays the basic Find window, with the default Quick Find action selected (see Figure 5-1).

Type the search criteria into the Find textbox, or select from previous searches by clicking the drop-down arrow and scrolling through the list of criteria that have been used. By default, the scope of the search is restricted to the current document or window you’re editing, unless you have a number of lines selected, in which case the default scope is the selection.
As you type each character into the search textbox, the editor moves to the next match for the text you entered. For example, typing f would find the first letter f, regardless of whether it is found within a word, such as in offer, or on its own. Typing an o would then move the cursor to the first instance of fo—such as form, and so on.
You can change the scope for the search. At the bottom of the dialog, you’ll see a Scope field. This drop-down list gives you additional options based on the context of the search itself, including Current Block, Selection, Current Document, Current Project, Entire Solution, and All Open Documents (shown in Figure 5-2).

Find-and-replace actions always wrap around the selected scope looking for the search terms, stopping only when the find process has reached the starting point again. As Visual Studio finds each result, it highlights the match and scrolls the code window so that you can view it. If the match is already visible in the code window, Visual Studio does not scroll the code. Instead, it just highlights the new match. However, if it does need to scroll the window, it attempts to position the listing so that the match is in the middle of the code editor window.
If you were comfortable using the Quick Find search box that was in the Standard toolbar, it is no longer part of the default configuration. You can still add it to the toolbar, but you need to do so manually.
Quick Replace
Performing a Quick Replace is similar to performing a Quick Find. You can switch between Quick Find and Quick Replace by clicking the caret to the left of the search textbox. If you want to go directly to Quick Replace, you can do so with the keyboard shortcut Ctrl+H or the menu command Edit ➪ Find and Replace ➪ Quick Replace. The Quick Replace options (see Figure 5-2) are the same as those for Quick Find, but with an additional field where you can specify what text should be used in the replacement.
The Replacement Term field works in the same way as Find—you can either type a new replacement string, or with the drop-down list provided choose any you previously entered.
Find Options
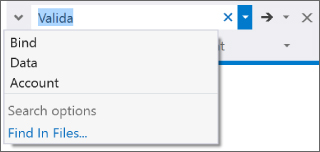
Sometimes you want to specify criteria and filter the search results in different ways. Click the triangle icon next to search text. A drop-down expands to show recently used search values (see Figure 5-3).
Also, below the search text, there are three buttons (shown in Figure 5-1). These are actually toggle buttons that enable you to refine the search to be case-sensitive (the left button) or to be an exact match (the middle button). And you can specify that you are performing a more advanced search that uses regular expressions (the right button). If you need a list of commonly used regular expressions, they are not in the Quick Find. But, as you will see shortly, these are found in the Find All Files dialog. To use regular expressions in Quick Find, you need to write them from scratch.
Find and Replace Options
You can further configure the find-and-replace functionality with its own set of options in the Tools ➪ Options dialog. Found in the Environment group, the Find and Replace options enable you to enable/disable displaying informational and warning messages, as well as to indicate whether or not the Find What field should be automatically filled with the current selection in the editor window.
FIND/REPLACE IN FILES
The Find in Files and Replace in Files commands enable you to broaden the search beyond the current solution to whole folders and folder structures, and even to perform mass replacements on any matches for the given criteria and filters. Additional options are available to you when using these commands, and search results can be placed in one of two tool windows, so you can easily navigate them.
Find in Files
The powerful part of the search engine built into Visual Studio is in the Find in Files command. Rather than restrict yourself to files in the current solution, Find in Files gives you the ability to search entire folders (along with all their subfolders), looking for files that contain the search criteria.
The Find in Files dialog, as shown in Figure 5-4, can be invoked via the menu command Edit ➪ Find. Alternatively, if you have the Quick Find dialog open, you can switch over to Find in Files mode by clicking the small drop-down arrow next to Quick Find and choosing Find in Files. You can also use the keyboard shortcut Ctrl+Shift+F to launch this dialog.

Most of the Quick Find options are still available to you, including regular expressions searching, but instead of choosing a scope from the project or solution, use the Look In field to specify where the search is to be performed. Either type the location you want to search or click the ellipsis to display the Choose Search Folders dialog, as shown in Figure 5-5.
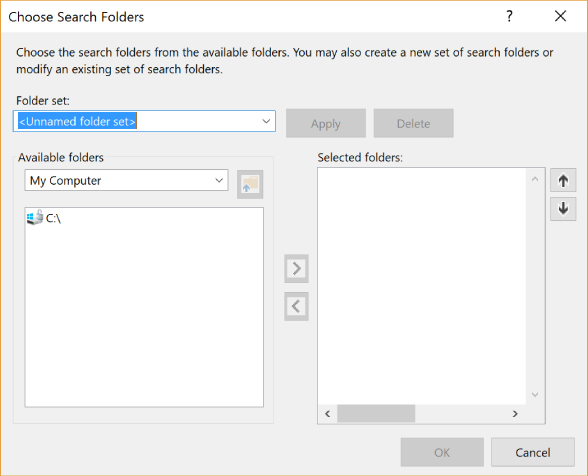
You can navigate through the entire filesystem, including networked drives, and add the folders you want to the search scope. This enables you to add disparate folder hierarchies to the one single search. Start by using the Available Folders list on the left to select the folders that you would like to search. Add them to the Selected Folders list by clicking the right arrow. Within this list you can adjust the search order using the up and down arrows. After you add folders to the search, you can simply click OK to return a semicolon-delimited list of folders. If you want to save this set of folders for future use, you can enter a name into the Folder Set drop-down and click Apply.
Find Dialog Options
The options for the Find in Files dialog are similar to those for the Quick Find dialog. Because the search is performed on files that are not necessarily open within the IDE or are even code files, the Search Up option is therefore not present. There is an additional filter that can be used to select only specific file types to search in.
The Look at These File Types drop-down list contains several extension sets, each associated with a particular language, making it easy to search for code in Visual Basic, C#, J#, and other languages. You can type in your own extensions too, so if you work in a non-Microsoft language, or just want to use the Find in Files feature for non-development purposes, you can still limit the search results to those that correspond to the file types you want.
In addition to the Find options are configuration settings for how the results display. For searching, you can choose one of two results windows, which enables you to perform a subsequent search without losing your initial action. The results can be quite lengthy if you show the full output of the search, but if you’re interested only in finding out which files contain the information you’re looking for, check the Display Filenames Only option, and the results window will be populated with only one line per file.
Regular Expressions
Regular expressions take searching to another level, with the capability to do complex text matching based on the full RegEx engine built into the .NET Framework. Although this book doesn’t go into great detail on the advanced matching capabilities of regular expressions, it’s worth mentioning the additional help provided by the Find and Replace dialog if you choose to use them in your search terms.
Figure 5-6 shows the Expression Builder for building a regular expression. From here you can easily build your regular expressions with a menu showing the most commonly used regular expression phrases and symbols, along with English descriptions of each.

An example of where using regular expressions might come in handy is when reversing assignments. For example, if you have this code:
VB
Description = product.Description
Quantity = product.Quantity
SellPrice = product.SellPrice
C#
Description = product.Description;
Quantity = product.Quantity;
SellPrice = product.SellPrice;
and want to reverse the assignments like so:
VB
product.Description = Description
product.Quantity = Quantity
product.SellPrice = SellPrice
C#
product.Description = Description;
product.Quantity = Quantity;
product.SellPrice = SellPrice;
This would be a perfect use for performing a Quick Replace with regular expressions rather than modifying each line of code manually. Be sure you select Use Regular Expressions in the Find Options, and enter the following as the Find What text:
VB
{<.*} = {.*}
C#
{<.*} = {.*};
and the following as the Replace With text:
VB
2 = 1
C#
2 = 1;
As a brief explanation, you are searching for two groups (defined by the curly brackets) separated by an equals sign. The first group is searching for the first character of a word (<) and then any characters (.*). The second group is searching for any characters until an end-of-line character is found in the VB example or a semicolon is found in the C# example. Then when you do the replace, you are simply inserting the characters from the second group found in its place, an equals sign (surrounded by a space on each side), and then the characters from the first group found (followed by a semicolon in the C# example). If you aren’t familiar with regular expressions, it may take some time to get your head around it, but it is a quick-and-easy way to perform an otherwise rather mundane manual process.
Results Window
When you perform a Find in Files action, results display in one of two Find Results windows. These appear as open tool windows docked to the bottom of the IDE workspace. For each line that contains the search criteria, the results window displays a full line of information, containing the filename and path, the line number that contained the match, and the actual line of text itself, so you can instantly see the context (see Figure 5-7).

In the top left corner of each results window is a small toolbar, as shown in Figure 5-7 and magnified in Figure 5-8, for navigation within the results. These commands are also accessible through a context menu.

Simply double-click a specific match to navigate to that line of code.
Replace in Files
Although it’s useful to search a large number of files and find a number of matches to your search criteria, even better is the Replace in Files action. Accessed via the keyboard shortcut Ctrl+Shift+H or the drop-down arrow next to Quick Replace, Replace in Files performs in much the same way as Find in Files, with all the same options.
The main difference is that you can enable an additional Results option when you’re replacing files. When you perform a mass replacement action like this, it can be handy to have a final confirmation before committing changes. To have this sanity check available to you, select the Keep Modified Files Open After Replace All check box (shown at the bottom of Figure 5-9).

Note that this feature works only when you use Replace All; if you just click Replace, Visual Studio opens the file containing the next match and leaves the file open in the IDE anyway.
Regardless of whether or not you have this option checked, after performing a Replace All action, Visual Studio reports back to you how many changes were made. If you don’t want to see this dialog box, you have an option to hide the dialog with future searches.
ACCESSING HELP
You are exposed to a wide range of technologies as a developer. Not only do they evolve at a rapid pace, but you are also constantly bombarded with additional new technologies that you must get up to speed on quickly. It’s impossible to know everything about these technologies, and being a developer involves constantly learning. Often, knowing how to find information on using these technologies is as important a skill as actually implementing them. Luckily, you can choose from a multitude of information sources on these technologies. The inclusion of IntelliSense into IDEs over a decade ago was one of the most useful tools to help developers write code, but it’s rarely a substitute for a full-blown help system that provides all the ins and outs of a technology. Visual Studio’s help system provides this support for developers.
The easiest way to get help for Visual Studio 2017 is to use the same method you would use for almost every Windows application ever created: Press the F1 key, the universal shortcut key for help. Visual Studio 2017’s help system uses Microsoft Help Viewer 2. Rather than using a special “shell” to host the help and enable you to navigate around and search it, the help system runs in a browser window. To support some of the more complex features of the help system such as the search functionality (when using the offline help), there is a help listener application that runs in your system tray and serves these requests. The address in the browser’s address bar points to a local web server on your machine. The online and offline help modes look and behave similarly to one another, but this chapter specifically focuses on the offline help.
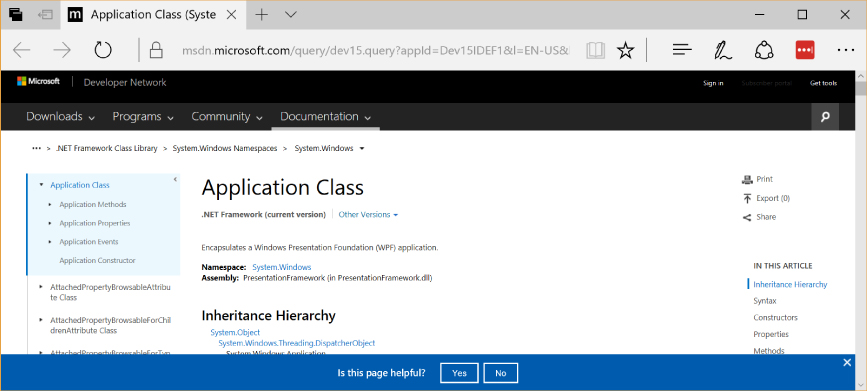
The help system in Visual Studio is contextual. This means that if, for example, the cursor is currently positioned on a XAML tag in a Windows Store project and you press F1, the help window opens immediately with a mini-tutorial about what the class is and how to use it, as shown in Figure 5-10.
This is incredibly useful because more often than not if you simply press F1, the help system navigates directly to the help topic that deals with the problem you’re currently researching.
However, in some situations you want to go directly to the table of contents within the help system. Visual Studio 2017 enables you to do this through the View Help menu item in its main Help menu (see Figure 5-11).

In addition to the several help links, you also have shortcuts to MSDN forums and for reporting a bug.
Navigating and Searching the Help System
Navigating through the help system should be familiar because it is essentially the same as navigating the MSDN documentation on the web. On the left side of the browser window, you can find links to pages in the same part of the help system as the page currently viewed. You can also find links that might be related to the current page.
In the top left of the browser window, you can find a search textbox. Enter your search query here (in much the same way you would in a search engine such as Google or Bing). This search is a full text search of the pages in the help system, and your query does not necessarily need to appear in the title of the pages. This takes you to the results, which are again provided in a manner similar to the results from a search engine. A one-line extract from the page of each result displays to help you determine if it is the article you are after, and you can click through to view the corresponding page.
Configuring the Help System
When you first start using the help system, it’s a good idea to configure it to your needs. To do so, select the Help ➪ Set Help Preferences menu. The menu provides two options: Use Online Help and Use Local Help.
The first option, Use Online Help, sets the help system to use the MSDN documentation on the web. Now pressing F1 or opening the help from the Help menu automatically navigates to the appropriate page in the documentation on MSDN online (for the current context in Visual Studio). Selecting the Use Local Help option navigates to the appropriate page in the documentation installed locally (assuming that the documentation has actually been installed on your machine).
The advantage of the online help over the offline help is that it is always up to date and won’t consume space on your hard drive (assuming you don’t install the help content). The disadvantage is that you must always have an active Internet connection, and at times (depending on your bandwidth) it may be slower than the offline version to access. Essentially it is a trade-off, and you must choose the most appropriate option for your work environment.
With the Use Local Help option selected, using F1 or opening help from the Help menu launches the Help Viewer. This viewer (refer to Figure 5-10) provides a user experience roughly the same as the Web documentation (navigation on the left, body of the content on the right).
The final option in the Help menu is Add and Remove Local Help Content, which enables you to remove product documentation sets from your local disk and free some disk space. The screen shows the documentation sets currently installed, and you can uninstall a documentation set by pressing the Remove hyperlink button next to its name.
SUMMARY
As you’ve seen in this chapter, Visual Studio 2017 comes with a number of search-and-replace tools, each suited to a particular type of search task to enable you to navigate and modify your code quickly and easily.
The help system is a powerful interface to the documentation that comes with Visual Studio 2017. The ability to switch easily between online and local documentation ensures that you can balance the speed of offline searches with the relevance of information found on the web. And the abstract paragraphs shown in all search results, regardless of their locations, help reduce the number of times you might click a false positive.