
26
Visual Database Tools
DATABASE WINDOWS IN VISUAL STUDIO 2017
A number of windows specifically deal with databases and their components. From the Data Sources window that shows project-related data files and the Data Connections node in the Server Explorer, to the Database Diagram Editor and the visual designer for database schemas, you can find most of what you need directly within the IDE. It’s unlikely that you need to venture outside of Visual Studio to work with your data.
Figure 26-1 shows Visual Studio 2017 in the process of a database-editing session. Notice how the windows, toolbars, and menus all update to match the particular context of editing a database table. In the main area is the list of columns belonging to the table. Below the column list is the SQL statement that can be used to create the table. The normal Properties tool window contains the properties for the current table. The next few pages take a look at each of these windows and describe their purposes so that you can use them effectively.

Server Explorer
You can use the Server Explorer to navigate the components that make up your system (or indeed the components of any server to which you can connect). One useful component of this tool window is the Data Connections node. Through this node, Visual Studio 2017 provides a significant subset of the functionality available through other products, such as SQL Server Management Studio, for creating and modifying databases.
Figure 26-1 shows the Server Explorer window with an active database connection (AdventureWorks2014.dbo). The database icon displays whether you are actively connected to the database and contains a number of child nodes dealing with the typical components of a modern database, such as Tables, Views, and Stored Procedures. Expanding these nodes lists the specific database components along with their details. For example, the Tables node contains a node for the Department table, which in turn has nodes for each of the columns, such as DepartmentID, Name, and GroupName. Selecting any of these nodes enables you to quickly view the properties within the Properties tool window. This is the default database view; you can switch to either Object Type or Schema view by selecting Change View, followed by the view to change to, from the right-click context menu off the database node. Each of these views simply groups the information about the database into a different hierarchy. The Schemas view groups the elements into Schemas, Assemblies and System-supplied objects.
To add a new database connection to the Server Explorer window, click the Connect to Database button at the top of the Server Explorer or right-click the Data Connections root node, and select the Add Connection command from the context menu.
If this is the first time you have added a connection, Visual Studio asks you what type of data source you are connecting to. Visual Studio 2017 comes packaged with a number of Data Source connectors, including Access, SQL Server, and Oracle, as well as a generic ODBC driver. It also includes a data source connector for a Microsoft SQL Server Database.
The Database File option borrows from the easy deployment model of its lesser cousin, Microsoft Access. With SQL Server Database File, you can create a flat file for an individual database. This means you don’t need to attach it to a SQL Server instance. This flexibility makes it highly portable; you simply deliver the .mdf file containing the database along with your application.
After you choose the data source type to use, the Add Connection dialog appears. Figure 26-2 shows this dialog for a SQL Server Database File connection with the settings appropriate to that data source type.
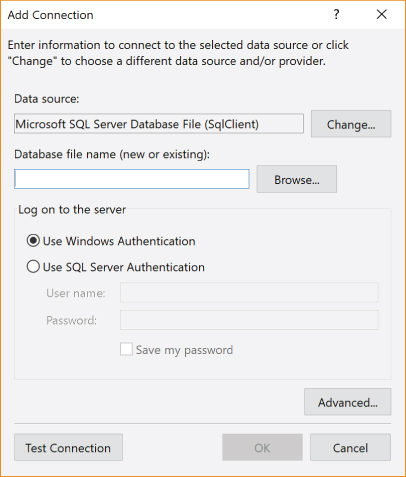
The Change button takes you to the Data Sources page, enabling you to select a different type of database connection for your Visual Studio session. Creating a SQL Server Database File is very straightforward. Just type or browse to the location where you want the file and specify the database name for a new database. If you want to connect to an existing database, use the Browse button to locate it on the filesystem.
Generally, the only other task you need to perform is to specify whether your SQL Server configuration uses Windows or SQL Server Authentication. As part of theinstallation of Visual Studio 2017, you have an option to install SQL Server 2016 Express, which uses Windows Authentication as its base authentication model.
This dialog will be slightly different for different connection types. But regardless of the type, when you click OK, Visual Studio attempts to connect to the database. If successful, it adds it to the Data Connections node, including the child nodes for the main data types in the database. Alternatively, if the database doesn’t exist, Visual Studio prompts you by asking if it should go ahead and create it. You can also create a new database by selecting Create New SQL Server Database from the right-click menu off the Data Connections node in the Server Explorer.
Table Editing
The easiest way to edit a table in the database is to double-click its entry in the Server Explorer. An editing window (Figure 26-3) then displays in the main workspace, consisting of three components. The left side of the top section is where you specify each field name, data type, and important information such as length of text fields, the default value for new rows, and whether the field is nullable. On the right side of the top section are additional table attributes. These include the keys, the indices, any constraints or foreign keys that are defined, and any triggers.
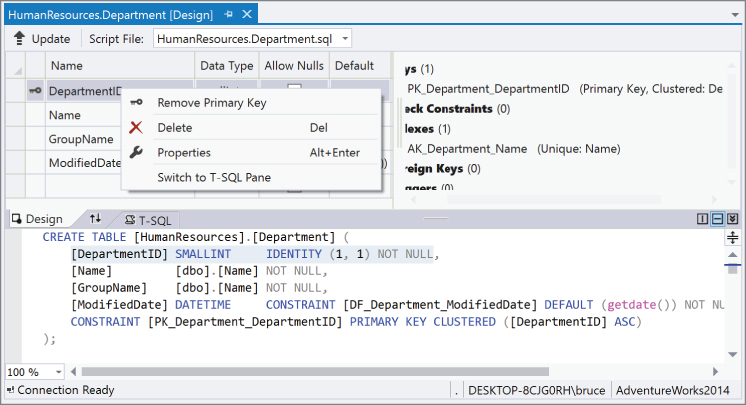
The lower half of the table editing workspace contains the SQL statement that, when executed, will create the table.
Right-clicking on one of the elements on the right gives you access to a set of commands that you can perform against the table (shown in Figure 26-3). Depending on which heading you right-click, the context menu allows you to add keys, indices, constraints, foreign keys, and triggers.
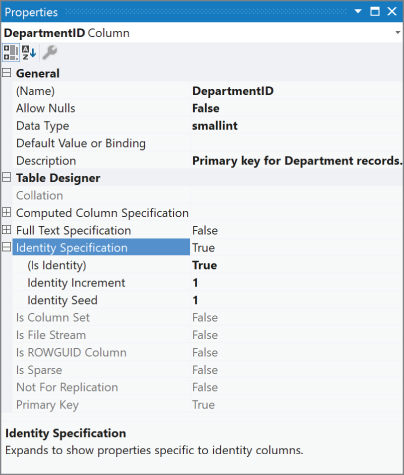
For any of the columns in the table, the Properties window contains additional information beyond what is shown in the workspace. The column properties area enables you to specify all the available properties for the particular Data Source type. For example, Figure 26-4 shows the Properties window for a field, DepartmentID, which has been defined with an identity clause automatically increased by 1 for each new record added to the table.
Relationship Editing
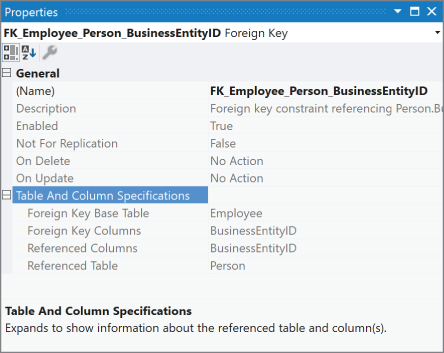
Most databases likely to be used by your .NET solutions are relational in nature, which means you connect tables together by defining relationships. To create a relationship, open one of the tables that will be part of the relationship, and right-click the Foreign Keys header at the right of the workspace. This creates a new entry in the list, along with a new fragment in the SQL statement (found at the bottom of the workspace). Unfortunately, this information is just a placeholder. In order to specify the details of the foreign key relationship, you need to modify the properties for the SQL fragment that was added, as shown in Figure 26-5.
Views, Stored Procedures, and Functions
To create and modify views, stored procedures, and functions, Visual Studio 2017 uses a text editor, as shown in Figure 26-6. Because there is no IntelliSense to help you create your procedure and function definitions, Visual Studio doesn’t allow you to save your code if it detects an error.
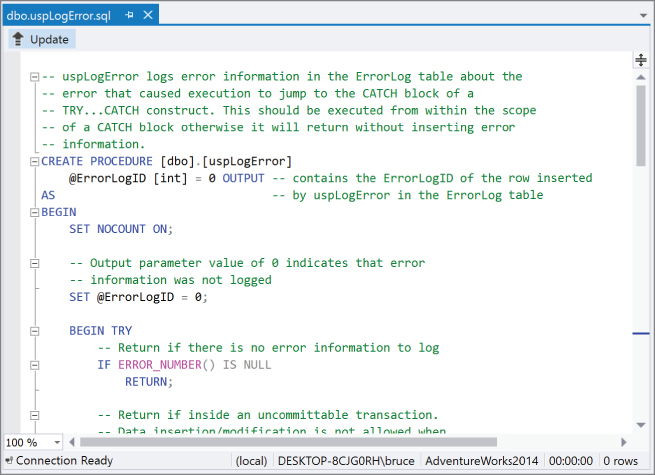
To help you write and debug your stored procedures and functions, there are snippets available to be placed in your SQL statements. The right-click context menu includes an Insert Snippet option that has snippets for creating a stored procedure, a view, a user-defined type, and a wide variety of other SQL artifacts. The context menu also includes options to execute the entire stored procedure or function.
A word of warning about executing the SQL for existing artifacts: When you double-click to look at the definition, the SQL that is displayed is the SQL that would be used to create the artifact. That is to say that double-clicking on a view will display the CREATE VIEW SQL statement. If you execute that statement, you will attempt to create a view that already exists, resulting in a number of error statements. If you’re attempting to modify the artifact, you need to change the statement to the ALTER version.
The Data Sources Window
The Data Sources window contains any active data sources known to the project, such as data sets (as opposed to the Data Connections in the Server Explorer, which are known to Visual Studio overall). To display the Data Sources tool window, use the View ➪ Other Windows ➪ Show Data Sources menu command.
The Data Sources window has two main views, depending on the active document in the workspace area of the IDE. When you edit code, the Data Sources window displays tables and fields with icons representing their types. This aids you as you write code because you can quickly reference the type without looking at the table definition.
When you edit a form in Design view, however, the Data Sources view changes to display the tables and fields with icons representing their current default control types (initially set in the Data UI Customization page of Options). Figure 26-7 shows that the text fields use TextBox controls, whereas the ModifiedDate field uses a DateTimePicker control. The icons for the tables indicate that all tables will be inserted as DataGridView components by default as shown in the drop-down list.

SQL Server Object Explorer
If you are a regular developer of database applications in Visual Studio, odds are good that you’re familiar with the SQL Server Management Studio (SSMS). The reason for the familiarity is that there are tasks that need to be performed that don’t fit into the Server Explorer functionality. To alleviate some of the need to utilize SQL Server Management Studio, Visual Studio 2017 includes the SQL Server Object Explorer. Through this information, some of the functionality not found in the Server Explorer can be found in an interface that is somewhat reminiscent of SSMS. To launch the SQL Server Object Explorer, use the View ➪ SQL Server Object Explorer option.
To start working against an existing SQL Server instance, you need to add it to the Explorer. Right-click the SQL Server node, or click the Add SQL Server button (second from the left). The dialog that appears is the standard one that appears when connecting to SSMS. You need to provide the server name and instance, along with the authentication method that you want to use. Clicking the Connect button establishes the connection.
When the connection has been made, three nodes underneath the server appear. These are the Databases, Security items, and Server Objects that are part of that instance (see Figure 26-8).

Under the Security and Server Objects nodes, a number of subfolders are available. These subfolders contain various server-level artifacts. These include logins, server roles, linked servers, triggers, and so on that are defined on the server. For each of the subfolders, you can add or modify the entities that are presented. For example, if you right-click the EndPoints node, the context menu provides the option to add either a TCP- or HTTP-based endpoint. When the Add option is selected, T-SQL code is generated and placed into a freshly opened designer tab. The T-SQL code, when executed, creates the artifact. Of course, you must modify the T-SQL so that when it is executed the results will be as wanted.
The Databases node also contains subfolders. The difference is that here each subfolder represents a database on the SQL Server instance. As you expand a database node, additional folders containing Tables, Views, Synonyms, Programmability items, Server Broker storage elements, and Security appear. For most of these items, the process to create or edit is commonplace. Right-clicking the subfolder and selecting the Add New option generates the SQL statement needed to create the selected item. (Naturally, you need to change a couple of values.) Or you could right-click on an existing item and select the View Properties or other similarly named menu options. This displays the T-SQL code that would alter the selected item. You can then change the appropriate values and execute the statement by clicking the Update button (see Figure 26-9).

EDITING DATA
Visual Studio 2017 also has the capability to view and edit the data contained in your database tables. To edit the information, right-click on the table you want to view in the Server Explorer and select the Show Table Data option from the context menu. You see a tabular representation of the data in the table, as shown in Figure 26-10, enabling you to edit it to contain whatever default or test data you need to include. As you edit information, the table editor displays indicators next to fields that have changed.

You can also show the diagram, criteria, and SQL panes associated with the table data you’re editing by right-clicking anywhere in the table and choosing the appropriate command from the Pane submenu. This can be useful for customizing the SQL statement used to retrieve the data, for example, to filter the table for specific values or just to retrieve the first 50 rows.
REDGATE DATA TOOLS
As part of an attempt to improve the integration between Visual Studio and database artifacts, Microsoft partnered with Redgate to include three different tools in Visual Studio 2017.
- ReadyRoll Core: Provides source control and deployment assistance to SQL Server artifacts.
- SQL Prompt Core: Provides code completion for SQL. Think of it as IntelliSense for SQL statements and you’re pretty close.
- SQL Search: Allows you to search for SQL objects within and across databases.
Each of these is covered in more detail in the subsequent sections.
ReadyRoll Core
One of the most common tasks for developers is making changes to a database. That’s a task that is fraught with challenges. Some developers make the changes directly against the database. This makes it challenging to track which changes have been made and to propagate those changes to QA or production systems. Other developers spend a great deal of effort maintaining migration scripts, for both data and schema, to handle the changes that are made to the database during development.
The purpose of ReadyRoll Core is to make the lives of both of these types of developers easier. It provides a mechanism for generating and maintaining the scripts necessary to deploy, migrate, and update databases, both at the data and the schema level.
The starting point is a new SQL Server project. Use File ➪ New ➪ Project to open the New Project dialog. On the left, navigate to the SQL Server node. You should see two project templates, as shown in Figure 26-11.
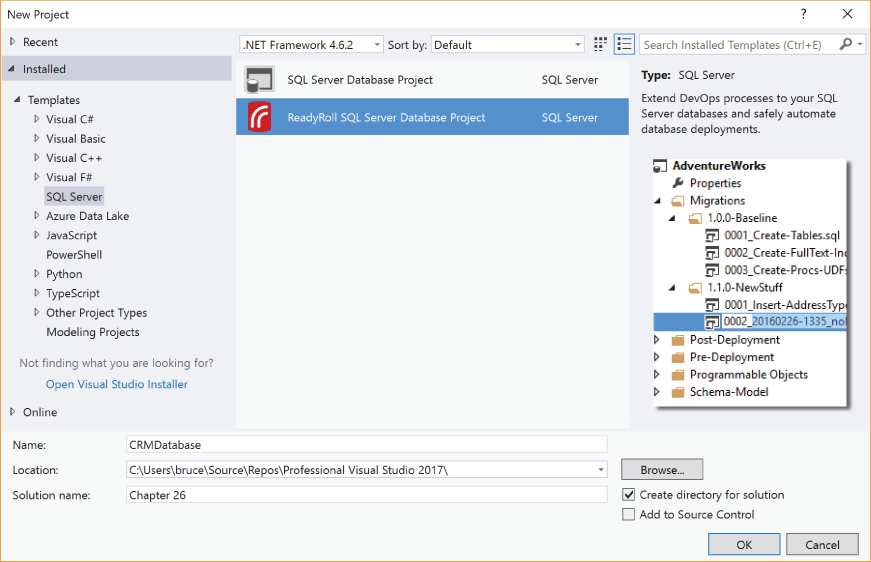
The first template, SQL Server Database Project, is the legacy template. There is also a ReadyRoll SQL Server Database Project available. Provide an appropriate project and solution name and click OK to create the project.
The project that is created can be seen in the Solution Explorer in Figure 26-12.
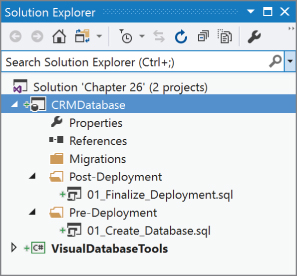
The project itself consists mostly of three folders: Migrations, Post-Deployment, and Pre-Deployment. Into each of these folders you will place (or generate) SQL scripts that will be executed at various points in the process. The Pre- and Post-Deployment scripts will be executed before and after the database deployment, respectively. The Migration scripts are run between those two, as they form the actual deployment.
Once the project has been created, the next step is to connect it to a database. To be fair, if you are creating a new database as part of your application, you can also connect to an empty database. But for this example, open the ReadyRoll pane by using View ➪ ReadyRoll. There are three steps that need to be taken to get started, and the pane indicates where you are. The pane shown in Figure 26-13 is what the pane looks like after you have created a project and connected to a database.

When you connect your project to a database, you get a dialog that allows you to create a connection. You can select a recently used connection (and that is recently used across all of the projects that you have opened, not just the database project). Or you can work with databases that have been defined in any of three different zones. Figure 26-14 shows the dialog that is used to choose databases in the different zones: local (on your machine), network (within your current network), or Azure.

In this dialog, you are presented with a list of database servers. Once you select the desired server, the fields in the lower half of the form are used to define the connection. This includes the specific database, the authentication mode, and any required credentials. There is a button that allows you to test the connection to make sure your information is correct. When you are finished, clicking on OK links the selected database to the database project.
Once you have connected to an existing database, you can use the Import Database button (as seen in Figure 26-13) to create the initial scripts. After a few minutes (the actual time depends on the number of objects in the database), the ReadyRoll pane looks similar to Figure 26-15.
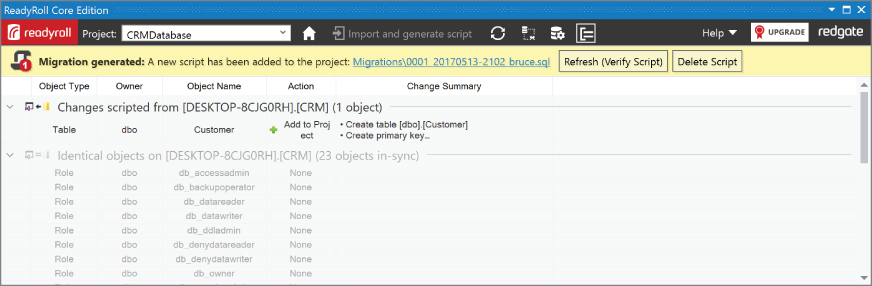
You can see from the messages in the body of the pane that a single table (Customer) was created. It also indicates that a migration script was placed into the project. You can double-click on the script to see what was actually created.
Across the top of the ReadyRoll pane, there are a number of controls aimed at giving you access to commonly needed functionality. On the left is a dropdown list containing the database projects that are in your current solution. Changing the project allows you to target your commands at different projects.
Depending on exactly what is displayed on the pane, you might see a Home icon to the right of the list of database projects. It can be seen in Figure 26-15. When clicked, the ReadyRoll pane looks like to Figure 26-16.

The next two controls will be covered in a few moments. They are used to import changes made to the database into the database project. The last two icons are used to open the target database in SQL Server Management Studio (SSMS) and to modify the connection for the target database.
Now that the connection to the database has been made, you are free to modify the database as you need to. You can use the SQL Object Explorer built into Visual Studio. You can also use SSMS. How you change the database is not important. When you are finished making the changes (for this example, an address column was added to the Customer table), come back to the ReadyRoll pane and click on the icon that refreshes the list of database object changes (the circular arrows in Figure 26-16). The result is shown in Figure 26-17.

You can see that the change that you made is included in the pane. When you click on the Import and generate script link, a SQL script is created and placed in the project in the Migration folder. You can repeat this process as often as you need to modify the database.
When it comes time to publish your database project, at the moment, the process is a little clunky. If you right-click on the database project, you’ll notice a Publish option. However, when you click on it, you see a message box saying that the database can’t be published through Visual Studio. Instead, there is a command line that can be used to publish the database, and one of the buttons on the dialog generates that command for the current project and puts it on the clipboard.
SQL Prompt Core
The goal of SQL Prompt Core is to introduce some of the productivity of IntelliSense into writing SQL commands. To start, open up a new SQL query window using Tools ➪ SQL Server ➪ New Query. The window opens and you are prompted for a connection against which you will be writing the query. Once you have the connection, you are ready to start writing.
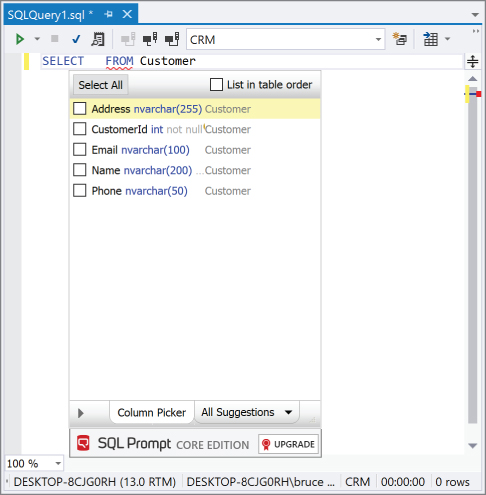
Presuming that you are working against the CRM database, type SELECT * FROM. Add a space after the FROM and you will see something like Figure 26-18.

Here you can choose any one of the available objects. This is precisely the kind of help that you expect when editing code files.
Beyond this basic functionality, there are other options available. In Figure 26-19, there is a relatively normal SQL query.

When the cursor is just to the right of the asterisk, using the Tab key will automatically replace the asterisk with the list of fields for the current table. If you don’t want to choose all of the columns, use Ctrl+Space to open the list of items and click on the Column Selector tab. What you see resembles Figure 26-20.
One final feature in SQL Prompt Core is the ability to suggest (and autocomplete) JOIN statements in your query. As you start to type the ON clause, the foreign key relationships in the tables are evaluated and the possible JOINs are presented to you.
SQL Search
When you are making changes to your database, it is frequently useful to be able to search either within a database or even across multiple databases for particular elements. In Visual Studio 2017, this functionality is available through the Tools ➪ SQL Search option. Figure 26-21 shows this window.
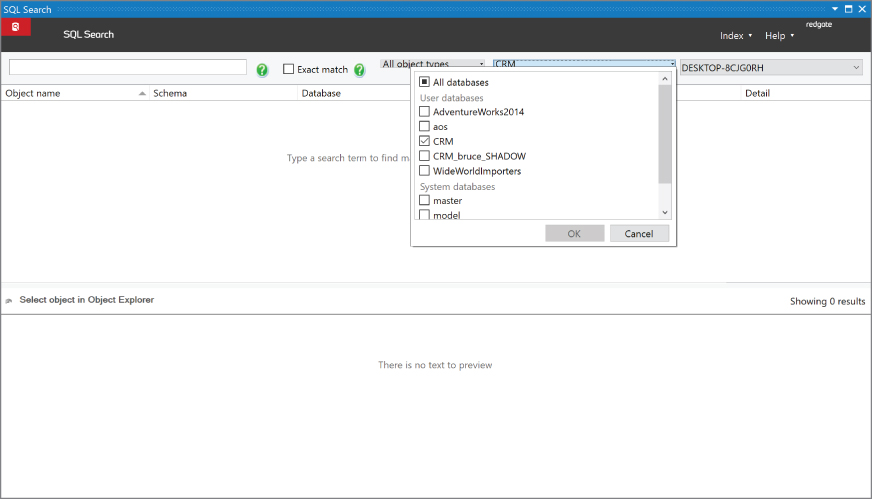
In the bar along the top of the window, you can select the databases that are to be scanned through a dropdown. Place a checkmark beside the database to include and click on OK. Then enter a value into the search box on the right and all of the selected databases are searched. Figure 26-22 illustrates a set of results.
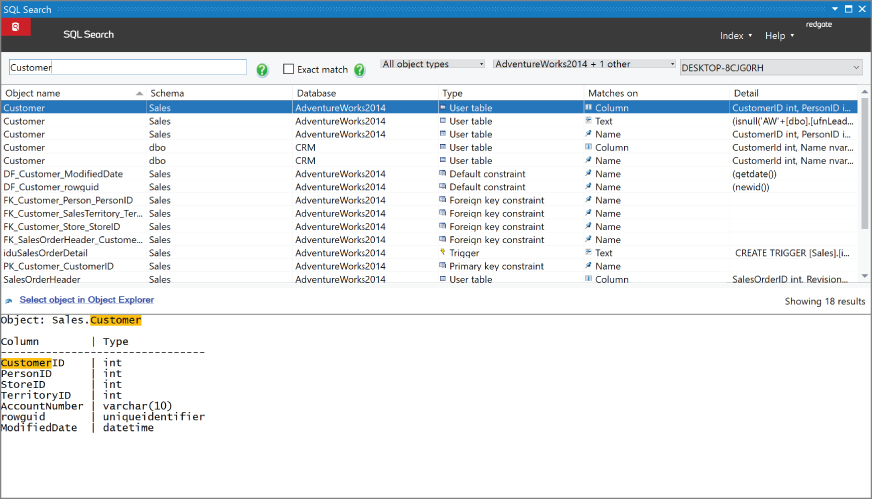
In some cases, there is contextual information available about the result. If that’s the case (and there is a column in the results called Detail that contains the context), then selecting the item causes the context to be displayed in the lower half of the pane.
SUMMARY
With the variety of tools and windows available in Visual Studio 2017, you can easily create and maintain databases without leaving the IDE. You can manipulate data and define database schemas visually using the Properties tool window with the Schema Designer view.
More importantly for developers who are frequently manipulating databases, Visual Studio 2017 includes a number of tools aimed at helping manage and deploy databases in a real-world production environment.