
35
Packaging and Deployment
WINDOWS INSTALLER XML TOOLSET
WiX is a toolkit that consists of a number of different components, each with its own purpose. And because geeks like to find humor in naming, the components are named after elements related to candles. (WiX is pronounced “wicks” as in “the candle has four wicks.”) The components are:
- Candle: The compiler that converts XML documents to object files that contain symbols and/or references to symbols.
- Light: The linker that takes one or more object files and resolves the symbols references. The output for Light also typically includes the packaged MSI or MSM file.
- Lit: A tool that can combine multiple object files (such as are produced by Candle) into a new object file that can then be processed by Light.
- Dark: A decompiler that examines existing MSI and MSM files and generates the XML documents that represent the installation package.
- Tallow/Heat: Tallow generates a WiX file list code by walking a directory tree. The fragment of XML produced is suitable for incorporation with other WiX source files by Candle. Heat is a more recent tool that performs a similar task, albeit in a more general manner.
- Pyro: A tool used to create Patch files (
.mspfiles) without the need for the Windows Installer SDK. - Burn: A tool that acts as a bootstrapper/installer chainer. The basic idea is to allow packages to specify dependencies, and the Burn coordinates the installation of the prerequisites prior to the installation of the main package.
To start creating a WiX package, you need to get the toolkit installed into your development environment. You can install the WiX Toolset by navigating to Tools ➪ Extensions and Updates. Then enter WiX Toolset in the search box in the top right corner of the dialog that appears. When the WiX Toolset Visual Studio 2017 Extension appears in the central section, click on the Download button to start the installation. You’ll need to restart Visual Studio to complete the process. As well as the Extension, which includes the project templates, you’ll need to install the Wix Build Tools. You can find the current installation files for Wix at http://wixtoolset.org/releases.
Building an Installer
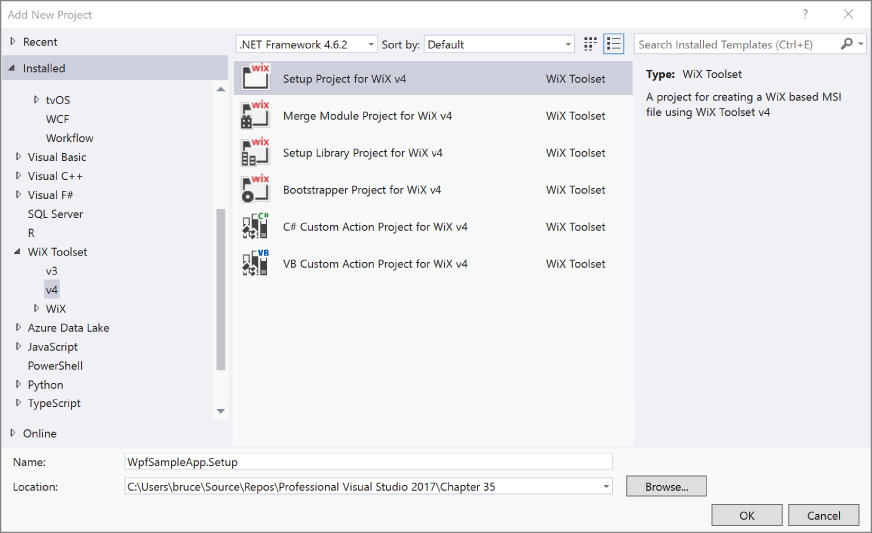
To build an installer with Visual Studio 2017, you need to add an additional project to the application that you want to deploy. Figure 35-1 shows the available setup and deployment project templates included with WiX. Either the setup project or the bootstrapper project can be used for most standalone applications. This includes ASP.NET applications or web services. The difference between the two is the format of the output, with the bootstrapper project producing an .EXE file, while the setup project creates an .MSI file. If you want to build an installer that will be integrated into a larger installer, you may want to build a merge module. Alternatively, you can use the Setup Library project to create an installer component—a wixlib—a piece of installation functionality that you might use in multiple installation packages, in a manner similar to the way you use assemblies in multiple applications.
Upon creation of the project, a single file appears in the designer. To be fair, the setup project does contain other files, but the Product.wxs file is the starting point and the heart of the installation package. So begin by taking a look at the contents. Figure 35-2 shows the default file.

You can notice that the file is divided into three main elements:
- Product: This section describes the fundamental information about the installation. This includes the manufacturer, the components that are to be included, the media that is to be used, and other details used to create the MSI or MSM file.
- Directory Fragment: This section describes the layout of the folders placed onto the target machine. You might notice that the default appears to be organized in a hierarchical manner. This is not a coincidence but a function of the declarative nature of WiX. The hierarchy in this fragment represents the hierarchy of the directory created on the target file system.
- Component Group Fragment: This section describes the features to be installed. The component group defines the files that make up a feature. Through a yet-to-be-seen fragment, the files in the component group are mapped onto the directory structure. And in the Product fragment, the component groups that make up the product are identified.
To start, consider the Product element. As already mentioned, this element describes the piece of software being installed. In the Product element, there are a number of attributes that should be defined — or at least modified from the default.
There are two GUIDs related to the Products. The Id attribute is used to uniquely identify your package. The WiX product enables you to specify an asterisk as a GUID value, in which case the GUID is generated as part of the compilation process. For the Product, you should take advantage of this because each installation will be different and therefore will need a unique identifier.
The second GUID is the UpgradeCode. This value is used if you create an upgrade installation package — in other words, for the installation package for the second or subsequent versions of your product. Every upgrade needs to reference the upgrade code, so unlike the Id attribute, this value will be the same for every version of your product. As such, you should set the attribute value to a GUID that you generate.
The other four attributes that should be set relate more to the user interface and experience of the installation process. The Name attribute is the name of the product. This is the value that appears when you look at the Program and Features portion of Control Panel. The Language attribute is the culture identifier for this installation. The default value of 1033 is U.S. English. The Version attribute is the version of the product that is installed and is in the typical format for a version number. Finally, the Manufacturer attribute defines the organization producing the product.
The Product element has a number of subelements that provide additional details about the installation. The MajorUpgrade element can determine the action that should be taken when an application is upgraded to a more recent version. Possible actions include uninstalling the old version and installing the new one, replacing the files or a custom action.
The purpose of the MediaTemplate element indicates the size and format of the media onto which the installation package will be placed. In fact, through WiX you can specify into which media component (such as a DVD disc) that a particular file will be placed. The default MediaTemplate, however, is usually sufficient because it includes the values that create a single file.
The remaining element in the Product describes the feature (or features) included in the installation package. A feature in WiX parlance is a collection of deployment items intended to be installed as an atomic unit. It could be as simple as one file per feature, or there could be multiple files in a single feature. But regardless, from the user’s perspective, the feature is the level at which the user has the choice to install or not to install. As such, there can be one or more Feature elements in the Product.
The example shown in Figure 35-2 has only a single feature. The attributes are, for the most part, fairly typical. The Id is a unique textual identifier for the feature. The Title is the name given to the feature. It appears in the installation user interface, so it should be user-friendly. The Level is used to nest Features one within the other.
For a given feature, you specify the ComponentGroups that are related to it. The ComponentGroup indicates a particular block of installation elements. It can be a single assembly or a configuration file; it can be a collection of files of different type. But the important aspect to the declaration is that the Id for the ComponentGroup must match a ComponentGroup defined in one of the subsequent fragments.
The next major component to a WiX file is the Directory fragment. First, notice that it’s not actually a second-level XML element (that is, at the same level as the Product). Instead, it’s a subelement of a fragment. This arrangement is done to allow Directory fragments to be placed in different packages and still be easily combined by the linker when the installation file is constructed.
The contents of the Directory fragment are intended to mimic the file system that will exist on the target system after the installation is complete. Referring to Figure 35-2, you can see that there is a three-level nesting that has been defined. Each level has an Id associated with it. The Id can be meaningful, as is the case here. But ultimately, you have the ability to map the placement of individual files into specific directories by referencing the Id. The Name attribute is optional; however if you plan to create directories where none already exist, as is the case with the INSTALLFOLDER element, it should be included. In the example, the default value for the directory created under Program Files is the name of the project.
The final fragment (refer to Figure 35-2) is a ComponentGroup, which contains a reference to the individual files that make up the group. The Id for the group is important because it must match an Id specified in the ComponentGroupRef back when the Features were being listed. The ComponentGroup element has a Directory attribute; the value of this attribute specifies the directory where the files in the group will be placed. The value must match one of the Ids of a Directory element in the Directory fragment.
Using Heat to Create Fragments
WiX provides a tool that examines various types of artifacts and creates WiX fragments based on which it finds. The tool is known as Heat. And fortunately, one of the artifact types that it understands is Visual Studio project files.
Heat is a useful tool. However, it is a command-line utility and, as such, you need to take a simple step to integrate it into Visual Studio. Specifically, it needs to be placed into your External Tools collection. To access the collection, select Tools ➪ External Tools from the menu. The dialog shown in Figure 35-3 appears.
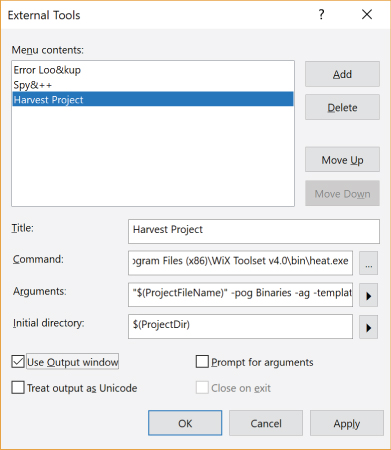
To add a new command, click the Add button. For the new tool, specify a name of Harvest Project. The command (which, not surprisingly, is implemented in heat.exe) is found in the WiX Toolset v3.11 directory underneath Program Files, or Program Files (x86) if you’re running on a 64-bit machine. The Arguments value is where the magic takes place. There are a number of parameters that need to be defined. And you can use the project tokens as well. Set the Argument value to the following.
project "$(ProjectFileName)" -pog Binaries -ag -template fragment -out $(TargetName).wxs
Finally, set the Initial Directory value to $(ProjectDir). This enables the utility to find the needed files starting at the project’s root. Make sure that Use Output Window is checked; then a final click on the OK button completes the creation process.
Now that the Heat command is available, you can put it to use. First, in Solution Explorer, make sure that the file within the project being harvested is selected. Then use the Tools ➪ Harvest Project menu option to scan the current project. If all goes well, the Output window should look something like Figure 35-4. Yes, it looks like nothing happened. But in the absence of any error messages, the scan was successful.

The result from harvesting your project in this manner is a .wxs file. More precisely, it is a .wxs file that has the same name as your project. You can locate it in the same directory as your project file. To view that file in Visual Studio, use the Show All Files button in the Solution Explorer. You’ll notice that a .wxs file is now visible. Double-click it to open the file. The results should appear similar to Figure 35-5, which is generated from a simple “Hello World” style WPF application named WpfSampleApp.

The contents of these WiX fragments complete the installation packaging story. There are two fragments visible. The first contains a DirectoryRef element. The purpose of this element is to enable multiple components to be placed into the same directory in the target machine.
Inside the DirectoryRef are two Component elements. Each component represents a file. The first component is the executable for the project. The second component is the configuration file. The Source attribute indicates the components.
The second fragment is the ComponentGroup previously discussed. The difference is that the ComponentGroup in Figure 35-2 had no files. This one does. In particular, the files contained in this ComponentGroup (as represented by the ComponentRef elements) refer to the files’ identity in the DirectoryRef element. The Id attribute in the ComponentRef matches the Id in the Component in the DirectoryRef.
This constant indirection might seem quite convoluted. And to a certain extent it is. But it enables a great deal of flexibility. By defining a directory reference and including components within it, you can place files from different components into the same physical directory with a minimum of effort.
The Heat-generated fragments need to be incorporated into the setup project to be included in the installation package. To accomplish this, copy the two fragments and paste them into the Product.wxs file from the setup project. In doing so, delete the existing ComponentGroup fragment.
Now the two components need to be referenced in the Product.wxs file. This is done in two steps. First, in the Feature element in the Product, set the ComponentGroupRef Id to be the Id of the ComponentGroup in the Heat-generated fragments. In the example, that would be WpfSampleApp.Binaries. This includes the components as part of the feature being installed.
Second, in the DirectoryRef element in the Heat-generated fragment, set the Id to INSTALLFOLDER. This links the components (and the files) into the target directory when the installation is performed. These changes should result in a Product.wxs file that looks like Figure 35-6.

There is one more step that needs to be done before the setup project can be built. You might notice that in the fragment generated by Heat, there were two references to $(var.WpfSampleApp.TargetDir). This is a preprocessor variable that will be resolved when the setup project is built. However, as it currently stands, the variable is unrecognized. To change that, you need to add a reference to the WpfSampleApp project to the WiX project. Right-click on the WiX project in Solution Explorer and select Add Reference. In the Add Reference dialog that appears, select the Project tab and double-click on the WpfSampleApp. Then click OK to complete the process.
Now the project can be built. The output from the build process (that is, the .MSI file) can be found in the binDebug directory. If you execute this file (by double-clicking on it in Windows Explorer, for example), you’ll see a standard set of installation screens. And the result will be a file placed into your Program Files directory named WpfSampleApp.Setup. To remove this, you need to use the Programs And Features application within Control Panel to uninstall the application. In other words, you have created a full-fledged installation of your application.
As you might expect, a large number of customizations can be done to the installation, both in terms of its functionality and its appearance. If you are interested in the details and capabilities, visit the WiX home page at http://wixtoolset.org. There, you can find not only the full documentation, but also links to tutorials and even the complete source code.
The Service Installer
You can create an installer for a Windows Service the same way you would create an installer for a Windows application. However, a Windows Service installer not only needs to install the files into the appropriate location, but it also needs to register the service so it appears in the services list.
The WiX Toolset provides a mechanism for doing this. It is the ServiceInstall and ServiceControl elements that describe what you want to happen when the service is installed. The XML related to these components can be seen next:
<Component Id='ServiceExeComponent'
  Guid='YOURGUID-D752-4C4F-942A-657B02AE8325'
  SharedDllRefCount='no' KeyPath='no'
  NeverOverwrite='no' Permanent='no' Transitive='no'
  Win64='no' Location='either'>
  <File Id='ServiceExeFile' Name='ServiceExe.exe' Source='ServiceExe.exe'
    ReadOnly='no' Compressed='yes' KeyPath='yes' Vital='yes'
    Hidden='no' System='no'
    Checksum='no' PatchAdded='no'/>
  <ServiceInstall Id='MyServiceInstall' DisplayName='My Test Service'
    Name='MyServiceExeName' ErrorControl='normal' Start='auto'
    Account='Local System' Type='ownProcess'
    Vital='yes' Interactive='no'/>
  <ServiceControl Id='MyServiceControl' Name='MyServiceExeName'
    Start='install' Stop='uninstall' Remove='uninstall'/>
</Component>
The File element is similar in purpose to the WiX fragments illustrated in Figure 35-6. In this case, it identifies that file that implements the service that is being installed. The most important element is KeyPath. It needs to be set to yes, whereas the KeyPath in the Component needs to be set to no.
The ServiceInstall element contains information about the service. This includes the name that appears in the service control applet (DisplayName) and the “real” name of the service (the Name attribute). If you have created installers for services in earlier versions of Visual Studio, you might be recosting the Account and Interactive attributes as being related to the account under which the service will run and whether the service will interact with the desktop.
The ServiceControl element describes what should happen to the service when it is installed. The three attributes in ServiceControl that matter are Start, Stop, and Remove. The values of these attributes determine what should happen when the service in installed or removed. The values previously shown would have the service start when it is installed, and both stopped and removed when the service is uninstalled.
CLICKONCE
Using a Windows installer is a sensible approach for any application development. However, deploying an installer to thousands of machines, and then potentially having to update them, is a daunting task. Although management products help reduce the burden associated with application deployment, web applications often replace rich Windows applications because they can be dynamically updated, affecting all users of the system. ClickOnce enables you to build self-updating Windows applications. This section shows you how to use Visual Studio 2017 to build applications that can be deployed and updated using ClickOnce.
One Click to Deploy
To demonstrate the functionality of ClickOnce deployment, this section uses the same application used to build the Windows Installer, WpfSampleApp, which simply displays an empty form. To deploy this application using ClickOnce, select the Publish option from the right-click context menu of the project. This opens the Publish Wizard, which guides you through the initial configuration of ClickOnce for your project.
The first step in the Publish Wizard enables you to select a location to deploy to. You can choose to deploy to a local website, an FTP location, a file share, or even a local folder on your machine. Clicking Browse opens the Open Web Site dialog, which assists you in specifying the publishing location.
The next step asks you to specify where the users are expecting to install the application from. The default option is for users to install from a CD or DVD-ROM disc. More commonly, you want to install from a file share on a corporate intranet or a website on the Internet. Note that the location you publish to and the location the users install from can be different. This can be useful while testing new releases.
The contents of the final step change depending on the installation option selected. If your application is installed from a CD or DVD-ROM, this step asks if the application should automatically check for updates. If this option is enabled, you must provide a location for the application to check. In the case that your users will be installing from a file share or website, it is assumed that the application will update from the location that it was originally installed from. Instead, the final question relates to whether the application will be available offline. If the offline option is selected, an application shortcut is added to the Start menu, and the application can be removed in the Add/Remove Programs dialog in the operating system. The user can run the application even if the original installation location is no longer available. If the application is only available online, no shortcut is created, and the users must visit the install location every time they want to run the application.
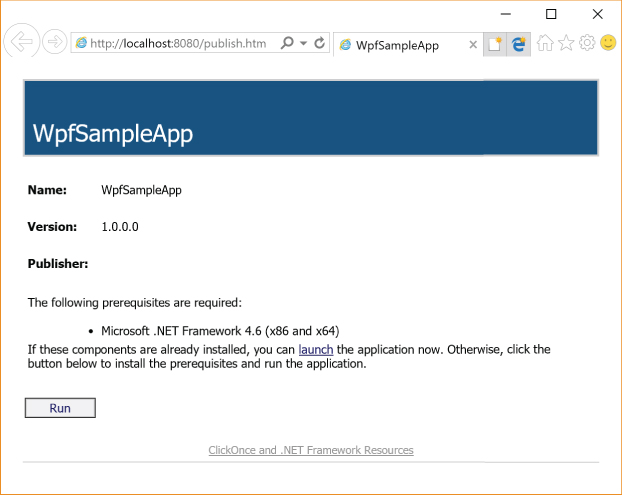
The last screen in the wizard enables you to verify the configuration before publishing the application. After the application has been published, you can run the Setup.exe bootstrap file that is produced to install the application. If you install from a website, you get a publish.htm file generated as well. This file, shown in Figure 35-7, uses some JavaScript to detect a few dependencies and provides a Run button that launches the Setup.exe.
Clicking the Run button at this location displays a dialog prompting you to run or save Setup.exe. Selecting Run (or running Setup.exe from a different kind of install) shows the Launching Application dialog, as shown in Figure 35-8, while components of your application are retrieved from the installation location.

After information about the application has been downloaded, a security warning launches, as shown in Figure 35-9. In this case, the security warning is raised because although the deployment manifest has been signed, it has been signed with a certificate that is not known on the machine on which it is installed.

Three options are available for signing the deployment manifest. By default, Visual Studio 2017 creates a test certificate to sign the manifest, which has the format application name_TemporaryKey.pfx and is automatically added to the solution. (This happens when the application is first published using the Publish Now button.) Though this certificate can be used during development, it is not recommended for deployment. The other alternatives are to purchase a third-party certificate, from a company such as VeriSign, or to use the certificate server within Windows Server to create an internal certificate.
The advantage of getting a certificate from a well-known certificate authority is that it can automatically be verified by any machine. Using either the test certificate or an internal certificate requires installation of that certificate in the appropriate certificate store. Figure 35-10 shows the Signing tab of the Project Properties window, where you can see that the ClickOnce manifest is signed with a certificate that has been generated on the local computer. An existing certificate can be used by selecting it from the store or from a file. Alternatively, another test certificate can be created.

If you want your application to install with a known publisher, you need to add the test certificate into the root certificate store on the machine on which you install the product. Because this also happens to be the deployment machine, you can do this by clicking More Details. This opens a dialog that outlines the certificate details, including the fact that it can’t be authenticated. (If you use the certificate created by default by Visual Studio 2017, you need to use the Select from File button to reselect the generated certificate and then use the More Details button. There seems to be an issue here, in that the details window does not show the Install Certificate button without this additional step.) Clicking Install Certificate enables you to specify that the certificate should be installed into the Trusted Root Certification Authorities store. This is not the default certificate store, so you need to browse for it. Because this is a test certificate, you can ignore the warning that is given, but remember that you should not use this certificate in production. Now when you publish your application and try to install it, you see that the dialog includes the publisher. You are still warned that additional security permissions need to be granted to this application for it to execute.
ClickOnce deployment manifests are rated on four security dimensions. You’ve just seen how you can specify a well-known publisher, critical for safe installation of an application. By default, ClickOnce publishes applications as full trust applications, giving them maximum control over the local computer. This is unusual because in most other cases Microsoft has adopted a security-first approach. To run with full trust, the application requires additional security permissions, which might be exploited. The Sample Application will be available online and offline; and though this isn’t a major security risk, it does modify the local file system. Lastly, the location from which the application is installed is almost as important as the publisher in determining how dangerous the application might be. In this case, the application was published within the local network, so it is unlikely to be a security threat.
Ideally, you would like to bypass the Application Install dialog and have the application automatically be granted appropriate permissions. You can do this by adding the certificate to the Trusted Publishers store. Even for well-known certificate authorities, for the application to install automatically, the certificate needs to be added to this store. With this completed, you see only the progress dialog as the application is downloaded, rather than the security prompt.
When installed, the application can be launched either by returning to the installation URL or by selecting the shortcut from the newly created Start Menu folder with the same name as the application.
One Click to Update
At some point in the future, you might make a change to your application — for example, you might add a button to the simple form you created previously. ClickOnce supports a powerful update process that enables you to publish the new version of your application in the same way you did previously, and existing versions can be upgraded the next time they are online. As long as you are content with the current set of options, the update process is just the Publish process. When using the Publish Wizard to update an existing application, all the values previously used to publish the application are preconfigured for you.
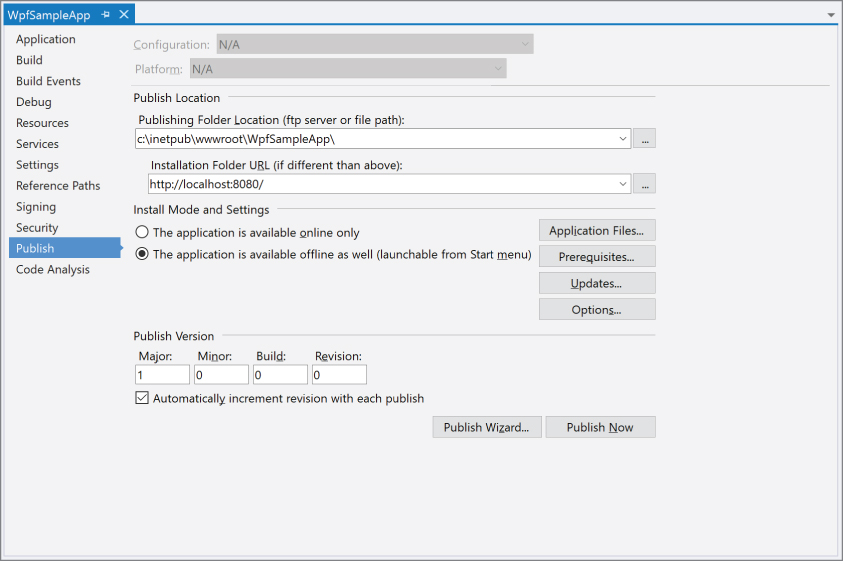
You can check the settings in the Publish tab of the Project Properties designer (Figure 35-11). The designer shows the publish location, the installation location, and the install mode of the application. There is also a setting for the Publish Version. This value is not shown in the Publish Wizard, but by default this version starts at 1.0.0.0 and increments the right-most number every time the application is published.
Along the right are a number of buttons that bring up more advanced options, most of which are not exposed by the wizard. The Application Updates dialog (Figure 35-12) enables you to configure how frequently the application updates itself. In Figure 35-12, the application checks for an update once every seven days, and that check occurs after it has started. You can also specify a minimum required version, which can prevent older clients from executing until they are updated.

With this change, now when you publish a new version of your application, any existing users will be prompted to update their application to the most recent version.
One of the most powerful features of ClickOnce deployment is that it tracks a previous version of the application that was installed. This means that at any stage, not only can it do a clean uninstall, but it can also roll back to the earlier version. The application can be rolled back or uninstalled from the Programs and Features list from the Control Panel.
SUMMARY
This chapter walked you through the details of building installers for various types of applications. Building a good-quality installer can make a significant difference in how professional your application appears. ClickOnce also offers an important alternative for those who want to deploy their application to a large audience.