
24
Synchronization Services
OCCASIONALLY CONNECTED APPLICATIONS
An occasionally connected application is one that can continue to operate regardless of connectivity status. You have a number of different ways to access data when the application is offline. Passive systems simply cache data that is accessed from the server so that when the connection is lost at least a subset of the information is available. Unfortunately, this strategy means that a limited set of data is available and is only suitable for scenarios in which there is an unstable or unreliable connection, rather than completely disconnected applications. In the latter case, an active system that synchronizes data to the local system is required. The Microsoft Synchronization Services for ADO.NET (Sync Services) is a synchronization framework that dramatically simplifies the problem of synchronizing data from any server to the local system.
SERVER DIRECT
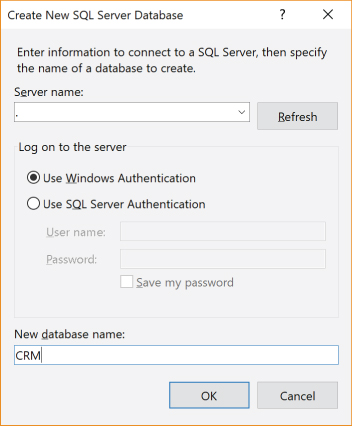
To become familiar with the Sync Services, you can use a simple database that consists of a single table that tracks customers. You can create this using the Server Explorer within Visual Studio 2017. Right-click the Data Connections node, and from the shortcut menu, select Create New SQL Server Database. Figure 24-1 shows the Create New SQL Server Database dialog in which you can specify a server and a name for the new database.
When you enter CRM into the name field and click OK, a database with the name CRM is added to the local SQL Server instance, and a data connection is added to the Data Connections node in the Server Explorer. From the Tables node, under the newly created data connection, select Add New Table from the right-click shortcut menu, and create columns for CustomerId (primary key), Name, Email, and Phone so that the table matches what is shown in Figure 24-2.

Now that you have a simple database to work with, it’s time to create a new WPF Application. In this case the application is titled QuickCRM, and in the Solution Explorer tool window of Figure 24-3, you can see the MainWindow and two additional forms, ServerForm and LocalForm, have been added.
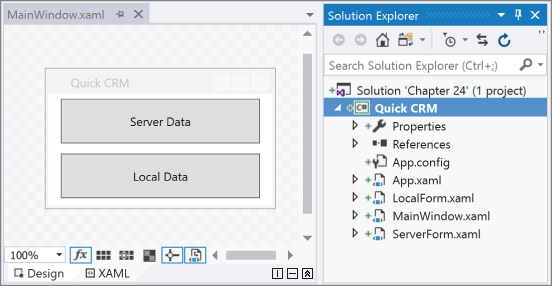
MainWindow has two buttons (refer to the editor area of Figure 24-3) and has the following code to launch the appropriate forms:
VB
Public Class MainWindow
    Private Sub ServerButton_Click(ByVal sender As System.Object,
                                   ByVal e As System.RoutedEventArgs) _
                          Handles ServerButton.Click
        My.Forms.ServerForm.Show()
    End Sub

    Private Sub LocalButton_Click(ByVal sender As System.Object,
                                  ByVal e As System.RoutedEventArgs) _
                           Handles LocalButton.Click
        My.Forms.LocalForm.Show()
    End Sub
End Class
C#
public partial class MainWindow : Window {
    public MainWindow(){
        InitializeComponent();
    }

    private void ServerButton_Click(object sender, RoutedEventArgs e){
        (new ServerForm()).ShowDialog();
    }
    private void LocalButton_Click(object sender, RoutedEventArgs e){
        (new LocalForm()).ShowDialog();
    }
}
Before looking at how you can use Sync Services to work with local data, take a look at how you might have built an always-connected, or server-bound, version. Open the Data Sources window, click on the Add New Data Source button, and step through the Data Source Configuration Wizard, selecting the DataSet option, followed by the CRM database created earlier, saving the connection string to the application configuration file, and adding the Customer table to the CRMDataSet.
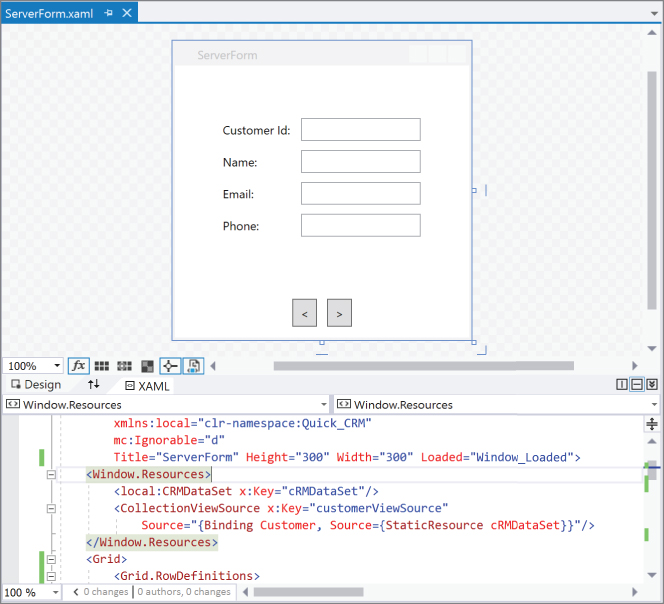
Open the ServerForm designer by double-clicking it in the Solution Explorer tool window. In the Data Sources tool window, use the drop-down on the Customer node to select Details. Then from the CustomerId node, select None. Dragging the Customer node across onto the design surface of the ServerForm adds the appropriate controls so that you can bind data to the Customer table of the dataset. It also contains the code to populate that dataset, so that you can navigate backward and forward through the database. To actually perform the navigation, a couple of buttons need to be added to the page, so that it appears as shown in Figure 24-4.
The functionality of the Next and Previous buttons is implemented in the Click event handler for those buttons. Add the following code to the code-behind file and make sure that the Click event is connected to it from within XAML.
VB
Private Sub Previous_Click(ByVal sender As Object,
   ByVal e As RoutedEventArgs) _
   Dim customerViewSource As System.Windows.Data.CollectionViewSource = _
      CType(Me.FindResource("customerViewSource"), _
         System.Windows.Data.CollectionViewSource)
   If (customerViewSource.View.CurrentPosition > 0) Then
      customerViewSource.View.MoveCurrentToPrevious()
   End If

End Sub

Private Sub Previous_Click(ByVal sender As Object,
   ByVal e As RoutedEventArgs) _
   Dim cRMDataSet As Quick_CRM.CRMDataSet = _
      CType(Me.FindResource("cRMDataSet"), Quick_CRM.CRMDataSet)
   Dim customerViewSource As System.Windows.Data.CollectionViewSource = _
      CType(Me.FindResource("customerViewSource"), _
         System.Windows.Data.CollectionViewSource)
   If (customerViewSource.View.CurrentPosition <
      cRMDataSet.Customer.Count - 1) Then
      customerViewSource.View.MoveCurrentToNext()
   End If

End Sub
C#
private void Previous_Click(object sender, RoutedEventArgs e)
   System.Windows.Data.CollectionViewSource customerViewSource =
      ((System.Windows.Data.CollectionViewSource)
        (this.FindResource("customerViewSource")));
   if (customerViewSource.View.CurrentPosition > 0)
      customerViewSource.View.MoveCurrentToPrevious();
}

private void Next_Click(object sender, RoutedEventArgs e)
{
    Quick_CRM.CRMDataSet cRMDataSet =
      ((Quick_CRM.CRMDataSet)(this.FindResource("cRMDataSet")));
    System.Windows.Data.CollectionViewSource customerViewSource =
      ((System.Windows.Data.CollectionViewSource)
         (this.FindResource("customerViewSource")));
   if (customerViewSource.View.CurrentPosition < cRMDataSet.Customer.Count - 1)
      customerViewSource.View.MoveCurrentToNext();
}
This completes the part of the application that connects directly to the database to access the data. You can run the application and verify that you can access data while the database is online. If the database goes offline or the connection is lost, an exception is raised by the application when you attempt to retrieve from the database.
GETTING STARTED WITH SYNCHRONIZATION SERVICES
Underlying the ability to synchronize data between a local and remote database is the Sync Framework. For Visual Studio 2017, version 2.1 of the Sync Framework is the one to work with, and to use the synchronization functionality that we’re discussing in this chapter, you need to make sure that it has been installed. It is available through NuGet.
To start, add a LocalDB to your project. Use the Add New Item dialog (right-click the project in Solution Explorer, and select Add ➪ New Item). In the dialog, navigate to the Data folder, and select the Service-Based Database template. For this example, give it the name LocalCRM.mdf. Then, in the Data Sources window, add a new Data Source. The Data Source Configuration Wizard is launched. Choose a Database, then select Dataset, set the data connection to point to LocalCRM.mdf, accept the default connection string (which should be called LocalCRMConnectionString), and save the string in the configuration file. On the final screen of the wizard, a message indicates that the database doesn’t contain any objects. Have no fear. You’ll be adding objects soon enough.
For this example, you need to add a form that displays the data that is stored on the client. While the LocalForm form is in design mode, drag the Customer node from the CRMDataSet data source onto the form. This action creates a connection to the server database, which is addressed momentarily.
Part of the process of a synchronized application is to get the data in sync. To do this, the databases need to be provisioned with a number of different elements. These elements enable change tracking to be managed on the tables, making it easier to keep the data on the two sides synchronized. This provisioning is done programmatically. And conveniently, it enables the database schemas to be kept in sync as well. Start by opening the MainWindow and adding a Load event handler to the form. In the Load event, you need to perform three steps. First, provision the server. Second, provision the client. And finally synchronize the data.
One of the key concepts with the Sync Framework is scope. By adding one or more tables to the scope, you can arrange for all the updates for the tables to be included in a single transaction. This sounds simple and straightforward, but there is a bit of a wrinkle. If you are performing a large number of updates, keeping them all in one transaction can have a negative impact on performance. So there is a setting (BatchSize on the synchronization provider object) that controls how many updates are kept in each transaction. If you want to batch your updates, set the BatchSize property to a nonzero value.
Start by provisioning the server. Add the following code to the Load event handler for the MainWindow form.
VB
Dim scopeName = "CRMScope"
Dim serverConn = New SqlConnection(Settings.Default.CRMConnectionString)
Dim clientConn = New SqlConnection(Settings.Default.LocalCRMConnectionString)
Dim serverProvision = New SqlSyncScopeProvisioning(serverConn)
If Not serverProvision.ScopeExists(scopeName) Then
   Dim serverScopeDesc = New DbSyncScopeDescription(scopeName)
   Dim serverTableDesc =
      SqlSyncDescriptionBuilder.GetDescriptionForTable("Customer", _
      serverConn)
   serverScopeDesc.Tables.Add(serverTableDesc)
   serverProvision.PopulateFromScopeDescription(serverScopeDesc)
   serverProvision.Apply()
End If
C#
var scopeName = "CRMScope";
var serverConn = new SqlConnection(Settings.Default.CRMConnectionString);
var clientConn = new SqlConnection(Settings.Default.LocalCRMConnectionString);
var serverProvision = new SqlSyncScopeProvisioning(serverConn);
if (!serverProvision.ScopeExists(scopeName))
{
   var serverScopeDesc = new DbSyncScopeDescription(scopeName);
   var serverTableDesc =
      SqlSyncDescriptionBuilder.GetDescriptionForTable("Customer",
      serverConn);
   serverScopeDesc.Tables.Add(serverTableDesc);
   serverProvision.PopulateFromScopeDescription(serverScopeDesc);
   serverProvision.Apply();
}
In this code, you can see the basic provisioning steps. The first step is to create the scope-provisioning object using a connection to the server database. Then, if the named scope has not already been added, create a new instance of the scope, add the wanted tables to the scope, and then apply the provisioning functionality.
The scope information is maintained beyond the running of the application. In other words, if you create a scope the first time the application runs, that scope still exists the next time the application runs. This has two side effects. First, it means that you should uniquely name your scopes so that there is no inadvertent collision with other applications. Second, you can’t add a new table to a scope and have that table be provisioned properly (at least not without performing additional configuration).
For the second step, do the same thing with the client provisioning:
VB
Dim clientProvision = New SqlSyncScopeProvisioning(clientConn)
If Not clientProvision.ScopeExists(scopeName) Then
   Dim serverScopeDesc = New DbSyncScopeDescription(scopeName)
   Dim serverTableDesc =
      SqlSyncDescriptionBuilder.GetDescriptionForTable("Customer", _
      clientConn)
   clientScopeDesc.Tables.Add(clientTableDesc)
   clientProvision.PopulateFromScopeDescription(slientScopeDesc)
   clientProvision.Apply()
End If
C#
var clientProvision = new SqlSyncScopeProvisioning(clientConn);
if (!clientProvision.ScopeExists(scopeName))
{
   var clientScopeDesc = new DbSyncScopeDescription(scopeName);
   var clientTableDesc =
      SqlSyncDescriptionBuilder.GetDescriptionForTable("Customer",
      clientConn);
   clientScopeDesc.Tables.Add(clientTableDesc);
   clientProvision.PopulateFromScopeDescription(clientScopeDesc);
   clientProvision.Apply();
}
The third step is to perform the synchronization. The Sync Framework 2.1 includes a SyncOrchestrator (as opposed to the SyncAgent in the previous versions) to manage the synchronization process. Add the following code below the two provisioning blocks:
VB
Dim syncOrchestrator = New SyncOrchestrator()
Dim localProvider = New SqlSyncProvider(scopeName, clientConn)
Dim remoteProvider = New SqlSyncProvider(scopeName, serverConn)
syncOrchestrator.LocalProvider = localProvider
syncOrchestrator.RemoteProvider = remoteProvider
syncOrchestrator.Direction = SyncDirectionOrder.Download

Dim syncStats = syncOrchestrator.Synchronize()
C#
var syncOrchestrator = new SyncOrchestrator();
var localProvider = new SqlSyncProvider(scopeName, clientConn);
var remoteProvider = new SqlSyncProvider(scopeName, serverConn);
syncOrchestrator.LocalProvider = localProvider;
syncOrchestrator.RemoteProvider = remoteProvider;
syncOrchestrator.Direction = SyncDirectionOrder.Download;

var syncStats = syncOrchestrator.Synchronize();
This is the data and schema synchronization step. There is a provider object created for each end of the synchronization. One of the additions with Sync Framework 2.1 is support for SQL Azure as being one of the endpoints.
The final addition is a small piece of code added to the Load method for the LocalForm. If you recall, you dragged the Customer node from the CRMDataSet data source, which is linked to the CRM database. You need to change that to link to the local CRM storage. So in the Load method, prior to the fill, the connection string for the table adapter is changed to point to the local CRM. When finished, the Load method should look like the following:
VB
Private Sub LocalForm_Load(ByVal sender As System.Object, _
                           ByVal e As System.Windows.RoutedEventArgs) _
                           Handles LocalForm.Load
   Me.customerTableAdapter.Connection.ConnectionString = _
      QuickCRM.Properties.Settings.Default.LocalCRMConnectionString
   Me.customerTableAdapter.Fill(this.cRMDataSet.Customer)
End Sub
C#
private void LocalForm_Load(object sender, RoutedEventArgs e)
{
   this.customerTableAdapter.Connection.ConnectionString =
      QuickCRM.Properties.Settings.Default.LocalCRMConnectionString;
   this.customerTableAdapter.Fill(this.cRMDataSet.Customer);
}
At this point, you can run the application. After a brief pause (while the provisioning is taking place), the MainWindow displays. Click the Server Data button to display the Server form. Modify a number of records in the database. Close the form and click the Local Data button. The modified data is visible.
Close the Local form and click the Server Data button again. In the Server form, change the existing ones. When you finish, close the form and reopen the Local form. Your changes are not there; however, when you click the button that you added to the toolbar (which basically performs a refresh), the new and changed data becomes visible.
SYNCHRONIZATION SERVICES OVER N-TIERS
So far, the entire synchronization process is conducted within the client application with a direct connection to the server. One of the objectives of an occasionally connected application is to synchronize data over any connection, regardless of whether it is a corporate intranet or the public Internet. Unfortunately, with the current application you need to expose your SQL Server so that the application can connect to it. This is clearly a security vulnerability, which you can solve by taking a more distributed approach. Sync Services has been designed with this in mind, enabling the server components to be isolated into a service that can be called during synchronization.
Sync Services supports separating the synchronization process so that the communication to either of the endpoints can be implemented in a custom provider. From the perspective of an N-Tier application, the actual implementation of the provider could be done through a WCF service (for example) instead of a direct database connection. To do this, you need to create a WCF service that implements the four methods that makes up Sync Service, as shown in the following IServiceCRMCacheSyncContract interface:
VB
<ServiceContractAttribute()>  _
Public Interface IServiceCRMCacheSyncContract
    <OperationContract()>  _
    Function ApplyChanges(ByVal groupMetadata As SyncKnowledge, _
                           ByVal dataSet As DataSet, _
                           ByVal syncSession As SyncSession) As SyncContext
    <OperationContract()>  _
    Function GetChanges(ByVal groupMetadata As SyncKnowledge, _
                         ByVal syncSession As SyncSession) As SyncContext
    <OperationContract()>  _
    Function GetSchema(ByVal tableNames As Collection(Of String), _
                        ByVal syncSession As SyncSession) As SyncSchema
    <OperationContract()>  _
    Function GetServerInfo(ByVal syncSession As SyncSession) As SyncServerInfo
End Interface
Now, create a custom provider class derived from the SyncProvider base class. In your custom class, you override some of the methods from the base class and call the corresponding methods through the WCF service proxy.
After the class has been constructed, you can set the Remote Provider on the Sync Orchestrator to be a new instance of the custom SyncProvider class. Now, when you call Synchronize, Sync Services uses the Remote Provider to call the methods on the WCF Service. The WCF Service in turn communicates with the server database carrying out the synchronization logic.
SUMMARY
In this chapter you have seen how to use the Microsoft Sync Framework to build an occasionally connected application. Although you have other considerations when building such an application, such as how to detect network connectivity, you have seen how to perform synchronization of both the data and the schema, and how to separate the client and server components into different application tiers. With this knowledge, you can begin to work with this technology to build richer applications that can continue to work regardless of where they are used.