
8
Code Snippets and Refactoring
CODE SNIPPETS REVEALED
Visual Studio 2017 includes extensive code snippet support that allows a block of code along with predefined replacement variables to be inserted into a file, making it easy to customize the inserted code to suit the task at hand.
Storing Code Blocks in the Toolbox
Before looking at code snippets, this section looks at the simplest means Visual Studio provides to insert predefined blocks of text into a file. Much as it can hold controls to be inserted on a form, the Toolbox can also hold blocks of text (such as code) that can be inserted into a file. To add a block of code (or other text) to the Toolbox, simply select the text in the editor and drag it over onto the Toolbox. This creates an entry for it in the Toolbox with the first line of the code as its name. You can rename, arrange, and group these entries like any other element in the Toolbox. To insert the code block, you simply drag it from the Toolbox (as shown in Figure 8-1) to the desired location in a file. Or simply double-click the Toolbox entry to insert it at the current cursor position in the active file.
This is the simplest form of code snippet behavior in Visual Studio 2017, but with its simplicity comes limited functionality, such as the lack of ability to modify and share the snippets. Nevertheless, this method of keeping small sections of code can prove useful in some scenarios to maintain a series of code blocks for short-term use.
Code Snippets
Code snippets are a much more useful way to insert blocks of code into a file. Code snippets are defined in individual XML files, each containing a block of code that programmers may want to insert into their code. They may also include replaceable parameters, making it easy to customize the inserted snippet for the current task. They are integrated with Visual Studio’s IntelliSense, making them easy to find and insert into a code file.
Visual Studio 2017 ships with many predefined code snippets for the two main languages, VB and C#, along with snippets for JavaScript, HTML, XML, CSS, Testing, Office Development, C++, and SQL Server. These snippets are arranged hierarchically in a logical fashion so that you can easily locate the appropriate snippet. Rather than locate the snippet in the Toolbox, you can use menu commands or keyboard shortcuts to bring up the main list of groups.
In addition to the predefined code snippets, you can create your own code snippets and store them in this code snippet library. Because each snippet is stored in a special XML file, you can even share them with other developers.
Following are three scopes under which a snippet can be inserted:
- Class Declaration: The snippet actually generates an entire class.
- Member Declaration: This snippet scope includes code that defines members, such as methods, properties, and event handler routines. This means it should be inserted outside an existing member.
- Member Body: This scope is for snippets that are inserted into an already defined member, such as a method.
Using Snippets in C#
Insert Snippet is a special kind of IntelliSense that appears inline in the code editor. Initially, it displays the words Insert Snippet along with a drop-down list of code snippet groups from which to choose. After you select the group that contains the snippet you require (using up and down arrows, followed by the Tab key), it shows you a list of snippets, and you can simply double-click the one you need. (Alternatively, pressing Tab or Enter with the required snippet selected has the same effect.)
To insert a code snippet in C#, simply locate the position where you want to insert the generated code, and then the easiest way to bring up the Insert Snippet list is to use the keyboard shortcut combination of Ctrl+K, Ctrl+X. You have two additional methods to start the Insert Snippet process. The first is to right-click at the intended insertion point in the code window and select Insert Snippet from the context menu that is displayed. The other option is to use the Edit ➪ IntelliSense ➪ Insert Snippet menu command.
At this point, Visual Studio brings up the Insert Snippet list, as Figure 8-2 demonstrates. As you scroll through the list and hover the mouse pointer over each entry, a tooltip displays to indicate what the snippet does and a shortcut that you can use to insert it.

To use the shortcut for a code snippet, simply type it into the code editor (note that it appears in the IntelliSense list) and press the Tab key twice to insert the snippet at that position.
Figure 8-3 displays the result of selecting the Automatically Implemented Property snippet. To help you modify the code to fit your own requirements, the sections you would normally need to change (the replacement variables) are highlighted, with the first one conveniently selected.

When you change the variable sections of the generated code snippet, Visual Studio 2017 helps you even further. Pressing the Tab key moves to the next highlighted value, ready for you to override the value with your own. Shift+Tab navigates backward, so you have an easy way to access the sections of code that need changing without needing to manually select the next piece to modify. Some code snippets use the same variable for multiple pieces of the code snippet logic. This means changing the value in one place results in it changing in all other instances.
To hide the highlighting of these snippet variables when you finish, you can simply continue coding, or press either Enter or Esc.
Using Snippets in VB
Code snippets in VB have additional features beyond what is available in C#, namely the ability to automatically add references to assemblies in the project and insert Imports statements into a file that the code needs to compile.
To use a code snippet, first locate where you want the generated code to be placed in the program listing, and position the cursor at that point. You don’t have to worry about the associated references and Imports statements; they will be placed in the correct location. Then, as with C# snippets, you can use one of the following methods to display the Insert Snippet list:
- Use the keyboard chord Ctrl+K, Ctrl+X.
- Right-click and choose Insert Snippet from the context menu.
- Run the Edit ➪ IntelliSense ➪ Insert Snippet menu command.
VB also has an additional way to show the Insert Snippet List: Simply type ? and press Tab.
Do so, and then navigate through the hierarchy and insert a snippet named Draw a Pie Chart. Figure 8-4 demonstrates how you might navigate through the hierarchy to find the snippet and insert it into your project.
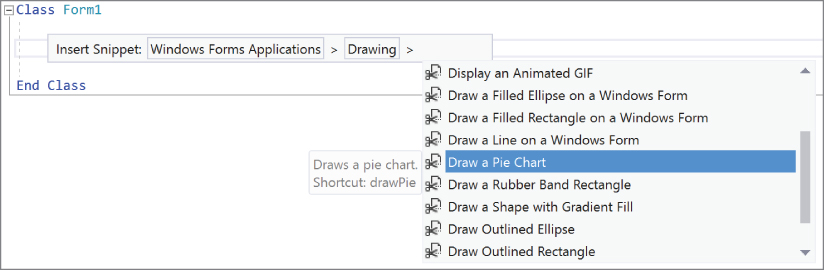
You might have noticed in Figure 8-4 that the tooltip text includes the words Shortcut: drawPie. This text indicates that the selected code snippet has a text shortcut that you can use to automatically invoke the code snippet behavior without navigating the code snippet hierarchy. As with C#, all you need to do is type the shortcut into the code editor and press the Tab key once for it to be inserted. In VB the shortcut isn’t case-sensitive, so you can generate this example by typing drawpie and pressing Tab. Note that shortcuts don’t appear in IntelliSense in VB as they do in C#.
After inserting the code snippet, if it contains replacement variables, you can enter their values and then navigate between these by pressing Tab as described for C#. To hide the highlighting of these snippet variables when you are done, you can simply continue coding, or right-click and select Hide Snippet Highlighting. If you want to highlight all the replacement variables of the code snippets inserted since the file was opened, right-click and select Show Snippet Highlighting.
Surround With Snippet
The last snippet action, available in C#, is the capability to surround an existing block of code with a code snippet. For example, to wrap an existing block with a conditional try-catch block, right-click and select Surround With, or select the block of code and press Ctrl+K, Ctrl+S. This displays the Surround With drop-down that contains a list of surrounding snippets that are available to wrap the selected line of code, as shown in Figure 8-5.

Selecting the try snippet results in the following code:
C#
public void MethodXYZ(string name)
{
    try
    {
        MessageBox.Show(name);
    }
    catch (Exception)
    {
        throw;
}
Code Snippets Manager
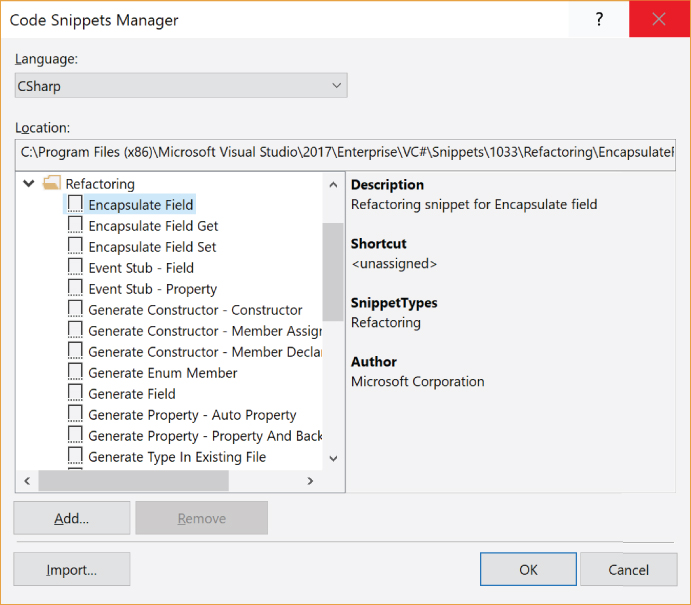
The Code Snippets Manager is the central library for the code snippets known to Visual Studio 2017. You can access it via the Tools ➪ Code Snippet Manager menu command or the keyboard shortcut chord Ctrl+K, Ctrl+B.
When it is initially displayed, the Code Snippets Manager shows the HTML snippets available, but you can change it to display the snippets for the language you are using via the Language drop-down list. Figure 8-6 shows how it looks when you’re editing a C# project. The hierarchical folder structure follows the same set of folders on the PC by default, but as you add snippet files from different locations and insert them into the different groups, the new snippets slip into the appropriate folders.
If you have an entire folder of snippets to add to the library, such as when you have a corporate setup and need to import the company-developed snippets, use the Add button. This brings up a dialog that you use to browse to the required folder. Folders added in this fashion appear at the root level of the tree — on the same level as the main groups of default snippets. However, you can add a folder that contains subfolders, which will be added as child nodes in the tree.
Removing a folder is just as easy — actually it’s dangerously easy. Select the root node that you want to remove, and click the Remove button. Instantly, the node and all child nodes and snippets are removed from the Snippets Manager without a confirmation window. If you do this by accident, you should click the Cancel button and open the dialog again. If you’ve made changes you don’t want to lose, you can add them back by following the steps explained in the previous walkthrough, but it can be frustrating trying to locate a default snippet folder that you inadvertently deleted from the list.
The location for the code snippets installed with Visual Studio 2017 is deep within the installation folder. By default, the code snippet library when running on 32-bit Windows is installed in %programfiles%Microsoft Visual Studio 15.0VBSnippets1033 for VB snippets and %programfiles%Microsoft Visual Studio 15.0VC#Snippets1033 for C#. For 64-bit Windows, replace %programfiles% with %programfiles(x86)%. You can import individual snippet files into the library using the Import button. The advantage of this method over the Add button is that you get the opportunity to specify the location of each snippet in the library structure.
Creating Snippets
Visual Studio 2017 does not ship with a code snippet creator or editor. However, Bill McCarthy’s Snippet Editor allows you to create, modify, and manage your snippets (including support for VB, C#, HTML, JavaScript, and XML snippets). The Snippet Editor is an open-source project hosted on CodePlex. With the help of other MVPs, it is also available in a number of different languages. You can download the source code for the snippet editor from the Wrox download code section. This source code is the same as what can be found on CodePlex, except that a section has been added to the app.config file to support Visual Studio 2017.
Creating code snippets by manually editing the .snippet XML files can be a tedious and error-prone process, so the Snippet Editor makes it a much more pleasant experience. When you start the Snippet Editor, you can notice a drop-down list in the top left corner. If you select SnippetEditor.Product.Utility from the list, a tree containing all of the known snippets appears. By expanding a node you can see a set of folders similar to those in the code snippet library.
Reviewing Existing Snippets
An excellent feature of the Snippet Editor is the view it offers of the structure of any snippet file in the system. This means you can browse the default snippets installed with Visual Studio, which can provide insight into how to better build your own snippets.
Browse to the snippet you’re interested in, and double-click its entry to display it in the Editor window. Figure 8-7 shows a simple snippet to Display a Windows Form. Four main panes contain all the associated information about the snippet. From top to bottom, these panes are described in Table 8-1.

TABLE 8-1: Information Panes for Snippets
| PANE | FUNCTION |
| Properties | The main properties for the snippet, including title, shortcut, and description. |
| Code | Defines the code for the snippet, including all Literal and Object replacement regions. |
| References | If your snippet requires assembly references, this tab enables you to define them. |
| Imports | Similar to the References tab, this tab enables you to define any Imports statements required for your snippet to function correctly. |
Browsing through these panes enables you to analyze an existing snippet for its properties and replacement variables. In Figure 8-7, there is a single replacement region with an ID of formName and a default value of Form.
To demonstrate how the Snippet Editor makes creating your own snippets straightforward, follow this next exercise to create a snippet that creates three subroutines, including a helper subroutine:
- Start the Snippet Editor and create a new snippet. To do this, select a destination folder in the tree, right-click, and select Add New Snippet from the context menu displayed.
- When prompted, name the snippet
Create A Button Sampleand click OK. Double-click the new entry to open it in the Editor pane. - The first thing you need to do is edit the Title, Description, and Shortcut fields (see Figure 8-8):

- Title:
Create A Button Sample - Description:
This snippet produces the code to create a button and hook an event. - Shortcut:
CreateAButton
- Title:
- Because this snippet contains member definitions, set the Type to Member Declaration.
- In the Editor window, insert the code necessary to create the three subroutines:
VB
Private Sub CreateButtonHelper
    CreateAButton(controlName, controlText, Me)
End Sub

Private Sub CreateAButton(ByVal ButtonName As String, _
                          ByVal ButtonText As String, _
                          ByVal Owner As Form)
    Dim MyButton As New Button

    MyButton.Name = ButtonName
    MyButton.Text = ButtonName
    Owner.Controls.Add(MyButton)

    MyButton.Top = 0
    MyButton.Left = 0
    MyButton.Text = ButtonText
    MyButton.Visible = True

    AddHandler MyButton.Click, AddressOf ButtonClickHandler
End Sub

Private Sub ButtonClickHandler(ByVal sender As System.Object, _
                               ByVal e As System.EventArgs)
    MessageBox.Show("The " & sender.Name & " button was clicked")
End Sub
C#
private void CreateButtonHelper() { CreateAButton(controlName, controlText, this); } private void CreateAButton(string ButtonName, string ButtonText, Form Owner) { Button MyButton = new Button(); MyButton.Name = ButtonName; MyButton.Text = ButtonName; Owner.Controls.Add(MyButton); MyButton.Top = 0; MyButton.Left = 0; MyButton.Text = ButtonText; MyButton.Visible = true; MyButton.Click += MyButton_Click; } private void MyButton_Click(object sender, EventArgs e) { MessageBox.Show("The " + sender.Name + " button was clicked"); } - Your code differs from that shown in Figure 8-8 in that the word
controlNamedoes not appear highlighted. In Figure 8-8, this argument has been made a replacement region. You can do this by selecting the entire word, right-clicking, and selecting Add Replacement (or alternatively, clicking the Add button in the area below the code window). - Change the replacement properties like so:
- ID: controlName
- Defaults to:
"MyButton" - Tooltip: The name of the button
- Repeat this for controlText:
- ID: controlText
- Defaults to:
"Click Me!" - Tooltip: The text property of the button
Your snippet is finished and ready to use. You can use Visual Studio 2017 to insert the snippet into a code window.
Distributing Code Snippets
If you have created a number of code snippets and want to share them with your friends and colleagues, the simplest approach is to send the .snippet files and have them use the Import feature in the Code Snippet Manager. However, if you are trying to make the process a little easier (or you have more than a few friends), you can package the snippet into a Visual Studio installer (.vsi) file and allow them to automatically install it into their Visual Studio instance.
For our example, consider the following snippet, which has been placed into the SayHello.snippet file.
<?xml version="1.0" encoding="utf-8"?>
<CodeSnippet Format="1.0.0"
    xmlns="http://schemas.microsoft.com/VisualStudio/2005/CodeSnippet">
  <Header>
    <Title>Say Hello</Title>
    <Author>Bruce Johnson</Author>
    <Description>C# snippet for being polite...because I'm Canadian, after all</Description>
    <HelpUrl>
    </HelpUrl>
    <Shortcut>sayh</Shortcut>
  </Header>
  <Snippet>
    <Code Language="C#">
      <![CDATA[Console.WriteLine("Hello World");]]>
    </Code>
  </Snippet>
</CodeSnippet>
Snippets can easily be distributed using a .vsi file. The simple structure of a .vsi file makes the process very easy. First, the file itself is just a .zip file with the extension changed to .vsi. Second, in the file itself, there is a manifest (which has a .vscontent extension) that describes what the components of the .vsi file are.
So, to distribute the snippet shown above, create a file called SayHello.vscontent. The content of the file (which is well-formed XML) looks like the following.
<VSContent xmlns="http://schemas.microsoft.com/developer/vscontent/2005">
    <Content>
        <FileName>SayHello.snippet</FileName>
        <DisplayName>Polite C# Code</DisplayName>
        <Description>C# snippet for being polite </Description>
        <FileContentType>Code Snippet</FileContentType>
        <ContentVersion>2.0</ContentVersion>
        <Attributes>
            <Attribute name="lang" value="c#"/>
        </Attributes>
    </Content>
</VSContent>
After you have saved the snippet, add both the .vscontent file and the SayHello.snippet file to a .zip file. Then change the extension on that file to .vsi instead of .zip. The file is ready for you to give to your friends and colleagues; when they double-click it, the snippet will be installed into Visual Studio.
ACCESSING REFACTORING SUPPORT
There are a number of ways to invoke the refactoring tools in Visual Studio 2017, including from the right-click context menu, light bulbs, and the Edit ➪ Refactor menu option. Regardless of your entry point, the refactoring user experience includes contextual awareness to help smooth the process. Specifically, the context menu shows only the items that apply to the currently selected code and the cursor position. In addition, you can use light bulb as the starting point for any refactoring, and it is only present when there are refactorings that apply to the current context. The full list of refactoring actions available within Visual Studio 2017 includes Rename, Extract Method, Encapsulate Field, Extract Interface, Promote Local Variable to Parameter, Remove Parameters, and Reorder Parameters. You can also use Generate Method Stub and Remove and Sort Usings, which can be loosely classified as refactoring. And two new refactoring actions have been added: Inline Temporary Variable and Inline Local.
The good news for VB developers is that Visual Studio 2017 provides support for all these refactorings. It’s just one more thing you can attribute to the development of the Roslyn compiler.
REFACTORING ACTIONS
The following sections describe each of the refactoring options and provide examples of how to use built-in support for both C# and VB (when appropriate).
Extract Method
One of the best ways to start refactoring a long method is to break it up into several smaller methods. The Extract Method refactoring action is invoked by selecting the region of code you want moved out of the original method and selecting Extract Method from the quick action options or using the Refactor ➪ Extract Method context menu option.
The mechanism for naming your new method utilizes the same interface that code snippets do. When you select Extract Method, the method is immediately removed from its current location and padded to a new method. The name of the method is set to NewMethod, and a call to the new method replaces the extracted code block in the original call site. The method name is highlighted, and if you change it (as you are likely to), the name of the method at the calling site is changed as well. If there are variables within the block of code to be extracted that were used earlier in the original method, they automatically appear as variables in the method signature.
For example, in the following code snippet, if you want to extract the conditional logic into a separate method, you can select the code, shown in bold, and choose Refactor ➪ Extract Method from the right-click context menu:
C#
private void button1_Click(object sender, EventArgs e)
{
    string connectionString = Properties.Settings.Default.ConnectionString;
    if (connectionString == null)
    {
        connectionString = "DefaultConnectionString";
    }
    MessageBox.Show(connectionString);
    /* ... Much longer method ... */
}
The result of the refactor is illustrated in Figure 8-9.
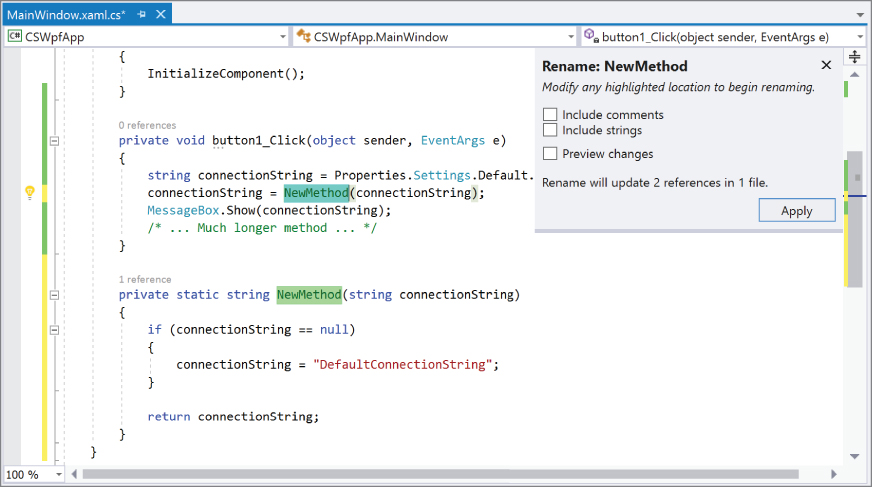
At this point, the Extract Method refactor is finished, and you are now in a Rename refactor. In this case, the Rename is related to the name of the method you just extracted. Your cursor is placed in the name of the new method. As you change the name, the change is immediately reflected in both locations. Notice the area in the top right of Figure 8-9. This area controls the Rename refactor. It contains a couple of options that are described in the “Rename” section later in this chapter. But more importantly, it includes an Apply button that must be clicked to confirm the renaming of the method from NewMethod to whatever you entered.
Encapsulate Field
Another common task when refactoring is to encapsulate an existing class variable with a property. This is what the Encapsulate Field refactoring action does. To invoke this action, select the variable you want to encapsulate, and then choose Quick Actions and Refactorings from the context menu. This displays the list of refactoring options, as shown in Figure 8-10.

Choose the type of encapsulation you want to use. The difference, as indicated by the and use property, and but still use field text, is whether existing references to the public field will continue to use the private field or use the public property instead. The name of the created property is generated from the name of the selected variable.
Extract Interface
As a project goes from prototype or early-stage development to a full implementation or growth phase, it’s often necessary to extract the core methods for a class into an interface to enable other implementations or to define a boundary between disjointed systems. In the past you could do this by copying the entire method to a new file and removing the method contents, so you were just left with the interface stub. The Extract Interface refactoring action enables you to extract an interface based on any number of methods within a class. When this refactoring action is invoked on a class, the user interface in Figure 8-11 displays.
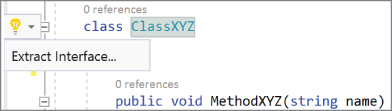
Choose the Extract Interface option and the dialog shown in Figure 8-12 appears. This enables you to select which methods are included in the interface. When selected, those methods are added to the new interface. The new interface is also added to the original class.

Change Signature
Sometimes it’s necessary to completely reorder parameters or remove parameters from the method signature. This is often for cosmetic reasons, but it can also aid readability and is sometimes warranted when implementing interfaces. Or perhaps the parameter is no longer needed by the underlying functionality.
When you’re modifying a method signature, one of the challenges is finding the method calls that are affected. By using the refactoring function, you can considerably reduce the searching that must be done for any compilation errors that would occur. This function is also particularly useful when there are multiple overloads for a method, and changing the signature may not generate compile errors; in such a case, runtime errors may occur due to semantic, rather than syntactical, mistakes.
To access the Change Signature functionality, select the method to be modified and choose Quick Actions and Refactorings from the context menu. That displays the interface shown in Figure 8-13.

Selecting the Change Signature option causes the Change Signature dialog, as shown in Figure 8-14, to appear. Through this dialog, you can move parameters up and down in the list according to the order in which you want them to appear, or you can remove them completely. When you’re finished, click OK to complete the refactoring.

Inline and Explaining Variables
These two refactorings provide both sides of a common scenario. That scenario revolves around the user of temporary, local variables in a method.
The purpose of the Inline Temporary Variables refactor is best demonstrated with code. Consider the following method.
C#
public void MethodXYZ(string name)
{
   var data = InternalMethod(2.0);
   var result = AnotherInternalMethod(name, data);
}
The inlining of the temporary variable data results in the parameter line for AnotherInternalMethod containing the call to InternalMethod instead of using the data variable. The refactor is accessed through the Quick Actions and Refactorings option in the right-click context menu after selecting the variable. The interface is visible in Figure 8-15. The preview section of Figure 8-15 should give you a decent indication of what the inlining would look like.

The Introduce explaining variable refactor goes the other way. In this case, you select the expression that is used in the method signature. The Quick Actions and Refactorings option in the context menu displays the interface (seen in Figure 8-16) that allows you to create an explaining variable that is placed back into the method signature.

If the selected expression is a constant, then along with being able to create a local variable (as a constant), you could also refactor into a class-level constant variable.
Rename
The Rename refactor is used in a number of other refactorings and as a standalone method. To trigger the standalone version, select a variable and then choose Rename from the right-click context menu. The interface shown in Figure 8-17 appears.

Now type the new name for the variable and click on the Apply button to complete the refactor. The options that appear in the right of Figure 8-17 are used to control the areas that are searched for the renaming. If you select the Include Comments option, then if the variable name appears in a string, it will be changed to the new variable name. For the Include Strings option, if the variable name is found in a string, it will be updated. And if you want to preview the changes, check the Preview Changes check box before clicking Apply.
Simplify Object Initialization
The ability to set properties of an object at the same time as the object is created has been available in .NET compilers for a number of years. As of Visual Studio 2017, there is now a compiler warning (IDE00017) that is generated if you don’t use object initializers but instead have a series of property assignments immediately after instantiating an object. The goal of this refactoring is to simplify the process of fixing this warning.
With your cursor on the instantiation code, the Lightbulb or Quick Actions and Refactorings context menu includes a couple of options. If you choose Object initialization can be simplified, then you see a preview similar to what is visible in Figure 8-18. Alternatively, you can select the Suppress IDE00017 option, and the compiler directive that suppresses the warning will be inserted into your code.

Inline Variable Declarations
For many, Inline Variable Declarations addresses a pet peeve in C#. If you use methods like TryParse that include an out parameter, it is necessary to declare the variable before using it in the method call. An example of this can be found below:
C#
int parsedValue
if (Int32.TryParse(stringToParse, out parsedValue))
{
   // Do stuff
}
With C# 7, it is now possible to declare the out parameter at the same time as it is used. And Inline Variable Declarations is used to perform a refactoring to get to the situation. With your cursor on the variable name (parsedValue in the example), the Lightbulb includes the Inline Variable Declarations options, shown in Figure 8-19.

Use “throw” Expression
The goal of this refactoring is to reduce the amount of code surrounding null checks. As well, it takes advantage of a new C# 7 features that allow for throw expressions to be executed from within a null coalescing operator. The code being replaced is a relatively standard null check, as seen below.
C#
if (value == null)
{
   throw new ArgumentNullException(nameof(value));
}
name = value;
With your cursor on the value parameter, the option to Use ‘throw’ expression appears in the list of possible refactorings. When you hover your mouse over that option, an interface similar to Figure 8-20 appears.

The suggested change is to use the null coalescing operator to either assign value to name or, in the case where value is null, throw an exception. In other words, the result is the same, but the number of lines of code has decreased.
Generate Method Stub
As you write code, you may realize that you need to call a method that you haven’t written yet. For example, the following snippet illustrates a new method that you need to generate at some later stage:
VB
Private Sub MethodA()
    Dim InputA As String
    Dim InputB As Double
    Dim OutputC As Integer = NewMethodIJustThoughtOf(InputA, InputB)
End Sub
C#
public void MethodA()
{
    string InputA;
    double InputB;
    int OutputC = NewMethodIJustThoughtOf(InputA, InputB);
}
Of course, the preceding code generates a build error because this method has not been defined. Using the Generate Method Stub refactoring action (available as a Quick Actions and Refactorings from the context menu), you can generate a method stub. As you can see from the following sample, the method stub is complete with input parameters and output type:
VB
Private Function NewMethodIJustThoughtOf(ByVal InputA As String,
                                         ByVal InputB As Double) As Integer
    Throw New NotImplementedException
End Function
C#
private int NewMethodIJustThoughtOf(string InputA, double InputB)
{
    throw new NotImplementedException();
}
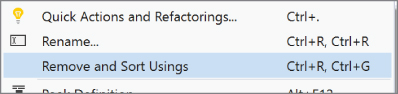
Remove and Sort Usings
It’s good practice to maintain a sorted list of Using statements in each file (in C#), and reference only those namespaces that are actually required within that file. After a major refactoring of your code, you may find that you have a number of using directives at the top of your code file that are no longer used. Rather than going through a process of trial and error to determine what is and isn’t used, you can use an operation in Visual Studio to do this for you by right-clicking in the code editor and choosing Remove and Sort Usings (shown in Figure 8-21). (In VB, the option is Remove and Sort Imports.) The using directives, using aliases, and external assembly aliases not used in the code file are removed. And the entire list is sorted. The using directives from the System namespace appear first; then the using directives from other namespaces appear in alphabetical order. If you have aliases defined for namespaces, these are moved to the bottom of the list, and if you use external assembly aliases (using the extern keyword in C#), these are moved to the top of the list.
SUMMARY
Code snippets are a valuable inclusion in the Visual Studio 2017 feature set. You learned in this chapter how to use them and how to create your own, including variable substitution (and Imports and reference associations for VB snippets). With this information, you can create your own library of code snippets from functionality that you use frequently, saving you time in coding similar constructs later. This chapter also provided examples of each of the refactoring actions available within Visual Studio 2017.