
6
Solutions, Projects, and Items
SOLUTION STRUCTURE
Whenever you work within Visual Studio, you have a solution open. When you edit an ad hoc file, this is a temporary solution that you can elect to discard when you complete your work. However, the solution enables you to manage the files that you’re currently working with, so in most cases saving the solution means that you can return to what you were doing at a later date without having to locate and reopen the files on which you were working.
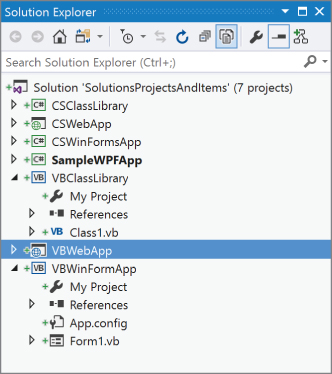
The most common way to structure applications written within Visual Studio is to have a single solution containing a number of projects. Each project can then be made up of a series of both code files and folders. The main window in which you work with solutions and projects is the Solution Explorer, as shown in Figure 6-1.
Within a project, you use folders to organize the source code that have no application meaning associated with them (with the exception of web applications, which can have specially named folders that have specific meaning in this context). Some developers use folder names that correspond to the namespace to which the classes belong. For example, if class Person is found within a folder called DataClasses in a project called FirstProject, the fully qualified name of the class could be FirstProject.DataClasses.Person.
Solution folders are a useful way to organize the projects in a large solution. Solution folders are visible only in the Solution Explorer — a physical folder is not created on the filesystem. Actions such as Build or Unload can be performed easily on all projects in a solution folder. Solution folders can also be collapsed or hidden so that you can work more easily in the Solution Explorer. Projects that are hidden are still built when you sbuild the solution. Because solution folders do not map to a physical folder, they can be added, renamed, or deleted at any time without causing invalid File references or source control issues.
Because the format for the solution file has not changed since Visual Studio 2012, you can open the same solution file with all subsequent versions. As you would expect, you can open a file in Visual Studio 2017 that was originally created in Visual Studio 2013. Even better, you can use Visual Studio 2013 to open a solution file originally created in Visual Studio 2017.
In addition to tracking which files are contained within an application, solution and project files can record other information, such as how a particular file should be compiled, project settings, resources, and much more. Visual Studio 2017 includes nonmodal dialog for editing project properties, whereas solution properties still open in a separate window. As you might expect, the project properties are those properties pertaining only to the project in question, such as assembly information and references, whereas solution properties determine the overall build configurations for the application.
SOLUTION FILE FORMAT
Visual Studio 2017 actually creates two files for a solution, with extensions .suo and .sln (solution file). The first of these is a rather uninteresting binary file and hence difficult to edit. It contains user-specific information — for example, which files were open when the solution was last closed and the location of breakpoints. This file is marked as hidden, so it won’t appear in the solution folder using Windows Explorer unless you enable the option to show hidden files.
The .sln solution file contains information about the solution, such as the list of projects, build configurations, and other settings that are not project-specific. Unlike many files used by Visual Studio 2017, the solution file is not an XML document. Instead, it stores information in blocks, as shown in the following example solution file:
Microsoft Visual Studio Solution File, Format Version 12.00
# Visual Studio 15
VisualStudioVersion = 15.0.26014.0
MinimumVisualStudioVersion = 10.0.40219.1
Project("{FAE04EC0-301F-11D3-BF4B-00C04F79EFBC}") = "SampleWPFApp",
    "SampleWPFAppSampleWPFApp.csproj",
    "{F745050D-7E66-46E5-BAE2-9477ECAADCAA}"
EndProject
Global
    GlobalSection(SolutionConfigurationPlatforms) = preSolution
        Debug|Any CPU = Debug|Any CPU
        Release|Any CPU = Release|Any CPU
    EndGlobalSection
    GlobalSection(ProjectConfigurationPlatforms) = postSolution
        {68F55325-0737-40A4-9695-B953F613E2B6}.Debug|Any CPU.ActiveCfg =
        Debug|Any CPU
        {68F55325-0737-40A4-9695-B953F613E2B6}.Debug|Any CPU.Build.0 =
        Debug|Any CPU
        {68F55325-0737-40A4-9695-B953F613E2B6}.Release|Any CPU.ActiveCfg =
        Release|Any CPU
        {68F55325-0737-40A4-9695-B953F613E2B6}.Release|Any CPU.Build.0 =
        Release|Any CPU
    EndGlobalSection
    GlobalSection(SolutionProperties) = preSolution
        HideSolutionNode = FALSE
    EndGlobalSection
EndGlobal
In this example, the solution consists of a single project, SampleWPFApp, and a Global section outlining settings that apply to the solution. For instance, the solution itself is visible in the Solution Explorer because the HideSolutionNode setting is FALSE. If you were to change this value to TRUE, the solution name would not display in Visual Studio.
Note that the Version stamp shown in the preceding code is 12.00, which is the same as the version used for Visual Studio 2012, 2013, 2015, and 2017. This is nicely consistent with the idea that the same solution file can be opened using a previous version of Visual Studio.
SOLUTION PROPERTIES
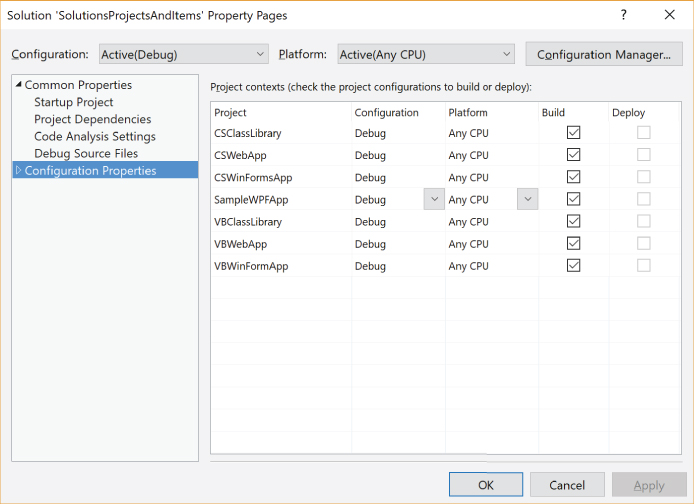
You can reach the solution Properties dialog by right-clicking the Solution node in the Solution Explorer and selecting Properties. This dialog contains two nodes to partition Common and Configuration properties, as shown in Figure 6-2.

The following sections describe the Common and Configuration properties nodes in more detail.
Common Properties
You have three options when defining the startup project for an application, and they’re somewhat self-explanatory. Selecting Current Selection starts the project that has current focus in the Solution Explorer. Single Startup Project ensures that the same project starts up each time. This is the default selection because most applications have only a single startup project. You can use the drop-down list to indicate the single project that you need to start. The last option, Multiple Startup Projects, allows for multiple projects to be started in a particular order. This can be useful if you have a client/server application specified in a single solution and you want them both to be running. When running multiple projects, it is also relevant to control the order in which they start up. Use the up and down arrows next to the project list to control the order in which projects are started.
The Project Dependencies section is used to indicate other projects on which a specific project is dependent. For the most part, Visual Studio manages this for you as you add and remove Project references for a given project. However, sometimes you may want to create dependencies between projects to ensure that they are built in the correct order. Visual Studio uses its list of dependencies to determine the order in which projects should be built. This window prevents you from inadvertently adding circular references and from removing necessary project dependencies.
In the Debug Source Files section, you can provide a list of directories through which Visual Studio can search for source files when debugging. This is the default list that is searched before the Find Source dialog displays. You can also list source files that Visual Studio should not try to locate. If you click Cancel when prompted to locate a source file, the file will be added to this list.
The Code Analysis Settings section is available only in the Visual Studio Enterprise edition. This allows you to select the static code analysis rule set that will be run for each project. Code Analysis is discussed in more detail later in the chapter.
Configuration Properties
Both projects and solutions have build configurations associated with them that determine which items are built and how. It can be somewhat confusing because there is actually no correlation between a project configuration, which determines how things are built, and a solution configuration, which determines which projects are built, other than they might have the same name. A new solution defines both Debug and Release (solution) configurations, which correspond to building all projects within the solution in Debug or Release (project) configurations.
For example, a new solution configuration called Test can be created, which consists of two projects: MyClassLibrary and MyClassLibraryTest. When you build your application in Test configuration, you want MyClassLibrary to be built in Release mode so that you’re testing as close to what you would release as possible. However, to step through your test code, you want to build the test project in Debug mode.
When you build in Release mode, you don’t want the Test solution to be built or deployed with your application. In this case, you can specify in the Test solution configuration that you want the MyClassLibrary project to be built in Release mode and that the MyClassLibraryTest project should not be built.
When you select the Configuration Properties node from the Solution Properties dialog, as shown in Figure 6-3, the Configuration and Platform drop-down boxes are enabled. The Configuration drop-down contains each of the available solution configurations (Debug and Release by default, Active, and All). Similarly, the Platform drop-down contains each of the available platforms. Whenever these drop-downs appear and are enabled, you can specify the settings on that page on a per-configuration and per-platform basis. You can also use the Configuration Manager button to add additional solution configurations and platforms.
When adding solution configurations, there is an option (checked by default) to create corresponding project configurations for existing projects (projects will be set to build with this configuration by default for this new solution configuration), and an option to base the new configuration on an existing configuration. If the Create Project Configurations option is checked and the new configuration is based on an existing configuration, the new project configuration copies the project configurations specified for the existing configuration.
The other thing you can specify in the solution configuration file is the type of CPU for which you are building. This is particularly relevant if you want to deploy to 64-bit architecture machines. The options available for creating new platform configurations are limited by the types of CPU available: x86 and x64.
You can reach all these solution settings directly from the right-click context menu from the Solution node in the Solution Explorer window. Whereas the Set Startup Projects menu item opens the Solution Configuration window, the Configuration Manager, Project Dependencies, and Project Build Order items open the Configuration Manager and Project Dependencies windows. The Project Dependencies and Project Build Order menu items will be visible only if you have more than one project in your solution.
When the Project Build Order item is selected, this opens the Project Dependencies window and lists the build order, as shown in Figure 6-4. This tab reveals the order in which projects will be built, according to the dependencies. This can be useful if you maintain references to project binary assemblies rather than Project references, and it can be used to double-check that projects are built in the correct order.

PROJECT TYPES
Within Visual Studio, the projects for Visual Basic and C# are broadly classified into different categories. With the exception of Web Site projects, which are discussed separately later in this chapter, each project contains a project file (.vbproj or .csproj) that conforms to the MSBuild schema. Selecting a project template creates a new project, of a specific project type, and populates it with initial classes and settings. Following are some of the more common categories of projects as they are grouped under Visual Studio:
- Classic Desktop: The Windows project category is the broadest category and includes most of the common project types that run on end-user operating systems. This includes the Windows Forms executable projects, Console application projects, and Windows Presentation Foundation (WPF) applications. These project types create an executable (
.exe) assembly that is executed directly by an end user. The Windows category also includes several types of library assemblies that can easily be referenced by other projects. These include both class libraries and control libraries for Windows Forms and WPF applications. A class library reuses the familiar DLL extension. The Windows Service project type can also be found in this category. - Web: The Web category includes the project types that run ASP.NET. This includes ASP.NET web applications (including MVC and Web API) and ASP.NET Core Web applications (both .NET Core and .NET Framework). Adding an ASP.NET web application starts a wizard session that enables you to create each of the different types of web projects.
- Office/SharePoint: As its name suggests, the Office/SharePoint category contains templates used to create managed code add-ins for Microsoft Office products, such as Outlook, Word, or Excel. These project types use Visual Studio Tools for Office (VSTO) and are capable of creating add-ins for most products in the Office 2013 and 2016 product suite. It also contains projects that target SharePoint, such as SharePoint Workflows or Web Parts. Visual Studio 2017 includes templates for the Office and SharePoint Add-Ins. These templates enable you to create applications that work within the App Model introduced with the 2013 versions of these products.
- .NET Core: The .NET Core category contains projects that are based on the .NET Core library. This is a version of .NET that is capable of running on Windows, Linux, and MacOS. Here you will find templates for console applications, a class library, unit test projects, and ASP.NET applications.
- .NET Standard: The .NET Standard template is used to create a library that conforms to the formal specification for .NET. Probably the easiest way to think of a .NET Standard project is as the most recent incarnation of a Portable Class Library (PCL) that can be executed on a variety of platforms.
- Cloud: This section contains templates that are related to cloud development. While you might automatically assume that this means Azure (and the Azure templates are in this category), it also includes ASP.NET templates as well. In the Azure group, there are a couple of templates that can be used to create Azure components, such as WebJobs, Mobile Apps, and Resource Groups.
- Test: The Test category includes a project type for projects that contain tests using the MSTest unit testing framework.
- WCF: This contains a number of project types for creating applications that provide Windows Communication Foundation (WCF) services.
- Windows UAP: The Windows Universal App Platform (UAP) category is new to Visual Studio 2017, although in terms of content, it is quite similar to the Windows Store category from Visual Studio 2015. There is a requirement that you be running Windows 8.1 or greater to create a Windows UAP application. If you haven’t upgraded and you try to create a project, you are redirected to a page that includes a link to start the upgrade process. When you are running Windows 8.1, the templates for Windows Store applications appear under this heading.
- Workflow: This contains a number of project types for sequential and state machine workflow libraries and applications.
The Add New Project dialog box, as shown in Figure 6-5, enables you to browse and create any of these project types. The target .NET Framework version is listed in a drop-down selector in the top center of this dialog box. If a project type is not supported by the selected .NET Framework version, such as a WPF application under .NET Framework 2.0, that project type will not display. Also be aware that the exact list of categories that you see depends a great deal on the workloads that you have installed. If you expect to see a particular project template and you can’t find it, it could very well be that the associated workload hasn’t been installed. There is a link (labelled Open Visual Studio Installer) at the bottom of the list of categories that will launch the Visual Studio installer, allowing you to easily add the workload that you’re looking for.

PROJECT FILES FORMAT
The project files (.csproj, .vbproj, or .fsproj) are text files in an XML document format that conforms to the MSBuild schema. The XML schema files for the latest version of MSBuild are installed with the .NET Framework, by default in C:WINDOWSMicrosoft.NETFrameworkv4.0.30319MSBuildMicrosoft.Build.Core.xsd.
The project file stores the build and configuration settings that have been specified for the project and details about all the files that are included in the project. In some cases, a user-specific project file is also created (.csproj.user or .vbproj.user), which stores user preferences such as startup and debugging options. The .user file is also an XML file that conforms to the MSBuild schema.
PROJECT PROPERTIES
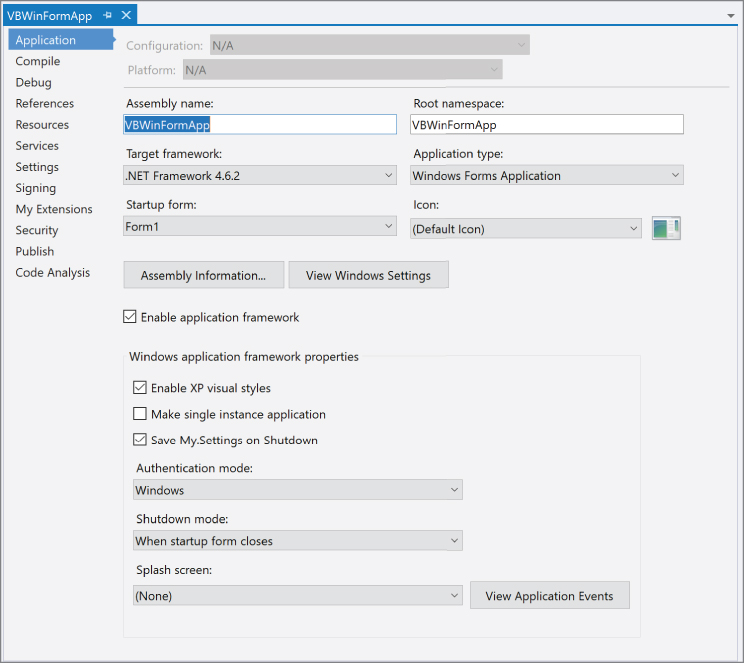
You can reach the project properties by either right-clicking the Project node in Solution Explorer and then selecting Properties, or by double-clicking My Project (Properties in C#) just under the Project node. In contrast to solution properties, the project properties do not display in a modal dialog. Instead, they appear as an additional tab alongside your code files. This was done in part to make it easier to navigate between code files and project properties, but it also makes it possible to open project properties of multiple projects at the same time. Figure 6-6 illustrates the project settings for a Visual Basic Windows Forms project. This section walks you through the vertical tabs on the project editor for both Visual Basic and C# projects.
The project properties editor contains a series of vertical tabs that group the properties. As changes are made to properties in the tabs, a star is added to the corresponding vertical tab. This functionality is limited, however, because it does not indicate which fields within the tab have been modified.
Application
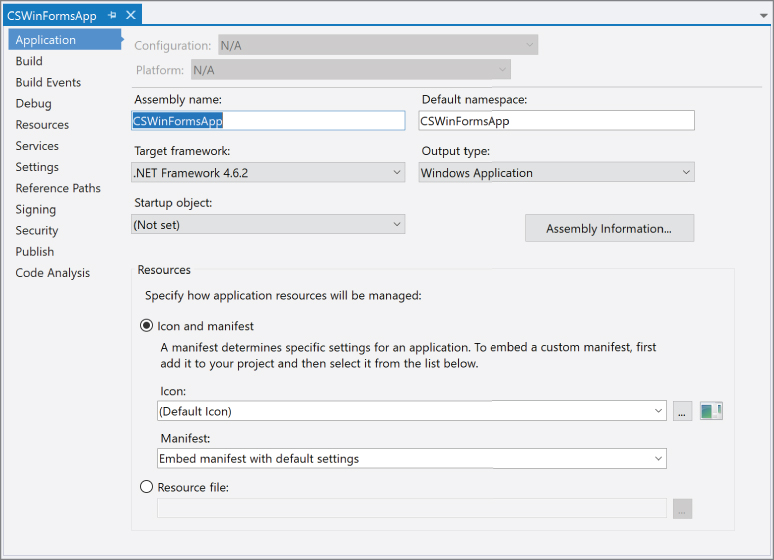
The Application tab, visible in Figure 6-6 for a Visual Basic Windows Forms project, enables the developer to set the information about the assembly that will be created when the project is compiled. These include attributes such as the output type (that is, Windows or Console Application, Class Library, Windows Service, or a Web Control Library), application icon, startup object, and the target .NET Framework version. The Application tab for C# applications, as shown in Figure 6-7, has a different format, and provides a slightly different (and reduced) set of options such as the ability to configure the application manifest directly.
Assembly Information
Attributes that would otherwise have to be configured by hand in the AssemblyInfo file contained in the project can also be set via the Assembly Information button. This information is important because it shows up when an application is installed and when the properties of a file are viewed in Windows Explorer. Figure 6-8 (left) shows the assembly information for a sample application and Figure 6-8 (right) shows the properties of the compiled executable.

Each of the properties set in the Assembly Information dialog is represented by an attribute that is applied to the assembly. This means that the assembly can be queried in code to retrieve this information. In Visual Basic, the My.Application.Info namespace provides an easy way to retrieve this information.
User Account Control Settings
Visual Studio 2017 provides support for developing applications that work with User Account Control (UAC). This involves generating an assembly manifest file, which is an XML file that notifies the operating system if an application requires administrative privileges on startup. In Visual Basic applications, you can use the View Windows Settings button on the Application tab to generate and add an assembly manifest file for UAC to your application. The following code shows the default manifest file generated by Visual Studio:
<?xml version="1.0" encoding="utf-8"?>
<asmv1:assembly manifestVersion="1.0" xmlns="urn:schemas-microsoft-com:asm.v1"
       xmlns:asmv1="urn:schemas-microsoft-com:asm.v1"
       xmlns:asmv2="urn:schemas-microsoft-com:asm.v2"
       xmlns:xsi="http://www.w3.org/2001/XMLSchema-instance">
  <assemblyIdentity version="1.0.0.0" name="MyApplication.app"/>
  <trustInfo xmlns="urn:schemas-microsoft-com:asm.v2">
    <security>
      <requestedPrivileges xmlns="urn:schemas-microsoft-com:asm.v3">
        <!-- UAC Manifest Options
           If you want to change the Windows User Account Control level replace the
           requestedExecutionLevel node with one of the following.

        <requestedExecutionLevel  level="asInvoker"/>
        <requestedExecutionLevel  level="requireAdministrator"/>
        <requestedExecutionLevel  level="highestAvailable"/>

           If you want to utilize File and Registry Virtualization for backward
           compatibility then delete the requestedExecutionLevel node.
        -->
        <requestedExecutionLevel level="asInvoker"/>
      </requestedPrivileges>
      <applicationRequestMinimum>
        <defaultAssemblyRequest permissionSetReference="Custom"/>
        <PermissionSet ID="Custom" SameSite="site"/>
      </applicationRequestMinimum>
    </security>
  </trustInfo>
</asmv1:assembly>
If the UAC-requested execution level is changed from the default asInvoker to require Administrator, Windows presents a UAC prompt when the application launches. If you have UAC enabled, Visual Studio 2017 also prompts you to restart in Administrator mode if an application requiring admin rights starts in Debug mode. Figure 6-9 shows the prompt that is shown in Windows allowing you to restart Visual Studio in Administrator mode.

If you agree to the restart, Visual Studio not only restarts with administrative privileges, it also reopens your solution including all files you had opened. It even remembers the last cursor position.
Application Framework (Visual Basic Only)
Additional application settings are available for Visual Basic Windows Forms projects because they can use the Application Framework that is exclusive to Visual Basic. This extends the standard event model to provide a series of application events and settings that control the behavior of the application. You can enable the Application Framework by checking the Enable Application Framework check box. The following three check boxes control the behavior of the Application Framework:
- Enable XP Visual Styles: XP visual styles are a feature that significantly improves the look and feel of applications running on Windows XP or later, because it provides a much smoother interface through the use of rounded buttons and controls that dynamically change color as the mouse passes over them. Visual Basic applications enable XP styles by default and can be disabled from the Project Settings dialog or controlled from within code through the
EnableVisualStylesmethod on the Application class. - Make Single Instance Application: Most applications support multiple instances running concurrently. However, an application opened more than two or three times may be run only once, with successive executions simply invoking the original application. Such an application could be a document editor, whereby successive executions simply open a different document. This functionality can be easily added by marking the application as a single instance.
- Save My Settings on Shutdown: Selecting the Save My Settings on Shutdown option ensures that any changes made to user-scoped settings will be preserved, saving the settings provided prior to the application shutting down.
This section also allows you to select an authentication mode for the application. By default this is set to Windows, which uses the currently logged-on user. Selecting Application-defined allows you to use a custom authentication module.
You can also identify a form to be used as a splash screen when the application first launches and specify the shutdown behavior of the application.
Compile (Visual Basic Only)
The Compile section of the project settings, as shown in Figure 6-10, enables the developer to control how and where the project is built. For example, the output path can be modified so that it points to an alternative location. This might be important if the output is to be used elsewhere in the build process.

The Configuration drop-down selector at the top of the tab page allows different build settings for the Debug and Release build configuration.
If your dialog is missing the Configuration drop-down selector, you need to check the Show Advanced Build Configurations property in the Projects and Solutions node of the Options window, accessible from the Tools menu. Unfortunately, this property is not checked for some of the built-in setting profiles — for example, the Visual Basic Developer profile.
Some Visual Basic–specific properties can be configured in the Compile pane. Option Explicit determines whether variables that are used in code must be explicitly defined. Option Strict forces the type of variables to be defined, rather than it being late-bound. Option Compare determines whether strings are compared using binary or text comparison operators. Option Infer specifies whether to allow local type inference in variable declarations or whether the type must be explicitly stated.
The Compile pane also defines a number of different compiler options that can be adjusted to improve the reliability of your code. For example, unused variables may only warrant a warning, whereas a path that doesn’t return a value is more serious and should generate a build error. It is possible to either disable all these warnings or treat all of them as errors.
Visual Basic developers also have the ability to generate XML documentation. Of course, because the documentation takes time to generate, it is recommended that you disable this option for debug builds. This can speed up the debugging cycle; however, when the option is turned off, warnings are not given for missing XML documentation.
The last element of the Compile pane is the Build Events button. Click this button to view commands that can be executed prior to and after the build. Because not all builds are successful, the execution of the post-build event can depend on a successful build. C# projects have a separate Build Events tab in the project properties pages for configuring pre- and post-build events.
Build (C# and F# Only)
The Build tab, as shown in Figure 6-11, is the C# equivalent of the Visual Basic Compile tab. This tab enables the developer to specify the project’s build configuration settings. For example, the Optimize code setting can be enabled, which results in assemblies that are smaller, faster, and more efficient. However, these optimizations typically increase the build time, and as such are not recommended for the Debug build.

On the Build tab, the DEBUG and TRACE compilation constants can be enabled. Alternatively, you can easily define your own constants by specifying them in the Conditional compilation symbols textbox. The value of these constants can be queried from code at compile time. For example, the DEBUG constant can be queried as follows:
C#
#if(DEBUG)
    MessageBox.Show("The debug constant is defined");
#endif
VB
#If DEBUG Then
    MessageBox.Show("The debug constant is defined")
#End If
The compilation constants are defined on the Advanced Build Settings dialog, which can be displayed by clicking the Advanced button at the bottom right of the Build tab.
The Configuration drop-down selector at the top of the tab page allows different build settings for the Debug and Release build configuration. You can find more information on the Build options in Chapter 33, “Build Customization.”
Build Events (C# and F# Only)
The Build Events tab enables you to perform additional actions before or after the build process. In Figure 6-12, you can see a post-build event that executes the output of the build to a different location under the solution folder after every successful build.
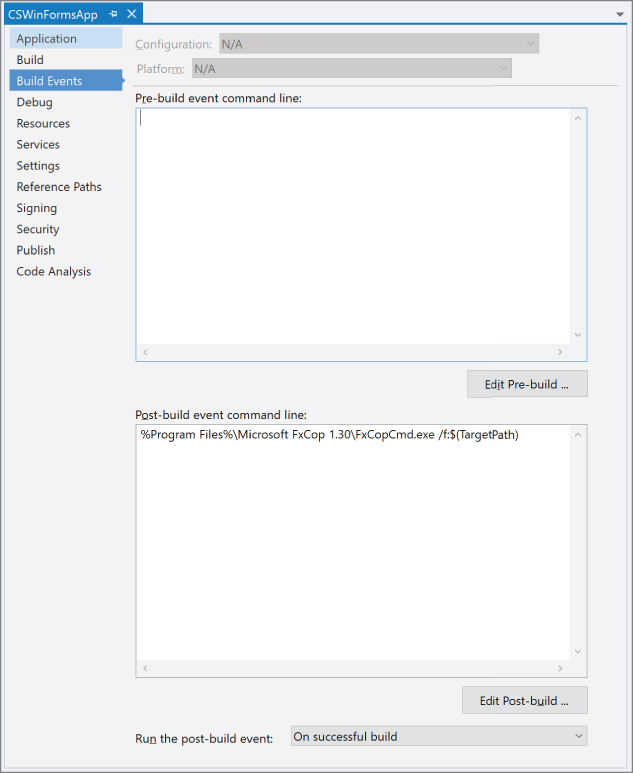
You can use environment variables such as ProgramFiles in your command lines by enclosing them with the percent character. A number of macros are also available, such as ProjectName and SolutionDir. These macros are listed when the Macros buttons on the Edit Pre-build and Edit Post-build dialog boxes are clicked and can be injected into the command wherever needed.
Debug
The Debug tab, shown in Figure 6-13, determines how the application will be executed when run from within Visual Studio 2017. This tab is not visible for web applications — instead, the Web tab is used to configure similar options.

Start Action
When a project is set to start up, this set of radio buttons controls what actually happens when the application is run within Visual Studio. The default value is to start the project, which calls the Startup object specified on the Application tab. The other options are to either run an executable or launch a specific website.
Start Options
The options that can be specified when running an application are additional command-line arguments (generally used with an executable start action) and the initial working directory. You can also specify to start the application on a remote computer. Of course, this is possible only when debugging is enabled on the remote machine.
Debugger Engines
Debugging can be extended to include unmanaged code and SQL Server. With these options checked, it becomes possible to enlist unmanaged code and SQL Server stored procedures in the debug process. For example, you can open a stored procedure through the Server Explorer, set a breakpoint and, while debugging your application through Visual Studio, the breakpoint will be hit and execution stopped when the stored procedure is called by your application.
References (Visual Basic Only)
The References tab enables the developer to reference classes in other .NET assemblies, projects, and native DLLs. When the project or DLL has been added to the References list, a class can be accessed either by its full name, including namespace, or the namespace can be imported into a code file so that the class can be referenced by just the class name. Figure 6-14 shows the References tab for a project that has a reference to a number of framework assemblies.
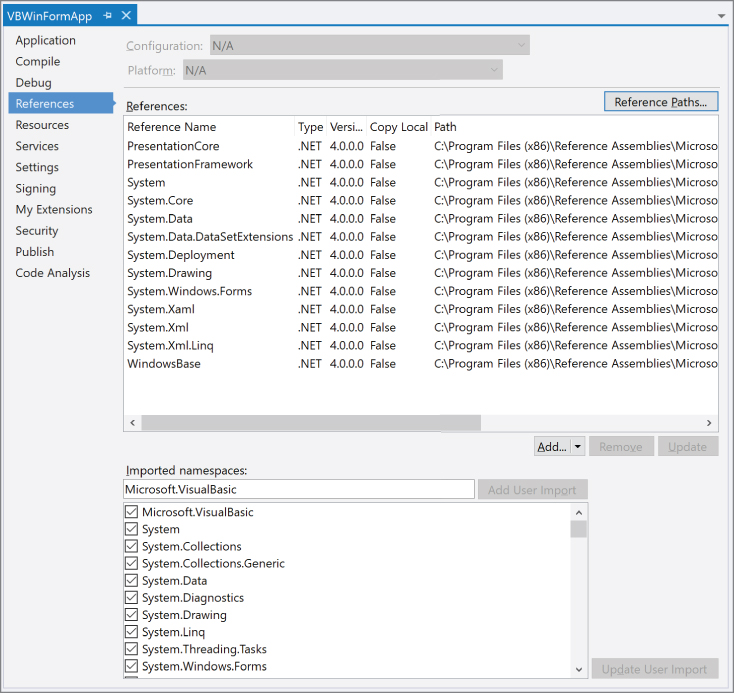
When an assembly has been added to the Reference list, any public class contained within that assembly can be referenced within the project. Where a class is embedded in a namespace (which might be a nested hierarchy), referencing a class requires the full class name. Both Visual Basic and C# provide a mechanism for importing namespaces so that classes can be referenced directly. The References section allows namespaces to be globally imported for all classes in the project, without being explicitly imported within the class file.
References to external assemblies can be either File references or Project references. File references are direct references to an individual assembly. You can create File references by using the Browse tab of the Reference Manager dialog box. Project references are references to a project within the solution. All assemblies that are output by that project are dynamically added as references. Create Project references by using the Solution tab of the Reference Manager dialog box.
The advantage of a Project reference is that it creates a dependency between the projects in the build system. The dependent project will be built if it has changed since the last time the referencing project was built. A File reference doesn’t create a build dependency, so it’s possible to build the referencing project without building the dependent project. However, this can result in problems with the referencing project expecting a different version from what is included in the output.
Resources
You can add or remove Project resources via the Resources tab, as shown in Figure 6-15. In the example shown, four icons have been added to this application. Resources can be images, text, icons, files, or any other serializable class.
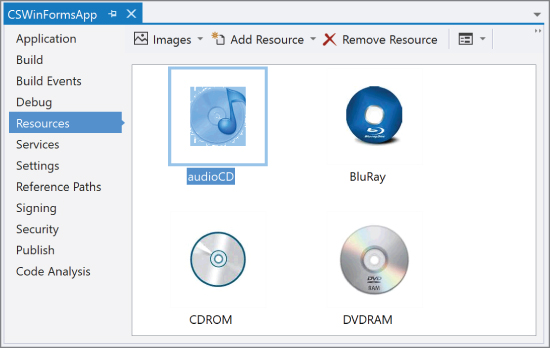
This interface makes working with resource files at design time easy. Chapter 56, “Resource Files,” in the online archive examines in more detail how you can use resource files to store application constants and internationalize your application.
Services
Client application services allow Windows-based applications to use the authentication, roles, and profile services that were introduced with Microsoft ASP.NET 2.0. The client services enable multiple web- and Windows-based applications to centralize user profiles and user-administration functionality.
Figure 6-16 shows the Services tab, which is used to configure client application services for Windows applications. When enabling the services, the URL of the ASP.NET service host must be specified for each service. This will be stored in the app.config file. The following client services are supported:

- Authentication: This enables the user’s identity to be verified using either the native Windows authentication or a custom forms-based authentication that is provided by the application.
- Roles: This obtains the roles an authenticated user has been assigned. This enables you to allow certain users access to different parts of the application. For example, additional administrative functions may be made available to admin users.
- Web Settings: This stores per-user application settings on the server, which allows them to be shared across multiple computers and applications.
Client application services utilize a provider model for web services extensibility. The service providers include offline support that uses a local cache to ensure that it can still operate even when a network connection is not available.
Client application services are discussed further in Chapter 47, “Client Application Services,” in the online archive.
Settings
Project settings can be of any type and simply reflect a name/value pair whose value can be retrieved at run time. Settings can be scoped to either the application or the user, as shown in Figure 6-17. Settings are stored internally in the Settings.settings file and the app.config file. When the application is compiled, this file is renamed according to the executable generated — for example, SampleApplication.exe.config.
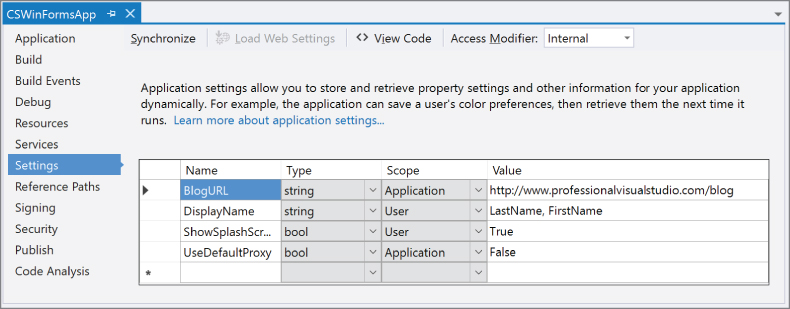
Application-scoped settings are read-only at run time and can be changed only by manually editing the config file. User settings can be dynamically changed at run time and may have a different value saved for each user who runs the application. The default values for User settings are stored in the app.config file, and the per-user settings are stored in a user.config file under the user’s private data path.
Application and User settings are described in more detail in Chapter 54, “Configuration Files,” in the online archive.
Reference Paths (C# and F# Only)
The Reference Paths tab, as shown in Figure 6-18, is used to specify additional directories that are searched for referenced assemblies.

When an assembly reference has been added, Visual Studio resolves the reference by looking in the following directories in this order:
- The project directory.
- Directories specified in this Reference Paths list.
- Directories displaying files in the Reference Manager dialog box.
- The obj directory for the project. This is generally only relevant to COM interop assemblies.
Signing
Figure 6-19 shows the Signing tab, which provides developers with the capability to determine how assemblies are signed in preparation for deployment. An assembly can be signed by selecting a key file. A new key file can be created by selecting <New…> from the file selector drop-down.

The ClickOnce deployment model for applications enables an application to be published to a website where a user can click once to download and install the application. Because this model is supposed to support deployment over the Internet, an organization must be able to sign the deployment package. The Signing tab provides an interface for specifying the certificate to use to sign the ClickOnce manifests.
Chapter 48, “Assembly Versioning and Signing,” in the online archive provides more detail on assembly signing and Chapter 35, “Packaging and Deployment,” discusses ClickOnce deployments.
My Extensions (Visual Basic Only)
The My Extensions tab, as shown in Figure 6-20, enables you to add a reference to an assembly that extends the Visual Basic My namespace, using the extension methods feature. Extension methods were initially introduced to enable LINQ to be shipped without requiring major changes to the base class library. They allow developers to add new methods to an existing class, without having to use inheritance to create a subclass or recompile the original type.
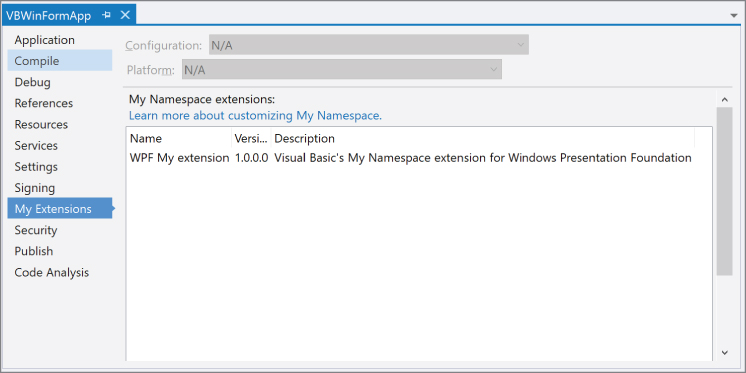
The My namespace was designed to provide simplified access to common library methods. For example, My.Application.Log provides methods to write an entry or exception to a log file using a single line of code. As such it is the ideal namespace to add custom classes and methods that provide useful utility functions, global state, or configuration information, or a service that can be used by multiple applications.
Security
Applications deployed using the ClickOnce deployment model may be required to run under limited or partial trust. For example, if a low-privilege user selects a ClickOnce application from a website across the Internet, the application needs to run with partial trust as defined by the Internet zone. This typically means that the application can’t access the local filesystem, has limited networking capability, and can’t access other local devices such as printers, databases, and computer ports.
The Security tab, illustrated in Figure 6-21, allows you to define the trust level that is required by your application to operate correctly.
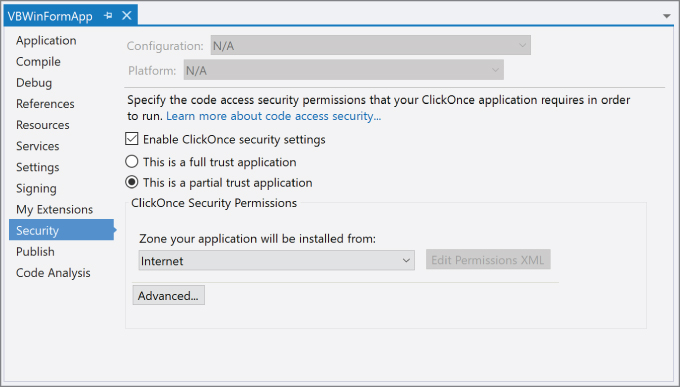
Modifying the permission set that is required for a ClickOnce application may limit who can download, install, and operate the application. For the widest audience, specify that an application should run in partial-trust mode with security set to the defaults for the Internet zone. Alternatively, specifying that an application requires full trust ensures that the application has full access to all local resources but necessarily limits the audience to local administrators.
Publish
The ClickOnce deployment model can be divided into two phases: initially publishing the application and subsequent updates, and the download and installation of both the original application and subsequent revisions. You can deploy an existing application using the ClickOnce model using the Publish tab, as shown in Figure 6-22.

If the install mode for a ClickOnce application is set to be available offline when it is initially downloaded from the website, it will be installed on the local computer. This places the application in the Start menu and the Add/Remove Programs list. When the application is run and a connection to the original website is available, the application determines whether any updates are available. If there are updates, users are prompted to determine whether they want the updates to be installed.
The ClickOnce deployment model is explained more thoroughly in Chapter 35, “Packaging and Deployment.”
Code Analysis
Most developers who have ever worked in a team have had to work with an agreed-upon set of coding standards. Organizations typically use an existing standard or create their own. Unfortunately, standards are useful only if they can be enforced, and the only way that this can be effectively done is to use a tool. In the past this had to be done using an external utility. All editions of Visual Studio 2017 (including the Community edition) have the capability to carry out static code analysis from within the IDE.
The Code Analysis tab, as shown in Figure 6-23, can be used to enable code analysis as part of the build process.

When the Enable Code Analysis on Build checkbox is checked, then code analysis will be performed automatically for each build. Alternatively, you can right-click a project and select Analyze ➪ Run Code Analysis on Solution or Analyze ➪ Run Code Analysis on the current project.
The basic unit of definition in code analysis is a rule. A rule consists of a specific criterion that needs to be met in order for the rule to pass. For instance, a rule might be something like “a variable has been declared but never used” or “the result of an expression is always null.” These rules can be combined into a collection of rules known as a ruleset.
In the Code Analysis tab, you specify which ruleset is going to be applied to your code when code analysis is run. More than 200 built-in rules are conveniently organized into 11 rulesets. You can even create your own sets of rules (Add New Item ➪ Code Analysis Rule Set) if the ones provided by Microsoft don’t meet your needs. Beyond that, you can add custom rules if needed.
Depending on your project, you might want to exclude some particular rules. To get to the details of a particular ruleset, click on the Open button to display a pane similar to Figure 6-24.
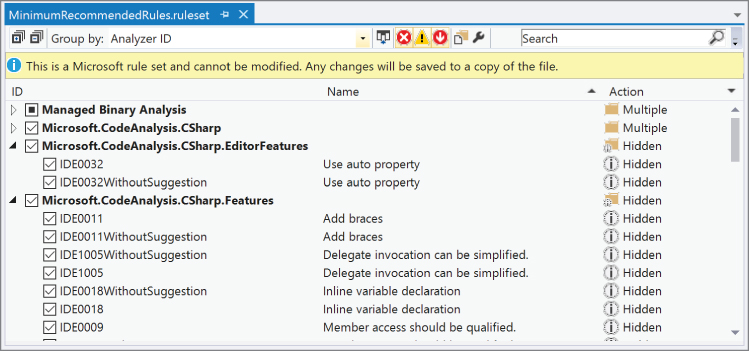
Unchecking the checkbox that appears to the left of a rule disables that rule. The dropdown box on the right controls what happens when a rule fails to be met, such as whether it’s a warning or a build error.
When you build your application, any errors or warnings associated with code analysis appear in the Error List. Within that pane, if you right-click a warning and select Show Error Help, you have a description of the rule, the cause, the steps on how to fix violations, and suggestions on when to suppress warnings. Suppressing warnings is done with System.Diagnostics.CodeAnalysis.SuppressMessageAttribute, which can be applied to the offending member or to the assembly as a whole. You can quickly and easily generate these attributes by selecting one of the Suppress Message menu options from the right-click menu in the Errors window.
When you first start with Code Analysis tools, you should turn on all the rules and either exclude or suppress the warnings as needed. This is an excellent way to learn best practices. After a couple of iterations, new code written will be less prone to violating a rule. If you start a new project, you might want to add a check-in policy, which prevents code with Analysis warnings from being checked in.
C/C++ CODE ANALYSIS TOOL
This tool is similar to the Managed Code Analysis Tool but works for unmanaged code. To activate it simply go to your C++ project’s properties window, look for the Code Analysis node inside the Configuration Properties, and select Yes for Enable Code Analysis for C/C++ on Build. Every time you compile your project, the tool intercepts the process and attempts to analyze each execution path.
It can help you detect crashes that are otherwise time-consuming and hard to find with other techniques, such as debugging. It can detect memory leaks, uninitialized variables, pointer management problems, and buffer over/under runs.
WEB APPLICATION PROJECT PROPERTIES
Due to the unique requirements of web applications, four additional project property tabs are available to ASP.NET Web Application projects. These tabs control how web applications run from Visual Studio as well as the packaging and deployment options.
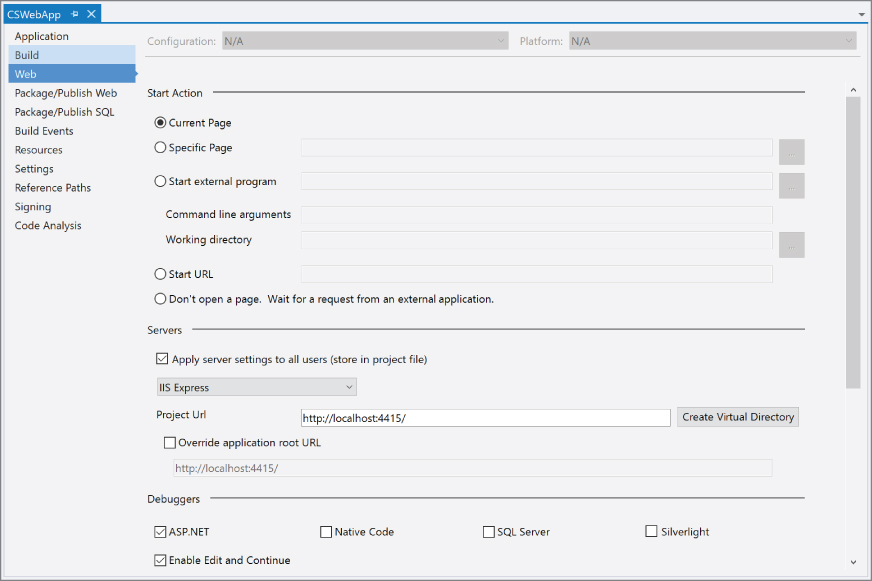
Web
The Web tab, shown in Figure 6-25, controls how Web Application projects are launched when executed from within Visual Studio. Visual Studio ships with a built-in web server suitable for development purposes. The Web tab enables you to configure the port and virtual path that this runs under. You may also choose to enable NTLM authentication.
The debugging options for web applications are explored in Chapter 58, “Debugging Web Applications,” in the online archive.
Package/Publish Web
Application deployment has always been a difficult challenge, especially for complex web applications. A typical web application is composed of not only a large number of source files and assemblies, but also images, stylesheets, and JavaScript files. To complicate matters further, it may be dependent on a specific configuration of the IIS web server.
Visual Studio 2017 simplifies this process by allowing you to package a Web Application project with all the necessary files and settings contained in a single compressed (.zip) file. Figure 6-26 shows the packaging and deployment options that are available to an ASP.NET web application.

Further discussion on web application deployment is included in Chapter 36, “Web Application Deployment.”
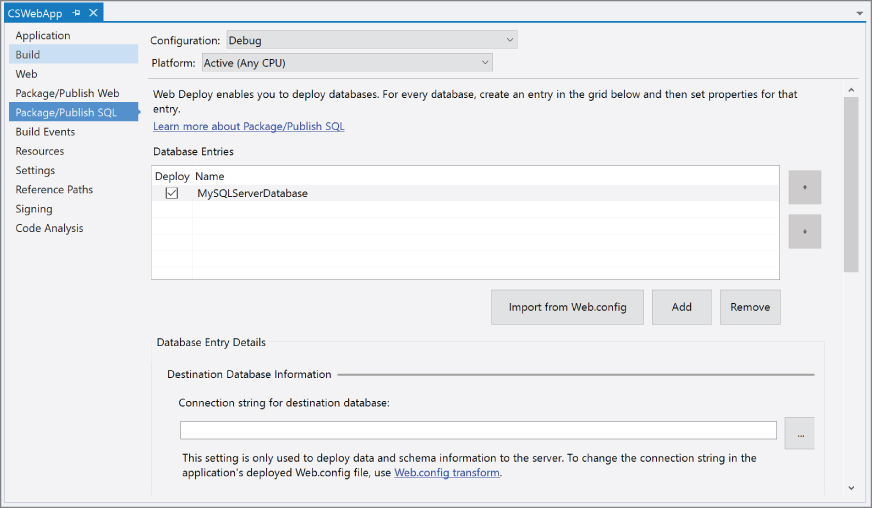
Package/Publish SQL
All but the simplest of web applications are backed by a database of some description. For ASP.NET web applications this is typically a SQL Server database. Visual Studio 2017 includes support for packaging one or more SQL Server databases. Although the project properties still include a sheet titled Package/Publish SQL, that page is not available by default. Instead, the configuration for SQL deployment appears as part of the Publish Web Wizard.
As illustrated in Figure 6-27, when you create a package you can specify a connection string for your source database. You can allow Visual Studio to create SQL scripts for the database schema only or schema and data. You can also provide custom SQL scripts to be executed either before or after the auto-generated script.
Chapter 36 explores the web application deployment options in more detail.
WEB SITE PROJECTS
The Web Site project functions quite differently from other project types. Web Site projects do not include a .csproj or .vbproj file, which means they have a number of limitations for build options, project resources, and managing references. Instead, Web Site projects use the folder structure to define the contents of the project. All files within the folder structure are implicitly part of the project.
Web Site projects provide the advantage of dynamic compilation, which allows pages to be edited without rebuilding the entire site. The file can be saved and simply reloaded in the browser. As such, they enable extremely short code and debug cycles. Microsoft first introduced Web Site projects with Visual Studio 2005; however, it was quickly inundated with customer feedback to reintroduce the Application Project model, which had been provided as an additional download. By the release of Service Pack 1, Web Application projects were back within Visual Studio as a native project type.
You can find further discussion on Web Site and Web Application projects in Chapter 16, “ASP.NET Web Forms.”
NUGET PACKAGES
One of the changes that have been slowly creeping into the .NET world is the reliance on NuGet as the platform for deploying components. NuGet is an open source platform that allows .NET components, as well as native components written in C++, to be distributed easily and automatically to your development platform. And with Visual Studio 2017, that reliance grows to the point where NuGet is used to handle deploying everything up to and including the .NET Framework. Fortunately, access to NuGet is available through a couple of mechanisms within Visual Studio 2017.
As a developer of components, you bundle everything necessary to install your software into a package (kept in a .nupkg file). Included in the package are the assemblies that need to be deployed and a manifest file that describes the contents of the package and what needs to be changed in the project to support your components (changes to configuration files, references to be added, and so on).
NuGet Package Manager
There are two main ways to bring a package from NuGet into your project. Although your preference likely depends on your predilection for command line versus graphical interfaces, it is expected that the most common method involves the NuGet Package Manager integrated into the Solution Explorer. In the Solution Explorer, right-click on a project and select the Manage NuGet Packages option. The page shown in Figure 6-28 appears. A similar page can be accessed through the Tools ➪ NuGet Package Manager ➪ Manage NuGet Packages for Solution menu option.
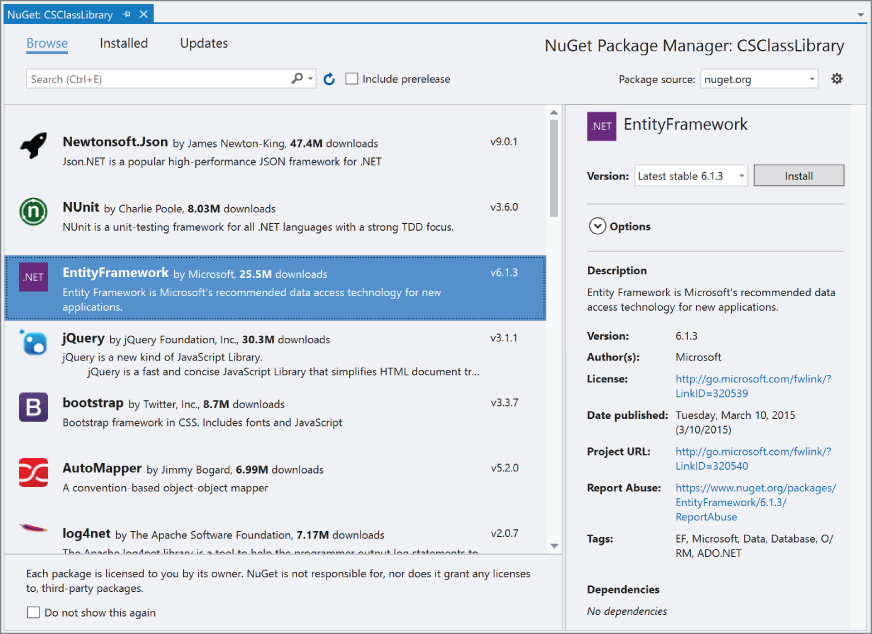
The elements of the page are designed to help you find the packages that you need to add to your project. The search box on the right gives you the ability to search the NuGet repository. The controls on the left let you choose the repository source. The options available out-of-the-box are nuget.org, preview.nuget.org (contains preview versions of components), and Microsoft. As well, you can filter the results of your search so that only already installed packages and packages with updates are shown.
Select the package that you want to include in your project. The details of the package appear in the panel on the right side of the page. The package can be installed by clicking on the Install button. If you would like to see the changes that would be made because of installing the package, click on the Preview button.
The last piece of functionality available on this page is initiated through the gear icon to the right of the search box. Clicking on the gear launches the Options dialog and displays the NuGet Package Manager pane, as seen in Figure 6-29.

The main function of the screen shown in Figure 6-29 is to allow you to configure the NuGet repositories that are searched by the Package Manager. You can add new repositories by clicking on the plus button in the top right of the dialog and then updating the Name and Source fields at the bottom of the page.
Package Manager Console
You access the command-line interface used to manage NuGet packages through the Tools ➪ NuGet Package Manager ➪ Package Manager Console menu option. The screen shown in Figure 6-30 appears.

The challenge at this point is knowing the various commands that are available to you to help manage the packages. The most basic is install-package, which takes the name of the package as a parameter. A complete list of the commands is well beyond the scope of this book. As indicated in the description found in Figure 6-30, get-help NuGet provides a list that is a decent start.
SUMMARY
In this chapter you have seen how a solution and projects can be configured using the user interfaces provided within Visual Studio 2017. In particular, this chapter showed you how to do the following:
- Create and configure solutions and projects.
- Control how an application is compiled, debugged, and deployed.
- Configure the many project-related properties.
- Include resources and settings with an application.
- Enforce good coding practices with the Code Analysis Tools.
- Modify the configuration, packaging, and deployment options for web applications.
In subsequent chapters, many of the topics, such as building and deploying projects and the use of resource files, are examined in more detail.