
40
Visual Studio Team Services
GETTING STARTED WITH GIT
Initially, TFS supported a version control system known as Team Foundation Version Control (TFVC). This is a centralized version control system where each developer has a single version of each file and historical information for the file is maintained on the server. When you branch a file, that process takes place on the server. Although this system works, it is hobbled by the fact that in order to perform relatively common version control operations (like checking history), you need to be connected to the server.
Git, on the other hand, is an open-source, distributed version control system. Each developer gets a copy of the source code on their machine and can commit changes or view history without communicating with the server. Branches in Git are much more lightweight and, again, are done without talking to the server. At some point, when the developer is ready, the local branches can be merged and published to the server.
Over time, VSTS has greatly increased its support for Git, to the point where Git repositories are the default version control system for new projects. This is not to say that TFVC is no longer available. It is. But unless you have a specific need to choose TFVC, you’re better off sticking with Git, safe in the knowledge that you can always add TFVC should the need for it arise later in a project. For the examples in the rest of this chapter, we’ll be using Git as the version control system, and we’ll be using a Single Page Web application.
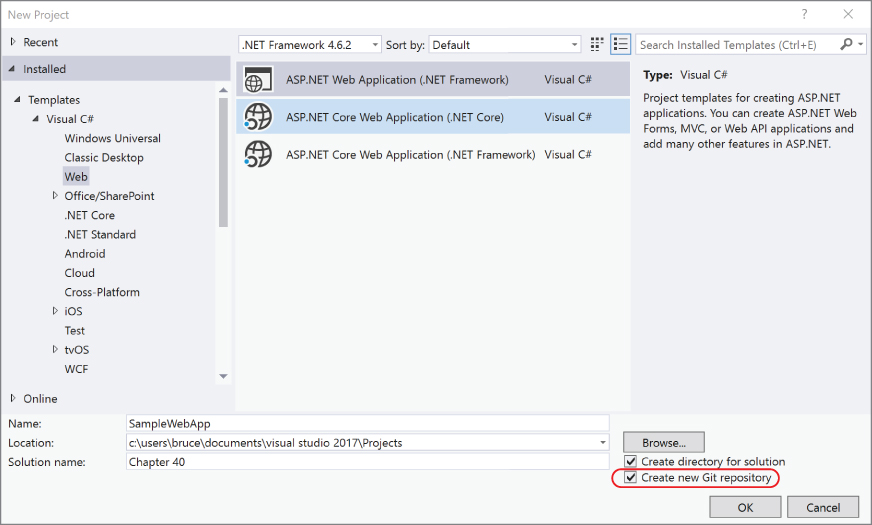
The starting point for using Git comes in two locations within Visual Studio 2017. When you are creating a project, there is an option in the New Project dialog (circled in Figure 40-1) to create a Git repository at the same time as the project.
Alternatively, you can add an existing project to source control through a control found at the bottom right of the main IDE (circled in Figure 40-2).
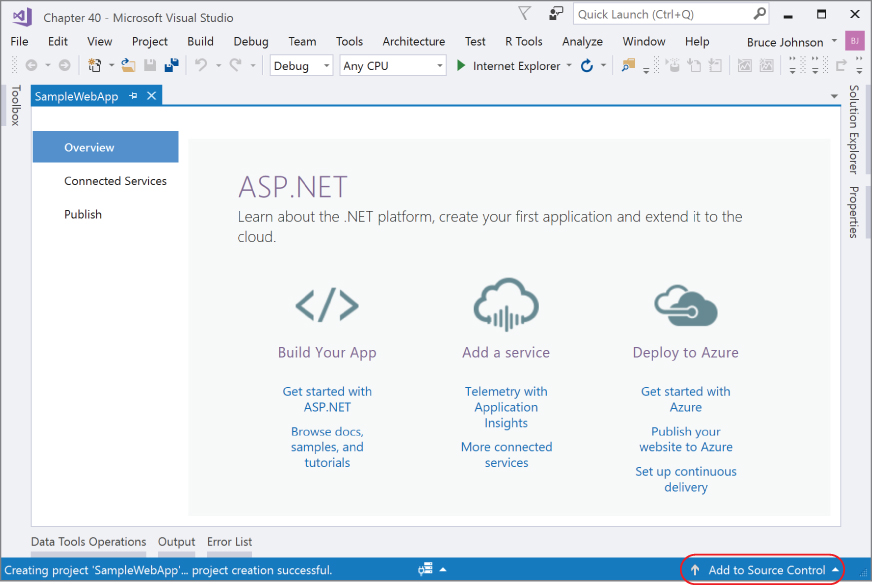
In the latter case, you might get the Team Explorer presented to you with an option to push your project to Team Services, GitHub, or a remote repository. There’s no need to make that choice right now unless you want to. The presumption made in this workflow is that you’ve been working on your project for a little while and might want to publish it to a remote repository for safekeeping.
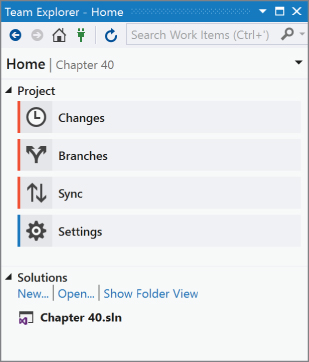
The Team Explorer window in the heart of version control within Visual Studio 2017 is designed to allow the developer to focus on the most common tasks related to version control, but also drill into these tasks to quickly get to the functionality required. Figure 40-3 illustrates the initial view of this window.
At this point, you are working solely with a local Git repository. As such, the choices you have are limited to those functions that are related to local development effort. However, to take advantage of Team Services, you need to connect to a Team Services project. To do this, click on the electrical plug icon in the tool bar. This changes the Team Explorer window to the one seen in Figure 40-4.

Here you can see your local Git repositories, along with the projects that are available in the Team Services or GitHub accounts that you’ve created. If you don’t see your Team Services or GitHub account in the list, click on the Manage Connections link. Through that option, you can connect to Team Services or GitHub. Once you have establishing a connection to a remote repository, the number of options you have changes. Figure 40-5 shows the Team Explorer Home view after you have connected to an existing Team Services project.

VERSION CONTROL
The version control functionality associated with Team Explorer revolves around a number of very commonly used functions: committing, branching, and syncing. In this section, we look at these functions and how they are implemented through Team Explorer.
Committing
As part of its commitment to being lightweight, Git does not automatically make snapshots of your code as you edit your project. Instead, you are required to manually inform Git about the specific changes that need to be saved by committing them to your repository. A commit actually consists of the following information:
- A snapshot of the files saved in the commit. Git actually includes all of the files in your repository in the snapshot. This makes moving from branch to branch very fast.
- A reference to the parent commit. This is the commit (or commits, in the case of a merge) that immediately preceded the current commit.
- A comment that describes the changes in the commit. You, the person making the commit, are responsible for writing the comment.
Before files can be committed, they must first be staged. This lets Git know which updates you want to include in the next commit. Although it might seem odd that the process of staging files is manual, the benefit is that you can selectively add some files to a commit while excluding others.
Visual Studio 2017 helps make the staging process as painless as possible. If you click on the Changes option in the Home view, you will get to a screen similar to the one shown in Figure 40-6.
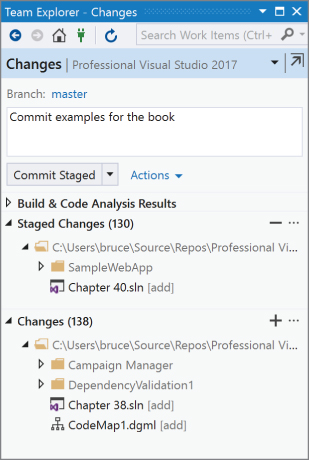
At the bottom of Figure 40-6, you can see that the changes (which are automatically tracked by Visual Studio) have been grouped into Staged and Unstaged collections. All of the changes start off as unstaged. You can moved them to a staged state by right-clicking on the file (or a selection of many files) and choosing the Stage option. To stage all of the files that have been changed, click on the plus sign to the right of the heading. Similarly, you can unstage files using the Unstage option in the context menu or the minus sign at the right of the heading.
Once all of the files have been staged or unstaged appropriately, you enter the commit message into the text box at the top of the window and click on the Commit button. This last action commits your changes to the local repository.
Branching
Technically speaking, a Git branch is just a reference that keeps track of the exact history of a set of commits. As described in the previous section, committing causes a block of changes to be snapshotted. That snapshot actually takes place within the context of a branch. There is a default branch (typically called the master), but you can create as many branches as you would like. When you perform a commit, you are actually adding your changes to the current branch.
To create a branch in Team Explorer, go to the Branches pane (click on Branches from the Home view). As shown in Figure 40-7, there is a list of your local repositories at the bottom of the window, along with a list of the current branches.

Right-click on branch that you wish to use as the base for the next branch and choose the New Local Branch from… option. This reveals a text box where you can specify the name of the branch (shown at the top of Figure 40-7). Provide a name for the new branch and click on the Create Branch button to create the new branch.
Switching between branches is a quick way to move between two different branches. In Git parlance, switching branches is performed using a checkout command. Right-click on the branch you wish to move to and select Checkout from the context menu. Your project is then loaded with the files from the new branch.
You see a number of other options available at the top of the Branches window. This includes the ability to merge and rebase branches. While getting into the details of what these functions do (they are relatively sophisticated Git features), be aware that should you need them, the options are available from within Team Explorer.
Syncing
All of the work done to this point has been within your local Git repository. At some point, you are likely to want to move your local commits back to the central repository. This is accomplished through the Sync option from the Team Explorer Home view.
When it comes to syncing with a remote repository, there are generally three steps that need to take place. First, you fetch any incoming commits. These are changes that have been made to the remote repository since the last time you synced. As part of the fetch process, you might be asked to merge the changes into your code. This happens if some of the remote changes impacted the same files that you have modified. The process of merging is greatly facilitated by the tooling within Visual Studio. Once the merge has been performed, it’s incumbent on you to recompile and retest your application with these new updates in place. Then, finally, you push your changes back to the remote repository.
In the Team Explorer window, all of these actions take place within the Sync window, seen in Figure 40-8.

In the top portion of the window, a list of the incoming commits is visible. The Fetch link is available to bring those commits into your local repository. You would then need to merge them into your branch. The Pull link performs a pull, which is the equivalent of a fetch followed by a merge.
Once you are satisfied that any remote changes have been incorporated into your application, you use the Push link in the Outgoing Commits section to push your changes back to the remote repository.
WORK ITEM TRACKING
Team Services enables you to manage activities using work items. As you see in the following sections, you can search for work items using work item queries and manage them using Visual Studio, Excel, or Project. Different types of work items are defined by your process template. A process template defines the building blocks of work item tracking in Team Services.
Work Item Queries
As you can see from the list of queries shown in Figure 40-9, you can look for different work items using the work item queries from Team Explorer. The Scrum process template includes a number of different team queries, grouped into different folders. As you might expect, the number of queries available out of the box is different for the other process templates.

Most of the time the standard queries are sufficient, but you have the option to create new ones. If you have sufficient permissions (such as, if you’re a project administrator) you can add new team queries to make them available to everyone with access to this project. If you have permission to modify the process template, you can add new team queries, so projects created with the edited templates include them. Changes in the templates don’t apply to team projects already created. If you don’t have permission to publish a publicly available query, you still have the ability to create a personal query that will be visible to just you.
To create a new query, click the New Query link (refer to Figure 40-9). Alternatively, you can right-click the My Queries node and select New Query.
Now you can visually design your query. In this case (as shown in Figure 40-10) you care only about the work items of the selected project, assigned to the current user and under Iteration 1. You specify this using the @Me and @Project variables. You can also specify which columns you want visible in the grid and sorting options by using the Column Options link just above the query results section. After all the criteria and columns have been set up, run the new query to see a sublist of the work items.

In Team Services, queries can take advantage of the hierarchical work item structure to show work items that are directly related, enabling you to see the impact of cutting a feature or the required tasks necessary to complete a feature. You can also show query results in a flat list, a list of work items and their direct links, or a tree of work items. Each of these is identified by a small icon that appears next to the query in the Team Explorer. And you can change the layout by using a drop-down control (refer to Figure 40-10 with the default value of Flat List). Also, you can create folder structures for your work item queries, and each query or folder can be secured separately.
Work Item Types
In the default team project template, you have seven types of work items: bug, task, user story, epic, feature, issue, and test case. Each work item has different fields depending on its type. For example, a bug has test information and a system info field, whereas a task contains effort information about estimated, remaining, and completed hours. Other project templates have different, albeit similar, work item types. All these fields are customizable at either a template or team-project level.
Adding Work Items
The basic way to add work items is via the Team ➪ New Work Item menu option and selecting the work item type you want to add, or with the New Work Item link in the Team Explorer (refer to Figure 40-9). Regardless of how it is created, you get the Work Item entry screen (Figure 40-11). Through this screen, all the information related to the work item can be entered or modified. Along with basic description information, each work item can be related to many other TFS artifacts through links. Team Services (and TFS 2017) understands several different types of links, including Parent, Child, Predecessor, and Successor. To add a link, click the Links tab (the third tab from the left on the right side of the window), and click the Add Link button.

Work Item State
During your normal daily activity, you’ll work on tasks described by work items assigned to you. Each work item is described by a simple state machine that determines the allowed next states for any given state. This state machine is a part of the work item definition and is determined by the process template. Whenever a new state is selected, you can provide a reason for the state transition. The reason field enables you to differentiate between the bugs that are active because they are new and those that are active because they have reoccurred.
BUILDS
Team Foundation Build, a part of both Team Services and TFS, has the capability to get the latest version of a solution from source Control, build the projects as configured, run tests, perform other tasks, and finally report the results and leave the output in a shared folder. When you create a repository, a default build is created as well. You can see that build, along with the results of previous builds, in the Builds window (Figure 40-12), available from the Home view of Team Explorer.

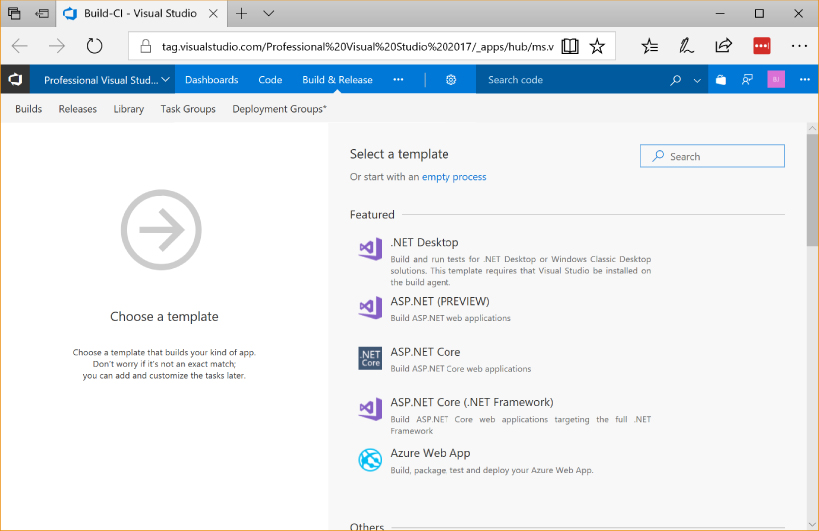
To create a new build definition, click the New Build Definition link. This opens a web page in Team Services (Figure 40-13) through which you can define the new build as required.
While it is possible to define a build so that it starts whenever a commit is performed to the remote repository, you can also start a build manually. To do so, right-click on the desired build and select Queue New Build in the context menu. After the build is queued, you can open it by double-clicking it in the My Builds list. This opens the Build Report (shown in Figure 40-14).
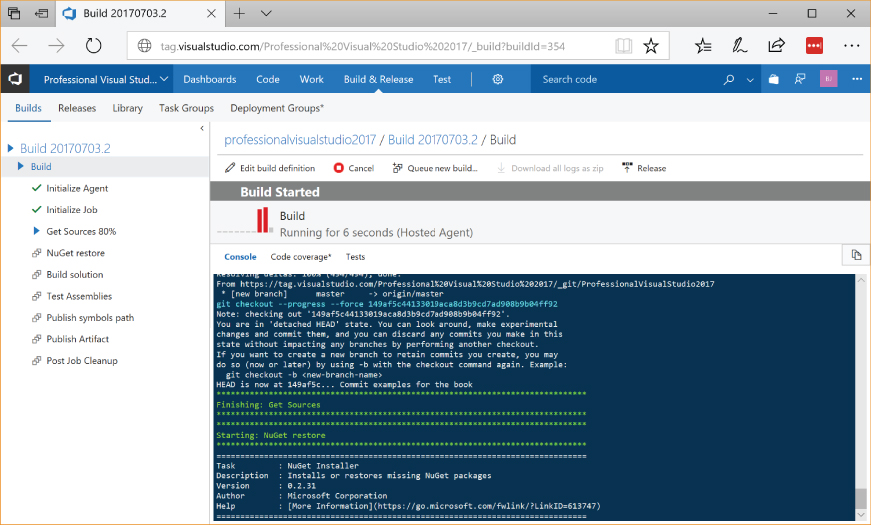
The screen shows the current activity in near real-time, as well as information on previous build statuses and durations. It also provides links to a number of other areas and activities related to this build.
WEB PORTAL
The last few features that have been discussed involved defining and running processes through a web site. That web site is Team Services, and the specific functionality is available through the Web Portal for your repository. This portal provides a central location for all of the artifacts associated with your project. This includes source code, work items, build definitions, build results, and test information. In other words, it’s a nice, convenient, one-stop location for all of what you need to develop your application.
SUMMARY
In this chapter, you saw how Visual Studio and Visual Studio Team Services can help you get the work done by integrating version control using Git, work item tracking and management, build definitions, and build execution. All of these features can be managed either through Visual Studio 2017 or through the Team Services web site, making for a relatively seamless blending of project management functionality.