
12
Managing Your Source Code
SOURCE CONTROL
Many different methodologies for building software applications exist, and though the theories about team structure, work allocation, design, and testing often differ, one point that the theories agree on is that there should be a repository for all source code for an application. Source control is the process of storing source code (referred to as checking code in) and accessing it again (referred to as checking code out) for editing. When we refer to source code, we mean any resources, configuration files, code files, or even documentation that is required to build and deploy an application.
Source code repositories vary in structure and interface. A source control repository not only provides a storage mechanism for your source code, it also provides versioning of files, branching, and remote access. And more sophisticated repositories assist with file merging and conflict resolution. More importantly, a couple of these sophisticated repositories can be used from within Visual Studio.
Version tracking, including a full history of what changes were made and by whom, is one of the biggest benefits of using a source control repository. Although most developers would like to think that they write perfect code, the reality is that quite often a change might break something else. Reviewing the history of changes made to a project makes it possible to identify which change caused the breakage. Tracking changes to a project can also be used for reporting and reviewing purposes because each change is date stamped and its author indicated.
Selecting a Source Control Repository
Visual Studio 2017 does not ship with a source control repository, but it does include rich support for checking files in and out, as well as merging and reviewing changes. To make use of a repository from within Visual Studio 2017, it is necessary to specify which repository to use. Visual Studio 2017 supports deep integration with Team Foundation Server (TFS), Microsoft’s premier source control and project tracking system, along with Git, a leading open source control system. In addition, Visual Studio supports any source control client that uses the Source Code Control (SCC) API. Products that use the SCC API include Microsoft Visual SourceSafe and the free, open source source-control repositories Subversion and CVS.
To get Visual Studio 2017 to work with a particular source control provider, you must configure the appropriate information under the Options item on the Tools menu. The Options window, with the Source Control tab selected, is shown in Figure 12-1.

Initially, few settings for source control appear. However, after a provider has been selected, additional nodes are added to the tree to control how source control behaves. These options are specific to the source control provider that has been selected.
Chapter 40, “Visual Studio Team Services,” covers the use of Team Foundation, which also offers rich integration and functionality as a source control repository. The remainder of this chapter focuses on the use of Git, an open-source source control repository, which can be integrated with Visual Studio 2017.
Environment Settings
After a source control repository has been selected from the plug-in menu, it is necessary to configure the repository for that machine. Many source control repositories need some additional settings to integrate with Visual Studio 2017. These would be found in additional panes that are part of the Settings form. However, these values are specific to the plug-in, so making generalized statements about the details is not feasible. Suffice it to say that the plug-in can provide the information necessary for you to properly configure it. And, more important, for integration with Git, there are no additional settings that need to be provided.
Accessing Source Control
This section walks through the process to add a solution to a Git repository; however, the same principles apply regardless of the repository chosen. This process can be applied to any new or existing solution that is not already under source control. We assume here that you have access to a Git repository and that it has been selected as the source control repository within Visual Studio 2017.
Adding the Solution
To begin the process (after you have selected the repository) of adding a solution to source control, use the Add to Source Control option at the very bottom right of Visual Studio, as shown in the left image in Figure 12-2. Alternatively, if you create a new solution, select the Add To Source Control check box on the New Project dialog to immediately add your new solution to a source control repository.

Once the solution has been added, the status bar in Visual Studio changes to show the status of your project with respect to the repository. In the image on the right of Figure 12-2, you can see the root branch (master), the name of the repository, the number of changes (3), and the number of unpublished commits (currently 0).
Most of the time, you interact with the source control repository through the Team Explorer window. There are a number of options available to you, as is apparent from the default view shown in Figure 12-3.

Solution Explorer
The first difference that you see after adding your solution to source control is that Visual Studio 2017 adjusts the icons within the Solution Explorer to indicate their source control status. Figure 12-4 illustrates three file states. When the solution is initially added to the source control repository, the files all appear with a little lock icon next to the file type icon. This indicates that the file has been checked in and is not currently checked out by anyone. For example, Order.cs and Properties have this icon.

When a solution is under source control, all changes are recorded, including the addition and removal of files. Figure 12-4 illustrates the addition of Product.cs to the solution. The plus sign next to Product.cs indicates that this is a new file. The red check mark next to the CSClassLibrary project signifies that the file has been edited since it was last checked in.
Changes
In a large application, it can often be difficult to see at a glance which files have been modified, recently added, or removed from a project. The Changes window, as shown in Figure 12-5, is useful for seeing which files are waiting to be committed. If there were files that were not being tracked by Git, they would be listed at the bottom of the windows.

To initiate a commit, fill in the Commit message textbox at the top of the window and click on the Commit All button. This commits the files to your local repository. By clicking on the drop-down on the right side of the Commit All button, you can also commit and push (which pushes your repository to a remote repository) or commit and sync (which pulls from a remote repository and pushes your repository to the same remote repository).
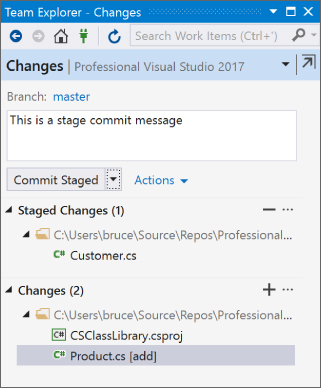
It’s also possible to stage your commits. In Git, a staged commit allows you to add files to a larger commit in small pieces. And each time you stage a commit, you can add a different message. As an example, while in the middle of a refactoring of your code, you notice that there is a typo in one of the messages. So you fix the typo and stage that single change (with the appropriate message) and continue on with your main work. When all of your work is finished, you can bundle it into a larger commit, but the individual message will be retained.
To stage files, right-click on the desired files and select Stage from the context menu. This will add the files to a staged section, as seen in Figure 12-6. Then clicking the Commit Staged button will complete the staging process.
Merging Changes
Occasionally, changes might be made to the same file by multiple developers. In some cases, these changes can be automatically resolved if they are unrelated, such as the addition of a method to an existing class. However, when changes are made to the same portion of the file, there needs to be a process by which the changes can be mediated to determine the correct code. When this happens, the Resolve Conflicts screen is used to identify and resolve any conflicts, as seen in Figure 12-7.

The files that are in conflict are listed. To resolve the conflict for a particular file, double-click on it to reveal the additional options visible in Figure 12-8.

From here, you have a number of options available for the resolution. You can take the remote or keep the local version as is. Or you can click on the Compare Files link to display the differences between the two files, as seen in Figure 12-9.

Once the conflict is resolved, the file is moved to the Resolved list at the bottom of the window.
History
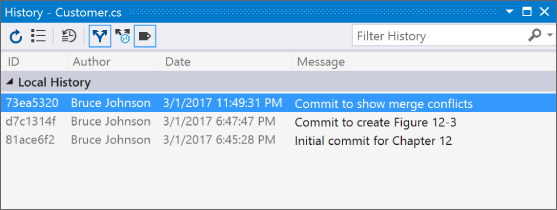
Any time a file is updated in the Git repository, history details for each version of the file are recorded. Use the View History option on the right-click shortcut menu from the Solution Explorer to review this history. Figure 12-10 shows what a brief history of a file would look like. This dialog enables developers to view previous versions (you can see that the current file has two previous versions) and look at the comments related to each commit. The functionality offered on this screen is dependent on the source control plug-in that is being used. For Git, these functions are the main ones available on this screen. However, if you utilize Team Foundation Server as your source control plug-in, then toolbar items and context menu options on this form allow you to get the particular version, mark a file as being checked out, compare different versions of the file, roll the file back to a previous version (which erases newer versions), and report on the version history.
SUMMARY
This chapter demonstrated the rich interface of Visual Studio 2017 when using a source control repository to manage files associated with an application. Checking files in and out can be done using the Solution Explorer window, and more advanced functionality is available via the Changes window.