
36
Web Application Deployment
WEB DEPLOYMENT
Web application projects are quite different from Web Site projects, yet the tool used to deploy them is the same. Visual Studio 2017 includes the capability to deploy both types with the Web Deployment tool, which is used to easily import and export IIS applications along with their dependencies — such as IIS meta data and databases — from the command line, IIS management console, PowerShell cmdlets, or directly from Visual Studio. It also provides the ability to manage several versions of configuration data for different environments in a clean manner without duplication.
Even more, if you are deploying ASP.NET 5 applications, the deployment can include everything your application needs to run, up to and including the .NET Framework.
Publishing a Web Application
The quickest way to deploy a Web project is to simply publish it directly from Visual Studio. Select the Publish item from the right-click context menu in Solution Explorer to display the Publish dialog. Each time you do a deployment you do so against a particular profile, which encapsulates the target environment settings. A Web Application project maintains a collection of profiles, which enable you to deploy the one web application to a number of target environments and keep the settings for each separate.
If this is the first time you have run the Publish dialog in your project, you need to specify the publish target (see Figure 36-1).

There are several options available to you initially. In the cloud, you can publish to either Microsoft Azure App Service or a Microsoft Azure Virtual Machine. You can import a previously created set of publishing settings (in the form of a .publishsettings file). Or you can publish to IIS, an FTP site, or a folder.
For the purpose of following along with this chapter, select the IIS, FTP, etc. target. You will then go to the Connection tab in the Publish dialog (shown in Figure 36-2).
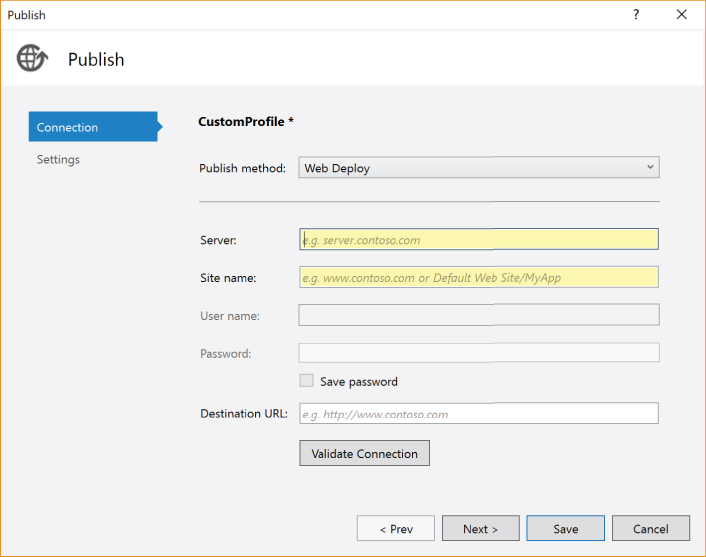
The Connection tab in this wizard enables you to define the connection to the deployment target. Several options for Publish Method determine what you see in the lower part of the dialog window: Web Deploy, Web Deploy Package, FTP, and File System. The File System option enables you to enter the target location (a directory in the filesystem) for the web application to be published. The FTP option offers the same but also enables you to enter FTP credentials. The Web Deploy option enables you to specify the service URL and the destination URL as well as the site/application combination that is the target of the publication. If necessary, credentials can be provided. The Web Deploy Package option takes what would normally be deployed through a Web Deploy and packages it into a Zip file. So instead of needing to identify the target system, you can just specify the path to the file that will be created.
The Settings tab enables you to configure some additional settings for the deployment. Again, the publish methods break the contents of this step into two categories. Both categories enable you to specify the configuration (by default, Debug and Release) that will be deployed. In addition, there are check boxes that can remove all the files from the target that are not deployed, precompile the application, and exclude any files in the App_Data folder. Not all options are available for all publishing methods. Finally, the Web Deploy and Web Deploy Package include a section that enables a database to be deployed with the web application (Figure 36-3).
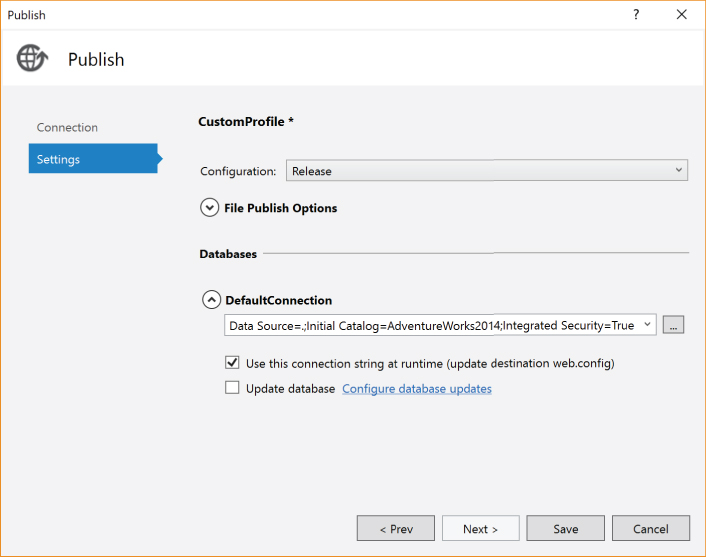
When you deploy a database, the Publish Wizard examines your development environment and identifies any databases that might be part of the application. These become choices that you can make in the drop-down list. Alternatively, you can specify the database connection manually. Also, there are check boxes that enable you to update the web.config file with the new connection information and to update the schema of an existing database with the deploying database.
If you use the Web Deploy Package option, it packages all the necessary files, along with all the metadata required to install and configure your application package, into a single Zip file. This Zip file can then be installed via the IIS 7.0/8.0 management interface, the command line, PowerShell cmdlets, or directly from Visual Studio.
The final step in this process is to click on the Save button. This actually performs two actions. First, it saves the publish profile in your project. Second, it performs the publication. Depending on the type of publication, you might need to log into Visual Studio with Administrator privileges. This is the case when performing a Web Deploy.
Publishing to Azure
Visual Studio 2017 has a number of features that allow you to more easily integrate your development with Microsoft Azure. The publishing process is one of those areas in which a large number of formerly manual steps have been combined into a seamless process.
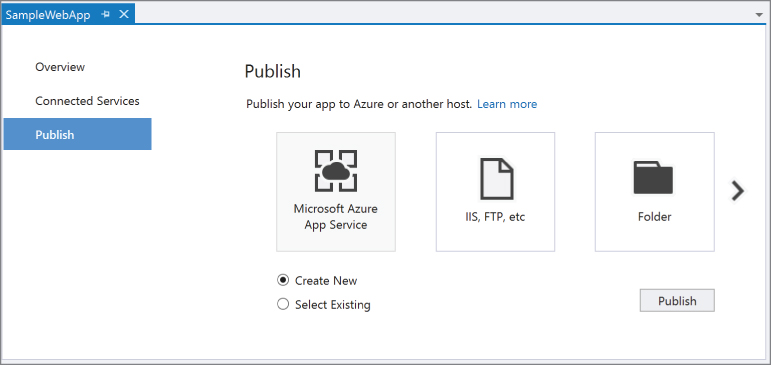
To publish your web application to Azure, start by selecting Microsoft Azure App Service as your publish target. You’ll also need to specify whether you’re going to create a new App Service or deploy to an existing one. This is done through the radio buttons visible in Figure 36-4.
Whether you choose to create a new service or use an existing one, you will need to indicate your Azure account. In the top right corner of Figures 36-5 and 36-6, there is a dropdown list containing the Microsoft Accounts that Visual Studio is aware of. You can select the account associated with the Azure subscription you want to use and provide credentials (indicated by the Reenter your credentials link in Figure 36-5).

To use an existing App Service, you will need to provide the information shown in Figure 36-5.
Select the subscription in which your existing app service is located. The list of previously defined app services appears in the box at the bottom. Select the desired app service and click OK.
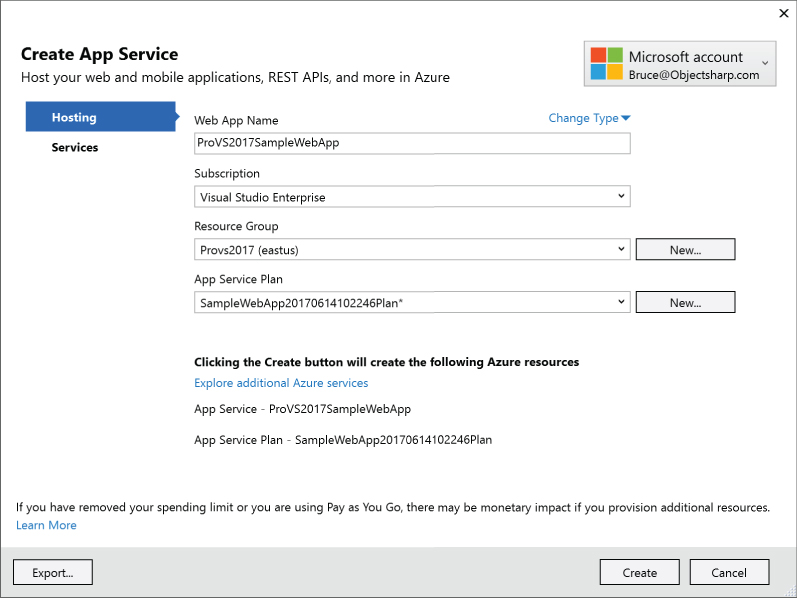
When you create a new app service, additional information is required. Figure 36-6 illustrates the type of information that you must provide.
As part of the creation process, you need to select a name for your website that is unique. It is entered into the Web App Name field and immediately checked for validity. Other options in the dialog include the subscription under which the web app is created (if you have more than one subscription associated with your account), the region in which the web app will be created, and the App Service Plan. The App Service Plan value is used to specify the size of the app service that you want to create. “Size” in this case identifies the number of cores, the available RAM, and some additional features (like the number of staging areas and whether automatic scaling is supported). The best option depends on the amount of traffic you expect, the pattern of that traffic (steady vs in bursts), and the management features that you need. Clicking on the New button opens a dialog (Figure 36-7) that lets you specify the size.

The Create App Service Plan dialog includes a Services tab, the contents of which appear in Figure 36-8.

This tab is used to define additional services that are part of your application and the app service. Initially, there is the App Service plan that you specified in Figure 36-6. That appears in the lower list of Figure 36-8. For this example, it is all that you need to include. However, if your application requires it, you can add more Azure resources to your deployment. The top list in Figure 36-8 shows SQL Database as an option. If you click on the plus sign to the right of that entry, you will be prompted for the information that Azure needs to create a SQL Database resource. That resource is then associated with your deployment.
Clicking on the Create button causes the web app to be created in Azure. When you’re finished, you’re returned to the Connection tab described in this chapter’s “Publishing a Web Application” section. The difference is that all the details related to your new web app have been filled in and you’re ready to move to the Settings tab. Once the rest of the details of the publication have been provided, clicking on the Publish button causes the output for your web application project to be promoted to Azure and your web app to be ready to accept requests.
WEB PROJECT INSTALLERS
In addition to using the Publish Wizard tool, you can create a standard Windows Installer package to manage a web application or website deployment. You do this using the same Windows Installer Toolkit (WiX) component covered in Chapter 35, “Packaging and Deployment.” But moving files onto the target machine is not sufficient for a web project. The installation needs to create a virtual directory as well. Fortunately, WiX supports this functionality. Consider the .wxs file shown here:
<?xml version="1.0" encoding="UTF-8"?>
<Wix xmlns="http://schemas.microsoft.com/wix/2006/wi"
     xmlns:iis="http://schemas.microsoft.com/wix/IIsExtension">
   <Product Id="381ED4A8-90AA-49F5-9F63-CD128B33895C" Name="Sample Web App"
      Language="1033" Version="1.0.0.0" Manufacturer="Professional Visual Studio 2017"
      UpgradeCode="A8E5F094-C6B0-46E5-91A1-CC5A8C65079D">
      <Package InstallerVersion="200" Compressed="yes"/>
      <Media Id="1" Cabinet="SampleWebApp.cab" EmbedCab="yes"/>
      <Directory Id="TARGETDIR" Name="SourceDir">
         <Directory Id="ProgramFilesFolder">
            <Directory Id="WebApplicationFolder" Name="MyWebApp">
               <Component Id="ProductComponent" Guid="80b0ee2a-a102-46ec-a456-33a23eb0588e">
                  <File Id="Default.aspx" Name="Default.aspx"
                        Source="..SampleWebAppDefault.aspx" DiskId="1"/>
                  <File Id="Default.aspx.cs" Name="Default.aspx.cs"
                        Source="..SampleAppDefault.aspx.cs" DiskId="1"/>
                  <iis:WebVirtualDir Id="SampleWebApp" Alias="SampleWebApp"
                        Directory="WebApplicationFolder" WebSite="DefaultWebSite">
                     <iis:WebApplication Id="SampleWebApplication" Name="Sample"/>
                  </iis:WebVirtualDir>
               </Component>
           </Directory>
        </Directory>
      </Directory>
      <iis:WebSite Id='DefaultWebSite' Description='Default Web Site'
         Directory='WebApplicationFolder'>
         <iis:WebAddress Id="AllUnassigned" Port="80"/>
      </iis:WebSite>
      <Feature Id="ProductFeature" Title="Sample Web Application" Level="1">
         <ComponentRef Id="ProductComponent"/>
      </Feature>
   </Product>
</Wix>
Several elements are unique to web installation. First, notice that the WiX element contains a namespace with a prefix of iis. This namespace contains the elements processed to create the virtual directory. You also need to add a reference in your setup project to the WixIIsExtension assembly in the WiX Toolkit directory.
The second difference is in the Component placed inside the Directory hierarchy. The WebVirtualDir element is used to create a virtual directory. Specifically, the directory named WebApplicationFolder is created, with the directory added to the default website for the server. In the WebVirtualDir element, the WebApplication directs the installer to make the just-created virtual directory a web application.
Finally, notice the WebSite element. This tells the installer to utilize (or create, if necessary) the default website when accessing the WebApplicationFolder directory. The WebAddress element sets the application to listen on port 80 on all unassigned endpoints.
THE WEB PLATFORM INSTALLER
Web applications tend to rely on a large number of technologies and tools to function correctly both during development and in production. Even after your environment is correctly set up for a single application, relationships and dependencies between applications need to be understood and managed. Finally, there are always new tools, libraries, and applications available on the Internet, which you can build on when creating your own projects. As your environment becomes more complex, it can be quite a challenge to keep everything working correctly and up to date.
The Microsoft Web Platform Installer, as shown in Figure 36-9, is a simple tool designed to manage the software that you have installed on your web servers and development machine.

After you download the Web Platform Installer from http://www.microsoft.com/web, you can run it as many times as you like. It can detect which components you already have on your machine, and you can add and remove components with the click of a button. It can even take care of dependencies between components and install everything you need.
The Web Platform Installer can manage components beyond just the Web Platform. Also available is a collection of applications from the Microsoft Web Application Gallery at http://www.microsoft.com/web/gallery. These applications are filed under various categories under the Web Applications tab. Just like the components in the Web Platform, these applications can have their own prerequisites and the Web Platform Installer can ensure they are installed.
If you are already packaging your web application for deployment with the Web Deploy Package option from the Publish dialog, it is ready to be distributed using the Web Platform Installer. You can get your application added to the Web Application Gallery by filling in a simple form on the Microsoft Web portal. After your application is approved, it shows up ready to be installed on any machine with the Web Platform Installer on it.
Extending the Web Platform Installer
It is quite easy to have your application included in the Web Application Gallery to make it available to a large audience. There are some scenarios in which you would like to take advantage of the Web Platform Installer but do not want to make your application publicly available. This might be because your application is used privately within your company or because your application is not yet ready for release and you want to test the deployment procedure.
The Web Platform Installer relies on atom feeds to ensure that the list of components and products that it installs are always kept up to date. Each entry in these feeds corresponds to an application or component in the user interface of the Web Platform Installer. The Web Platform and Web Application tabs each come from different feeds at http://www.microsoft.com/web/webpi/5.0/WebProductList.xml and http://www.microsoft.com/web/webpi/5.0/WebApplicationList.xml, respectively. In addition to these two feeds, each installation of the Web Platform Installer can specify additional feeds that reference more components.
Here is a sample feed for a simple timesheets web application:
<?xml version="1.0" encoding="utf-8"?>
<feed xmlns="http://www.w3.org/2005/Atom">
  <webpiFile version="4.2.0.0"/>
  <title>Adventure Works Product WebPI Feed</title>
  <link href="#http://www.professionalvisualstudio.com/SampleProductFeed.xml"/>
  <updated>2015-02-10T08:29:14Z</updated>
  <author>
    <name>Adventure Works</name>
    <uri>http://www.professionalvisualstudio.com</uri>
 </author>
 <id>http://www.professionalvisualstudio.com/SampleProductFeed.xml</id>

 <entry>
    <productId>TimeSheets</productId>
    <title resourceName="Entry_AppGallerySIR_Title">Adventure Works Timesheets</title>
    <summary resourceName="Entry_AppGallerySIR_Summary">
       The Adventure Works corporate Timesheeting system</summary>
    <longSummary resourceName="Entry_AppGallerySIR_LongSummary">
       The Adventure Works corporate Timesheeting system</longSummary>
    <productFamily resourceName="TestTools">Human Resources</productFamily>
    <version>1.0.0</version>
    <images>
      <icon>c:AdventureWorksIcon.png</icon>
    </images>
    <author>
      <name>Adventure Works IT</name>
      <uri>http://www.professionalvisualstudio.com</uri>
    </author>
    <published>2015-02-10T18:26:31Z</published>

    <discoveryHint>
      <or>
        <discoveryHint>
          <registry>
            <keyPath>HKEY_LOCAL_MACHINESOFTWAREAdventureWorksTimesheets</keyPath>
            <valueName>Version</valueName>
            <valueValue>1.0.0</valueValue>
          </registry>
        </discoveryHint>
        <discoveryHint>
          <file>
            <filePath>%ProgramFiles%AdventureWorksTimesheets.exe</filePath>
          </file>
        </discoveryHint>
      </or>
    </discoveryHint>
    <dependency>
      <productId>IISManagementConsole</productId>
    </dependency>
    <installers>
      <installer>
        <id>1</id>
        <languageId>en</languageId>
        <architectures>
          <x86/>
          <x64/>
        </architectures>
        <osList>
          <os>
            <!-- the product is supported on Vista/Windows Server SP1 + -->
            <minimumVersion>
              <osMajorVersion>6</osMajorVersion>
              <osMinorVersion>0</osMinorVersion>
              <spMajorVersion>0</spMajorVersion>
            </minimumVersion>
            <osTypes>
              <Server/>
              <HomePremium/>
              <Ultimate/>
              <Enterprise/>
              <Business/>
            </osTypes>
          </os>
        </osList>
        <eulaURL>http://www.professionalvisualstudio.com/eula.html</eulaURL>
        <installerFile>
          <!-- size in KBs -->
          <fileSize>1024</fileSize>
          <installerURL>http://www.professionalvisualstudio.com/Timesheets_x86.msi
          </installerURL>
          <sha1>111222FFF000BBB444555EEEAAA777888999DDDD</sha1>
        </installerFile>
        <installCommands>
          <msiInstall>
            <msi>%InstallerFile%</msi>
          </msiInstall>
        </installCommands>
      </installer>
    </installers>
  </entry>
  <tabs>
    <tab>
    <groupTab>
    <id>AdventureWorksHRTab</id>
    <name>Adventure Works Human Resources</name>
    <description>Adventure Works HR Apps</description>
    <groupingId>HRProductFamilyGrouping</groupingId>
    </groupTab>
    </tab>
  </tabs>
  <groupings>
    <grouping>
      <id>HRProductFamilyGrouping</id>
      <attribute>productFamily</attribute>
      <include>
        <item>Human Resources</item>
      </include>
    </grouping>
  </groupings>
</feed>
The first part specifies some standard information about the feed, including the date it was last updated and author information. This is all useful if the feed is consumed using a normal feed reader. Following this is a single entry node containing information about the application. The Web Platform Installer can use the value of productId to refer to the application in other places, including being listed as a dependency for other components.
The discoveryHint node determines if this application is already installed. The sample application can be detected by looking for a specific Registry key value or by looking for a specific application by name. If either one of these items is found, the Web Platform Installer considers this application to be already installed. In addition to these two kinds of hints, you can use an msiProductCode hint to detect applications installed via Microsoft Installer (MSI).
The sample timesheets application has a dependency on the IIS Management Console. Each component that your application relies upon can be specified by its productId. If it is not already installed on the target machine, the Web Platform Installer installs it for you. In addition to dependencies, you can specify incompatibilities for your application, which can prevent both applications from installing at once.
The last component of the application entry is the installers element. There should be one installer element for each installer that you want to make available, and they should all have different identifiers. Each installer can be targeted at a specific range of languages, operating systems, and CPU architectures. If the target environment doesn’t fall into this range, the installer will not be shown. Each installer should specify an installer file, which will be downloaded to a local cache before the specified installCommands are executed against it.
The final two elements relate to what displays in the Web Platform Installer user interface. Each tab element adds to the list of tabs on the left. In the example, you add a tab based on a grouping of products, which is defined in the groupings element based on the productFamily attribute.
To add this feed to a Web Platform Installer instance, click the Options link to bring up the Options page. Enter the URL to the atom feed into the textbox, and click the Add Feed button. When you click OK the Web Platform Installer refreshes all the feeds and reloads all the applications including any custom installations that you have defined in your feed.
SUMMARY
This chapter showed you how to use a number of the features of Visual Studio 2017 to package your web applications and get them ready for deployment. The Web Deployment tool makes deployment to a number of environments and machines quick and painless. The Windows Installer Toolkit provides a mechanism to perform a typical installation of a web application. Finally, the Web Platform Installer provides you with an easy way to reach a large number of potential customers or to manage your own suite of enterprise applications.