
27
The ADO.NET Entity Framework
WHAT IS THE ENTITY FRAMEWORK?
Essentially, the Entity Framework is an ORM framework. Object Relational Mapping enables you to create a conceptual object model, map it to the database, and the ORM framework can take care of translating your queries over the object model to queries against the database, returning the data as the objects that you’ve defined in your model.
Here are some of the important concepts involved in the Entity Framework and some of the terms used throughout this chapter:
- Entity Model: The entity model you create using the Entity Framework consists of three parts:
- Conceptual model: Represents the object model, including the entities, their properties, and the associations between them
- Store model: Represents the database structure, including the tables/views/stored procedures, columns, foreign keys, and so on
- Mapping: Provides the glue between the store model and the conceptual model (that is, between the database and the object model), by mapping one to the other
Each of these parts is maintained by the Entity Framework as XML using a domain-specific language (DSL).
- Entity: Entities are essentially just objects (with properties) to which a database model is mapped.
- Entity Set: An entity set is a collection of a given entity. You can think of it as an entity being a row in a database, and an entity set being the table.
- Association: Associations define relationships between entities in your entity model and are conceptually the same as relationships in a database. Associations are used to traverse the data in your entity model between entities.
- Mapping: Mapping is the core concept of ORM. It’s essentially the translation layer from a relational schema in a database to objects in code.
GETTING STARTED
To demonstrate some of the various features in the Entity Framework, the example in this section uses the AdventureWorks2014 sample database developed by Microsoft as one of the sample databases for SQL Server.
The AdventureWorks2014 database is available for download from https://github.com/Microsoft/sql-server-samples/releases/tag/adventureworks2014.
Adventure Works Cycles is a fictional bicycle sales chain, and the AdventureWorks2014 database is used to store and access its product sales data.
Follow the instructions from the CodePlex website detailing how to install the database from the downloaded script in a SQL Server instance (SQL Server Express Edition is sufficient) that is on or can be accessed by your development machine.
Now you will move on to create a project that contains an Entity Framework model of this database. Start by opening the New Project dialog and creating a new project. The sample project you create in this chapter uses the WPF project template. You can display data in a WPF DataGrid control defined in the MainWindow.xaml file named dgEntityFrameworkData.
Now that you have a project that can host and query an Entity Framework model, it’s time to create that model.
CREATING AN ENTITY MODEL
You have two ways of going about creating an entity model. The usual means to do so is to create the model based on the structure of an existing database; however, with the Entity Framework it is also possible to start with a blank model and have the Entity Framework generate a database structure from it.
The sample project uses the first method to create an entity model based on the AdventureWorks2014 database’s structure.
The Entity Data Model Wizard
Open the Add New Item dialog for your project, navigate to the Data category, and select ADO.NET Entity Data Model as the item template (as shown in Figure 27-1). Call it AdventureWorks2014Model.edmx.

This starts the Entity Data Model Wizard that can help you start building an Entity Framework model.
As the first step, the dialog in Figure 27-2 enables you to select whether you want to automatically create a model from a database, start with an empty model, start with an empty model for code-first design, or create a code-first model using an existing database.
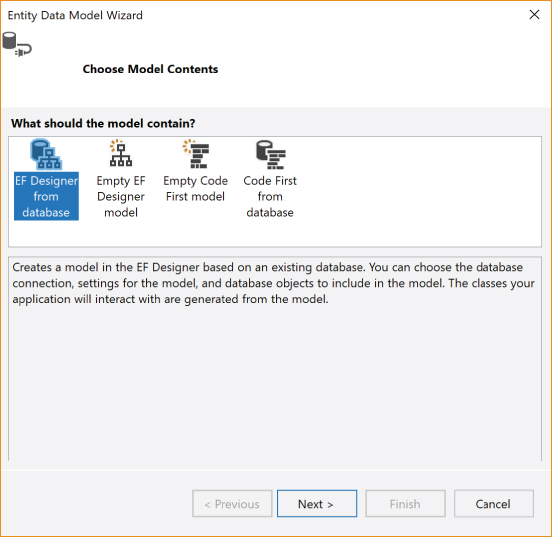
The empty model option is useful when you want to create your model from scratch, and either mapping it manually to a given database or letting the Entity Framework create a database based on your model.
However, you can create an entity model from the AdventureWorks2014 database, so for the purpose of this example use the EF Designer from Database option, and get the wizard to help you create the entity model from the database.
Moving to the next step, you now need to create a connection to the database (as shown in Figure 27-3). You can find the most recent database connection you’ve created in the drop-down list, but if it’s not there (for example, if this is the first time you’ve created a connection to this database) you need to create a new connection. To do so, click the New Connection button, and go through the standard procedure to select the SQL Server instance, authentication credentials, and finally, the database.

If you use a username and password as your authentication details, you can choose not to include those in the connection string (containing the details required to connect to the database) when it is saved because this string is saved in plain text that would enable anyone who sees it to have access to the database. In this case you would have to provide these credentials to the model before querying it for it to create a connection to the database. If you don’t select the check box to save the connection settings in the App.config file, you also need to pass the model the details on how to connect to the database before you can query it.
Next, the wizard asks you which version of Entity Framework to use. The choices presented include, by default, version 6.0 and 5.0. The reason to include version 5.0 (and to allow you to have older versions as well) is to support existing applications that have not yet upgraded to version 6.0. Keep the default of version 6.0 and click Next.
In the next step, the wizard connects to the database and retrieves its structure (that is, its tables, views, and stored procedures), which displays in a tree for you to select the elements to be included in your model (see Figure 27-4).

Other options that can be specified on this screen include:
- Pluralize or singularize generated object names: This option (when selected) intelligently takes the name of the table/view/stored procedure and pluralizes or singularizes the name based on how that name is used in the model. (Collections use the plural form, entities use the singular form, and so on.)
- Include foreign key columns in the model: The Entity Framework supports two mechanisms for indicating foreign key columns. One is to create a relationship and hide the column from the entity, instead representing it through a relationship property. The other is to explicitly define the foreign key in the entity. If you wish to use the explicit definition, select this option to include it in your entities.
- Import selected stored procedures and functions into the entity model: While the entity data store supports the inclusion of stored procedures and functions, they need to be imported as functions in order to be accessible through the model. If you select this option, the stored procedures and functions that you choose in this dialog will automatically be imported into the model.
- Model Namespace: This enables you to specify the namespace in which all the classes related to the model will be created. By default, the model exists in its own namespace (which defaults to the name of the model entered in the Add New Item dialog) rather than the default namespace of the project to avoid conflict with existing classes with the same names in the project.
Select all the tables in the database to be included in the model. Clicking the Finish button in this screen creates an Entity Framework model that maps to the database. You might get prompted with a security warning about running a text template. The reason is that the generation of the classes used by Entity Framework is accomplished through a T4 Template. Visual Studio will prompt you for confirmation before running a template unless you have previously disabled that warning. See Chapter 43, “Code Generation with T4,” in the online archive for more information about T4 Templates.
Once generated, you can view the model in the Entity Framework designer, adjust it per your requirements, and tidy it up as per your tastes (or standards) to make it ideal for querying in your code.
The Entity Framework Designer
After the Entity Framework model has been generated, it opens in the Entity Framework designer, as shown in Figure 27-5.

The designer has automatically laid out the entities that were created by the wizard, showing the associations it has created between them.
You can move entities around on the designer surface, and the designer automatically moves the association lines and tries to keep them neatly laid out. Entities automatically snap to a grid, which you can view by right-clicking the designer surface and selecting Grid ➪ Show Grid from the context menu. You can disable the snapping by right-clicking the designer surface and unchecking Grid ➪ Snap to Grid from the context menu to have finer control over the diagram layout, but entities line up better (and hence make the diagram neater) by leaving the snapping on.
As you move entities around (or add additional entities to) the diagram, you may find it gets a little messy, with association lines going in all directions to avoid getting “tangled.” To get the designer to automatically lay out the entities neatly again according to its own algorithms, you can right-click the designer surface and select Diagram ➪ Layout Diagram from the context menu.
Entity Framework models can quickly become large and difficult to navigate in the Entity Framework designer. Luckily, the designer has a few tools to make navigating it a little easier. The designer enables you to zoom in and out using the zoom buttons in its bottom-right corner (below the vertical scrollbar — see Figure 27-6). The button sandwiched between these zoom in/out buttons zooms to 100% when clicked.

To zoom to a predefined percentage, right-click the designer surface, and select one of the options in the Zoom menu. In this menu you can also find a Zoom to Fit option (to fit the entire entity model within the visible portion of the designer), and a Custom option that pops up a dialog enabling you to type a specific zoom level.
In addition, selecting an entity in the Properties tool window (from the drop-down object selector) automatically selects that entity in the designer and brings it into view; right-clicking the entity in the Model Browser tool window (described shortly) and selecting the Show in Designer menu item does the same. These make it easy to navigate to a particular entity in the designer, so you can make any modifications as required.
You can minimize the space taken by entities by clicking the icon in the top-right corner of the entity. Alternatively, you can roll up the Properties/Navigation Properties groupings by clicking the +/– icons to their left. Figure 27-7 shows an entity in its normal expanded state, with the Properties/Navigation Properties groupings rolled up, and completely rolled up.

You can expand all the collapsed entities at one time by right-clicking the designer surface and selecting Diagram ➪ Expand All from the context menu. Alternatively, you can collapse all the entities in the diagram by right-clicking the designer surface and selecting Diagram ➪ Collapse All from the context menu.
A visual representation of an entity model (as provided by the Entity Framework designer) can serve a useful purpose in the design documentation for your application. The designer provides a means to save the model layout to an image file to help in this respect. Right-click anywhere on the designer surface, and select Diagram ➪ Export as Image from the context menu. This pops up the Save As dialog for you to select where to save the image. It defaults to saving as a bitmap (.bmp); if you open the Save As Type drop-down list, you can see that it can also save to JPEG, GIF, PNG, and TIFF. PNG is probably the best choice for quality and file size.
It can often be useful (especially when saving a diagram for documentation) to display the property types against each property for an entity in the designer. You can turn this on by right-clicking the designer surface and selecting Scalar Property Format ➪ Display Name and Type from the context menu. You can return to displaying just the property name by selecting the Scalar Property Format ➪ Display Name item from the right-click context menu.
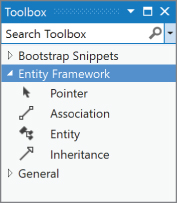
As with most designers in Visual Studio, the Toolbox and Properties tool windows are integral parts of working with the designer. The Toolbox (as shown in Figure 27-8) contains three controls: Entity, Association, and Inheritance. How to use these controls with the designer is covered shortly. The Properties tool window displays the properties of the selected items in the designer (an entity, association, or inheritance), enabling you to modify their values as required.
In addition to the Toolbox and Properties tool windows, the Entity Framework designer also incorporates two other tool windows specific to it — the Model Browser tool window and the Mapping Details tool window — for working with the data.
The Model Browser tool window (as shown in Figure 27-9) enables you to browse the hierarchy of both the conceptual entity model of the database and its storage model. Clicking an element in the Store model hierarchy shows its properties in the Properties tool window; however, these can’t be modified (because this is an entity modeling tool, not a database modeling tool). The only changes you can make to the Store model is to delete tables, views, and stored procedures (which won’t modify the underlying database). Clicking elements in the Conceptual model hierarchy also shows their properties in the Properties tool window (which can be modified), and its mappings display in the Mapping Details tool window. Right-clicking an entity in the hierarchy and selecting the Show in Designer menu item from the context menu brings the selected entity/association into view in the designer.
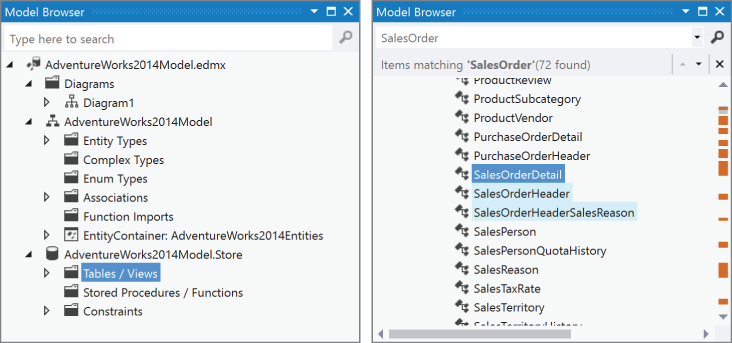
The second picture in Figure 27-9 demonstrates the searching functionality available in the Model Browser tool window. Because your entity model can get quite large, it can be difficult to find exactly what you are after. Therefore, a good search function is important. Type your search term in the search textbox at the top of the window, and press Enter. In this example the search term was SalesOrder, which highlighted all the names in the hierarchy (including entities, associations, properties, and so on) that contained the search term. The vertical scrollbar has the places in the hierarchy (which has been expanded) highlighted where the search terms have been found, making it easy to see where the results were found throughout the hierarchy. The number of results is shown just below the search textbox, next to which are an up arrow and a down arrow to enable you to navigate through the results. When you finish searching, you can click the cross icon next to these to return the window to normal.
The Mapping Details tool window (as shown in Figure 27-10) enables you to modify the mapping between the conceptual model and the storage model for an entity. Selecting an entity in the designer, the Model Browser tool window, or the Properties tool window shows the mappings in this tool window between the properties of the entity to columns in the database. You have two ways to map the properties of an entity to the database: either via tables and views, or via functions (that is, stored procedures). On the left side of the tool window are two icons, enabling you to swap the view between mapping to tables and views, to mapping to functions. However, focus here just on the features of mapping entity properties to tables and views.

The table/view mapping has a hierarchy (under the Column column) showing the tables mapped to the entity, with its columns underneath it. To these columns you can map properties on your entity (under the Value/Property column) by clicking in the cell, opening the drop-down list that appears, and selecting a property from the list.
A single entity may map to more than one database table/view (bringing two or more tables/views into a single entity). To add another table/view to the hierarchy to map to your entity, click in the bottom row where it says <Add a Table or View> and select a table/view from the drop-down list. When you add a table to the Mapping Details tool window for mapping to an entity, it automatically matches columns with the same name to properties on the entities and creates a mapping between them. Delete a table from the hierarchy by selecting its row and pressing the Delete key.
Conditions are a powerful feature of the Entity Framework that enable you to selectively choose which table you want to map an entity to at run time based on one or more conditions that you specify. For example, say you have a single entity in your model called Product that maps to a table called Products in the database. However, you have additional extended properties on your entity that map to one of two tables based on the value of the ProductType property on the entity — if the product is of a particular type, it maps the columns to one table, if it’s another type, it maps the columns to the other table. You can do this by adding a condition to the table mapping. In the Mapping Details window, click in the row directly below a table to selectively map where it says <Add a Condition>. Open the drop-down list that appears, which contains all the properties on the entity. Select the property to base your condition on (in the given example it would be the ProductType property), select an operator, and enter a value to compare the property to. Note that there are only two operators: Equals (=) and Is. You can add additional conditions as necessary to determine if the table should be used as the source of the data for the given properties.
Creating/Modifying Entities
The Entity Data Model Wizard gave you a good starting point by building an entity model for you. In some cases this may be good enough, and you can start writing the code to query it, but you can now take the opportunity to go through the created model and modify its design as per your requirements.
Because the Entity Framework provides you with a conceptual model to design and work with, you are no longer limited to having a 1:1 relationship between the database schema and an object model in code, so the changes you make in the entity model won’t affect the database in any way. So you may want to delete properties from entities, change their names, and so on, and it will have no effect on the database. In addition, because any changes you make are in the conceptual model, updating the model from the database will not affect the conceptual model (only the storage model), so your changes won’t be lost.
Changing Property Names
Often you might work with databases that have tables and columns containing prefixes or suffixes, over/under use of capitalization, or even names that no longer match their actual function. This is where the use of an ORM like the Entity Framework can demonstrate its power because you can change all these in the conceptual layer of the entity model to make the model nice to work with in code (with more meaningful and standardized names for the entities and associations) without needing to modify the underlying database schema. Luckily, the tables and columns in the AdventureWorks2014 database have reasonably friendly names, but if you wanted to change the names, it would simply be a case of double-clicking the property in the designer (or selecting it and pressing F2), which changes the name display to a textbox enabling you to make the change. Alternatively, you can select the property in the designer, the Model Browser tool window, or the Properties tool window, and update the Name property in the Properties tool window.
Adding Properties to an Entity
Now look at the process of adding properties to an entity. Three types of properties exist:
- Scalar properties: Properties with a primitive type, such as string, integer, Boolean, and so on.
- Complex properties: A grouping of scalar properties in a manner similar to a structure in code. Grouping properties together in this manner can make your entity model a lot more readable and manageable.
- Navigation properties: Used to navigate across associations. For example, the SalesOrderHeader entity contains a navigation property called SalesOrderDetails that enables you to navigate to a collection of the SalesOrderDetail entities related to the current SalesOrderHeader entity. Creating an association between two entities automatically creates the required navigation properties.
The easiest way to try this is to delete a property from an existing entity and add it back again manually. Delete a property from an entity. (Select it in the designer and press the Delete key.) To add it back again, right-click the entity, and select Add ➪ Scalar Property from the context menu. Alternatively, a much easier and less frustrating way when you are creating a lot of properties is to simply select a property or the Properties header and press the Insert key on your keyboard. A new property will be added to the entity, with the name displayed in a textbox for you to change as required.
The next step is to set the type of the property; you need to move over to the Properties tool window to set it. The default type is string, but you can change this to the required type by setting its Type property.
Properties that you want to designate as entity keys (that is, properties used to uniquely identify the entity) need their Entity Key property set to True. The property in the designer will have a picture of a little key added to its icon, making it easy to identify which properties are used to uniquely identify the entity.
You can set numerous other properties on a property, including assigning a default value, a maximum length (for strings), and whether or not it’s nullable. You can also assign the scope of the getter and setter for the property (public, private, and so on), useful for, say, a property that will be mapped to a column with a calculated value in the database where you don’t want the consuming application to attempt to set the value (by making the setter private).
The final task is to map the property to the store model. You do this as described earlier using the Mapping Details tool window.
Creating Complex Types
Though you can create a complex type from scratch, the easiest way to create a complex type is to refactor an entity by selecting the scalar properties on the entity to be included in the complex type and having the designer create the complex type from those properties. Follow these instructions to move the name-related properties on the Person entity to a complex type:
- Select the name-related properties on the Person entity (FirstName, LastName, MiddleName, NameStyle, Suffix, Title) by selecting the first property, and while holding down the Ctrl key selecting the other properties (so they are all selected at the same time).
- Right-click one of the selected properties, and select the Refactor ➪ Move To New Complex Type menu item.
- In the Model Browser will be the new complex type that it created, with its name displayed in a textbox for you to name to something more meaningful. For this example, simply call it PersonName.
- The Entity Framework designer will have created a complex type, added the selected properties to it, removed the selected properties from the entity, and added the complex type that it just created as a new property on the entity in their place. However, this property will just have ComplexProperty as its name, so you need to rename it to something more meaningful. Select the property in the designer, press F2, and enter Name in the textbox.
You will now find that by grouping the properties together in this way, the entity will be easier to work with in both the designer and in code.
Creating an Entity
So far you’ve been modifying existing entities as they were created by the Entity Data Model Wizard. However, now take a look at the process to create an entity from scratch and then mapping it to a table/view/stored procedure in your storage model. Most of these aspects have already been covered, but walk through the required steps to get an entity configured from scratch.
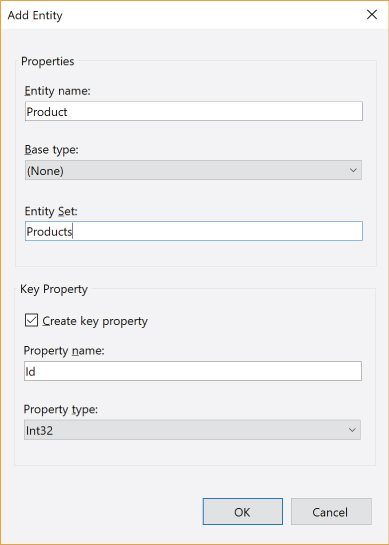
You have two ways to manually create entities. The first is to right-click the designer surface and select Add New ➪ Entity from the context menu. That pops up the dialog shown in Figure 27-11, which helps you set up the initial configuration of the entity. When you enter a name for the entity in the Entity Name field, you’ll notice that the Entity Set field automatically updates to the plural form of the entity name (although you can change this entity set name to something else if required). The Base Type drop-down list enables you to select an existing entity in your entity model that this entity inherits from (discussed shortly). There is also a section enabling you to specify the name and type of a property to automatically create on the entity and set as an entity key.
The other way to create an entity is to drag and drop the Entity component from the Toolbox onto the designer surface. However, it doesn’t bring up the dialog from the previous method, instead opting to immediately create an entity with a default name, entity set name, and entity key property. You then have to use the designer to modify its configuration to suit your needs.
The steps needed to finish configuring the entity are as follows:
- If required, create an inheritance relationship by specifying that the entity should inherit from a base entity.
- Create the required properties on the entity, setting at least one as an entity key.
- Using the Mapping Details tool window, map these properties to the storage schema.
- Create any associations with other entities in the model.
- Validate your model to ensure that the entity is mapped correctly.
You aren’t limited to mapping to a single database table/view per entity. This is one of the benefits of building a conceptual model of the database — you may have related data spread across a number of database tables, but through having a conceptual entity model layer in the Entity Framework, you can bring those different sources together into a single entity to make working with the data a lot easier in code.
Creating/Modifying Entity Associations
You have two ways of creating an association between two entities. The first is to right-click the header of one of the entities and select Add New ➪ Association from the context menu. This displays the dialog shown in Figure 27-12.

This dialog includes:
- Association Name: Give the association a name. This becomes the name of the foreign key constraint in the database if you update the database from the model.
- Endpoints: These specify the entities at each end of the association, the type of relationship (one-to-one, one-to-many, and so on), and the name of the navigation properties that it creates on both entities to navigate from one entity to the other over the association.
- Add Foreign Key Properties to the Entity: This enables you to create a property on the “foreign” entity that acts as a foreign key and map to the entity key property over the association. If you’ve already added the property that will form the foreign key on the associated entity, you should uncheck this check box.
The other way to create an association is to click the Association component in the Toolbox, click one entity to form an end on the association, and then click another entity to form the other end of the association. (If it is a one-to-many relationship, select the “one” entity first.) Using this method gives the association a default name, creates the navigation properties on both entities, and assumes a one-to-many relationship. It will not create a foreign key property on the “foreign” entity. You can then modify this association as required using the Properties tool window.
Despite having created the association, you aren’t done yet unless you used the first method and selected the option to create a foreign key property for the association. Now you need to map the property that acts as the foreign key on one entity to the entity key property on the other. The entity whose primary key is one endpoint in the association is known, but you have to tell the Entity Framework explicitly which property to use as the foreign key property. You can do this by selecting the association in the designer and using the Mapping Details tool window to map the properties.
When this is done, you may want to define a referential constraint for the association, which you can assign by clicking the association in the designer and finding the Referential Constraint property in the Properties tool window.
Entity Inheritance
In the same way that classes can inherit from other classes (a fundamental object-oriented concept), so can entities inherit from other entities. You have a number of ways to specify that one entity should inherit from another, but the most straightforward method is to select an entity in the designer, find its Base Type property in the Properties tool window, and select the entity from the drop-down list that this entity should inherit from.
Validating an Entity Model
At times your entity model may be invalid (such as when a property on an entity has not been mapped to the storage model, or its type cannot be converted from/to the mapped column’s data type in the database); however, despite having an invalid entity model your project can still compile.
You can run a check to see if your model is valid by right-clicking the designer surface and selecting the Validate menu item from the context menu. This checks for any errors in your model and displays them in the Error List tool window.
You can also set the Validate On Build property for the conceptual model to True (click an empty space on the designer surface, and then you can find the property in the Properties tool window), which automatically validates the model each time you compile the project. However, again, an invalid model will not stop the project from successfully compiling.
Updating an Entity Model with Database Changes
The structure of databases tends to be updated frequently throughout the development of projects, so you need a way to update your model based on the changes in the database. To do so, right-click the designer surface, and select the Update Model from Database menu item. This opens the Update Wizard (as shown in Figure 27-13) that obtains the schema from the database, compares it to the current storage model, and extracts the differences. These differences display in the tabs in the wizard. The Add tab contains database objects that aren’t in your storage model, the Refresh tab contains database objects that are different in the database from their corresponding storage model objects, and the Delete tab contains database objects that are in the storage model but no longer in the database.

Select the items from these three tabs that you want to add, refresh, or delete, and click the Finish button to have your entity model updated accordingly.
QUERYING THE ENTITY MODEL
Now that you’ve created your entity model, you no doubt want to put it to the test by querying it, working with and modifying the data returned, and saving changes back to the database. The Entity Framework provides a number of ways to query your entity model, including LINQ to Entities, Entity SQL, and query builder methods. However, this chapter focuses specifically on querying the model with LINQ to Entities.
LINQ to Entities Overview
Details about LINQ can be found in Chapter 46, “Language Integrated Queries (LINQ),” in the online archive. That chapter specifically focuses on the use of LINQ to Objects, LINQ to SQL, and LINQ to XML; however, the Entity Framework has extended LINQ with its own implementation called LINQ to Entities. LINQ to Entities enables you to write strongly typed LINQ queries against your entity model and have it return the data as objects (entities). LINQ to Entities handles the mapping of your LINQ query against the conceptual entity model to a SQL query against the underlying database schema. This is an extraordinarily powerful feature of the Entity Framework, abstracting away the need to write SQL to work with data in a database.
Getting an Object Context
To connect to your entity model, you need to create an instance of the object context in your entity model. So that the object context is disposed of when you finish, use a using block to maintain the lifetime of the variable:
VB
Using context As New AdventureWorks2014Entities()
    'Queries go here
End Using
C#
using (AdventureWorks2014Entities context = new AdventureWorks2014Entities())
{
    // Queries go here
}
If you need to specify the connection to the database (such as if you need to pass in user credentials or use a custom connection string rather than what’s in the App.config file) you can do so by passing the connection string to the constructor of the object context (in this case AdventureWorks2014Entities).
CRUD Operations
It would be hard to argue against the most important database queries being the CRUD (Create/Read/Update/Delete) operations. Read operations return data from the database, whereas the Create/Update/Delete operations make changes to the database. Create some LINQ to Entities queries to demonstrate retrieving some data from the database (as entities), modify these entities, and then save the changes back to the database.
Data Retrieval
Just like SQL, LINQ to Entity queries consist of selects, where clauses, order by clauses, and group by clauses. Take a look at some examples of these. The results of the queries can be assigned to the ItemsSource property of the DataGrid control created earlier in the MainWindow.xaml file, enabling you to visualize the results:
VB
dgEntityFrameworkData.ItemsSource = qry
C#
dgEntityFrameworkData.ItemsSource = qry;
There are actually a number of ways to query the entity model within LINQ to Entities, but you can just focus on one method here. Assume that the query is between the using block demonstrated previously, with the variable containing the instance of the object context simply called context.
To return the entire collection of customers in the database, you can write a select query like so:
VB
Dim qry = From c In context.Customers
          Select c
C#
var qry = from c in context.Customers
          select c;
You can filter the results with a where clause, which can even include functions/properties such as StartsWith, Length, and so on. This example returns all the customers whose last name starts with A:
VB
Dim qry = From c In context.Customers
          Where c.Name.LastName.StartsWith("A")
          Select c
C#
var qry = from c in context.Customers
          where c.Name.LastName.StartsWith("A")
          select c;
You can order the results with an order by clause — in this example you order the results by the customer’s last name:
VB
Dim qry = From c In context.Customers
          Order By c.Name.LastName Ascending
          Select c
C#
var qry = from c in context.Customers
          orderby c.Name.LastName ascending
          select c;
You can group and aggregate the results with a group by clause — in this example you group the results by the salesperson, returning the number of sales per salesperson. Note that instead of returning a Customer entity you request that LINQ to Entities returns an implicitly typed variable containing the salesperson and his sales count:
VB
Dim qry = From c In context.Customers
          Group c By salesperson = c.SalesPerson Into grouping = Group
          Select New With
          {
                .SalesPerson = salesperson,
                .SalesCount = grouping.Count()
          }
C#
var qry = from c in context.Customers
          group c by c.SalesPerson into grouping
          select new
          {
              SalesPerson = grouping.Key,
              SalesCount = grouping.Count()
          };
Saving Data
The Entity Framework employs change tracking — where you make changes to data in the model, it tracks the data that has changed, and when you request that the changes are saved back to the database, it commits the changes to the database as a batch. This commit is via the SaveChanges() method on the object context:
VB
context.SaveChanges()
C#
context.SaveChanges();
A number of ways to update data exists (for different scenarios), but for purposes of simplicity, this example takes simple straightforward approaches.
Update Operations
Assume you want to modify the name of a customer (with an ID of 1), which you’ve retrieved like so:
VB
Dim qry = From c In context.Customers
          Where c.CustomerID = 1
          Select c

Dim customer As Customer = qry.FirstOrDefault()
C#
var qry = from c in context.Customers
          where c.CustomerID == 1
          select c;

Customer customer = qry.FirstOrDefault();
All you need to do is modify the name properties on the customer entity you’ve retrieved. The Entity Framework automatically tracks that this customer has changed, and then calls the SaveChanges() method on the object context:
VB
customer.Name.FirstName = "Chris"
customer.Name.LastName = "Anderson"

context.SaveChanges()
C#
customer.Name.FirstName = "Chris";
customer.Name.LastName = "Anderson";

context.SaveChanges();
Create Operations
To add a new entity to an entity set, simply create an instance of the entity, assign values to its properties, add the new entity to the related collection on the data context, and then save the changes:
VB
Customer customer = new Customer()
customer.Name.FirstName = "Chris"
customer.Name.LastName = "Anderson"
customer.Name.Title = "Mr."
customer.PasswordHash = "*****"
customer.PasswordSalt = "*****"
customer.ModifiedDate = DateTime.Now
context.Customers.AddObject(customer)

context.SaveChanges()
C#
Customer customer = new Customer();
customer.Name.FirstName = "Chris";
customer.Name.LastName = "Anderson";
customer.Name.Title = "Mr.";
customer.PasswordHash = "*****";
customer.PasswordSalt = "*****";
customer.ModifiedDate = DateTime.Now;
context.Customers.AddObject(customer);

context.SaveChanges();
After the changes are saved back to the database your entity can now have the primary key that was automatically generated for the row by the database assigned to its CustomerID property.
Delete Operations
To delete an entity, simply use the DeleteObject() method on its containing entity set:
VB
context.Customers.DeleteObject(customer)
C#
context.Customers.DeleteObject(customer);
Navigating Entity Associations
Of course, working with data rarely involves the use of a single table/entity, which is where the navigation properties used by associations are useful indeed. A customer can have one or more addresses, which is modeled in your entity model by the Customer entity having an association with the CustomerAddress entity (a one-to-many relationship), which then has an association with the Address entity (a many-to-one relationship). The navigation properties for these associations make it easy to obtain the addresses for a customer.
Start by using the query from earlier to return a customer entity:
VB
Dim qry = From c In context.Customers
          Where c.CustomerID = 1
          Select c

Dim customer As Customer = qry.FirstOrDefault()
C#
var qry = from c in context.Customers
          where c.CustomerID == 1
          select c;

Customer customer = qry.FirstOrDefault();
You can enumerate and work with the addresses for the entity via the navigation properties like so:
VB
For Each customerAddress As CustomerAddress In customer.CustomerAddresses
    Dim address As Address = customerAddress.Address
    'Do something with the address entity
Next customerAddress
C#
foreach (CustomerAddress customerAddress in customer.CustomerAddresses)
{
    Address address = customerAddress.Address;
    // Do something with the address entity
}
Note how you navigate through the CustomerAddress entity to get to the Address entity for the customer. Because of these associations there’s no need for joins in the Entity Framework.
However, there is an issue here with what you’re doing. At the beginning of the loop, a database query will made to retrieve the customer addresses for the current customer. Then, for each address in the loop, an additional database query will be made to retrieve the information associated with the Address entity! This is known as lazy loading — where the entity model requests data only from the database when it actually needs it. This can have some advantages in certain situations; however, in this scenario it results in a lot of calls to the database, increasing the load on the database server, reducing the performance of your application, and reducing your application’s scalability. If you then did this for a number of customer entities in a loop, that would add even more strain to the system. So it’s definitely not an ideal scenario as is.
Instead, you can request from the entity model when querying for the customer entity that it eagerly loads its associated CustomerAddress entities and their Address entities. This requests all the data in one database query, thus removing all the aforementioned issues, because when navigating through these associations the entity model now has the entities in memory and does not have to go back to the database to retrieve them. The way to request that the model does this is to use the Include method, specifying the path (as a string) of the navigation properties (dot notation) to the associated entities whose data you also want to retrieve from the database at the same time as the actual entities being queried:
VB
Dim qry = From c In context.Customers
                            .Include("CustomerAddresses")
                            .Include("CustomerAddresses.Address")
          Where c.CustomerID = 1
          Select c

Dim customer As Customer = qry.FirstOrDefault()
C#
var qry = from c in context.Customers
                            .Include("CustomerAddresses")
                            .Include("CustomerAddresses.Address")
          where c.CustomerID == 1
          select c;

Customer customer = qry.FirstOrDefault();
ADVANCED FUNCTIONALITY
There’s too much functionality available in the Entity Framework to discuss in detail, but here’s an overview of some of the more notable advanced features available that you can investigate further if you want.
Updating a Database from an Entity Model
It’s possible with the Entity Framework to create an entity model from scratch, and then have the Entity Framework create a database according to your model. Alternatively, you can start with an existing database, but then get the Entity Framework to update the structure of your database based on the new entities/properties/associations that you’ve added to your entity model. To update the structure of the database based on additions to your model, you can use the Generate Database Wizard by right-clicking the designer surface and selecting the Generate Database from Model menu item.
Adding Business Logic to Entities
Though you are fundamentally building a data model with the Entity Framework rather than business objects, you can add business logic to your entities. The entities generated by the Entity Framework are partial classes, enabling to you extend them and add your own code. This code may respond to various events on the entity, or it may add methods to your entity that the client application can use to perform specific tasks or actions.
For example, you might want to have the Product entity in your AdventureWorks2014 entity model automatically assign the value of the SellEndDate property when the SellStartDate property is set (only if the SellEndDate property does not have a value). Alternatively, you may have some validation logic or business logic that you want to execute when the entity is being saved.
Each property on the entity has two partial methods that you can extend: a Changing method (before the property is changed) and a Changed method (after the property is changed). You can extend these partial methods in your partial class to respond accordingly to the value of a property being changed.
Plain Old CLR Objects (POCO)
One of the big complaints with the first version of the Entity Framework was that your entities had to inherit from EntityObject (or implement a set of given interfaces), meaning that they had a dependency on the Entity Framework — which made them unfriendly for use in projects where test-driven development (TDD) and domain-driven design (DDD) practices were employed. In addition, many developers wanted their classes to be persistence ignorant — that is, contain no logic or awareness of how they were persisted.
By default, the entities generated from the Entity Model Data Wizard in the Entity Framework v6 still inherit from EntityObject, but you now have the ability to use your own classes that do not need to inherit from EntityObject or implement any Entity Framework interfaces, and whose design is completely under your control. These types of classes are often termed Plain Old CLR Objects, or POCO for short.
Entity Framework Core
A lot of work has been invested into making .NET applications (or a subset of .NET applications, actually) work across different platforms. As part of this effort, Microsoft released Entity Framework Core for use in .NET Core applications. This is a lightweight, cross-platform version of Entity Framework 6.0. There is some missing functionality, but the vast majority of features carry across.
If you are thinking about upgrading from Entity Framework Core to Entity Framework 6.0, you might want to reconsider. Although the name (“Entity Framework”) and the classes are the same, the namespace is different. And, in reality, they are different products even if they fulfill the same function. In fact, it’s possible to use both Entity Framework and Entity Framework Core in the same project. From that standpoint, any move from one version to the other could reasonably be considered to be a port and not an upgrade.
SUMMARY
In this chapter you learned that the Entity Framework is an Object Relational Mapper (ORM) that enables you to create a conceptual model of your database to interact with databases in a more productive and maintainable manner. You then learned how to create an entity model and how to write queries against it in code.