
Now we can take our knowledge of tables and expand our WDTU application. Our base Radio Show table needs to be added to and modified. We also need to create and reference additional tables.
Although we want to have a realistic design in our sample application, we will focus on changes that illustrate the features in the NAV table design which the authors feel are among the most important. If there are capabilities or functionalities that you feel are missing, feel free to add them. Adjust the examples as much as you wish to make them more meaningful to you.
In Chapter 1, An Introduction to NAV 2015, we created the Radio Show table for the WDTU application. At that time we used the minimum fields that allowed us to usefully define a master record. Now, let's set properties on existing data fields, add more data fields, and create an additional data table to which the Radio Show table can refer.
Our new data fields are shown in the following layout table:
|
Field No. |
Field Name |
Description |
|---|---|---|
|
1000 |
Frequency |
An Option data type (Hourly, Daily, Weekly, Monthly) for the frequency of a show; Hourly to be used for a show segment such as news, sports, or weather that is scheduled every hour. A space/blank is used for the first option to allow a valid blank field value. |
|
1010 |
PSA Planned Quantity |
A number (stored as an Integer) of Public Service Announcements to be played per show; this will be used by playlist generation and posting logic. |
|
1020 |
Ads Planned Quantity |
A number (stored as an Integer) of advertisements to be played per show; this will be used by playlist generation and posting logic. |
|
1030 |
News Required |
Is headline news required to be broadcast during the show (a Boolean)? |
|
1040 |
News Duration |
The duration (stored as a Duration) of the news program embedded within the show. |
|
1050 |
Sports Required |
Is sports news required to be broadcast during the show (a Boolean)? |
|
1060 |
Sports Duration |
The duration (stored as a Duration) of the sports program embedded within the show. |
|
1070 |
Weather Required |
Is weather news required to be broadcast during the show (a Boolean)? |
|
1080 |
Weather Duration |
The duration (stored as a Duration) of the weather program embedded within the show. |
|
1130 |
Date Filter |
A date FlowFilter (stored as a |
After we have completed our Radio Show table, it will look like the following image:

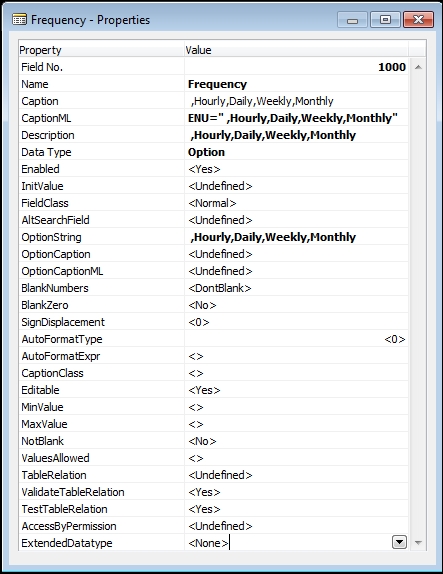
Next we need to fill the OptionString and Caption properties for the Option field Frequency. Highlight the Frequency field, then click on the Properties icon or press Shift + F4. Enter the values for the OptionString property as shown in the next screenshot; don't forget to include the leading space followed by a comma to get a space/blank as the first option. Be sure to copy and paste the same information to the OptionCaption property. The OptionCaptionML property will be filled in automatically with a copy of that information (since we do not have a second language installed). Note that the properties that have been changed from the default are displayed in bold. This new feature makes it much easier for developers to see what properties have been modified.
Next we want to define the reference table we are going to tie to the Type field. The table will contain a list of the available Radio Show Types such as Music, Talk, Sports, and so on. We will keep this table very simple, with Code as the unique key field and Description as the text field. Both fields will be of the default length as shown in the following layout. Create the new table and save it as Table 50001 with the name of Radio Show Type.
|
Field No. |
Field Name |
Description |
Data Type |
Length |
|---|---|---|---|---|
|
10 |
Code |
Primary key of data type Code |
Code |
10 |
|
20 |
Description |
A text field |
Text |
30 |
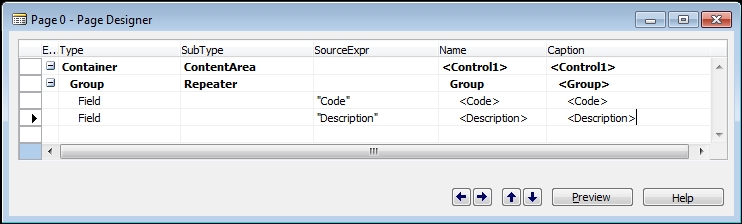
Before we can use this table as a reference from the Radio Station table, we need to create a list page that will be used for both data entry and data selection for the table. We will use Page Designer, and Page Wizard to create a List page. We should be able to do this pretty quickly. Click on Pages, click on the New button, enter 50001 in the Table field (the table field will redisplay the table name), then choose the wizard to create a page type of List.

Populate the page with all the fields from the Radio Show Type table. Our designed page should look like the following screenshot:
Save the page as number 50002, and exit Page Designer, naming the page Radio Show Types. Test the page by highlighting it in the Object Designer, then clicking on the Run button. The new page will be displayed. While the page is open, enter some data (by clicking on New) such as the examples shown in the following screenshot:

Now we'll return to the Radio Show Type table and set the Table's Properties for LookupPageID and DrillDownPageID to point to the new page we have just created. As a reminder, we will use Design to open the table definition, then focus on the empty line below the description field, and either click on the Properties icon or press Shift + F4.
In the value for each of the two PageID properties, we can either enter the page name (Radio Show Types) or the page number (50002). Either entry will work, but as you can see in the following screenshot, the appearance depends on what you enter:
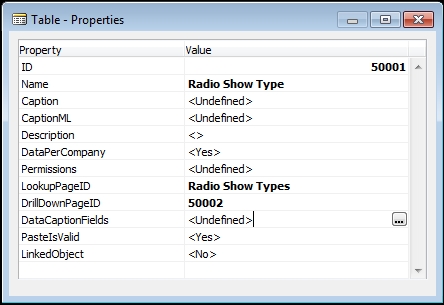
After the table has been saved, the next time we view these two PageID properties, they look like the following image:
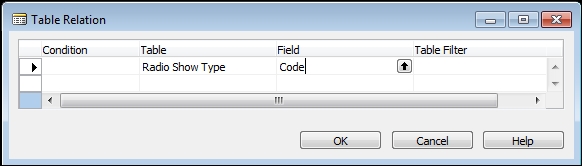
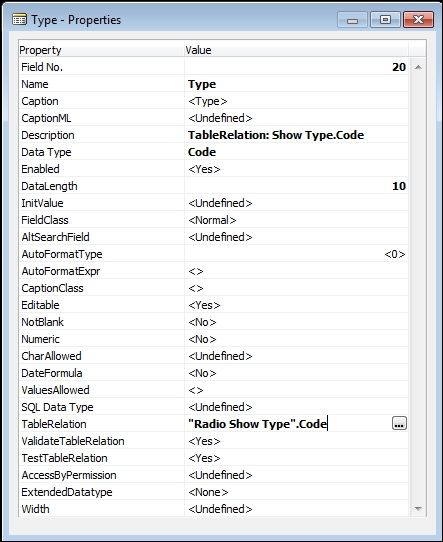
Finally, we open the Radio Show table again by highlighting the table line and clicking on the Design button. This time highlight the Type field and access its Properties screen. Highlight the TableRelation property and click on the ellipsis button (the three dots). We see the Table Relation screen with four columns, as shown in the following image. The middle two columns are headed Table and Field. In the top line in the Table column, enter 50001 (the table number) or Radio Show Type (the table name). In the same line, in the Field column, click on the up-arrow button and choose Code.
We exit the Table Relation screen (by clicking the OK button) and return to the Type - Properties page that looks like the following image. Save and exit the modified table.
To check that TableRelation is working properly, we could run the Radio Show table (that is, highlight the table name and click on the Run button). We could also run the Radio Show List page and have almost exactly the same view of the data. This is because the Run of a table creates a temporary list page which includes all the fields in the table: thus, it contains the same data fields as the page we created using the Page Wizard. In either one, we should highlight the Radio Show Type field and click on the drop-down arrow to view the list of available entries. The following image is of our Radio Show List page; you should also try it using the Run function on the Radio Show table:

If all has gone according to plan, the Radio Show Type field will display a drop-down arrow (the downward pointing arrowhead button). Whether we click on that button or press F4, we will invoke the drop-down list for the Radio Show Type table, as shown before.
Another property we can define for several of the Radio Show fields is InitValue. WDTU has a standard policy that news, sports, and weather be broadcast for a few minutes each at the beginning of every hour in the day. We want the Boolean (Yes/No) fields for News Required, Sports Required, and Weather Required to default to Yes. We also want the default time value of the News Duration, Sports Duration, and Weather Duration to be 2 minutes, 2 minutes, and 1 minute, respectively. That way the first 5 minutes of every hour can be spent on keeping the listeners informed of the latest happenings.
Setting the default for a field to a specific value simply requires setting the InitValue property to the desired value. In the case of the "Required" Boolean fields, that value is set to Yes. Using the Table Designer, we must Design the Radio Station table, and access the Properties screen for the News Required field. Repeat this for the Sports Required and Weather Required fields. After we have filled in the values for the three fields, exit the Properties screen, exit Table Designer, and save the changes.
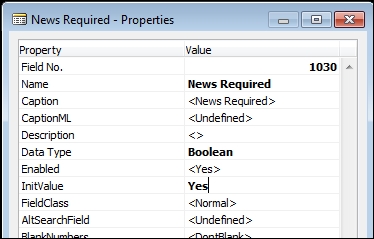
In the case of the "Duration" fields, we will set InitValue to 2 minutes each for News Duration and Sports Duration, and 1 minute for Weather Duration. Duration fields require both the time span numeric and the time unit of measure (seconds, minutes, hours, and so forth). Our entries will look like 2 minutes (or 2 minute, both are acceptable).
Our WDTU organization is a profitable and productive radio station. We track historical information about our advertisers, royalties owed, and listenership. We track the music that is played, the rates we charge for advertisements based on the time of day, and we provide a public service by broadcasting a variety of government and other public service announcements.
We aren't going to cover all these features and functions in the following detailed exercises. However, it's always good to have a complete view of the system on which we are working, even if we are only working on one or two components. In this case, the parts of the system not covered in detail in our exercises will be opportunities for you to extend your studies and practice on your own.
Any system development should start with a Design Document that completely spells out the goals and the functional design details. Neither system design nor project management will be covered in this book, but when we begin working on production projects proper attention to both of these areas will be critical to success. Use of a proven project management methodology can make a project much more likely to be on time and within budget.
Based on the requirements our analysts have given us, we need to expand our application design. We started with a Radio Show table, one reference table (Radio Show Type), and pages for each of them. We earlier entered some test data and added a few additional fields to the Radio table (which we will not add to our pages here).
Now we will add a supplemental table, document (header and line) tables, plus a ledger (activity history) table relating to Playlist activities. Following that, we will also create some pages for our new data structures.
Our WDTU application will now include the following tables:
- Radio Show: A master list of all programs broadcast by our station.
- Radio Show Type: A reference list of possible types of radio shows.
- Playlist Header: A single instance of a Radio Show with child data in the form of Playlist Lines.
- Playlist Line: Each line represents one of a list of items and/or durations per Radio Show.
- Playlist Item Rate: A list of rates for items played during a show as determined by our advertising sales staff or the royalty organization we use.
- Radio Show Ledger: A detailed history of all the time spent and items played during the show, with any related royalties owed or advertisement revenue expected.
- Listenership Ledger: A detailed history of estimated listenership provided by the ratings organization to which we subscribe.
- Publisher: A reference list of the publishers of content that we use. This will include music distributors, news wires, sports and weather sources, as well as WDTU (we use material that we publish).
Remember, one purpose of this example system is for you to follow along in a hands-on basis in your own system. You may want to try different data structures and other object features. For example, you could add functionality to track volunteer activity, perhaps even detailing the type of support the volunteers provide.
For the best learning experience, you should be creating each of these objects in your development system to learn by experimenting. In the course of these exercises, it will be good if you make some mistakes and see some new error messages. That's part of the learning experience. A test system is the best place to learn from mistakes, at the minimum cost.
First, we create a Playlist Header table (Table number 50002), which will contain one record for each scheduled Radio Show:

Then we will create the associated Playlist Line table (Table number 50003). This table will contain the child records for the Playlist Header table. Each Playlist Line record represents one scheduled piece of music, advertisement, public service announcement, or embedded show within the scheduled Radio Show, as defined in the Playlist Header table. The description for each of the Option fields shows the information that needs to be entered into the OptionString, OptionCaption, and OptionCaptionML properties for those fields.

Now we'll create our Playlist Item Rate table. These rates include both what we charge for ad time and what we must pay in royalties for material we broadcast.

A Ledger table contains the detailed history of processed activity records. In this case, the data is a detailed history of all the Playlist Line records for previously broadcast shows.

Now we'll create one more Ledger table to retain the data we receive from the listenership rating service.

Finally, the last new table definition for now, our Publisher table, is shown in the next screenshot:

Each of the new tables we have created should be supported with an appropriately named List Page. As part of our WDTU project work, we should create the following pages:
- 50003 Playlist Document
- 50005 Playlist Item Rates
- 50006 Radio Show Ledger
- 50007 Listenership Ledger
- 50008 Publishers
Thus far, we have created basic table definitions and associated pages for the WDTU project. The next step is to flesh out those definitions with additional keys, SIFT field definitions, table relations, and so on. The purpose of these are to make our data easier and faster to access, to take advantage of the special features of NAV to create data totals and to facilitate relationships between various data elements.
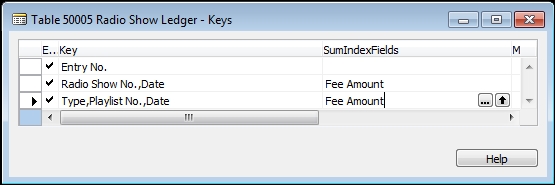
The Playlist Line table default primary key was the one field Playlist No. In order for the primary key to be unique for each record, another field is needed. For a Line table, the additional field is the Line No. field which is incremented via the C/AL code for each record. So we'll change the key for table 50003 accordingly.

We know a lot of reporting will be done based on the data in the Radio Show Ledger. We also know that we want to report on data by Radio Show and by the Type of entry (individual song, specific ad, and so on). So we will add secondary keys for each of these, including the Date field so we can rapidly filter the data by Date. The reporting that is financial in nature will need totals for the Fee Amount field, so we'll put that in the SumIndexFields column for our new keys.
We know that to do the necessary Listenership analysis, the Listenership Ledger needs an additional key combined with SumIndexFields for totaling listener statistics.

To utilize SumIndexFields we have just defined, we will need to define corresponding FlowFields in other tables. We will leave that part of the development effort for the next chapter where we are going to discuss Fields, Flowfields, and FlowFilters in detail.
For those tables where we defined fields intended to refer to data in other tables for lookups and validation, we must define the relationships in the referring tables. Sometimes these relationships are complicated, dependent on other values within the record.
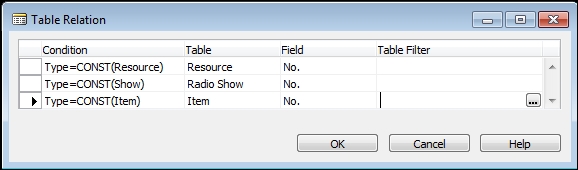
In Table 50003, Playlist Line, we have the field No. If the Type field contains Resource, then the No. field should contain a Resource No. If the Type field contains Show, then the No. field should contain a Show Code. And, if the Type field contains Item, the No. field should contain an Item No. The pseudo-code (approximate syntax) for that logic can be written as:
IF Type = 'Resource' THEN No. := Resource.No.
  ELSE IF Type = 'Show' THEN No. := Radio Show.No.
    ELSE IF Type = 'Item' THEN No. := Item.No.
Fortunately, a tool built into the C/SIDE editor makes it easy for us to build that complex logic in the TableRelation property. When we click on the TableRelation property, then click on the ellipsis button (three dots), we get a Table Relation screen we can use to construct the necessary logic structure:
When we exit the Table Relation screen by clicking on the OK button, the TableRelation line looks like the following image:
Table 50004, Playlist Item Rate, has a similar Table Relation requirement for the field No. in that table. In this case, the No. field will refer to Vendor No. if Type = Vendor, or to the Customer No. if Type = Customer.
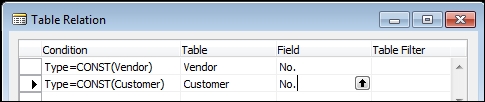
When we exit the Table Relation screen this time (by clicking on the OK button), the TableRelation line looks like the following image:

If in the process of making these changes (or some future changes), we realize that we need to change the Data Type of a field and try to do so, we may get the following error message:

The intent of this message is to keep us from unintentionally deleting or corrupting data through a change in the table definition. After checking that we really aren't going to make that mistake, perhaps making a backup of the data about to be affected, we can override the system's error checking and force the change to be done by choosing the Synchronize Schema. The Force option in the Save Changes screen as shown following.

One of the big advantages to the NAV system development environment is the fact that we are allowed to enhance the tables that are part of the standard product. Many package software products do not provide this flexibility. Nevertheless, with privilege comes responsibility. When we modify a standard NAV table, we must do so carefully.
In our system, we are going to use the standard Item table – Table 27, to store data about recordings such as music, advertisements, and PSAs which we have available for broadcast. One of the new fields will be an Option field. Another will refer to the Publisher table we created earlier. When the modifications to the Item table design are completed, they will look like the following image:
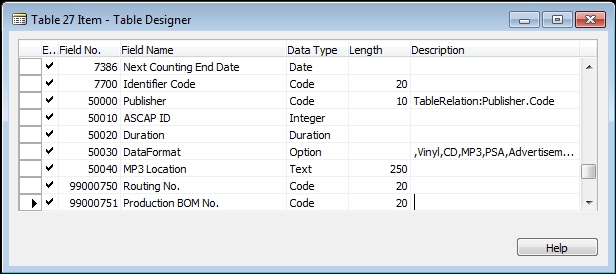
Note that we were careful not to touch any of the standard fields that were already defined in the Item table. Plus, we numbered all our new fields in the range of 50000 to 99999, making them easy to identify as belonging to a Partner modification.
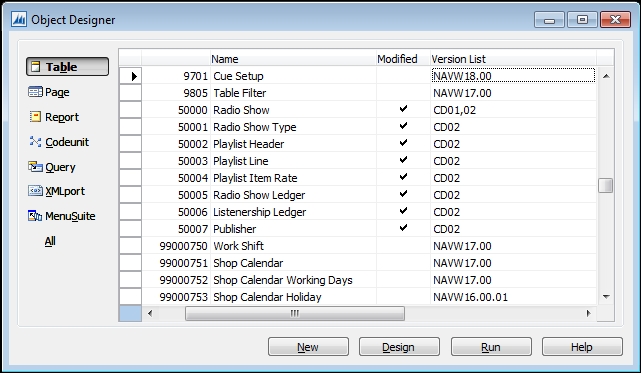
In Chapter 1, An Introduction to NAV 2015, we mentioned the importance of good documentation; one component being the assignment of version numbers to modifications and enhancements. Frequently, modifications are identified with a combination letter number code, the letters indicating who did the modification (such as the NAV Partner initials—or, in this case, the book authors' combined initials) and a sequential number for the specific modification. Our Partner initials are CD, so all our modifications will have a version number of CDxx. We will use the Chapter number of this book for the sequential number, such as:
- CD01 – Chapter 01
- CD02 – Chapter 02
- CD01, 02 – Chapters 01 and 02
When applied to the table objects we have created so far, our Version List entries look like the following for the tables (Table 27 Item not shown):
Similar version numbers should be assigned to the pages and reports that have been created thus far.
When working on a customer's system, a more general purpose versioning structure should be used in the same general format as the one used by Microsoft for the product. Such a structure would be in the format CD8.00.01 (CD company, NAV version 8, minor version 00 (no Service Pack), build 01). The next release of objects would then be CD8.00.02. In the Documentation trigger, there should be a sequential list of changes showing each incremental version followed by a list of all the features implemented for that version. This approach provides a standardized Version list externally and the full detail of changes internally. Done properly and combined with good external documentation describing the reasons and intended outcomes of each modification, the result is a system that is much easier to maintain.