Filtering is one of the most powerful tools within NAV. Filtering is the application of defined limits on the data that is to be considered in a process. When we apply a filter to a Normal data field, we will only view or process records where the filtered data field satisfies the limits defined by the filter. When we apply a filter to a FlowField, the calculated value for that field will only consider data that satisfies the limits defined by the filter. Filter structures can be applied in at least three different ways, depending on the design of the process.
The first way is for the developer to fully define the filter structure and the value of the filter. This can be done in a report designed to show information on only a selected group of customers, such as those with an unpaid balance. The Customer table would be filtered to report only customers who have an outstanding balance greater than zero.
The second way is for the developer to define the filter structure, but allow the user to fill in the specific value to be applied. This approach would be appropriate in an accounting report that was to be tied to specific accounting periods. The user would be allowed to define the periods to be considered for each report run.
The third way is the ad hoc definition of a filter structure and value by the user. This approach is often used for general analysis of ledger data where the developer wants to give the user total flexibility in how they slice and dice the available data.
It is common to use a combination of the different filtering types. For example, the report just mentioned lists only customers with an open Balance (via a developer-defined filter) could also allow the user to define additional filter criteria. If the user wants to see only Euro currency customers, they would filter on the Customer Currency Code field.
Filters are an integral part of the implementation of both FlowFields and FlowFilters. These flexible, powerful tools allow the NAV designer to create pages, reports, and other processes that can be used under a wide variety of circumstances. In most competitive systems, standard user inquiries and processes are quite specific. The NAV C/AL toolset allows us to have relatively generic user inquiries and processes; it then allows the user to apply filtering to generate results that fit their specific needs.
The user sees FlowFilters filtering referred to as Limit Totals onscreen. Application of filters and ranges may give varying results depending on Windows settings or the SQL Server collation setup. A good set of examples of filtering options and syntax can be found in Developer and IT Pro Help in the section titled Entering Criteria in Filters.
Now, it's time for some experimenting with filters. We want to accomplish a couple of things through our experimentation. First, get more comfortable with how filters are entered, and second, see the effects of different types of filter structures and combinations. If we had a database with a large volume of data, we could also test the speed of filtering on fields in keys and fields not in keys. However, the amount of data in the basic Cronus database is small, so any speed differences will be difficult to see in these tests.
We could experiment on any report that allows filtering. A good report for this experimentation is the Customer/Item List. This reports which Customer purchased what items. The Customer/Item List can be accessed on the Role Tailored Client Departments menu by navigating to Sales & Marketing | Sales | Reports | Customer | Customer/Item Sales.
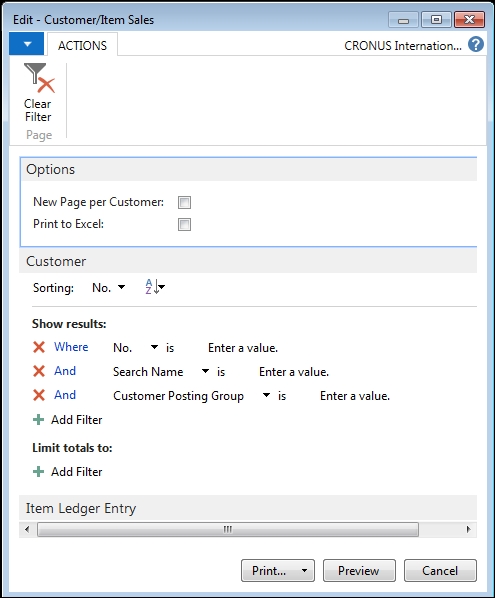
When we initially run Customer/Item Sales, we will see just three data fields listed for the entry of filters on the Customer table, as shown in the following screenshot:
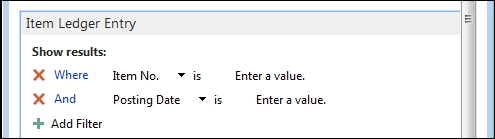
There are also two data fields listed for the entry of filters on the Item Ledger Entry table, as shown in the following screenshot (which has the Item Ledger Entry FastTab that can be expanded by clicking on it so we can see its predefined filter entry options):
For both the Customer and Item Ledger Entry, these are the fields that should be emphasized as per the developer of this report. If we run the report without entering any filter constraints at all, using the standard Cronus data, the first page of the report will resemble the following:

If we want to print information only for customers whose names begin with the letter A, our filter will be very simple, similar to the following screenshot:

The resulting report will be similar to the following screenshot and show only the data for the two customers on file whose names begin with the letter A:

If we want to expand the customer fields to which we can apply filters, we can access the full list of other fields in the customer table. We can either click on the drop-down symbol next to a filter field that is not already in use or click on the Add Filter button to add a new filter field with a drop-down list access. If the number of fields available for filtering is longer than what the initial list display allows, the bottom entry in the list is Additional Columns. If we click on that, we might end up with a display like the following. Note that the lists are in alphabetical order, based on the field names. If the list of available fields is too long to display in the second column, that column can be scrolled up and down.

From these lists, we can choose one or more fields and then enter filters on those fields. If we choose Territory Code, for example, then the Request Page would look similar to the following screenshot. And, if we clicked on the lookup arrow in the Filter column, a screen would pop up, allowing us to choose from the data items in the related table—in this case, Territories:

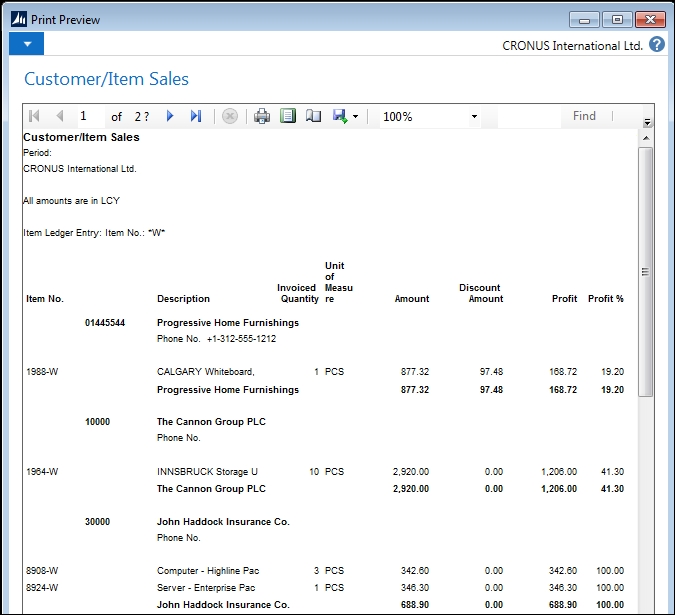
This particular Request Page has FastTabs for each of the two primary tables in the report. Click on the Item Ledger Entry FastTab to filter the Item-related data. If we filter on the Item No. for item numbers that contain the letter W, the report will be similar to the following screenshot:
Tip
Downloading the example code.
You can download the example code files from your account at http://www.packtpub.com for all the Packt Publishing books you have purchased. If you purchased this book elsewhere, you can visit http://www.packtpub.com/support and register to have the files e-mailed directly to you.
If we want to see all of the items containing either the letter W or the letter S, our filter would be *W* | *S*. If we made the filter W | S, then we would get only entries that are exactly equal to W or S because we didn't use any wildcards.
You should go back over the various types of filters that we discussed and try each one and try them in combination. Get creative! Try some things that you're not sure may work and see what happens. Explore a variety of reports or list pages in the system by applying filters to see the results of your experiments. A good page on which to apply filters is the Customer List (Sales & Marketing menu | Sales | Customers). This filtering experimentation process is safe (you can't hurt anything or anyone) and a great learning experience.
NAV 2015 has two very different approaches to set up filtering—one for the Development Environment and the other for the Role Tailored Client. Since we develop in the former, we will briefly cover filtering there. As we target our development for use in the Role Tailored Client, we need to be totally comfortable with filtering there; that is the interface for our users.
There are four buttons at the top of the screen that relate to filtering; there is another one to choose the active key (that is, current sort sequence). Depending on the system configuration (OS and setup), they will look similar to those in the following screenshot:
From left to right, they are:
- Field Filter (F7): To highlight a field, press F7 (or select View | Field Filter), and the data in that field will display as being ready for us to define a filter on that data field. We can freely edit the filter before clicking on OK.
- Table Filter (Ctrl + F7): Press the Ctrl key and F7 simultaneously (or select View | Table Filter). We will get a screen that allows us to choose fields in the left column and enter related filters in the right column. Each filter is the same as would have been created by using the Field Filter option. The multiple filters for the individual fields are ANDed together (that is, they all apply simultaneously). If we invoke the Table Filter form when any Field Filters are already applied, they will be displayed in the form.
- Flow Filter (Shift + F7): Since we cannot view any data containing FlowFields in the Development Environment, using the Flow Filter in the Development Environment is not useful.
- Show All (Shift + Ctrl + F7): This will remove all Field Filters, but it will not remove any Flow Filters.
- Sort (Shift + F8): This allows us to choose key that is active on a displayed data list.
When we are viewing a set of data (such as a list of objects) and want to check whether any filters are in effect, we should check the bottom of the screen for the word FILTER.
The method of accessing fields to use in filtering in the Role Tailored Client (RTC) is quite different from that in the Development Environment.
When a page such as the Customer List is opened, the filter section at the top of the page looks like the following screenshot. On the upper-right corner is a place to enter single-field filters. This is the Type to filter (also referred to as Quick), which is essentially equivalent to the Field Filter in the Development Environment. The fields available for filtering are the same as the visible columns showing in the List.
If we click on the chevron circle button in the upper-right corner to expand the Filter Pane, the result will look similar to the following screenshot. This filter display includes an additional filtering capability, Show Results, that allows entry of filters of the Limit Totals to type:

If we go to the Filter Pane header line (where the Page's Menu Caption is Customers in this page) and click on the drop-down symbol, we will see a set of selection options (the filter menu), similar to that in the following screenshot. The Advanced filter provides for the entry of multiple Field Filters (essentially the same as the Development Environment Table Filter). The Limit Totals filter provides for the entry of FlowFilter constraints.
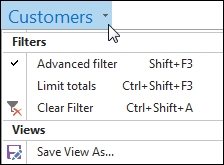
This is one of two places in which we can clear filters of all types (we can also enter Ctrl + Shift + A as indicated in the filter menu). The Save View As… option allows the user to save the filtered view, name it, and add it to an Activity Group in the Navigation pane. The following image shows a series of Saved Views on Sales Orders (most of them are out of the box). The Euro Orders entry is a Saved View created by a user.

If we click on Limit Totals (or press Ctrl + Shift + F3), the Limit Totals to: portion of the Filter pane will be displayed. When we click on the drop-down arrow, we will get a list of all the FlowFields to which we can apply one or more Limit totals (FlowFilters).
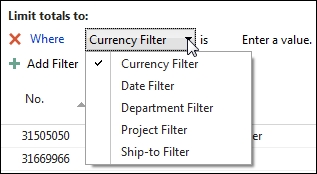
Depending on the specific page and functional area, Flowfield filtering can be used to segregate data on Dimension fields. For example, in the page shown in the preceding screenshot, we can filter data regarding a single Department or Project (both of which are Dimension fields), a range of Departments or Projects, or a range of Customer Ship-to locations.