
Now we're going to add some C/AL code to objects we've created for our WDTU application.
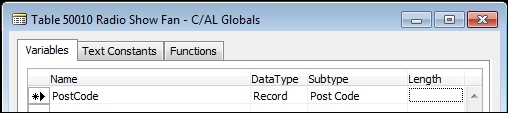
In Chapter 4, Pages – the User's Interactive Interface, we created Table 50010 – Radio Show Fan. We've decided that we want to be able to use this list for promotional activities such as having drawings for concert tickets. Of course we want to send the tickets to the winners at their mailing addresses. We didn't originally include those fields in our table design, so must add them now. To keep our design consistent with the standard product, we will model those fields after the equivalent ones in Table 18 – Customer. Our updated Table 50010 will look as shown in the following screenshot:

Part of modeling our Table 50010 – Radio Show Fan fields on those in Table 18 – Customer is faithfully copying the applicable properties. For example, the TableRelation property for the Post Code field in Table 18 contains the following, which we should include for the Post Code in Table 50010:
IF (Country/Region Code=CONST()) "Post Code" ELSE IF (Country/Region Code = FILTER(<>' ' ) "Post Code" WHERE (Country/Region Code = FIELD (Country/Region Code))
When a Radio Show Fan record is added or the Post Code field is changed, we would like to update the appropriate address information. Let's start with some code in a Validation trigger of our table.
Since we modeled the address fields for our Fan record on the standard Customer table, let's look at the Customer table to see how Post Code validation is handled there. We can access the code through the Table Designer via Object Designer | Table | select Table 18 - Customer | Design | select Field 91 - Post Code | F9. We would see the following:

Looking at this C/AL code, we can see that the OnValidate trigger contains a call to a function in another object identified as PostCode. To find out what object PostCode actually is, we need to look in C/AL Globals (which we have sometimes referred to in this book as part of Working Storage).
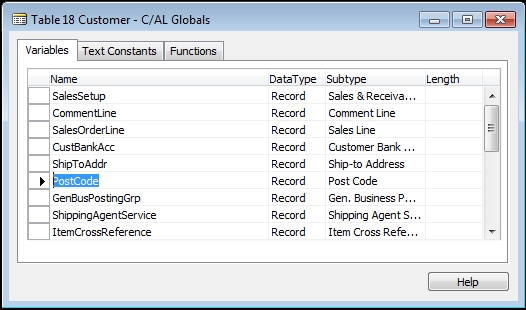
We see that PostCode is a reference to the Record (that is, table) Post Code. This is sort of like a treasure hunt at a birthday party. Now we follow that clue to the next stop, the Post Code table and the ValidatePostCode function that is used in the Customer Post Code validation trigger. To learn as much as we can about how this function works, how we should call it, and what information is available from the Post Code table (table 225), we will look at several things:
Following are the screenshots for all these areas.
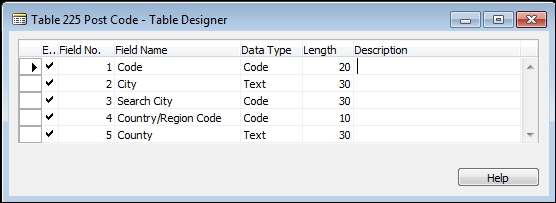
First, the field list in Table 225—Post Code:
Next, the C/AL code for the ValidatePostCode function:

Now, the list of callable functions available within the Post Code table (this isn't critical information but helps us better understand the whole picture of the structure):

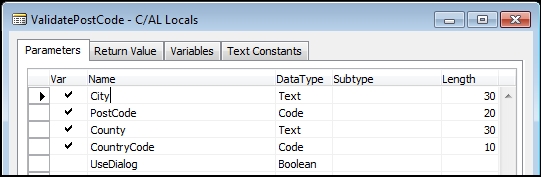
Next, a look at the calling Parameters for the ValidatePostCode function:
Finally, the Return Value for the ValidatePostCode function:
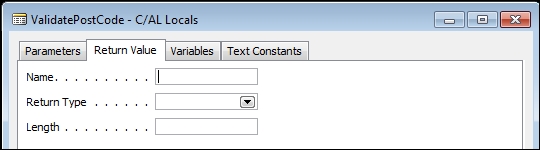
Doing some analysis of what we have dissected, we can see that the ValidatePostCode function call uses five calling Parameters. There is no Return Value. The function avoids the need for a Return Value by passing four of the Parameters by Reference (not by Value) as we can tell by the checkmark in the Var column. The function code updates the parameters that reference the data elements in the calling object. This interpretation is reinforced by studying the ValidatePostCode
function C/AL code as well.
We conclude that we can just copy the code from the Post Code OnValidate trigger in the Customer table into the equivalent trigger in our Fan table. This will give us the Post Code maintenance we want. The result looks as shown the following screenshot (the variable CurrFieldNo is a System-Defined Variable leftover from previous versions retained for compatibility reasons):

If we press F11 at this point, we will get an error message indicating that the variable PostCode has not been defined.

Obviously, we need to attend to this. The answer is shown in the next screenshot in the form of the PostCode Global Variable definition:
After we save this change (by simply moving focus from the new line of code to another line on the form or closing the form), press F11 again. We should get no reaction other than a brief cursor blink when the object is compiled.
Because we haven't created a page for maintenance of Table 50010, we will test our work by Running the table. All we need to do is move to the Post Code field, click on it, and choose an entry from the displayed list of codes. The result should be the population of the Post Code field, the Country/Region Code field, and the City field. If we fill in the new data fields for some Fan records, our Radio Show Fan table would look like the following screenshot:

We've accomplished our goal. The way we've done it may seem disappointing. It didn't feel like we really designed a solution or wrote any code. What we did was find where in NAV the same problem was already solved, figured out how that solution worked, cloned it into our object, and we were done.
Each time we start this approach, first we should look at the defined Patterns (https://community.dynamics.com/nav/w/designpatterns/105.nav-design-patterns-repository.aspx) to see if any Patterns fit our situation. The benefit of starting with a Pattern is that the general structural definition has been defined for how this function should be done within NAV. Whether you find a matching Pattern or not, the next step is to find and study the applicable C/AL code within NAV.
Obviously, this approach doesn't work every time. But every time it does work is a small triumph of efficiency. This helps us to keep the structure of our solution consistent with the standard product, reuse existing code constructs, and minimize the debugging effort and chances of production problems. In addition, our modifications are more likely to work even if the standard base application function changes in a future version.
Most reports require some embedded logic to process user selected Options, calculate values, or access data in related tables. To illustrate some possibilities, we will extend our WDTU application to add a new report.
To support promotions giving away posters, concert tickets, and so on, we must further enhance the Radio Show Fan table and create a new report to generate mailing information from it. Our first step is to create a New report in the C/SIDE Report Designer, then define the data fields we want to include for mailings (including a Global variable of CountryName), and then Save and Compile the result as Report 50002 – Fan Promotion List.

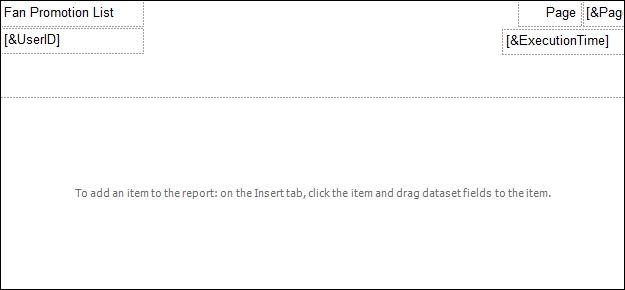
Next, we will begin the design of the report layout in the SQL Server Report Builder (SSRB). From the C/SIDE RD, we click on View | Layout to open SSRB, ready to begin work on our layout. We'll begin by defining a report header.
Right-click in the layout work area (in the middle of the screen display), click on Insert, and then select Page Header. On the left-side of the menu, ReportData is displayed. Click on Datasets to display DataSetResult. Depending on what information we want to appear in the header, we might use fields from various parts of ReportData. If we had defined a Label to use for our Report Header, we could have done a drag-and-drop from the Label in the Parameters list. However, in our example, we dragged in a Text Box from the menu ribbon, which we placed in the upper left corner of the layout work area. We then typed a report name into that text box. Most of the other header fields were brought in from the Report Data Built-in Fields section. We used the Execution Time, Page Number, and User ID fields. We added another Text Box for the word Page in front of the Page Number.
Entering text data directly into the SSRB layout for heading labels (as we did here with the Report Header and Page label) is only appropriate for beginners or for reports that are for very short term use. Good report design practice requires that such values are defined in the C/SIDE RD, where multilanguage is supported and where such fields should be maintained. In C/SIDE RD, these values can be entered and maintained in the Report Label Designer accessed via View | Labels.
In the process of working on this sample report, we might want a different layout, to use Labels or add other features. Feel free to experiment and design your header to suit your own preferences. You will learn by the results of your experiments.
At this point, it's time to save and test what we've done so far. Exit from the Report Builder. Save the report layout changes, exit the C/SIDE RD, and save and compile the report object.
This first test is very simple (assuming it works). Run Report 50002. The Report Request Page will appear in the RoleTailored client. Click Preview to see the Report display onscreen. The layout shown in the preceding screenshot will result in the report page seen in the following screenshot (or something similar):

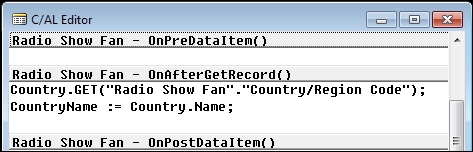
Once we have a successful test of the report (heading only), we'll move on to laying out the body of the report. As we think through the data we want to include in a mailing address (Name, Address, Address 2, City, County (State), Country Name, Post Code), we realize that our table data includes Country Code, not Country Name. So we will look up the Country Name from the Country/Region table (Table 9). Let's take care of that now.
First we'll add a couple of Global Variables to our report. One of them will allow us to access the Country/Region table and the other will act as a holding place for the Country Name data we get from that table.

Each time we read a Radio Show Fan record, we'll look up the country name for that fan and store it in CountryName.
Now we can add the CountryName variable to the list of data elements attached to DataItem Radio Show Fan so it will be included in the data passed to the Report Builder and, when the report is run, to the Report Viewer.
While what we've done will probably work most of the time, how could it be made better? For one thing, shouldn't we handle the situation where there is no Country/Region Code in the fan record? And do we really need to move the country name to a Global variable instead of simply reporting it directly from the Country/Region record?
Both of these issues could be handled better. Look up the GET function in the Help to see what should be done in terms of error handling. And, after we work through the report as we're doing it here, enhance it by eliminating use of the CountryName Global variable. For now, let's just move on to completing an initial version of our report by creating the rest of our report layout in the SSRB.
Open the report layout in the SSRB. From the Ribbon, we'll grab a Table and drag it into the layout work area for the report body. The Table starts with only three columns. After positioning the Table to the top-left of the body, we will add four more columns to accommodate the seven data fields we want to include for each mailing address.
We will drag a data field from the DataSet_Result into each of the Data Row Text Boxes (the bottom row). In the top row, captions will appear. Where we want the displayed captions to be different than what fills in automatically, we'll either type in what we want (not very sophisticated) or delete the default captions and drag in captions from the Parameters list.
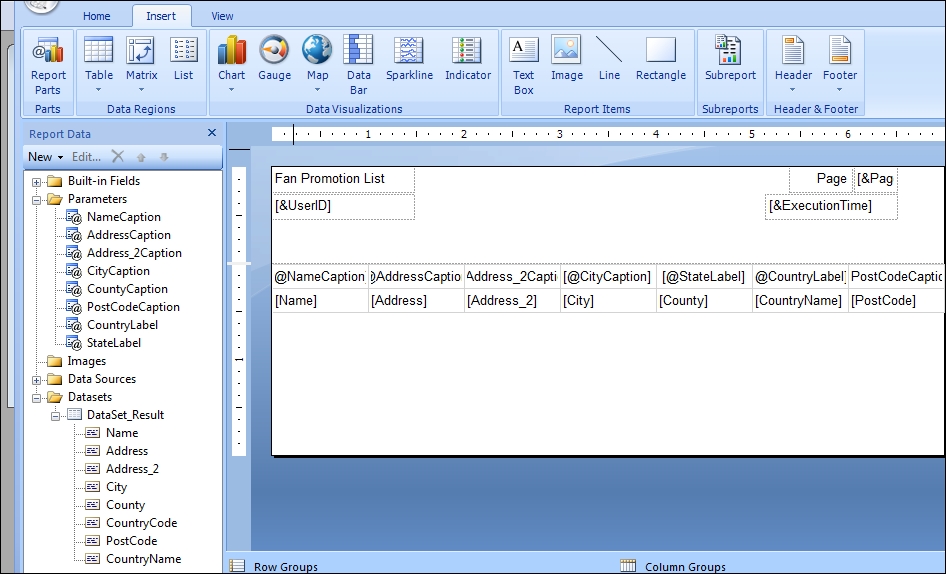
Among our caption options are the CountryLabel and StateLabel we see in the preceding and following images. These are the result of defining Labels in the C/SIDE RD Report Label Designer.

After we lay out, Save and Exit, Update, and Save and Compile, it's time to do another test Run of our report in process. If we simply Preview without doing any filtering, we should see all of our test data address information (complete with Country Name).

Part of our report design includes allowing the user to choose fans based on some simple demographic data based on age and gender. We'll need to add two more fields to our Radio Show Fan table definition, one for Gender and the other for Birth Date, from which we can calculate the fan's age.

Note
This back and forth process of updating first one object, then a different one, then yet another, is typical of the NAV development process much of the time. Exceptions are those cases where either the task is so simple that we think of everything the first time through or the cases where we create a completely documented, full featured design before any development starts (but nobody thinks of everything, there are always changes – our challenge is to keep the changes under control).
An advantage to the more flexible approach we are following is that it allows us to view (and share with others) intermediate versions of the application as it is developed. Design issues can be addressed as they come up and overlooked features can be considered mid-stream. Two downsides are the very real possibility of scope creep (the project growing uncontrollably) and poorly organized code. Scope creep can be controlled by good project management. If the first pass through results in poorly organized code, then a thoughtful refactoring is appropriate, cleaning up the code while retaining the design.
In order for the user to choose which Fan demographics will be used to filter the Fan data for a particular promotion, we will have to create a Request Page for entry of the desired criteria. This, in turn, requires the definition of a set of Global Variables in our Report object to support the Request Page data entry fields and as working variables for the age calculation and Fan selection. We've decided that if a Fan fits any of the individual criteria, we will include them. This makes our logic simpler. Our final Global Variable list in Report 50002 looks as shown in the following screenshot:

