"Language shapes the way we think, and determines what we can think about." | ||
| --Benjamin Lee Whorf | ||
"Quality means doing it right when no one is looking." | ||
| --Henry Ford | ||
So far we have reviewed the basic objects of NAV 2015: tables, data fields, pages, queries, and reports. For each of these, we also reviewed the different triggers in various areas – triggers whose purpose is to be containers for C/AL code. When triggers are "fired" (invoked), the C/AL code within is executed.
In this chapter, we're going to start learning the C/AL programming language. Many of the things you may already know from your experience of programming in other languages. Some of the basic C/AL syntax and function definitions can be found in the embedded NAV 2015 Help (as well as in the MSDN Library sections for Microsoft Dynamics NAV).
As with most of the programming languages, we have considerable flexibility for defining our own model for our code structure. However, when we insert new code within an existing code, it's always a good idea to utilize the model and follow the structure that exists in the original code. When we feel compelled to improve on the model of the existing code, we should do so in small increments and we must take into account the effect of our changes on upgradability.
The goal of this chapter is to help us productively use the C/SIDE development environment and be comfortable in C/AL. We'll focus on the tools and processes that we will use most often. We will also review concepts that we can apply in more complex tasks down the road. This chapter's topics include:
- C/SIDE Object Designers and their navigation
- C/AL Syntax, Operators, and Built-in functions
- C/AL Naming conventions
- Input/Output functions
- Creating custom functions
- Basic Process Flow structures
With a few exceptions, all the development for NAV 2015 applications takes place within the C/SIDE environment. Exceptions include the use of SQL Server Report Builder (or Visual Studio) for reporting (as we saw in Chapter 5, Queries and Reports), plus work we might do in a .NET language to create compatible add-ins. While it is possible to do development using a text editor, it is only appropriate for special cases of modifications to existing objects by an advanced developer.
As an Integrated Development Environment, C/SIDE provides us with a reasonably full set of tools for our C/AL development work. While C/SIDE is not nearly as fully featured as Microsoft's Visual Studio, it is not intended to be a general purpose "one size fits all" development toolkit. Most importantly, C/SIDE and C/AL are designed for NAV compatible business applications software development with many features and functions specifically designed for business applications work.
C/SIDE includes a smart editor (it knows C/AL, though sometimes not as much as we would like), the one and only C/AL compiler, integration with the application database, and tools to export and import objects both in compiled format and as formatted text files.
We'll explore each of these C/SIDE areas in turn, starting with Object Designer.
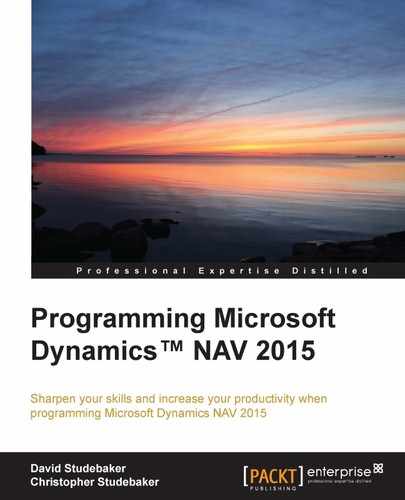
All the NAV object development work starts from within the Microsoft Dynamics Development Environment in the C/SIDE Object Designer. After we have invoked the Development Environment and connected to a NAV database, Object Designer is accessed by selecting Tools | Object Designer or by pressing Shift + F12 keys, as shown in the following screenshot:
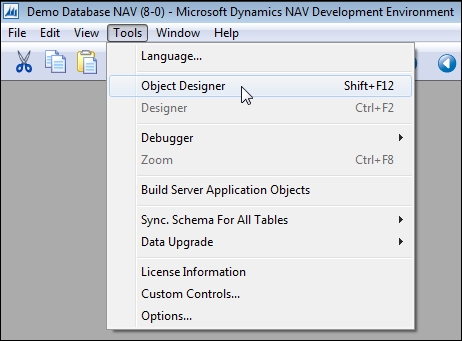
The type of object on which we're going to work is chosen by clicking on one of the buttons on the left side of the Object Designer screen, as shown in the following image:
The choices match the seven object types: Table, Page, Report, Codeunit, Query, XMLport, and MenuSuite. When we click on one of these, the Object Designer screen display is filtered to show only that object type. There is also an All button, which allows objects of all types to be displayed on the screen.
No matter which object type has been chosen, the same four buttons appear at the bottom of the screen: New, Design, Run, and Help. But, depending on which object type is chosen, the effect of selecting one of these options changes. When we select Design, we open the object that is currently highlighted, in a Designer specifically tailored to work on that object type. When we select Run, we are requesting the execution of the currently highlighted object. The results, of course, will depend on the internal design of that particular object. When we select Help, the C/SIDE Help screen will display, positioned at the general Object Designer Help.
When we select New, the screen we see will depend on what type of object has focus (the seven available object types ot Table, Page, Report, Codeunit, Query, XMLport and MenuSuite were introduced in Chapter 1, An Introduction to NAV 2015). In each case, we have the opportunity to create a new object in the Designer used for that object type.
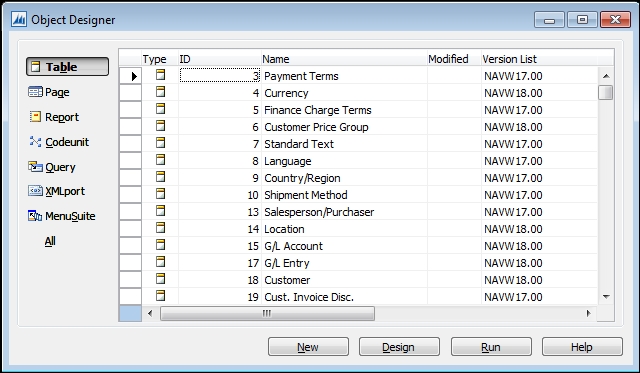
The Table Designer screen for starting a new table is shown in the following screenshot:
The Table Designer screen invites us to begin defining data fields. All the associated C/AL code will be embedded in the underlying triggers and developer-defined functions.
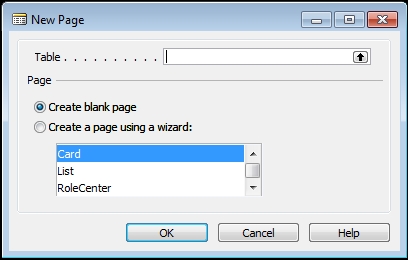
For Page Designer, the first screen for a new page allows us to choose between the Wizard (for assistance) or the Page Designer (to work on our own).
If we use the Wizard, it will walk us through defining FastTabs (collapsible/expandable groups of fields) and assigning fields to those tabs, as we saw in Chapter 4, Pages – the User's Interactive Interface. When we finish with the Wizard, we will be dropped into the Page Designer screen with our page well on the way to completion.
If we choose not to use the Wizard and want to begin designing our page totally on our own, we will select the Create blank page option. The empty Page Designer screen will display. We will do all control and field definition on our own. In either case, the C/AL code we create will be placed in triggers for the Page or its controls.
For a New Report, the following Report Dataset Designer screen is initially displayed:

Since NAV 2015 does not have a Report Wizard, we begin Report development by defining the primary DataItem for our report and continuing from there as we did in Chapter 5, Queries and Reports. All C/AL code in a Report is tied to the Report triggers and controls.
When we access the Codeunit Designer using the New button, a Codeunit structure is opened with C/AL Editor active as shown in the following screenshot:

Codeunits have no superstructure or surrounding framework around the single code OnRun trigger. Codeunits are primarily a shell in which we can place our own functions and code so that it can be called from other objects.
For a New Query, the following screen is displayed:
Much like a new Report, we begin Query development by defining the primary DataItem for our query and continuing from there as we did in Chapter 5, Queries and Reports. All C/AL code in a query is tied to the OnBeforeOpen trigger of the query (this code is often used to apply filters to the Query DataItems using the SETFILTER function).
XMLports are objects for defining and processing text-based data structures, including those which are defined in XML format. XMLports are used to import and export both the XML formatted files and the text files (particularly variations of the .CSV format), but can handle many other text file formats in both delimited and fixed formats. XML is a set of somewhat standardized data formatting rules for dissimilar applications to exchange data. XML-structured files have become an essential component of business data systems.
There is no Wizard for XMLports. When we click New, we proceed directly to the XMLport Designer screen.
Once we become comfortable using C/SIDE and C/AL, we will learn more about XMLports for XML formatted data and other text file formats. XMLports can be run directly from menu entries as well as from within other objects. XMLport objects can also be passed as parameters to web services in a Codeunit function, thus supporting the easy passing of bulk information, such as a list of customers or inventory items.
MenuSuites are used to define the menus that are available from the Departments button in the Navigation pane and which also appear on the Departments page in the NAV Windows client. The initial MenuSuite Designer screen that comes up when we ask for a new MenuSuite, asks what MenuSuite Design Level we are preparing to create. The following screenshot shows all 15 available Design Level values:
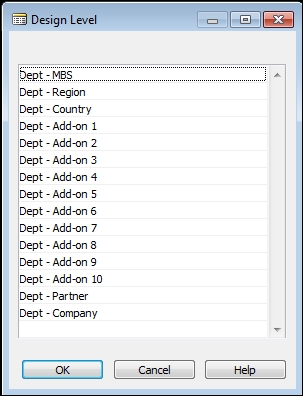
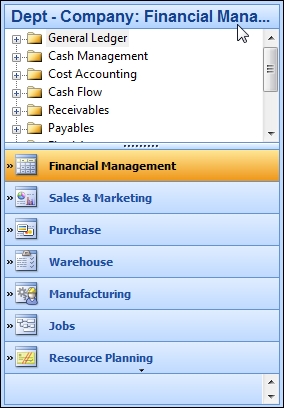
When one of the design levels has been used (created as a MenuSuite option), it will not appear in the list the next time New is selected for the MenuSuite Designer. MenuSuites can only exist at the 15 levels shown in the preceding image, and only one instance of each level is supported. Once we have chosen a level to create, NAV shifts to the MenuSuite Designer mode. The following screenshot shows the navigation pane in Designer mode after selection of Create | Dept - Company:
To add, change, or delete menu entries in the Navigation Pane Designer, highlight and right-click the entry. That will display the following window. The action options visible in this MenuSuite Designer window are dependent on the entry which is highlighted and, sometimes, on the immediate previous action taken.

Descriptions of each of these menu maintenance action options follows:
- Create Item… (Insert): Allows the creation of a new menu action entry (Item), utilizing the same window format for Creation that is displayed when the entry Properties option is chosen
- Insert Items…(Shift + Insert): Allows the insertion of a new instance of a menu action entry, choosing from a list of all the existing entries
- Create Group (Ctrl + Insert): Allows the creation of a new group under which menu action entries can be organized
- Delete (Delete): For deleting either an individual entry or a whole group
- Rename (F2): To rename either an entry or a group
- Move Up (Ctrl + Shift + Up) and Move Down (Ctrl + Shift + Down): Allows moving an entry or group up or down one position in the menu structure
- Cut (Ctrl + X), Copy (Ctrl + C), and Paste (Ctrl + V): Provides the normal cut, copy, and paste functions for both entries and groups
- Properties (Alt + Enter): Displays the applicable property screen
A Group Properties screen only contains Caption and CaptionML along with the Department Page checkmark field. The Item Properties screen looks as shown in the following screenshot:

The Object Type field can be any of Report, Codeunit, XMLport, Page, or Query. The Department field can be Lists, Tasks, Reports and Analysis, Documents, History, or Administration, all of which are groups in the Departments menu.
There are a number of basic differences between the MenuSuite Designer and the other object designers including a very limited property set. One major difference is the fact that no C/AL code can be embedded within a MenuSuite entry.
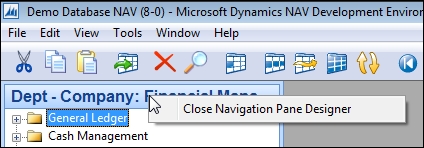
To exit the Navigation Pane Designer, we press the Esc key with focus on the Navigation Pane or right-click on the Navigation Pane Designer heading and select the Close Navigation Pane Designer option as shown in the following image:
We will then be asked if we want to save our changes. We should answer Yes or No or Cancel, depending on what result we want.
In many places in the various designers within the Object Designer, there are standard NAV keyboard shortcuts available. For example:
- F3 to create a new empty entry.
- F4 to delete the highlighted entry.
- F5 to access C/AL Symbol Menu, which shows us a symbol table for the object on which we are working. This isn't just any old symbol table; this is a programmer's assistant. More on this later in this chapter.
- F9 to access the underlying C/AL code.
- F11 to do an on-the-fly compile (very useful for error checking as we go).
- Shift + F4 to access properties.
- Ctrl + X, Ctrl + C, and Ctrl + V in normal Windows mode for deletion (or cut), copy, and paste, respectively.
When we are in a list of items that cannot be modified, for example, C/AL Symbol Menu, we can focus on a column, key a letter, and jump to the next field in the column starting with that letter. This works in a number of places where search is not supported, so it acts as a very limited search substitute, applying only to an entry's first letter.
Tip
The easiest way to copy a complete object to create a new version is as follows:
Open the object in Design mode. Click the File | Save As object, assign a new object number, and change the object name (no duplicate object names are allowed). A quick (mouseless) way to do a Save As is pressing Alt + F , then the A key – continuously holding down the Alt key while pressing first F and then A.
Don't ever delete an object or a field numbered in a range where the license doesn't allow creation of an object. If there isn't a compiled (.fob) back-up copy of the deleted object available for import, the deleted objects will be irretrivably lost.
If we must use an object or field number in the NAV reserved number range for a different purpose other than the standard system assignment (not a good idea), we must make the change in place. Don't try a delete followed by add; it won't work.
Object Export from the Object Designer can be accessed for backup or distribution purposes via File | Export. Choosing this option, after highlighting the objects to be exported, brings up a standard Windows file-dialog screen with the file type options of .fob (NAV object) or .txt, as shown in the following screenshot:
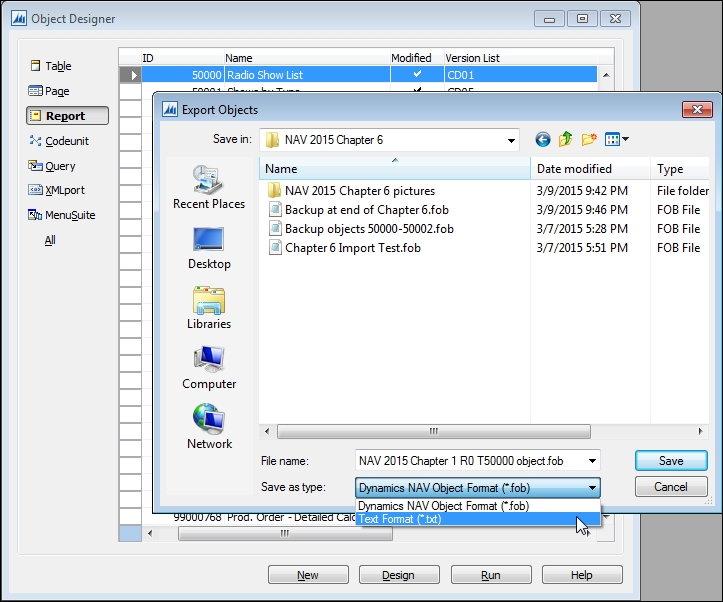
The safer, more general purpose format for exporting is as a compiled object, created with a file extension of .fob. But someone with a developer's license can export an object as a text file with a file extension of .txt. An exported text file is the only way to use a tool such as a text editor to do before and after comparisons of objects, or to search all parts of our objects for the occurrences of strings (such as finding all the places a variable name is used). An object text file can be used with a source-control tool such as Microsoft Visual Studio Online (https://www.visualstudio.com/en-us/products/what-is-visual-studio-online-vs.aspx), Microsoft Team Foundation, or ifacto ReVision for NAV (http://www.ifacto.be/en/revision).
A compiled object can be shipped to another system as a patch to be installed with little fear that it will be corrupted midstream. The system administrator at the other system has to simply import the new object following directions from the developer. Exported compiled objects also make excellent fractional backups. Before changing or importing any working production objects, it's always a good idea to export a copy of the "before" object images into a .fob file. These should be labeled so that they can easily be retrieved. If we want to check what objects are included in a fob, we can open the file in a text editor – the objects contained will be listed at the beginning. Any number of objects can be exported into a single .fob file. We can later selectively import any one or several of the individual objects from that group .fob.
Object Import is accessed through File | Import in the Object Designer. The import process is more complicated than the export process because there are more decisions to be made. When we import a compiled version of an object, the Object Designer allows decisions about importing and provides some information to help us make those decisions.
When we import a text version of an object, the new version is brought in immediately, regardless of what it overwrites and regardless of whether or not the incoming object can actually be compiled. The object imported from a text file is not compiled until we do so in a separate action. By importing a text-formatted object, we could actually replace a perfectly good production object with something useless.
When we import a compiled object from a .fob file, we will get one of two decision message screens, depending on what the Object Designer Import finds when it checks the existing objects. If there are no existing objects that the import logic identifies as matching and modified, then we will see the following dialog:

Even though you have the option to proceed without checking further, the safest thing to do is always open Import Worksheet, in this case by clicking on the No button. Examine the information displayed before proceeding with the import.
If the .fob file we are importing is found to have objects that could be in conflict with existing objects that have been previously modified, then we will see the following on our screen:

Of course, we can always click Cancel and simply exit the operation. Normally, we will click OK to open Import Worksheet and examine the contents.

While all the information presented is useful at one time or another, usually we can focus on just a few fields. The basic question, on an object-by-object basis, is "Do I want to replace the old version of this object with this new one?"
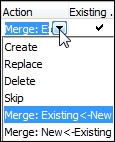
At the bottom of the preceding screenshot, we can see the comparison of the Existing object and the New object information. Use this information to decide whether or not to take an action of Create, Replace, or Skip. More information on using Import Worksheet and the meaning of various warnings and actions can be found in the NAV Developer and IT Pro Help under Import Worksheet.
Although Import also allows us to merge the incoming and existing table versions, only very sophisticated developers should attempt to use this feature. The rest of us should always choose the Import Action Replace or Skip (or Create, if it is a new object).
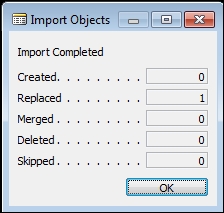
When a .fob import completes, the system tells us the result.
When an existing table is changed as a result of a fob import, the new table definition is compared against the existing schema defined in the SQL Server database. The following message will be displayed (new in NAV 2015):

The options available for the Synchronize Schema choice are shown in the following screenshot:

If we choose the first option, we will receive another stern warning message allowing us one last opportunity to cancel the import. If we tell the system to proceed, it will do so and, at the end of its processing, inform us of the results. More information on this process is available in the Help Synchronizing Table Schemas.
A text version of an object is useful for a few specific development tasks. C/AL code or expressions can be placed in a number of different nooks and crannies of objects. In addition, sometimes object behavior is controlled by Properties. As a result, it's not always easy to figure out just how an existing object is accomplishing its tasks.
An object exported to text has all its code and properties flattened out where we can use our favorite text editor to search and view. Text copies of two versions of an object can easily be compared in a text editor. Text objects can be stored and managed in a source code library. In addition, a few tasks, such as renumbering an object, can be done more easily in the text copy than within C/SIDE.
We should liberally make backups of objects on which we are working. Always make a backup of an object before changing it. Make intermediate backups regularly during the development. This allows recovery back to the last working copy.
If our project involves several developers, we may want to utilize a source control system that tracks versioning and has a check-out, check-in facility for objects. Larger projects should take advantage of the test functionality that's now part of C/AL (see Testing the Application in Help).
Compile frequently. We find errors more easily this way. Not all errors will be discovered just by compiling. Thorough and frequent testing is always a requirement.
When we are developing pages or reports, we should do test runs (or previews) of the objects relatively frequently. Whenever we reach a stage where we have made a number of changes and again have a working copy, we should save it before making more changes.
Never design a modification that places data or changes it directly in a Ledger table without going through the standard Posting routines. It's sometimes tempting to do so, but that's a sure path to unhappiness. If creating a new Ledger for our application, design the process with a Journal table and a Posting process consistent with the NAV standard flow.
If at all possible, try to avoid importing modifications into a production system when there are users logged-in to the system. If a logged-in user has an active object that is being modified, they may continue working with the old version until they exit and re‑enter. Production use of the obsolete object version may possibly cause confusion or even the corruption of data.
Always test modifications in a reasonably current copy of the production system. Do the final testing by using real data (or at least realistic data) and a copy of the customer's production license. As a rule, we should never develop or test in the live production system. Always work in a copy. Otherwise, the price of a mistake, even a simple typo, can be enormous.
If we wish to check that changes to a production system are compatible with the rest of the system, we should import the changes into our test copy of the system and then recompile all of the objects in the system. We may uncover serious problems left by a previous developer with bad habits, so be prepared.
The integration of the development environment with the application database is particularly handy when we are making changes to an application that is already in production use. C/SIDE is good for not letting us make changes that are inconsistent with the existing data. For example, let's presume we have a text field that is defined as 30 characters long and there is already data in that field in the database, one instance of which is longer than 20 characters. If we attempt to change the definition of that field to 20 characters long, we will get a warning message when we try to save and compile the table object. We should not force the change until we adjust either the data in the database or we adjust the change so that it is compatible with all the existing data.
Whenever we exit the Designer for an object in which we have made a change, NAV wants to save and compile the object on which we were working. We will see a dialog similar to the following screenshot:

We have to be careful not to be working on two copies of the same object at once as we may lose the first set of changes when the second copy is saved. If we want to save the changed material under a new object number while retaining the original object, we must Cancel this Save Changes and instead use the File | Save As option to rename and renumber the new copy.
If the object under development is at one of those in-between stages where it won't compile, we can deselect the Compiled checkbox and save it by clicking on the Save button without compiling it.
On occasion, we may make changes that we think will affect other objects. In that case, from the Object Designer screen, we can select a group of objects to be compiled by Marking them. Marking an object is done by putting focus on the object and pressing the Ctrl + F1 keys. The marked object is then identified with a bullet in the left screen column for that object's row. After marking each of the objects to be compiled, use the View | Marked Only function to select just the marked objects.
We can then compile the Marked objects as a group. Select all the entries (using Ctrl + A keys is one way to do this), press F11, and respond Yes to the question Do you want to compile the selected objects? Once the compilation of all the selected objects is completed, we will get an Error List window indicating which objects had compilation errors of what types.
After we respond to that message, only the objects with errors will remain marked. The Marked Only filter will still be on, so that just those objects that need attention will be shown on the screen. In fact, anytime we do a group compilation of objects, those with errors will be marked so that we can use the Marked Only filter to select the objects needing attention.
In previous chapters, we discussed naming conventions for tables, pages, and reports. In general, the naming guidelines for NAV objects and C/AL encourage consistency, common sense, and readibility. Use meaningful names. These make the system more intuitive to the users and more self‑documenting.
When we name variables, we must try to keep the names as self-documenting as possible. We should differentiate between similar, but different, variable meanings such as Cost (cost from the vendor) and Amount (selling price to the customer). Embedded spaces, periods, or other special characters should be avoided (even though we find some violations of this in the base product). If we want to use special characters for the benefit of the user, we should put them in the caption, not in the name. If possible, we should stick to letters and numbers in our variable names. We should always avoid Hungarian naming styles; keep names simple and descriptive.
There are a number of reasons to keep variable names simple. Other software products with which we may interface may have limitations on variable names. Some special characters have special meanings to other software or in another human language. In NAV, ? and * are wildcards and must be avoided in variable names. $ has special meaning in other software. SQL Server adds its own special characters to NAV names and the resultant combinations can get quite confusing (not just to us but to the software). The same can be said for the names constructed by the internal RDLC generator, which replaces spaces and periods with underscores.
When we are defining multiple instances of a table, we should either differentiate clearly by name (for example, Item and NewItem) or by a descriptive suffix (for example, Item, ItemForVarient, ItemForLocation). In the very common situation where a name is a compound combination of words, begin each abbreviated word with a capital letter (for example, NewCustBalDue).
Avoid creating variable names that are common words and might be reserved (for example, Page, Column, Number, and Integer). C/SIDE will sometimes not warn us that we have done so and we may find our logic and the automatic logic working at very mysterious cross purposes.
Do not start variables with the prefix "x", which is used in some automatically created variables (such as xRec). We should make sure that we clearly differentiate between working storage variable names and the field names originating in tables. Sometimes C/SIDE will allow us to have a global name, local name, and/or record variable name, all with the same literal name. If we do this, we are practically guaranteeing a variable misidentification bug where the compiler uses a different variable than what we intended to be referenced.
When defining a temporary table, preface the name logically, for example with Temp. In general, use meaningful names that help in identifying the type and purpose of the item being named. When naming a new function, we should be reasonably descriptive. Don't name two functions located in different objects with the same name. It will be too easy to get confused later.
In short, be careful, be consistent, be clear, and use common sense.
As we've gone through examples showing various aspects of C/SIDE and C/AL, we've seen and referred to variables in a number of situations. Some of the following is obvious, but for clarity's sake we'll summarize here.
In Chapter 3, Data Types and Fields, we reviewed various data types for variables defined within objects (referred to in Chapter 3, Data Types and Fields as working storage data). Working Storage consists of all the variables that are defined for use within an object, but whose contents disappear when the object closes. Working Storage data types discussed in Chapter 3, Data Types and Fields, are those that can be defined in either the C/AL Global Variables or C/AL Local Variables tabs. Variables can also be defined in several other places in a NAV object.
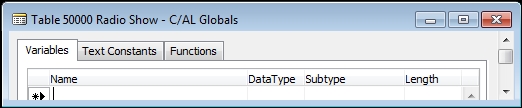
Global variables are defined on the C/AL Globals form, in the Variables tab.
Global Text Constants are defined on the Text Constants tab section of the C/AL Globals form. The primary purpose of the Text Constants area is to allow easier translation of messages from one language to another. By putting all message text in this one place in each object, a standardized process can be defined for language translation. There is a good explanation in NAV Developer and IT Pro Help on How to: Add a Text Constant to a Codeunit. The information applies generally.
Global Functions are defined on the Functions tab of the C/AL Globals form. The following screenshot shows the C/AL Globals form:
Local identifiers only exist defined within the range of a trigger. This is true whether the trigger is a developer‑defined function or one of the default system triggers or standard application‑supplied functions. In NAV 2015, when a new function is defined, it is set as a local function by default. This means that if we want the new function to be accessible from other objects, we must set the Local property of the function to No.
Function local identifiers are defined on one or another of the tabs on the C/AL Locals form that we use for defining a function.
Parameters and Return Value are defined on their respective tabs.
The Variables and Text Constants tabs for C/AL Locals are exactly similar in use to the C/AL Globals tabs of the same names. The tabs of the C/AL Locals form can be seen in the following screenshot:

Trigger local variables (variables that are local to the scope of a trigger) are also defined on one or another of the tabs on the C/AL Locals form. The difference between trigger Local Variables and those for a function is that only the Variables and Text Constants tabs exist for trigger Local Variables. The use of the Variables and Text Constants tabs are exactly the same for triggers as for functions. Whether we are working within a trigger or a defined function, we can access the local variables through the menu option View | C/AL Locals.
Some working storage variables have additional attributes to be considered.
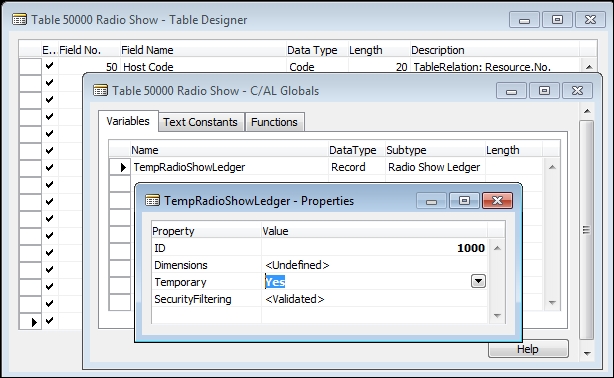
Temporary tables were discussed in Chapter 2, Tables. Let's take a quick look at how one is defined. Defining a Global Temporary table begins just like any other Global Variable definition of the Record data type. With an object open in the Designer, follow these steps:
- Select View | C/AL Globals.
- Enter a variable name, data type of Record.
- Choose the table whose definition is to be replicated for this temporary table as the Subtype.
- With focus on the new Record variable, click on the Properties icon (or press the Shift + F4 keys).
- Set the Temporary property to Yes.
That's it. We've defined a temporary table similar to the one in the following image:
We can use a temporary table just as though it were a permanent table with some specific differences:
- The table contains only the data we add to it during this instance of the object in which it resides.
- We cannot change any aspect of the definition of the table, except by changing the permanent table (which was its template) using the Table Designer, then recompiling the object containing the associated temporary table.
- Processing for a temporary table is done wholly in the client system in a user specific instance of the business logic. It is, therefore, inherently single user.
- A properly utilized temporary table reduces network traffic and eliminates any locking issues for that table. It is often much faster than processing the same data in a permanent, database-resident table because both data transmission and physical storage I/O are significantly reduced.
Note
In some cases, it's a good idea to copy database table data into a temporary table for repetitive processing within an object. This can give us a significant speed advantage for a particular task by updating data in the temporary table, then copying it back out to the database table at the end of processing.
When using temporary tables, we need to be very careful that references from C/AL code in the temporary table (such as data validations) don't inappropriately modify permanent data elsewhere in the database. We also must remember that if we forget to properly mark the table as temporary, we will likely corrupt production data with our processing.
Arrays of up to 10 dimensions containing up to a total of 1,000,000 elements in a single variable can be created in a NAV object. Defining an array is done simply by setting the Dimensions property of a variable to something other than the default <Undefined>. An example is shown in the following screenshot:

The semicolon separates the dimensions of the array. The numbers indicate the maximum number of elements of each of the dimensions. This example is a two-dimensional array which has three rows of 99 elements each. An array variable like TotalCountArray is referred to in C/AL as follows:
- The 15th entry in the first row is
TotalCountArray[1,15] - The last entry in the last row is
TotalCountArray[3,99]
An array of a complex data type such as a record may behave differently than a single instance of the data type, especially when passed as a parameter to a function. In such a case, we must make sure the code is especially thoroughly tested so that we aren't surprised by unexpected results. NAV 2013 added the capability to also use arrays from the .NET Framework. See the Help titled Using Arrays for more information.
When an object is initiated, the variables in that object are automatically initialized. Booleans are set to False. Numeric variables are set to zero. Text and code data types are set to the empty string. Dates are set to 0D (the undefined date) and Times are set to 0T (the undefined time). The individual components of complex variables are appropriately initialized. The system also automatically initializes all the system-defined variables.
Of course, once the object is active, through our code and property settings we can do whatever additional initialization we wish. If we wish to initialize variables at intermediate points during processing, we can use any of the several approaches. First we reset a Record variable (for example, the TempRadioShowLedger temporary table defined in the preceding example) with the RESET function, and then initialize with the INIT function in statements in the form:
TempRadioShowLedger.RESET;
TempRadioShowLedger.INIT;
The RESET makes sure that all previously set filters on this table are cleared. The INIT makes sure that all the fields, except those in the Primary Key, are set either to their InitValue property value or to their data type default value. Primary Key fields must be explicitly set by C/AL code.
For all types of data, including complex data types, we can initialize fields with the CLEAR or CLEARALL function in a statement in the following form:
CLEAR(TotalArray[1,1]);
CLEAR(TotalArray);
CLEAR("Shipment Code");
The first example would clear a single element of the array, the first element in the first row. Because this variable is an Integer data type, the element would be set to Integer zero when cleared. The second example would clear the entire array. In the third example, a variable defined as a Code data type would simply be set to an empty string.
Many of the things that we do during development in C/SIDE might not be called programming by some people because it doesn't involve writing C/AL code statements. But so long as these activities contribute to the definition of the object and affect the processing that occurs, we'll include them in our broad definition of C/SIDE programming.
These activities include setting properties at the object and Data Item levels, creating Request pages in Reports, defining Controls and their properties, defining Report data structures and their properties, creating Source Expressions, defining Functions, and, of course, writing C/AL statements in all the places where we can put C/AL. We are going to primarily focus on C/SIDE programming as it relates to tables, reports, and codeunits.
We will touch on C/SIDE programming for pages and XMLports. In the case of RTC reports, C/AL statements can reside only in the components that are developed within the C/SIDE RD and not the RDLC created by the SSRB.
NAV objects are generally consistent in structure. Most have some properties and triggers. Pages and Reports have controls, though the tools that define the controls in each are specific to the individual object type. Reports have a built-in DataItem looping logic. XMLports also have DataItem looping logic but structured differently from reports (for example, Reports can have multiple DataItems at the 0 level and XMLports can only have one Node at the 0 level). All the object types that we are considering can contain C/AL code in one or more places. All of these can contain function definitions which can be called either internally or externally (if not marked as Local). Remember, good design practice says that any functions designed as "library" or reusable functions that are called from a variety of objects should be placed in a Codeunit (or, in some circumstances, in the primary table).
A function is a defined set of logic that performs a specific task. Similar to many other programming languages, C/AL includes a set of pre-written functions that are available to us to perform a wide variety of different tasks. The underlying logic for some of these functions is hidden and not modifiable. These non-modifiable functions are supplied as part of the C/AL programming language. Following are some simple examples:
DATE2DMY: Supply a date and, depending on a calling parameter, this will return the integer value of the day, the month, or the year of that dateSTRPOS: Supply a string variable and a string constant; the function will return the position of the first instance of that constant within the variable, or a zero if the constant is not present in the string contained in the variableGET: Supply a value and a table, and the function will read the record in the table with a Primary Key equal to the supplied value, if a matching record existsINSERT: Adds a record to a tableMESSAGE: Supply a string and optional variables; this function will display a message to the operator
Such functions are the heart of the C/SIDE-C/AL tools. There are over 100 of them. On the whole, they are designed around the essential purpose of an NAV system: business and financial applications data processing. These functions are not modifiable; they operate according to their predefined rules. For development purposes, they act as basic language components.
In addition to the prewritten "language component" functions, there are a large number of pre-written "application component" functions as well. The difference between the two types is that the code implementing the latter is visible and modifiable, though we should be extremely cautious about making such modifications.
An example of an application component function might be one to handle the task of processing a Customer Shipping Address to eliminate empty lines and standardize the layout based on user-defined setup parameters. Such a function would logically be placed in a Codeunit and thus made available to any routine that needs this capability.
In fact, this function exists. It is called SalesHeaderShipTo and is located in the Format Address Codeunit. In the following table, we can explore the Codeunits for some functions we might find useful to use or from which to borrow logic. This is not an all-inclusive list, as there are many functions in other Codeunits which we may find useful in a future development project, either to be used directly or as templates for designing our own similar function. Many library Codeunits have the words Management or Mgt. in their name.
|
Object number |
Name |
|---|---|
|
1 |
ApplicationManagement |
|
356 |
DateComprMgt |
|
358 |
DateFilter-Calc |
|
359 |
PeriodFormManagement |
|
365 |
Format Address |
|
397 |
|
|
5052 |
AttachmentManagement |
|
5054 |
WordManagement |
|
6224 |
XML DOM Management |
The pre-written application functions have generally been provided to address the needs of the NAV developers working at Microsoft. But we can use them too. Our challenge will be to find out that they exist and to understand how they work. There is very little documentation of these "application component" functions.
One significant aspect of these application functions is the fact that they are written in C/AL and their construction is totally exposed. In theory, they can be modified, though that is not advisable. If we decide to change one of these functions, we should make sure our change is compatible with all the existing uses of that function.
Tip
A useful "trick" to find all the calls of a function is to add a dummy calling parameter to the function (temporarily) and then compile all objects in a copy of the application system. Errors will be displayed for all objects that call the changed function (we mustn't forget to remove the dummy calling parameter and recompile when we're done testing). This technique not only works for Microsoft created functions, but also for functions created as part of a customization or add-on.
Rather than changing an existing function, it is much better to clone the existing function into our own library codeunit, creating a new version, and making any modifications to the new version while leaving the original untouched.
We can also create our own custom functions to meet any need. The most common reason to create a new function is to provide a single, standardized instance of logic to perform a specific task. When we need to use the same logic in more than one place, we should consider creating a callable function.
We should also create a new function when we're modifying standard NAV processes. Whenever more than three or four lines of code are needed for the modification, we should consider creating the modification as a function. If we do that, the modification to the standard process can be limited to a call to the new function. It's usually not a good idea to embed a new function into an existing standard function. It's better to clone the existing function and make the modifications in-line in our copy.
Although using a function for inserting new code into the flow is a great concept, occasionally it may be difficult to implement in practice. For example, if we want to revise the way the existing logic works, sometimes it's confusing to implement the change through just a call and an external (to the mainline process) function. In such a case, we may just settle for creating an in-line modification and doing a good job of commenting the modification. This is most reasonable which this code is only required in one place and does not also need to be referenced elsewhere.
If a new function will be used in several objects, it should be housed in our library codeunit. If it is only for use in a single object, then the new function can be resident in that object. This latter option also has the advantage of allowing the new function direct access to the global variables within the object being modified, if necessary.
Let's take a quick look at how a function can be created. We're going to add a new codeunit to our C/AL application, Codeunit 50000. Since this is where we will put any callable functions that we need for our WDTU application, we will simply call it Radio Show Management. In that Codeunit, we're going to create a function to calculate a new date based on a given date. If that seems familiar, it's the same thing we did in Chapter 3, Data Types and Fields, to illustrate how a DateFormula data type works. This time, our focus is going to be on the creation of a function.
Our first step is to copy Table 50009, which we created for testing, and then save it as table 50008. As a reminder, we do that by opening Table 50009 in the Table Designer, then selecting File | Save As, changing the object number to 50008 and Name to Date Formula Test-2 (see the following screenshot), and then exiting and compiling.

Once that's done, change the Version List to show that this table has been modified. We used CD and 03 for the original Chapter 3, Data Types and Fields, table Version. Now we'll add, 06 to make the new table Version read CD 03,06.
We will create our new Codeunit by simply clicking on the Codeunit button at the left of the Object Designer screen, then clicking on the New button and choosing File | Save As, and entering the Object ID of 50000 and Name as Radio Show Management.
Now comes the important part—designing and coding our new function. When we had the function operating as a local function inside the table where it was called, we didn't worry about passing the data back and forth. We simply used the data fields that were already present in the table and treated them as global variables (which they were). Now that our function will be external to the object from which it's called, we have to pass the data values back and forth. Here's the basic calling structure of our function:
Output := Function (Input Parameter1, Input Parameter2)
In other words, we need to feed two values into our new callable function and accept a return value back on completion of the function's processing.
Our first step is to click View | C/AL Globals, and then the Functions tab. Enter the name of the new function following the guidelines for good names (such as CalculateNewDate). Then keeping the function name in focus (highlighted), display the Properties of the function by either clicking the Properties icon, pressing Shift + F4 or via View | Properties.
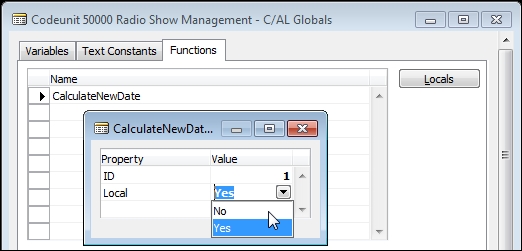
Set the Local property to Yes so that we will be able to call the function from other objects. Click on the Locals button. This will allow us to define all the variables that will be local to the new function. The first tab on the Locals screen is Parameters, our input variables.
In keeping with good naming practices, we will define two input parameters, as shown in the following screenshot:

Tip
Re; Var column in the leftmost column of the Parameters tab form
If we checkmark the Var column, the parameter is passed by reference to the original calling routine's copy of that variable. If the parameter is passed by reference, when the called function changes the value of an input parameter, it directly changes the original variable value in the calling object.
Since we've specified the input parameter passing here with the Var column unchecked, changes in the value of that input parameter will be passed by value. That makes the parameter local to this function and any changes to its value will not directly affect the variable in the calling routine.
Checking the Var column on one or more parameters is a way to effectively have multiple results passed back to the calling routine. Parameter passing with the Var column checked (passing by reference) is also faster than passing by value, especially when passing complex data types (for example, records).
Select the Return Value tab and define our output variable as shown in the following screenshot:

A/The name is not required for Return Value if the return terminates processing with an EXIT([ReturnValue]) instruction. Choose the Date option for Return Type. Exit by using the Esc key and the results will be saved.
One way to view the effect of what we have just defined is to view C/AL Symbol Menu. From the Codeunit Designer screen, with our new Codeunit 50000 in view and our cursor placed in the code area for our new function, we click View | C/AL Symbol Menu (or just press F5) and see the following image:
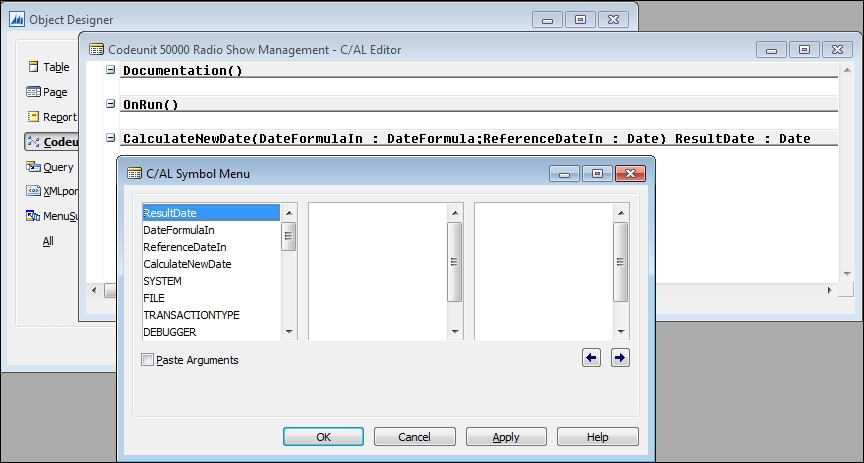
We see in the C/AL Editor that our CalculateNewDate function has been defined with two parameters and a result. Now press Esc or select OK, move the cursor to the OnRun trigger code area and again press F5 to view C/AL Symbol Menu. We don't see the two parameters and result variables.
Why? Because Parameters and Return Value are local variables, which only exist in the context of the function and are not visible outside the function. We'll make more use of the C/AL Symbol Menu a little later, because it is a very valuable C/AL development tool. But right now we need to finish our new function and integrate it with our test Table 50008.
Move the cursor back to the code area for our new function. Click on the menu item Window | Object Designer | Table button, then click Table 50008 | Design, and press F9. That will take us to the C/AL Code screen for Table 50008. Highlight and cut the code line from the local CalculateNewDate function. Admittedly, this will not be a particularly efficient process this time, but hopefully it will make the connection between the two instances of functions easier to envision. Using the Window menu, move back to our Codeunit function and paste the line of code we just cut from Table 50008. We should see the following image:
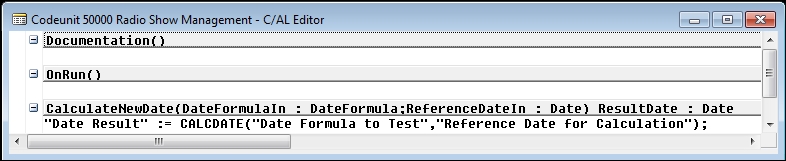
Edit the line of code just pasted into the codeunit so the variable names match those shown in our function trigger above. This will result in the following image:

Press F11 to check if we have a clean compile. If we get an error, we must do the traditional programmer thing. Find it, fix it, and recompile. Repeat until we get a clean compile. Then exit and Save our modified Codeunit 50000.
Finally, we will return to our test Table 50008 to complete the changes necessary to use the external function rather than the internal function. We have two obvious choices for doing this. One is to replace the internal formula in our existing function with a call to our external function. This approach results in fewer object changes.
The other choice is to replace each of our internal function calls with a call to the external function. This approach may be more efficient at run time because when we need the external function, we invoke it in one step rather than two. We will walk through the first option here and then you should try the second option on your own.
Which is best? It depends on our criteria. Such a decision comes down to a matter of identifying the best criteria on which to judge the design options, then applying those criteria. Remember, whenever feasible, simple is best.
For the first approach (calling our new Codeunit resident function), we must add our new Radio Show Management codeunit 50000 to table 50008 as a variable. After Designing the table, View | Globals, click on the Functions tab, highlight the CalculateNewDate function, click on the Locals button, and click on the Variables tab. Add the Local variable as shown in the following screenshot (it's good practice to define variables as local unless global access is required):

The two lines of code that called the internal function CalculateNewDate must be changed to call the external function. The syntax for that call is:
Global/LocalVariable := Global/LocalObjectName.FunctionName(Parameter1,Parameter2,…).
Based on that, the new line of code should be:
"Date Result" := RadioShowMgt.CalculateNewDate("Date Formula to Test","Reference Date for Calculation");If all has gone well, we should be able to save and compile this modified table. When that step works successfully, we can Run the table and experiment with different Reference Dates and Date Formulas, just as we did back in Chapter 3, Data Types and Fields. We should get the same results for the same entries as we saw before.
When you try out the other approach of replacing each of the calls to the internal function by directly calling the external function, you will want to:
- Either define the Radio Show Management codeunit as a Global variable or as a Local variable for each of the triggers where you are calling the external function
- Go to the View | Globals | Functions tab and delete the now unused internal
CalculateNewDatefunction
We should now have a better understanding of the basics of constructing both internal and external functions and some of the optional design features available to us for building functions.