
6. Building Display Profiles: Your Window to Color
Who said “the eyes are the windows to the soul”? Well, Guillaume de Salluste Du Bartas, the 16th century French poet and diplomat, did pen the line, “These lovely lamps, these windows of the soul,” and Shakespeare’s Richard III did say, “Ere I let fall the windows of mine eyes.” But the line everyone remembers seems to stem from the 1955 movie, “The Ladykillers,” where Alec Guinness’ Professor Marcus asks, “And didn’t someone say, ‘The eyes are the windows of the soul’?” and Katie Johnson’s Mrs. Wilberforce replies, “I don’t really know. But, oh, it’s such a charming thought, I do hope someone expressed it.” Of course, since then many people have.
Whether or not you happen to be one of them, one thing is certain: your monitor is the window to the world of digital color. Monitor profiles—or more accurately, display profiles—are key to the big payoff of color management: the instantaneous preview of all your color-managed materials. We can’t stress enough the importance of good monitor calibration and profiling to a well-oiled color management system. You may be able to get by with vendor-supplied profiles for input and output devices, but effective color management really demands a custom profile for each display.
As with any other type of profiling, building display profiles is a process of comparing known values with measured ones—in this case, the profiling software displays a series of color patches with known RGB values, and compares them with measurements from a colorimeter or spectrophotometer. And as with any other type of profiling, you want to get the device behaving properly before you profile it. The difference between monitor profiling and other types is that monitor profiling packages actually help you get the device behaving well before you profile it, because they combine the functions of calibration and profiling.
This occasionally gives rise to some confusion—see the sidebar, “Muddying the Waters,” later in this chapter—but generally speaking, it’s easier to calibrate and profile displays than it is to calibrate and profile just about any other type of device.
Note that we say calibrating and profiling displays, not monitors. You’re really calibrating and profiling the combination of the video driver, the video card, and the actual monitor—in short, the whole display system. So it’s very helpful to understand just how monitor calibration is achieved. Profiling the calibrated result is really the trivial part of the exercise.
Display Calibration
When you calibrate a display, you (or your calibration software) adjust up to four things, depending on the display technology:
• The luminance of monitor white, expressed either in foot-lamberts or in candelas per meter squared (cd/m2).
• The color of monitor white, usually expressed in Kelvins.
• The tone response curve of the display system, expressed as a gamma value.
• Optionally, the luminance of monitor black, expressed either in foot-lamberts or in candelas per meter squared (cd/m2).
Where you make these adjustments depends on the capabilities of your monitor.
What to Adjust
There are two ways to change the behavior of a display. You can adjust the controls on the monitor itself, or you can adjust the signals that get sent to the monitor by tweaking the values in the video card’s lookup table, or videoLUT. It’s always preferable to make the adjustments to the monitor itself, because when you tweak the videoLUT, it’s essentially the same as editing an 8-bit channel—you start out with 256 levels, but you end up with a smaller number.
However, the only way to adjust the display gamma is in the videoLUT, so you’ll always be doing some tweaking there—the goal is to keep the videoLUT tweaks to a minimum. The degree to which you can do so is dictated by the controls your monitor offers, and, to some extent, the controls offered depend on the type of monitor you’re using.
• The workhorse of computer displays is still the CRT (cathode ray tube). A cathode ray is a stream of electrons that are fired from one end of an enclosed glass tube to the other. The electrons originate from electron guns that spray a beam of electrons onto the inside face of the tube, which is coated with phosphors—chemical compounds that kick off photons (light) of specific wavelengths when they’re struck by electrons. Color monitors use three phosphors in the mixture coating the inside of the CRT—the red phosphor, the green phosphor and (you guessed it) the blue phosphor. The voltages sent from the video card control the bursts of electrons from the electron gun, and hence the amount of light emitted by the phosphors.
• The new kid on the block, and gaining fast in the world of computer displays, is the LCD (liquid crystal display). The liquid crystals that give this type of monitor its name have the peculiar property of changing shape in response to electrical currents. When sandwiched between layers of polarized glass or plexiglass, they act as filters that modulate the backlight, a fluorescent light behind a diffuser that produces all the light the display emits.
CRT monitor controls
Every CRT we’ve ever seen has controls for contrast and brightness (which really control white luminance and black luminance, respectively). Most offer some degree of control over the color of white, either as a series of presets, as a continuously variable control, or as separate gain controls for the red, green, and blue channels. A few high-end monitors also offer red, green, and blue bias controls, which set the black level for each channel.
LCD monitor controls
Because of the way they work, the only real control possible on most current LCD monitors is the brightness control, which controls the brightness of the backlight. Some LCDs, particularly those with analog rather than digital interfaces, supply software controls that mimic those found in CRTs, but they’re just tweaking the videoLUT, not adjusting the behavior of the monitor itself.
The upshot of all this is that with a CRT monitor, you may be able to adjust the white luminance, black luminance, and color temperature in the monitor itself, while with an LCD monitor, the only thing you can really adjust in the monitor is the white luminance. This has some implications for your choice of calibration aim points. See “Choosing Calibration Settings,” later in this chapter.
However, LCD display technology continues to evolve, and during this book’s lifespan, we expect to see LCD displays that use red, green, and blue LEDs to produce the backlight. In theory, such displays would allow you to adjust the color temperature of monitor white in addition to luminance. Also, we know of at least two LCDs—the EIZO ColorEdge CG18 and CG21—that have their own 10-bit lookup tables built into the display. EIZO’s calibration software uses these 10-bit tables to adjust color temperature and gamma, so the calibrated display is still capable of producing the full 256 shades per channel. Note, however, that LCD displays have a fixed contrast ratio—unlike CRT displays, they offer no way to adjust black luminance separately from white luminance, so as you increase the white luminance, the black luminance is increased too.
Calibration and Profiling Tools
There are essentially four different types of calibration and profiling packages.
• Packages that are bundled with a monitor
• Standalone instrument-and-software bundles
• Standalone software packages that support different instruments
• Visual calibrators
Let’s deal with the last first. If you’re at all serious about color management, we don’t recommend visual monitor calibration. The very same adaptability that makes our eyes incredibly useful organs for living on Planet Earth makes them pretty useless as calibration devices—the goal of calibration is to return the device to a known, predictable state, and while our eyeballs are very good at making comparisons, they’re lousy at determining absolutes. If your viewing environment is completely stable—essentially, a windowless cave—you may be able to get by with a visual calibrator, but in our opinion, you’d be penny-wise and pound-foolish to do so. But if you must, see the sidebar, “Visual Calibration,” later in this chapter.
Monitor/Calibrator bundles
Monitors that come with a bundled calibrator are, thus far, invariably CRTs. These are “smart” packages in the sense that the communication between monitor and host is two-way, allowing the calibration software to adjust the monitor’s internal controls in response to feedback from the measuring instrument. Early models used a serial cable to communicate with the host CPU, but the current ones all use USB. (This means that they occupy two USB ports, one for communication between monitor and host, the other for the measuring instrument.)
Examples include the Sony Artisan Color Reference System, the LaCie Electron/BlueEye line, the Mitsubishi SpectraView line, and the Barco Calibrator V line. The less-expensive packages typically use off-the-shelf general-purpose colorimeters that will work with any CRT monitor.
The Sony Artisan uses a colorimeter with filters specifically designed for the phosphor set used in the Artisan monitor—so it won’t work as well with other monitors—while the Barco Reference Calibrator V actually uses a monochrome luminance meter—a simple photon counter—and gets its color information from factory measurements of the phosphors in each specific unit. The phosphors don’t change color over time, though they lose their ability to emit photons, so this approach actually results in very accurate calibration and profiling.
One huge advantage of these bundled systems is convenience. They automatically adjust the monitor’s brightness, contrast, gain, and bias controls to reach the specified luminance and color temperature, and tweak the videoLUT only to achieve the requested gamma. Calibration and profiling with these packages is typically a one-button operation—you attach the measuring instrument to the screen, press the button, and walk away. It’s almost impossible to make mistakes with these systems.
A second less-obvious advantage of these systems is that they can often make finer adjustments than are available through the display’s front-panel controls, so they can create a more accurate calibration than is possible with a human operator making adjustments through the display’s controls (see Figure 6-1).
Figure 6-1 Sony Artisan and LaCie BlueEye

With the advent of the DDC2 (Display Data Channel) standard, which is incorporated in just about every CRT monitor currently being sold, any DDC2-compliant monitor, when equipped with a suitable cable, has the potential to become a “smart” monitor. Thus far, the only standalone profiling package to exploit the DDC2 standard is Integrated Color Solutions’ BasICColor Display—we’re still waiting for others to follow suit.
Standalone instrument-and-software bundles
At the time of writing, the prominent contenders in this category are GretagMacbeth’s EyeOne Display, Monaco Systems’ MonacoOPTIX XR, and ColorVision’s Monitor Spyder with either PhotoCAL or the fuller-featured OptiCAL.
The packages differ mainly in instrument support. ColorVision’s Photo-CAL and OptiCAL support several third-party instruments, while the GretagMacbeth and Monaco solutions only work with their own instruments, the EyeOne Display and the Monaco OPTIX, aka the X-Rite DTP 94, respectively. While all the aforementioned instruments are colorimeters, EyeOne Monitor also supports the EyeOne spectrophotometer. (Arguments about whether a colorimeter or a spectrophotometer is the better instrument for measuring monitors tend quickly to head into angels-dancing-on-pinheads territory. In practice, we can’t say that we’ve found that one instrument type is invariably superior to the other, and have had great success with both.)
The only real advantage we’ve seen from standalone bundles over separately purchased instruments and software is one-stop shopping, both for the initial purchase and for after-sales support.
Standalone software and instruments
Most monitor calibration packages try to support the widest range of instruments possible.
Monitor calibration and profiling is a pretty straightforward process. We find that the main differences between packages are the list of supported instruments, and, mainly, the licensing terms. The latter isn’t an issue if you’re only worried about calibrating a single monitor, but if you need to calibrate all the monitors in a shop, the varying license policies can add up to significant differences in cost.
Instruments
Once known affectionately as hockey pucks, the instruments that you attach to the center of your monitor now come in so many shapes and forms that the epithet rarely applies. The puck stops here, so to speak. (We couldn’t resist.) See Figure 6-2.
Figure 6-2 Monitor calibrators

Warning
If you’re calibrating an LCD monitor, make sure that you use an instrument expressly designed for LCDs. The suction cups used to attach calibration instruments to CRTs will rip the coating right off the front of an LCD monitor, rendering it useless. (Dead LCD monitors aren’t heavy enough to make good doorstops.)
Some instruments are more influenced by ambient light than others. A monitor hood can help shield the face of the monitor from ambient light, so that less of it is reflected into the instrument. With CRT monitors, we generally recommend working in a fairly low ambient light anyway, so if you find that ambient light is making your instrument produce inconsistent results, you may want to consider paying some attention to your viewing environment. See “Viewing Environment” in Chapter 9, Evaluating and Editing Profiles.
Choosing Calibration Settings
To a great extent, the whole notion of monitor calibration standards stems from the days before the display was taken out of the color management chain, and represented an attempt to make all monitors behave identically by calibrating them to the same white point and gamma. Of course, this never worked, and has been supplanted by the current approach of color-managing the data that gets sent to the video card, using the profile that represents the behavior of the specific display in question.
So from the narrow color-management point of view, it doesn’t really matter what calibration settings you choose—all that matters is that your display profile represents the behavior of your display as accurately as possible. But other considerations come into play. For example, if some of your work lies outside the color-management realm, you may want to calibrate your monitor to a recognized standard. And even if all your work is color-managed, your display will behave better at some settings than others. The one thing to avoid is making major corrections in the videoLUT, because doing so reduces the number of discrete levels your display can reproduce—the bigger the correction, the fewer levels.
Adjustments you make to the monitor itself, on the other hand, are “free”—there’s no loss—so a major consideration in choosing calibration settings is the means available to achieve them. All calibrators ask you for two target values:
• white point
• gamma
For CRT displays the three of us, by separate paths, have come to the same recommended calibration settings: calibrate your monitor to a white point of 6500 K and a gamma of 2.2. You can just take our word for it, but we think it’s useful to understand why we like white point-6500 K, and gamma-2.2, so we’ll discuss that in the next section.
For LCD displays, the only thing you can typically adjust on the monitor itself is the brightness of the backlight. Changes to the color temperature are carried out in the videoLUT, so we recommend using the native white point for LCDs whenever the software allows us to do so. If native white point isn’t an option, we use D65 because the color temperature of most LCD backlights is closer to D65 than to anything else.
Target White Point
The white point of the monitor plays an important role for your eye. As described in Chapter 1, your eye judges all colors relative to some neutral baseline that it considers white. The three of us unanimously recommend that you calibrate your monitor to 6500 K even though many people think of 5000 K as the standard viewing white point in graphic arts. Here’s why.
The eye has a tremendous ability to adapt to different white-point environments. However, the eye works best when it’s operating in a white point closest to that environment most familiar to it through millions of years of evolution—namely daylight. So the discussion quickly reduces to which of the two most commonly used daylight standards, D50 (5000 K correlated color temperature) or D65 (6500 K correlated color temperature), is best. (See Chapter 1 if you’re unfamiliar with these terms.) If you have a D50 viewing booth, this might seem to tip the scales toward setting your monitor to 5000 K so that your monitor and print-viewing environment have identical white points. But long experience has told us that this doesn’t work the way the theory would seem to predict—see “Monitor-to-print comparisons,” in Chapter 9, Evaluating and Editing Profiles.
A second factor is that many uncalibrated CRTs, especially older models, are pretty darned blue, with a color temperature closer to 9300 K, though the better current CRTs have a native white point closer to 6500 K. In either case, to move the white point to 5000 K, we have to limit the output of the display’s blue channel, lowering the overall brightness and dynamic range. This is why many people (including us) often find a 5000 K monitor to be a bit too dim, dingy, and ... well ... too darned yellow.
So instead, it’s worth remembering the sentence that started off this explanation. The eye has a tremendous ability to adapt to different white-point environments. The eye takes a little bit of time to adjust to a change in brightness, but it has little trouble looking at a color image in a 6500 K monitor and then moving to view the same image printed out and mounted in a viewing booth. It’s the relationships within the image or page that you’re evaluating. As long as you give the eye a good adaptation environment, and both environments are of approximately equivalent brightness, then you should have no problems.
If your software has more than just two choices for white point, you have another option—you can perform iterative calibrations to find the white point setting that best approximates a sheet of paper in your viewing booth. Some people in extremely color critical environments, with control over all of their equipment, including the paper being used, have found this to be useful. We, however, prefer to deal with the color of paper white in the printer profile, and concentrate on matching the brightness of the monitor and the viewing booth.
Target Gamma
The recommended setting for gamma depends somewhat on how much work you do outside the color-managed environment. Without color management, the general practice has been to choose a gamma that best simulated the mid-tone characteristics of the target medium—in English, if you’re going to print, you want your monitor to have similar tone reproduction characteristics to your printer.
This, supposedly, is why Macintosh displays have traditionally been assumed to have a gamma of 1.8—the default table in Macintosh video cards is set to produce an approximate display gamma of 1.8, and calibration instructions have long touted 1.8 as the “standard Macintosh gamma” when calibrating your monitor. Why 1.8? A monitor gamma of 1.8 roughly approximated the dot-gain curve of the Apple LaserWriter. This served as a poor-man’s color management (actually a grayscale management, as this was well before the days of color management, since the displays being used at the time were monochrome). If an image looked good on a monitor calibrated to gamma 1.8, then it would look reasonable when printed without much adjustment.
But with color management, simulation is now the job of the color management system, and specifically, of the printer profile. So instead, we recommend that you calibrate your monitor to a gamma of 2.2, for the simple reason that, in all our testing, we’ve found that calibrating to around gamma 2.2 produces the smoothest display of gradients, with little or no visible banding or posterization.
If you’re picky, like us, you may want to go further, and use the techniques described in “Checking the Display,” in Chapter 9, Evaluating and Editing Profiles, to find the ideal gamma for your particular display. On the other hand, if you’ve been happily calibrating your monitor to D50, to gamma 1.8, or to both, don’t feel you have to change it just because we say so—as long as you have an accurate monitor profile, the differences between the various calibration aim points are pretty darned subtle.
How Often Should I Calibrate?
With CRT monitors, we recommend calibrating weekly. At minimum, you should calibrate monthly—some of the high-end systems like the Barco Calibrator V and the Sony Artisan are pretty insistent that you recalibrate after 30 days. We know people who calibrate their monitors every day, which seems excessive, but harmless.
With LCD monitors, the jury is still out. The dyes in LCD cells wear at a much slower rate than the phosphors in CRTs—it’s unlikely to be an issue in a human lifespan. The backlight, however, will decay slowly over time. We calibrate our LCDs weekly to be on the safe side, but you can probably get by with less-frequent calibration than with CRTs.
Before Calibration
The first thing to do before calibrating your monitor is to make sure that it’s worth calibrating. On a CRT, turn the contrast control all the way up; on an LCD, turn the brightness control all the way up. If the result is something other than a display that’s at least a hair brighter than you’d like, the monitor is probably a candidate for replacement rather than calibration—calibrators work by turning things down, so if the display, running wide open, isn’t as bright as you’d like, it’ll be even worse after calibration.
Warm-Up Time
Before calibrating a CRT, make sure it’s been on and in use for at least 30 minutes, and preferably for an hour so that it’s reached its stable operating temperature. If you have any energy-saving software that turns the monitor off when not being used, make sure this doesn’t kick in during the warm-up period. (If you use this as your excuse for a little Web surfing every morning, we won’t tell anyone.) Regular screensavers (those floatie fishies or flying toasters) are fine, as are the simpler ones that just display a black screen, as long as they don’t actually turn the monitor off.
Since we wrote the first edition of this book, we’ve realized that LCD displays also need at least 30 minutes warm-up time, maybe more. Various objective evaluations of LCD display warm-up time range from a low of 30 minutes to a high of 90 minutes for the fluorescent backlight to reach stable output. We’ve also seen some work that suggests the LCD filters themselves may be influenced by temperature, but the effects are much smaller.
Resolution, Refresh, and Other Monitor Settings
Make sure that all the other monitor settings are finalized before you calibrate. Just changing the resolution from say 1280×1024 to 1152×864, or changing the refresh rate from 85 to 75 Hz, can affect the overall brightness output of the monitor. So can changing the geometry settings on the display—reducing the size of the displayed image on the monitor targets the electron guns on a smaller area of phosphors, which slightly increases the brightness of the image.
Tip: Extend the Life of Old Monitors
If you followed the instructions on evaluating your monitor and didn’t achieve satisfactory brightness, it may be time for a new monitor. However, to try and squeeze some extra brightness back into the monitor, you can:
• use the geometry controls on the front panel of the monitor to reduce the horizontal and vertical size of the displayed image
• reduce the refresh frequency from, say, 85 Hz to 75 Hz
• reduce the resolution from, say, 1280×1024 to 1152×864 or even 800×600
The refresh frequency and resolution settings can be found in the Display Settings or Control Panel on your system, but be careful that you select a combination that supports true 24-bit color (millions of colors).
It’s OK to change these settings, but you must do so before you calibrate, and if you change any of these parameters, you need to recalibrate for each change. Also, it should go without saying—but we will anyway—that you should set your monitor to display true 24-bit color (millions of colors).
Cleaning the Screen
It’s important to make sure your screen is free of dust and fingerprints before calibration, because they can introduce inaccuracies into the readings. In the case of CRT monitors, they can also cause the sensor to fall off halfway through the calibration process, which can be a major frustration and a hazard for your keyboard and measuring instrument.
Use a weak solution of mild detergent or a cleaning product specifically formulated for monitors. Don’t use glass cleaners containing ammonia or other harsh solvents—most high-end CRTs use antiglare coatings that household glass cleaners wreck: the coatings on LCDs are even more fragile.
Precalibration—Setting the Analog Controls
In addition to specifying the color temperature and gamma of the display, calibrators ask you to set the dynamic range by choosing white and black luminance. In some packages, this step—setting the analog controls on the monitor—is handled as part of the calibration process. Others, such as ColorVision’s OptiCAL and PhotoCAL, use a separate application, PreCAL, to step you through optimizing the monitor’s contrast, brightness, and color temperature settings. Smart monitors with bundled calibrators, such as the LaCie Electron/BlueEye and the Sony Artisan Color Reference System, handle this task automatically, and usually more accurately.
Setting White Luminance
Some packages allow you to specify a value for white luminance—how bright you want the monitor to be. Others simply adjust the monitor to an internal (and sometimes undocumented) preset value. With CRT monitors, when given a choice, we opt for a value somewhere between 85 and 95 cd/m2, or 24 and 28 foot-lamberts.
Most of today’s CRTs can reach a higher luminance—sometimes much higher—for a while. It’s always tempting to crank up the white luminance to get the maximum possible contrast ratio, but when you do so, you shorten the monitor’s useful life. A decent CRT should be able to achieve our recommended luminance for at least three years, often for longer.
The default brightness of LCD displays is usually so high it needs reducing, sometimes by as much as half. Good calibration packages guide you in setting brightness. This is important because we find that the half-life of the backlight is about 18 months—if you drive the display at full brightness, it will be half as bright in 18 months and there won’t be anything you can do about it. Dropping the brightness from the get go will give you headroom to increase white luminance as the backlight ages.
Unless we’re using a calibrator that adjusts the monitor automatically, we start out by turning the contrast all the way up and the brightness all the way down—most calibrators tell you explicitly to do so, anyway. The non-automatic varieties generally display the target luminance and the current measured luminance. You then adjust the contrast control (on CRTs) or the brightness control (on LCDs) to make the two match. Figure 6-3 shows some typical examples.
Figure 6-3 Setting white luminance

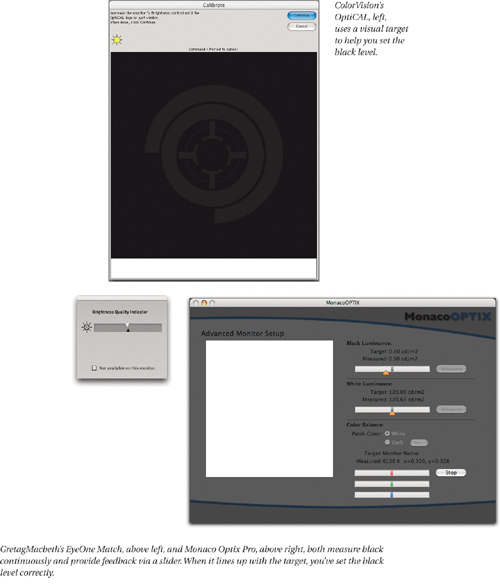
Setting Black Level
Setting the black level is quite a bit trickier than setting the white. If you set it too low, you’ll clip some shadow levels, and if you set it too high, your blacks will be washed out. To further complicate matters, most of the instruments we use to calibrate monitors have diminishing accuracy as the sample gets darker, and the light output of CRT monitors gets progressively less stable the closer it gets to black.
This is where systems that adjust the monitor’s controls automatically have a huge advantage. They take hundreds of measurements and average them. Calibrators that step you through these same adjustments manually also take many measurements of black, but the problem then becomes how to present these measurements to the user in a useful form.
On CRTs (and on a very few LCDs), you adjust the black level using the brightness control (which is really what the techies call an offset). On most LCDs, the black level isn’t controllable separately from white luminance—the only real control is the brightness of the backlight—so you simply have to accept what the calibrator gives you. We’ve seen many cases where the indicator of the current measured black level jumps around, making it quite hard to determine when you’ve arrived at an optimal setting. In this situation, the key is patience. Don’t expect the indicator to magically stop moving around—it won’t. Instead, just keep making small adjustments to the black level. Gradually, the results will converge on the target point.
Some calibrators let you set the black level visually, instead—they usually show a dark gray patch against a black one. With this approach, it’s very easy to set the black level too low, which results in clipping potentially useful shadow values. The goal is to set the black level a hair (since you’re working visually, more technical definitions don’t apply) higher than no signal at all. Figure 6-4 shows some different approaches to setting the black level.
Figure 6-4 Setting black level
Setting the black level is by far the most difficult part of monitor calibration. It’s worth learning the quirks of your chosen calibration system and working with them to get the most consistent results possible. See “Black-point check” in Chapter 9, Evaluating and Editing Profiles, for some techniques that can help you refine the black-point setting.
Setting the Color Temperature
In CRT monitors, the color temperature is adjusted by changing the individual gains on the red, green, and blue guns. With LCDs, it can only be accomplished by filtering the backlight, so we generally leave LCDs at their native white point, which is usually close to 6500 K anyway.
But the level of control that CRTs offer varies from model to model. Typically, CRTs offer one (or more) of the following:
• Several preset color temperature settings (typically 5,000 K, 6500 K, and 9300 K, though some offer additional presets)
• Continuously variable color temperature
• Gain controls for two of the three guns
• Gain controls for all three guns
So how you get to the desired color temperature depends on the monitor controls. Again, with automatic systems, the software takes care of the necessary adjustments automatically. Many of the manual calibrators tell you to skip this adjustment if your monitor doesn’t have individual R, G, and B gains, but we find it useful on all CRTs (see Figure 6-5).
Figure 6-5 Setting white point

CRTs with presets
We always start out with the preset closest to our desired color temperature, but the presets are often off by a considerable amount, almost invariably giving a lower color temperature than the preset value. In that case, we may try going to the next-higher preset. For example, if the 6500 K preset measures as 6100 K, and the monitor offers a 7500 K preset, we’ll use that instead. Once we’ve determined the best preset to use, we’ll skip this step in future calibrations.
CRTs with continuously variable color temperature
Again, the color-temperature labels on the color-temperature control are often significantly off from the real, measured color temperature. We adjust the color temperature to get as close as possible to the desired result.
CRTs with gain controls
We find that it doesn’t make a whole lot of difference whether the monitor offers control over two or three of the channels—we rarely adjust more than two, anyway. Most calibrators show you where the guns are now, and where they need to be. Make the adjustments until you get as close as possible. (How close this is varies considerably with different monitors, different instruments, and different software—after you’ve gone through the process a few times you’ll develop a sense of how far you can go before you reach the point of diminishing returns.)
Calibration and Profiling
At this point, you’ve done all the difficult stuff—setting the analog controls is really the only part of calibrating and profiling the monitor that requires user intervention. The software displays patches on the screen, looks at the measurements from the instruments, and makes the necessary tweaks to the videoLUT. Then it displays some more patches, looks at the measurements, and builds a profile. There are, however, a few things that can go wrong.
Make sure that some screensaver software doesn’t kick in during calibration. Any good calibration software should detect when this happens, and, in fact, most have code that prevents it. Nevertheless, if your floatie fishies appear during calibration, you may have to adjust the screensaver’s settings, or disable it altogether. And of course, you’ll have to restart the calibration process.
It’s possible to throw off a calibration by allowing your mouse pointer to move across the measurement area during a measurement. Most calibrator programs nowadays are able to hide the pointer if it enters the measurement area, or at the least can detect when this happens and beep angrily at you, but there are still exceptions. It’s just good advice to keep the pointer safely off to the side and don’t touch anything during calibration.
If you use the calibration process as an opportunity to take whatever kind of break you need, check that the calibrator is still attached to the monitor when you come back. The industrial design of instruments intended to attach to the monitor has greatly improved since the early days, but it’s still by no means unheard-of for the instrument to fall off before the calibration is done. In that case, you need to start over.
Saving the Monitor Profile
Regardless of what type of calibrator you are using, the last thing it does seems like such a tiny afterthought, but is the key to getting this laboriously calibrated monitor into your color management system—saving and naming the monitor profile.
Some people create a new profile each time by including the date in the filename. We think this is silly—the condition that the old monitor profile described no longer exists since you’ve recalibrated the monitor. We recommend that you just overwrite the previous profile—the old ones are useless and just clutter your system.
Most profilers automatically save the profile in the correct location and load it as the profile that describes the monitor, even in dual-monitor systems. Unless you really know what you’re doing, let the software save the profile in its preferred location, which varies on different operating systems. On Mac OS 9, save the profile in the ColorSync Profiles folder in the System Folder (some calibrators save the profile in the Displays folder inside the ColorSync folder—either way is fine).
On Mac OS X, the situation is a little trickier. Some calibrators save the profile in the /Library/ColorSync/Profiles/Displays folder if you’re logged in as an Admin user, thereby making the profile available to all users. Others save it in the ~/Library/ColorSync/Profiles/Displays folder—that’s your “Home” Library, which is unavailable to other users. Eventually, we hope vendors will make up their minds whether monitor profiles should go with the user or with the monitor, but meanwhile we advise saving it in /Library/ColorSync/Profiles whenever possible, so all users have access to it.
On Windows 98, 98SE, and ME, save the monitor profile in Windows SystemColor. On Windows 2000, and Windows XP, save the monitor profile in WinNTSystem32SpoolDriversColor. On Windows NT, save the profile in WinNTSystem32Color.
Piece of Cake
Monitor calibration and profiling is really very straightforward, which is just as well, because it’s the lynchpin of a color-managed workflow. Most people say they want to trust their monitor, and calibration and profiling is the first step in attaining that goal. Often, though, it’s an iterative process. See “Checking the Display,” in Chapter 9, Evaluating and Editing Profiles, for techniques to help you evaluate and improve your display calibration and profiling.