
17. Automation and Scripting: The Smart Way to Be Lazy
Unfortunately, our desktop applications and our equipment—scanners, RIPs, and printers—don’t always give us the exact color-management options we need. Fortunately, automation and scripting provide us not only with solutions to these limitations, but also bring a lot of power and flexibility to workflows that we may not otherwise have considered.
The purpose of this chapter isn’t to cover every conceivable automation or scripting option, or even to serve as a primer. Instead, it’s meant to give you a taste of the kinds of things automation and scripting can do, and teach you the right questions to ask when you look for products to solve your particular needs.
Why Automate?
We use automation for the following reasons:
• To free humans from repetitive, brainless grunt work that doesn’t require intelligent human decision making or intervention
• To make efficient use of our available processing power
• To work around color-management limitations in our applications or equipment
For example, we may have scanners or digital cameras that we’ve profiled, but the software that drives them doesn’t embed profiles. We know which profile we need to assign to the images they produce, so rather than doing so manually in Photoshop, we can use automation (or scripting) to batch embed the appropriate profile in a single image, in multiple images, or even in folders of images. Since we don’t need to open or display the images, the performance advantages can be significant, especially with RAM-gobbling high-resolution images, and we free ourselves from mind-numbing, repetitive button-pushing.
A good example of using automation to work around an application’s limitations is using a color server to address desktop applications’ near-universal lack of color-management support for vector EPS—many automation products can process EPS files, and sometimes even embedded EPSs or TIFFs within EPS files. On the device end, it’s not uncommon for an imagesetter, platesetter RIP, or proofing device to have no idea what ICC profiles are. Color servers placed in front of such hardware can perform color management tasks before PostScript or PDF get to the RIP.
Color management offers one other very specialized type of automation—so specialized, in fact, that many people don’t even recognize it as an automation feature. DeviceLink profiles offer an elegant way to store specific, hardwired device-to-device conversions—see “DeviceLink Profiles,” later in this chapter.
Color Servers
Color servers are sometimes called batch processors, or generically, automation products. Color servers placed at the front-end of another device/RIP do their work by parsing PostScript or PDF files, changing only the numeric values—they don’t damage the integrity of the PostScript or PDF files. When they process bitmap information (such as TIFF, JPEG, or bitmap EPS), they effectively open the file, perform the conversions, then rewrite the file.
Common color server features include
• Processing multiple files or folders of files.
• Performing color conversions on TIFF and JPEG. Some also support EPS (both bitmap and vector).
• Supporting embedded profiles, with a mechanism for assuming profiles if no embedded profile is present.
• Using a LAB-based look-up table for converting Pantone (sometimes also Focoltone) colors to custom RGB or CMYK builds.
• Batch embedding profiles, or batch removing embedded profiles.
• Most support hot folders. Some support print queues that appear on the network as though they were PostScript printers.
Color Server Pros
Like any other technology, color servers have their pros and cons—we’ll look at these in a general way before getting into specific examples.
• Fast processing—processing is much faster than doing an equivalent procedure in an application such as Photoshop, because the files don’t need to be opened or displayed.
• Configurability—you can set up color servers to do tasks ranging from simply embedding profiles into images to simultaneously producing multiple converted files for scatter proofs and monitor soft-proof versions. You can set it to color manage TIFF, but not EPS. You can set it to color manage RGB images, but not CMYK.
• Front end to almost any hardware—sticking a color server into a workflow provides a single front end for color-managing a variety of devices. When you add a new proofer, you can simply add another queue to support that device without having to worry if it supports ICC profiles, and your future purchasing decisions don’t depend on built-in color management support.
• Hot folders and print queues available over network—you can set up hot folders to accommodate remote clients over a network and publish print queues on the network, too. Users don’t have to deal with configuration issues or decide which profiles to use for source and destination—instead they simply place the files into the appropriate hot folder. Faster, and less prone to error.
• Named color system support—lets you deal effectively with named color systems like Pantone and Focoltone by generating custom CMYK equivalents for your specific devices. Equally important, it uses the same CMYK equivalents for all instances of a given Pantone or Focoltone color, effectively solving the seemingly unending problem of applications that use libraries containing different CMYK equivalents for the same solid colors.
Color servers are very well suited to repurposing already separated jobs (coated to uncoated, or between inksets) or to turning any device with a large enough gamut into a proofer, even if it doesn’t have explicit color management support.
Color Server Cons
Lest the picture we’ve painted above sounds overly rosy, we feel bound to point out the following downsides to most server-based automation products:
• Costly—especially if you’re used to the prices for desktop applications. Prices range from just under $1,000 to about $3,000.
• Limited rendering intent control—if you plan on using a server in late-binding workflows—such as using all-RGB page layout, and printing RGB PostScript to a color server that converts to the appropriate CMYK space—you generally can’t specify per-object rendering intent control. (We don’t know of any page-layout applications that can generate a PostScript stream that contains rendering intents.) You can, however, specify rendering intents for classes of objects, such as “images” and “vector graphics,” to use something else.
• Limited source profile control—when a page-layout application generates a PostScript stream, it doesn’t embed ICC profiles for formats other than EPS, and it only does so for EPSs that already contain embedded profiles. If you use TIFF or JPEG file formats with a variety of source profiles, the color server can only assume source profiles. Again, you can specify source profiles for different classes of objects, but that’s it.
Most of these cons have workarounds. The subtle differences between relative colorimetric and perceptual rendering may be within acceptable tolerances for many workflows, so the limited choice of rendering intent may only be a problem in workflows aimed at very high-quality output. And if you can standardize on a single source space in the page layout, the limited source profile control isn’t a problem because the assumed profile is always correct.
Late-binding workflows that use color servers for final conversion simply don’t provide per-image control over conversions—but even in high-end workflows that demand per-image control, servers can still do conversions to use devices that don’t have explicit color-management support as proofers, and to assist with solid-color matching.
Examples
This is by no means an exhaustive review of every server-based automation product available. We’ve chosen the following examples both because we’re familiar with them and because they provide good illustrations of the capabilities of server-based automation in general.
Praxisoft ICC Autoflow
ICC Autoflow, available for Macintosh and Windows, processes PostScript, EPS, and—on Windows only—PDF. A reduced-cost desktop version doesn’t support hot folders—you point it manually to a folder, then the files it contains are processed according to the configured settings. Both versions let you create and save multiple configuration sets (see Figure 17-1). Note that this product doesn’t process grayscale content—it simply passes through unchanged.
Figure 17-1 Praxisoft ICC Autoflow

As discussed in Chapter 15, Color Management in QuarkXPress, VectorPro creates custom palettes that are also supported in ICC Autoflow.
GretagMacbeth iQueue
iQueue comes in several flavors: 110, 120 and 140. The primary differences are that 110 doesn’t support PostScript (or EPS), while the other two do. In addition to 120’s features, 140 adds PDF and print queue support instead of just hot folders (see Figure 17-2).
Figure 17-2 GretagMacbeth iQueue
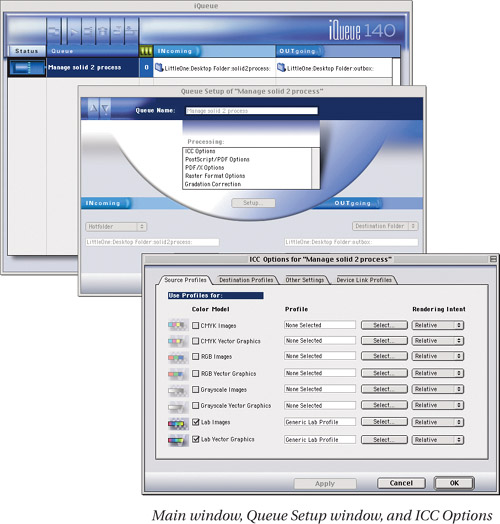
A few other features:
• Explicit support for PDF/X-1a and PDF/X-3 (140 version)
• DeviceLink and abstract profile support
• Additional file formats: BMP, Scitex CT, and PNG
• A built-in mini-Web server that lets you obtain job status from any workstation
Color Server Questions
If you’re contemplating a server-based automation product, here are three important questions you need to ask:
• Which file formats are supported? Most though not all workflows require PostScript (and hence EPS) support. Increasing numbers want PDF support.
• What black-preservation options are offered? Does black-only text remain black-only when converted? What about black-only drop shadows? Most products have some means of ensuring that black-only text is ignored, and thus remains device black instead of being converted to a rich black.
• What is my intended use for the color server? As we’ve previously discussed, color servers are well suited to repurposing and proofing. They can also make separations in high-volume workflows in which the separation is subsequently checked by a skilled operator. The lack of per-image rendering intent or source profile control may be acceptable in some workflows and not in others.
DeviceLink Profiles
DeviceLink profiles are one of the seven profile classes defined by the ICC specification. A DeviceLink doesn’t describe a device—instead, it’s a concatenation of two or more profiles, in a single file. It acts as both source and destination. They’re an automation feature because the alternatives involve manually manipulating file content, which is why we cover them in this chapter.
More about Links
Three things make them different from the device profiles we’ve discussed throughout this book: They’re an apparent exception to the rule that you need at least two profiles to make a conversion happen. Even though a DeviceLink is a single file, it always contains at least two device profiles.
The DeviceLink itself is not a device profile. They rarely contain a PCS; therefore they cannot describe device behavior in relation to a device-independent color space. This also means you can’t embed them into images. They don’t describe a single color space, but a hardwired conversion from one set of device values to another.
The source and destination tables both contain device values, so the conversions are directly from RGB to CMYK, or CMYK to CMYK, depending on the device profiles used to build the DeviceLink. (The PCS is involved in the initial joining of the two profiles, but once that initial concatenation occurs, the PCS has played its role.)
DeviceLinks are always unidirection—conversions are only from the profile that was originally defined as the source to the profile that was originally defined as the destination at the time the device link was created.
Some caution is required when building workflows around products and scripts that use DeviceLink profiles. Most implementations assume that if you are sending documents to be processed by a DeviceLink that you are doing so with foreknowledge that any embedded ICC profiles will be ignored in favor of the DeviceLink’s source profile. This implies content is normalized to favor the DeviceLink’s source profile, and if that’s not the case you will get less than ideal results. Thus, DeviceLinks are well suited for proofing and repurposing scenarios, but will require more caution if you use them for making separations. They’re just a look-up table, after-all, but due to the lack of a PCS in the middle, their unique channel data is not lost in the course of a PCS becoming involved in the conversion. These advantages seemingly defy traditional color management convention, and are at least as much about automation as color management, if not more so about automating.
Why use DeviceLinks?
Normal profile-to-profile conversions sometimes do things we don’t want. For example, we usually want 100% black (C0 M0 Y0 K100) to stay 100% black, but CMYK conversions through the PCS always turn the four original channels into three before turning them back into four, so there’s just no way they can preserve black-only text or drop shadows. They turn into a rich black, with the attendant registration headaches, instead. A DeviceLink lets you force the conversion to 100% black.
Likewise, if you have a yellow background, or yellow text, normal device profile conversions will add scum dots as it attempts to compensate for hue differences between source and destination. The most common instance of this is when proofing, but it could just as well be a job originally separated for a low-quality stock and the job now needs to be printed on a higher-quality stock as well. Traditional color management will try to match the dingier gray yellow on the lower-quality stock, and a Device-Link can be set to preserve channel purity.
Traditional workflows will use simple curves to adjust for tone reproduction differences, but they cannot compensate for differences in ink hues where you should compensate for them, such as in photographic images, nor do curves compensate for differences in wet trap. A DeviceLink can, while also preserving channel purity unlike output device profiles.
Making DeviceLinks
For generating DeviceLink profiles, our favorite tool is Link-o-lator 2.0, by Left Dakota Inc. (www.leftdakota.com), because it offers controls and options we haven’t found anywhere else. You can download a trial version, which comes with documentation in PDF format describing the nitty-gritty of various features (see Figure 17-3). Two features are particularly valuable:

• You can build in black point compensation, so you get a DeviceLink profile that simulates a conversion using Adobe’s black point compensation (see “Black Point Compensation” in Chapter 12, The Adobe Common Color Architecture.) For non-Adobe products, it’s the only way to get conversions using black point compensation.
• You can specify pure channel preservation with dot gain compensation, which can be used to preserve black, or any of the other channels in the destination profile. Most products offering black channel preservation do only that, preserving the black channel exactly so the pre-conversion and post-conversion black is identical. This is rarely useful, because the source and destination devices often have different black dot gain. Black channel dot gain compensation preserves the black channel purity while compensating for the dot gain difference, so you still get a black-only drop shadow when you repurpose CMYK images, but the tonal characteristics of the black channel are preserved.
Another application for making DeviceLink profiles is UltraLinks 1.0, also from Left Dakota. (We are convinced they are totally obsessed with DeviceLink profiles.) This application is uniquely suited for building RGB to CMYK DeviceLinks. You can ensure 255 R, 0 G, 0B always converts to specific CMYK values that, for example, contain no cyan or black. Or 255 R, 255 G, 0B always converts to 100% yellow.
There are controls to affect the blending between this “color-by-the-numbers” approach, and the colorimetric result mandated by the original source and destination profiles. While we have not fully put this product through the wringer, we think it’s interesting and solves a number of problems some people consistently complain about with respect to conventional RGB to CMYK conversions.
How to Use These Darn Things?
None of the major color-managed applications discussed in this book support DeviceLink profiles. While long in the tooth, Apple’s free ColorSync Plug-ins for Photoshop provide support for DeviceLinks on import and export, and but most of the time DeviceLink profiles belong in RIPs, in color servers, and in prepress equipment that explicitly supports them. Some scripting methods, such as AppleScript, discussed later in this chapter, will also support DeviceLinks.
Prepress Solutions
Prepress solutions are proprietary modules that fit into an existing prepress workflow, such as Creo Prinergy or the Rampage System made by Rampage, Inc. Their features vary widely—some only offer color-management capability as an extra-cost add-on; others have very limited color-management functionality. While they vary in their capabilities, these types of solutions generally share two common characteristics:
• The workflows into which they integrate are inherently late-binding. Conversions happen at the prepress stage, immediately prior to printing, rather than at the design or customer approval stages. You can’t get much later than that.
• The solutions are proprietary. In contrast to color servers, which are designed to work with practically anything that has a profile, integrated prepress solutions work only in the specific prepress workflow system for which they were designed.
Who Should Consider Prepress Solutions?
These products plug into complex and expensive prepress workflow systems that cost tens or even hundreds of thousands of dollars, and critiquing such systems is well beyond the scope of this book. If you’re an individual or a small shop, and such workflow systems are something you neither want nor need, the only reason to read this section is to gain some insight into the kinds of things that happen to your job once you submit it.
This discussion deals solely with the pros and cons of the color-management aspects of the products, and its only purpose is to help you decide whether you’d be better served by a proprietary color-management module for your existing (or intended) workflow system or an open color-management solution. The trade-off is typically one between convenience and cost. A proprietary color-management module offers the convenience of seamless integration into your workflow system and one-stop shopping for service and support, but you can expect to pay a hefty price for something that more or less replicates the standard color-management features found in desktop applications. That said, prepress solutions can help in several situations.
Effective late-binding workflow solutions
For workflows where the intended output is unknown during the design process, products in this category offer per-object source profiles and per-object rendering intent control, so that you can prepare the content for separation without actually knowing the destination. Once the destination becomes known, everything is ready to create final separations. In lower-volume workflows, you can color manage the content in QuarkXPress at print time, but that’s less practical in high-volume workflows that rely on high-end prepress solutions.
Hard proofing
Some of the products in this category offer explicit inkjet printer support. Enabling color management can turn an inkjet with a sufficiently large gamut into a proofing device.
Postflight normalization
If preflight rejects a submitted job solely because it contains a few RGB images, the workflow system can assign appropriate source and destination profiles, and convert those silly RGB images into CMYK. This is much more efficient than the traditional alternatives, which are either to reject the job, or to have someone open the images in Photoshop, convert them, update the placed images in the page-layout application, then output another PostScript file....
Solid color substitution
Prepress systems can often parse the PostScript to find instances of solid-to-process Pantone or Focoltone color conversions. When it finds them, it can substitute your custom hand-tuned CMYK equivalents, so you get the best possible simulation of solid colors, no matter which application originally specified them.
The Downsides
You need to judge the downsides to these solutions in the larger context of the entire workflow system, of which the color-management component may be a relatively tiny part.
Price
None of the vendors we’ve spoken to are willing to quote exact prices because “they vary” depending on the particular workflow bundle. That said, while pricing covers a fairly wide range, the approximate number we keep seeing “thrown out there” is $5,000, which sounds like a hefty chunk of change to replicate what boils down to the basic desktop color-management features.
With growing demand, we predict that color-management capabilities will become standard in future prepress solutions, but for now, they often cost extra. The best piece of advice we can offer you is to be a savvy consumer—ask lots of questions, and see demos (including ones with typical, and maybe a few atypical, jobs) to see just what they’ll buy you.
Training
The challenge with closed proprietary systems is finding people who can train you how to use them and integrate them into your specific workflow. The few people who are really knowledgeable about integrating color management into proprietary workflow products tend to command top dollar.
Examples
The two products presented here typify the potential differences in this class of product and illustrate the need for careful research. Color-management support is available in Xinet, Rampage, and Apogee, among others. But the term “color-management support” means quite different things to different vendors. You need to dive in and find out what each one means.
Helios ImageServer and PDF Handshake
These are separate products, but are complementary in many workflows. ImageServer used to be called Helios EtherShare OPI, and is an image handler more than a prepress workflow solution. It combines OPI and color-management features, so it can change image size, resolution, and compression, in addition to doing color management. Unique features we like about this product include:
• Print queue support. In Helios ImageServer, configured print queues appear as virtual printers, so the user simply prints to the appropriate print queue—such as “Coated Stock #2” or, for a proofing queue, “Eps10K Mgl CS#2” (to denote an Epson 1000 using a Mitsubishi glossy coated paper, simulating the press using coated stock #2). Naming systems are workflow-specific—the point is that you can name the queue as whatever makes sense for your workflow and your people.
• Remote proofing. You can upload PDFs to PDF Handshake, which rasterizes and color manages it, then soft-proof the result in a Web browser on a suitably calibrated and profiled display. Note, however, that PDF Handshake honors embedded profiles in all content, both bitmap and vector. For bitmaps, PDF Handshake lets you remove or reassign profiles in bitmaps when you don’t want to use the embedded one, but for text and vector content, you’d need to use something like PitStop Pro or Server.
Creo Prinergy
Prinergy is a full-blown prepress workflow system that’s similar to Scitex Brisque, except that it’s PDF-based, so everything that goes into Prinergy is in PDF format. Prinergy offers two levels of color-management support:
• Standard. The standard level sees and uses the embedded profiles for each object in the PDF as source profiles, and converts them to one hardwired SWOP-based destination profile. If you’re satisfied with a workflow that converts from the embedded source profiles to a SWOP destination, the standard level of color management is all you need.
• Advanced. The advanced color-management license lets you override or assign source profiles for each object in the PDF, and select a custom profile for the destination. It supports not only CMYK, but up to eight-channel ICC output device profiles, so you can use it to make Hi-Fi separations. It also supports DeviceLink profiles, black preservation, and proofing.
Prinergy can perform color-management tasks (embed, change embedded, or convert) when the job is first brought into the workflow, or at any time thereafter, but proofing conversions happen only when you generate the output stream to the proofer, so it doesn’t create a separate proofing file. You select the job, the proofing device, and the proofing profile, then the job is converted so that the proofer simulates the selected destination (the press or a contract proofing system). If your proofing system does its own color management, and you prefer it, you can submit the job for proofing as final press CMYK without specifying a proofer profile, so that you don’t end up with double color management.
Important Questions
If you’re contemplating introducing such a product into your workflow, here are some of the questions we think are critical:
• Does the product support black preservation? It’s almost always a problem when 100% black-only text and drop shadows get converted to rich black, or when your carefully crafted black channel vanishes because it gets converted to LAB, then reseparated. This always happens when you use color management for repurposing (CMYK-to-CMYK) conversions.
• Does the product support black scaling? A black channel for a low-quality uncoated stock won’t give good results when the job is repurposed for a higher-quality coated stock if the black channel is simply preserved. What’s really needed is to preserve the tone reproduction curve of the black channel, not the original numeric values. For this, you need a scaling function for the black channel to compensate for the differences in dot gain between the source and destination devices. If the product you’re looking at doesn’t have this feature, and you think you need it, see if it supports DeviceLink profiles instead (see the section, “DeviceLink Profiles,” earlier in this chapter).
• Can automatic RGB-to-CMYK conversions give me the quality I need? This is something you can test without buying or upgrading existing equipment. Profile conversions are made with no knowledge of the image content—they’re one-size-fits-all, treating a picture of a black cat in a coal cellar exactly the same way as a picture of a polar bear in the snow. With good profiles, you may be able to create acceptable separations without any intelligent human intervention, but premium-quality work usually needs image optimization either before or after separation. You need to look at the work you do, and test the quality of your automatic profile-to-profile conversions, before you can answer this question.
• Are DeviceLinks supported? Many of the above issues can not only be resolved, but resolved more easily and with greater flexibility if the product supports DeviceLink profiles, and you use one of the products mentioned in the DeviceLinks section, earlier in this chapter.
In-RIP Color Management
In-RIP color management is most commonly used for proofing, because the total lack of control inherent in in-RIP separations usually doesn’t work in other workflows. It occurs in three different ways:
• Front-end. The conversions are done before the PostScript is interpreted. This is like having an integrated color server in your RIP product, and is most common in proofing products such as the BestColor RIP. You can treat bitmap and vector objects separately, and automatically replace solid Pantone colors with process CMYK equivalents.
• Back-end. The PostScript is interpreted, creating a rasterized page image which is then color-managed and sent to the output device. Since there’s only one raster object, there can be only one source and one destination. This approach is usually adequate for basic proofing needs—an example is the now-orphaned Adobe PressReady.
• In-RIP. This is literally in-RIP conversion—color management is performed by the PostScript interpreter as part of the PostScript interpretation process. The two flavors are PostScript color management and ICC-based in-RIP color management. In theory, any PostScript level 2 RIP at version 2017.xxx or higher supports PostScript color management, but in practice, workable PostScript color management is rarer than hen’s teeth. Global Graphics’ Harlequin RIP has an ICC option that literally builds an ICC-based color-management engine into the RIP, so it uses regular ICC profiles to perform the conversions.
The Good
We’re generally not fond of solutions that rely on sending our jobs into a mysterious black box, but proofing is a simple enough and unambiguous enough conversion—from output CMYK to proofer CMYK or RGB via absolute colorimetric rendering—that it’s an exception to our general rule. The main advantage it confers is simplicity—you simply send the final output files to the proofer, and the RIP takes care of the necessary conversion.
The Bad (and The Ugly)
In-RIP separations do involve sending your data into a mysterious black box, and hoping that the mysterious black box does the right thing. In-RIP separations tend to rely on assumed source profiles and rendering intents—there’s no consistent or reliable mechanism for specifying custom, per-object source profiles and rendering intents.
InDesign 2 does provide a consistent mechanism for creating PostScript source profiles for each object (Color Space Arrays, also called CSAs), and PostScript destination profiles with the proper rendering intent for each object (Color Rendering Dictionaries, also called CRDs). But you need a RIP that consistently uses them. Some RIPs ignore CSAs and CRDs entirely, others honor RGB CSAs and ignore CMYK CSAs, and some use CSAs but ignore downloaded CRDs and use only the RIP’s built-in CRD. If you’re tenacious enough or lucky enough to sort through the mess and create a functioning system for anything more complex than basic proofing conversions, we take our hats off to you—and as we mentioned elsewhere, maybe you should write a book!
Scripting
We sometimes find it strange that smart people who use computers every day to carry out tasks of great complexity simply glaze over as soon as the word “scripting” is mentioned. If pressed, we’d have to confess that we often number ourselves among those smart people—we’re far from being scripting mavens, but we often use simple scripts, and we’ve seen what the more complex ones can do.
Scripting can save enormous amounts of time and eliminate equally enormous amounts of mind-numbing drudgery. But making it do so demands a hefty initial investment of time and energy.
What Is Scripting?
Scripting is the act of writing a script in a language like AppleScript, JavaScript, or Visual Basic, that makes the computer do useful things. As such, it’s a bit like programming in the way parking a car is a bit like landing the Space Shuttle—both require attention to detail and skills that you have to learn, but one requires attention to a lot more details, and learning a lot more skills, than the other.
Writing scripts is a great deal simpler than writing code, but it does require you to learn a scripting language, and while scripting language resembles natural human language much more than programming languages do, it’s not by any stretch of the imagination natural human language.
What Can Scripting Do?
Scripting can do almost anything you can imagine. It lets you leverage existing applications—for example, Photoshop 7 offers extensive JavaScript support, and almost anything you can do in Photoshop can be JavaScripted. You can also write scripts that automate the communication between applications—for example, an AppleScript could pass off images to Photoshop, have it run a JavaScript to resize, rotate, and color manage them, and then pass them onto QuarkXPress for automated layout. The possibilities are nearly endless.
Scripting Advantages
One of the biggest advantages that scripting has over other automation tools is that it’s essentially free—the tools for scripting are already built into your operating system. (Of course, your time is probably worth something too.) But scripting offers other advantages—here are the ones we find most compelling.
Customizability
Perhaps the biggest benefit of scripting is that it can automate almost any custom task as long as you can break it down into manageable chunks. Some scripting languages and tools—such as AppleScript with AppleScript Studio, and Visual Basic—let you create actual standalone applications, including a user interface to prompt the user for information or to provide status report feedback.
Leveraging existing applications
With AppleScript, you can leverage the unique capabilities of existing applications as well as existing scripts. For example, you can create a script that launches Photoshop, asks it to open a folder full of images, embed a profile, then resave the image in a different format.
You can do many of the same kinds of automation using Photoshop’s Actions, but Actions don’t allow conditionals, while scripts do. If you simply use an Action to embed a profile in a folder full of images, it will fail if the folder contains images in different modes; with a script, you can make Photoshop run a different Action to embed the appropriate profile in RGB and CMYK images.
Speed
By eliminating unnecessary human interaction, you can drastically reduce the total time from beginning to completion. We’ve seen advanced, moderately complex scripts cut task time from 30–45 minutes down to 1–2 minutes.
Scripting Disadvantages
The only real disadvantage to scripting is that you have to learn to do it, and complex scripting seems to require a certain mind-set that some people have and others simply have not. You can’t buy scripts off-the-shelf the way you can other automation products, though the Macintosh platform supplies some handy scripts that automate simple color-management tasks. On Mac OS 9, they’re in the Apple Extras:ColorSync Extras:AppleScripts folder; on Mac OS X, they’re in the /Library/ColorSync/Scripts folder.
Learning the scripting language is only one part of the challenge. While you can eventually save time using custom scripts to automate common tasks, the development, testing, and debugging time is often quite lengthy.
Scripting Examples
The three scripting methods that we’ve selected—Photoshop Actions, JavaScript, and AppleScript—certainly aren’t the only ones, but they’re the most widely supported, and probably the most widely used. Photoshop Actions are mostly cross-platform, JavaScripts are almost completely cross-platform, while AppleScript is only available on Mac OS.
Our example scripts show what it takes to make all three scripting methods assign a profile to an image (ColorMatch RGB), convert it to U.S. Sheetfed Coated v2, and then save it with U.S. Sheetfed Coated v2 embedded. These scripts were provided courtesy of Nathan Wade, who can be reached at [email protected] (in case you’d like to hire him instead of learning scripting yourself).
Photoshop Actions are by far the easiest of the three—if you can do it with your mouse in Photoshop, you can probably record it as an Action. Then you can either run it manually, make it into a droplet, or use it with the Automate:Batch command. Photoshop Actions are generally cross-platform—the main problem area is file and folder navigation, which uses somewhat different syntax on each platform (see Figure 17-4).
Figure 17-4 Photoshop Action example

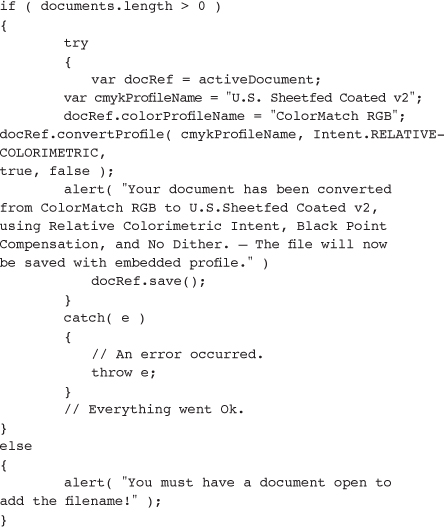
Photoshop also supports JavaScript, which has more cross-platform capability than Actions, but demands that you know something about JavaScript. If you can do it with the mouse, you can do it with JavaScript, and even you can’t do it with the mouse, you might still be able to do it with JavaScript. See Figure 17-5 for the JavaScript version of our scripting example—it does the same thing as the Photoshop Action.
Figure 17-5 JavaScript example
Last, but not least, is AppleScript. AppleScript is unique in that it can not only access ColorSync directly and do transformations on supported image types, but it can also drive scriptable applications. A single AppleScript can ask Photoshop to do a series of tasks—even ask it to run a pre-written JavaScript—and then forward the processed files to QuarkXPress or InDesign for automatic formatting and layout.
AppleScript Studio, new in Mac OS X, is an AppleScript development application that lets suitably motivated individuals create full-blown applications with an actual user interface. AppleScripts in Mac OS X can also access UNIX command-line scripts, and make XML-RPC calls and SOAP requests for remote procedures over the Internet. Very cool stuff for those who understand it.
In the AppleScript example we’ve included, you’ll first notice it’s a lot longer, because AppleScript assumes nothing. You have to teach it pretty much everything, including the fact you want to open an image. While you need to be a lot more specific and detailed when using AppleScript, it lets you do things that would otherwise only be possible if you became a programmer (see Figure 17-6).
Figure 17-6 AppleScript example


Hybrid Scripting and Remote Profile Access
Our friend Nathan Wade (www.scriptingpro.biz) has provided a simple script that further demonstrates the power of combining technologies. This script is an AppleScript that accesses a destination profile remotely stored on a server, installs the profile, then uses JavaScript to instruct Photoshop CS to convert a document, and save it with the profile embedded. Because it uses JavaScript, this capability is not limited to just Photoshop CS.
On Windows machines, you can use Visual Basic to access the URL location for the remote profile, download and install it, and then have Photoshop CS execute the JavaScript.
Platform-specific scripting is used to enable the Web access portion of this automation sequence, with a bulk of the code in platform-independent JavaScript to perform image handling and conversion.
The AppleScript is shown in Figure 17-7—make sure you name it “Download Profile - Use with Photoshop CS JavaScript.scpt”. The JavaScript is shown in Figure 17-8—make sure you name it “rwcm.js”. These are the only files you need, and you can download them from www.colorremedies.com/ realworldcolor.
Figure 17-7 AppleScript to download remote profile
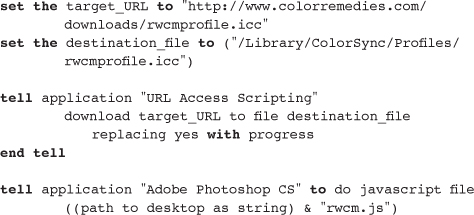
Figure 17-8 JavaScript to convert image using remote profile, and save with profile embedded

The Automation Trade-Off
The trade-off inherent in automation is that you gain efficiency at the expense of control over individual elements. It’s up to you to decide where that trade-off needs to lie in your workflow, but a good rule of thumb is that if you find yourself doing exactly the same task over and over again, it’s a good candidate for automation. The kind of automation you choose will depend on your workflow, your budget, and your skills, but it’s always a good idea to keep your eyes open for aspects of your work that cry out for automation. When you think about it, you probably have more computing power on your desktop than NASA had in its entire organization when it launched the Voyager program. If that power can free you from repetitive drudgery, why not let it?