
14. Color Management in CorelDRAW 10: It Manages Everything But Its Own Files
CorelDRAW has a rather clever user interface for color management that makes the way it functions relatively obvious, but its use of icons instead of menu options makes it a little hard to describe in writing.
Like Macromedia FreeHand, CorelDRAW sees CMYK as press-ready, so it doesn’t do any CMYK-to-CMYK conversions except when you make a composite CMYK printer simulate the Separations printer. Also like FreeHand, CorelDRAW only performs conversions on output (with one exception—see “Manual Controls,” later in this chapter) or on export. It supports embedded profiles in RGB images for import and export of TIFF, JPEG, and .PSD (Photoshop) formats, but it doesn’t support profile embedding in its own document format.
CorelDRAW settings are application-wide, so they apply to all open documents. CorelDRAW documents are always governed by only two profiles, one for RGB and one for CMYK, but the gaping hole in CorelDRAW’s color management is that it doesn’t embed these profiles in its own native files, and doesn’t offer any other mechanism for recording the settings that apply to a specific document. So the only way to color manage native CorelDRAW files is to note the settings manually, and associate them somehow (text file, Mac OS Finder Info) with the document—a kludge at best.
Color Management Preferences
You access the Color Management Preferences by going to Color Management on the Edit menu in Mac OS 9 and X, and on the Tools menu in Windows. The resulting dialog box shows a series of icons and arrows representing workflow (see Figure 14-1).
Figure 14-1 CorelDRAW Color Management dialog box

This dialog box works a little differently than most. As you move your mouse around, the cursor periodically changes into a hand. If you briefly pause, a description of what the hand is pointing to appears (see Figure 14-2). Each icon has a description, as does each of the arrows that serve to enable or disable color management in the direction of the arrow.
Figure 14-2 Mouse over in Color Management dialog box

To select a profile, click once on the black arrow below the icon for the device/feature you want to change, and a pop-up menu of available profiles appears—CorelDRAW finds ICC profiles in their usual locations on each platform. In addition, three of the icons have advanced options that are accessed by clicking once on the icon. If you click on an icon and nothing happens, that icon doesn’t have advanced options.
At the very bottom is a Style pop-up menu. These are presets—once you’ve configured CorelDRAW to your liking, you can click the “+” button to save your settings as a preset. The ColorSync Workflow preset grabs settings from ColorSync, such as the RGB default, CMYK default, and the current display profile. At least on Mac OS X, we’ve found the behavior to be inconsistent, so don’t rely on making changes in the ColorSync panel without also going into Corel’s Color Management dialog to make sure the profiles you want are selected.
We’ll describe each settings icon—including any advanced features—starting with the center icon, followed by the monitor, then clockwise from there.
Internal RGB
The center icon represents the RGB editing space used in CorelDRAW. By default it’s effectively disabled since its profile is the same as the Monitor profile, so no display compensation is in effect, although import, export, printer, and scanner conversions can still happen.
It’s important to understand that Internal RGB is the assumed RGB source profile for all RGB content, both native and imported. It doesn’t get embedded into CorelDRAW documents when you save, so you need to pick a profile and use it consistently. If you share documents with others who also want to use color management, you’ll need to tell them what profile you used for Internal RGB. If you change the Internal RGB profile while working on a document, the color behavior of all RGB content is updated immediately to reflect the new profile. This isn’t a conversion, but a change to the assumed profile—so the numeric values for RGB content don’t change—but their color meaning, and hence their appearance, does.
When you click once on the Internal RGB icon itself, you get an Advanced Settings dialog box (see Figure 14-3).
Figure 14-3 Internal RGB: Advanced Settings dialog box

Rendering Intent
Rendering Intent affects all conversions except those going to the display profile for on-screen preview purposes—Relative Colorimetric is probably the best choice considering the lack of per-object control.
Color Engine
Color Engine lets you choose a CMM. On Mac OS, if you choose ColorSync, CorelDRAW uses the CMM you’ve selected in the ColorSync control panel (OS 9) or System Preferences (OS 10.2 or older) or ColorSync Utility>Preferences (OS X 10.3), and if you choose Kodak Digital Science CMM, CorelDRAW uses that CMM for all conversions. On Windows, the options are Microsoft ICM 2.0 CMM or Kodak Digital Science CMM.
Monitor
This is where you select the profile for your display. When you click on Monitor, the Advanced Display Settings dialog box appears (see Figure 14-4). If you have activated either of the arrows coming from the Composite or Separations printers, then the “Highlight display colors out of printer gamut” option becomes available. It does exactly what the name implies—if the color can’t be printed on the output device the display is simulating, CorelDRAW superimposes a chosen warning color instead.
Figure 14-4 Monitor: Advanced Display Settings dialog box

What determines whether the on-screen simulation is based on the Composite or Separations printer profile is whether the arrow to the Monitor icon comes from the Composite or Separations printer icon. If it comes from the Internal RGB icon, the software just performs display compensation from the Internal RGB profile to the display profile.
Map spot colors into CMYK gamut
This option displays spot colors using their Pantone-specified process equivalents (which are pre-May 2000 in CorelDRAW 10) piped through the Composite or Separations printer profile (used as the source profile), and then to the display profile (used as the destination profile), to show how those CMYK builds would output on the simulated printer. It doesn’t create custom CMYK builds for Pantone colors—it’s an on-screen simulation only.
Composite Printer
This can be either an RGB or CMYK profile. CorelDRAW supports full RGB-to-RGB and CMYK-to-RGB workflows. To make the Composite printer simulate the Separations printer, click on the large curved arrow at the bottom of the Color Management dialog, which then deactivates the arrow between Internal RGB and Composite printer.
Import/Export
By default, no profile is selected for this icon; click on it once and you’ll get the Advanced Import/Export Settings dialog box (see Figure 14-5). Above all, note that this dialog pertains only to RGB. On CMYK import, CorelDRAW ignores embedded profiles and uses the Separations profile instead.
Figure 14-5 Advanced Import/Export Settings dialog box

The first options in the import and export sections (“Use embedded ICC profile” and “Embed Internal RGB profile,” respectively) are the settings we recommend. The others are potentially dangerous.
Import: Use embedded ICC profile
This option makes CorelDRAW use the embedded profile as the source profile for tagged RGB images, and the profile that you choose here as the source for untagged RGB images. From there, CorelDRAW converts images to the Internal RGB profile. If you choose “None” then it assumes the Internal RGB profile for untagged images, and no conversion occurs.
Import: Always convert using
This option ignores the embedded profile, substitutes the selected profile as the source profile, and converts the image to the Internal RGB space. Needless to say, we don’t think this is a good idea. If there’s a problem with the embedded profile in an image, correct it in the originating application.
Import: Ignore embedded ICC profile
This option ignores embedded ICC profiles, doesn’t convert the image, and assumes the Internal RGB profile.
Export: Embed Internal RGB profile
This option embeds the Internal RGB profile in exported RGB files.
Scanner/Digital Camera
Select a profile here to be used as the source profile for acquiring images from the File menu’s Acquire Image command. All images that come in through Acquire Image are converted to Internal RGB when Internal RGB and Scanner/Digital Camera are set to different profiles.
Separations Printer
This setting accommodates only CMYK profiles. The profile you choose here is used as the source profile for all CMYK content. It’s also used as the destination profile for the conversion that takes place when you print to the Separations printer. (Which profile is used at print time—this profile or the Composite printer—depends on settings in the printer driver, which we discuss in “Printing,” later in this chapter.)
Tip: Check Your Output Conversions
Make absolutely certain that the arrow between Internal RGB and Separations Printer is turned on, or CorelDRAW won’t use ICC color management for its RGB to CMYK conversions. Instead, it will use a built-in table whose separations are uncontrollable and usually pretty hideous. For the Composite printer, make sure that either the arrow from Internal RGB or the large curved arrow from the Separations printer is activated, for the same reason.
Importing
Importing files into CorelDRAW is fairly straightforward once you know the rules. The Import dialog box appears when you choose Import from the File menu (see Figure 14-6). When importing a file with an embedded profile, the “Extract embedded ICC profile” checkbox is enabled. If you check this box, then immediately after clicking the Import button for this dialog, you’re presented with a Save dialog box that lets you save the profile embedded in the image.
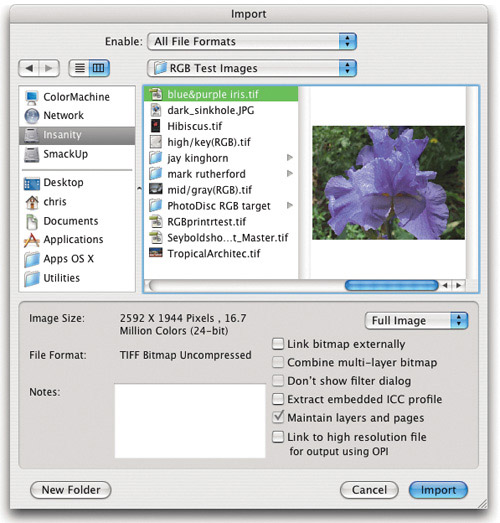
CorelDRAW does see embedded profiles in CMYK images, as the example figure shows, but it doesn’t retain them upon import. Instead, it always assumes the Separations printer profile as the source for any imported CMYK, ignoring the embedded profile.
For RGB importing, CorelDRAW honors embedded profiles and uses them as the source profiles (if you’ve configured the Advanced Import/Export Settings to use embedded profiles) in the following file formats: TIFF, JPEG, PSD, and CPT (Corel PHOTO-PAINT). We’ve tested TIFF, JPG, and PSD, and we’re confident that those formats are reliable.
Tagged RGB images then get converted on import to Internal RGB. Untagged RGB images use Internal RGB as their assumed profile.
Manual Controls
CorelDRAW has no manual controls for per-object profile assignment. However, it does let you do mode changes on already-imported bitmap images, such as from RGB to CMYK, CMYK to RGB, RGB to RGB, and even from RGB or CMYK to LAB.
• To convert RGB to CMYK, select an RGB image, then choose CMYK Color (32-bit) from the Mode submenu on the Bitmap menu. The image gets converted from the Internal RGB profile to the Separations printer profile.
• To convert CMYK to RGB, select a CMYK image, then choose RGB Color (24-bit) from the Mode submenu on the Bitmap menu. The image gets converted from the Separations printer profile to the Internal RGB profile.
• To convert RGB to RGB, select an RGB image, then choose Apply ICC Profile from the Mode submenu on the Bitmap menu, which opens the Apply ICC Profile dialog box (see Figure 14-7). The profile you choose in the pop-up menu is used as the source profile for the conversion—the destination profile is always the Internal RGB profile.
Figure 14-7 Apply ICC Profile dialog box

Exporting
The previously described Color Management Advanced Import/Export Settings dialog box implies that if you select “Embed Internal RGB profile,” CorelDRAW will embed the Internal RGB profile in the supported formats, and this is true.
At export time, the Bitmap Export dialog box appears, which contains an “Apply ICC profile” checkbox (see Figure 14-8). This control has varying effects depending on just what you’re exporting. When exporting RGB, it seems to have no effect.
Figure 14-8 Bitmap Export and EPS Export dialog boxes: Color Management options

The EPS Export dialog box contains a Color Management section (see Figure 14-8). If you don’t check “Apply ICC profile,” you get a hardwired separation instead of one that’s ICC based. You can choose the Composite or Separations printer profile as the destination using the radio buttons—CorelDRAW also displays the name of the specific profile.
When you select CMYK Color from the Color pop-up menu, the document is converted to CMYK using Internal RGB as the source and the Separations Printer profile as the destination—but only if “Apply ICC profile” is checked. Otherwise you’ll get a remarkably ugly hardwired conversion to CMYK.
Profile Embedding
The documentation states that the supported export formats for embedding profiles are TIFF, JPEG, EPS, PDF, PSD (Photoshop), CPT (Corel PHOTO-PAINT), and CDR (CorelDRAW). However, EPS files only seem to contain a reference to the profile, not the profile itself.
The CDR format doesn’t even appear as an export format option. Since we get no profile mismatch warning when opening an exported CDR file, even with an Internal RGB profile that doesn’t match what should be embedded in the document, we can’t tell whether or not a profile is really embedded.
The PDF format isn’t an export format option, but CorelDRAW offers a Publish To PDF command on the File menu. CorelDRAW doesn’t embed ICC profiles in PDF, at least as far as Photoshop and Enfocus PitStop Pro are concerned.
We can confirm that CorelDRAW does embed profiles in RGB TIFF, JPEG, and PSD files. It never embeds profiles in CMYK exports.
Printing
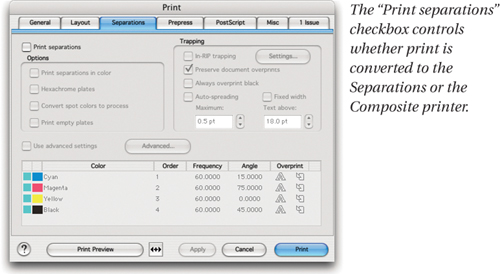
For color-management purposes, the options in the Print dialog are fairly straightforward. The first option selects the Composite printer profile or Separations printer profile as the destination for RGB-to-CMYK or RGBto-RGB conversions at print time (see Figure 14-9). In the Print dialog, under the Separations tab, the first option on the upper-left corner is “Print separations.” When this is unchecked, the Composite printer profile is the destination, and when it’s checked, the Separations printer profile is the destination. To produce simulations of the Separations printer on your composite printer, uncheck “Print separations,” and select the large curved arrow that goes from the Separations printer to the Composite printer in the Color Management dialog box. Piece of cake.
Figure 14-9 Print dialog box: Separations tab
The Misc tab of the Print dialog box contains two options that are easy to overlook.
First, the “Apply ICC profile” checkbox is available and checked by default in two situations:
• The arrow from Internal RGB to Composite printer is enabled in the Color Management dialog box, and the “Print separations” checkbox is unchecked.
• The arrow from Internal RGB to Separations printer is enabled in the Color Management dialog box, and the “Print separations” checkbox is checked (see Figure 14-10).
Figure 14-10 Print dialog box: Misc tab

Second, you must pay attention to the “Output color bitmaps as” popup menu if you want RGB output. Even if you select an RGB profile for the Composite printer and it appears under “Apply ICC profile,” if you don’t select RGB from the “Output color bitmaps as” pop-up, your images get converted to CMYK or grayscale instead.
Strengths and Weaknesses
CorelDRAW lets you work entirely in CMYK, using color management for on-screen previews and proofing. It successfully color manages exports according to the Color Management settings and a simple set of rules for a limited set of file formats. You can print to RGB printers, but native elements built in CMYK may not turn out the way you want. The biggest plus for CorelDRAW is its Color Management dialog box user interface. The glaring weakness that it doesn’t embed the profiles that define RGB and CMYK into its own documents. So it’s relatively easy to export color managed content from CorelDRAW, but the only way to manage CorelDRAW files themselves is to keep track, manually, of the RGB and CMYK profiles you used to create the document.