
11. Color Management in the Operating System: Who Does What to Whom, When?
Apple and Microsoft tend to paint an overly rosy picture of color management as a panacea that will make whatever comes out of your desktop printer match your monitor, automatically. Anyone who has ever printed from a desktop computer, or has a passing knowledge of the laws of physics, knows otherwise. The truth is that OS-level color management does less than the marketing hype, but it also does much more than the marketing hype.
It does less in that OS-level color management can’t change the gamut of your printer to match that of your monitor—it can come reasonably close, but there’s simply no way you’ll get that R0, G0, B255 blue out of your printer (or, for that matter, on any other reflective hard-copy medium).
But it does more in that it’s not just a color management system—it’s a whole architecture for color management systems to live in. OS-level color management provides a whole slew of services that applications can call to do all sorts of useful things, but in some cases makes us do more work than should be necessary.
Color Management in OSs, Applications, and Drivers
One of the more confusing aspects of color management lies in figuring out who does what to whom, when. One might think that in the year 2004 we’d have applications, OSs and device drivers that could effectively talk to each other and prevent obviously conflicting settings from being used. But those ducks aren’t yet in the row. Therefore, if you want to ensure that color conversions happen correctly, at the right time, and only at the right time, understanding the various interactions yourself is critical.
OS-level color management is the generic term for ColorSync on Mac OS, and ICM on Windows. In the past, we’ve thought of OS-level color management as something that gets invited to the party on request, and on Windows, Mac OS 9, and Mac OS X up to version 10.2.x, this is indeed how OS-level color management behaves—it’s invited either by applications or drivers specifically written to ask the OS for a color conversion. It often requires an explicit setting in the application or driver for it to be used. There are only two actors to cause OS-level color management to occur—applications, and drivers.
But Mac OS X Panther (10.3.x) changes the rules, and comes to the party whether invited or not. The operating system follows an “always on” philosophy to color management, unless specific settings are used to prevent it from being involved. So the possible actors in Panther are: applications; drivers; and the OS itself. This approach has some potential pitfalls that we discuss in detail in “Mac OS X Panther (10.3.x),” later in this chapter.
The main graphic arts applications, such as those from Adobe, Quark, Macromedia, and Corel, offer user-configurable color settings in the applications themselves. We call these “color-managed applications.” The distinction between color-managed and non-color-managed applications is important because the operating systems don’t negotiate potential conflicts between settings in color-managed applications and device drivers. So you have to do so yourself.
Color-managed applications allow far greater control within the application than do the comparatively rudimentary settings in printer drivers, for example. Professional users will likely want to rely on application settings and commands for color management, and ensure no additional OS-level color management occurs.
Non-color-managed applications rely on driver settings, and a series of assumptions (made by either the OS or the driver), to control color management, because that’s all there is.
One of the keys to successful color management lies in making sure that OS-level color management in the various device drivers cooperates with the application-level color management done by color-managed applications, rather than injecting unexpected extra conversions into the color production chain.
With color-managed applications, you can use either application-level color management or driver-level color management, but we recommend using the application controls to manage color rather than relying on limited printer driver options. You almost invariably want to avoid using application-level and driver-level color management at the same time, so much of this chapter is devoted to understanding how OS-level color management functions so that you can make sure that it doesn’t do anything you didn’t expect.
ColorSync and ICM
Apple’s ColorSync and Microsoft’s ICM (Image Color Management) are the technologies that provide color management services as part of the Macintosh and Windows operating systems, respectively. As previously noted, they’re both less than and more than color management systems.
What Are They? What Do They Do?
The overwhelming bulk of both ColorSync and ICM is comprised of APIs, or Application Programming Interfaces. These are chunks of code that developers can exploit using relatively simple calls to the operating system. They provide a way for developers to include color-management capability into their applications without having to write their own color management system from scratch, and they also provide an architectural framework in which third-party CMMs can live.
For example, a programmer might use CMConvertXYZToLab to ask ColorSync to convert CIE XYZ-based data into CIE LAB. There are APIs for almost anything you can think of: support for all of the profile classes, conversions, status of conversions, reporting of profile locations and profile information, and ways for applications to request user settings related to color management—pretty much all the basic housekeeping services related to dealing with profiles and conversions. ColorSync and ICM are primarily useful for programmers, whose lives are made easier by using APIs instead of having to write the code themselves.
Users need relatively little interaction with ColorSync and ICM. The one user setting everyone needs to make is the display profile—most color-managed applications ask the OS (using ColorSync or ICM) for that single piece of user-supplied information. Other ColorSync and ICM user interface elements have less obvious effects.
Mac OS 9
On Mac OS 9, ColorSync 3 has two pieces—a system extension called “ColorSync Extension” and a control panel called “ColorSync.” The only part of the ColorSync Extension that might concern users is the AppleScript dictionary it contains, accessed by the ScriptEditor. (See Chapter 17, Automation and Scripting.)
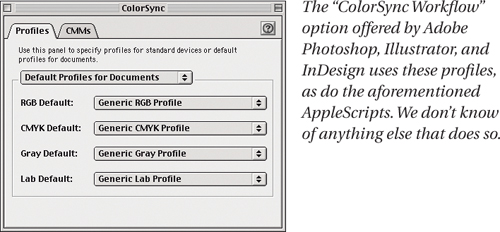
The control panel, on the other hand, is exclusively for users to manipulate (see Figures 11-1 and 11-2). The control panel is misleading because it implies that it will universally use the profiles specified under “Profiles for Standard Devices” and “Default Profiles for Documents.” Nothing could be further from the truth. In fact, applications must be written to request this information specifically from ColorSync. A few of the major applications offer the option to use the “Default Profiles for Documents” profiles, but we can’t think of any that do so by default, and we don’t know of any that use “Profiles for Standard Devices.”
Figure 11-1 ColorSync control panel: Profiles for Standard Devices
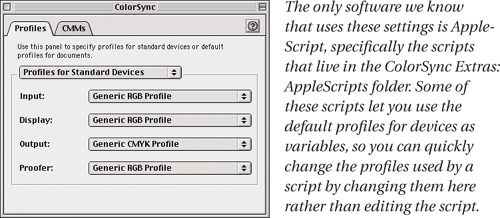
Figure 11-2 ColorSync control panel: Default Profiles for Documents
The ColorSync control panel represents a laudable attempt to create a single point of access and consistent user interface for configuring color management for all applications. It was great in theory, but since all the major applications aim for cross-platform parity, and ICM lacks any comparable features, it didn’t work out in practice. So you can safely ignore the Profiles tab of the ColorSync control panel entirely. However, two settings are important.
ColorSync Control Panel Settings
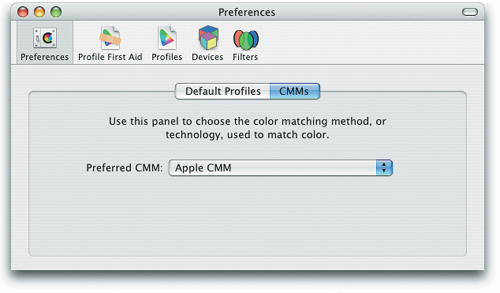
In the ColorSync control panel, under the CMMs tab, you’ll find a single setting for the Preferred CMM (see Figure 11-3). The default is Automatic, which is functionally equivalent to “random.” If you want subtly random results, use this setting. Otherwise change it to something else. We’ve found the Apple CMM to work well, and with the exception of black point compensation, it provides similar results to the Adobe Color Engine (ACE) found in Adobe applications.
Figure 11-3 ColorSync control panel: CMMs tab
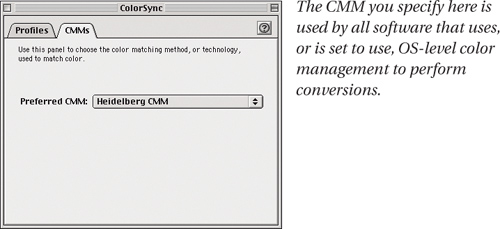
If you’re working in a cross-platform environment without the exclusive use of the Adobe applications (which can use ColorSync, ICM, or their own ACE engine), you may want to standardize on a single CMM for all systems. Since the Apple CMM doesn’t exist on Windows, but the Heidelberg CMM exists on both, you can standardize on the Heidelberg CMM.
Likewise, if you have an important application or profile that uses the Kodak Digital Science Color Management System, you can standardize on the Kodak CMM. However, be aware that these CMMs don’t exist for OS X, so if an upgrade is in your future (and frankly, it’s a matter of when rather than whether), you’ll have to rethink your workflow for OS X, where the only available OS-level CMM is the one from Apple.
Monitor Settings
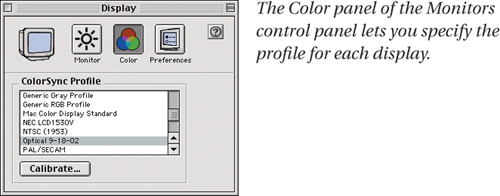
In the Monitors control panel, click on the Color button and you’ll be presented with a list of ColorSync profiles (ICC profiles) to select (see Figure 11-4). Each display connected to your Macintosh can have a separate display profile selected, but don’t count on applications performing display compensation on anything other than the primary display. (Adobe Photoshop 6 and 7 are the only applications we know of that can perform display compensation to multiple displays on Mac OS 9.)
Figure 11-4 Monitors control panel
This setting does two things:
• If the profile contains the vcgt tag, which most do, the Display Manager updates the video card LUTs with the correction needed to place the monitor in the calibrated condition defined in the profile.
• The selected profile becomes the display profile for the current display.
The effect of updating the video card LUTs happens immediately and is usually visually obvious. Changing the display profile may have no visible effect, but applications that query the system for the display profile use the one you specify here for display compensation. Adobe applications are well behaved in asking the system for the display profile, but most other applications require you to specify the display profile in their settings manually—watch out for this potentially major pitfall.
Profile Locations
Profiles are usually stored in Hard Drive:System Folder:ColorSync Profiles. However, some older applications and printer drivers insist on finding profiles in the old location, Hard Drive:System Folder:Preferences:ColorSync Profiles. Other applications may store profiles in subfolders in the Hard Drive:System Folder:Application Support folder, though the ones of which we’re aware always place an alias in the ColorSync Profiles folder to let other applications use the profiles. Since some applications don’t resolve aliases, and others don’t look deeper than the root level of the ColorSync Profiles folder, this doesn’t always work, so if you have a profile that appears in some applications but not others, try placing a copy in the root level of the ColorSync Profiles folder.
Location for CMMs
CMMs are system extensions. You can find them in Hard Drive:System Folder:Extensions.
Mac OS X Panther (10.3.x)
ColorSync 4, the latest version of ColorSync, debuted in a previous version of Mac OS X and persists in OS 10.3 (Panther) and later. ColorSync 4 is a framework buried quite deeply within the ApplicationServices.framework bundle. Fortunately, this isn’t a problem since, again, it’s intended for programmers.
Color is handled in a very different way on Panther than on any other operating system, and, like much of Mac OS X, is a work in progress. The major applications still work as expected, but this operating system blurs the lines between what is and is not a color-managed application. It doesn’t blur them heavily, but over time it will become increasingly easy for developers to implement color management in their applications and printer drivers, and increasingly hard for them to avoid doing so.
Mac OS X’s color management rests on the premise that every window is color-managed, whether the application that requests the window to be drawn knows anything about ColorSync or not. This is currently achieved through assumptions, and these assumptions are not always consistent.
Panther’s color-management behavior in some cases seems more in flux and less stable than in previous versions. Some of these problems are due to bad assumptions on the part of Apple, while others rest with device drivers that don’t work as expected. All we can do is report what we know at the time we’re writing this chapter, as it applies to Mac OS X 10.3.4.
Rules of Engagement
Mac OS X Panther has always-on color management, as previously stated. What does this mean? It literally means that the OS will perform a conversion no matter what, but the conversion could be what’s called a null transform. For display purposes, a null transform occurs when the OS assumes the current display profile as the source profile for an untagged image or object, and also uses the display profile as the destination. Since they are the same, no conversion occurs. Likewise when printing with raster drivers, a null conversion occurs when Generic RGB is assumed as source as well as destination.
Apple seems obsessed with the problems created by untagged files, so they’ve embarked on a course of making assumptions on how to deal with them—even if the untagged file is a prematched print file on its way to the printer driver! Making matters somewhat worse, the application of the assumptions in Panther is inconsistent, and even Apple’s own applications don’t always behave as expected. But here are some guidelines to help put it into perspective.
Display
Non-color-managed applications have no say, so the operating system assumes the display profile as both source and destination, which means no display compensation occurs.
Color-managed applications query ColorSync for the current display profile, and use it as a destination profile for display using either embedded profiles for tagged files, or a selected assumed profile for untagged files as source. This is display compensation.
The key point is that the application determines the sophistication of color management. At this point, ColorSync will bow out if it isn’t otherwise asked to be involved by an application.
Input
For scanners and digital cameras, the profiles selected in ColorSync Utility>Devices window are used only by applications that look for these settings. Image Capture, which is both an application and an API provided by Apple, looks to these settings as default. Image Capture allows you to override the default within the application itself. Your manufacturer’s scanner driver invariably ignores this, and for capture purposes ColorSync is uninvolved, again, unless requested by the application or driver.
When you print from any application using a raster driver, and when you print from applications that do not generate their own PostScript stream using a PostScript driver, a PDF spool file is generated. The application sends drawing commands to the OS, which in turn produces the PDF spool file.
• When the application sends untagged RGB, the OS embeds the Generic RGB profile.
• When the application sends untagged gray, the OS embeds the Generic Gray profile.
• When the application sends untagged CMYK, it remains untagged, for the moment.
The behavior of the print driver becomes important at this time, because its settings determine the destination profile ColorSync will use. PostScript drivers are fairly straightforward, and are discussed later in this chapter.
Raster drivers are the main concern because ColorSync affects them no matter what. If you select a proprietary color management option (i.e., anything but ColorSync), then ColorSync assumes Generic RGB for the destination profile. The result is a null transform when applications submit untagged RGB data.
If you select ColorSync, then theoretically the profile set for the printer in the ColorSync Utility will be used as destination. More about this can be found in the section on Raster Drivers later in this chapter. The key point is that ColorSync invites itself at print time even if neither the application nor the print driver has explicitly asked for it.
The scary part is that the handling of prematched data from a color-managed application such as Photoshop, set to convert your image to SP2200 Premium Luster.icc, only works because of a sequence of events that causes Generic RGB to be the source profile and the destination profile, and hence a null transform. The data is clearly not Generic RGB, and the print behavior is clearly not Generic RGB either, yet that is the philosophy of null transforms on Mac OS X Panther.
Fortunately, color-managed applications that prematch data don’t tag files, which means the OS will tag it with Generic RGB. And so long as you don’t select ColorSync in the print driver, Generic RGB will be used as the destination profile also. The end result is ColorSync is a non-factor in the conversion. But clearly Apple needs a strategy for explicitly handling prematched print data, since all professional graphic arts applications can produce it. If you’re wondering about those generic profiles, see the sidebar, “The Generics.”
Displays Panel Settings
This panel is found in System Preferences, and is functionally equivalent to the Monitors control panel on Mac OS 9. Click on the Color tab, and select the profile for your displays here. As on Mac OS 9, multiple displays are supported by the operating system, but also as with OS 9, you’ll need to determine whether or not your specific application supports color management for two separate displays. (See Figure 11-5.)
Figure 11-5 Mac OS X Displays panel: Color tab

Profile Locations
Mac OS X stores profiles in a variety of locations, and in order for it to make any sense, a bit of background on Mac OS X is necessary. Mac OS X is designed as a multiuser operating system. You may only have one user, but the system is still designed for more than one. Thus, the locations for profiles follow the general rule that there are five possible “domains”: Apple only, all users, a specific user, a specific application, and network. For practical purposes we list just the first three:
• /System/Library/ColorSync/Profiles—All users can use profiles stored here, but they can’t be removed or supplemented unless you have a special set of keys. Since this is Apple’s domain, nothing except the Mac OS installer should remove profiles from or add profiles to this location
• /Library/ColorSync/Profiles—All users can use these profiles, but only Admin users and authenticated installers can add profiles to or remove profiles from this location. The preferred location for display profiles is in the Displays folder contained within this location, although they’ll work if placed in the other legitimate locations.
• /Users/<username>/Library/ColorSync/Profiles—Profiles in this location are only available when this user is logged in, and aren’t available to other users; only this user can add profiles to or remove profiles from this location.
More than likely you’ll want profiles available to everyone, so we recommend placing them in the /Library/ColorSync/Profiles folder. If you’re working in an administered environment where you don’t have permissions for this location, place them in your user ColorSync Profiles folder instead.
Another major difference with Mac OS X is that manufacturer-supplied “canned” printer profiles don’t normally go in any of the above locations. Instead, they’re stored as resources within the printer module bundle and as such aren’t directly accessible by users. However, they are available to all applications just as if they were stored in /Library/ColorSync/Profiles, but they don’t clutter the various Profiles folders with profiles for which professional users may have no use. The ColorSync Utility, discussed later in this section, has a Profiles feature that, among other things, shows locations of currently available profiles.
Locations for CMMs
CMMs live in /Library/ColorSync/CMMs.
ColorSync Utility
The ColorSync Utility has evolved from its lowly beginnings as a slightly beefed-up system preference to a fairly handy toolkit. It incorporates the old Profile First Aid utility, and adds some nifty features such as 3D gamut comparisons of profiles, and the ability to view the individual tags inside profiles.
Preferences
The preference settings for ColorSync are no longer found in System Preferences. Everything is now rolled into the ColorSync Utility found in the /Applications/Utilities folder (see Figures 11-6 and 11-7). Here, you can (supposedly) specify default RGB, CMYK, and grayscale profiles for documents that don’t contain embedded profiles. You may be tempted to conclude two things from these settings: embedded profiles are recognized system-wide, and documents without embedded profiles will have the default profiles assumed as source profiles. You’d be wrong on both counts.
Figure 11-6 Mac OS X ColorSync panel: Default Profiles tab

Figure 11-7 Mac OS X ColorSync panel: CMMs tab
Mac OS X, like OS 9 and Windows, still requires developers to specifically write code into their applications to make them recognize these settings, as well as to recognize embedded profiles. An application that isn’t written this way ignores these preferences, and if it doesn’t know what an embedded profile is, it opens the image as though it were untagged.
Apple has claimed it was never their intention to imply that the Default Profiles settings would be used system wide. Why they chose language that pretty clearly indicates this would happen, we don’t know, but it seems like it’s not a very good idea, and we hope the wording will finally change in the next version of Mac OS X.
The advice we give under Mac OS 9 for the setting of the Preferred CMM applies here as well. If you like random results, use the Automatic option. Otherwise, pick something else (at the time of writing, the only something else that’s available is the Apple CMM). Interestingly enough, Apple also recommends the Apple CMM in their “Color Management with Mac OS X Panther” documentation, yet the default is set to Automatic.
Profile First Aid
This is a utility for verifying the integrity of ICC profiles stored on your system, and can repair most problems it finds. It looks for aspects of the profile that don’t conform to the ICC specification version under which they were written (i.e., it applies v.2 rules only to v.2 profiles, and v.4 rules to v.4 profiles). One of the most common side effects of a non-conforming profile is that it doesn’t appear in application pop-up menus, which, of course, means you can’t use it.
Running a repair session in Profile First Aid, then relaunching the application frequently solves such problems. We recommend running a Repair session regularly because a surprisingly large number of profiles don’t conform full to the ICC spec. Most deviations are benign, but so is running Profile First Aid.
Profiles
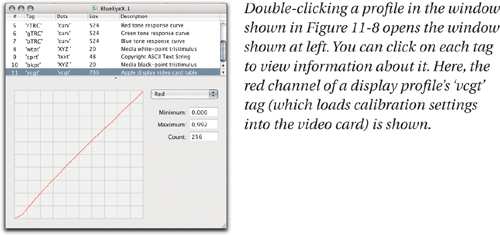
The Profiles window shows currently installed ICC profiles. Here you can view basic profile information to the right, and even click on the black arrow on the upper-left corner of the Lab Plot, to find more options. You can view the color space in 3D in a number of color spaces other than LAB, as well as perform gamut comparison between profiles. (See Figure 11-8.) If you double-click on a profile, it opens in a separate window showing information about each tag in the profile. (See Figure 11-9.)
Figure 11-8 ColorSync Utility: Profile view

Figure 11-9 ColorSync Utility: Profile Info
Devices
Developers can write their device drivers to register themselves as ColorSync devices. Doing so allows them to appear in this window, with possible sub-categories such as media type, or color model. Each sub-category can have a profile associated with it. Developers can specify default profiles to use for their devices, and end users can select the arrow pop-up menu to change the Current Profile to a custom profile, for example. See Figure 11-10.
Figure 11-10 Mac OS X ColorSync Utility, Devices window

What does this do exactly? If the application or driver you use doesn’t specifically look to these settings, they do nothing. We can confirm that changing the Current Profile for a display device has the same effect as selecting it in the Displays panel in System Preferences. If you use Apple’s Image Capture application, changing the Current Profile for your listed scanner or camera will change the default profile used for embedding in captured images.
For printers it’s dicey. The idea is that if you tell your printer driver to use ColorSync, the Current Profile selected will be used as destination. The problem is that not all drivers play along with this rule, which seriously undermines the usefulness of print driver level ColorSync support. To date we know of no Epson printer driver that honors custom profiles selected in the ColorSync Utility, and Apple was unable to provide us with information regarding other vendors’ level of compliance. See the section on printing later in this chapter.
Filters (also known as Quartz Filters)
We really hope Apple works on this feature because it sounds like a great idea, but due to non-standard terminology, an ill conceived user-interface, and bugs, its real-world usefulness is lacking. Filters can be used directly in ColorSync Utility itself, or in the standard print driver under the ColorSync>Quartz filter pop-up menu. See Figure 11-11.
Figure 11-11 Mac OS X ColorSync Utility, Filters window and print driver, ColorSync panel
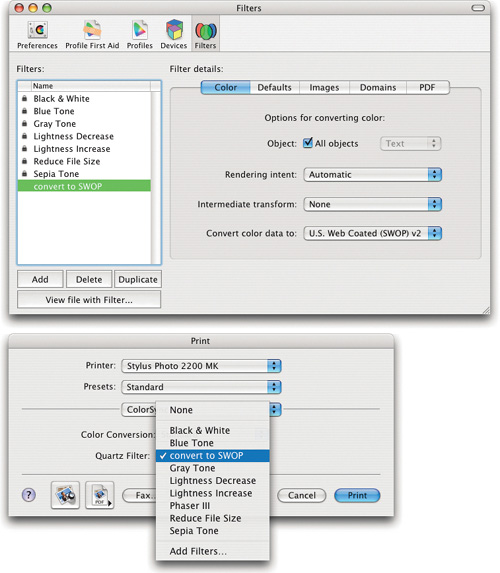
For example, Chris created a filter set to “Convert color data to,” which is Quartz Filter terminology for “Destination profile.” Opening a PDF in ColorSync Utility with this filter, and checking the Preview checkbox in the upper-left corner of the resulting window showing the document, would make ColorSync convert all objects in the PDF to SWOP, and then display them on-screen. Similarly, when printing from an otherwise non-color-managed application, selecting this Filter in the ColorSync portion of the print driver would first convert the document to SWOP, and then Color-Sync color matching would convert again to the profile for the printer you’re printing to. In theory.
In practice, as previously mentioned, many inkjet printer drivers don’t play along well, which makes hard proofing a game of chance. Other drawbacks include the lack of black point compensation and rendering intent control to the would-be proofing device. Known bugs at the time of writing include:
• The default tab specifies profiles for untagged objects, but no matter what you select only the Generic profiles are used.
• At least two and possibly three destination profile pop-up menus are possible.
• The claimed PDF/X-3 support doesn’t pass preflight in Acrobat 6, Pit-stop Pro, PDF/X Inspektor, or PDF/X Checkup; and the OS ignores the OutputIntent in existing PDF/X-3 documents so you can neither soft proof nor hard proof them. We aren’t sure where or how PDF/X-3 is supported in OS X Panther.
Windows
ICM 2.0 (Image Color Management) is built into Windows 98 and higher, including Windows XP. Like ColorSync, ICM is a set of APIs intended for use by programmers. Outside of printer drivers, and applications specifically written to use ICM 2, there’s only one user setting, but it’s an important one to which you should pay special attention.
Setting the Active Color Profile for the Display
Each device on Windows can have multiple profiles associated with it, as well as a default profile. Only the default profile is the active profile for that device and is the one that gets used. To associate profiles with a device, and to set the default profile, go the device’s Properties panel, click the Advanced button under Settings, then click on the Color Management tab. In that window, you can associate profiles with the device and also specify one of them as the default profile.
For example, to set the display profile, go to the Display control panel, click on the Settings tab, then click the Advanced button. In the resulting window, click on the Color Management tab, click Add to open the Add Profile Association dialog box, then choose the profile and click Add. To set the profile as the default, select it in the Color Management tab, and click Set As Default (see Figure 11-12 and Figure 11-13).
Figure 11-12 Display Properties: Settings tab

Figure 11-13 Display Properties, Advanced: Color Management tab
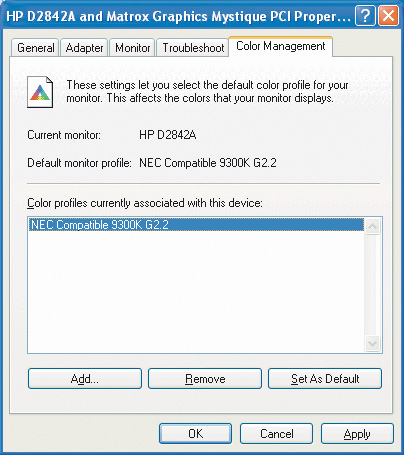
On Windows, you need to be extra careful in setting the active display profile. Unlike the Mac OS, Windows doesn’t get calibration information from the profile to update the video card LUTs, so it’s all too easy for the monitor to behave differently than the way the active profile describes. Display calibration/profiling packages should set the display profile automatically when it’s created, but if in doubt, double-check to make sure that it has in fact done so.
Locations for Profiles
Where your profiles live depends on what version of Windows you’re using, and whether or not you chose the most typical installation (on a C: drive). You don’t need to worry about these locations except for doing housecleaning, because you can right-click on a profile in any location to get a contextual menu containing an option to “Install Profile,” which will place it in the appropriate directory.
• Win98, Win98SE, WinMe—C:WindowsSystemColor
• Windows 2000, XP—C:WinNTSystem32SpoolDriversColor
• Windows NT—C:WinNTSystem32Color
NOTE: Windows NT doesn’t support ICM 2, and has no built-in color management at all. Any color management happening under Windows NT is done entirely by applications, and is hardwired into them. So the location for profiles under Windows NT is merely for reference.
Color Management in Applications
In the introduction to this chapter, we mentioned that color management can be requested by either applications or printer drivers. This section looks at color management strictly from an application point of view, covering both color-managed and non-color-managed applications.
Color-Managed Applications
Color-managed applications know what ICC profiles are, and use them to at least some degree. Most of these applications use either ColorSync or ICM to do color-management tasks such as color space conversions.
Some color-managed applications implement their own color engine, such as the Adobe applications, all of which use ACE (the Adobe Color Engine). Within each application, ACE produces the exact same results between its Macintosh and Windows counterparts. However, even when using ACE, they still make minimal use of ColorSync and ICM to request the current display profile and to find profiles on the system. All conversions are performed, by default, by ACE. It’s possible to select ColorSync or ICM (and thus any available CMMs) in lieu of ACE in most Adobe applications. More detail on this can be found in Chapter 12, The Adobe Common Color Architecture.
Note that color-managed applications don’t all have identical capabilities. While they’ll support color conversions in one way or another, not all of them support color management to the display (such as many scanner drivers) or fully support embedded profiles.
The sure way to distinguish a color-managed application from a non-color-managed application is to snoop around in the program itself. Color-managed applications have preferences for configuring source, destination, and possibly display profiles (if they don’t request the display profile from the operating system).
So where is the color management actually happening? From a programming point of view, it’s in the application. While ColorSync or ICM may actually be doing the work, they’re APIs, not standalone programs. Think of it like this: if you drive a friend to the airport, did you or the car do the work? Well, both.
Source profiles
Color managed applications can hand off the source profile for your document to the operating system at print time along with the data to be printed, but with the exception of the Adobe applications, this seems to be fairly rare. The point of doing so is to provide the source profile(s), and let the printer driver and operating system do any subsequent color management. However, color-managed applications can already do the conversion to print space while producing the print stream, so most of them don’t include source profiles in the print stream.
Non-Color-Managed Applications
Previous examples of non-color-managed applications are Microsoft Word, Excel, and PowerPoint, as well as most Web browsers. However, this has become a little more blurred on both operating systems’ latest versions of these applications. Microsoft Office applications honor embedded profiles for preview. Some applications pass source profiles onto the OS at print time; others convert to Monitor RGB first, then submit the print job tagged with the current display profile.
Non-color-managed applications send the RGB values in the file directly to the monitor, so the sensible assumption for a source profile for files generated by these applications is the display profile, since it defines the color the monitor produces in response to the RGB values.
To color manage files from these applications, export them as TIFF, JPEG, or as a PostScript file produced by printing to disk, then import them into a color-managed application, assign the current display profile, and resave with the display profile embedded. From that point onward, the files are color managed. This technique works for screen shots, too. (Mac OS X Panther screen shots are embedded with the current display profile.)
Color Management in Printer Drivers
At first glance, it may seem that the printer driver is where all color management destined for print was intended to occur. Applications would manage color within the application and pass on a source profile for their documents at print time, then the printer driver would specify the destination profile and the operating system would do the necessary conversion.
The truth is that printer drivers have no knowledge of the application that’s sending the data, so they have to handle both tagged and untagged files. However, the assumptions that different printer drivers make as to the source profile vary widely, and in our experience, they’re usually incorrect.
Meanwhile, color-managed applications generally want to color manage the content of their documents completely before passing it off onto the operating system for printing, sending “pre-matched data.” But the printer drivers still expect to do color management at their end, and to date there isn’t a mechanism for the application to tell the printer driver, “Hey, buddy, don’t do any more color management!” That means you, the user, have to ensure that when you print from applications that do their own color management, either the printer driver color management is turned off or the application doesn’t convert to printer space before handing off the data to the printer driver.
With non-color-managed applications, you can use printer driver color management to perform the conversion to print space, but doing so involves some pitfalls that we discuss below.
Default Behavior
Each manufacturer seems to decide a different default behavior for their printer driver, and sometimes they decide on different defaults for different models or change the default behavior between versions of the driver. Most raster drivers default to proprietary color management rather than to ColorSync or ICM.
PostScript printers also vary their default settings, but we know of none that default to ColorSync or ICM—at least not directly. They almost all use PostScript color management when receiving RGB data, to convert it into CMYK in the printer itself. Some also use PostScript color management when receiving CMYK data. The printer driver option that controls this is usually called something like color correction, color management, or simulation.
When you use driver-level color management, the settings you use when you print the target to profile the device are very important. For example, when you use ColorSync or ICM in Epson printer drivers, what actually goes on under the hood is that the driver uses the “No Color Adjustment” setting, and asks ColorSync or ICM to do the conversion to the print space. If you print the profiling target using the “Photo-realistic” setting to take advantage of its better linearization and gray balance (putting up with the smaller gamut), the resulting profile won’t work well with ColorSync or ICM selected because the printer driver won’t use the “Photo-realistic” setting when you choose ColorSync or ICM.
Source Profile Assumptions
When the application doesn’t include the source profile in the print stream, and you use ColorSync or ICM in the printer driver, a source profile has to be assumed. Two things can make the assumption: the printer driver itself, or the operating system.
In Windows, the assumed source profile is always sRGB, whether the printer driver or Windows itself is doing the assuming. Applications that don’t generate their own PostScript must use GDI, which has no idea what CMYK is. So the application must convert CMYK content into RGB for either display or for print. A few applications use GDI+, which will assume a default CMYK SWOP profile.
On Mac OS 9, the operating system assumes the currently selected display profile, although an increasing number of printer drivers tell Color-Sync to use sRGB as the source instead. To find out which assumption your printer driver makes, print an image with a display profile selected, then select a substantially different display profile (or perhaps even a non-display profile such as Wide Gamut RGB if you have Photoshop installed) and reprint the image. If the test prints look the same, something is being assumed over which you have no control, probably sRGB. If they’re different, the driver is assuming the display profile. CMYK behavior is similar to Windows.
On Mac OS X Panther, Generic RGB is assumed system-wide for untagged RGB at print time. As we discussed earlier in the chapter if the application does not specify a profile, Mac OS X embeds the PDF print spool file with Generic RGB. For CMYK, the waters are muddy because legacy applications still use QuickDraw, so they still convert their content to RGB at print time, and this conversion is up to the developer. However, applications using Quartz can send CMYK data for display or print. Currently Generic CMYK is the assumed source.
Raster Drivers
Using printer driver color management with raster printers and non-color-managed applications boils down to choosing a destination profile—the source profile is largely out of your control as it’s assumed by either the application, printer driver, or operating system. Where you choose the destination profile depends on the operating system.
We can’t possibly cover all printer drivers, so let’s use the example of printing to an Epson Stylus Photo 2200 from Microsoft PowerPoint, a typical non-color-managed application. You should be able to find similar terminology in other printer drivers. If you don’t find a ColorSync or ICM option in your printer driver, then it almost certainly doesn’t support ICC-based color management.
Mac OS 9
When you open the printer driver, the default behavior is set to Automatic. To access the ColorSync option, you must select Custom in the Mode portion of the driver, and click the resulting Advanced button (see Figure 11-14).
Figure 11-14 Mac OS 9 Epson Stylus Photo 2200 main dialog
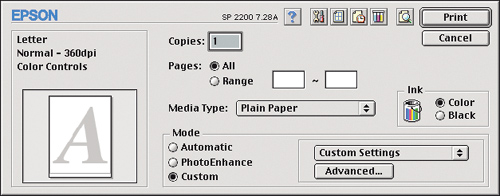
In the resulting dialog, look in the Color Management section. The default setting is for the Color Controls radio button, so select ColorSync here (when you’re printing from an application that does its own color management, you’d select the setting you used when making the profile for this printer, usually No Color Adjustment). See Figure 11-15.
Figure 11-15 Mac OS 9 Epson Stylus Photo 2200 Advanced dialog

Epson drivers select a printer profile based on the media and resolution settings you’ve selected. Some printer drivers allow you to select a specific profile here manually, but in nearly all cases it must be the canned profile supplied by the manufacturer. We haven’t had much success in getting custom profiles to appear in Mac OS 9 printer drivers, even by replacing the profile with an identically named profile.
Mac OS X
Things are quite a bit different in Mac OS X, starting with the print dialog (see Figure 11-16). The third pop-up menu item lists different views, and the one you want is Color Management. Select ColorSync, and you’ll see something like Figure 11-17.
Figure 11-16 Mac OS X Epson Stylus Photo 2200 Print dialog

Figure 11-17 Mac OS X Epson Stylus Photo 2200 Print dialog: Color Management options

Tip: Use No Color Adjustment
When printing from applications that let you select a destination profile for your print, choose No Color Adjustment (Epson) or equivalent in your print driver to ensure double-color management does not occur. If you are printing from a non-color-managed application, use either ColorSync or the driver’s proprietary color management, whichever gets you results you prefer.
Where are the printer profiles? On Mac OS X, each device registers a device profile. Some printers, such as the Epson Stylus Photo 2200, register a profile for each media type they support. You don’t need to do anything unless you don’t want to use the registered profile for the media you’re using. The ColorSync Utility, discussed earlier in this chapter, is how you theoretically can override the registered profiles. In some cases this works, and in other cases it doesn’t. With native printer drivers, it’s hit or miss, and with Epson drivers it appears to be most often a miss. If you are using PostScript drivers that register your printer, or Gimp-Print drivers, custom profiles set in the ColorSync Utility generally seem to work.
Mac OS X 10.3 print dialogs contain a new “ColorSync” menu item, where you can access Quartz filters, mentioned earlier, as well as a Color Conversion menu. For raster printers, the only option available is Standard. See the “PostScript Drivers” section for more information on this.
The version of OS X that was current when we wrote this lacks any mechanism for selecting a rendering intent to use with printer driver color management. Once you’ve selected the desired profile for the intended media type in the ColorSync Utility, you simply print your document.
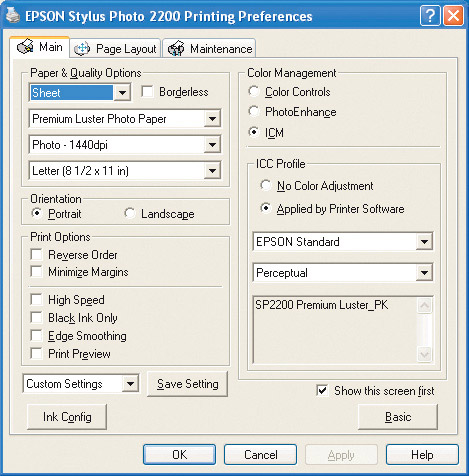
Windows XP
Windows printer drivers share similarities with both Mac OS 9 and Mac OS X drivers. Using the Epson Stylus Photo 2200 as an example again, in the main print dialog, click on the Advanced button (see Figure 11-18). The resulting window contains a Color Management section where you select ICM (see Figure 11-19). As in Mac OS X, there are no options—they’re determined from a list of associated profiles. We like that the driver displays the profile that will be used by the OS as the destination profile. Also, note that on Windows XP you need to first select ICM if you wish to select No Color Adjustment, such as when using application level color management.
Figure 11-18 Windows XP Epson Stylus Photo 2200 Print dialog

Figure 11-19 Windows XP Epson Stylus Photo 2200 Print dialog: Advanced
To associate profiles with a device, go to the Start menu>Printers and Faxes. Here we right-click Epson Stylus Photo 2200 and select Properties, as shown in Figure 11-20, which brings up the Properties dialog box as shown in Figure 11-21.
Figure 11-20 Windows XP Printers and Faxes dialog box
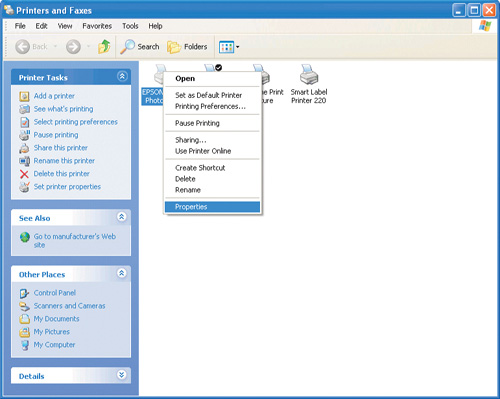
Figure 11-21 Epson Stylus Photo 2200: Properties, General tab

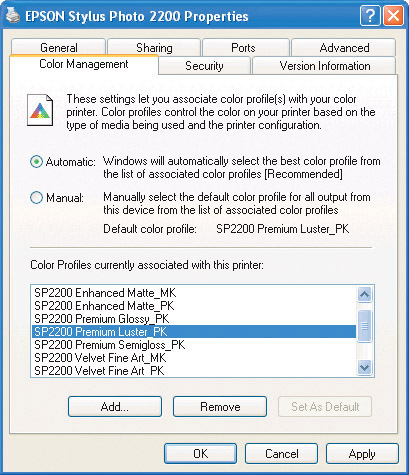
Here we click on the Color Management tab to open the dialog box shown in Figure 11-22. These profile associations, and the default profile, are device-specific, not media-specific.
Figure 11-22 Epson Stylus Photo 2200: Properties, Color Management tab
PostScript Drivers
ColorSync and ICM can affect PostScript output, even though neither actually knows what PostScript is. Non-color-managed applications don’t generate PostScript themselves—they send drawing commands to the operating system, and the PostScript printer driver turns those Quick-Draw, GDI, or Quartz commands into PostScript. The operating system can color manage QuickDraw, Quartz, and GDI/GDI+ routines, then produce the PostScript stream already color managed. The latest Mac OS and Windows operating systems can also produce CSAs (Color Space Arrays, which are PostScript source profiles). Note that applications that generate their own PostScript (which virtually every color-managed application does) aren’t affected by ColorSync/ICM settings, so PostScript printer driver color management simply doesn’t work with these applications.
Mac OS 9
The Mac OS 9 PostScript driver is a frequent and fruitful source of confusion due to the Color Matching section, which contains ColorSync Color Matching (and, for some printers, PostScript Color Matching). See Figure 11-23.
Figure 11-23 Mac OS 9 Laserwriter 8: ColorSync Color Matching

Both options only work with applications that don’t generate their own PostScript. Why a mechanism was never developed for the application to better communicate its capabilities to the printer driver isn’t something we can explain, so let us just stress that with all of the major applications we cover in later chapters, these printer driver options don’t apply because all of the color-managed applications generate their own PostScript.
But if you’re printing from an application like PowerPoint or a Web browser, you can use the ColorSync Color Matching option, which works the same as for raster printer drivers, with the exception that the current display profile is always the assumed source profile. You simply choose a destination profile, which normally should be the profile for your intended destination PostScript device.
PostScript Color Management is an option we don’t recommend, both because we know of very few people who have made it work, and because there are precious few tools to help anyone do so. The way it’s supposed to work is that the assumed source profile (the current display profile) gets converted by ColorSync into a PostScript CSA (Color Space Array). The selected destination profile gets converted into a PostScript CRD (Color Rendering Dictionary), and both are sent with the OS-generated PostScript print stream to the printer. The PostScript RIP uses the CSA and CRD as source and destination profiles, respectively, and makes the conversion. If you get it to work and it doesn’t cause you confusion or misery, feel free to let us know.
Mac OS X (10.2)
The PostScript driver on Mac OS X has absolutely no user options for color management, apparently by design. Applications that generate their own PostScript simply bypass any additional influence by the operating system, anyway. For all other applications, a PostScript CSA (a PostScript source profile) is placed in the print stream by the operating system based on the following conditions:
• Tagged images. The embedded profile is used as the source profile, so it becomes the CSA sent to the PostScript printer.
Tip: It’s Only Tagged If the Application Knows It’s Tagged
If the application being used to print doesn’t know what an embedded profile is, the image isn’t considered tagged by the operating system.
• Untagged /DeviceRGB, /DeviceCMYK, /DeviceGray. With applications that generate device-dependent color, a CSA is generated from the Generic RGB, Generic CMYK, or Generic Gray profiles.
• Untagged /CalRGB or /CalCMYK. Applications that produce calibrated color get a CSA generated from the calibrated color tables submitted by the application.
There are two gotchas inherent in printing under Mac OS X 10.2 and earlier from applications that don’t generate their own PostScript to a PostScript printer. First, there’s no way to avoid sending a CSA to the printer, so there’s no way to avoid PostScript color management (unless your RIP simply ignores CSAs, which is relatively rare). So don’t print test files from such applications. Second, the destination profile is almost always the printer’s built-in CRD, which is usually a generic placeholder rather than an actual description of the printer’s behavior.
Mac OS X (10.3)
Mac OS X Panther has added a ColorSync menu option to all printer drivers. It contains the aforementioned Quartz filters menu, and also a Color Conversion menu. For raster drivers, the “In-Printer” option is grayed out because it can’t occur in the printer itself.
The “Standard” option is grayed out with PostScript drivers when you access the driver-level ColorSync menu item from an application that generates its own PostScript. This is because the OS can’t color manage application-level generated PostScript. Finally, there is some sensible communication between applications, OS, and drivers. See Figure 11-24.
Figure 11-24 Mac OS X PostScript driver: ColorSync menu’s Color Conversion options
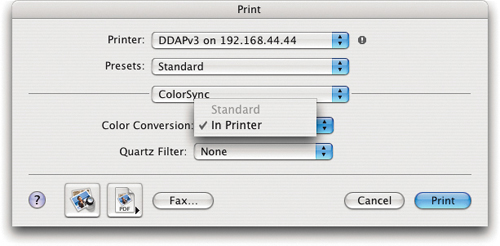
Chris wondered if the dog, the pig and the pony would have to squaredance under a full moon and shake hands afterward to start seeing such examples of cooperation. However, technically the “In-Printer” option should not apply either unless PostScript color management is selected in the application. There’s still room for improved communication between the parties, but rest assured that the OS will not modify PostScript print streams from applications that generate them.
For PostScript printers the option is either “Standard” or “In-Printer.” In-Printer is the behavior we were stuck with in 10.2, with one exception. If you have untagged CMYK content, also known as /DeviceCMYK, the OS will allow that to pass through without PostScript color management.
Standard causes ColorSync to do all conversions prior to PostScript being generated, and then sends essentially untagged /DeviceCMYK data to the printer. The destination profile is set in ColorSync Utility>Devices window. If your printer registers itself with ColorSync, this method of color managing output from otherwise non-color-managed applications will be faster, and superior in quality than relying on PostScript color management used with the “In-Printer” option.
Eventually we expect Apple to provide a mechanism for sending CRDs based on ICC profiles, which should provide reasonable results from PostScript Level 2 or later RIPs. But for the time being, if you want good output from a PostScript device, print from an application that allows you to control the source profile, destination profile, and rendering intent.
Color Management in Scanner Drivers
Most scanner drivers implement their own proprietary and rudimentary color management by default, and some also tie into the operating system. Moreover, scanner drivers that do offer color management exhibit a fairly wide range of behaviors and capabilities. See Figure 11-25.
Figure 11-25 Epson Perfection 3200 Color Configuration

The best drivers let you specify a source and a destination profile, convert the data from the source to the destination during the scan, and embed the destination profile in the scanned image on save, while also using the display profile to display the image correctly on the monitor. The worst ones have a single button marked ColorSync or ICM that converts from a hidden generic scanner profile to the display profile, and produces untagged RGB as output. Most fall somewhere between the two extremes, but the most common problem is the inability to let the user specify a custom scanner profile as the source profile. In most cases, we find that the easiest course of action is to find out how to turn off both color management and any autocorrection features in the scanner driver, treat it as dumb and raw, bring the scans into Photoshop, and assign the scanner profile there. Some scanner drivers make this procedure more difficult than others, but it’s rarely impossible.
If you decide to use scanner driver color management, you need to confirm whether the driver embeds the scanner profile, or uses it as a source profile for a conversion to some destination profile. If the latter, what is the destination? If there’s no explicit setting for the destination, it’s probably the display profile, which the scanner driver grabs automatically from the operating system. That means that all your scans get clipped to the gamut of your display, which is far from ideal.
Scanner drivers that operate as Photoshop plug-ins need special attention, because the API that lets the driver pass a source profile to Photoshop along with the pixels hasn’t been implemented in any scanner software we’ve encountered, so the images always come in as either untagged or working space RGB. If the scanner driver actually converted the pixels to working space RGB, that’s fine. If it didn’t, you need to assign the scanner profile manually.
Using the Epson Perfection 3200 Photoshop plug-in driver as an example, note that by default proprietary color management is used. If you select ColorSync the driver will ask ColorSync to use the specified source and target profiles to convert the file. Remember, after conversion what was selected as target (destination profile) becomes the source profile for the scanned data. Be aware many of these Photoshop plug-in drivers do not inform Photoshop of the proper source profile. They may open in Photoshop “Untagged” or tagged with the RGB Working Space profile. Either way this is incorrect, you will need to manually assign the proper profile if you scanner software behaves this way. See Chapter 12, The Adobe Common Color Architecture, for more information on assigning profiles.
East Is East, West Is West
The old saw has it that, “East is east, west is west, and never the twain shall meet.” It’s generally a good idea to enforce a similar separation between OS-level and application-level color management as much as is feasible, and to ensure that when they do meet, they do so gracefully rather than colliding. It’s not only possible, but distressingly easy to have both the application and the printer driver managing color behind each other’s backs, so you need to keep track of who is doing what to whom. When you work with color-managed applications, the easiest course is almost always to turn off color management in the various device drivers and simply let the applications handle the color management.