
2. Customizing Your Work Environment
Writing is an interesting enterprise. On the one hand, we can work just about anywhere. I once sketched out an entire scene on a bib in the dentist’s chair. On the other hand, we can be incredibly picky about our work environment. This is especially true of our computers. If your workspace doesn’t suit your personality, it’s hard to get the words to flow.
Scrivener understands the need for writers to have control over their creative environment. Some writers need a lot of visual stimulation while others need a minimalist setup in order to focus. To that end, Scrivener’s Preferences (Options in Windows) are numerous. To access the preferences window, choose Scrivener, Preferences (or press Cmd-,) on the Mac or Tools, Options (or press F12) in Windows.
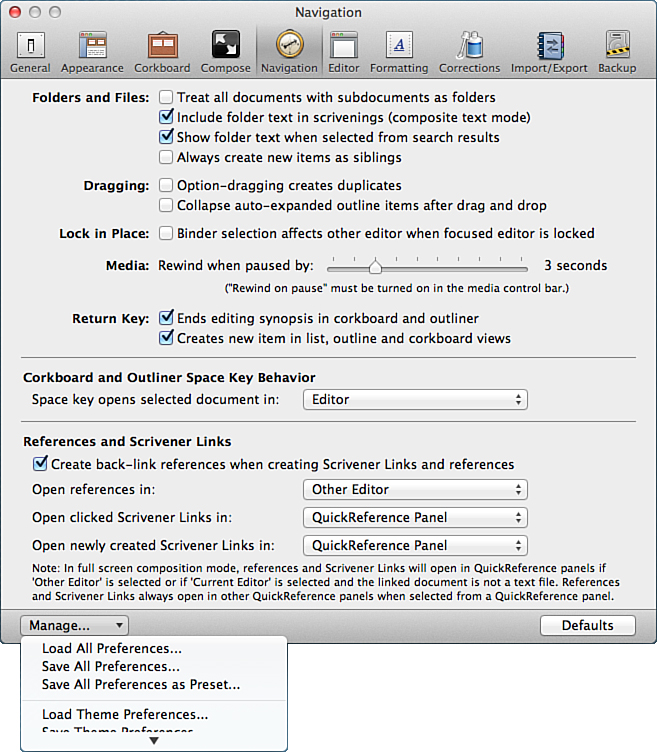
This chapter focuses primarily on the preferences that control the visual aspects of your writing environment. When you enter the Preferences (or Options) window, you see several tabs that are not covered here, such as Navigation, Corrections, Import/Export, and Backup. Those options are covered in the appropriate chapters throughout the rest of the book.
Setting General Preferences
The General preferences determine how the Scrivener application will launch, save your data, and control the Scratch Pad. Figure 2.1 shows the General preferences window for the Mac version. Although not necessarily related to your visual workspace, these initial preferences are important to how you will work in Scrivener.
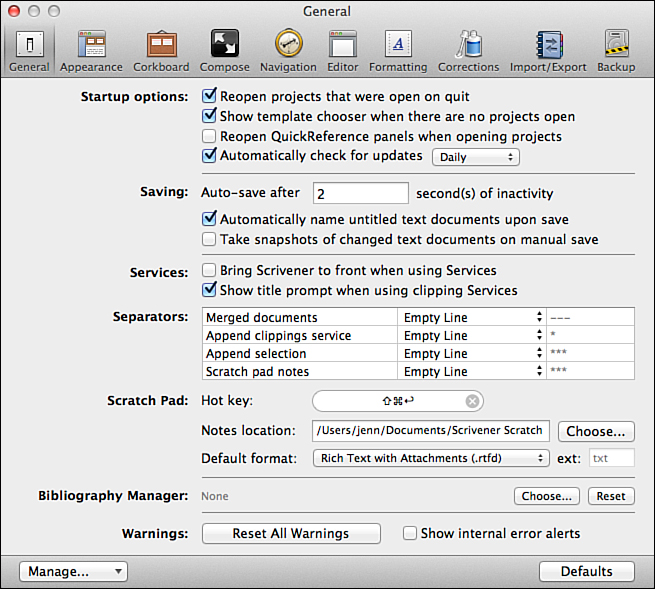
Figure 2.1 The General preferences window includes options for how Scrivener starts up and auto-saves.
Startup Options
After you create your first project in Scrivener, it automatically reopens any projects that you left open the last time you quit the program, rather than opening the Project Templates window. You can change this behavior with the Startup Options. If you want to manually open projects, deselect the Reopen Projects That Were Open on Quit check box. In Windows, this option is labeled Open Recent Projects on Program Launch.
Select or deselect the Show Template Chooser When There Are No Projects Open check box (Show Start Panel When There Are No Projects Open in Windows) to determine if the Project Templates window automatically displays when there are no open projects.
If you make use of QuickReference panels on the Mac, you may want to select the check box to Reopen QuickReference Panels When Opening Projects. This is convenient if you need to quit your work while you’re in the middle of referring to multiple documents.
![]() Tip
Tip
Reopen QuickReference Panels When Opening Projects is a good option to select even if you’re not yet sure how frequently you want to use QuickReference panels. If you don’t have any panels open, it doesn’t do anything, so you’ve lost nothing. If you use panels, however, it ensures that they reopen in the same state you left them when you last exited Scrivener.
Scrivener is updated on a regular basis, with bug fixes and the addition of minor features to the program. To stay on top of these updates, select Automatically Check for Updates, and then choose an interval to perform the check.
Saving
Scrivener automatically saves your project whenever you pause in your work for 2 seconds. You can change this interval if you are on a slow machine or experience lag due to image-heavy documents, but it’s generally best to leave it as the default to minimize the chance of any lost work.
If you are particularly worried about losing documents, you can set Scrivener to take Snapshots of any changed text documents whenever you perform a manual save (File, Save or Cmd-S). This is a Mac-only option, however.
If you have not titled a text document, Scrivener can name it when it saves the project. If the Automatically Name Untitled Text Documents Upon Save option is selected, Scrivener uses the first few words in the text as the document name. You can, of course, rename the document at any time.
Services (Mac Only)
Services are underutilized tools in Mac OS X. They are quick commands that allow you to perform an action in one app that relates to another app. The primary menu of an app (such as the Safari menu in Safari or the Word menu in Microsoft Word) has a Services submenu, which lists all available services for an action or selection. Scrivener has services that allow you to append a selection from a word processor, browser, or other application to a document or Scratch Pad note in Scrivener. You can also make a selection in one of these other apps and create a new clipping in Scrivener. Services can be very helpful when you utilize online research.
The Services preferences in Scrivener control how Scrivener behaves when you use one of its related services within another app. You can choose to bring Scrivener to the front after you use the services so you can immediately add your own notes or format the text, for example. You can also choose to be prompted to title a new clipping in Scrivener.
Separators (Mac Only)
When you merge two documents or append a selection or clipping to a document, the new text is separated from the existing text. The Separators preferences on the Mac allow you to set how that separation appears visually. There are four selections for which you can set automatic separators:
• Merged Documents: Controls how text is separated when you use the Documents, Merge command to combine multiple documents into one
• Append Clippings Service: Separates new text when you use the Append to Current Note or Append to Current Text services to clip a selection into Scrivener
• Append Selection: Separates selected text when you use the Edit, Append Selection to Document command
• Scratch Pad Notes: Controls the separation of text appended from the Scratch Pad into a text document
For each of the four types of selections, you can choose to separate the new text with a single return, an empty line, or custom characters.
![]() Tip
Tip
If you choose to separate text with custom characters, Scrivener provides some suggestions in the rightmost column of the Separators table. You can modify these suggestions. If you want to add one or more carriage returns to a custom setting, press Option-Return.
Scratch Pad
The Scratch Pad preferences allow you to set a keyboard shortcut to quickly access the Scratch Pad. You can also choose where Scratch Pad notes should be stored. Because these notes are not linked to a specific project, you should use a separate folder for them, such as the one created by default.
![]() Note
Note
The keyboard shortcut for the Scratch Pad is global, meaning that it will launch the Scratch Pad even if you are using another app. Therefore, be sure to choose a key combination that does not conflict with other shortcuts.
Scratch Pad notes are stored in Rich Text Format (.rtf) by default. Rich Text Format is compatible with a wide range of other applications, so it should suit your needs. If you prefer to save your notes in Plain Text Format (.txt), which is an option on the Mac, use the drop-down menu in the Default Format option to select it.
Bibliography Manager
If you are doing academic or nonfiction writing, you may have a need for a third-party Bibliography/Citations Manager. Scrivener is compatible with several bibliography managers, such as Sente and BookEnds for the Mac and EndNote for both Mac and Windows. Your chosen app must be installed on your computer before you can select it in the preferences. If you’ve previously selected an app and want to remove it, the Reset button clears the selection.
![]() Tip
Tip
If you don’t need a citations manager, you can set this preference as a shortcut to launch a different type of app. If you use a timeline program, for example, you can select it here. Then you can press Cmd-Y (Ctrl+G, O in Windows) or go to Format, Bibliography/Citations in the menu whenever you need to access your timeline app.
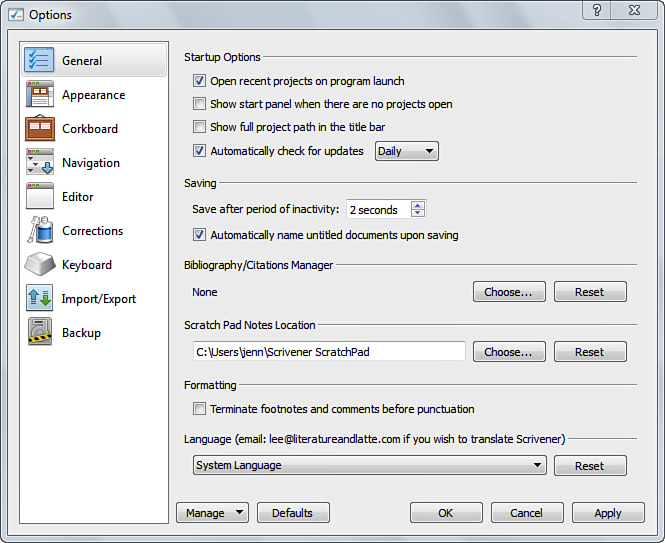
A Windows View: General Options
Because the Windows version doesn’t have the QuickReference panels feature, it obviously doesn’t have an option to reopen those panels when opening projects. Scrivener for Windows does offer the option to display the full project path in the title bar. Windows does not have services—those are part of the Mac operating system—so you won’t see options for them. You also won’t see the Separators options in Windows. Because the Windows version already has a preset keyboard shortcut (Ctrl+Alt+Shift+P) for the Scratch Pad, you won’t find that option in the Options window. You can also set a different interface language by selecting from the Language drop-down menu. If you change the interface language, you must restart Scrivener to see the change.
Customizing Scrivener’s Appearance
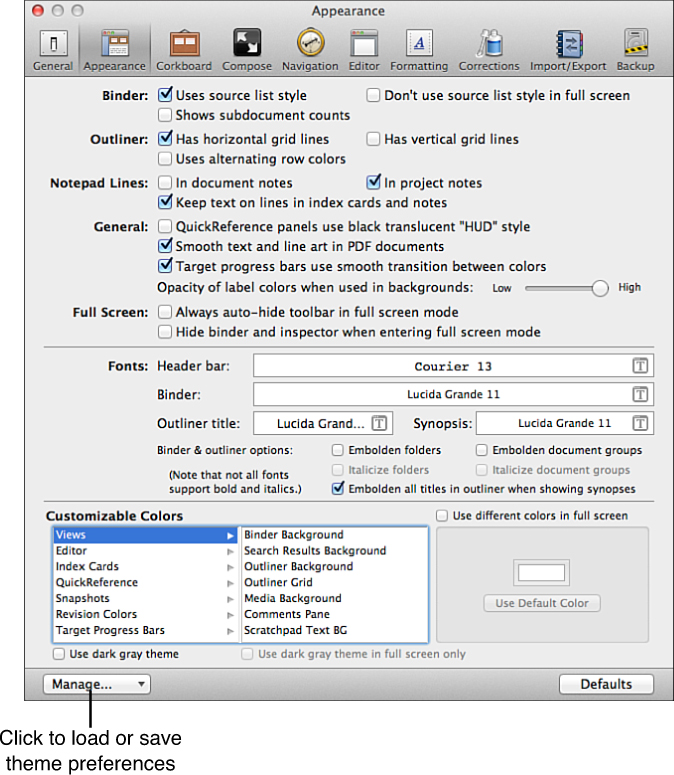
For writers of a visual bent, the Appearance tab may be every bit as important as the rest. You can set Scrivener’s colors to match your favorite desktop wallpaper, evoke the mood of your story, or simply provide as much or little distraction as you desire. You can also change the appearance of the Binder, Outliner, and other features. Figure 2.2 shows the Appearance tab.
![]() Note
Note
On the Mac, you can change the appearance of the Corkboard and Composition mode in other tabs, as described later in this chapter.
Binder
The preferences at the top of the Appearance tab affect how the Binder, Outliner, Notepad, and other screens appear. Most of these options are specific to Scrivener for Mac, although a couple are for both Mac and Windows.
The highlight color in the Binder is controlled by the Mac OS X System Preferences rather than by the Scrivener Preferences. When the Use Source List Style check box is selected, the active document in the Binder is highlighted by the color you select in the Appearance color of the General tab in the System Preferences. If you deselect this option, the Binder uses the Highlight Color instead.
![]() Note
Note
In Windows, the highlight color in the Binder is determined by the Windows theme.
![]() Tip
Tip
If you’re using OS X Lion or above, you can view Scrivener in Full Screen mode, which is covered in Chapter 5, “Writing in Full Screen.” When in Full Screen mode, you may want to use the Highlight Color rather than the Source List Style. To do this, select the Don’t Use Source List Style in Full Screen option.
Both Mac and Windows users have the option to Show Subdocument Counts. If this is selected, the Binder displays a badge showing how many subfolders and subdocuments are within each folder and document.
![]() Note
Note
The badge displays the number of folders/documents within that item as well as any subfolders/documents beneath those.
Outliner
The Outliner Appearance options control whether horizontal and vertical gridlines are displayed between rows and columns to make it easier to visually distinguish between items. This is a Mac-only feature. Personally, I use horizontal gridlines to separate items, but not the vertical gridlines to separate meta-data columns within an item.
You can also choose to alternate row colors on the Mac. This option applies two different shades of the Outliner Background color to alternate rows. In Windows, change the Outliner Background and Outliner Alternate Background colors in the General list.
Notepad Lines
The Notepad appears in the bottom pane of the Inspector. You can choose to display lines in the document or project notes if you want them to appear as they would in a ruled notebook. If these options are not selected, the Notepad appears as an unruled notebook. Select Keep Text on Lines in Index Cards and Notes if you want the lines to adjust to the font size of your notes.
General
The QuickReference panels appear as either a standard window or a translucent HUD-style display. HUD stands for heads-up-display and gives the impression of a floating screen rather than a distinct window. Your choice of how to display QuickRefs has little bearing on the functionality of these panels, so it’s primarily a stylistic choice. The only functional difference is that the non-HUD style can display the format bar. This is not accessible from the HUD style.
If you have a slower Mac, you may want to disable Smooth Text and Line Art in PDF Documents in order to speed up the visual rendering of PDFs if you magnify them.
The Project Targets tools use gradients to display your progress toward your writing goals. If you prefer to see a more distinct transition as you reach your 50% and 100% goals, deselect the Target Progress Bars and use the Smooth Transition Between Colors option.
You can use the color associated with the Label tag of an item as a background color for that item in the Binder, Corkboard, and Outliner. Adjust the Opacity of Label Colors When Used in Backgrounds slider to set the vividness of the label color against the background color of the Corkboard.
![]() Note
Note
See Chapter 12, “Putting Keywords and Meta-Data to Work,” to learn how to use the Label color as visual cues for your project.
Full Screen
If you use Mac OS X 10.7 or higher, you see settings for Full Screen in the Appearance tab. You can opt to Always Auto-Hide Toolbar in Full Screen to maximize your workspace even more. If you auto-hide the toolbar in this mode, you can access it along with the menu bar by moving your mouse to the top of the display. Similarly, you can hide the Binder and Inspector, turning your full screen into a large Editor.
 Caution
Don’t confuse Full Screen mode with Composition mode. Full Screen mode hides the Dock and menu bar and stretches the Scrivener application to make use of the full display screen. Composition mode is a distraction-free environment with a custom background and automatic scrolling that keeps your insertion point in the middle of the screen.
Full Screen mode in Scrivener for Windows is the same as Composition mode on the Mac. Despite the name, it is not the same as Full Screen mode on the Mac.
Fonts
The Fonts options control the appearance of the Scrivener interface items. You can change the default fonts for the Header Bar, Binder, Outliner Title, and Synopsis. To change a font, click the current font setting. This opens the Fonts dialog box, shown in Figure 2.3. Choose a font family, typeface, and size. Click the Close box to close the Fonts dialog box. Select the Embolden Folders and/or Italicize Folders options if you want to distinguish folders and document groups from individual documents. If the font you choose for the Binder or Outliner Title options does not have a bold or italic typeface, the associated Embolden Folders and Italicize Folders options are grayed out.
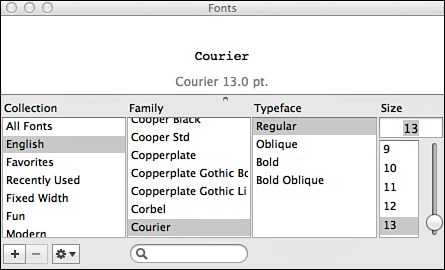
Figure 2.3 The Fonts dialog box is used to set fonts for various elements, such as the appearance of the Header bar in the Binder.
![]() Tip
Tip
These options only control the interface elements. Set your writing fonts in the Formatting tab.
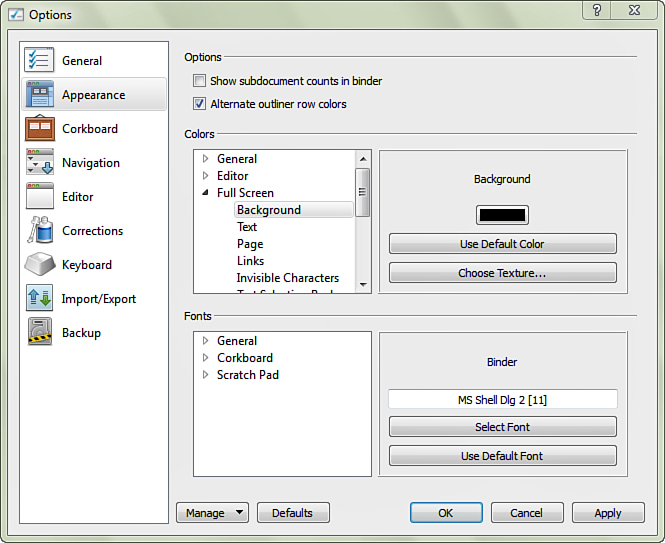
Modifying the Color Scheme
The meat of the Appearance tab is the Customizable Colors area. The plethora of options here allow you to change the color of almost every aspect of the Scrivener interface.
![]() Note
Note
Some elements, such as the color of the windows themselves, are controlled by the operating system. You cannot change the appearance of your windows to bright green on your Mac using the Scrivener Preferences, no matter how much the OS X graphite or aqua themes may interfere with your overall color scheme.
To change the color of an element in Scrivener:
1. Click a category in the left column, shown in Figure 2.4.
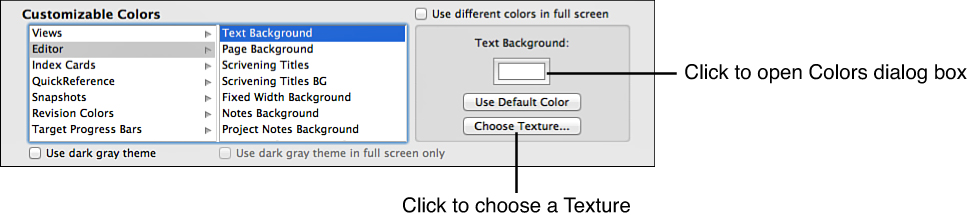
Figure 2.4 The Customizable Colors section of the Appearance preferences allows you to control almost every visual aspect of the interface.
2. Choose a specific option in the middle column.
3. Click the color well on the right to open the Colors dialog box, shown in Figure 2.5.
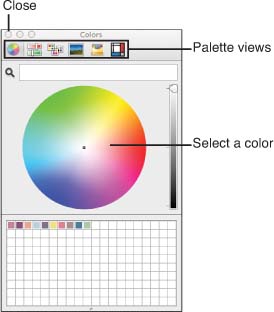
Figure 2.5 Select a color from the Colors dialog box. You can view the available colors in different ways by switching palette views. You can download additional palettes from the Internet.
4. Select a color from the color wheel or one of the other color selectors.
5. Click the Close button to close the Colors dialog box.
The color change is immediately visible in the Scrivener interface, even while the preferences window is open. If you have a large display, you can arrange your windows to view the main Scrivener interface while customizing multiple color settings so you can see how your changes work together.
![]() Note
Note
In Windows, you must click Apply or OK to apply your color changes to the Scrivener interface.
Some options allow you to set a texture instead of a color. This allows you to use an image file as a background for the various Background or Paper options. Images that tile well work best here, and the smaller the file size, the better. To set a texture, click the Choose Texture button, and then navigate to the file you want to use. Double-click on the file or select the file and click Open to return to the Appearance tab.
There are too many customizable interface elements to list here. If you’re in doubt about an option, try setting it to a particularly bright or dark color and then poke around the interface to see the changes. Once you know what’s what, you can select the color that suits your needs.
![]() Tip
Tip
For a complete table of Customizable Color options, visit my website at http://www.jenniferkettell.com.
If you use the Full Screen option on the Mac, you can choose to set different colors for the major features. To enable this feature, select the Use Different Colors in Full Screen check box above the right column. This adds another category for Full Screen. Personally, I don’t prefer to use different colors for the same exact interface, but others might want to change the color of the Editor page to a less glaring color or mimic their Composition mode color settings.
A Windows View: Appearance Options
The Appearance options window may not seem to contain as many options as the Mac version, but most of the “missing” options are unnecessary because of the operating system or are actually located on other Options tabs.
When you choose an element to customize color, the color well opens the Select Colors dialog box. Choose a color and then click OK. In Windows, you cannot automatically see your changes as you make them. Instead, click Apply to set your new choices while leaving the Options window open, or click OK to accept the changes and exit the window.
The same applies to changes in the Fonts panel. Select the element you want to change, and then click the Select Font button beneath the sample text. After choosing a font in the Select Font dialog box, click OK to return to the Options window, where you can then either click Apply or OK to accept the changes.
Unlike on the Mac, all of the interface-related color and font options (with the exception of the Corkboard Background) are listed in the Appearance tab, including those for the Corkboard and Full Screen. Windows users also have an advantage over Mac aficionados in how they control their entire workspace appearance. If you want your windows to complement your Scrivener color settings, access the Windows Control Panel to modify your display settings. You can also override the system font settings for Scrivener’s windows and menus within the General fonts list.
Customizing the Corkboard Appearance
The Corkboard tab preferences, shown in Figure 2.6, control the appearance and function of the Corkboard. As you discover in Chapter 6, “Storyboarding with the Corkboard,” this tool can be very helpful to both plotters and pantsers.
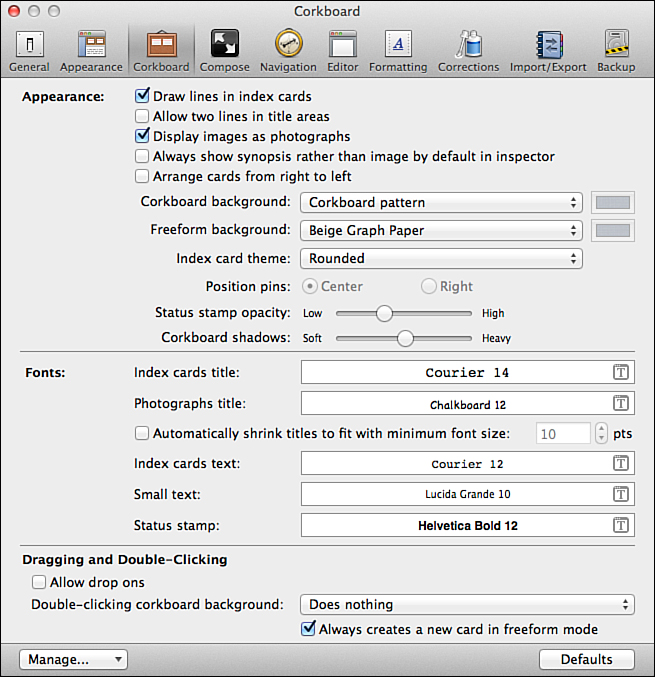
Figure 2.6 The Corkboard tab controls the appearance of the Corkboard and index cards as well as some of the basic functions of the Corkboard view.
![]() Note
Note
In Scrivener for Mac, the default color of the index cards and the label color opacity are controlled in the Appearance tab. In Scrivener for Windows, all of the color and font settings for the Corkboard aside from the Corkboard Background are in the Appearance tab.
![]() Tip
Tip
In Windows, you can remove the lines on index cards with a Color Selector trick. In the Appearance tab, choose Index Card Lines from the Index Cards options in the Colors pane. Click on the color swatch to open the Select Color dialog box. Set the Alpha Channel option to zero (0), then click OK. You can apply the same trick to the Index Card Divider option.
Appearance
On the Mac, the Corkboard Appearance options have settings to control the arrangement and appearance of the Corkboard and index cards. In the Corkboard, each text document has an associated index card. The index card is drawn with lines by default to mimic a physical index card, but you can remove those lines. The top line contains the title of the document; this area is constrained to one line by default, but can be expanded on the Mac by selecting the Allow Two Lines in Title Areas check box.
Images attached to index cards appear as snapshots on the card in the Corkboard. If you deselect the Display Images as Photographs option, the Corkboard always displays the synopsis rather than the photograph. Similarly, you can toggle the Always Show Synopsis Rather Than Image by Default in Inspector check box to show either the synopsis or image in the Inspector.
![]() Tip
Tip
If you use both a synopsis and an image on an index card, deselect both the Display Images as Photographs and the Always Show Synopsis Rather Than Image by Default in Inspector options. This allows you to view the photograph in the Inspector while seeing the synopsis in the Corkboard. Alternatively, select both check boxes to swap the view.
Index cards appear on the Corkboard from left to right by default, but if you use a right-to-left language, you may prefer to reverse the card order.
Scrivener for Mac has two types of Corkboards, as you discover in Chapter 6. To change the background for either the Corkboard or Freeform Corkboard, click the current setting and choose a different pattern. The drop-down menu also provides options to set a custom background or color. When choosing a custom background, choose an image that will tile well.
The index cards can be either square to mimic a physical card, or rounded. Mac users are limited in the appearance of the index cards, whereas Windows users can choose a card shape and then fully customize the colors of the divider and lines in the Appearance tab.
The pins on an index card assume the color of the Label assigned to that item in the Inspector. On the Mac, pins can be positioned in either the center or right side of the card if you use one of the two square index card options. If you opt to use rounded index cards, the pin is replaced by a square chip in the upper-right corner of the card. In Windows, use the Label Indicator option to select either a Corner Mark or a Pin.
The Status tag you apply to an item in the Inspector can be displayed as a watermark across the face of index cards. The watermark appears beneath any synopsis text you add to the card, so your synopsis always remains visible, but you can control the opacity using the Status Stamp Opacity slider. Figure 2.7 shows some of the configurations you can create using the different index card, pin, and status tab options.
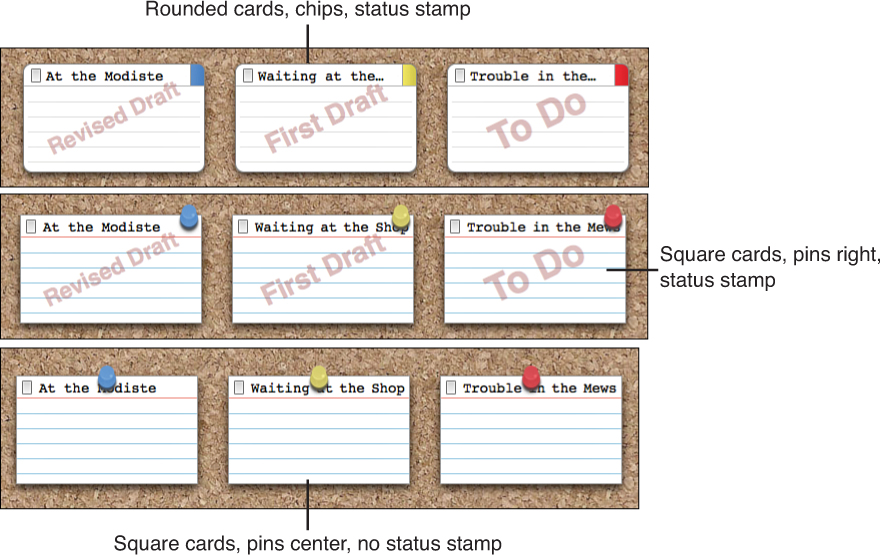
Figure 2.7 The settings for index cards, pins, and the status stamp give you a range of options in how cards appear on the Corkboard.
![]() Tip
Tip
You can toggle the display of pins on index cards with the View, Corkboard Options, Show Pins command in the menu. Toggle the display of stamps with the View, Corkboard Options, Show Stamps command.
You can alter the appearance of the shadow beneath each index card by adjusting the Corkboard Shadows slider. This option is referred to as Index Card Shadows in Windows.
Fonts
The Fonts options control the fonts that are used for Corkboard elements. As with the Fonts options in the Appearance tab, you can change these by clicking on the current font and choosing from the Fonts dialog box. You can set fonts for the following:
• Index Cards Title: The document title that appears at the top of the index card in both the Corkboard and the Inspector.
• Photographs Title (Mac Only): The title of an image on an index card.
• Index Cards Text: The text of the synopsis on an index card.
• Small Text: An alternative font that can be used on index cards when the Use Small Font option is selected in the Corkboard Options.
Caution
The Corkboard Options are different than the Corkboard Preferences and are covered in Chapter 6.
• Status Stamp: The stamp that appears on index cards to reflect the status you’ve set for an item. This text is automatically resized to fit the index cards, so you don’t have to worry about the font size.
![]() Note
Note
These font options are in the Appearance tab in Windows.
Dragging and Double-Clicking
The final options in the Corkboard tab control some of the behaviors of the Corkboard itself. If you select Allow Drop Ons, you can drop one index card onto another to move that item as a subdocument of that card.
![]() Note
Note
These options appear at the bottom of the Mac Corkboard Preferences window but at the top of the Windows Corkboard Options window.
When you double-click on the Corkboard itself, you can set it to either open the parent of the current Corkboard (also known as the Enclosing Group) or create a new card. I suggest setting the double-click action to Creates a New Card when you’re plotting and drafting your novel, as that’s when you’re most likely to be creating a lot of new index cards. You can change this preference to Opens the Parent Corkboard when you reach the editing phase of your work, as that’s when you’re more likely to be moving around the folders and file groups in your manuscript to get a broad overview of how the story flows. You can also set this option to Does Nothing.
![]() Tip
Tip
The keyboard shortcut to open the enclosing group is Control-Cmd-R (Alt+Shift+Up Arrow in Windows). The keyboard shortcut to create a new card is Cmd-N (Ctrl+N in Windows). So no matter which option you select for the double-click action in the Corkboard, you can quickly access the other.
On a Mac, if you select the Always Creates a New Card in Freeform Mode check box, double-clicking while in a Freeform Corkboard always creates a new index card where you clicked, no matter what option you choose for the standard Corkboard. Deselect this check box if you want the Freeform Corkboard’s behavior to mirror that of the standard Corkboard.
Setting Full Screen Composition Mode Preferences
If you use Mac OS X 10.7 (Lion) or higher, Scrivener for Mac has two different “full-screen” options. Full Screen mode simply hides the Dock and menu bar so the Scrivener window can take advantage of the extra screen real estate. Composition mode is a full-screen writing environment that puts your manuscript front and center. You can learn more about these views in Chapter 5. Although the name of the Full Screen Composition Mode tab obfuscates which features it controls, these options relate to Composition mode. Figure 2.8 shows the Full Screen Composition Mode Preferences tab.
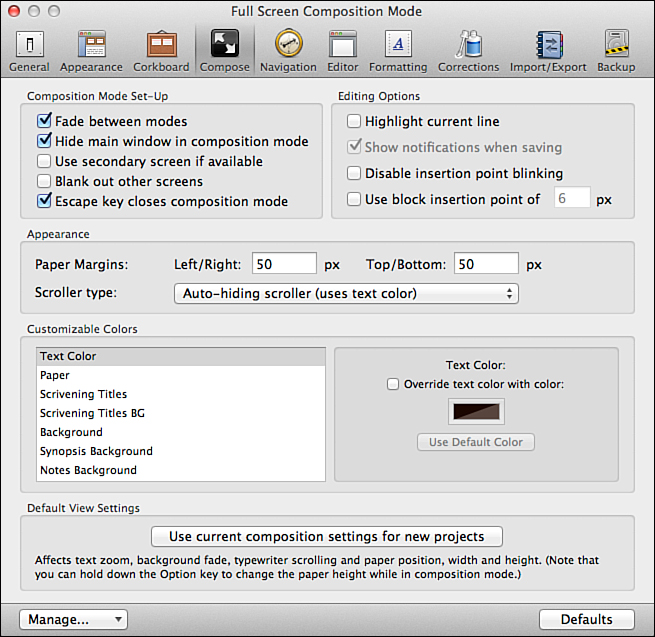
Figure 2.8 The colors and other options for Composition mode can vary greatly from those of the main Scrivener interface.
![]() Note
Note
Scrivener for Windows does not have an Options tab for Full Screen mode. Instead, all of the settings for this mode are in the Appearance tab.
Composition Mode Setup
On the Mac, the Fade Between Modes option fades the screen between the Composition mode and the full Scrivener mode when you switch modes. When you’re in Composition mode, the background is translucent, so any open windows show through. The Hide Main Window in Composition Mode option hides the main Scrivener window while you’re in this mode. This can speed up your typing because Scrivener doesn’t have to update the screen in both Composition mode and the Editor at the same time. It’s also less distracting.
In Windows, you might want to display the Binder, another document, or keep some other element visible. By arranging the Scrivener window and the Composition/Full Screen mode paper alignment, you can use the background fade slider on the control strip to view or hide the window.
If you have two or more displays hooked up to your computer, you can select the Use Secondary Screen If Available option to open the Composition window on your second display. This enables you to keep the main Scrivener interface open on your primary display.
![]() Tip
Tip
Opening Composition mode on a second display is helpful if you want to keep your research open on your primary display while you write.
If you want to completely avoid distractions while writing in Composition mode, select Blank Out Other Screens. This fills your other displays with the background color. Of course, you can also just turn off your other displays, but this option can be useful if you want to avoid distractions while you’re writing but also want the ability to exit Composition mode and have your other open applications immediately available on your desired displays.
There are several ways to exit Composition mode and return to the main Scrivener interface. If you want to use the Escape key as one of them on the Mac, select the Escape Key Closes Composition Screen option. In Windows, the Escape key always closes Full Screen mode.
Editing Options
In Composition mode, once you reach halfway down the screen while typing, Scrivener keeps the insertion point in the middle of the screen, scrolling like a typewriter. If you want to make it even easier to see the current line, use the Highlight Current Line option and then set a highlight color in the Customizable Colors panel. I personally find the highlighted line to be more of a distraction than a help, so I leave this option disabled.
The Show Notifications When Saving option is selected by default to provide a notice whenever you manually save your project. If you are using OS X 10.7 (Lion) or higher, this option uses the Notification Center. If you are using OS X 10.6 (Snow Leopard) or below, this feature requires the use of Growl, a third-party application that provides notices about other apps and activities on your Mac. If you don’t have Growl installed, this option is grayed out.
The insertion point blinks by default. If you find this to be distracting, select Disable Insertion Point Blinking. You can also adjust the width of the insertion point. The default width is 1 pixel. If you choose to disable the blinking of the insertion point, I suggest increasing the width of the insertion point by a couple of pixels to make it easier to locate in a sea of text.
Composition Mode Appearance
The Composition mode screen looks like a sheet of endlessly scrolling paper. Increase or decrease the Left/Right Paper Margins to show more or less space between the edge of the paper and the text. It’s generally not worth adjusting the Top/Bottom Paper Margins because those are only apparent when you reach the very top and bottom of a document.
There are five types of scrollbars available in Composition mode:
• Regular Scroller: Uses the default scroller from the operating system. If you’re using OS X Lion or Mountain Lion, the scrollbar automatically hides unless you move your cursor to the edge of the paper.
• Standard Full Screen Scroller: Uses the default full-screen scrollbar from the operating system, which is always visible if there’s more than one screen of text in the document.
• Auto-Hiding Scroller (Uses Text Color): The scrollbar uses the same color as your text. Use this setting in conjunction with the Override Text Color with Color setting in the Customizable Colors panel. This scrollbar automatically hides unless the cursor is moved to the edge of the paper.
• Minimalist Scroller (Uses Text Color): This setting is similar to the Auto-Hiding Scroller but uses a softer hue and is more rounded.
• No Scroller: If you don’t want to see any scrollbar at all, use this option. You can still scroll through your document with your mouse, trackpad, or arrow keys.
![]() Tip
Tip
If you’re very visually oriented and are customizing colors to suit a particular theme, choose either the Auto-Hiding or Minimalist Scroller, as they can assume the text color. This may be less intrusive to your theme than the default black.
Composition Mode Customizable Colors
As with the Customizable Colors in the Appearance tab, you can customize the colors of all of the major elements in Composition mode. You can use a texture or image for the Background instead of just a solid color. As with the other elements with texture options, choose an image that will tile well. Many writers choose an image that motivates their writing in general or the specific work they’re writing.
On the Mac, you can also use a texture for the paper. In this case, you should choose an image that won’t interfere with your text. If you search on the Internet for “paper textures,” you can find dozens of options. Just remember that the image will tile, so images with borders won’t work well.
Default View Settings
Aside from the Composition mode settings in the preferences window, you can control the opacity of your paper and background, the position of the paper, and how the text scrolls using the control strip at the bottom of the Composition mode. These options are covered in Chapter 5. Once you set up this view to your liking, you can click the button to Use Current Composition Settings for New Projects. Any projects you create afterward will have the same Composition mode settings as the current project.
![]() Note
Note
You can, of course, customize each project individually, if you prefer. I use different backgrounds for each of my books. To change the backdrop on a per-project basis on the Mac, select View, Composition Backdrop from the menu, and then select an image or texture.
Customizing the Editor
Now that you’ve set up the window dressing for your writing environment, it’s time to think about the writing itself. Scrivener for Mac has two preference tabs to set up the Editor and Formatting elements.
![]() Note
Note
Scrivener for Windows combines these into one Options tab for the Editor.
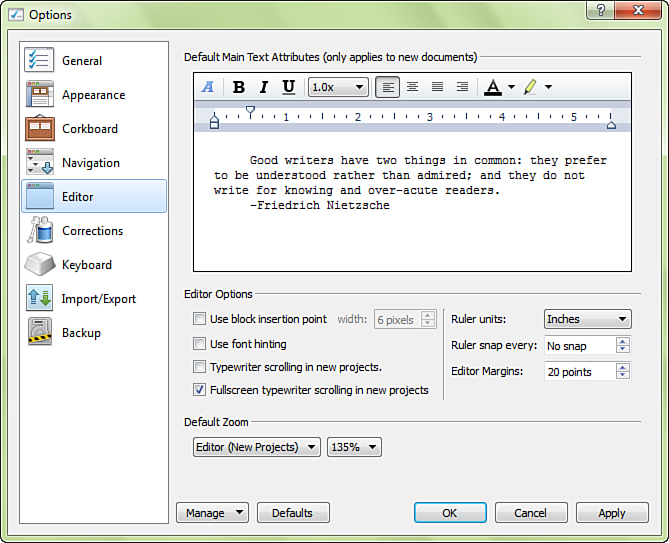
The Editor tab, shown in Figure 2.9, controls the flow of text in the Editor. The formatting of the text itself is the purview of the Formatting tab, covered in the next section of this chapter.

Editing Options
The Editing Options control the major functions of the Editor. When Smart Copy/Paste is selected, Scrivener automatically removes extraneous whitespace and inserts a single space to separate the pasted text from any surrounding text, if necessary.
When you search your project, Scrivener highlights any text that matches your search criteria. Enable the Typing Clears Search Highlights check box if you want these highlights to disappear when you resume typing in the document.
As with the similar feature in Composition mode, you can choose to highlight the current line in the document to make it easier to find your place. Set the highlight color in the Customizable Colors panel of the Appearance tab; choose Editor and then Current Line Highlight.
Hyphenation is disabled by default and is rarely necessary in Scrivener. If you use full (left and right) justification, you may want to select Use Hyphenation to automatically hyphenate long words at the end of a line.
![]() Note
Note
Your margin, page size, and font settings in Scrivener may not carry over onto the printed page, which would change the hyphenation, so this feature only affects readability while you are working.
Kerning is the space between letters on a page. The Use Fine Kerning setting enables Scrivener to make finer adjustments when you zoom in and out of text so it appears better on the screen.
If you are using Mac OS X 10.7 (Lion) or higher, the Auto-Detect Dates, Addresses, Etc. option enables the operating system’s data detection tools to recognize dates and addresses and enable you to add them to your calendar or contacts list. This feature is rarely of use to fiction writers, and, in fact, having your character’s locations or dates in the story highlighted for potential use may be quite annoying. Fortunately, this feature is disabled by default.
When you draft a scene or chapter, you may want to increase or decrease the size of the text to ease eyestrain. Using the Text Scale tool, you can do this without changing the actual font size of the text. The Default Text Zoom can be adjusted to provide an initial scale setting.
The Editor and QuickReference panels can display rulers to make it easier to set tabs and indents in a document. The Ruler Units setting allows the ruler to use centimeters, inches, picas, or points as its unit of measure.
The Typewriter Scroll Line setting controls the current insertion point’s position within the Editor window when typewriter scrolling is enabled for that specific editor. The default setting is Middle of Screen, but you can change this to the top or bottom quarter or third of the screen if you want.
As with Composition mode, the insertion point blinks by default unless you select Disable Insertion Point Blinking. Likewise, the Use Block Insertion Point Of setting controls the width of the insertion point to make it easier to locate in the Editor window. In Windows, this setting affects both the Editor window and Full Screen mode.
Wrap to Editor Mode
Scrivener can use either an Editor or Page View mode. In Editor mode, text wraps to the width of the Editor window. This is similar to using a text editor such as TextEdit on the Mac or Notepad in Windows.
The Margins settings control the space between the text and the edge of the window. Adjust the Left/Right margin to set whitespace between your text and the Binder and Inspector. The Top/Bottom setting is only useful at the top and bottom of a document, so the default is usually fine.
On the Mac, the Default Editor Width controls the size of the Editor. If you resize the window using the Zoom command in the Window menu, Scrivener maintains the Default Editor Width for the Editor and adjusts the Binder and Inspector accordingly. Click the Use Current button to make your current Editor width the default. If you set the default to zero, Scrivener always makes the Editor as large as possible on the screen.
If you enable the Use Fixed Width setting, Scrivener maintains the default width of the page even if the Editor is wider. Any extra space is filled with a background color. If you use this option, set the background color in the Customizable Colors panel of the Appearance tab. Choose Editor and then Fixed Width Background.
The page is centered by default, so any background colors appear on both the right and left sides of the Editor. You can align the page to the left side of the Editor by deselecting the Center check box.
If you work in Scrivener in Full Screen mode, the Editor can become quite large, making it harder to focus on a reasonable amount of text in a line. Click the Full Screen Only check box to constrain the width of the page when you’re in Full Screen mode, even if you don’t choose to use such limits when working in a smaller window.
Wrap to Page Mode
Page mode is similar to a word processor in that it uses preestablished page margins to control the flow of text. The Editor view is used by default, so if you prefer Page view, you need to set it up for future projects and then close your current project and reopen it. This setting affects future new projects but does not affect existing ones. You can toggle the Page view per project by selecting View, Page View, Show/Hide Page View from the menu.
![]() Note
Note
Unlike a word processor, the page settings you establish for the Editor do not necessarily mirror those of the printed output. You can create a customized “page” setting while you write and then use the Compile settings to control the final appearance of your text.
To enable Page view, select Show Page View in New Projects. If you want to view two pages across instead of one, select Use Facing Pages in New Projects. You can also choose to Center Pages to align the page in the middle of the Editor. This setting only affects future new projects. To enable it on a per-project basis, select View, Page View, Two Pages Across from the menu.
To view the printable area on the screen, choose Show Margin Guides. This draws a border on the page. You can also add a shadow around the page to form a border between the page and the background color. If you display two or more pages, the Spacing Between Pages option puts the set number of pixels (the default is 20) between pages.
When using Page view, your onscreen page can match either the printed page size or a custom size. For the Printed Page Size option, Scrivener uses either the settings in the Page Setup window (File, Page Setup) or the settings you choose in the Compile options (File, Compile, then choose Page Settings). For the Custom Page Size, set the overall paper size and the margins.
A Windows View: Wrap to Editor
Scrivener for Windows uses the Editor view only. There is no option for Page view. Lest you think that Windows users have lost out, keep in mind that Page view is primarily for display purposes, not an actual representation of the printed page. When given the choice, I find that using Editor view lets me focus on the words themselves rather than how many “pages” I’ve written.
Setting a Writing Font
The Formatting tab, shown in Figure 2.10, controls how text is formatted in the Editor and Composition mode on the Mac. In Windows, these options are in the Editor tab. The Main Text Style displays a format bar, which allows you to set the font, typeface, alignment, text and highlight colors, and line spacing for your text. To change the font, click the A button to open the Fonts dialog box and then select a font family, typeface, and size. On a Mac, you can move between the Fonts dialog box and the Preferences window to preview your font choice. Click the Close button on the Fonts dialog box when you finish.

Set indents and tabs on the ruler below the formatting bar. You can do this as follows:
• Change tab position: Click on one of the right-facing triangles and drag it to the desired position on the ruler.
• Remove a tab: Click on a triangle and drag it off the ruler.
• Add a tab: Click on the ruler where you want to position the tab. In Windows, double-click to add a tab.
• Change the first-line indent at the start of a paragraph: Click on the downward-facing triangle and drag it to the desired position on the ruler.
The Nietzsche quote beneath the ruler displays a preview of your formatting selections. In Windows, the order of options on the formatting bar is different, but the elements are the same.
![]() Tip
Tip
Don’t resign yourself to endless hours staring at Courier on your screen! Instead, choose a font that’s comfortable for you to view onscreen for prolonged periods. You can write in neon green, 14-point Comic Sans, if your eyes can stand it, yet still compile your completed manuscript in 12-point, Times New Roman or Courier for submission to an editor. Learn how to automatically substitute fonts when exporting your manuscript in Chapter 19, “Compiling Your Completed Work.”
There’s no need to reinvent the wheel if you’ve already formatted text to your liking in the Editor. Instead, click within a paragraph that’s formatted as you want and then click the Use Formatting in Current Editor button in the Formatting preferences tab, and the default text takes on those attributes.
The Formatting tab also lets you set the Writing Direction. In most circumstances, the default Natural setting is appropriate. If your operating system is set to one language but you usually write in a different language, you can adjust this option accordingly.
Project and Document Notes, usually found in the bottom pane of the Inspector, have their own font setting. To change the default, click the current font and choose another from the Fonts dialog box. In Windows, you can use different fonts for both Project and Document Notes, and both are set in the Appearance tab.
If you enter hyperlinks in a document, they are underlined by default unless you deselect the Underline Links option. When you annotate text within the Editor, it changes the color of the text and adds a bubble outline around the selected text. On the Mac, select the Do Not Color the Text of Inline Annotations option if you want annotated text to appear in the default font color. This setting fills the bubble outline with the annotation color.
If you are unsatisfied with the default fonts for comments and footnotes in the Inspector, change them in the Formatting tab just as you made other font adjustments. You can opt to position footnote markers before or after the punctuation of a sentence. The Terminate Footnotes and Comments Before Punctuation option is helpful if your work requires you to add footnotes to text within the punctuation of a sentence instead of following a sentence.
![]() Note
Note
Changes in the Main Text Style section of the Formatting tab only affect new documents. They will not alter any previously created documents. You can convert the formatting of existing documents if you want, but choosing this as an option rather than the default behavior allows you to preserve the formatting of already-typed documents.
Scrivenings is the term for viewing multiple items in the Editor at once. This View mode is useful when working on the transitions between scenes or chapters or when you simply want to view a chapter or your entire manuscript at once. The Separate Scrivenings with Single Line Breaks option divides each document with a line break rather than the more obtrusive graphic divider. If you want to see the titles of each document in your Scrivenings (using View, Editor, Show Titles in Scrivenings), set the Scrivenings Title Font and appearance options to control how this is displayed.
![]() Note
Note
The Scrivenings options are not available in Scrivener for Windows.
Saving and Sharing Your Preference Settings
After all the thought you put into setting all of Scrivener’s preferences, you should preserve your selections. This allows you to recall the settings if you ever need to reinstall Scrivener. You can also use a saved preference file to install your preferences on another computer. To save preferences:
1. Click the Manage button that appears at the bottom of every preference tab, as shown in Figure 2.11.
2. Click Save All Preferences (Save Preferences in Windows) to save all of your preference settings.
3. In the Save dialog box, navigate to the folder where you want to store your preference files.
4. Enter a name for the file. Choose a name that reminds you of any key settings you selected, which makes it helpful to distinguish if you create multiple preference files.
5. Click Save.
![]() Tip
Tip
Remember that this chapter has focused primarily on the visual preferences and those that affect how Scrivener operates as a whole. As you work your way through this book, you may change other preference options. If you change your settings, you can overwrite an existing preference file or create a new one.
To load a saved preference file, simply click the Manage button and then choose Load All Preferences (Load Preferences in Windows). Navigate to the .prefs file and double-click on it.
Saving Preference Presets
Some writers may need different settings for varying types of writing projects, such as screenplays and nonfiction. Other writers may use one group of settings during the writing process and another when they’re revising. Saving your preferences as a preset saves time when you organize and switch between preference sets. To save a preset:
1. Click the Manage button at the bottom of the Preferences window.
2. Select Save All Preferences As Preset.
3. In the dialog box, shown in Figure 2.12, name the preset.
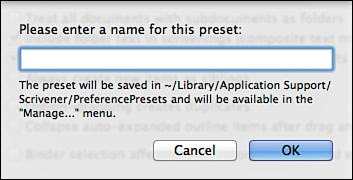
4. Click OK.
Caution
When you click the Manage button again, you see your preset appear as a menu option. This makes it faster to load this set of preferences in the future. When you save a preference file using the Save All Preferences command, you can choose where to save the file. Preference presets, on the other hand, are stored in Scrivener’s Application Support folders in your Library folder. Choose Scrivener, Reveal Support Folder in Finder from the menu, then double-click on the PreferencePresets folder. If you’re comfortable accessing your Library folder, you can copy the .prefs file from there onto a flash drive or another folder for access to the file on another computer. Otherwise, you can save the same preferences using both methods described above so you have a copy of the preferences wherever you need it.
Of course, once you save your preferences, you have the option of sharing them with other Scrivener users. Once you’re an experienced Scrivener user, you may want to share your preference files with a newbie to help him or her get started with all the most useful settings already selected.
Saving Theme Preferences
The All Preferences files save all of your settings, including Backup, Navigation, and Import/Export settings. If you use a Mac and all you care to save or share are your color and font schemes, use the Save Theme Preferences option instead. Theme preferences only save the settings that control the appearance of Scrivener. Thus, all of your Customizable Color settings, the Corkboard and Outliner appearance, and Composition mode settings are saved. You can also save fonts in a theme, if you choose.
To save theme preferences:
1. Click the Manage button at the bottom of the preferences window.
2. Select Save Theme Preferences.
3. In the Save dialog box, shown in Figure 2.13, navigate to the folder where you want to store your preference files.
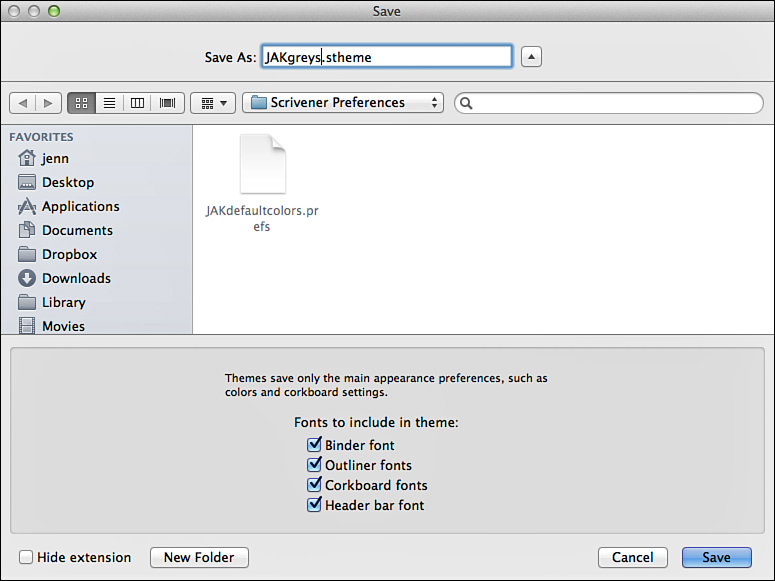
5. Select which fonts you want to save with the theme preferences.
6. Click Save.
Save theme presets using the same steps as saving preference presets. When prompted for a filename, you are also prompted to select which fonts you want to save with the theme.
![]() Note
Note
Sorry, Windows users, although you can save preference files in Windows, you cannot save theme preference files or presets.
Caution
If you’ve been playing with all of the preferences tabs and changing colors at random and find you’ve made a muddle of things, you can easily restore order by clicking the Defaults button at the bottom of the Preferences/Options window. This restores all of the settings and colors to their original state. You can also reset individual colors by clicking the Use Default Color button below the color swatches in the Appearance tab. In Windows, click the Use Default Font button to restore individual font settings.
Using Workspace Layouts
Beyond the preference settings, there is much more to Scrivener that can be customized to support your workflow. One of the most useful of these is layouts. When you exit Scrivener, it automatically saves the layout—which elements are visible or hidden, the Group View mode, and which options are being used in each element—so you return to the same settings the next time you open your project. Better still, you can save different layouts to easily switch between them.
When you begin working on a project, you might need only the Corkboard so you can throw ideas up without worrying about their order or tagging it with meta-data. Later, you might use the Binder along with the Corkboard as you tease a story out of all those bits and pieces. At some point, you might want to use the Inspector along with the Binder to add label and status tags, choose which files to include in the compiled manuscript, and view comments and footnotes. When you write a scene, you might want to split the Editor into two windows, so you can refer to research in one while writing in the other. Your needs change as your project progresses.
![]() Tip
Tip
Once you save a layout, you can use it in any project without having to start from scratch.
Layouts contain the following elements:
• The size of the Scrivener window, its position on your screen, and the size of each of the open elements
• The visibility of the toolbar, ruler, and format bar
• The toolbar’s icon size on the Mac
• The visibility of the Header and Footer bars
• The Binder’s status—visible or hidden—and whether the Collection tab is visible or hidden
• The Binder’s mode and how it affects documents in the Editor
• The Inspector’s status—visible or hidden
• The Editor’s layout, how the window is split, and whether the Editor is locked in place
• The Group View mode in the Editor—whether each window in the Editor displays the single text mode, Corkboard, Outliner, or Scrivenings mode
• The auto-load state of the editor—if the editors are linked to that, selecting an item in the Corkboard or Outliner loads it in the other screen
• Whether each split in the Editor is in Page view or the standard view
• The Full Screen status on the Mac (Mac OS X 10.7 Lion and above, only)
• The Corkboard and Outliner settings (optional)
• The use of label and status meta-data on index cards, in the Outliner, and in the Binder, and visibility of keyword chips on index cards (optional)
Creating Layouts
The first step to creating a layout is to adjust all of the interface elements to your liking. When you first begin using Scrivener, you may be fine-tuning and adjusting a lot to see what works for you, but you’ll soon find yourself settling into a particular group of features and settings that suit you. To save the layout:
1. Open the Layouts window by choosing Window, Layouts, Manage Layouts (in Scrivener for Windows, choose View, Layout, Manage Layouts), as shown in Figure 2.14.
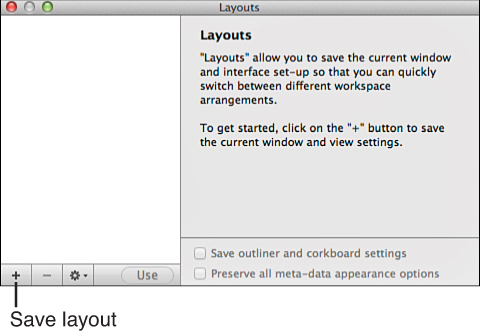
Figure 2.14 The Layouts window explains the purpose of layouts. If you’ve previously saved a layout, a preview of the first layout in the list appears in place of the instructions.
2. Click the plus sign (+) button at the bottom of the Layouts window.
3. Enter a name for your layout.
4. Press Return (Enter).
The pane on the right now displays a preview of your layout, as shown in Figure 2.15. The left column lists the name of your new layout.

Beneath the preview pane are two optional settings you can select with your layout. The Save Outliner and Corkboard Settings option saves the column visibility and sorting in the Outliner and the index card size, ratio, and spacing in the Corkboard. Select Preserve All Meta-Data Appearance Options to save the appearance of keyword chips and the status stamp on the Corkboard and the tinting of documents to match the label tag in the Binder, Outliner, and Corkboard. These settings are optional because you can choose to apply them in a particular instance by toggling the check boxes for the layout before clicking the Use button.
![]() Note
Note
The Corkboard and Outliner options are explained in Chapters 6 and 7, “Storyboarding with the Corkboard” and “Plotting in the Outliner,” respectively. Learn more about setting visual cues to meta-data in Chapter 12, “Putting Keywords and Meta-Data to Work.”
To save additional layouts, adjust the settings in your project and then repeat steps 1–4 above.
Accessing Layouts
Once you create a couple of layouts, switching between them is easy. You can apply a layout using one of the following options:
• Select the layout from the Layouts window and click the Use button at the bottom of the window.
• Choose Window, Layouts, Manage Layouts (or View, Layout, All Layouts if you use Windows) and choose a layout from the submenu.
• Click and hold the Layouts button on the toolbar, and then select a layout from the pop-up menu.
![]() Note
Note
The Layouts button is on the default toolbar on the Mac. Windows users can add this button by customizing the toolbar, which is explained later in this chapter. When you click the Layouts button in Windows, it opens the Layouts window, from which you can select a layout and click the Use button.
Modifying Layouts
As you work in a layout, your needs may change. Perhaps you’re using a different computer with a larger or smaller display and want to resize the entire Scrivener window or adjust which elements are visible. Make the changes you want to your workspace and then do the following:
1. Open the Layouts window.
2. Select the name of the layout you want to modify.
3. Click the gear button at the bottom of the window.
4. Select Update Selected Layout from the pop-up menu.
If you make drastic changes, you notice them in the preview pane.
Renaming Layouts
Many Scrivener users don’t realize the Layouts feature even exists, but those who do tend to create layouts for every aspect of their writing process. As you add more layouts, you may find that the name you initially used is not descriptive enough or doesn’t fit the naming pattern you’ve chosen for other layouts. To rename a layout:
1. In the Layouts window, double-click the name of the layout you want to rename.
2. Enter a new name for the layout.
3. Press Return (Enter).
![]() Tip
Tip
Consider naming your layouts with the phase of writing you’re in when you use it. For example, you could save your layouts as Brainstorming, Research, Writing, Story Analysis, and Revisions.
Deleting Layouts
If you no longer wish to keep a layout, you can delete it by following these steps:
1. In the Layouts window, select the name of the layout you want to delete.
2. Click the minus sign (-) at the bottom of the window.
3. A message appears to remind you that you cannot undo this action. Click OK to delete the layout.
Caution
As the dialog box warns, you cannot change your mind once you delete a layout. If you’re unsure whether you’ll need a layout again in the future, consider renaming it to xBrain-storm or something similar, and then see if you find yourself returning to it for a period of time. On the Mac, saved layouts are automatically sorted alphabetically, so prepending an x to the name moves the layout to the bottom of the list.
Exporting and Importing Layouts
Layouts are not project-specific, so you can access them from any project. If you want to use a layout on another computer or send it to another writer, you can export it.
Caution
Layouts are platform-specific. You cannot use Mac layouts in Windows, and vice versa.
To export a layout:
1. Open the Layouts window.
2. Select the layout you want to export.
3. Click the gear button at the bottom of the window.
4. Select Export Selected Layout from the pop-up menu.
5. In the Save dialog box (Export Layout in Windows), choose a name for the exported layout.
6. Select where you want to save the exported layout.
7. Click Save.
If you receive a layout from a friend or want to use a layout you exported from a different computer, either copy the file onto your hard drive or insert the flash drive or other media into your computer. Mac layout files have a .scrlayout extension while Windows files have a .scrivlayout extension.
To import the file into Scrivener:
1. Open the Layouts window.
2. Click the gear button and select Import Layout from the pop-up menu.
3. In the Import dialog box, select the file to import.
4. Click Open.
The imported layout is added to the Layouts window.
Customizing the Toolbar
The toolbar at the top of the Scrivener window contains buttons for the most common features, but you can add or remove buttons to suit your needs. You can customize the toolbar in both Windows and the Mac, although the procedure is different for each.
On the Mac, customize the toolbar as follows:
1. Choose View, Customize Toolbar from the menu. Alternatively, right-click on the toolbar and choose Customize Toolbar from the context menu.
2. Drag icons from the Customize Toolbar window, shown in Figure 2.16, into the toolbar.
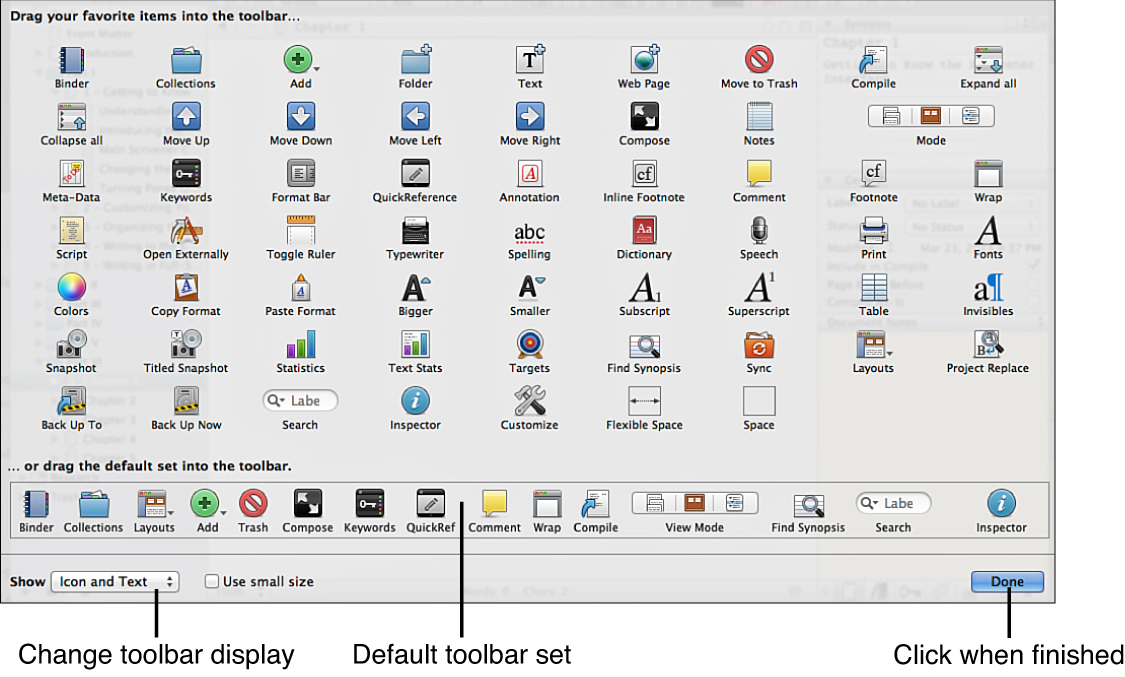
3. Drag icons off the toolbar to remove them.
4. Click the Done button when you finish making changes.
If you want to display the name of the button beneath the icon, click the drop-down menu button at the lower left of the Customize Toolbar window and choose Icon and Text. You can also opt to display only the icon or only text. If you want to hide the toolbar completely, choose View, Hide Toolbar on the Mac or View, Toolbar in Windows.
![]() Tip
Tip
Notice in the figures in this book that I have chosen to display Icon and Text for demonstration purposes. Once you’re familiar with the icons, you may choose to hide the Text to save a few pixels of screen real estate. If you forget the name of a button, you can hover over it to view the ToolTip.
You can return to the default toolbar at any time by dragging the default set from the Customize Toolbar window into the toolbar.
If you want to customize the toolbar in Windows, do the following:
1. Select Tools, Customize Toolbars from the menu to open the Customize Toolbars window, shown in Figure 2.17.
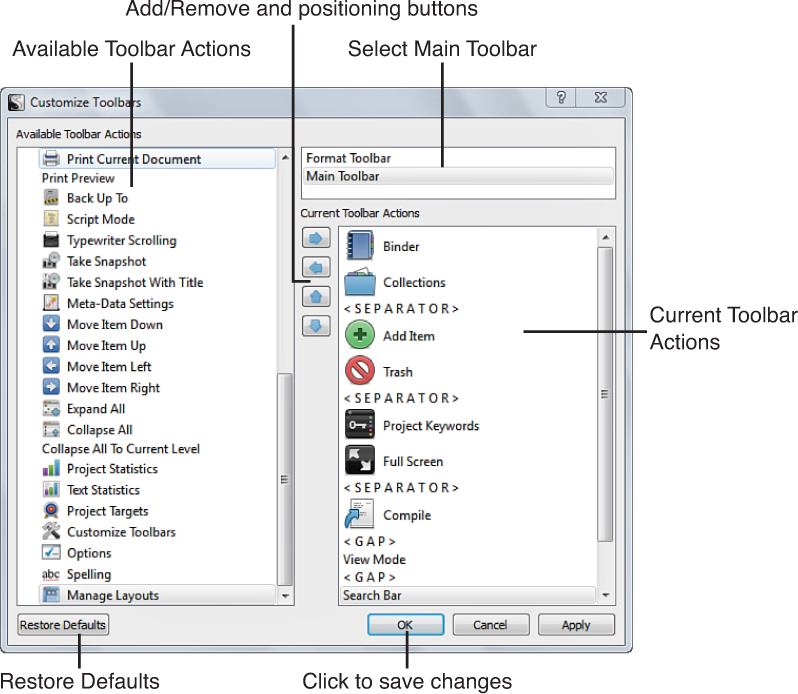
2. Click Main Toolbar in the upper-right pane.
3. Select an action from the Available Toolbar Actions list to add to the toolbar.
4. Click the right-arrow button in the middle of the window to add the action to the Current Toolbar Actions.
5. Use the up- and down-arrow buttons to position the new button where you want on the toolbar.
6. To remove a button, select the action in the Current Toolbar Actions list and then click the left-arrow button.
7. Click Apply to preview your new setting without closing the dialog box. When you’re satisfied with your choices, click OK to save your changes and exit the dialog box.
![]() Tip
Tip
Consider adding the Layouts button to the Windows toolbar, as mentioned earlier in this chapter.