
1. Getting to Know the Scrivener Interface
Scrivener might look like a word processor at first glance. There is a large empty space for you to type and a toolbar to change the font and paragraph styles. You can certainly use Scrivener much like a word processor, typing your entire manuscript in one long document—indeed, many users who adopt Scrivener in the middle of a manuscript do this before learning how to use the myriad of other features—but they miss out on the full power of the tool on their screen. As you begin to see in this chapter, Scrivener is a complete toolkit for writers, with tools to help you do everything from brainstorming to researching to helping you discover weaknesses in your story.
Understanding Projects
Scrivener uses projects to keep your manuscript and associated materials together. Think of a project as an accordion folder that expands to hold everything you accumulate when writing a book. When you write in Scrivener, you can create separate documents for each chapter or scene, each of which is stored in the project. You may have character or setting sheets you create related to your book, along with any other notes you take as you brainstorm or write. Your project may also contain photos, web pages, PDFs, and even audio/video files you’ve gathered for research.
On a Mac, a Scrivener project looks like a single file, but it is actually a package containing individual files for each item in the project. In Windows, a Scrivener project is a folder with subfolders and files for the various components of your project.
 Caution
Do not edit or move the files in a Scrivener project outside the Scrivener application, as this may corrupt your project. Scrivener relies on the ability to locate the files within the project and track the current version of each component.
Creating a New Project
When you first launch Scrivener, the Project Templates window opens, as shown in Figure 1.1. This launchpad allows you to create and name a new project, as well as give the new work a basic structure. If you’ve previously created and closed a project in Scrivener, the Project Templates window enables you to reopen that project.
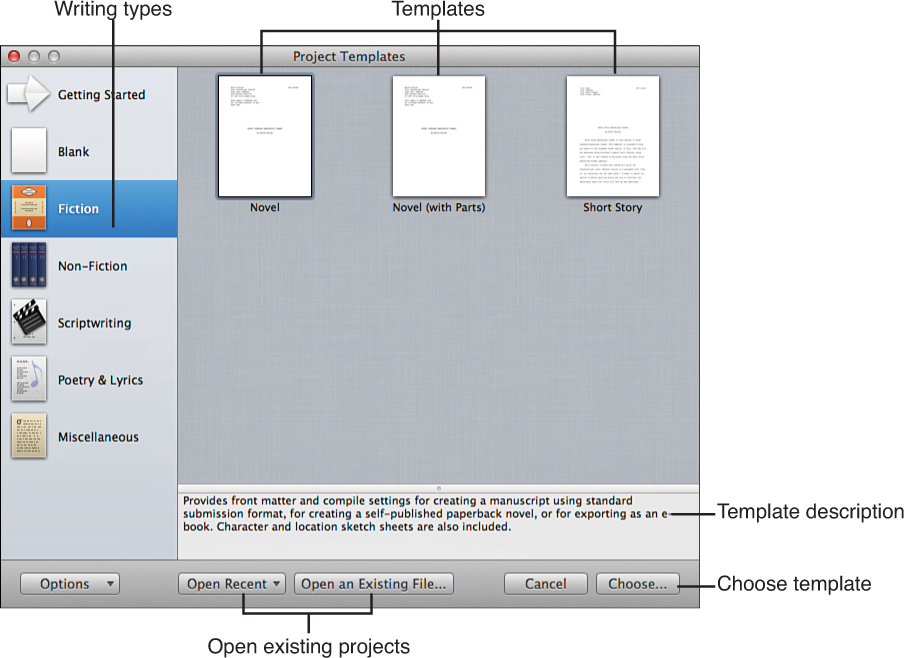
Figure 1.1 The Project Templates window allows you to create a new project geared to a specific type of writing.
![]() Note
Note
On the Mac, if you don’t close a project when you exit Scrivener, the project automatically reopens by default the next time you launch the application. This enables you to quickly access your current work in progress when you open Scrivener. The Project Templates window only appears when you launch Scrivener after having previously closed all open projects or when you choose File, New Project.
On Windows, the most recent project you opened automatically reopens the next time you launch Scrivener. If you want to automatically open the Project Templates window when you launch Scrivener, click on Tools, Options, and then deselect Open Recent Projects on Program Launch and select Show Start Panel When There Are No Projects Open.
To create a new project:
1. Choose the writing type appropriate to your new work from the left sidebar.
2. Choose a project template from the options on the right.
3. If you want to learn more about a template, read the description in the pane beneath the templates.
4. Click Choose to create a new project using the selected template.
5. Scrivener opens a Save As window, as shown in Figure 1.2. Provide a filename, which also becomes the project name. If you want to save the project into a different folder than the default, click the expansion button to the right of the Save As field and navigate to the folder you want.
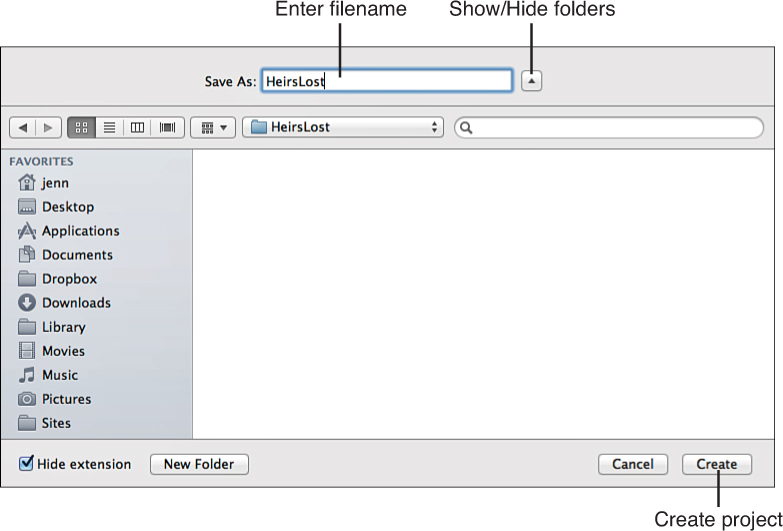
6. Click Create.
After you’ve created a project, it opens in the main Scrivener window.
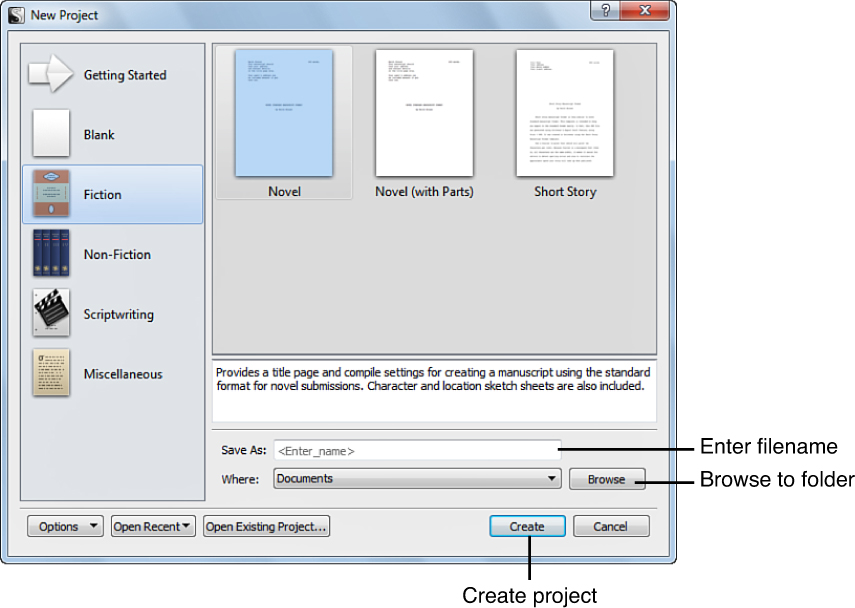
A Windows View: Creating New Projects
The New Project window, shown here, has minor differences from the Mac version. Enter a filename in the Save As field in the New Project window. Click the Browse button to choose a location for the project file. Then click Create.
![]() Note
Note
On the Mac, some templates automatically use the project name as the title of your manuscript and insert it into the title page and header when you compile the project into a completed manuscript. With this in mind, choose a filename carefully. Of course, you can always rename the project later or manually change the title page and header.
![]() Tip
Tip
The Getting Started tab in the Project Templates window provides links to a hands-on tutorial and the Scrivener user manual. On the Mac, you can also access video tutorials from this window. Select the item and then click Open. The manual and video options open your default PDF reader and the YouTube website, respectively. The hands-on tutorial opens an introductory message and then a Save As dialog box for creating a sample project.
Both Mac and Windows users can access the PDF manual, hands-on tutorial, and video tutorial from the Help menu, as well.
Selecting a Project Template
Project templates provide a basic set of documents and formatting to help you start your new manuscript. The Blank project template provides only an empty folder for the draft of your manuscript and an empty folder for your research. The Novel project template, on the other hand, contains additional folders for characters and settings and front matter. If you are on a Mac, you will find a folder of page templates to generate multiple character and setting sheets. The template provides a guide on how to use it, including tips for compiling your manuscript. The Draft folder has even been renamed to Manuscript and contains an initial chapter folder with a scene document inside it to get you started.
Project templates also include Compile settings to work with the Binder structure established by the template. The Blank project uses the “Original” Compile preset by default, which compiles the manuscript exactly as it appears in the Editor. The Novel template uses the “Novel” Compile preset. The About document at the top of the Binder in the template explains how to use and modify the Compile settings when using that template.
If your goal right now is simply to get to work and begin writing, I suggest starting with the Blank template. You won’t have to worry about figuring out what each additional folder or file is intended to do, so you can focus on getting words on the page. You can always drag folders or files from one of the other templates into your work in progress if you discover you need them later.
If, on the other hand, you want to take the time now to master Scrivener, by all means dive into one of the other templates.
![]() Tip
Tip
Don’t feel locked in by project templates! A template is simply a starting point for a project, just extra documents and settings that were added to a blank project to make certain tasks easier. If you start a project in one template and want to add elements of another, you can open a project with the second template and drag and drop documents between them. You can also delete or ignore any elements you don’t want to use.
If you obtained your copy of Scrivener during National Novel Writing Month (NaNoWriMo), you may see a NaNoWriMo Novel template in the Fiction tab. This template comes with preset project and daily writing targets to help you reach your NaNoWriMo goal of 50,000 words in one month.
As you become more familiar with Scrivener, you will almost certainly want to customize an existing template or create a brand-new one from scratch. You can also download additional project templates created by other Scrivener users. To learn more about project templates, see Chapter 14, “Creating and Using Project Templates.”
Saving Projects
After you create a project, you don’t have to worry about saving it as you work. Scrivener automatically saves the project whenever you pause for more than 2 seconds. You can change this interval in the General preferences tab (Scrivener, Preferences on the Mac or Tools, Options in Windows), but I recommend leaving it as the default. Scrivener works quickly, so you won’t experience any lag time with such frequent saves. You can also manually save the project at any time (File, Save, or Cmd-S for Mac, Ctrl+S for Windows), if you want.
![]() Tip
Tip
Whenever you’re tempted to manually save your project, consider using the Snapshot feature. A Snapshot saves the current version of your document, allowing you to roll back to a previous version if you don’t like changes you make afterward. To take a Snapshot, choose Documents, Snapshots, Take Snapshot or press Cmd-5 (Ctrl+5 in Windows). Learn more about using Snapshots in Chapter 10, “Editing Your Manuscript.”
Scrivener also automatically creates backups of your project. To learn more about backups, see Chapter 17, “Backing Up Your Work.”
Introducing the Main Scrivener Components
After your project opens in the main Scrivener interface, you are presented with both the familiar and the new. As you can see in Figure 1.3, Scrivener has a large editing area, which may look comfortingly like a word processor. But there are also sidebars that may give you pause, and some of the toolbar buttons bring up floating panes with even more options. The rest of this chapter is devoted to introducing the key components of Scrivener, just to eliminate the fear factor. These are all explored in much more detail in the following chapters.
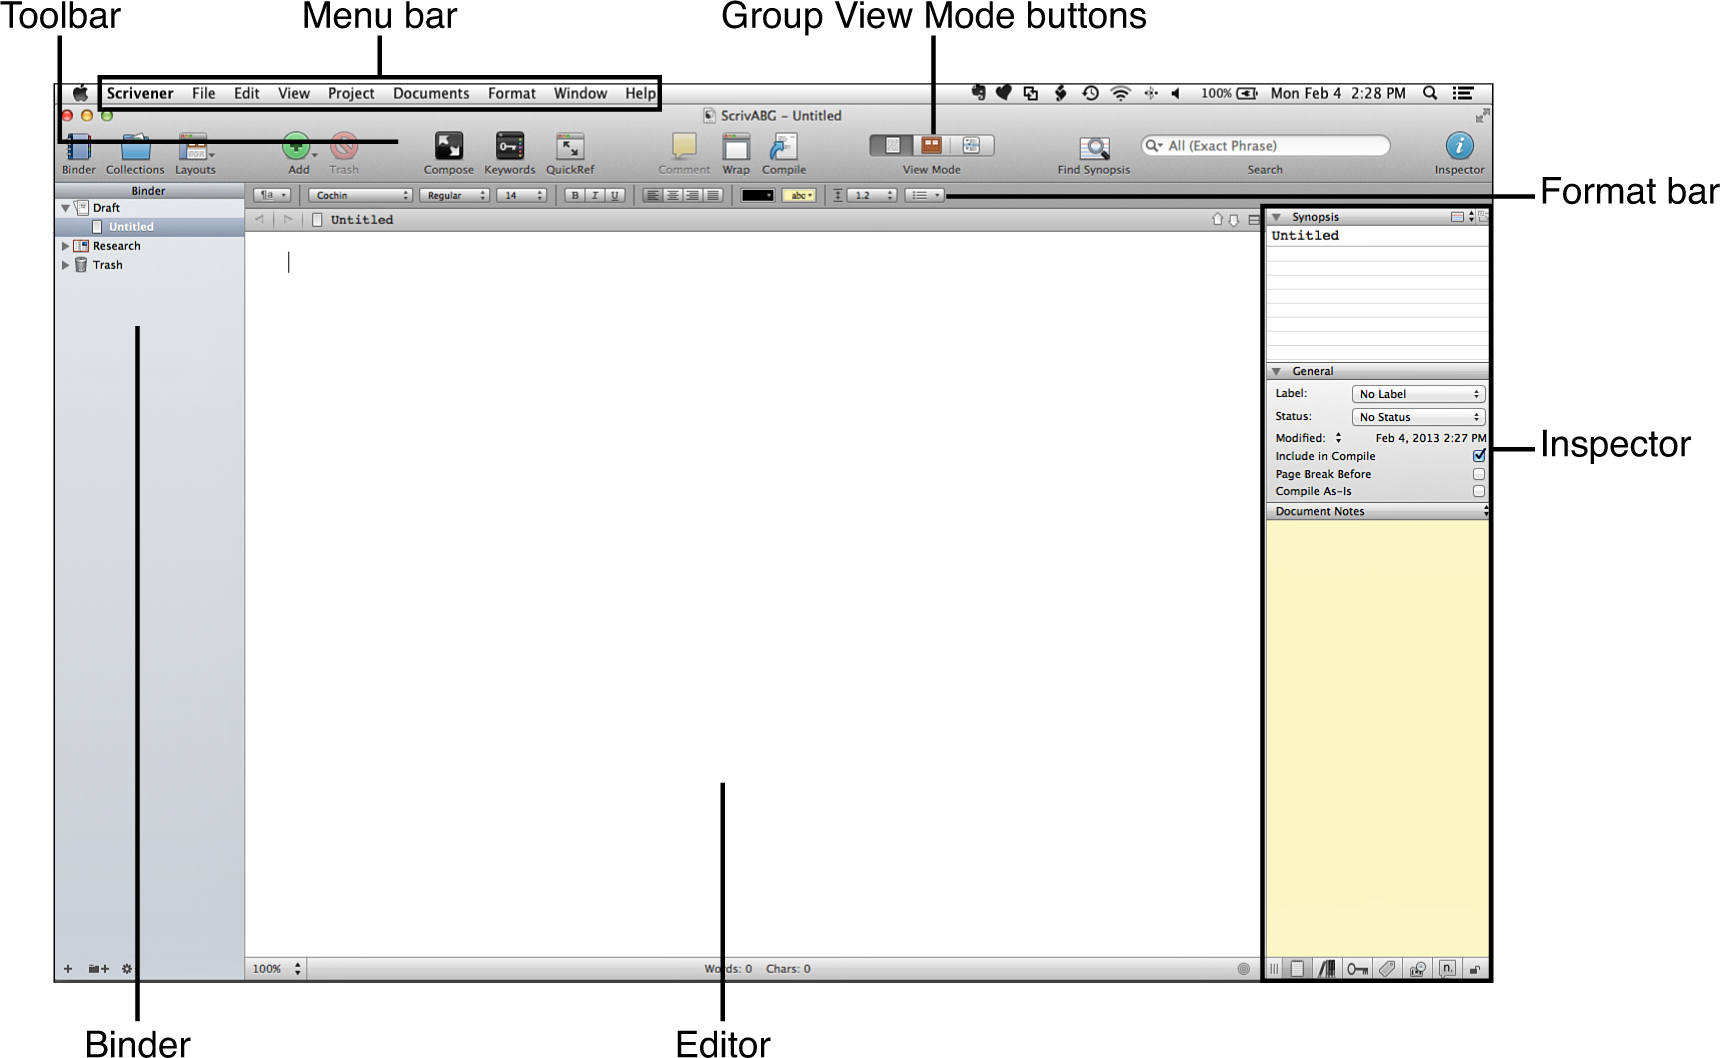
Figure 1.3 The Scrivener interface may be intimidating at first, but each component serves to help you work more efficiently once you understand them.
![]() Tip
Tip
If the Inspector doesn’t appear in the Scrivener window when you first open your project, click the Inspector button in the toolbar (the blue circle with an i in it). You can also open the Inspector by choosing View, Layout, Show Inspector from the menu.
Examining the Editor
The largest area on the screen is the Editor, as shown in Figure 1.4. If you opened a project using the Blank template, the Editor opens to a blank screen. If you used a different template, the Editor opens an introduction page with details about the template and how to use any unique features.
![]() Tip
Tip
The Editor may open to the Corkboard or Outliner instead of the Document view, especially if you’ve opened Scrivener and played around with it in the past. If this is the case, you can switch to Document view by clicking on a single document in the Binder.
Use the Editor to type the body of your work. The format bar above the Editor can be used to control the font and style of your text. You can also insert images into your text. This isn’t generally of much use to fiction writers, but may be necessary for writers of academic papers and other works of nonfiction.
To learn more about the Editor, see Chapter 4, “Writing in the Editor.”
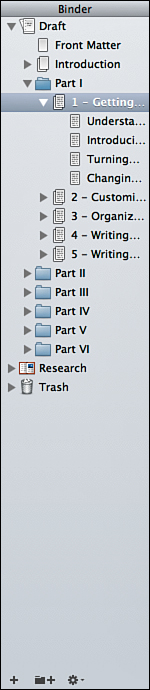
Using the Binder
The left sidebar, shown in Figure 1.5, is called the Binder. Use the Binder to organize your scenes, research, and notes into folders. The Binder allows you to quickly open one of these items in the Editor just by clicking on it. You can rearrange your scenes by dragging documents around the Binder or dropping them into different folders or subfolders. The buttons at the bottom of the Binder give you quick access to tools that help organize your project. Some of these functions include adding or duplicating items, grouping items together, and emptying the trash. These options are also available from the context menu if you right-click in the Binder.
![]() Note
Note
Deleting a document or folder as you work doesn’t mean all is lost. If you later realize you need a critical scene that was previously deleted, it can still be retrieved. When you delete an item, it moves to the Trash, which is accessible from the Binder. The item is not permanently deleted until you empty the Trash. If you’re not certain if you may want to use a scene later, however, I recommend creating a folder for Scrap (or whatever you want to name it) and moving documents to that folder instead. Use the Trash for deleted blank documents and accidental duplicates.
Collections also appear in the Binder. A collection is a group of related files in your project. You can search for a character name, for example, and create a collection of all the scenes that contain that character. You can also create a collection manually, dropping in files that you consider relevant. You could create a collection of scenes that relate specifically to your protagonist’s internal conflict to see if his or her growth follows a logical progression.
The Binder is open by default. If you want to close the Binder to focus on the Editor, choose View, Layout, Hide Binder from the menu. View, Layout, Show Binder restores the Binder. On Windows, this menu option is always titled Show Binder, with a check mark to indicate if it’s toggled on or off. You can also click the Binder button in the toolbar or use Cmd-Option-B (or Ctrl+Shift+B in Windows) to toggle the Binder.
Discover more about the Binder in Chapter 3, “Organizing the Binder.” To learn more about collections, see Chapter 16, “Searching Your Project.”
Opening the Inspector
The right sidebar is the Inspector. This area displays information about the active file or folder. This information is known as meta-data. It’s not the document itself, but all of the details about the document. To understand meta-data, think about a digital photograph. The image is the beautiful landscape or candid shot that evokes emotion. The meta-data is the information about where the shot was taken, the date of the event, the camera settings, and the filters you applied. This information is important to you as the photographer, but not to those who admire your work.
In the case of Scrivener, meta-data is divided into three areas in the Inspector, as shown in Figure 1.6. The Synopsis area at the top of the Inspector allows you to enter a brief summary of the scene or chapter. The General area in the middle displays the date the file was last modified, any labels or status you choose to tag, and information about how the file will be used when you compile your project into a completed manuscript. The Document Notes section at the bottom of the Inspector can be used to jot down notes about the document or project.
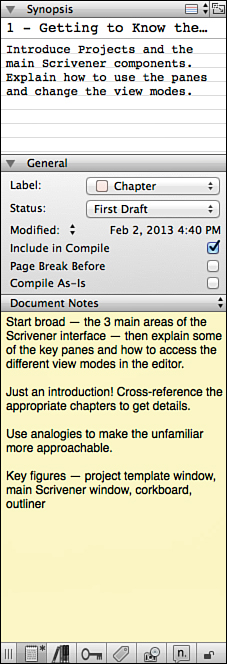
The toolbar at the bottom of the Inspector provides access to additional meta-data, such as keywords, comments, and links to other information. When selected, these options appear in the Inspector sidebar. Some of these options fill the entire Inspector when selected.
Learn more about the Inspector and meta-data in Chapter 11, “Digging into the Inspector,” and Chapter 12, “Putting Keywords and Meta-Data to Work.”
Changing the Group View Mode
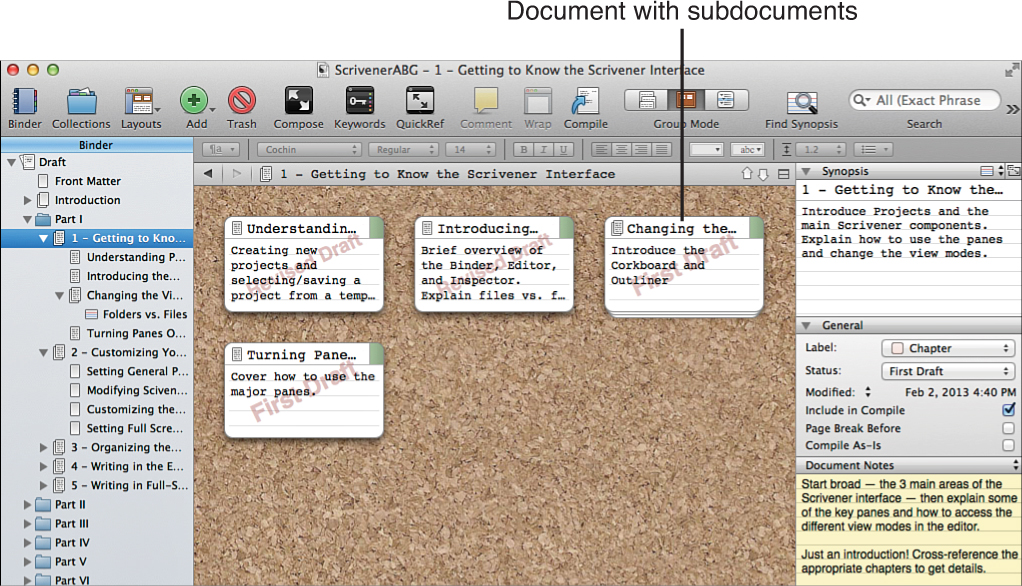
The Scrivenings, Corkboard, and Outliner modes are three other methods for viewing your work, each of which appears in the Editor when selected. The Corkboard, shown in Figure 1.7, looks just like its namesake—a blank board to which you can attach index cards. Each index card represents a file in your project and can contain a brief synopsis or an image. The Corkboard is good for viewing one level of documents at a time, such as all the scenes in a chapter. Folders and documents with subdocuments appear as a stack of index cards. To access the Corkboard, click the Corkboard icon in the toolbar (the second Group View Mode button); choose View, Corkboard from the menu; or press Cmd-2 (Ctrl+2 in Windows).
![]() Note
Note
The toolbar groups the Scrivenings, Corkboard, and Outliner icons together. If you have text displayed under your toolbar icons on the Mac, the label for this icon grouping changes from View Mode to Group Mode depending on whether you’re viewing a single document or a group of documents in the active Editor window. Also, if you’re viewing a single document, the Scrivenings icon switches to a single Document icon in the View Mode group on both Mac and Windows platforms.
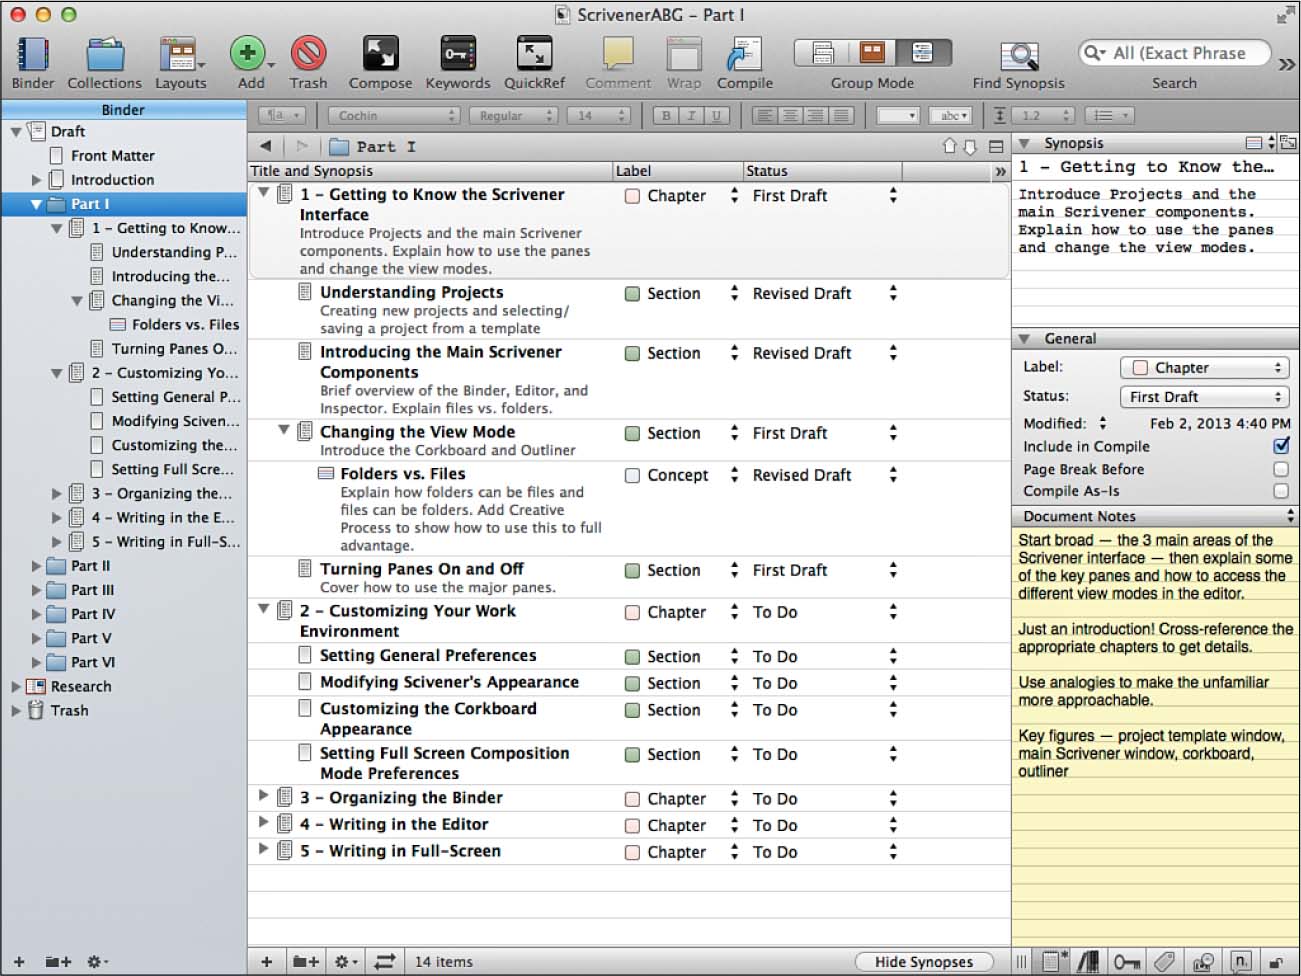
The Outliner, shown in Figure 1.8, provides a hierarchical outline view of your project. Like the Corkboard, this is another way to get an overview of your project. You can view the synopsis and other meta-data in the Outliner, and can even add columns to display the word count, target word count, and progress bars to give you more control. One advantage of the Outliner over the Corkboard is that you can view the entire draft at once, rather than just one level (part, chapter, and so on). To access the Outliner, click the Outliner icon in the toolbar (the third icon in the Group View Mode grouping); choose View, Outline from the menu; or press Cmd-3 (Ctrl+3 in Windows).
The Corkboard and Outliner are powerful plotting tools. If you are a plotter—someone who carefully preplans a book before writing—you may choose to create all your scene documents in advance, adding a brief synopsis in the Inspector for each document. You can then add, delete, and move the documents around in the Corkboard or Outliner until you’re satisfied with the story and ready to write. This may take away the spontaneity of the story if you’re a pantser—someone who likes to let his story unfold as he writes it. The Corkboard and Outliner are still useful tools for pantsers, however, because if you get an idea for a scene that will come later in the book, you can quickly generate a document and synopsis for it in either the Corkboard or Outliner, and then get back to writing. And as you’re writing, you can use the Corkboard and Outliner along with judicious use of meta-data to see potential flaws in your story. In Chapter 6, “Storyboarding with the Corkboard,” and Chapter 7, “Plotting in the Outliner,” you discover more ways to put these tools to work, no matter how you approach your writing process.
The third Group mode is called Scrivenings. This mode is just like the standard text editor, but it displays all the selected documents on one screen. This mode is helpful when you write transitions from one scene or chapter to another. To access Scrivenings, select multiple documents or a folder in the Binder and then either click the Scrivenings icon in the toolbar (the first button in the Group View Mode grouping); choose View, Scrivenings from the menu; or press Cmd-1 (Ctrl+1 in Windows). Learn more about Scrivenings in Chapter 4.
Understanding Folders Versus Files
One key difference between Scrivener and other applications is the concept of files and folders. You may be accustomed to using folders strictly as a container for your files. In Scrivener, however, the folder itself can contain text, acting as both folder and document. Also, documents can contain subfiles and folders, acting as both document and folder. In other words, both files and folders serve the same purposes. Folders and files do, however, display different icons in the Binder depending on their content and whether they contain subdocuments.
Although this fluidity between files and folders may be confusing at first, you can use this flexibility to your advantage. For example, you can create a folder for each chapter, and put the chapter heading in the folder itself. Depending upon your Compile settings, this information may then be used to appear on the first page of the chapter when you compile your manuscript, as you discover in Chapter 19, “Compiling Your Completed Work.” Another advantage is that you don’t need to know when you begin writing if this will be just a scene or a complete chapter. You can easily convert files to folders and vice versa, or nest additional files and folders within a parent file or folder.
Accessing Other Panels
In addition to the main interface elements, Scrivener has additional panels accessible from the toolbar and menus. All of these are explained in the appropriate chapters of this book, but a couple are worth noting right out of the gate.
The QuickReference (QuickRef) panels allow you to open documents in a separate window rather than in the Editor. This is helpful when you want to refer to one or more documents while writing another. You can move the QuickRef panels around on the screen to keep them visible but out of your way. Access the QuickRef panel using one of these options:
• Select one or more documents in the Binder, Corkboard, or Outliner and then click the QuickReference button on the toolbar.
• Select one or more documents and drag them onto the QuickReference button on the toolbar.
• Select one or more documents and choose Documents, Open, As QuickReference.
• Select one or more documents and then right-click to open the context menu and select Documents, Open, As QuickReference.
• Choose View, QuickReference from the menu and then choose a document from the submenu.
• Select one or more documents and then press the spacebar.
The Scratch Pad, as its name suggests, is a place for you to take notes. Yes, Scrivener already has a lot of other places for you to take notes—within a document, the Project and Document Notes in the Inspector, the Synopsis—but all of those are connected to a particular document or project. The Scratch Pad is separate from your projects, so you can take notes that don’t necessarily apply to the open project. This makes the Scratch Pad a quick way to jot down other book ideas, your shopping list, or any other thoughts that come to mind while you’re writing and then tuck them away so they don’t clutter your head while you’re trying to focus. You can also use the Scratch Pad to collect information from web pages or other applications and import those notes into your project later. Chapter 4 explains how to use the Scratch Pad and how to import notes from the Scratch Pad into a project. In the meantime, if you want to check it out, choose Window, Show Scratch Pad from the menu or press Shift-Cmd-Return. In Windows, choose Tools, Scratch Pad from the menu or press Ctrl+Alt+Shift+P.
![]() Note
Note
On the Mac, the keyboard shortcut can be changed in the General tab of the preferences window. In Windows, the keyboard shortcut can be changed in the Keyboard tab of the Options window.