

L1. LAB 1: GETTING FAMILIAR WITH ANDROID SOFTWARE TOOLS 25
In order to find the SDK path, launch Android Studio and find the SDK location:
File > Project Structure > SDK Location: “Android SDK location”
e path for the SDK and platform tools directories is:
PATH: PATH=$PATH:$ANDROID_HOME/tools:$ANDROID_HOME/platform-tools
Once NDK is downloaded, set the NDK location to: home/dev folder (/dev) .
It is worth noting that the Android NDK or SDK folders should not be appear inside
each other.
Set the ANDROID_NDK_HOME environment variable to the directory where the NDK is
installed; for example:
export ANDROID_NDK_HOME=~/dev/android-ndk-r14b
en the NDK directory should be added to PATH:
export PATH=$PATH:$ANDROID_NDK_HOME
e SDK is usually installed in the library. In order to find the folder, use cd ~/Library ,
and then open ~/Library/ in the terminal to find full path of SDK.
To check, write the following command in the terminal:
nano~/.bash_profile
en, in the nano~/bash_profile, write these commands (see Figure 2.17):
export ANDROID_HOME={YOUR_PATH}
export PATH=$PATH:$ANDROID_HOME/tools:$ANDROID_HOME/platform-tools
export ANDROID_NDK_HOME=[NDK_PATH]/android-ndk-[version]
export PATH=$PATH:$ANDROID_NDK_HOME
L1 LAB 1:
GETTING FAMILIAR WITH ANDROID SOFTWARE
TOOLS
is lab covers a simple app on the Android smartphone platform by constructing a “Hello
world!” program. Android Studio and NDK tools are used for code development, emulation,
and code debugging. All the codes needed for this and other labs can be extracted from the
package mentioned in Chapter 1. Start by launching Android Studio, and if not already done,
set up an Android Virtual Device (AVD) for use with the Android emulator.
• Begin by creating a new Android project using the Quick Start menu found on the Android
Studio home screen.

26 2. ANDROID SOFTWARE DEVELOPMENT TOOLS
Figure 2.17: Commands.
• Set the Application Name to HelloWorld and the project location to a folder within the
C:Android directory.
• Change the Company Domain to dsp.com so that the package name reads as
com.dsp.helloworld . is is of importance later as it will affect the naming of your
native code methods. Refer to Figure L1.1a for the previous three steps.
• e Target Android device should be set to Phone and Tablet using a
Minimum SDK setting of API 15 .
• Click Next and on the following screen choose to create a Blank Activity .
• Click Next again to create a Blank Activity and leave the default naming.
• Select Finish. e new app project is now created and the main app editor will open to
show the GUI layout of the app.
• Navigate to the java directory of the app in the Project window and open the MainActiv-
ity.java file under com.dsp.helloworld, as shown in Figure L1.1b.

L1. LAB 1: GETTING FAMILIAR WITH ANDROID SOFTWARE TOOLS 27
(a)
(b)
Figure L1.1: (a) Create Android project; (b) HelloWorld project.

28 2. ANDROID SOFTWARE DEVELOPMENT TOOLS
e class that typically defines an Android app is called an Activity. Activities are generally
used to define user interface elements. An Android app has activities containing various sections
that the user might interact with such as the main app window. Activities can also be used
to construct and display other activities—such as if a settings window is needed. Whenever
an Android app is opened, the onCreate function or method is called. is method can be
regarded as the “main” of an activity. Other methods may also be called during various portions
of the app lifecycle as detailed at the following website:
http://developer.android.com/training/basics/activity-lifecycle/starting.h
tml
In the default code created by the SDK, setContentView(R.layout.activity_main)
exhibits the GUI. e layout is described in the file res/layout/activity_main.xml in the Package
Explorer window. Open this file to preview the user interface. Layouts can be modified using
the WYSIWYG editor which is built into Android Studio. For now the basic GUI suits our
purposes with one minor modification detailed as follows.
• Open the XML text of the layout (see Figure L1.2) by double clicking on the
Hello world! text or by clicking on the activity_main.xml tab next to the Graphical
Layout tab.
• Add the line android:id="@+id/Log" within the <TextView/> section on a new line
and save the changes. is gives a name to the TextView UI element.
Figure L1.2: XML text.
TextView in the GUI acts similar to a console window. It displays text. Additional text
can be appended to it. By adding the android:id directive to TextView, it may be interfaced
with in the app code.
After setting up the emulator and the app GUI, let us now cover interfacing with C codes.
Note that it is not required to know the Java code syntax. e purpose is to show that the Java
L1. LAB 1: GETTING FAMILIAR WITH ANDROID SOFTWARE TOOLS 29
Native Interface ( JNI) is a bridge between Java and C codes. Java is useful for handling Android
APIs for sound and video i/o, whereas the signal processing codes are done in C. Of course,
familiarity with C programming is assumed.
A string returned from a C code is considered here. e procedure to integrate native code
consists of creating a C code segment and performing more alterations to the project. First, it is
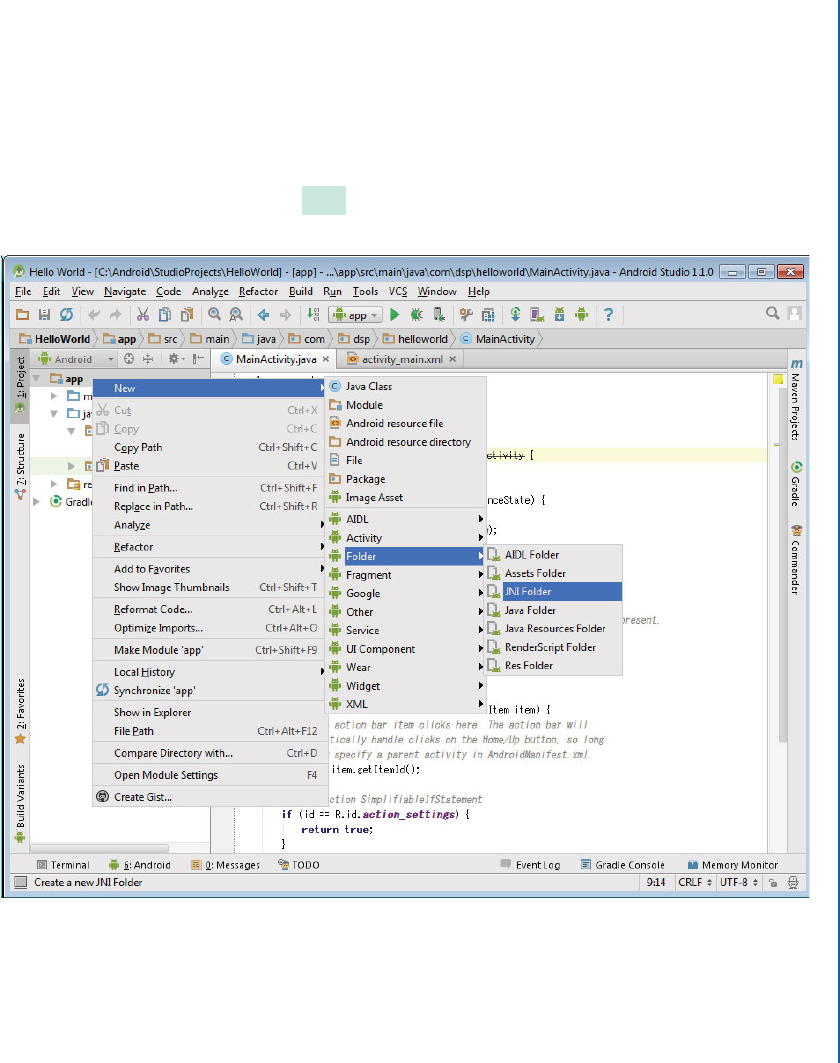
required to add support for the native C code to the project. e first step is to create a folder in
which the C code will be stored. In the Project listing, navigate down to New > Folder > JNI to
create a folder in the listing called jni . Refer to Figures L1.3–L1.6. Figure L1.5 shows how
the Project listing view may be changed in order to show the jni folder in the main source listing.
Figure L1.3: JNI folder.
Android Studio now needs to be configured to build a C code using the Gradle build
system. Begin by specifying the NDK location in the project local.properties file according to
Figure L1.7. Assuming the directory C:/Android is used for setting up the development tools,
the location specification would be as follows:
..................Content has been hidden....................
You can't read the all page of ebook, please click here login for view all page.