

30 2. ANDROID SOFTWARE DEVELOPMENT TOOLS
Figure L1.4: Folder location.
Figure L1.5: Project listing.

L1. LAB 1: GETTING FAMILIAR WITH ANDROID SOFTWARE TOOLS 31
Figure L1.6: MainActivity.java.
ndk.dir=C:\Android\ndk
Figure L1.7: local.properties.
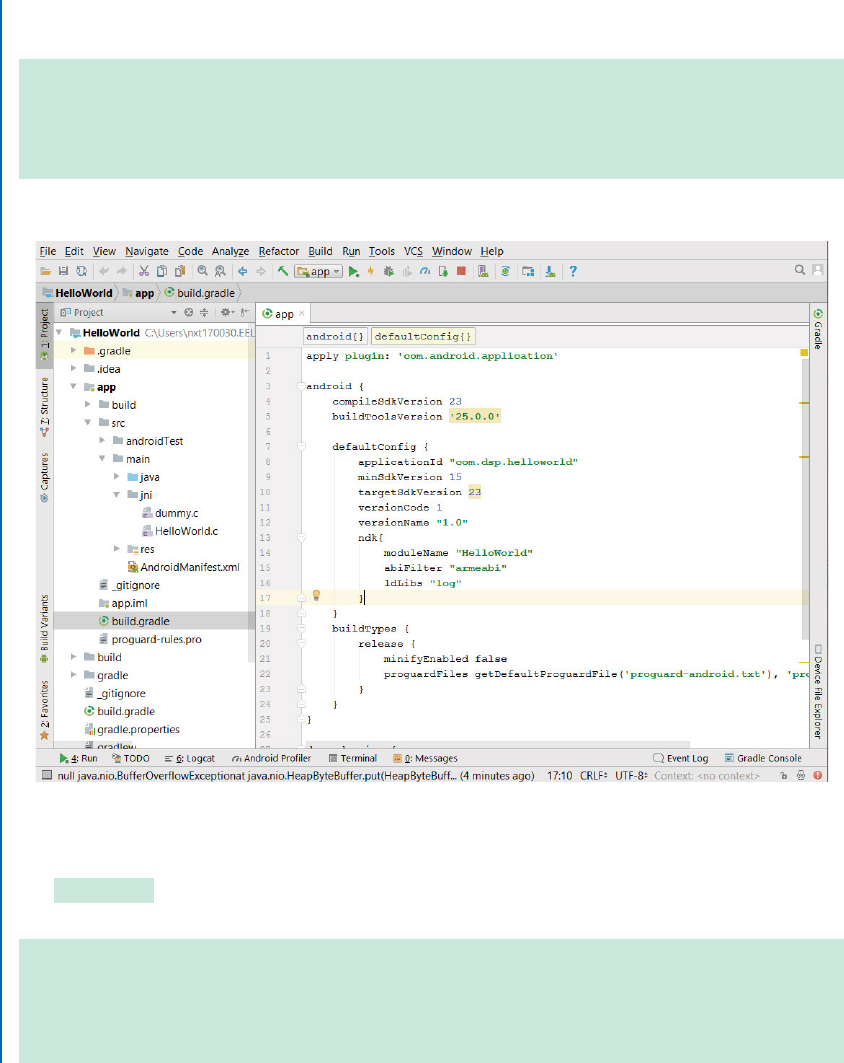
Next, the native library specification needs to get added to the build.gradle file within the
project listing, beneath the app section. is specification declares the name of the native library
32 2. ANDROID SOFTWARE DEVELOPMENT TOOLS
which is needed by Java to actually load the library, as well as the library target platform (e.g.,
armeabi, x86, mips). is is done by adding the following code to the defaultConfig section:
ndk {
moduleName "HelloWorld"
abiFilter "armeabi"
}
e correct placement of the code is shown in Figure L1.8.
Figure L1.8: Correct placement of code.
e C code considered here consists of a simple method to return a string when it is called from
the onCreate method. First, the code that defines the native method needs to be included.
Create a new HelloWorld.c file. Add the following code and save the changes:
#import <jni.h>
jstring Java_com_dsp_helloworld_MainActivity_getString (
JNIEnv* env, jobject thiz )

L1. LAB 1: GETTING FAMILIAR WITH ANDROID SOFTWARE TOOLS 33
{
return (*env)->NewStringUTF(env, "Hello UTD!");
}
is code defines a method that returns a Java string object according to the JNI specifications
with the text Hello UTD! . e naming for this method is dependent on what is called fully
qualified name of the native method which is defined in the MainActivity class. ere are alternate
methods of defining native methods that will be discussed in later labs.
It is important to note that due to a bug currently present in the Gradle build system,
a dummy C source file needs to be created in the jni folder in order for the build process to
complete successfully. Simply create a new source file, named dummy.c for example, without
any code content.
Next, the native method needs to be declared within the MainActivity.java class (see Fig-
ure L1.9) according to the naming used in the C code. To do so, add this declaration below the
onCreate method already defined:
public native String getString();
Now, add the following code within public class to load the native library:
static {
System.loadLibrary("HelloWorld");
}
To use the TextView GUI object, it needs to be imported by adding the following declaration
to the top of the MainActivity.java file:
import android.widget.TextView;
e TextView defined in the GUI layout needs to be hooked to the onCreate method
by adding the following lines to the end of the onCreate method code section (after
setContentView but inside the bracket):
TextView log = (TextView)findViewById(R.id.Log);
log.setText( getString() );
is will cause the text displayed in the TextView to be changed by the second line which calls
the C getString method.
Save the changes and select the Make Project option (located under the Build category
on the main toolbar). Android Studio would display the build progress and notify if any errors
occur. Next, run the app on the Android emulator using the Run app option located in the Run

34 2. ANDROID SOFTWARE DEVELOPMENT TOOLS
Figure L1.9: MainActivity class.
menu of the toolbar. If an emulator is already running, an option will be given to deploy the
app to the selected device (see Figure L1.10). Android Studio should launch the emulator and
the screen (see Figure L1.11) would display Hello UTD! . To confirm that the display is being
changed, comment out the line log.setText() and run the app again. is time the screen
would display Hello World!
Note that the LogCat feature of Android Studio can be used to display a message from the
C code. LogCat is equivalent to the main system log or display of the execution information.
Here, the code from the previous project is modified to enable the log output capability as
follows.
• Add the logging library to the build.gradle file (see Figure L1.8) by adding the line
ldLibs "log" to the ndk section which was added previously.
• Add the Android logging import to the top of the HelloWorld.c source file (see Fig-
ure L1.12) by adding the line #include<android/log.h> .
• Add the following code to output the test message before the return statement:
..................Content has been hidden....................
You can't read the all page of ebook, please click here login for view all page.