
In this chapter
As the development of your web pages continues, it’s likely that you’ll want to add feature functionality beyond just the simple hyperlinks. The good news is that JavaScript offers you a whole range of new options that supplement those offered by standard HTML. So what if you’re not a scripting guru who can create functions and arrays in your sleep? Dreamweaver is going to do most of the work for you and even write the necessary code to add options such as opening external browser windows, validating forms, and even checking to see whether the visitor has a specific browser plug-in installed.
Just sit back and you’ll see how easy it is to make Dreamweaver behaviors spice up your web applications!
Oh sure, I said that you wouldn’t have to understand any JavaScript and the first subsection I jump into is called “JavaScript and Dreamweaver.” Great trick, eh? Actually, before we start exploring the snippets and behaviors that come with Dreamweaver, I thought it would be a good idea to give a brief background on JavaScript because it is the language that Dreamweaver uses to generate behaviors. If the thought of learning anything about a scripting language is completely revolting, go ahead and skip on to the next section. If, however, you want to learn a little more about JavaScript and how it relates to Dreamweaver, read on.
JavaScript is one of the more popular client-side scripting languages in use today. Don’t confuse JavaScript with its big brother Java—which is a full-blown object-oriented language. Although they share similar syntax, JavaScript is essentially a stripped-down version of Java that is much easier to write and implement because it doesn’t have to be compiled prior to execution. In addition, because it is a client-side language, the machine rendering the code in the browser is the one that does all the work.
Unless you really want to get into developing your own scripts, it’s likely that you’ll take advantage of the predefined functions that are built into JavaScript. For instance, if you wanted to open a new browser window, you could use the JavaScript function
Window.Open()
If you want to close that same browser, you could use the function
Window.Close()
These are just a couple of examples of the many built-in functions that JavaScript offers and, as I mentioned before, Dreamweaver makes it very easy for you to access some of the more common functions through the JavaScript snippets and behaviors.
Although Chapter 24, “Working Efficiently in Dreamweaver,” already covered snippets, it’s worth spending a minute to take a closer look at the JavaScript snippets that are included in the Snippets panel. To view the JavaScript snippets, open the Snippets panel by choosing Window, Snippets and then expand the JavaScript folder (see Figure 28.1)
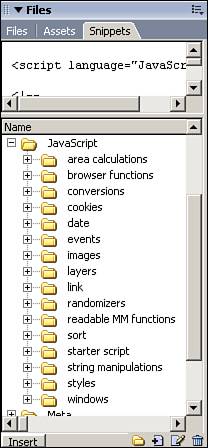
As you can see, Macromedia has provided quite a few JavaScript code snippets that can be used for everything from mathematical calculations to reading cookies.
I highly recommend that you take some time to go through these folders and see what types of scripts are available for use in your pages. Doing so could save you the time and hassle of building your own script, only to discover that Macromedia had already provided you with everything you needed.
Tip
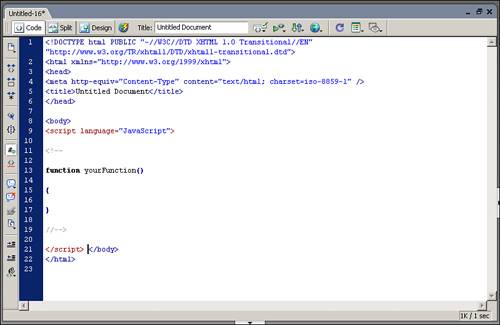
One of the snippets I use most frequently is the Starter Function snippet located in the starter script folder. This snippet places the bare necessities of a JavaScript function in the page and saves me the hassle of typing it every time I need to create a function. It also saves me from typos, to which I am prone.
Just as was discussed in Chapter 24, after you find a snippet that you want to use, it’s extremely easy to apply it to your page. Just place your cursor on the code line where you would like the snippet inserted, and then double-click on the appropriate snippet and the code is added to your page. If areas of the code need to be customized, they are indicated as such. Figure 28.2 shows the Starter Function applied to the head section of the page code.
If you’re still unsure about your ability to add JavaScript functionality to your pages, let’s make it even easier. What if I told you that you could add JavaScript to your pages and never have to write a line of code? Sound good? Well, Dreamweaver’s behaviors do exactly that.
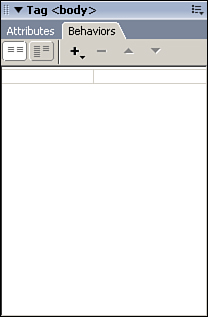
Dreamweaver behaviors are accessed via the Behaviors panel and represent some of the most commonly used scripts applied to web pages. The Behaviors panel (see Figure 28.3) enables you to track and organize those behaviors that are already applied to your pages and apply new behaviors to the page.
To apply a behavior to your page, click the plus sign on the panel and choose the appropriate behavior from the menu. Some behaviors require that a specific object be selected before the behavior can be applied, such as the Control Shockwave or Flash behavior. Logically, Dreamweaver applies this behavior only to Shockwave (Director) or Flash movies.
Other behaviors are grouped into categories such as the Set Text behaviors, shown in Figure 28.4, which enable you to choose between setting the text of a frame, layer, text field, or the status bar.
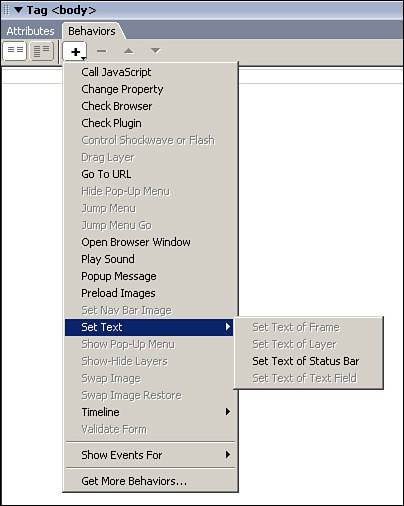
Table 28.1 gives a brief overview of the Dreamweaver behaviors.
Table 28.1. Dreamweaver Behaviors
After they are applied to the page, these behaviors are assigned an event handler that indicates when they should be triggered. If the default handler is not the one that you want, you can adjust it via the drop-down menu in the leftmost column of the Behaviors panel. The states that are available are
OnBlur—Triggers the event when a form field loses focus, meaning that the cursor is no longer in the field.OnClick—Triggers the event when the user clicks on the object.OnDblClick—Triggers the event when the user double-clicks on the object.OnFocus—Triggers the event when a form field gains focus by being clicked on or tabbed to.OnKeyDown—Triggers the event one time when a key on the keyboard is depressed.OnKeyPress—Triggers the event continuously when a key on the keyboard is depressed.OnKeyUp—Triggers the event when a key on the keyboard is released.OnMouseDown—Triggers the event when any mouse button is depressed.OnMouseMove—Triggers the event when the mouse is moved in any direction.OnMouseOut—Triggers the event when the mouse cursor is moved off of the target object.OnMousOver—Triggers the event when the mouse cursor is moved over the target object.OnMouseUp—Triggers the event when any mouse button is released.
After you have applied behaviors to your page, you may determine in the future that a behavior is no longer necessary. To remove a behavior from your page, click the minus sign in the Behaviors panel to remove it from the page.
Probably the most commonly used Dreamweaver behaviors are the Swap Image and Restore Image behaviors because rollover buttons and interactive navigation bars are extremely popular. Creating rollovers is very easy in Dreamweaver, both for the use of buttons and for altering other images on the page. Let’s take a look at some of the different methods that can be used to change the various images on your pages.
The concept of a rollover image is relatively straightforward. When you place your mouse cursor over an image, an image on the page is changed. The changed image most commonly is the image that was rolled over, but other images can be altered as well.
The easiest way to create a rollover image in Dreamweaver is to place your cursor at the place in the page where you want the rollover inserted and choose Insert, Image Objects, Rollover Image from the menu bar. The Insert Rollover Image dialog box, shown in Figure 28.5, enables you to name the image, specify the locations of the original image and rollover image, and choose what alternative text and URL should be assigned to the rollover. If you don’t want the rollover to be a button, simply leave the URL field blank.
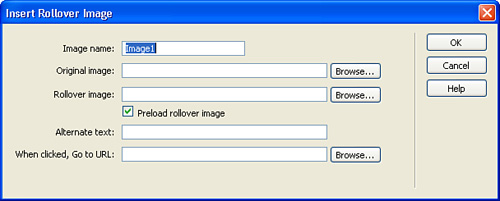
When you create a rollover (or any object, for that matter), it is a very good practice to provide a name for the object that is meaningful to you. Dreamweaver, by default, names objects with generic names such as “Image1” and “Form1.” Although it might be easier just to leave these names, it makes it more difficult when you need to interact with the items, as you’ll see in a bit. So be sure that you type a meaningful name like “homeButton” for a navigation button that returns your visitors to the home page.
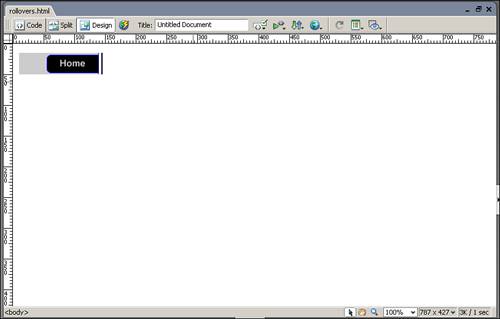
Another important aspect of this dialog box to note is the Preload Rollover Image check box. It is a good idea for you to always leave this box checked for rollovers. If you don’t preload the image, the first time a visitor rolls over the image, it will load from the server, and if the server is busy or slow, the visitor might be presented with a broken image. For that reason, preloading rollovers can ensure consistency in the way your site displays. After you have entered the appropriate values, click OK and Dreamweaver places the image in your page (see Figure 28.6).
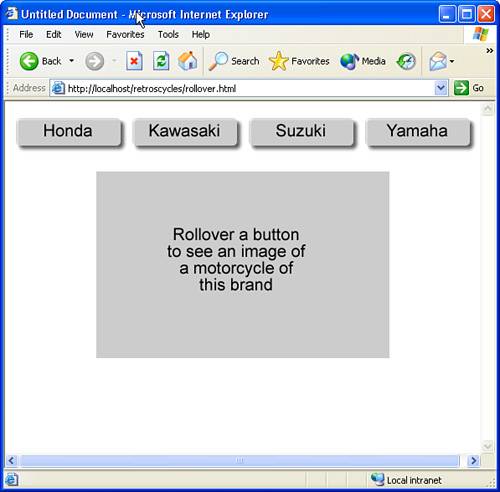
If you already have an image placed in your page and want to swap out a different image on the page when the first is rolled over, you can do that by using the Swap Image behavior. This is where uniquely naming your objects comes in handy. For instance, suppose that the Retro’s Cycles site has a series of buttons on the page that say “Honda,” “Yamaha,” “Suzuki,” and several other motorcycle manufacturers. The client has asked that when you roll over any of those links, an image below changes to display one of the manufacturer’s motorcycles. Basically, the buttons change to a secondary image when rolled over.
To accomplish this, select a button and click the plus sign on the Behaviors panel. Choose Swap Image from the menu and Dreamweaver displays the Swap Image dialog box, shown in Figure 28.7.
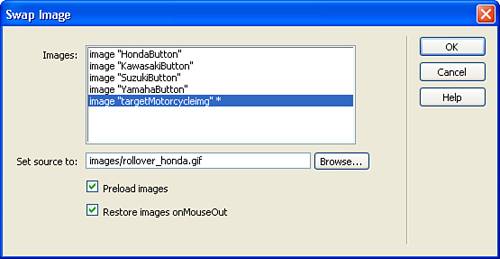
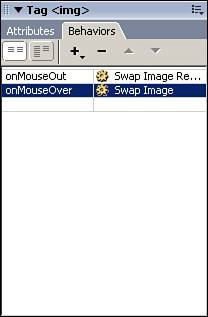
In the Swap Image dialog box, choose the image that you want to change. This is where naming your images something logical comes in handy. Because I named the image “targetMotorycleimg,” I can more easily identify it than I could if it were named “Image4.” With the target image selected, type or browse to the image to which you want to swap. Leave the check boxes so that the image is preloaded and restored to its original state when the mouse is rolled off the button. Click OK and Dreamweaver adds the Swap Image and Swap Image Restore behaviors to the page. Note also that the Swap Image behavior uses the onMouseOver event handler and the Swap Image Restore behavior uses the onMouseOut event handler (see Figure 28.8).
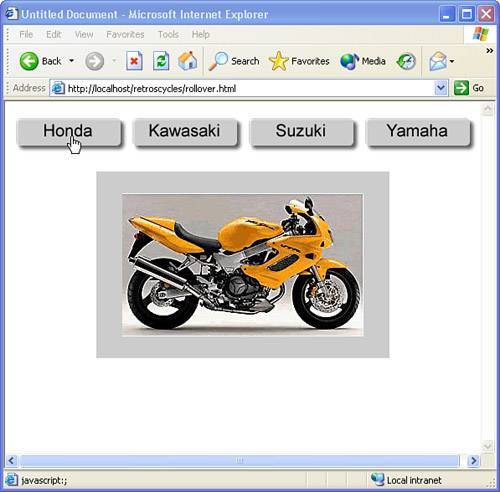
To see the remote rollover in action, preview the page in a browser and roll your mouse over the button to which the behavior was assigned. Figure 28.9 shows the image in its native state, and Figure 28.10 shows what happens when you roll over the button.
Now that you know how to create single instances of rollover buttons, imagine being able to easily create a collection of them that would result in an entire navigation bar for your site. Well, hold on tight, because Dreamweaver can do just that!
To create a navigation bar, place your cursor in the page where you want the navigation bar to be inserted and then choose Insert, Image Objects, Navigation Bar from the menu bar. The Insert Navigation Bar dialog box, shown in Figure 28.11, looks complex, but it’s relatively straightforward when you break it down.
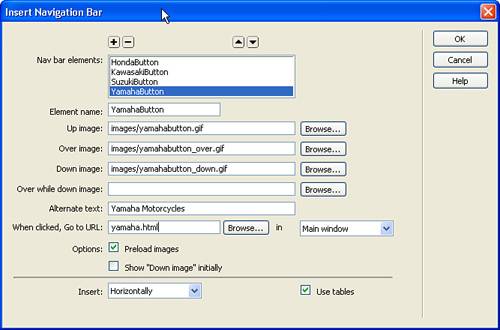
Table 28.2 provides a look at the various fields in the Insert Navigation Bar dialog box and the function they perform.
Table 28.2. Insert Navigation Bar Dialog Box Fields
For each button in the navbar, you need to create an element and specify its settings. You can also reorder the objects by using the up and down arrows to place the objects in the correct order. When the final navbar is built, a horizontal bar has the item at the top of the list at the far left and the item on the bottom of the list at the far right. Vertical bars list the objects in the same order that they appear in the elements list. After you have completed the list, click OK and Dreamweaver inserts the navigation bar into your page (see Figure 28.12).
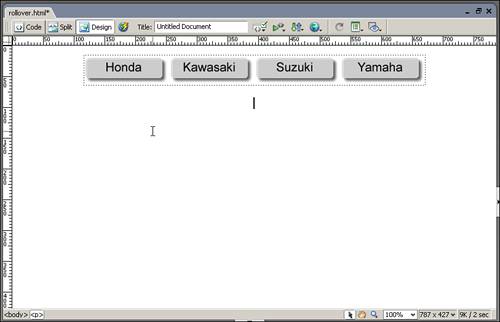
Just as with the rollover buttons, Dreamweaver displays only the initial state of the buttons in the design view; to see the buttons in action, you need to preview them in your browser.
As more and more different types of audio, video, and application formats are released on the market, third-party plug-ins, Java Applets, and ActiveX controls have provided additional support beyond the native browser’s capability to display certain types of content. Let’s take a look at how Dreamweaver can help you manage these custom browser extensions and the content they serve.
Browser plug-ins are helper applications that enable you to display a specific type of application. One of the more popular plug-ins on the market today is the Adobe Reader application, which enables you to view PDF documents in your browser. When you link to a PDF document on your site and an end user clicks on that link, one of two things happens. Either the PDF document is sent to the Adobe Reader application installed on the user’s machine, which renders the document for display, or if the Acrobat Reader isn’t installed, the user is asked whether or not the file can be downloaded.
Because the second option isn’t exactly what you had intended for your visitor, Dreamweaver enables you to determine whether or not a plug-in is installed on the user’s machine and can redirect the user if the plug-in isn’t found. To do so, use the Check Plugin behavior found in the Behaviors panel (see Figure 28.13).
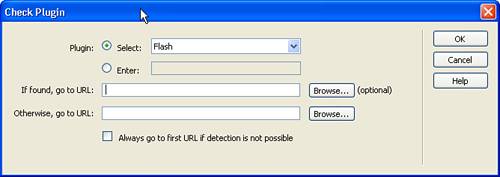
Figure 28.13. The Check Plugin dialog box enables you to specify which plug-in should be located and what to do if it is or isn’t found.
If the plug-in you want to check for isn’t included in the Select list, you can also type the exact name of the application in the Enter field and the behavior checks for that plug-in.
If you really want to ensure that your visitors have access to the correct plug-in to view your content, you can also embed the plug-in in your page. To do this, select the Common category of the Insert bar and then click the Media button. You can either select the plug-in from the drop-down or click Plugin to select a custom plug-in (see Figure 28.14).
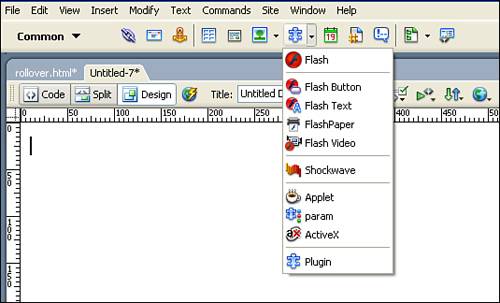
Table 28.3 provides information about some of the common plug-ins and their uses.
Table 28.3. Common Plug-ins
After you embed a plug-in in your page, you can configure the plug-in parameters by using the Property inspector (see Figure 28.15). Although most of the parameters are common, the Plg URL field deserves an additional note because it enables you to specify the location of the appropriate plug-in to be downloaded if the user doesn’t have the plug-in installed on his or her machine.

Java Applets are programs written in the Java language and compiled so they can be run on virtually any platform. Typically, Java applets are stored in archive files known as JAR files (derived from Java Archive). To process the applet, however, the end user’s machine must have some version of Java or the Java virtual machine installed. Most of the later browsers come standard with the virtual machine installed, but earlier versions required the application to be installed separately.
Like plug-ins, Java applets can be embedded in your pages if you use the Media drop-down button from the Insert toolbar. To embed an applet, select the Applet icon with the coffee cup symbol and indicate the location of the applet file in the Select File dialog box.
ActiveX controls act very similarly to plug-ins and applets in that they provide a way for your web page to display a specific file format by using a helper application. Java applets, however, require the Java virtual machine, whereas ActiveX controls can be developed to run any application stored in the Windows environment. This means that application developers can create an ActiveX control that serves as a conduit to their application, and after the application is installed on the end user’s machine, they can view the application from within a web page. A perfect example of this is the Microsoft Excel ActiveX control that enables you to view and interact with Excel worksheets from within Internet Explorer.
Note
The fact that ActiveX controls are calling an application in the Windows environment means that these controls are limited to the Windows environment.
Like plug-ins and applets, you can also embed ActiveX controls in your pages by using the Media drop-down button from the Insert toolbar. To embed an ActiveX control, place your cursor in the page where you want to embed the control and select the ActiveX icon. Be aware that for the ActiveX control to function effectively, you need to use the Property inspector to set appropriate attributes and parameters.
As more and more computers are connected to the web via broadband, the demand has risen for high-bandwidth content such as video, audio, and rich media files such as Flash movies. In response, new streaming and compression technologies have improved the delivery methods for these technologies, making them much easier to deliver from within web pages.
Keep in mind, however, that although audio and video may be fun to add to your pages, it needs to be done properly to ensure that the sounds aren’t annoying and the videos stream properly, rather than require the end user to download the entire movie before being able to watch it.
No matter how you distribute your audio or video, keep in mind that for the most part, the Web has been muted since its inception. People aren’t necessarily prepared for blaring music or plug-ins that talk to them from a web page, so give them the choice as to whether or not the sound should play before you deluge them with the latest sounds of your motorcycle revving or your favorite MIDI file.
Dreamweaver offers a couple of different options when it comes to adding sound to your web pages. The first option is to create a hyperlink to the audio file on your server. This option enables users to choose whether to open the file or save the file to the local machine. If they choose to open it, the workstation decides which application plays the audio, depending on which application is assigned the audio file’s particular format. To link to an audio file, add an image or text to your page and select it. Using the Link field in the Property inspector, locate the audio file or type the path to it.
The second option is to simply embed the sound in your page, which requires users to have either an audio plug-in or ActiveX control to play the audio. As with all plug-ins or ActiveX controls, you can determine which application should process the audio, and if the user doesn’t already have it installed, you can link to the plug-in or control that can be downloaded. To embed audio into your page, use the Media button on the Insert toolbar to embed the appropriate ActiveX control or plug-in.
The third option is to create a Flash movie, using only the audio track, and embed the Flash movie in your page. This option is becoming more and more popular because most modern browsers have the Flash Player installed and, therefore, no additional software is required to play the audio. In addition, the Flash Player offers controls that can be embedded into your page layout that enable the end user to pause, play, and stop the audio. To add a Flash movie to your page, use the Media button on the Insert toolbar and choose Flash. Select the location of the Flash movie and be sure to upload that movie to your server when you upload your pages.
Programmatically, the process of adding video to your pages is virtually identical to that of adding audio. The difference lies in the fact that you’ll be selecting a video formatted file, as opposed to an audio file, as the source or target of your link. Although new video formats are always emerging, Dreamweaver can embed a variety of existing formats, including video formatted for the Apple Quicktime player, the Windows Media Player, and the RealMedia Player.
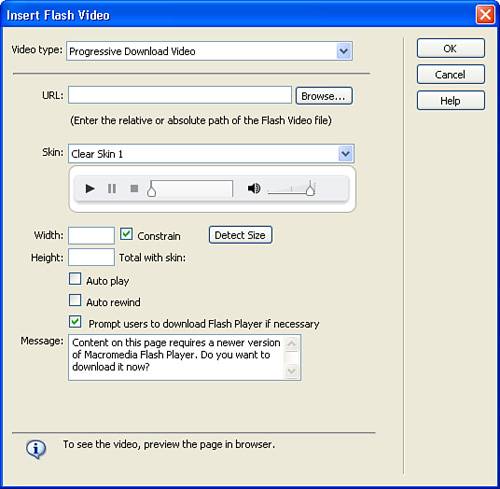
One relatively new format, called Flash Video, does deserve some extra detail because support for it is now standard in Dreamweaver 8. Flash Video is a new format created by Macromedia that enables you to capture new video or transfer existing video to the FLV format. Flash Video files are then stored on your server and either linked to or embedded in your web pages. One of the great features about this new format is that it is rendered with the Flash Player, so nearly every browser out there is capable of displaying it. In addition, Flash Video uses a technology called “progressive download,” which means that users start downloading the video to their hard drives, but during the course of the download, the video plays. This means that they don’t have to wait for the entire video to be downloaded before they can start watching it.
To insert a Flash Video into your page, choose Insert, Media, Flash Video from the menu bar. Using the Insert Flash Video dialog box, shown in Figure 28.16, you can determine whether you want to use the Progressive Download Video for video stored on any web server, or stream the video if you have access to a Flash Communication Server connection. Streaming the video means that you are not caching the video in the browser, but rather are relaying it from a special server directly to the user’s browser in real time.
Tip
For more information on the Flash Communication Server, take a look at Chapter 15, “Enhancing Projects with Sound and Video.”
In addition, you can specify the look and feel (the “skin”) of the player, the size of the video in the page, and the text of the message displayed to users who don’t have the latest version of the Flash Player. After you specify the settings for your video, click OK and Dreamweaver embeds the movie into your page. To view it, you need to preview the HTML page in your browser.
In addition to Flash Video, Dreamweaver 8 also includes support for other rich media formats such as traditional Flash movies, images via the Image Viewer, Flash Text, Flash buttons, and FlashPaper documents.
Embedding a Flash movie is pretty straightforward in Dreamweaver 8. Choose Insert, Media, Flash from the menu bar, choose the location of the Flash movie by using the Select File dialog box, and click OK.
Next, add the accessibility information via the Object Tag Accessibility Attributes dialog box and click OK. Dreamweaver embeds the Flash movie placeholder in your page and the Property inspector, shown in Figure 28.17, enables you to modify the attributes of the movie.

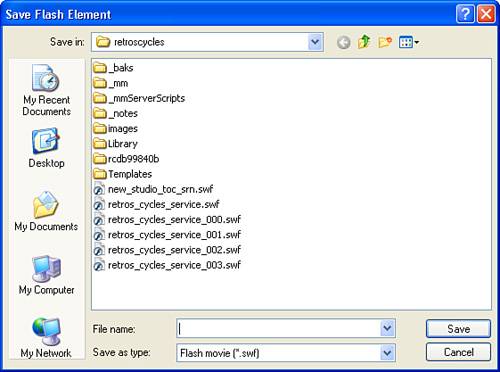
The Flash Image Viewer was added to Dreamweaver in the MX 2004 version and offers an easy way to add an images slideshow to your pages. To insert the Image Viewer into your page, choose Insert, Media, Image Viewer from the menu bar. Because the resulting slideshow is a Flash file, type a name and choose a location for the file in the Save Flash Element dialog box, shown in Figure 28.18.
Click OK and Dreamweaver embeds a Flash movie placeholder into your document. As with any other Flash movie, the attributes of the movie are editable via the Property inspector. The next step in creating your slideshow is to indicate the locations of the images that are to be included in the show. To do this, select the Flash placeholder and notice that Dreamweaver opens a special panel called the Flash Element panel (see Figure 28.19). This panel enables you to adjust any of the attributes of the Flash objects in your page.
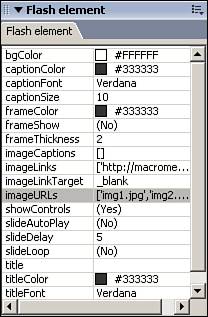
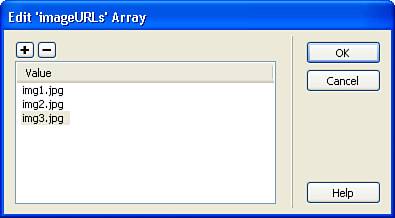
The locations for the images to be displayed in the slideshow are stored in the imgURLs attribute and can be adjusted by selecting the imgURLs attribute and clicking the Edit button that appears. In the Edit ‘imgURLs’ Array dialog box, shown in Figure 28.20, add or remove as many values as you would like to the list and click OK.
Save the page and preview it in your browser and the slideshow displays the images you included in the array.
One of the biggest issues with placing text in a web page is the fact that if the font of the text is not one that is supported by every browser, you run the risk of your page not displaying as you intended. Flash Text resolves that issue by enabling you to render your text into a Flash movie, using any font present on your current system, style, or color, and then convert the text into a Flash movie that retains all this information for all users to be embedded in your page. To create Flash Text, chose Insert, Media, Flash Text from the menu bar. In the Insert Flash Text dialog box, shown in Figure 28.21, add your text and style it however you would like.
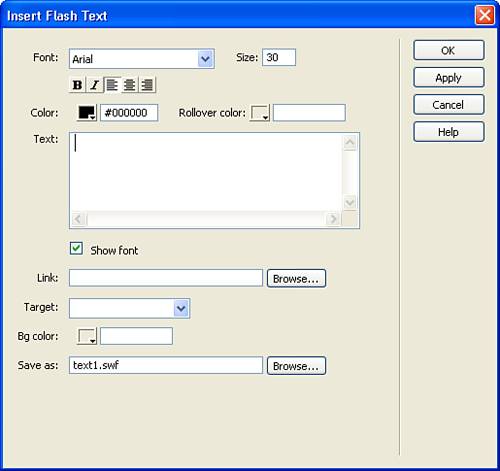
You can also turn the Flash Text movie into a hyperlink by typing the URL to which it should point in the Link field. Be sure to type a name and location for the resulting filename and click OK. Dreamweaver saves the movie and embeds it in your document.
Similar to Flash Text, Flash buttons enable you to style your text into a clickable button format that contains different states for when the button is moused over or clicked on. To insert a Flash button, choose Insert, Media, Flash Button from the menu bar. In the Insert Flash Button dialog box (see Figure 28.22), choose a button style, enter the text for the button, style it to your taste, and type the URL to which the browser should go when clicked.
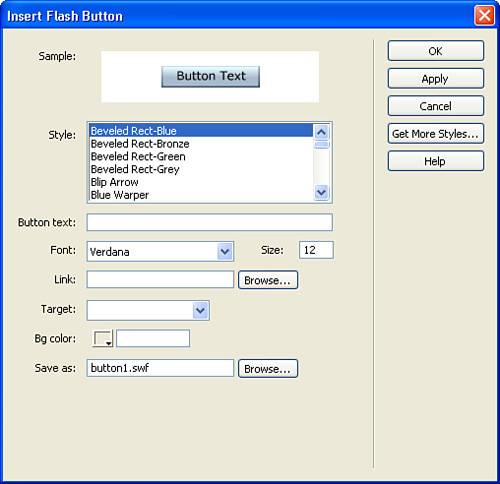
Finally, indicate where the resulting Flash movie should be saved and click OK. Dreamweaver embeds the button in your page and you can view it by previewing the page in your browser.
The last rich media type that I want to cover in this chapter is new to Dreamweaver 8 and is called FlashPaper. FlashPaper is a new format created by Macromedia that enables you to convert documents such as those created in Microsoft Word or Excel into Flash movies. These movies, referred to as FlashPaper, can then be displayed in your pages just like any other Flash movie.
Note
The creation process of FlashPaper documents is covered a little later in the book in the “Adding FlashPaper Documents” in Chapter 34, “Putting It All Together: Using Contribute to Manage Site Content.”
To insert a FlashPaper movie, choose Insert, Media, FlashPaper from the menu bar. In the Insert FlashPaper dialog box (see Figure 28.23), select the source FlashPaper movie and the size to be displayed.
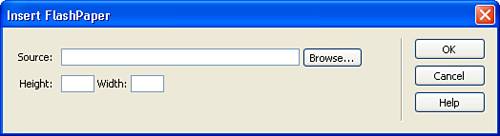
Click OK and Dreamweaver embeds the button in your page. You can then view it by previewing the page in your browser.
Have you ever wondered how some web pages move content or images across the screen as though they were being dragged? The likely answer is that movement either took place as part of a Flash movie or through the use of moveable layers. We have already talked in depth about using Flash movies to create motion, so let’s take a look at a feature that has returned to Dreamweaver in version 8—Timelines.
Timelines enable you to animate the layers in your page by moving them or resizing them. The process of creating and managing these animations is controlled by the Timelines panel, shown in Figure 28.24. You can access this panel by choosing Window, Timelines.
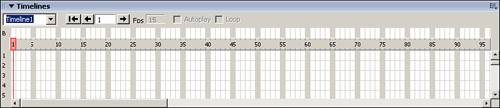
As you can see, the Timelines panel looks a lot like the Flash development environment in that it can accommodate multiple objects and it uses frames and keyframes. To create a timeline, add a layer to your page and insert an image into the layer. Select the layer in the Design view, right-click in the first row of the Timelines panel, and choose Add Object from the menu. This indicates to Dreamweaver that the timeline will be changing the layer in some fashion. Dreamweaver adds the object to the Timelines panel and creates a default 15-frame timeline for the object (see Figure 28.25).
Note
By default, the timeline is set to 15 frames per second in the FPS field. This means that the default 15 frames that Dreamweaver establishes play for only one second.
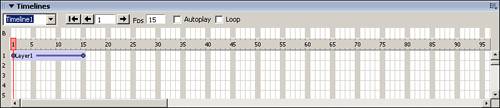
Suppose that you wanted to move your layer across the screen over a 3-second period. The easiest way to do this is to extend the object to 45 frames (3 seconds at 15 frames per second) by clicking on the ending keyframe, indicated by a white circle, and dragging it out to 45 (see Figure 28.26).
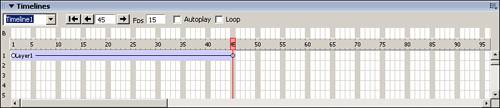
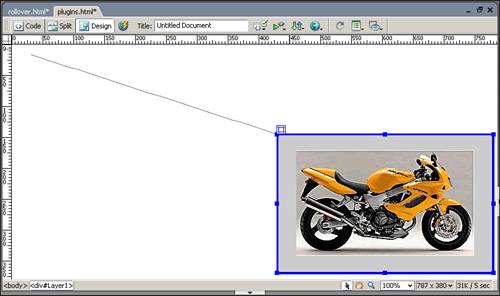
Now you need to indicate where the layer should end up after the timeline is completed. To do this, drag your layer to wherever you want it to end up in the Design view. Notice that Dreamweaver creates a line in the Design view that shows the path the layer will take as it is animated (see Figure 28.27).
But what if you don’t want the layer to proceed to its destination in a straight line? You can accommodate custom paths by using the Record Path command. To see how this works, create a second layer with an image inside it and add it to the Timelines panel. Now select the layer in the Design view and click on the Menu button for the Timelines panel. From the menu, choose Record Path of Layer.
After you click this link, Dreamweaver remembers where you drag the layer and creates a custom path for it. In the design view, drag the layer in a looping manner to a random destination. Notice that Dreamweaver draws the line following the path you indicated. When the layer is at its destination, release the mouse button and Dreamweaver alerts you that only certain aspects of the layer can be controlled (see Figure 28.28).
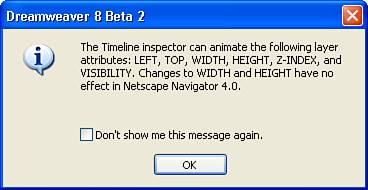
Figure 28.28. Dreamweaver alerts you that some modifications to layers aren’t visible in earlier versions of Netscape.
Click OK to close the alert. In the Timeline panel, click the first frame for this object and then use the right arrow to proceed through the frames. The layer moves according to the path you recorded. To see your animations in action, save the page and preview it in your browser.
I need to delete an object from my page that has behaviors associated with it. What is the best way to remove it?
The best way to ensure that all unnecessary code is removed from your page is to select the object, open the Behaviors panel, remove all the behaviors associated with the object, and then delete the object from the page.
I like the Flash buttons and want to use them in my site, but I would like to modify them. Can I change their colors, gradient, and so on?
No. The Flash button templates are pretty much set in stone. You can, however, use Flash to create your own buttons that use the same states as the Flash buttons. When embedding any custom-created Flash buttons, use the Insert, Media, Flash menu item as opposed to the Insert, Media, Flash Button menu item.
I want to record the path of my layer for a timeline, but when I click the menu button on the Timelines panel, the Record Path of Layer menu item is grayed out. What is the problem?
To see the Record Path of Layer menu item, you need to be sure that the layer is selected in the Design view first.
The use of video as a training tool and for entertainment is becoming more and more popular as the availability of broadband and high-speed Internet connections grows. Be aware, however, that just because more data can be transferred easily across the Web doesn’t mean that you shouldn’t use good judgment in determining the best way to provide video to your end users.
For instance, I work in a centralized office that also has several outlying offices in different locations of the country. These offices are significantly smaller than the main office and, therefore, have limited resources. In addition, they use Voice Over IP for their telephone systems, which relies on having available bandwidth.
If I were to start streaming large video files to my technicians in these offices, it’s possible that these large videos could adversely affect the office’s telephone system. In addition, the more bandwidth I consume in pushing the videos, the more my company has to pay for their consumption.
For these reasons, be cautious when providing video to your end users. Be sure you optimize the video for your audience, but take care to keep bandwidth usage and cost considerations in mind as well.