
In this chapter
One of the most popular things to do with Flash is to add video to websites. Because of the high penetration of the Flash Player in browsers, you can include video in your site without necessarily having to use sophisticated server technology to deliver it. Flash’s video tools make adding video to your projects an amazingly easy thing to do. This chapter covers your options for importing, creating FLV content, and playback in Flash.
There are two main ways to add video to your Flash projects: either embed video into your Flash file during author-time, or dynamically load external video files in a special media playback component during run-time. The following sections discuss each of these options in more detail.
Embedding video in a Flash document involves importing it into the file and actually placing it either on your main timeline or in a movie clip timeline. This imported video file must be prepared in advance: its length and content edited and saved in its final form. In addition, the frame rate of the video you import and the Flash document frame rate must be the same.
The most common video file types you will encounter when working on Flash video projects are .avi, .mov, and .flv. AVI is a Windows format, but is supported on Macs if QuickTime is installed. MOV is a QuickTime format, and FLV is the Flash video format, which has quickly become popular because of its stunning file compression size combined with higher quality video. You will find that in most cases, other file formats are converted to the FLV format for use on the Web.
The list of supported video file formats grows depending on what other software is installed on your system. If you have QuickTime 7 (or later) installed (Windows or Mac), the following video file formats can be imported into Flash: .avi, .dv, .mpg, .mpeg, and .mov. If DirectX 9 (or later) is installed on a Windows system, you can also import video files with the .wmv and .asf Windows media file formats.
When you import a video file and embed it into your Flash project, it becomes a part of the published document. You can actually see the individual frames of the video on the Flash timeline. This gives you a lot of control over the individual frames of the video; however, it can greatly increase the file size of your project. Therefore, if the playback time is more than 10 seconds, you should consider using progressively downloaded video or streaming video with the Flash Communication Server, as discussed later in this chapter.
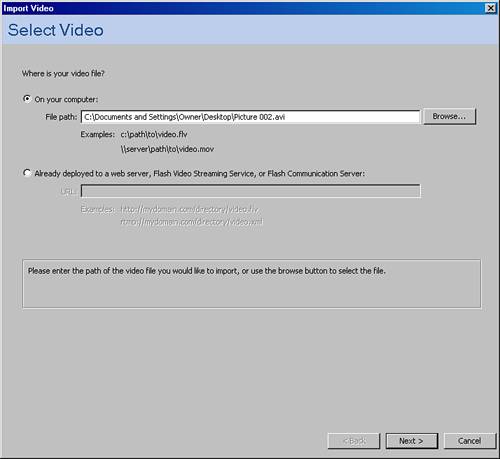
To import video into Flash, go to File, Import, Import Video. This brings up the Video Import Wizard (see Figure 15.1). When you are in the Video Import Wizard, you have the option to browse for the video file you want to import. Select the file and click on the Next button.
Tip
At this point, if you don’t have either DirectShow 9 (Windows) or QuickTime 7 or higher (Mac or Windows) installed on your system, you will get an error message. If this happens, take some time to download and install either program.
Next, you are asked how you would like to deploy the video. If you’re embedding a small video clip, select the Embed Video in SWF and Play in Timeline option and then click on the Next button. We discuss other options later in this chapter.
At the next screen (shown in Figure 15.2), you can select what type of symbol you want to embed your video from the following options:
Embedded video—. The video is integrated into the timeline selected when you import your video. This could be useful when you want to work with the frames of a video on the main timeline, especially if the resulting
.swfcontains just the video.Movie clip—. This option gives you the most control over playback of the video because movie clips can be accessed and controlled with ActionScript.
Graphic—. This option encloses the video in a symbol that belongs to the main timeline. This gives you fewer options for controlling the video because a graphic symbol is not accessible to ActionScript.
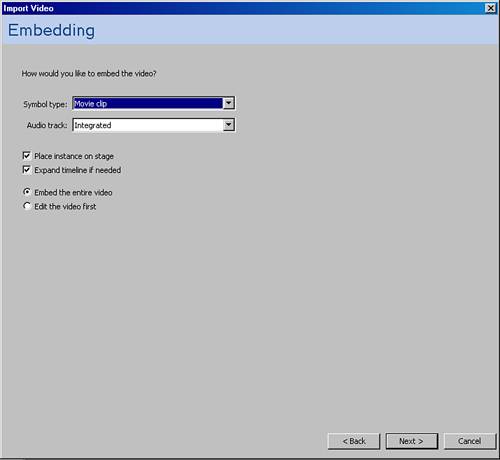
You can select the option to place an instance of the symbol containing the embedded video on the stage. You can also expand the timeline, if needed, to fit all the frames in the video automatically. You usually should have this option checked for embedded projects, so that your timeline is long enough to hold all of the frames needed for the embedded video. You can select the Edit option to trim the clip’s start or end point before you embed the file into Flash. If you choose to edit, a new panel comes up that enables you to trim the video by resetting the start and/or end frames. This does not change the file size, but changes how many frames are visible on the timeline.
The final step is to select the video encoding profile for your video. The video encoding profile determines what level of compression is applied to your video, which is based on the version of the player for which you want to publish. The level of compression is determined by which codec you select. A codec is an algorithm that controls how video files are compressed during encoding and then decompressed during playback. If you’re publishing for the Flash 8 Player, your end users will benefit from the use of the On2 VP6 video codec because it optimally combines video quality and small file size. If you’re publishing for the Flash 7 Player, you should choose the Sorenson Spark video codec. This is also a great compression strategy, just not as small as the On2 codec.
After you select the video encoding profile, click the Finish button, wait for the Flash Video Encoding Process to complete, and you’re finished. Flash has now encoded your video into the .flv format and embedded the video into the FLA file.
If you embed the video as a movie clip, you have access to some interesting properties. You can change the alpha and color properties for the movie clip instance, and by definition, the video inside the movie clip. You can also use the Blend modes that are available for movie clip symbols. However, applying these effects to video is processor intensive, and can cause problems for end users with slower systems.
You can also use ActionScript to control the playback of video embedded as a movie clip. For example, to stop the video from playing more than once in a continual loop, you can open the video instance, add an actions layer, and put a stop(); action in a blank keyframe on the last frame of the video’s timeline. If you wanted the video to restart after the user clicks on the video itself, you could use the following code in the main timeline:
myVideo_mc.onRelease = function(){
    this.gotoAndPlay(1);
}
If you wanted the video to restart when the user clicks a rewind button, you could use the following code on the main timeline. This code is programmatically attached to your rewind button instance.
rewind_mc.onRelease = function(){
    myVideo_mc.gotoAndPlay(1);
}
You need to pay close attention to scope in a situation like this. Although using the keyword this is correct, you can also address the video movie clip directly because it is assumed you are talking to the timeline on which the rewind_mc button lives.
As with other movie clips, a video embedded in a movie clip can respond to most traditional button or movie clip event handlers and can use all the same timeline control methods to stop, rewind, pause, and play the video embedded on the timeline. The next section explores other simple ways to accomplish these tasks with video.
Now that you know something about how to create videos in FLV format, and balance video quality versus file size, you can move into a more sophisticated way of working with video in Flash. Projects with progressive video download enable users to download the video only when they want to and to watch the movie almost instantly. Users don’t have to wait for the entire video to download before they can start watching it. Although this may sound like streaming video, it’s not. Streaming video is covered in a later section of this chapter.
The progressive download process buffers a little bit of video into the end user’s computer and then starts to play the video while the rest continues to download. One big advantage of progressive video downloading is that you can keep your video assets external to the Flash file. This is much more convenient for the end user because it greatly reduces the wait, while the SWF file is downloading.
The progressive video process is also convenient for you as you develop your project. Imagine that you’re almost finished integrating video into a mid-size to large project. Suddenly, the client (or project manager) drops a bomb and says that all the video has to be replaced with new versions, and more clips need to be added. If you’ve built the project with embedded video, this could be a problem. But because progressively downloaded video files are external, the changes are as simple as swapping the existing video files with newly edited video that has the same filenames and then adding the extra files into your directory and project architecture. This is all possible because the video file isn’t modified by Flash. Instead, you’re using Flash to store information on which frames of the video you want to play for the end user. The other frames are there; you’re just not playing them.
To create a Flash document that progressively downloads a single FLV movie in a special video display component, open the Import Video Wizard by selecting File, Import, Import Video, as shown in Figure 15.3. Yes, you read correctly, you need to go to go to the Import Video screen even though the video will ultimately be an external file. This import process is more of a preparation for the display of the video than it is about actually importing the video itself. When you have the wizard open, you can set the path to the video you are going to import just as you would for importing video to embed.

You are next asked how you would like to deploy the video. Select the Progressive Download from a Web Server option.
In the next step, you can select the video encoding profile and preview the quality your setting will produce. As you did earlier in the chapter, choose the On2 VP6 codec for Flash Player 8 or the Sorensen Spark codec for Flash Player 7.
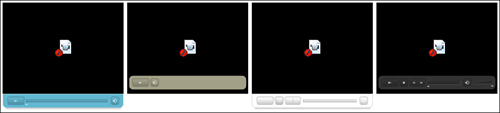
In the Skinning step, you select how the user interface for the Flash Video Playback component will appear and function. Many skins are provided with Flash. These skins provide the look of the video player, but also include interactive elements that enable the end user to control the playback of the video. If you want to use a custom skin, select Custom Skin URL from the Skin drop-down menu and enter the relative directory path of the skin’s .swf file that you want to use into the URL field. This path is relative to the directory of the .swf into which the video will be loaded. If you want to just play the video without giving the end user control over the player (such as stop, start, rewind, and the loading indicator), select None from the skin menu. Figure 15.4 shows some of the different skins that come with Flash.
The last screen of the wizard displays some useful information including the current location of the video you selected for encoding and the relative path where your Flash file will find the encoded video file (.flv). To complete the process, click on the Finish button.
After the video file is encoded, notice that a new file has been created in the directory where the original video file resides. This is the newly encoded .flv version of the video. In addition, you can see that the FLVPlayback component is now on the stage of your Flash file, all set to load the .flv movie file at run-time.
Now all you need to do to play the file on your web server is publish an HTML display document that includes the SWF and upload the FLV, SWF, and HTML documents to your server.
Tip
When you are ready to publish your project on a web server, you need to upload the external video files, the SWFs that play the video, and all the HTML files that display the SWFs to the server to see your video display in the HTML document. Be aware that you cannot see the video display when you test your HTML documents locally in a browser. You can see them only after you have uploaded them to your web server. However, you can view the video by playing the SWF locally.
In addition to automatically creating an FLVPlayback component as a part of the Video Import Wizard as described in the previous section, you can also manually insert it into your projects and set it up to play any external FLV files that you want to include. This manual method is helpful when you create your FLV content in Sorensen Squeeze or with the Flash 8 Video Encoder, which is covered later in this chapter. Figure 15.5 shows the Playback component in the Components panel.
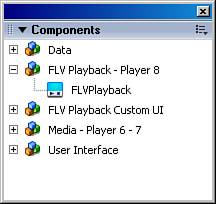
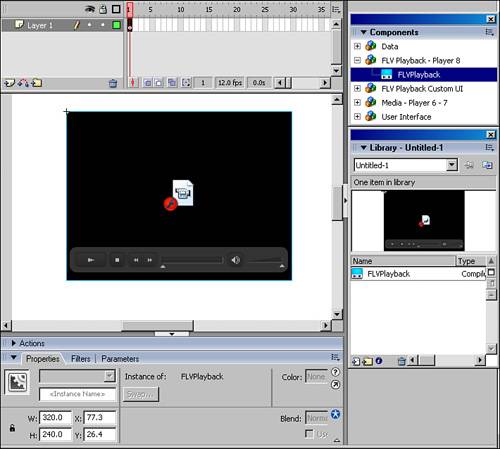
In the Components panel, (Window, Components), open the FLV Playback Player 8 menu item. Drag the FLVPlayback component from the menu to the stage. When you place it on the stage, it automatically adds the component to your document’s library, so from now on you can go to your library to pull out a new instance of the component. Figure 15.6 shows an instance of the FLVPlayback component on the stage.
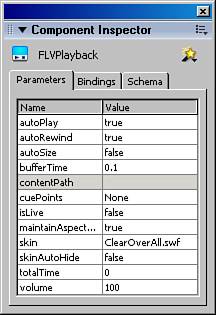
After you have an instance on the stage, you’re ready to set the parameters for the component, including the video source file and skin. Select the component instance on the stage and open the Component Inspector panel (see Figure 15.7).
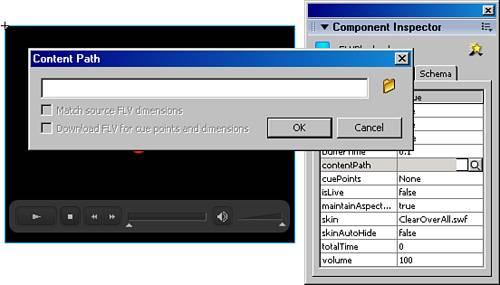
Setting the parameters for the FLVPlayback component is easy. Double-click on one of the parameters and either a drop-down menu or a dialog box opens to set that parameter. For instance, to tell the component what FLV to play, set the content path. Double-click the Content Path item in the Component Inspector and a dialog box opens that you can use to browse your system and select the FLV file to load into the component (see Figure 15.8).
As with the Video Import Wizard, the FLVPlayback component enables you to choose from a selection of skins with different styles and functions. Double-click the Skin parameter to bring up the Select Skin interface, which has a drop-down menu of skins to choose from and a preview window so that you can see what you’ve selected before clicking on the OK button.
If you give the component an instance name, you can access it with ActionScript. You can use ActionScript to set the value for the contentPath parameter dynamically, rather than with the Component Inspector. You can use the following code, placed on a keyframe of the main timeline, to load an .flv into an instance of the FLVPlayback component.
family_vid1.contentPath = "family_vid1.flv";
The FLVPlayback component combines flexibility with ease of use. The capability to use ActionScript to dynamically set parameter values is a powerful feature. In my own work, I don’t use components, but this one is working its way into my projects. Although you can use the Import Video Wizard to prepare a single .flv and the component that plays it, you can also use the standalone Flash 8 Video Encoder to batch process many video files at once.
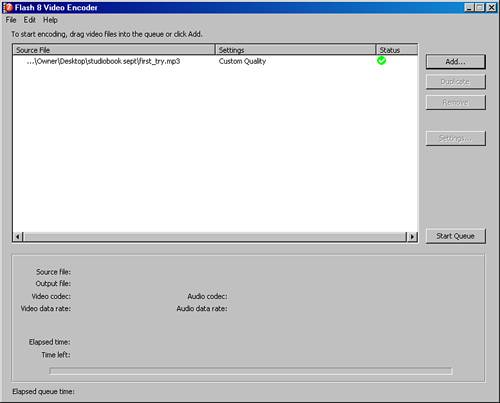
The Import Video Wizard is great for importing a single video file, but if you’re working with several video files, you should get familiar with the Flash 8 Video Encoder, which is automatically installed when Flash 8 Professional installs on your computer. To open it directly, use the Windows Start menu to navigate to All Programs, Macromedia. You can also locate the applications folder in which Flash 8 was installed and open Macromedia Flash 8 Video Encoder directly and/or create a shortcut (alias) on the desktop for future use. Figure 15.9 shows the Flash 8 Video Encoder.
Whereas the wizard steps you through the process, you can control all the settings directly when creating multiple FLV files with the Video Encoder. With the Flash 8 Video Encoder you can build a list (queue) of one or more files to be processed all in one batch.
To add a file to the batch processing queue, click the Add button and browse for the file on your system. You can delete files in the queue list by selecting them and clicking the Remove button.
When added to the queue, a file can be duplicated and then configured with its own settings. This way, you can process one original video file and create multiple compiled files with different compression levels at once. For example, one might be set for end users with broadband access and another might be set for slower connections. This is incredibly helpful when creating web projects.
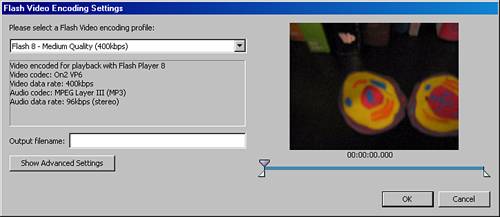
To configure a file’s settings, highlight the file in the list and click on the Settings button, which brings up the Flash Video Encoding Settings dialog box (see Figure 15.10). Here you can select a compression profile and assign an output filename.
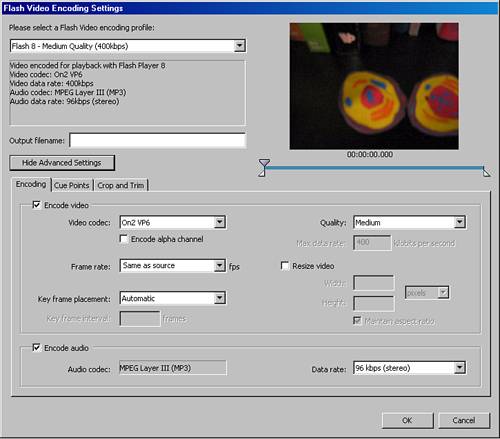
You can also configure advanced settings such as custom encoding options, cue points, and crop and trim options (see Figure 15.11). Note that when you crop the video area and trim the ends of the video, you are marking only the part of the video that Flash plays, so this does not change its file size. To optimize the file size, you should make these changes in an external video editor before associating the file with Flash.
When you’re ready to begin the batch process of your video files, click the Start Queue button. The Encoder shows you a preview of each video as it’s being encoded, along with the settings for that file. If you don’t like what you see, you can stop the encoding and reset the file’s settings.
True streaming video is never cached in your browser as a progressive download is. It is streamed by special server-side software and really is played on-demand. In this case, the special software is the Flash Communications Server. With streaming, a persistent connection is established between the Flash Player (the client) and the Flash Communications Server. As a result, streaming video has far more controls over buffer time and adjustments to accommodate different user connection speeds. If you’re working with video that is more than 20–30 seconds long, or anticipate high traffic, you should consider using streaming video.
Note
Flash Communications Server provides not only streaming video for your projects, but live multiuser streaming for video chat and video conferencing applications. For more information on the Flash Communication Server, check out the Macromedia Flash Communication Developer Center at http://www.macromedia.com/devnet/mx/flashcom/.
There are many uses for sound in Flash. Sound can include a voiceover to a presentation, sound effects for an animation, user interaction cues, jukebox lineups, and any kind of ambient soundtrack for your site. Although Flash doesn’t provide any sound-editing tools, it does give you a wide variety of options for embedding and playing external sound files for any type of project you are working on.
Flash has two types of playback sound. The first is event sound, which must be completely downloaded into the user’s system before it begins playing. These types of sounds continue playing until stopped, when they either run to the end of their cycle or receive a command from ActionScript. Event sounds are used for short sound effects or other sounds that play over and over. The second type is streaming sound. Streaming sounds are synchronized to the timeline and begin playing as soon as enough data is downloaded for a few frames to play. They are used whenever the sound needs to be synced to an animation or when you want it to end at a specific moment on the timeline.
By default, both Windows and Mac systems can import MP3 files into Flash. In addition to MP3, which is a compressed file format, Macs can import AIFF files and Windows can import WAV files into Flash. Additional audio file formats can be imported if QuickTime 4 or later is installed on your system. When you add multimedia to your Flash projects, always start with high-quality, uncompressed content whenever possible, which means 16-bit WAV or AIFF audio and .mov or .avi content for video. These files can then be compressed in Flash and encoded in the .flv format.
To import a sound file go to File, Import, Import to Library and select the file you want to import from your system files. Another way to import sound files into a Flash project is to drag them from a common library (Windows, Common Libraries, Sounds) to the library or onto the stage of your current Flash project.
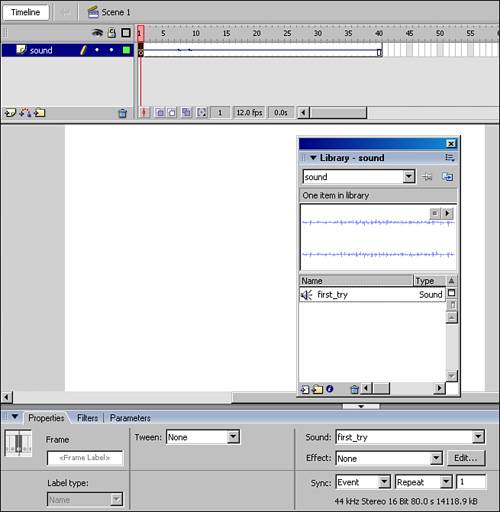
To add sound to any timeline you must first import the sound file as described in the previous section. Then create a new layer in the timeline for the sound, make sure this layer is selected, and create or select a blank keyframe on the new layer where you want the sound to begin. In the Property inspector, choose the name of the sound from the Sound menu. Choose your settings and add frames to the layer as needed for correct playback. See Figure 15.12 for an illustration of how to add sound to the timeline.
Adding sound to a button symbol instance is an easy way to learn this process. To start from scratch, draw a simple shape on the stage. Next, select the drawing and convert it to a symbol (Modify, Convert to Symbol), choose Button as the type, and give it a name. Go into symbol edit mode by double-clicking the symbol and you should see the four frames of a button timeline, as shown in Figure 15.13.
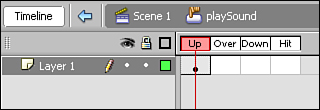
Begin by adding a new layer called sound. If you want to have the sound play when the user clicks on the button symbol, select the frame labeled “Down” and insert a blank keyframe (F7) on the new sound layer. With the blank keyframe selected, drag one of the sounds from the Window, Common Libraries, Sounds library to the stage. That’s it! You’ve added sound to your button. Use Test Movie, (Cmd-Return) [Ctrl+Enter] to export the SWF, and the sound plays when you click on the button.
This is the same process you would use to add sound to any frame in the movie, changing the sync setting to fit the particular sound. The sound file plays at the same rate as any animation on the stage. To create an animated mini-music video, you could have your animation elements on their own layers of the timeline, and the music sound file on a separate layer.
Although you can’t really edit sounds within Flash, you can modify properties of those sounds and apply a number of effects to them. For example, you can change the envelope of the sound and add effects such as fade out. The envelope is basically the wrapping that Flash puts around the sound file, which tells Flash how to play back the file.
To edit a sound’s properties in Flash, first select the frame in which the sound starts and then view the options in the Property inspector, as shown in Figure 15.14.
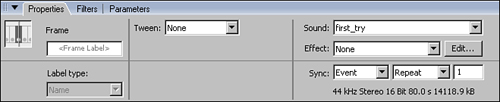
In the Property inspector you can apply effects to your sound by selecting options from the Effect drop-down. These include Fade Out (the sound fades from its current volume to silence) and Fade Left to Right (the sound fades from the left speaker to the right speaker). To edit an existing effect or create a custom effect, click the Edit button next to the Effect drop-down menu. This brings up the Sound Edit Envelope panel (see Figure 15.15), where you can edit how the effects are applied to your sound. The upper view shows the left channel and the lower view shows the right channel. The ruler in the middle is the timeline for the sound, which enables you to trim the sound with the time-in and time-out handles on the left and right sides.
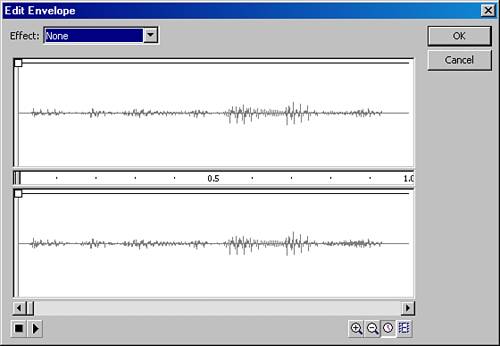
Figure 15.15. The Sound Edit Envelope panel enables you to edit how effects are applied to your sound track.
To change the effect, you can select one of the preset options (such as fade in or fade out) in the drop-down menu. To create your own custom effect, click anywhere on the upper or lower view to add a new point on the envelope rubber band. This point can be dragged up or down to raise the volume or lower it. Remember that just as with video, trimming a sound file doesn’t decrease the file size. If you need to edit the sound for length, you should use a sound-editing program and then update the sound file in the project’s library.
You can also choose from the following Sync properties with the Property inspector:
Event sync sounds need to download before playing and play to the end of the sound, creating new iterations of the sound each time the starting keyframe is reached on the timeline.
Start sync sounds are the same as Event sounds, but do not start a new iteration of the sound if the playback head returns to the keyframe until the previous sound has ended. This is useful for looping sounds on your timeline.
Stop sync sounds enable you to stop the sound at the chosen keyframe to which the sync is added.
Stream sync sounds are tied to the timeline on which they occur and play as fast as they are downloaded. You can also set how many times the sound repeats, either by setting a specific number of repetitions or directing the sound to loop continually.
Now that you have an understanding of how to bring sound files into Flash, you are ready for some more advanced topics such as compression and loading external MP3 files.
MP3 files that are imported and embedded use the settings with which they were imported with, whereas AIFF and WAV files have compression performed on them as the SWF file is created.
Different types of sounds can be compressed with different methods that are uniquely suited to provide high sound quality and compression for that type of sound. It’s a good idea to find the balance between compression and quality, because although you want to minimize the file size as much as possible, there is little point in having an overcompressed file that sounds terrible. The following list shows which compression setting should be used with different sound types:
There are two different scopes for setting sound compression: globally for the entire document and all of the sound files in it, or individually for each sound file used in the document.
The global setting is applied to all sounds, both event and streaming. You can find this by going to File, Publish Settings and choosing the Flash tab. Near the bottom of the dialog box, the compression settings for Streaming and Event audio are displayed. To change them, click the Set button. The default setting for the global compression settings is the MP3 option.
Individual settings for a sound file override the global settings configured in the Publish settings. If you’ve embedded a number of AIFF and WAV files into your document, this is the best route to getting the tightest compression with the highest sound quality. To create individual settings, open the Library and double-click the individual sound file icon. In the Sound Properties dialog box, you can select and test the compression settings for that sound. These include Sample rate for Speech, and Bit rate and Quality for MP3.
If you’re working with large sound files, especially if they are not tightly tied to animation on the timeline, you should consider loading external MP3 files. The benefit to this is that it decreases the file size of the published .swf file, and allows flexibility similar to that of using external video files. You can more easily change and stream the content, and allow the user to initiate download of sound files without having to wait for the application and all its assets to download.
You can control the loading and playback of external MP3 files with ActionScript. As shown in the following code, you must first create a new Sound object. Then you can load the external .mp3 file into your Sound object instance. After it is loaded, you can play the sound:
mySound = new Sound();
mySound.loadSound(myfile.mp3);
mySound.start();
Use the following code to stop the sound at any point:
mySound.stop();
You can also add some simple buttons to let the user stop and start the .mp3 file after it is loaded. If you name your buttons soundPlay_mc and soundStop_mc, you could use this code:
soundStart_mc.onRelease = function(){
    mySound.start();
}
soundStop_mc.onRelease = function(){
    mySound.stop();
}
The sound object gives you control over how you load and use external sound files in your applications. Working with external MP3 files and ActionScript, you can create some sophisticated applications, including a Flash jukebox.
I imported a video file, but there is no sound when I run a test.
Check to see that the original video file is in a format that your system supports and that you have QuickTime 7 installed. If you have QuickTime 4 installed, MPG/MPEG files do not have their audio portion imported into Flash. The video imports, but not the audio portion. Also, make sure that your speakers are turned on and that the sound channel is not muted.
The playback of my embedded video is inconsistent.
Make sure that the frame rate of the embedded video is the same as the .fla document file in which it’s embedded. A difference in frame rates can result in inconsistent playback. Embedded video is automatically set to the same frame rate as the .fla If you have changed the video frame rate during the import process, be sure that you changed the .fla frame rate as well.
My embedded video doesn’t restart when the user clicks on a rewind button I’ve created.
Make sure that you have the correct path and scope when you reference the video clip from another symbol.
I dragged a sound to the stage. Why don’t I see it in the timeline?
When any symbol, including a sound, is dragged from the library to the stage, it’s added to the currently selected layer. Check the other layers to see whether your sound is on one of them.
I’m having trouble getting the playback of FLV video from my server. What could be causing this?
To avoid any problems with playback, your HTML document, SWF, FLV, and MP3 files should all be in the same directory. Also, be sure to check that your ISP is set up to play and receive the FLV video mime type (x-flv). The mime type needs to be set to octect-stream, particularly on Windows 2003 servers.
Although it’s possible to do some minor editing in Flash, such as trimming and cropping, you should do your sound and video editing in an external application. This way you can make sure that there is no fat in your project because trimming in Flash controls only what portion of the file is shown to the end user, not the actual file. By preparing your files ahead of time, you can keep bandwidth concerns in the project plans from the beginning.
Bandwidth concerns should be primary in every project plan. If you’re publishing large sound or video files, be sure to offer end users the chance to choose a download option best suited to their connection speeds.
Finally, if your project has several sound files, set the compression for each sound individually. Some sounds might be compressed more tightly than others and every little optimization lightens the whole load.