14.2 Formulating the Apollo Architecture Decision Problem
Heuristics for Decisions
Formulating the Apollo project as a decision-making problem requires selecting a set of decisions (with their corresponding alternatives) and a set of metrics. This section describes three heuristics for formulating decisions and shows how they are applied to the Apollo architecture problem.
The first heuristic for formulating the decision problem is to carefully set the boundaries of the architectural space under consideration (see Principle of the System Problem Statement in Chapter 11). What range of architectures should be included in the Apollo analysis? The highest-level specification of the Apollo system can be derived from President Kennedy’s 1961 speech: “landing a man on the Moon and returning him safely to the Earth.” This statement sets as the minimum scope that Apollo should land at least one man on the Moon. But architectures that extend to a much larger scope of issues (Mars exploration, space stations, and so on) may not have been appropriate, considering the limited schedule NASA was given.
One decision that NASA faced was the size of the crew. In the early 1960s, landing even one man on the Moon was an extremely ambitious goal. [4] However, because a lunar mission is a relatively long and complex space mission, it may have been too risky to send a lone astronaut on the voyage. Again considering schedule constraints, it was probably inappropriate to consider missions with large teams of astronauts, such as von Braun’s proposed Conquest of the Moon. [5] In this retrospective analysis, we will bound the number of crew members to at least one and no more than three.
Another decision was that of the mission-mode. The feasibility and reliability of in-space rendezvous and docking was a heavily debated topic at the beginning of the Apollo project. Earth orbit rendezvous was considered of lower technical risk but also of lower benefit. John C. Houbolt, a NASA engineer, showed that lunar orbit rendezvous was challenging but technically feasible. He argued that missions including rendezvous and docking in lunar orbit should be considered, because they provided opportunities for saving mass and launch cost. [6] Therefore, in this retrospective analysis we will consider both EOR and LOR.
The second heuristic states that the decisions should significantly influence the metrics by which the architecture is evaluated. This seems obvious, but when architecture decision models are created, some of the decisions are often found to have low impact on the metrics (that is, the metrics are relatively insensitive to these decisions), implying that these decisions could be dropped. Two metrics that are considered important in space missions are the total mass of the mission elements and the probability of mission success. Both strongly depend on the mission-mode and the crew size, as well as on the fuel types to be used for spacecraft maneuvers. [7]
The third heuristic states that the decision model should include only architectural decisions. For Apollo, decisions related to the mission-mode directly drive the function-to-form mapping. For example, if the mission-mode includes lunar orbit rendezvous, the concept for the mission includes two vehicles: one crew vehicle that has a heat shield so that it can re-enter Earth’s atmosphere, and a lunar lander vehicle that is specialized for descent to the surface of the Moon. Sometimes decisions indirectly influence architecture. For example, the fuel types influence the kind of engine used and the requirements for propellant tanks. The application of this third heuristic led to the removal of some decisions from our model; these include the decision on the location of the launch site, which does not substantially change the architecture.
Apollo Decisions
After considering the three heuristics, we selected a set of nine decisions for the Apollo study (see Figure 14.1). The process of creating a decision model is iterative in nature. For example, if a model shows that architectures that differ only in Decision X produce the same metric scores, then either Decision X can be eliminated from the model, or a new metric should be included that reflects the effect of this decision on metrics.
The set of nine decisions shown in Figure 14.1 includes decisions related to the mission-mode, the crew size, and the rocket propellant type used for Apollo. The figure also shows the range of allowed alternatives for each decision. Such tables are called morphological matrices, and in Section 14.5 we will discuss them as a tool to organize architectural decisions.
The first five decisions listed and illustrated in Figure 14.1 are related to the mission-mode: EOR (Will there be rendezvous and docking in Earth orbit?); earthLaunch (Will the vehicles go into orbit around the Earth or launch directly to the Moon?); LOR (Will there be rendezvous and docking in lunar orbit?); moonArrival (Upon arrival, will the vehicles go into orbit around the Moon or descend directly to the Moon’s surface?); and moonDeparture (Upon ascent, will the vehicles go into lunar orbit or proceed directly toward the Earth?). All five of these decisions indicate alternative maneuvers at different points of the mission. By combining one alternative from each of the five decisions, a mission-mode can be defined.
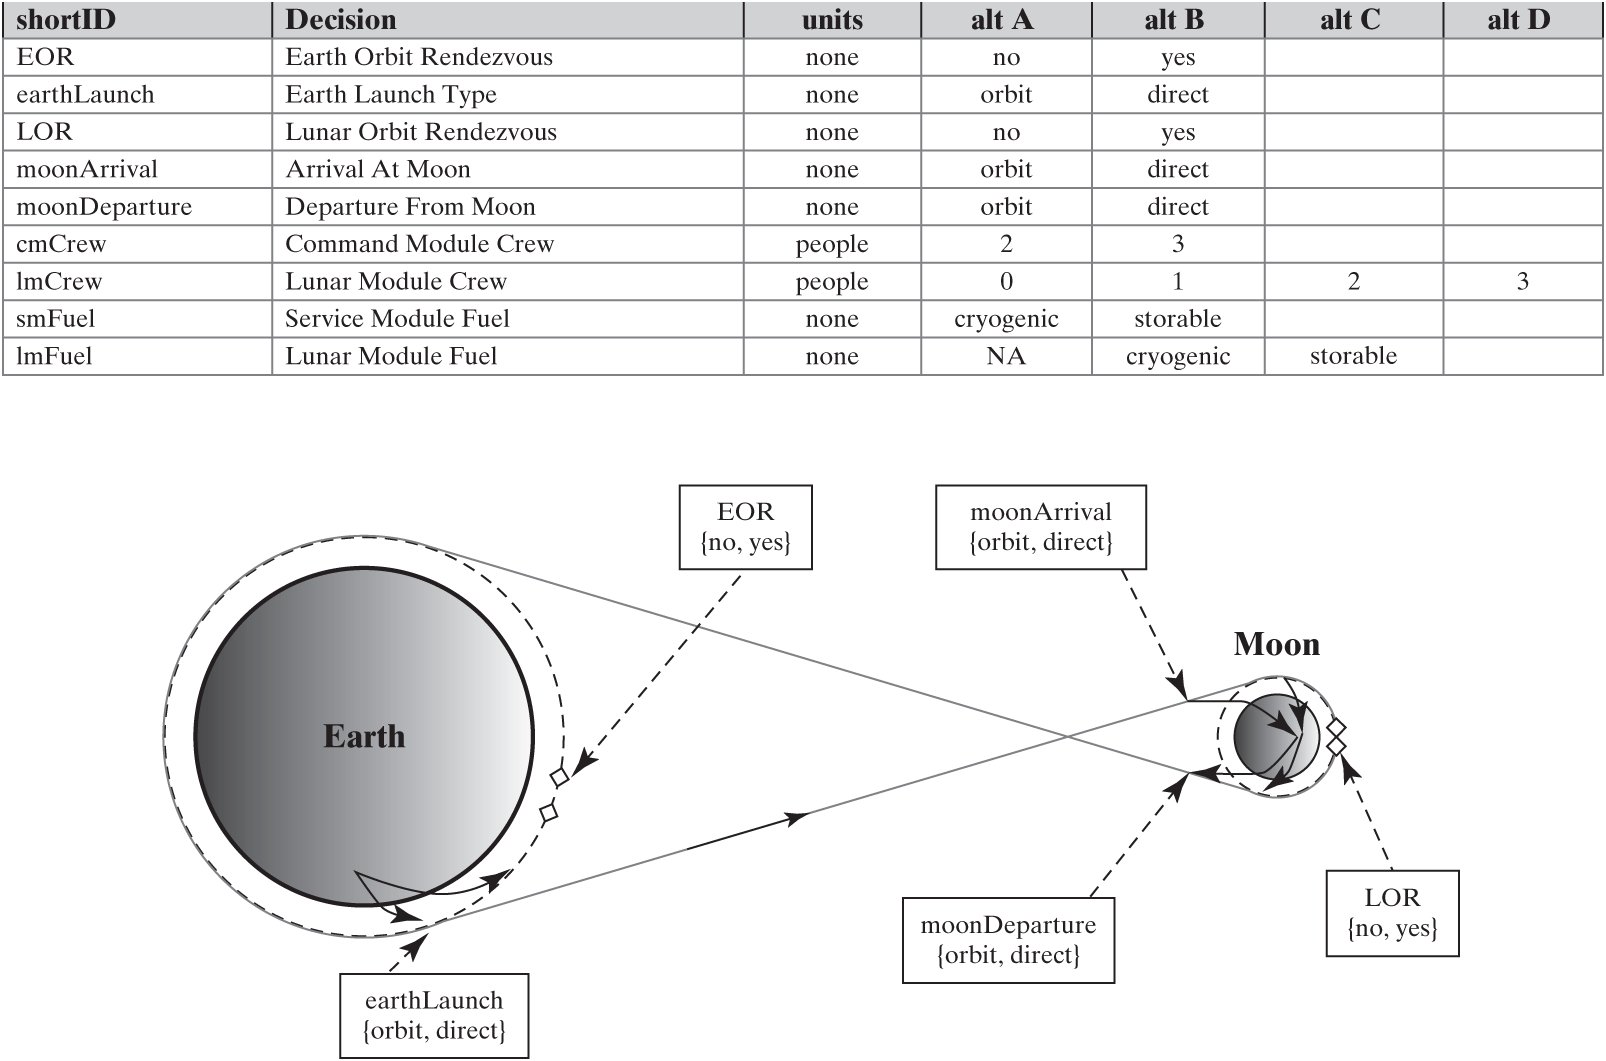
Figure 14.1 Mapping of historical Apollo mission-modes to the nine decisions. Note that the combinations of decision assignments listed must also satisfy the logical constraints shown in Figure 14.2.
The four remaining decisions are related to crew size and fuel type. The choice from cmCrew sets the size of the Command Module crew, and lmCrew includes the choices for the size of the Lunar Module crew (which of course is zero if there is no lunar module). The choices for smFuel and lmFuel set the fuel of the Service Module and the Lunar Module (NA if it does not exist). “Cryogenic” indicates a higher-energy LOX/LH2 propellant, and “storable” represents a lower-energy but higher-reliability hypergolic propellant.
Constraints and Metrics
In addition to defining the decisions, a complete description of the architecture model contains constraints and metrics. The constraints capture available knowledge about the system and the relationships between the decisions. Logical constraints are those that identify combinations of decisions that are not possible. Table 14.1 shows the logical constraints in the Apollo example. For instance, constraint d says that the Lunar Module crew must be smaller than or equal to the Command Module crew—you cannot create astronauts in the vicinity of the Moon!
Table 14.1 shows that the key decision is LOR. If it is yes, there cannot be direct descent at lunar arrival or direct lunar departure (constraints b and c), and there must be a Lunar Module with a crew of at least 1 and a propellant (constraints e and f).
There are also weaker forms of “reasonableness constraints” that encode things you would probably not do together. For example, if you were to construct an international effort to go to the Moon, you would probably not have the United States build a lander, and a second nation also build one. That would be wasteful of resources and hence unreasonable. But there is nothing logically incorrect about it.
Table 14.1 | Constraints in the Apollo example
| Id | Name | Scope | Equation |
| a | EORconstraint | EOR, earthLaunch | (EOR == yes && earthLaunch == orbit) || (EOR == no) |
| b | LORconstraint | LOR< moonArrival | (LOR == yes && moonArrival == orbit) || (LOR == no) |
| c | moonLeaving | LOR, moonDeparture | (LOR == yes && moonDeparture == orbit) || (LOR == no) |
| d | lmcmcrew | cmCrew, lmCrew | (cmCrew ≥ lmCrew) |
| e | lmexists | LOR, lmCrew | (LOR == no && lmCrew == 0) || (LOR == yes && lmCrew > 0) |
| f | lmFuelConstraint | LOR, lmFuel | (LOR == no && lmFuel == NA) || (LOR == yes && lmFuel ! = NA) |
In assessing the effectiveness of architectures, we usually find that there are metrics that quantify some measures of performance, some measures of cost, and some measures of developmental and operational risk. Our Apollo case is iso-performance, which means that all architectures provide for landing at least one crew on the lunar surface, satisfying Kennedy’s goal. Therefore, the two metrics that we use in assessing the potential success of the Apollo project are (1) operational risk and (2) initial mass to low Earth orbit (IMLEO), a proxy for cost. The IMLEO is calculated for any architecture using the rocket equation [8] and the parameters taken from Houbolt’s original documents. [9]
The risk metric was based on Table 14.2, which directly links decisions with the probability of successful operation. The overall probability of success is obtained by multiplying the individual probabilities together for the operations represented in any one architecture. The risks metric contains four categories of risk: high (0.9 probability of success), medium (0.95), low (0.98), and very low (0.99). The risk factor for each operation is assessed on the basis of documents written in the early 1960s and interviews with key decision makers.
Metrics are another way in which decisions can be linked to each other. For example, the probability of mission success is computed by multiplying all individual probabilities. Thus each decision is linked through this metric to all other decisions.
Table 14.2 | Table used to compute the risk metric in the Apollo example with the probability shown in brackets below each alternative.
| shortID | Decision | alt A | alt B | alt C | alt D |
| EOR | Earth Orbit Rendezvous | no | yes | ||
| risk | (0.98) | (0.95) | |||
| earthLaunch | Earth Launch Type | orbit | direct | ||
| risk | (0.99) | (0.9) | |||
| LOR | Lunar Orbit Rendezvous | no | yes | ||
| risk | (1) | (0.95) | |||
| moonArrival | Arrival at Moon | orbit | direct | ||
| risk | (0.99) | (0.95) | |||
| moon Departure | Departure from Moon | orbit | direct | ||
| risk | (0.9) | (0.9) | |||
| cmCrew | Command Module Crew | 2 | 3 | ||
| risk | (1) | (1) | |||
| lmCrew | Lunar Module Crew | 0 | 1 | 2 | 3 |
| risk | (1) | (0.9) | 1 | 1 | |
| smFuel | Service Module Fuel | cryogenic | storable | ||
| risk | (0.95)^(burns) | (1) | |||
| lmFuel | Lunar Module Fuel | NA | cryogenic | storable | |
| risk | (1) | (0.9025) | 1 |
Computed Apollo Architecture
Figure 14.2 shows the results of possible architectures for the Apollo program, which were obtained by exhaustively calculating the outcomes (IMLEO and probability of mission success) for all combinations of decisions that are not logically constrained. Among the best solutions closest to the Utopia point (low mass and high probability of success, identified with the “U” symbol in Figure 14.2), we’ve highlighted eight architectures. What is remarkable is that these eight mirror the three main proposals considered at the time: von Braun’s Direct mission, Houbolt’s LOR concept, and the Soviet mission design.
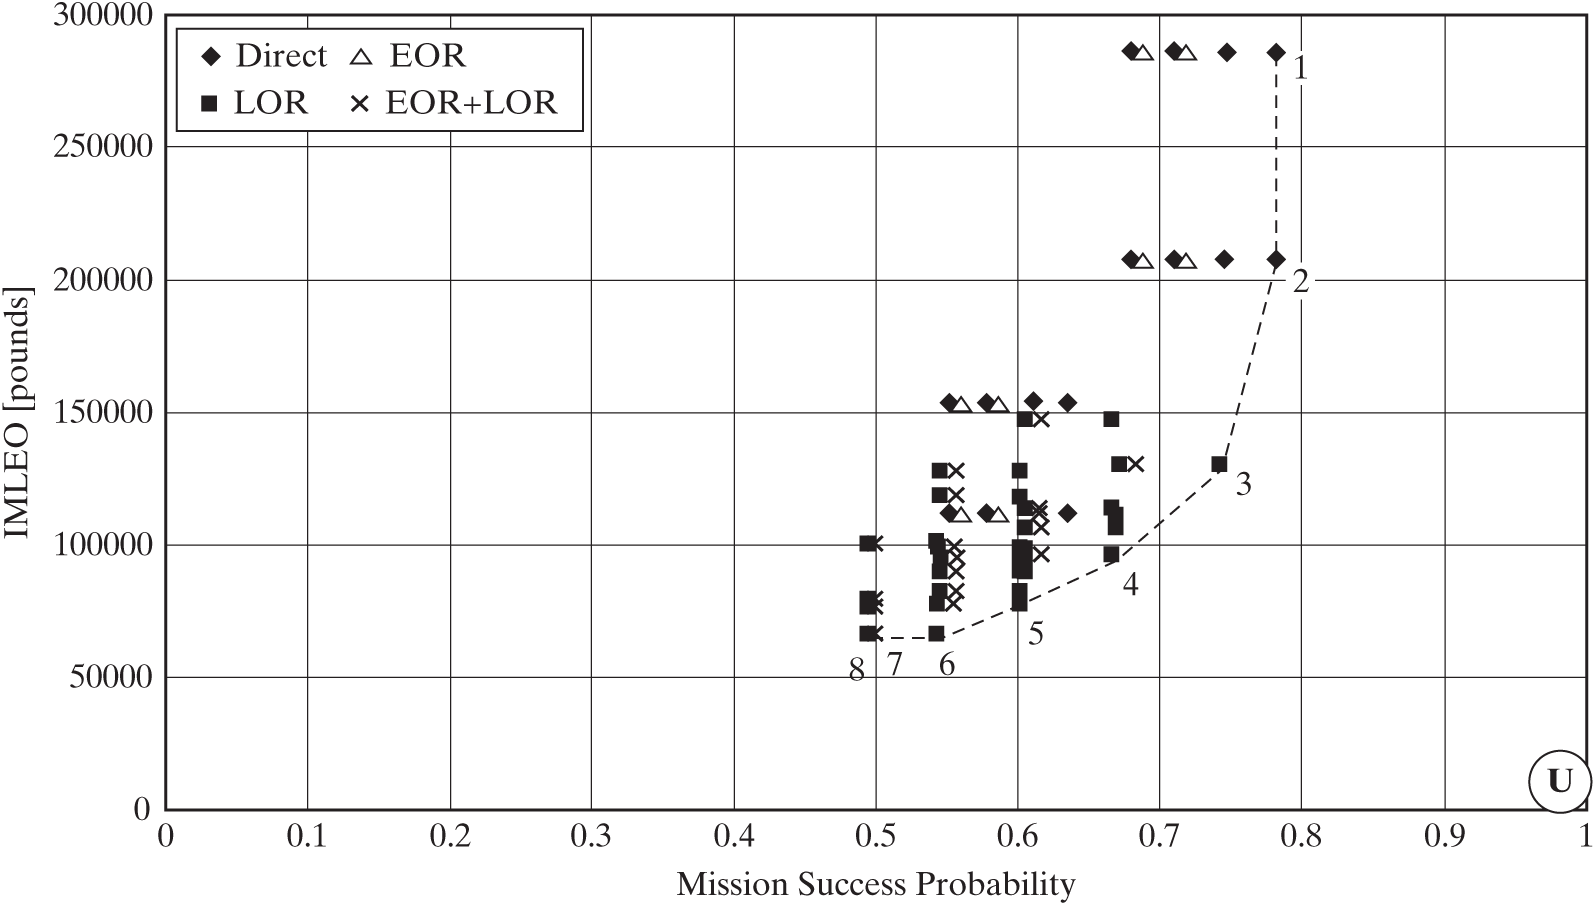
Figure 14.2 Apollo tradespace plot comparing IMLEO to probability of mission success. Each point in the plot indicates a logically feasible combination of decision assignments. The dashed line indicates the best architectures. The “U” symbol indicates the Utopia point, an imaginary point with perfect scores for all metrics.
Point designs 1 and 2 are “direct” missions with three and two crew members, respectively. A direct mission-mode implies that the mission has neither lunar orbit rendezvous nor Earth orbit rendezvous, and no lunar module. These types of missions were among the ones initially proposed by von Braun. [10] They have high mission reliability, at the cost of very high IMLEO.
Point designs 3 to 8 are architectures that include lunar orbit rendezvous maneuvers. Point design 3 matches the actual configuration of Apollo: It has three crew members in the command module, has two crew members in the lunar module, and uses storable propellants for both the service module and the lunar module. [11] It represents a reasonable compromise between mass and risk. Point 8, which is the minimum-mass configuration, uses two crew members in a command module and one crew member in a lander with cryogenic propellants. Point design 8 is the point that most closely models the proposed Soviet lunar mission’s architecture. [12] Searching computationally through the possible architectures, we surface the three primary choices considered during the mission-mode decision process in the 1960s, and we come to understand the essential tradeoff between mass and risk. We will see in the next chapter how to mine this type of chart for useful information that can help us structure the system architecture process.