
STORYTELLING WITH VIDEO 9
This chapter will focus on the use of video and motion graphics in design presentations.
Ethan’s firm would soon be interviewing for a wayfinding project at a large hospital. Ethan learned first-hand how important wayfinding is to anxious patients – and their partners. His son was born six weeks premature just a few months earlier. Having no opportunity to visit the hospital in advance, he had felt bewildered as he and his partner hurried toward the maternity ward.
Back at work, Ethan was confident in his firm’s capabilities, but firm leaders were unsure if they would even win the project. Their company was smaller than their competitors, and they had never worked on such a high-profile project. After discussing their predicament in a staff meeting, Ethan nervously shared his story. Together, they decided that a video filmed in first-person recounting Ethan’s experience would not only be memorable, but it would illustrate their passion for the project.
INTRODUCTION
Video is an enticing communication platform for designers. Unlike any other media, videos have the power to garner attention and convey the emotionality of a moment. At the same time, new technologies have made it increasingly easier for the average viewer to see, share, and even create their own videos. These videos can be viewed from all over the world, and at any time of day.
Acknowledging this potential, the media analysis company, comSCORE Inc., named the rise of short-form videos and the demand for the skills needed to create them as one of the ten trends that defined 2015.1 While videos are seemingly easy to produce, the work that goes into their production is often grossly underestimated, and since videos send so many vivid messages (both intended and unintended) they require extra consideration.
THE ROLE OF VIDEO IN DESIGN
Some design fields have long been entrenched in video, having collaborated on television and multimedia campaigns for decades. Others are relatively new to the media. Interior design and architectural firms are just beginning to use video to share firm news, research, and ideas, highlight key projects, and recruit talent.2
Given the decreasing cost of video equipment, smaller firms and freelance designers can also include videos as a part of a larger communication and marketing strategy. However, videos aren’t created solely for external communications. There is evidence to suggest that videos created by job candidates could enhance their prospects of being granted an interview.
THE ROLE OF VIDEO IN HIRING
Not only can firms create videos, but evidence suggests that job candidates may benefit from doing so as well. In one study on viewer perceptions, seven of eight designers in hiring positions felt that design candidate videos would give an applicant an edge in making hiring decisions. They suggested such videos could:
1. Offer a novel for a candidate.
2. Confirm a candidate’s speaking ability.
3. Feature a candidate’s video production skills.
4. Provide a means to showcase a candidate via voice and music choice.
5. Provide an added dimension to traditional application materials.3
COMPARISON OF STRATEGIES
Videos can be an appealing, but not always appropriate, communication vehicle for designers. Since video production can be a time-intensive proposition, designers should consider how best to incorporate videos into their communication strategies.
STRATEGIES FOR COMMUNICATING DESIGN IDEAS
Static, no presenter
Deliverables are shared without a verbal presentation. Example: online portfolio or design competition exhibition
Short videos may be embedded into the document.
*Static, with presenter
Deliverables are shared alongside a verbal presentation. Example: project critique, job interview, or jury panel
Short videos may be embedded into a slide deck.
Time-based (video)
Deliverables are shared via short-form, scripted videos. Example: video RFPs or candidate marketing videos
* Note: this can include in-person or video conference calls.
COMPARISON COMMUNICATION STRATEGIES
Those opting to create videos should understand their differences from other communication tactics.
| Static no presenter |
Static with presenter |
Time-based (video) |
|
| captive vs. voluntary audience | voluntary
Audience members are free to exit the presentation area. |
captive
Social etiquette discourages the audience from leaving. |
voluntary
Viewers are free to stop the video. |
| attention & timing | audience-dependent
The viewer determines how long to view the material. |
audience-influenced
The audience can change the pace by asking questions or providing non-verbal cues. |
producer-dependent
The video producer dictates timing and influences the viewer’s attention through visual & auditory cues. |
| potential for rapport between audience & presenter | none | high | low |
| level of exchange between audience and presenter | none | high
Questions are asked & answered. |
little to none
However, non-linear formats can provide audience choice and the potential to post messages to provide feedback. |
| level of reach the potential to share information with a broad audience over time and geographic range |
moderate | low | high (if online) |
| other considerations | How the audience will navigate information | How the speaker will best support the information | The optimum level of information to curtail boredom and over-stimulation |
EXERCISE 9.0 ADAPTING MESSAGE TO MEDIA (VIDEO)
Review the chart above and compare it to your last presentation. If you were to incorporate a video, how might your approach change? List 3–4 of the most important changes.
WORKFLOW OF VIDEO PRODUCTION
It is important to understand the tasks involved in producing a persuasive video because it is often more work than expected, and changes made late in the process are often more costly and time-consuming. This workflow can be generalized into stages of Pre-production (planning), Production (creating), and Post-production (refining).

Figure 9.0
Video production workflow
OVERVIEW OF PRE-PRODUCTION
Thoughtful preparation during pre-production can save a great deal of time and expense later on.
Tasks in this stage should include:
Audience Analysis & Segmentation
Determining audience characteristics
(See Chapter 2)
Logline
Determining the essence of the message
(See Chapters 2 & 3)
Tone Check
Planning for the viewers’ emotional journey
(See Chapters 2 & 3)
Storyboarding
Determining the video’s structure
Script Writing
Determining what will be said
Scouting Shots and/or Outlining Assets
Determining each filming location
Testing sound and lighting levels in filming locations
Selecting props
Inviting talent (actors or narrators)
and/or
Developing initial concepts for graphics
PRE-PRODUCTION
AUDIENCE ANALYSIS & SEGMENTATION
When dealing with a specific audience, video producers must first consider who their audience is and how best to engage them. Recall the Audience Characteristics table in Chapter 2, and revisit your goals. Is the intent to inspire a movement, evoke an emotion, or provide information? Keep these goals in mind as you determine logline and tone – the two most critical decisions in pre-production.
LOGLINE
A logline can be thought of as a one or two sentence synopsis of your story. But, more importantly, these short statements convey the premise of your message. A logline serves as an anchor for all future decisions – both large and small, from those on story and cinematography to music selection and prop placement – all subsquent decisions will support your logline.
Though they’re important, loglines can be difficult to conceptualize. Since the goal is to be brief but powerful, start by considering how you might deliver your message via a bumper sticker. Think back to the themes unearthed in Chapter 3, then place the protagonist within the theme (remember this protagonist doesn’t need to be a person). Do, however, suggest their goal, the conflict, and the stakes. Finally, incorporate one or two well-placed adjectives to give some emotional insight, but avoid providing too much information. The most powerful loglines are memorable, not comprehensive.
EXAMPLE LOGLINES
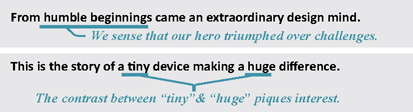
TONE CHECK
How should the audience feel during the video, and after?
Should they feel hopeful for the future, or spurred into action?
The answer to these questions will help determine what tone the video should take. Tone can be characterized as the overall “feel” of the video, and it’s imperative to align the tone to your audience, yourself, and your message. A lighthearted, humorous tone would be grossly inappropriate in recounting the plight of refugees, and a fast-paced video, dripping with pop culture references, is unlikely to appeal to retirees. When determining tone, consider which persuasive appeal would sway your audience, convey your values, and highlight any universal truths that may align your message with the audience.
Remember that sometimes the audience has to feel the gravity of a problem to appreciate the solution. This means that the tone may change. A video that starts in a dark place can end on a high note. Such a change is reflected in the video’s music, pacing, and the expressions of those being featured.
EXAMPLE TONES
| provocative | awe-inspiring | empowering | tragic |
| endearing | uplifting | stoic | light-hearted |
THE ROLE OF TONE IN VARIOUS VIDEO TYPES
The desired tone of the video will likely influence how it is produced. Stories steeped in pathos (i.e., emotional appeal) may be best communicated via live-action footage, which can authentically depict human emotions. Yet, the success of a live-action video hinges on finding the best talent and filming locations.
On the other hand, stories that are light-hearted or have little need for realism may be well-suited for motion graphics. Since they make use of graphic assets generated specifically for the video, motion graphic teams also have greater control over aesthetics. However, animation can be time-intensive, and computer-generated special effects can be difficult to produce. So, consider your goals, equipment access, and skills when determining how to produce your video.
QUESTIONS TO CONSIDER WHEN SELECTING VIDEO TYPES
When choosing between live-action and motion graphics, consider the following:
| Live-Action | Motion Graphic | |
| Tone | Would real people most authentically convey the desired emotional tone? Is human expressiveness a priority? |
Is there a specific visual style that would best represent the desired tone? How much control is needed/desired? |
| Equipment | Do you have access to a video camera, mic, & editing software? | Do you have access to a vector-based graphic program & compositing software? |
| Knowledge | Are you familiar with photography & camera settings? | Are you familiar with key framing? |
| Asset Acquisition | Do you have willing, able, and relevant participants to act as your talent? | Do you (or others) have the ability to make high quality graphics to support your tone & message? |
| Access | Do you have access to the necessary scene locations? Do you have access to appropriate props? |
STORYBOARDING FOR VIDEO
Storyboarding is the process of deciding how the logline and tone should be communicated.
A well-crafted storyboard has two primary functions:
1) aiding project development, and
2) serving as a record of the decisions made.
A storyboard outlines the overall sequence of the video – including what is both seen and heard at all critical junctures. Storyboards are also used to help plan for shot locations, talent needs, and graphic elements.
SEQUENCE
One of the most fundamental decisions made during the storyboarding process is the arrangement of the story. Video storyboard sequences often fall into one of two general categories: linear and nonlinear.
Linear Sequence
Videos following a linear sequence are likely to be familiar to viewers. A predetermined order shapes the story, and while it may make use of flashbacks, or foreshadowing elements, each audience member will view the same plot unfolding.

Figure 9.1
A linear video sequence follows a predetermined order
Linear Storyboard The plot is predetermined
Non-linear Sequence
Videos making use of a non-linear sequence can be likened to the Choose Your Own Story formats found in some children’s books. Not to be confused with non-linear editing, non-linear sequences allow the viewer to choose their own path during critical junctures in the story. Storyboards for these types of videos are often represented by flowcharts that outline the options available to viewers. While nonlinear stories may allow for more engagement with the audience, they can become confusing, and producers of these videos will likely need to develop more material to cover the available options.
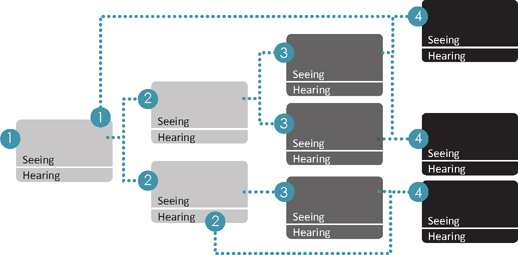
Figure 9.2
A non-linear video sequence allows the audience to chose their path
Non-Linear Storyboard
The audience decides how the plot will unfold.
SCRIPT WRITING
Writing a script is different from writing a paper or book. This is because dialogue is conversational, using colloquial words, phrases, and contractions – essentially, everyday language. Viewers typically expect an alignment between what they hear and what they see, so timing matters. Long-winded dialogue can cause imagery to linger on screen, while a series of short, bursts of lines might seem rushed. So consider the rhythm and cadence of the words being used against the imagery that will be shown. Know how much time it takes for lines to be spoken aloud at a reasonable rate of conversation, including time for pauses and inflection. Be sure to indicate pauses and unspoken action in the script so that they’re not overlooked.
| Time | Audio | Video |
| 00:02 | I wake up everyday thinking about people, {pause} |
Live footage of the designer talking to the crowd. |
| how they live their lives, how they spend their time, and the products that make their lives better. | ||
| 00:08 | {Musical score fades in} | Cut to shot of the crowd listening and gaining interest. |
Figure 9.3
The script above indicates timing and has unspoken elements in italics
When a script calls for multiple people to have a speaking role, professionals almost always do a table read. Not only does a table read force everyone to practice their lines, but it also helps those involved to understand their responsibilities and gain a sense of the overall timing of the story. During a table read, anyone with dialogue reads their lines aloud with the same inflection and cadence as they would during filming. If a script calls for yelling … they yell; if they are to cry … they cry. Everyone involved also pauses for any non-verbal action to take place.
You might find that some will stick closely to the script while others will start ad-libbing, and give unprepared remarks. In either case, it is important for everyone to seem natural, at ease, and on message.

Figure 9.4
A table read can help finalize the script & timing
SCOUTING LOCATIONS
If your video will feature any live-action footage, determining when and where to film should be done early in the planning process. Consider the following:
When scouting locations, look for places and spaces that will help elevate your story and what is happening in the scene.
-Annette Tulley
GETTING PERMISSION
Apart from very public spaces such as open parks, you will likely need to obtain permission to film in most locations. This process may take some time, or you might even get denied, so plan on getting permission early. You’ll also need to get consent from anyone that will have a recognizable likeness on the video – whether speaking or not.
It is best to have these agreements in writing and signed. Also be sure to save them in the event of any issues. On the consent forms, include information as to how you intend to use the video and what it is about.
MAXIMIZING NATURAL SETTINGS
Proper lighting can take a scene from dull to inspiring. Outdoor photographers have long credited the golden hour as the optimal time to shoot. The golden hour is roughly the first hour after sunrise and the last hour before sunset. During those times, the sun is low in the sky, casting a soft, diffused light. However, it can be difficult to shoot footage during such short time spans since the sun’s angle will quickly change. For that reason, it is important to visit a site at the same time of day you plan on filming and during the same time of year. A location will feel very different at 6 pm in January than at 6 pm in June.
Also, when filming longer scenes outdoors, you may need to visit the site at the same time of day on consecutive days, so plan accordingly.
MAINTAINING CONSISTENCY
A distracted viewer is not an engaged viewer, so avoid potential distractions by eliminating seemingly small, but unplanned changes. These can include any number of things, such as people wearing different clothing or accessories, changing hands on a clock, or props that have moved.
To avoid the potential for distractions, think about variables such as weather, noise, and people-related factors like uninvited passersby or awkward gawkers.
MAXIMIZING THE VIDEO’S LIFESPAN
Ever wonder why some videos feel tired?
Hairstyles and clothing can quickly date a video, as can indicators of time. So to extend the shelf life of a video, ask talent to dress in a timeless manner, and try to avoid having time-sensitive objects in scenes such as calendars or date-specific signs.
FILMING EQUIPMENT
A basic filming kit should include equipment to capture audio and video, steady the camera, and light the scene. Today, this equipment is much less costly than several years ago. In fact, some independent films, such as And Uneasy Lies the Mind, have been filmed entirely on smartphones. However, there are advantages to using upgraded equipment. Consider the following:
FILMING EQUIPMENT
| $ | $$ | $$$ | |
| Video Capture | Smartphone or other portable device Limited settings Little memory New recording apps |
SLR single lens reflex camera Ability to change aperture, shutter speed, & ISO settings Expandable memory |
Multiple cameras such as: Mirrorless cameras with lens kit or Professional camcorder Ability to change aperture, shutter speeds, & ISO settings Expandable memory Multiple cameras allow for cutting between scenes |
| Audio Capture | Smartphone in a quiet room with little distance away from the speaker Some mics can be used with smart phones. |
Lavalier mic Allows for audio capture close to the source with minimal impact on the scene |
Shotgun mic on a boom Allows for audio capture close to the source with no visible impact on the scene |
| Lighting | Natural daylight and inexpensive lights on clamps
Allows for some light movement |
3 clamp lights and riser stands to allow for more flexibility
Ability to move light |
Photographers light kit that includes stands and collapsible soft-boxes to diffuse light Ability to move and diffuse light |
| Tripod | Shoulder mount or extended arms |
54” with pan Allows for relatively stable side-to-side rotation |
60” with fluid head Allows for relatively stable side-to-side & up/down rotation |
OTHER FILMING EQUIPMENT
After gathering the essentials, other useful filming equipment includes:
HEADPHONES
Headphones allow the videographer to listen to audio as it is recorded.
COLOR FILTERS & GELS
Color filters slide over the camera lens to correct for color issues or provide visual effects.
GREEN SCREEN
While not always green, these solid color backgrounds allow for footage to be superimposed over another by isolating a color and making it transparent.
JIB ARM
A jib arm is a camera mount that allows the camera to move up and down smoothly and reach high angles.

CINEVATE SLIDER
A cinevate slider is a mount that allows a camera to move from side to side.

DOLLY
Dollies are wheeled carts that allows for camera movement.
DRONES
Drones with camera mounts allow for aerial shots.
BATTERIES & MEMORY
On the day of filming, be sure to bring extra batteries and memory storage.
CAMERA DISTANCE
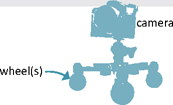
The distance that the camera is away from the action (i.e., person or objects of interest) can impact how the audience perceives the message. For example, long shots can be used to give context, setting the stage for a story, while an extreme close-up can provide artistic detail and highlight facial expressions.

Figure 9.5
The camera’s distance from the action can change how viewers perceive the message
CAMERA SETTINGS
Your camera’s settings (i.e., shutter speed, iso, and aperture) can make a big difference to the look and feel of your footage. For an overview of these settings, see the Photography Terms Appendix.
Your camera lenses can also impact your photos. If you are using a camera with a removable lens, consider experimenting with different focal lengths. For instance, macro lenses work well for close-up photos, whereas telephoto lenses allow you to photograph from a distance, and wide angle lens allow you to capture more of a scene. In general, the smaller the focal length number, the wider the angle.
LENS FOCAL LENGTH
| 18mm | wide angle | landscapes, skylines |
| 35–70mm | normal | streetscapes |
| 70–135mm | medium telephoto | portraits |
| 200+ | telephoto | sports, wildlife, distant subjects |
SCENE COMPOSITION/FRAME
A scene’s composition, or frame, can send messages as well. Professionals often use the Rule of Thirds to compose dynamic frames, which means that subjects are not positioned in the center of the frame but one-third from the right or left side of the screen.

Figure 9.6
Placing the subject 1/3 from the edge is often considered more dynamic than centering it
Leading lines can draw the eye toward the action, and bigger items will receive more attention.

Figure 9.7
Leading lines can be positioned in the composition to lead viewers’ eyes toward the action
CAMERA ANGLE
Camera angles can imply importance, stature, or imbalance. For instance, sharp angles add drama. Regarding camera height, a low positioned camera can make those on screen appear more significant or imposing, while an aerial shot can provide an overview.
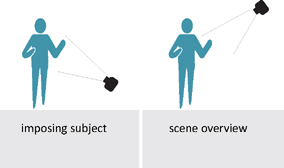
Figure 9.8
Camera heights can impact viewers’ perceptions
CAMERA POSITION
When positioning the camera, aim to stay in front of subjects. Moving behind them flips the scene, this is not only disorientating, but it causes signs and text objects to appear backward.

Figure 9.9
Avoid backward text by limiting camera positions to a 180° range in front of the subjects
CAMERA ORIENTATION
At the time of this writing, the aspect ratio on most screens is either 4:3 (4 units of width, for every 3 units of height) or 16:9 (1920×1080 pixels). Practically speaking, this means that screens are typically wider than they are long. So when filming with a smartphone, hold it horizontally.

Figure 9.10
If filming with a smartphone, hold it horizontally to match the orientation of most screens
CHANGING CAMERA POSITION
Moving the camera during filming can add visual interest. However, this should be done with great care so as not to distract or overwhelm the audience.

Figure 9.11
There are multiple ways that the camera can move during filming
CHANGES TO TIME
The speed of a video clip can also impact how the audience perceives the message. Slow motion adds drama (but requires more light), while fast-paced footage conveys a sense of urgency. Some cameras will allow you to film in “slowmo” or time lapse modes, or you can speed up or slow down clips with the time remapping settings available in most video editing software programs.

Figure 9.12
The pace of the video can convey meaning
PREPPING TALENT
If the video will feature on-screen talent, it is important to prepare them prior to filming. Interviewees won’t do a table read, but there are steps a producer should take to maximize filming outcomes. After all, it’s in the best interest of everyone to have talent appearing comfortable and confident while on camera.
PREPARING FOR AN INTERVIEW
Establish your location. Be sure to visit all sites in advance so that you can review camera, lighting, and sound conditions. This will ensure that you have packed the right equipment. If possible, plan to have two cameras for filming, which will give you more options while editing, and serve as a backup in the event one camera fails to record.
Depending on your comfort level, you may want to instruct talent on appropriate attire.
Establish general goals (i.e., what they will be talking about). You may want to do this by sharing a few talking points. A phone conversation is best so that you will have a sense of their vocal patterns (i.e., are they soft-spoken; do they speak in a monotone manner, or are they fast in delivery?).
Obtain a signed consent form, as well as the spelling of their name and official title. While this can be done later, it is much easier to do this prior to filming. Plus, having them provide this information themselves will reduce your chances of getting it wrong.
FILMING AN INTERVIEW
Many people don’t like to be on camera, so it helps to set a relaxed tone. Telling a story or joke can help put them at ease.
Explain that your voice will not be recorded, so they will need to restate the given questions as part of their answers.
Start with a few easy questions to help them warm them up.
If they are agreeable, ask them to provide both short and long answers to questions; this will give you more options when editing.
If they provide an inaccurate answer, correcting them can be awkward. Instead, try asking the question differently.
Listen for how you can edit what they are saying. If the person gives a long-winded answer, it may be that you want to incorporate only a portion of their response.
At the end of the session, simply ask them if there is anything else they would like to share, which may provide some interesting insights.
If you have not already done so, be sure to obtain a signed consent form, as well as the correct spelling of their name, and official title (if any).
Be sure to thank them for their time and keep them posted on the video’s progress.
PRODUCTION
After what seems like a lifetime of planning, the video will be ready for production, which involves generating and compiling assets like video footage or artwork.
PRODUCTION TASKS
Tasks in this stage should include:
Recording Clips or Developing Footage
This includes both primary footage and b-roll, or background footage
Reshooting
Obtaining footage again (if necessary)
Recording Voice-overs
Recording speaking parts used for narration
Locating Musical Score
Obtaining royalty-free music
Locating Stock Footage or Graphics
Obtaining royalty-free video footage and graphics
TECHNICAL ISSUES OF FILMING
Prior to filming, there are several camera settings to consider:
FILE TYPE
Videos are often filmed using .AVI, .MP4, or .MOV formats. AVI files are universally accepted but are typically large files. Apple Quick Time is needed to play .MOV files, while .MP4 files are universally accepted but within a relatively small file size.
See the Video File Types Appendix for more information.
FRAME RATE
Frame rate, or fps, is the number of frames your video shows per second. The more frames per second, the smoother the footage, but the difference becomes negligible with reasonably high frame rates. Over the years, there have been several standards for frame rates. Most Hollywood films are 24fps; in the US and Japan, television is broadcast at 29.97 (rounded up 30 frames per second), though many other countries use a frame rate of 25fps and newer technologies have allowed frame rates of 60fps. The most important thing is to be consistent with your footage so that all clips are filmed with the same frame rate.
RESOLUTIONSIZE
Be sure to film at the highest possible resolution quality for your camera. Most cameras have resolution presets which may be labeled as high quality, or as 1920x1080, 720 (for standard – quality), or 480 (for low – quality). These numbers refer to the output size. Higher numbers denote higher – quality footage – and larger file sizes. Footage shot at 720p or, worse yet, 480i, will be of low quality on bigger screens. The “p” and “i” refer to how the file is scanned (or drawn on screen). Progressive scanning “p” updates the entire frame at once, whereas interlaced “i” files update portions of the frames. Practically speaking, progressive scanning reduces the “flickering” effect one may see as a video is played.
You may have seen an odd coding when filming, such as:

COMPRESSION
Video files are going to be large. To save room, they are often compressed using a codec. While this is a complex topic, the essence is this: big files are compressed into small files and then decompressed using an algorithm; this can be done through either:
Lossless Compression compresses videos but retains fidelity (i.e., video quality).
Lossy Compression removes information during compression that can never be restored, thus slightly compromises the quality.
Many editing programs include compression settings. At the time of this writing, the most common is H.264, which is lossy, but the resulting .MP4 video file is relatively small, making it easy to upload online. MP4 file types are often considered the industry standard file format. See the Video File Types Appendix for more information.
LIGHTING
Lighting can be used to add drama or general appeal to any scene. As discussed earlier, it is important to recognize the variables that come with natural lighting. For indoor scenes, artificial lighting might be needed to supplement ambient illumination levels. However, your camera flash produces a relatively harsh light, so consider obtaining a few portable lights. You can either opt to mount these lights on floor stands or an overhead beam.
TYPES OF LIGHTING
When selecting light fixtures, consider your illumination goals, either to supplement light levels or to add focus and drama. If the aim is to boost overall light levels, it will be important to avoid washing out the scene with harsh light. Generally speaking, the broader the light source, the softer its glow. In diffuse light, rays are traveling in multiple directions, producing a more even glow overall. To achieve this effect, place a relatively inexpensive softbox over the light fixture. Specular lights, also known as spotlights, can add focus to the subject by providing a more intense light. These lights produce a tight beam with hard shadows. The lamps, or light bulbs you use can impact the look of the scene as well.
LAMP TYPES
| Incandescent | Fluorescent | |
| Pros | Inexpensive up front, dimmable, good color | Efficient, long life, good color |
| Cons | Short life, inefficient, produces heat | Expensive up front |
| LED | Halogen | |
| Pros | Long life, efficient, dimmable, small | Efficient, warm light |
| Cons | Somewhat limited colors, expensive up front | Expensive up front |

Figure 9.13
Overhead lights and those on stands can be used to light a scene
COLOR TEMPERATURE
Another thing to keep in mind is that very few lights produce pure white light. Instead, most have either a bluish or yellow tint. These shifts in tint are due to light’s wavelength, known as color temperature, which is measured in degrees Kelvin. The higher the Kelvin number, the bluer the light.
LEDs are growing in popularity due to their small size and energy efficiency. At first, they were avoided for photography, but they now come in both warm (3,000K) and cool types (6,000K), though photographers still use other types of light sources as well.

Figure 9.14
Color temperature
DIRECTION OF LIGHT
The direction at which light strikes a subject can affect how it appears on-screen. As a rule of thumb, lights that shine directly on a subject will cast very short shadows, while lights that graze the subject from the side will produce long directional shadows. A key light is the primary light of the scene, while the fill lights add illumination to dark areas.
Single Fixture Lighting Schemes.
Singular lighting schemes use only one light fixture. While these schemes can create drama, they can be problematic since they cause harsh shadows.
SINGULAR LIGHTING SCHEMES
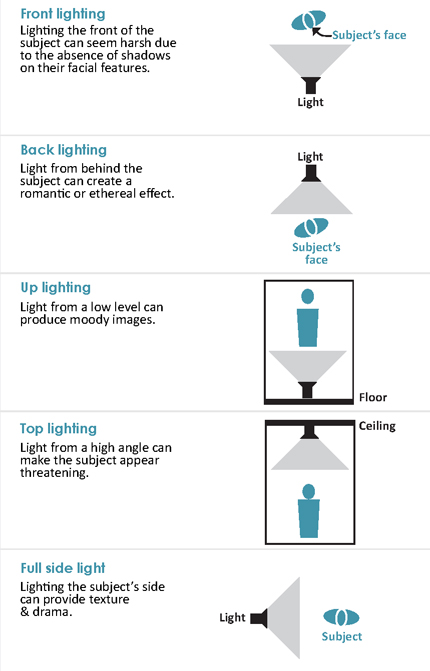
Figure 9.15
Single light lighting schemes
3-point Lighting Scheme
Most scenes are rarely lit with only one source of light. To balance brightness while minimizing undesirable shadows, most are lit using a three-point lighting system in which lights are placed in three locations.
The key light shines directly on the subject and is often the brightest light. The fill light also shines on the subject, but from a different (often lower) position. Its role is to balance lighting and eliminate harsh shadows. Finally, the back light shines on the subject from behind. Its role is to minimize shadows on a backdrop.
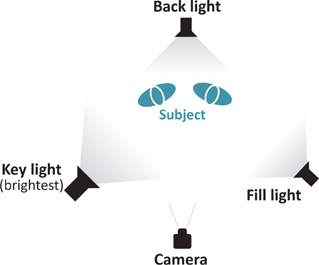
Figure 9.16
A 3-Point lighting scheme can be used to eliminate harsh shadows
EXERCISE 9.1 LIVE-ACTION FILM PLANNING
Thorough planning is critical in video production.
Determine locations for filming (i.e., school, work, home, local businesses, etc.).
Consider any potential issues which may impact filming in these locations.
Consider how you may need to modify these sites to accommodate sound & lighting.
Refer to pages 178-179, and develop a list of necessary items for filming, such as camera and mounts, lighting, mics, etc.
List any camera angles that you would like to use.
Determine which lighting scheme you plan to use for each scene.
SOUND
Poor sound quality can actually alienate viewers faster than a poor picture.4 That being the case, a camera’s built-in mic will rarely suffice. The key is to record desirable sound as close to the source as possible, while eliminating – or at least mitigating – undesirable sounds.
DESIRABLE SOUNDS
In recording high-quality sound – location matters. Aim to record in dead rooms, which are often small, carpeted, and contain furniture or irregularly shaped walls. These soft surfaces work together to absorb, rather than reflect sounds. Dead rooms are especially useful when recording voice-over sessions when someone is heard but not seen. Conversely, live rooms are large and have primarily hard surfaces and reflective finishes, such as stone and concrete. There may be times when recording sound in live spaces is unavoidable. For instance, the backdrop may be important to add context, and the person may need to be visible when speaking. In these scenarios, there are a few strategies that can help minimize potential issues. First, use a directional mic for recording (see Mic Types below), and position the mic as close to the person speaking as possible, without corrupting the shot. However, when placing mics, be mindful of noises that might occur close to the mic itself, such as clothes rustling when the person is moving, or air movement while they are breathing. Finally, to eliminate hollow sounding voices and echoes install sound blankets on vertical surfaces. These will help deaden a live room by dampening the sound. This can be as simple as tacking up moving blankets to any walls that will be out of the frame. Together, these strategies can help you capture the audio you need, in the location you choose.
UNDESIRABLE SOUNDS
Undesirable sounds are a constant threat when filming. Surrounding noises such as the wind, equipment feedback, coughs, and even the buzz of lights can be audible. To reduce these variables, use a directional mic to target the sound’s source. And since every room has some level of sound, aim to record the room while it’s seemingly silent. This recording is known as room tone, and these clips can be used to fill gaps between speaking segments.
MICS
To avoid compromising camera angles for sound quality, several mic systems can help to position the mic close to the sound source, while remaining off the screen.
MIC TYPES
Wireless mics use radio waves to transmit sound from a discreetly placed transmitter (on or near the speaker) to the receiver. While wireless mics allow for freedom of movement, they can be unreliable due to feedback issues or poor signal strength.
Directional mics are often placed on a boom, which allows someone to hold the mic just over the speaker (and out of the shot).
Lavalier mics are small enough to clip to the speaker’s lapel. While most lavaliers are omni-directional, meaning they pick up sounds from all directions, they are often placed so close to the sound source that ambient noises are rarely recorded.
PRODUCTION OF MOTION GRAPHICS
On their own, graphics can be quite informative, but they become even more potent when paired with the element of motion. The power of motion graphics lies in leveraging the element of change to direct viewers’ attention.
To design motion graphics, start by developing a package of graphics. Each individual graphic should relate to all others through shared color palettes, line weights, and positioning. Creating your own artwork will give you the most freedom (See Chapters 6 & 7). However, if you can’t do so, select work that you have obtained written permission to use, or have acquired from a royalty-free website. Designers should never infringe upon the intellectual property of designers – ever, period.
After creating the artwork, components are separated onto layers – one layer for each item that will change. These layers can appear in the foreground, mid ground, and background of the composition and each can undergo changes to either scale, position, or opacity. With so many “moving parts,” it can be easy to overwhelm viewers, so it is critical to develop cohesive patterns and pacing. The goal is to avoid the appearance of discontinuous elements that bear little relation to the overall video. With this in mind, avoid limiting the video to a series of short sequences flanked by hard transitions, which can start to feel like a string of presentation slides. Instead, consider having prominent elements carry over from one sequence to the next, which, in turn, will also help viewers process the most important pieces of information.

Figure 9.17
In this simple “countdown” motion graphic, the progression of time is suggested by the numbers themselves in addition to the spinning “hand” and growing circles
EXERCISE 9.2 MOTION GRAPHIC PLANNING
Thorough planning is also critical in motion graphics.
Use your storyboard to sketch ideas for artwork.
Consider what elements will be consistent throughout your graphics.
Determine how you can use the element of change to direct viewer attention.
Determine what elements carry from one sequence to the next.
AUDIENCE FACTORS IN MOTION GRAPHICS
To avoid overwhelming (or underwhelming) your audience consider:
Information Quantity
The nature of motion graphics makes comprehensive treatment of information difficult. In other words, too much information can quickly bore an audience or scare them off. The best use of motion graphics in design storytelling is either as a “primer,” highlighting specific aspects of information, or as a “teaser” aimed to pique interest. In either approach, consider how to help your audience construct an accurate mental map of the given information. Incorporate factors of visual hierarchy so that the most important elements are most prominent on screen (Chapter 6).
Change
Our eyes our are biologically predisposed to notice a change; this is how we stay safe. But when viewing too many changes, our eyes become overwhelmed. With this in mind, apply changes only to where the viewer should be looking and when. These changes do not have to be complicated to be effective. Simply altering the scale of an item can attract the eye.
Timing
The best motion graphics balance comprehension with visual appeal. A video that moves too slowly is considered boring; too fast, and viewers won’t comprehend the message. That said, novice producers of motion graphics tend to rush the timing, since they already know the content and can anticipate where to look and when. A good rule of thumb is that information should be on screen for about twice as long as needed for the producer to read it. Finally, refrain from including long lines of text, since viewers would be pressed to read them.
KEYFRAMING & INBETWEENING
Keyframing is the most common method for adding motion. A keyframe marks a starting point and ending point of a change. The time that elapses between keyframes (when the change occurs) is referred to as inbetweening.5 Keyframes can be used to change a layer’s scale, position, transparency, and rotation. Movement can either be linear (i.e., a straight line from one position to the next) or curved, which allows easing in and easing out, such as picking up speed or slowing down. Many compositing programs also have a series of effects which can be applied to layers.
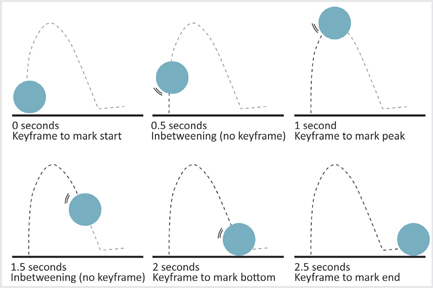
Figure 9.18
Key framing is a process of marking starting and ending points
SOFTWARE
To maintain image quality, it is best to use vector-based programs for creating motion graphic artwork. These graphics can then be linked or imported into a compositing program.
Compositing Software
| After Effects | Autodesk Flame/Smoke |
| Apple Motion | Foundry Nuke |
POST-PRODUCTION
Post-production begins after all footage has been recorded and assets developed. During this stage, editors use the storyboard as a guide to arrange footage and refine the story.
POST-PRODUCTION TASKS
Tasks in this stage include:
Viewing & Organizing Clips
Determining which assets to include
Editing Video and Audio
Establishing structure, sequence, and cuts
Screening the Video
Playing the video with the goal of receiving feedback
Exporting & Disseminating
Finalizing the video and sharing it with the intended audience
A NOTE ABOUT POST-PRODUCTION & EDITING
Early film editors used to physically cut and splice footage in darkened rooms. Famed editor Walter Murch asserted that from this apparent violence emerged the “soul of the work.”6 He suggested that editing was not an act of simply “putting together” a film, but discovering its path.7
In addition to ordering footage, editors must determine the structure, dynamics, timing, and transitions of the story, this involves many decisions, and the process itself requires sharp focus. Good editors can put themselves in the place of their audience, understanding how viewers will perceive everything from the overarching story down to the smallest of details. In other words, good editing manipulates our attention and emotions, so that we feel as though we are participants in the unfolding story. At the same time, editors must practice great restraint. As Murch put it “doing the most with the least,” meaning an editor does only what is necessary to engage the audience.8
When telling a design story, it’s easy to become consumed with editing – spending hours, days, or even weeks refining the story. The results can be stunning, but the process itself unsustainable. To help alleviate your workload, the following pages outline steps for editing design story videos.
EDITING STEPS
Today, many editors use NLEs or non-linear software programs to edit footage. These programs allow them to view and rearrange clips on a timeline without destructing the original clips. The technical aspects of editing can seem daunting, especially since there are many decisions to be made and often no “right” answers exist. But, following a process can make the tasks more manageable and the outcomes more sophisticated.

Figure 9.19
Editing tasks
1. Review all footage, noting desirable and undesirable clips Review all of your footage twice, (one for first impressions and a second time with a more critical eye). If you find that you’re missing necessary components, you’ll need to either reshoot or buy footage. Stock clips can be purchased from a company or artist on websites such as Adobe Stock or Getty Images. If you plan to use stock clips, ensure that these are royalty-free, meaning you aren’t required pay royalties to the originating artist; instead you pay the fees in advance. In other words, royalty-free doesn’t mean free to download. However, designers should never violate the copyright or intellectual property of another designer or artist, even when faced with a small budget.
Walter Murch suggested editors select a representative set, which entails finding the clips that best capture the tone of your story. Your set can be used as a guide for editing to help ensure you’re crafting a cohesive story.
2. Organize footage
Sort desirable clips, or intakes, into named folders. Footage that won’t be used which (referred to as outtakes) should be archived. Keep these clips organized and accessible. Time spent upfront organizing footage can save time later on because many NLEs link rather than import files. If you move (or even rename) a linked clip on your computer, the program can no longer access it.
DIGITAL EDITING SOFTWARE
NLEs or non-linear editing software programs range from consumer-friendly packages such as iMovie and tablet apps to robust professional programs such as Final Cut Pro and Adobe Premiere Pro. Professional versions add sophistication with settings that allow more nuanced manipulation of sound, color, and transitions. Online sites can help you learn how to use these programs; just consider your knowledge against your deadlines. And before purchasing any software, confirm its compatibility with your computer’s operating system.
DIGITAL EDITING HARDWARE
It’s best to use a powerful computer for video editing. While cloud-based computing is becoming more common, at the time of this writing, it is not the norm in video editing. A high-quality graphics card will allow for faster playback and video rendering. This is especially important when working with HD footage.
3. Prepare settings for NLE program
Sequence is the term many programs use to refer to a set of clips that are arranged on a timeline. You can have multiple sequences in a file. Each sequence has settings that define size, aspect ratio, and frame rate. It’s best to match the settings of your main footage. Avoid enlarging clips since this reduces picture quality.
4. Import footage takes into NLE
While it may be tempting to import all clips into the software (regardless of whether or not they will be used), this will be cumbersome and could even corrupt the project file. Import only what you plan to use.
5. Mark ins and outs
Play each clip (this is also referred to as scrubbing) in the program’s source monitor. While scrubbing, define which portion of the footage will be included in the sequence by marking an “in point,” where the clip will begin, and an “out point” where it will end.
6. Add footage to the timeline
Add the clip to a layer on the timeline. The relationship from one clip to the next can be marked by either abrupt transitions, known as cuts, or with soft transitions, such as in dissolves and fades. Using multiple layers on the timeline allows for the overlapping of footage, which will give you more transition options later on in editing. If footage overlaps, the footage on the highest layer is what is typically seen by viewers.
A common editing practice is continuity editing, which aims to make space and time appear continuous from one scene to the next. Any break in continuity is considered discontinuity. Intentional discontinuity can suggest contrast or growing tension. For instance, jump cuts purposefully introduce stark discontinuity between shots, (e.g., someone walking followed by a shot of them sitting), while intercutting is cutting between two or more events that are occurring at the same time, which can be used to develop two plot lines or ideas at once.
Unintentional discontinuity, on the other hand, can seem unprofessional and can even be jarring to audiences. To disguise unintended discontinuity, editors use subtle cuts to conceal changes between the clips.
The pacing of the cuts themselves can move the story. Action sequences may have up to 20 cuts per minute, but dialogue scenes may only have six.9
Murch’s Rule of Six.10
Make a cut when it:
1. Would support the emotion of the audience.
2. Would advance the story.
3. Is at an interesting moment.
4. Encourages attention on the right aspects of the story.
5. Respects two-dimensional continuity (i.e., does not change the height or position of the subject).
6. Respects three-dimensional continuity (i.e., maintains the location of subjects in space (X, Y, Z coordinates)
Murch asserted that the first three rules are more important than the latter, positing that if the first three are satisfied, the audience would be largely unaware of issues in the last three.
7. Develop rough cut
A rough cut is the first assembled version of the video. All footage is present and in order, yet subtle refinements such as transitions and titles are not yet complete. Rough cuts are a great tool for getting formative feedback because they allow others to review the overall story and pacing, but you haven’t yet invested much time in making fine edits. Ergo, making changes won’t be too painful.
8. Edit audio
Most videos are comprised of a combination of voice-over narration, voiced clips (sometimes known as talking heads), and musical scores. Even if these are high-quality audio files, they may still require some editing. For one, you may need to adjust sound levels. In NLE software, you can change an entire clip’s audio or just a portion of it with using keyframes. Also, aim for a consistent sound level across clips. Once an appropriate level is determined, adjust all other clips to be at a similar level. Keep in mind though that it’s difficult (if not impossible) to increase the volume of a relatively quiet clip. Not only are you raising the volume of the clip’s dialogue, but you are inadvertently increasing the level of white noise as well. Hence, you end up with a staticky sounding clip. In addition to volume adjustments, you may need to fade in or fade out tracks with gains and crossfades.
Scoring your video is often critical to conveying your desired tone. Well-selected scores are well-paced, following a rhythm similar to the video’s footage. The score should also work alongside the other audio components rather than overwhelming them, so make sure that there is enough contrast between background music and dialogue. Music can be purchased from online repositories, and these too should be cleared for copyright and royalty issues.
9. Add titles
There are several types of titles which may be incorporated into your video. Supers are superimposed over an image. It’s best only to superimpose titles over footage with little movement; this can help eliminate contrast issues between the text and the background footage, as well as reduce the potential to conceal footage inadvertently.
Head credits are at the beginning of the video; a credit roll is at the end. Horizontally moving text (often seen at the bottom of cable newscasts) is considered crawling, while vertically moving text is considered scrolling. Lower thirds are often used to show a person’s name and title at the bottom of the screen. If you plan on using lower thirds, it is a good idea to plan for this during filming by allowing for some extra space at the bottom of the screen.
Timing is critical. Slow moving titles are dull. At the same time, viewers can get frustrated if they cannot finish reading the text before it disappears. When setting the timing for titles, remember that viewers are often reading the text for the first time, and it may need to run a little slower than you’d initially expect. To improve comprehension, limit text to short lines, and consider making use of progressive disclosure so that viewers have access to what they need, just when they need it. Finally, aim to avoid small and hard-to-read fonts. Together, these strategies will help ensure your viewers comprehend on-screen titles.
10. Develop a Fine Cut
The fine cut is the refined version of the video. This iteration includes titles and all transitions between clips. When determining how to transition between clips, common options include:
TYPES OF TRANSITIONS
A straight cut is a simple transition from one clip to another.
A fade can punctuate a scene by gradually turning into a solid color.
A dissolve serves as a bridge between ideas since one clip dissolves into the other.
There are many types of transitions available. Some feature 3D motion or jarring movements such as wipes, and iris rounds. Keep in mind though that these can distract viewers from the story at hand. Consider refraining from complicated transitions and aim to use only two to three transition types.
11. Screening
Many film directors find it invaluable to have their films screened to small audiences before releasing them. Some choose to do this early in the process, while others prefer to wait until all technical issues are resolved. At whatever point you opt to screen your video, during the screening itself, avoid focusing on the video (chances are you have seen it many times anyway). Instead, watch the reaction of the audience, which can be quite telling. Look to see if they chuckle or tear up when you’d expect and try to catch their facial expressions at critical points.
Be prepared to receive feedback or notes. Given a myriad of opinions (some of which may be unclear or conflicting), some feedback may seem harsh. If needed, have someone calibrate comments to filter for only the useful information. Following a poorly received opening for her musical Movin Out, Twyla Tharp had her son read newspaper reviews and share only those that provided actionable feedback.11 Remember that everyone receives negative feedback from time to time, but strive to act upon any trends in the comments. Over time, and with experience, skilled designers can distinguish critiques of work from personal condemnation. Also, consider your own emotional reaction to sharing your work; if you have strong misgivings about screening the video, chances are it’s not yet ready.
12. Exporting & Disseminating
Exporting videos was once a complicated process. Today, however, many editing programs have presets designed for specific uses and you can select which website or device you intend to use. Depending on your video’s length and target audience, you may choose to disseminate it in multiple ways.
Currently, a popular method is to post videos on online repositories (such as YouTube or Vimeo). These sites allow for videos to be deemed either public or private. Public videos are discoverable by anyone using the site (and on external search engines), whereas a video flagged as private can be accessed only via a unique link. Social media sites are also providing platforms for circulating videos by sharing links or posting clips. You can also opt to share a video during a meeting or even ship physical copies for distribution. The key is to consider how your audience might best approach and access your message.
LESSONS FROM AN EXPERT EDITOR
Famed film editor, Walter Murch observed that good editors should:12
Always be aware of both the micro and macro story. To paraphrase an old adage, while a bricklayer is aware of the importance of each brick, they should not lose sight of the resulting cathedral. So too, an editor should examine details, looking for consistency and quality, but never at the expense of the overall vision for the story.
Feel freed from the creation. A difficult shot may have been a triumph over adversity, and even beautiful in its own right. However, if it does not support the message or trigger the desired emotions from the audience, it shouldn’t “make the cut” into the final video.
Remain aware and look for possibilities. When editing, there may be unforeseen potential in the footage, which may deviate from your storyboard, but it is important to acknowledge these opportunities. However, use restraint when editing and remember your goals for the audience.

Annette Tully is a marketing consultant & video producer. Annette bridges strategy, creative, and process to produce stories her clients can be proud of, inside their organizations and around the world.
STORYTELLING IN PRACTICE
How do you use video to share a unique point of view?
While working for an architecture and design firm, a design team brought me on board to help them respond to an RFP. They were going after design work to renovate key areas of a football stadium that fans use. So seeing and experiencing these areas from a fan’s point of view was critical for us, in addition to hearing what they have to say about those areas and their beloved team. So, with the client’s full support, we were given full access to the stadium during the last home game of the season. With one amazing camera person by my side, we spent the entire day talking to fans and filming their activities. These fans are a bit…infamous, with the media choosing to focus more on their fighting spirit. From tailgating to entering the stadium, to experiencing the clubhouse, to being on the actual field itself, we captured the fans’ passion, their feelings of community, and the love of their team and the sport. It was amazing. Because we were a team of two (I was writer/director/producer and he was camera/sound/editor), we were able to turn around our 3-minute piece quickly so the design team could use it in the interview for the project. The design team was incredibly talented in their own right and did an amazing job on the proposal and at the interview. But sharing the video in the interview to literally SHOW the client how well our team understood their fans and what they crave in a stadium and sports experience, well, that sealed the deal. The design team won the work!
AUTHOR’S NOTES Time for a Gut Check
Is video the best way to share your story?
Before deciding whether or not to create a video for your design story, you should reflect on the pros and cons of what can be a surprisingly time-consuming endeavor. Both my experience in teaching a class firmly entrenched in video, as well as my research on viewer perceptions of design-orientated videos, has revealed the following:
Pros
Videos hold several storytelling advantages over other media.
For one, the multi-sensory experiences made possible by videos give them an uncanny ability to transport audiences and sway their emotions; this can be an especially potent force when pathos appeals most affect your audience.
Videos provide the ability to connect with others across time and space.
Online videos are viewable from anywhere at any time.
Video can provide a unique platform to highlight sought-after qualities.
When presenting yourself as a candidate for a job or project, evidence suggests reviewers look for soft skills such as character, trustworthiness, grit, and the ability to work well with others. Since these qualities can be difficult to showcase in traditional application materials, video can provide a unique platform to communicate desirable traits.
Cons
Many unintended messages can be sent via video.
Subliminal messages can stem from a video’s subtext, such as its settings, context, props, lighting, and sound, to the gestures, voices, and mannerisms of on-screen talent. Or viewers may judge a message by the quality of the video itself. These signals can be difficult to predict, though they may elicit visceral reactions and sometimes snap judgments. This means that designers working in video media have more decisions to make and their decisions can have unintended consequences that may remain unknown since feedback opportunities are rare.
Audiences have short attention spans.
Chances are you won’t be dealing with a captive audience – which is good for them, but bad for you; this means you’ll need to consider how to gain and maintain their attention.
Video production can be a great deal of work.
Videos look easy, but great videos – the kind the prompt the audience change you are seeking – are difficult to make. This chapter only provides an overview of the many factors and decisions that go into making a persuasive video. Moreover, if you are going to be on-screen, this takes a bit of tenacity, since you’ll likely be hearing and seeing yourself many times when editing. However, your grit may pay off if you can connect with your audience.
EXERCISE 9.3 EVALUATING PRECEDENT VIDEOS IN DESIGN
Design-orientated videos are becoming more commonplace. Today, many designers and firms have their own YouTube or Vimeo channels and post videos on their websites and social media. Watching these videos may help you understand the potential of video for sharing your design stories.
Locate 8–10 online videos produced by professionals in from your design field.
Determine which aspects are successful and unsuccessful, such as pacing, audio, or story structure. List any themes from your evaluation.
Share 2–3 of these videos with others without sharing your assessments. Do they evaluate the videos in the same way?
Retain links to any videos that received favorable evaluations and refer to them when making your own video.
SUMMARY
Video can be an especially powerful means of telling a design story. Their vividness and multi-sensory appeal can be captivating. Moreover, online videos can help designers reach audiences across the world and at any time of day. And evidence suggests that videos are increasingly utilized in design. However, they are often more work than is realized. To create a persuasive video, the designer will need to have a clear idea of who their target audiences is, and how to best reach them; this requires many decisions and technical strategies. However, if mastered, the outcomes can prove invaluable.
The tasks involved in video production can be categorized into three stages: pre-production, production, and post-production.
Pre-Production
Thoughtful planning during pre-production can save time and expense later on. The most important decisions occur early in the process. First, consider the video’s logline, or central message — all subsequent decisions will support the logline. Then determine the intended tone, or overall feel for the video. The tone should align the audience to the message. Next, decide if live-action footage or motion graphics will best suit the desired tone. Live action can be more authentic, but you’ll have more control over the aesthetics in motion graphics. The video’s structure can be either linear or non-linear. Linear is more familiar to viewers, though a non-linear structure adds the element of choice by letting viewers decide how they will navigate through the story. Regardless of your method, it will often take multiple iterations to develop a script that is both conversational and well-paced. If shooting a live-action video, there are many considerations when scouting your locations, such as permissions, lighting, consistency, and tactics to help maximize the video’s lifespan. Be sure to determine camera angles as well as strategies for lighting and audio recording prior to filming; this will help to ensure you have packed the right equipment on filming day.
Production
Production involves filming or generating assets. You’ll also want to record any necessary voice-overs, obtain music, and secure any other necessary materials. If you are creating motion graphics, consider how to help viewers create an accurate mental map of the information by leveraging tactics of visual hierarchy, change, and timing.
Post-Production
While editing can be a great deal of work, think of it as where the story comes to life since you’re deciding on the video’s final structure, dynamics, timing, and transitions. Finally, don’t be afraid to ask for feedback since it can significantly improve the quality of your design story.
TERMS
| ad-libbing | clips | dolly |
| assets | compression | frame |
| b-roll | continuity editing | framerate |
| boom | crawling | golden hour |
| cinevate slider | credit roll | head credits |
| clip | crossfade | inbetweening |
| cut(s) | intercutting | |
| directional mic | jib arm | |
| discontinuity | jump cuts |
APPLICATION 9.0
To create a video for your design story, consider the following:
1 Determine your video’s logline. Remember to think back to your themes from Chapter 3. Then place your protagonist within the theme by stating their goals, the conflict at hand, as well as the stakes of the issue. Keep the logline brief but powerful.
2 Determine the video’s tone, keeping in mind that the tone should align your audience, your values, and to your message.
3 Based on your desired tone, determine if live action or motion graphics would be more appropriate.
4 Determine if your story is best suited for a linear or non-linear story. Based on your decision, craft a video storyboard, noting what the viewer will be seeing and hearing at each critical juncture.
5 Write your script. Bear in mind, that it should be conversational and paced to align with your intended visuals. Be sure to get feedback from others and, if you’ll have others speaking on-screen, do a table read.
6 If you’re filming live-action shots, determine the best filming locations. Be sure to visit these sites at the same time of day that you will be filming, and take your camera. While there, shoot some footage to uncover any potential issues. Also, determine appropriate camera locations and angles. Note any equipment you’ll need for filming day (including props and equipment).
If you’re creating motion graphics, generate your artwork using the tactics of visual hierarchy, change, and timing. Use keyframing in a compositing program to add motion.
7 If you plan to score your video, be sure to find an audio file prior to editing. If your video will go on the web, you must seek the appropriate permissions to use it. When in doubt, use royalty-free files.
8 After you have obtained your footage, use the Editing Steps to edit your video.
9 Be sure to screen your video, acknowledging that not all of comments will be positive. However, strive to address any trends in the critiques so that you can improve the video.
| key framing | notes | table read |
| lavalier mic | pre-production | talent |
| linear sequence | production | timeline |
| live-action | post-production | tone |
| logline | rough cut | voiceover |
| lower thirds | score | |
| motion graphics | scrolling | |
| NLEs | scrubbing | |
| non-linear sequence | supers |