
THE INTERFACE
I fell in love with Final Cut Pro the first time I saw it and knew that it was going to be an app. that changed the world.
GARY ADCOCK
CHICAGO FINAL CUT PRO USER GROUP
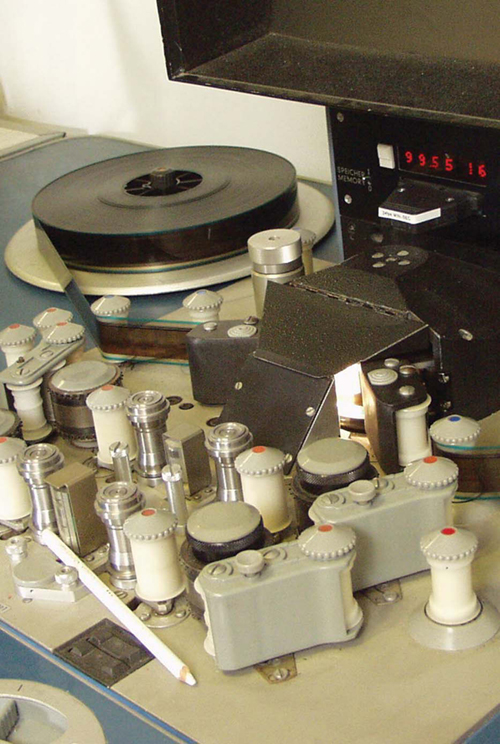
As much of the post-production industry moved from film to video production a new way of working came into being. Moviolas and flat-beds had competition to deal with as a new kid appeared on the block. The kid was called the two-machine video editing suite.
In this environment the editor would line up a shot on a source machine and edit across to a record machine. ‘In’ and ‘out’ points were marked, tapes pre-rolled, then run up to speed and images in the form of electronic signals were copied from one machine to the other.
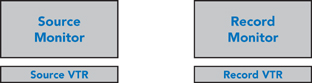
The Final Cut Pro interface is modelled on the same idea.
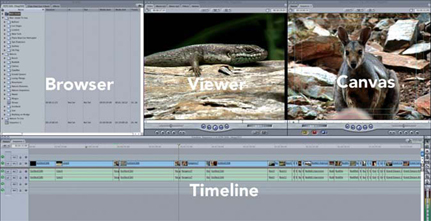
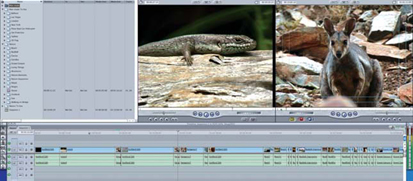
The Interface is Made up of Four Main Windows
Notice the two windows located at the top right of the Final Cut Pro interface. Think of the window on the left, the Viewer, as being the source monitor and the window on the right, the Canvas, as being the record monitor. In essence, a shot is lined up in the Viewer and copied across to the Canvas. The area immediately below the Viewer and Canvas is known as the Timeline. This shows the edited shots as blocks in the order in which they have been edited. The left window above the Timeline is called the Browser. Think of this as being like a cabinet which stores the masses of footage ready for the editor to access.
Also, take note of the Audio Meters and Tool Palette.
All professional VTRs have meters which must be watched to make sure the audio doesn’t distort during the transfer and playback of sound and picture. The golden rule is always to make sure the audio meters do not peak into the red (DV audio should peak at −12 dB).
To swing the analogy back to the film days the Tool Palette represents the tools the editor would physically work with: the splicer, the hand-winders, the spools and frame measuring instruments. The Tool Palette in Final Cut Pro gives the editor access to the instruments with which the finer details of the editing process are crafted. It should be clear by now that Final Cut Pro draws on the very best the world of post-production has offered in the history of film and video production.
If you find the terms Browser, Viewer, Canvas, and Timeline difficult to identify with, just think of the Browser as the place where all clips are stored, the Viewer is where one watches the individual video clips, the Canvas is where the material is edited and the Timeline is the place where the individual shots which make up the entire movie are arranged.
Arranging the Interface
The Final Cut Pro interface can be set up in several different ways. Individual users can work according to their own particular preference. Several different arrangements can be chosen from within Final Cut Pro or the editor can create their own custom layouts.
![]() Go to the Window menu (located top right) and scroll down to Arrange. You will notice there is a list of options for arranging the interface.
Go to the Window menu (located top right) and scroll down to Arrange. You will notice there is a list of options for arranging the interface.
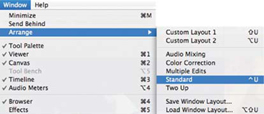
![]() Scroll to any of these options and release your mouse button. Each time you wish to try a different layout you need to return to the Window menu, scroll to Arrange and then move across to the layout you wish to select.
Scroll to any of these options and release your mouse button. Each time you wish to try a different layout you need to return to the Window menu, scroll to Arrange and then move across to the layout you wish to select.
My preference is to use the Standard setting, however, I do modify this setup slightly.
I position the Toolbar to the left, the Timeline in the center and the Audio Meters to the right. This produces a neat, symmetrical display.
To achieve this setup is simple:
![]() Drag the Toolbar by clicking in the gray area at the top and position it on the opposite side of the screen beneath the Browser and next to the Timeline.
Drag the Toolbar by clicking in the gray area at the top and position it on the opposite side of the screen beneath the Browser and next to the Timeline.
![]() Slide the Timeline to the right so that it is positioned directly between the Toolbar and the Audio Meters.
Slide the Timeline to the right so that it is positioned directly between the Toolbar and the Audio Meters.
![]() If necessary resize the Timeline window by dragging the bottom right corner so there is no overlap onto either the Toolbar or Audio Meters.
If necessary resize the Timeline window by dragging the bottom right corner so there is no overlap onto either the Toolbar or Audio Meters.
Once you have set the layout according to your personal preference it is then possible to save the setup as a Custom Layout.
Learning a Custom Layout
To set a Custom Layout, so that it can be recalled at any time, is easy to achieve. Press the key/mouse combination in the following order:
![]() Hold down the Alt/Option key (located to the left of the Space Bar).
Hold down the Alt/Option key (located to the left of the Space Bar).
![]() While still holding down the Alt/Option key, select the Window menu at the top of the screen.
While still holding down the Alt/Option key, select the Window menu at the top of the screen.

![]() Scroll to Arrange. Where it normally displays Custom Layout 1 it will now read Set Custom Layout 1. Point your cursor to this setting and release the mouse button. Your Custom Layout will now be set.
Scroll to Arrange. Where it normally displays Custom Layout 1 it will now read Set Custom Layout 1. Point your cursor to this setting and release the mouse button. Your Custom Layout will now be set.

You can confirm this has been achieved by selecting any of the other layouts. Now go back to the Window menu, scroll to Arrange and select Custom Layout 1. Your screen should revert back to the Custom Layout you have just set. If it does not, backtrack using the instructions above and try again. Once your Custom Layout has been set it will be remembered each time you open up Final Cut Pro and you can then choose your Custom Layout, or any of the setups which are listed under the Arrange options.
It is possible to set up to two Custom Layouts, for easy access, or to save to hard drive an infinite amount of setups. This can be convenient when there is more than one editor who uses the same system or if you find different layouts suitable for different aspects of working within the program.
To save a Window Layout you need to:
![]() Set up the layout according to your needs on-screen.
Set up the layout according to your needs on-screen.
![]() Select the Window menu.
Select the Window menu.
![]() Scroll to Arrange.
Scroll to Arrange.
![]() Choose Save Window Layout.
Choose Save Window Layout.
![]() To recall a Window Layout choose Load Window Layout.
To recall a Window Layout choose Load Window Layout.
![]() Navigate to the setup of your choice.
Navigate to the setup of your choice.
![]() Click Choose.
Click Choose.
Important Details about the Interface
It is worth having a good understanding of the interface of Final Cut Pro. This gives you the power to use Final Cut Pro to its full potential and to achieve a variety of editing tasks in many different ways.
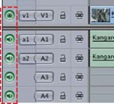
Look to the extreme left of the Timeline — notice there are green radio buttons next to each of the tracks. These are monitoring buttons for video and audio. If you press the green button on any of the tracks you are effectively switching it off — this will deactivate the monitoring for that particular track and gives you the ability to mute the audio, or kill the video, at the flick of a switch.

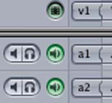
At the base of the Timeline is a little speaker icon. Click this and you will see a selection of controls open in the Timeline next to the green monitoring buttons. These controls give you the means to quickly isolate an audio track for monitoring purposes. The speaker icon does the same as the green radio buttons, whereas by clicking the headphone indicator this will switch off all tracks except that which you have just selected. This can be more efficient than isolating each of the tracks individually.
At the bottom left of the Timeline there is a symbol that looks like two mountains — this is called Clip Overlays. Later, as you get into the editing and sound mixing process, you will find this facility extremely useful for adjusting audio levels and setting the opacity of video clips.
To the right of Clip Overlays are four little boxes. These boxes affect the size of the clips as they are displayed in the Timeline. This is useful for increasing the visual size of the clips if you are working with a monitor which is cramped for screen real estate.
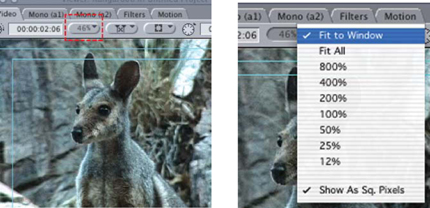
The following point is very important to take note of: look to the top of the Viewer and Canvas, just below the tabbed sections. You will notice there is a button with a percentage value in it. Click this button and it will reveal a series of numeric values — always keep this set to Fit To Window and have Show As Square Pixels checked at the bottom. If you do not select Fit To Window you may encounter jerky playback and experience a great deal of frustration working out the solution. This applies to both the Viewer and the Canvas.
Considering that we have not even begun the editing process, the relevance of these details may seem a bit obscure at this stage. Rest assured it will make sense as you become familiar with the inner workings of Final Cut Pro.
Button Bars
To speed up your workflow it is possible to add buttons to the top of the main windows of the interface. This enables you to quickly access functions which are often used.
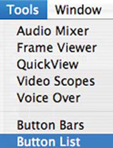
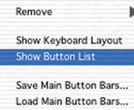
![]() Select the Tools menu and scroll to Button List. A list of assignable functions will appear.
Select the Tools menu and scroll to Button List. A list of assignable functions will appear.
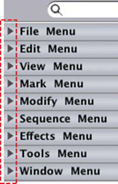
![]() Click any of the arrows to the left of each of the headings to reveal a list of the mappable functions.
Click any of the arrows to the left of each of the headings to reveal a list of the mappable functions.
![]() Choose a function you wish to move to a button bar.
Choose a function you wish to move to a button bar.
![]() Drag the item from the Button List to the bar at the top of one of the windows of the interface. The button will then slot into place.
Drag the item from the Button List to the bar at the top of one of the windows of the interface. The button will then slot into place.
![]() Press the button to perform the function assigned to it.
Press the button to perform the function assigned to it.

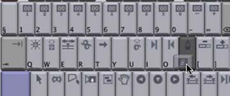
Customizing the Keyboard Layout
For editors migrating from other editing systems, this feature can make the learning curve with Final Cut Pro a much smoother transition. Every single button on the keyboard can be remapped to perform specific functions.
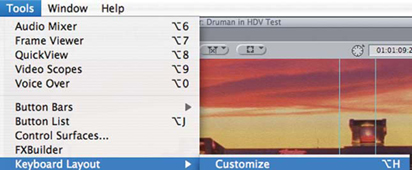
![]() Select the Tools menu and scroll to Keyboard Layout.
Select the Tools menu and scroll to Keyboard Layout.
![]() Move right and choose Customize.
Move right and choose Customize.
![]() Click on the lock to unlock the keyboard.
Click on the lock to unlock the keyboard.

Click any of the arrows next to the menu list to reveal a list of assignable functions.
![]() Choose a function and drag it to a key of your choice.
Choose a function and drag it to a key of your choice.
![]() Close the keyboard layout by clicking top left. The changes will then saved.
Close the keyboard layout by clicking top left. The changes will then saved.
If you happen to change the settings and wish to revert back to the defaults then press Reset.
Note: Both settings, the button bars and the ability to customize the keyboard layout can also be accessed by Control clicking in the gray area next to each of the bars at the top of the windows.
Saving Projects and Accessing the Autosawe Vault
OS X is regarded as being extremely stable and reliable. However, just like any computer, there are times when an application may freeze or crash. This doesn’t happen often with Final Cut Pro (in fact I regularly edit for days and weeks without the slightest hitch), however, in the event of something going wrong you need to be able retrieve the most up-to-date version of your project.
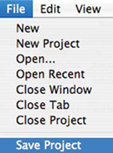
The saying ‘save early, save often’ is a motto to live by. As soon as you begin work on a project save it. Get in the habit of regularly pressing Apple + S or selecting Save Project from the File menu.

Beyond this it is advisable to switch on the Autosave Vault option found under User Preferences (accessed under the Final Cut Pro menu). This will automatically save a copy of your project at the intervals you specify. I set this to save every 5 minutes and to keep 100 copies of my project. My philosophy is one can’t be too careful!
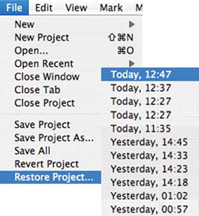
In the event of a catastrophe simply open up your project, go to the File menu and choose Restore Project. A list will appear of all the Autosaved versions of your project with the most recent version being displayed at the top of the list. Click to open the version of your choice, then click OK and you will then be back on track. Having the Autosave function could save you a great deal of heartache.
Note: for reference, the Autosave Vault is buried away in your Final Cut Pro documents folder. The method described is the easiest way to access it.